Reviewing Sample Database Application
Sample Database Application demonstrates how to display summary information, use reports and forms for viewing, updating, and adding information, include charts and maps, and create dedicated mobile pages that replicate most functionality available in the desktop version.
- Home Page
- About the Navigation Menu
- Customers Page
- Using the Customers Page
- Products Page
- Using the Products Page
- Orders Page
- Using the Orders Page
- Reports Page
- Administration Page
Parent topic: Understanding Sample Database Application
Home Page
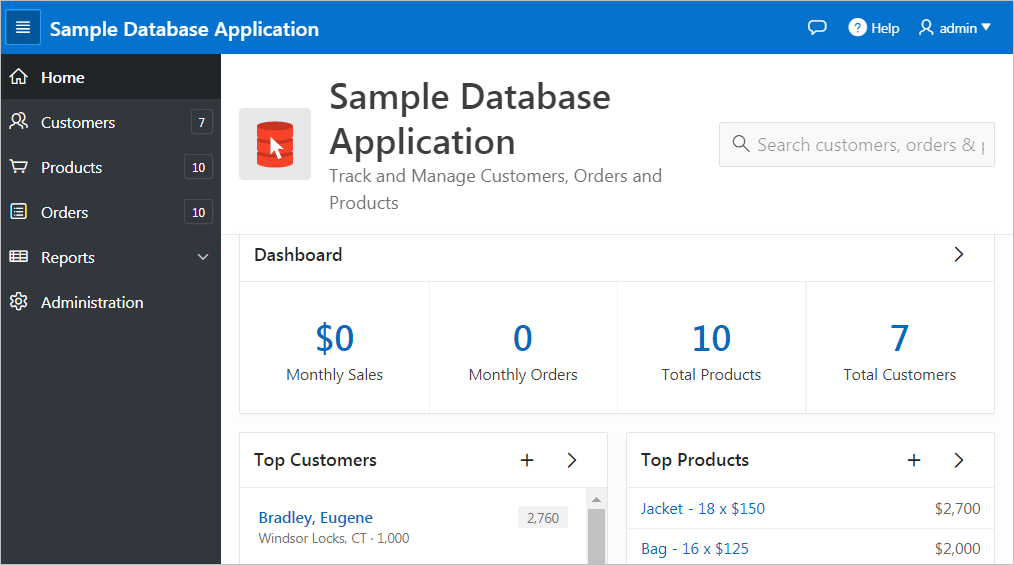
The home page contains the following main regions:
-
Dashboard - Demonstrates the use of a Badge List plug-in. This regions displays a value based on an underlying SQL statement. Links in this region take you to reports on Monthly Sales, Monthly Orders, Total Products, and Total Customers.
-
Top Customers - Demonstrates the Slider Tooltip plug-in. This regions displays a value based on an underlying SQL statement. Links in this region take you to reports on Monthly Sales, Monthly Orders, Total Products, and Total Customers.
-
Top Products - Top Products is an interactive report. The report is based on an underlying SQL statement and displays a subset of the information that appears on the Customers page. Users can view the additional details by clicking the product or by clicking the view Products icon (a right arrow) in the upper right corner of the region.
-
Top Orders by Date - Demonstrates the use of a HTML5 Bar Chart plug-in. This chart displays orders by date and order amount, based on an underlying SQL statement. Users can view the Orders page by clicking the right arrow in the upper right corner.
-
Tags - Demonstrates the use of a Tag Cloud plug-in. This region displays a value based on an underlying SQL statement. Links in this region take you to search results matching the selected tag.
See Also:
Parent topic: Reviewing Sample Database Application
About the Navigation Menu
Applications using newer themes, such as Universal Theme - 42, provides navigation with a navigation menu. Sample Database Application includes a navigation menu on the left side of the page. Use this menu to move between application pages.
A Expand and Collapse Navigation icon displays to the left of the application title and functions as a toggle to collapse and expand the navigation menu. The following illustration shows that the Home page with the navigation menu collapsed.
To expand the navigation menu again, click the icon again.
See Also:
Parent topic: Reviewing Sample Database Application
Customers Page
The Customers page enables users to view and edit customer information.
Customers is an interactive grid tracking customer information. To search for a customer information, enter search terms in the Search field and click Go. To sort by customer, click the column heading and then select the sort icons.
You can change the appearance of the report using the Actions menu.
See Also:
Parent topic: Reviewing Sample Database Application
Using the Customers Page
Use the Customers page to edit existing customers, create new customers, or upload data.
Parent topic: Reviewing Sample Database Application
Products Page
Products page enables users to view and edit product information. The Products page features an interactive report based on a SQL query that uses a custom function for displaying images stored in the database.
By default, this page displays in Report view. You can change the view by clicking View Icons and View Detail to the left of the Actions menu. In Report view, you can sort by column by clicking the column heading and then selecting the icons. Users can change the appearance of the report using the Actions menu.
Parent topic: Reviewing Sample Database Application
Using the Products Page
Use the Products page to edit or add products.
Editing a Product
To edit or delete a product:
- Click Products in the navigation menu.
- To update a product:
- On the Products page, click the product name.
- On the Product Details page, edit the fields and click Apply Changes.
- To delete a product:
- On the Products page, click the product name.
- On the Product Details page, click Delete.
Parent topic: Using the Products Page
Adding a Product
To add a new product:
- Click Products in the navigation menu.
- Click the Add Product button.
- On the Product Details page, edit the fields and click Add Product.
Parent topic: Using the Products Page
Orders Page
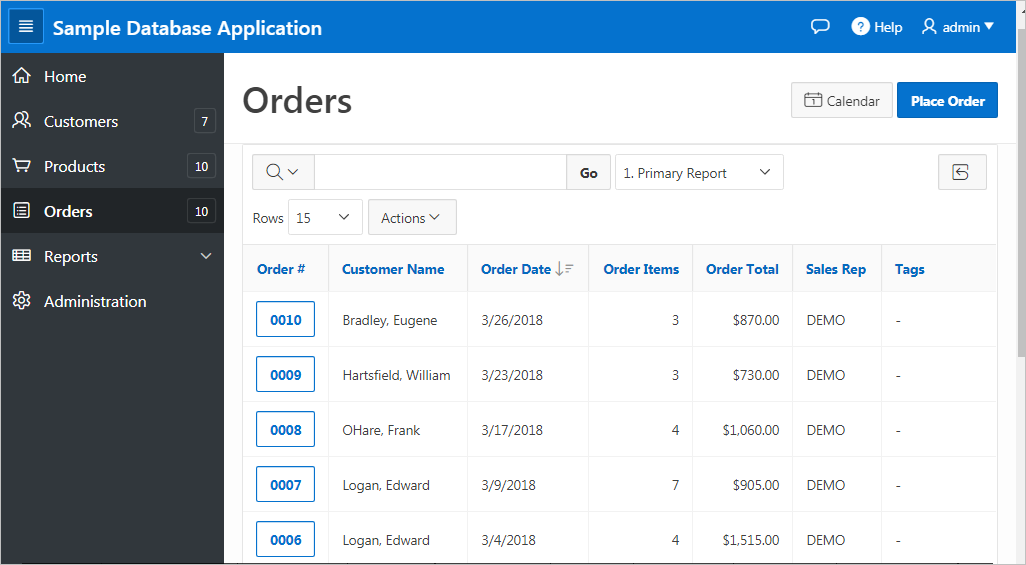
The Orders page enables users to create, view, and edit customer orders. The Orders page is an interactive report for tracking order information. To sort by column, click the column heading and then select the appropriate sort icon. You can change the appearance of the report using the Actions menu. To edit an order, click the Order #.
See Also:
Parent topic: Reviewing Sample Database Application
Using the Orders Page
Use the Orders page to edit or place orders.
Editing an Order
To edit or delete an order:
- Click Orders in the navigation menu.
- To update an order:
- To delete an order:
Parent topic: Using the Orders Page
Reports Page
Access the Reports page to view information in various formats, including bar chart, pie chart, map, tree, and tags. To view a report or chart, select it.
See Also:
Parent topic: Reviewing Sample Database Application
Administration Page
Use the Administration page to manage sample data, manage state codes and names, edit the defined Theme Style, and enable and manage user feedback, and view activity and performance reports.
The Administration page features the following regions:
-
Manage Sample Data - Re-create or remove sample data delivered with this application.
-
Manage States - Manage state codes and names.
-
Theme Styles - Change user interface theme styles for all users.
-
Feedback Settings - Manage if attachment should be allowed.
-
User Feedback - View a report of all submitted feedback.
-
Top Users - Displays top views aggregated by user.
-
Application Error Log - Report of errors logged by this application.
-
Page Performance - Reports of activity and performance by application page.
-
Page Views - Report of each page view by user inclusing date of access and elapsed time.
See Also:
Parent topic: Reviewing Sample Database Application


