4.3 Using Quick SQL
Rapidly design and prototype data models using a markdown-like shorthand syntax that expands to standards-based Oracle SQL.
- Getting Started with Quick SQL
Learn about common Quick SQL use cases, the basics of Quick SQL shorthand syntax, and how to access the Quick SQL page. - Using Quick SQL Help
Review Quick SQL Help to learn about Quick SQL shorthand syntax. - Generating Quick SQL with SQL Shorthand Syntax
Quickly develop a script for simple tables and views by entering SQL shorthand syntax in the the left pane and clicking Generate SQL. - Saving Scripts
Learn about saving or downloading generated script. - Creating an Application from a Generated SQL Script
Create an application from a saved script. - Using Quick SQL Samples
Learn about about SQL shorthand syntax by viewing Quick SQL samples. - Configuring Settings
Configure settings inline to explicitly set SQL syntax generation options, or click Settings at the top of the right pane to declaratively set the generation options. - About Database Terminology
Learn about common database terminology used in Quick SQL. - Recommendations When Using Quick SQL
Learn about recommended approaches to creating effective data models. - About Supported Data Types
Learn about supported data types.
Parent topic: Using Oracle Application Express Utilities
4.3.1 Getting Started with Quick SQL
Learn about common Quick SQL use cases, the basics of Quick SQL shorthand syntax, and how to access the Quick SQL page.
4.3.1.1 About Quick SQL
Quick SQL reduces the time and effort required to create SQL tables, triggers, and index structures. It is not designed to be a replacement for data modeling. Quick SQL is simply a quick way to develop a script for simple tables and views. Once the SQL is generated it can be tweaked and expanded upon. Quick SQL provides a quick way to generate the SQL required to create a relational data model from an indented text document.
Use Cases:
-
Quickly create robust data models
-
Easily generate random data
-
Learn SQL create table, select, insert, index, trigger, PL/SQL package, and view syntax using provided examples
Parent topic: Getting Started with Quick SQL
4.3.1.2 About Quick SQL Shorthand Syntax
When using using Quick SQL shorthand syntax, follow these rules:
-
Parent table names - Enter parent table names without any indention.
-
Table column names - Enter table columns with a uniform indention of two or more spaces.
-
Parent/child relationships - Create parent child relationships by indenting child tables under parent tables. Indent the child tables to the same level as the columns in the parent table.
Note:
As a best practice, do not specify primary keys, the system will generate them for you.
Tip:
To learn more about Quick SQL shorthand syntax, click Help at the top of the Quick SQL Shorthand pane.
About Settings
Click the Settings button to view many generation options. You can automatically add Who Columns which indicate who created or last updated a given row and when. You can add a row sequence column that automatically increments by one on each row update. A row sequence can be useful to simplify lost update detection. You can also generate a PL/SQL API which provides a package per table and provides procedures to query, insert, update, and delete rows. Some applications benefit by having each change captured in a history table, logging of old and new values, which is also an option.
See Also:
Parent topic: Getting Started with Quick SQL
4.3.1.3 Accessing Quick SQL
To access the Quick SQL page:
Note:
You can also access Quick SQL on the SQL Scripts page by clickig the Quick SQL button. See "Using SQL Scripts."
Parent topic: Getting Started with Quick SQL
4.3.2 Using Quick SQL Help
Review Quick SQL Help to learn about Quick SQL shorthand syntax.
Parent topic: Using Quick SQL
4.3.3 Generating Quick SQL with SQL Shorthand Syntax
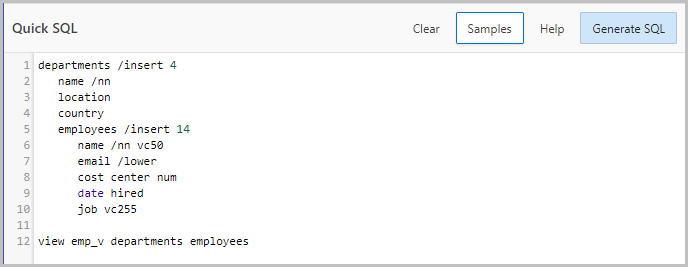
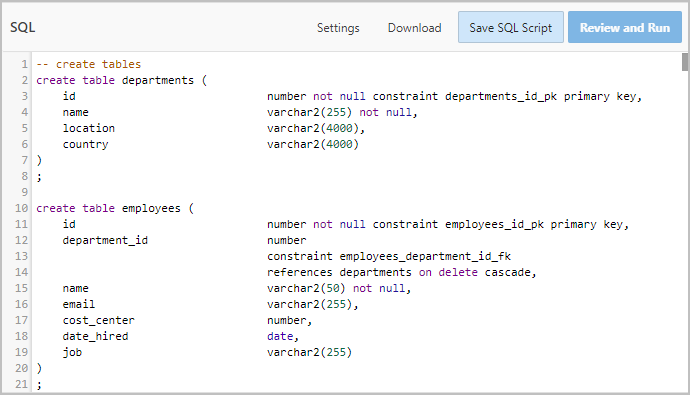
Quickly develop a script for simple tables and views by entering SQL shorthand syntax in the the left pane and clicking Generate SQL.
Tip:
Viewing samples is a great way to learn about Quick SQL shorthand syntax. To view samples, click Help and then Samples. Select a sample by clicking Load Model.
To generate the Quick SQL with SQL shorthand syntax:
Parent topic: Using Quick SQL
4.3.4 Saving Scripts
Learn about saving or downloading generated script.
Parent topic: Using Quick SQL
4.3.4.1 Saving a SQL Script
To save a SQL script:
Parent topic: Saving Scripts
4.3.4.2 Downloading SQL Scripts
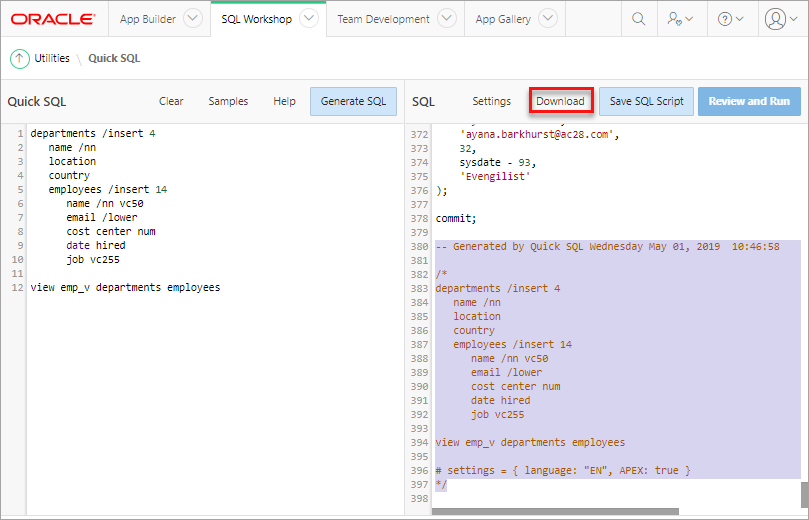
To download Quick SQL shorthand and the generated SQL script locally:
Parent topic: Saving Scripts
4.3.5 Creating an Application from a Generated SQL Script
Create an application from a saved script.
Saving a script, saves it to SQL Scripts. After you run the saved script, you You can run the Create Application Wizard from SQL Scripts page.
To create an application from saved script:
Parent topic: Using Quick SQL
4.3.6 Using Quick SQL Samples
Learn about about SQL shorthand syntax by viewing Quick SQL samples.
4.3.6.1 About Quick SQL Samples
Quick SQL Help includes the four samples. By selecting a sample and clicking Load Model, you can view both the SQL shorthand syntax and the generated SQL.
Available Quick SQL samples include:
-
Departments and Employees - Shorthand SQL syntax creates a
DEPARTMENTSandEMPLOYEEStable with a SQL joinVIEW. Random data is also generated using/INSERTsyntax. The/NNadds aNOT NULL SQLcolumn constraint. Indented lists are used to define tables, columns and child tables. Primary and foreign key columns are automatically added. You do not need to supply any primary or foreign key columns. -
Employee Skills - Creates a
DEPARTMENTS,EMPLOYEES, andSKILLStable using indentation to identify parent and child tables. Shorthand syntaxVC255is used to specify a SQL datatype. The/INSERTsyntax is used to generate random data. -
Product Sales - Short hand syntax that creates a star schema with
PRODUCTS,CUSTOMERS,CHANNELS,PROMOTIONS, andSALEStables. TheSALEStable contains foreign key references to the other tables. ASQL VIEWis also created which joins all five tables. Random sample data is also generated. Numeric column are identified withNUMsyntax. -
Project Management - Creates a
PROJECT_MANAGEMENTand four detail tables. Two views are created using/VIEWsyntax. Database CHECK constraints are also added using/CHECKsyntax. Also uses#APEXto set settings that control SQL syntax generation.
Parent topic: Using Quick SQL Samples
4.3.6.2 Accessing Quick SQL Samples
To access the Quick SQL samples:
Parent topic: Using Quick SQL Samples
4.3.7 Configuring Settings
Configure settings inline to explicitly set SQL syntax generation options, or click Settings at the top of the right pane to declaratively set the generation options.
4.3.7.1 Configuring Settings Inline
You can configure settings inline to explicitly set SQL syntax generation options. When configuring setting inline:
- Settings must start on a new line. To enter multiple settings, begin with
# settings =. To enter a single setting per line, use#. - All values are case insensitive.
- Brackets, spaces, and commas can be added for clarity but are ignored.
- To have all settings generated use
# verbose: true
Entering settings directly into the Quick SQL Shorthand pane ensures the same SQL generation options are utilized even if you download the script and later paste it back. For example, enter the following to prefix all table names with TEST and generate for schema OBE:
# settings = { prefix: "test", schema: "OBE" }.
Alternatively, enter each setting on a separate line for the same result:
# prefix: "test"
# schema: "OBE"
Tip:
To view a listing of settings, by clicking Help and then Settings.
Parent topic: Configuring Settings
4.3.7.2 Configuring Settings Declaratively
To configure settings declaratively:
Parent topic: Configuring Settings
4.3.8 About Database Terminology
Learn about common database terminology used in Quick SQL.
Common database terms referenced in Quick SQL include:
-
BLOB – A binary large object or
CLOB. BLOBs store binary data and do not impose any character set encoding.BLOBsize can store 4GB or more depending on system configuration. -
Check Constraint – A check constraint is a declarative way to limit the values a given column may contain.
create table projects ( id number primary key, name varchar2(50), status varchar2(30) check (status in ('OPEN','CLOSED')) ); -
CLOB – A character large object or
CLOB. The maximum size of aVARCHAR2datatype is 32,767 bytes, however aCLOBsize can be store up to 4GB of character data. -
Column – RDBMS tables store data in tables that are comprised of rows and columns. Each column is named. For example,
first_name. -
Database – A structured set of data held in a computer, especially one that is accessible in various ways.
-
Data Model – A Data Model is a method of organizing elements of data and defining how they relate to one another. A model typically organizes data into entities that when they are transformed into a physical database model are converted into tables and columns. This tool is a very rudimentary tool that creates physical data models from indented text. For serious data modeling it is recommended that you use a proper data modeling tool Oracle SQL Data Modeler. It is a free graphical tool that enhances productivity and simplifies data modeling tasks.
-
Data Type – Each column in a table has a data type. Data types are frequently character
(VARCHAR2),number, ordates. -
DML – Data Manipulation Language. SQL commands that include the following:
-
INSERT- SQL statement used to add new rows to a table. -
UPDATE- SQL statement used to update one or more rows of data within a table. -
DELETE- SQL statement used to remove one or more rows of data from a table.
-
-
Foreign Key – A column(s) in a table that references another table. For example, if employees are organized by departments, a
department_idin the employees table could be a foreign key to the primary key of theemployeetable. By defining foreign keys you are declaratively defining a relationship between tables. -
Join – A join is a SQL query that combines rows from two or more tables or views. A query is a join query whenever multiple tables appear in the
FROMclause. A major benefit of the relational database model is that you can store data that repeats in one location. For example, assume we have two table departments, and employees. Here is a query that selects data from both tables.select d.name, d.location, e.name, e.job from departments d, employees e where e.department_id = e.idNote if the department name or location changes it is changed in only one place.
-
Relational Database – A database model that organizes data in a relational model. The relational model organizes data into one or more tables, also known as relations, of columns and rows. The standard language to access data within a relational database and to define database objects is SQL.
-
RDBMS – Relational Database Management System.
-
Object – A database object is a named widget used to store or manage data. For example
tables,views,triggers, andsynonymsare all considered database objects. -
PL/SQL – Oracle procedural extension to the SQL language. PL/SQL stands for Procedural Language SQL. PL/SQL is a server-side, stored procedural language that can be used to perform procedural operations on Oracle database data.
-
Query – To access / query data in your relational database you use a SQL
SELECTstatement. In SQL aSELECTstatement can query data from one or more tables or views.-
Query of 3 columns from a table called projects
select id, name, status from projects where status = 'OPEN'; -
Aggregate Query
select count(*) count_of_projects,
           sum(case when status = 'OPEN' then  1 else 0) open_projects,
           sum(case when status = 'CLOSED' then  1 else 0) closed_projects
    from projects;
-
-
Reserved Word – A name that cannot be used as an object identifier. For example
SELECTcannot be used as a table name. -
Row – RDBMS tables store data in tables that are comprised of rows and columns. Each row is made up of one or more columns.
-
Sequence – Sequences are database objects from which multiple users can generate unique integers. The sequence generator generates sequential numbers, which can help to generate unique primary keys automatically, and to coordinate keys across multiple rows or tables. A sequence can be created with the following Syntax:
create sequence project_seq;The sequence values can be referenced using
project_seq.currval(current value) orproject_seq.nextval(next value). Each time thenextvalis access the sequence increments. The default increment is1. -
Schemas – A schema is a namespace for creating database objects such as tables. You do not create database tables in databases you create them within schemas within a database. Each database can store any number of schemas. Schemas are also sometimes called users. When you have a new database you first create a schema (or user, they are the same thing) then create your tables within the schema or user. You can create schemas using the SQL
create schemaorcreate usercommand. Schemas are a way of organizing database objects within a database. -
SQL – Structure Query Language. The language used to define database tables, and to manipulate the data within the tables.
-
Structured Data – Relational database data is frequently referred to as structured because data is organized cleanly into rows and columns. Unstructured typically refers to data that has no structure imposed on it.
-
Table – A database object that stores related data organized into rows and columns.
-
Creating a table
create table projects ( id number primary key, name varchar2(50), status varchar2(30) ); -
Inserting rows into a table
insert into projects (id, name, status) values (1, 'My Project','OPEN'); -
Querying the data with the table
select id, name, status
      from projects
      where status = 'OPEN';
-
-
Trigger – A database trigger is procedural code that is automatically executed in response to certain events on a particular table. For example before or after insert of a row. The following trigger forces a column to lower case.
create or replace trigger PROJECTS_BIU before insert or update on PROJECTS for each row begin :new.OWENER_EMAIL := LOWER(:new.OWENER_EMAIL); end; / -
View – A database view is a virtual table based on the result-set of an SQL statement. A view is also known as a stored query. You can create a view that joins multiple tables. Once the view is created you can query it as if it was a table. Following is an example of the SQL to create a view:
	create view department_employees as
	select d.name, d.location, e.name, e.job
	    from   departments d, employees e
	    where  e.department_id = e.id;
Parent topic: Using Quick SQL
4.3.9 Recommendations When Using Quick SQL
Learn about recommended approaches to creating effective data models.
Although there are many valid approaches to creating an effective data model, Oracle recommends the following:
-
Table Naming – Define your tables as plural and columns as singular. Since tables are designed to store many rows it makes sense to have them plural. For example
Employees. -
Column Naming – Define your column names as singular. For example
First Name. -
Primary Keys – Every table should have a primary key, primary keys are used to uniquely identify each row and can be used to associate child table data.
-
Primary Key Column Naming – Every table will have a primary key and it should be called
IDand it should be numeric. -
Table Constraints – The best way to ensure data integrity is to have the database only allow proper data. For example, if a column is required ensure you have a
not nullconstraint. If a column is unique ensure you have a unique constraint. -
Referential Integrity – Most relational database models have parent child, also known as one too many relationships. They frequently also have many to many relationships. Using declarative primary key and foreign key syntax you can have the database enforce these relationships to ensure the integrity of your data. By defining the referential integrity you ensure all child tables do in fact relate to parent tables.
Parent topic: Using Quick SQL
4.3.10 About Supported Data Types
Learn about supported data types.
Quick SQL supports the following data types:
-
VARCHAR2 -
NUMBER -
INTEGER -
DATE -
TIMESTAMP -
TIMESTAMP WITH TIME ZONE -
TIMESTAMP WITH LOCAL TIME ZONE -
CLOB -
BLOB
Tip:
To learn more about Quick SQL shorthand syntax for supported data types, click Help and select Data Types.Parent topic: Using Quick SQL


