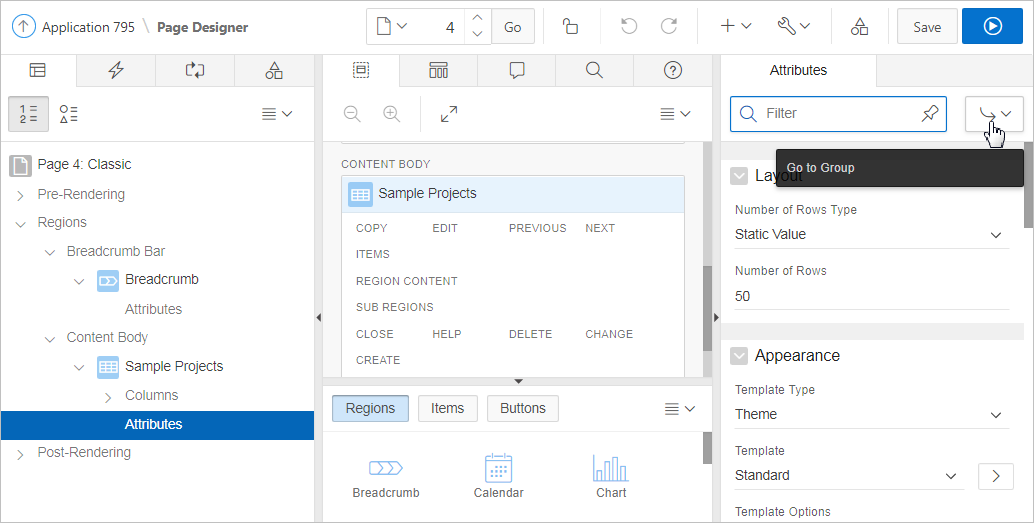
9.7.2 Managing Classic Report Attributes

Report Attributes control how a classic report works. Developers edit report Attributes to alter the report appearance, configure report pagination, create error messages, break formatting, and configure download options.

9.7.2.1 Editing Classic Report Attributes

You can customize a classic report by editing report attributes in Page Designer.

To edit report attributes:

  1. View the page in Page Designer:
    1. On the Workspace home page, click the App Builder icon.
    2. Select an application.
    3. Select a page.
    Page Designer appears.
  2. In the Rendering tab, locate the region containing the report.
  3. Under the region, select the Attributes node.

    The Property Editor displays the report attributes. Attributes are organized in groups.

    Tip:

    To find a group or attribute, enter keywords in the Filter Properties field. The Property Editor displays the group or attributes. Or, you can click Go to Group and select the group.

  4. Edit the appropriate attributes.
  5. To view Help, select the attribute and click the Help tab. Once you activate the Help pane, the content that displays changes every time you select another attribute.
  6. To save your changes click Save. To save and run the page, click Save and Run Page.

9.7.2.2 Editing Classic Report Pagination

To control classic report pagination:

  1. View the page in Page Designer:
    1. On the Workspace home page, click the App Builder icon.
    2. Select an application.
    3. Select a page.
    Page Designer appears.
  2. In the Rendering tab, locate the region containing the report.
  3. Under Region, select the Attributes node.

    The Property Editor displays the attributes. Attributes are organized in groups.

    Tip:

    To find a group or attribute, enter keywords in the Filter Properties field. The Property Editor displays the group or attributes. Or, you can click Go to Group and select the group.

  4. Find Pagination.
  5. Under Pagination, edit the following:

    Tip:

    To view help for an attribute, select the attribute in the Property Editor and click the Help tab in the central pane.

    1. Type - Select the pagination type for this report. Generally only a subset of the results are currently displayed in the report. Pagination provides the user with information about the number of rows and the current position within the result set. Pagination also defines the style of links or buttons that are used to navigate to the next or previous page.

    2. Display Position - Select where the report pagination displays.

    3. Partial Page Refresh - Specify whether to use Partial Page Refresh (PPR) to update the report display.

      If the end user performs an action, such as a pagination request or selection of a new sort column, the current report rows must be refreshed. Setting this attribute to Yes, refreshes just the report region. Setting this attribute to No, refreshes the entire page.

  6. To save your changes click Save. To save and run the page, click Save and Run Page.

9.7.2.3 Adding Support for XML File or a CSV File Export

You can add support for exporting a report as an XML or CSV by selecting a report template.

To export a report as a file:

  1. View the page in Page Designer:
    1. On the Workspace home page, click the App Builder icon.
    2. Select an application.
    3. Select a page.
    Page Designer appears.
  2. In the Rendering tab, locate the region containing the report.
  3. Under the region, select the Attributes node.

    The Property Editor displays the attributes. Attributes are organized in groups.

    Tip:

    To find a group or attribute, enter keywords in the Filter Properties field. The Property Editor displays the group or attributes. Or, you can click Go to Group and select the group.

  4. Find Appearance.
  5. Under Appearance, edit the following:
    1. Template Type - Select Predefined.
    2. Template - Select XML or CSV.

      Selecting XML prevents the Application Express engine from rendering the page and dumps the content to an XML file.

      Tip:

      To view help for an attribute, select the attribute in the Property Editor and click the Help tab in the central pane.

  6. To save your changes click Save. To save and run the page, click Save and Run Page.

9.7.2.4 Enabling Classic Report CSV Output Option

To use the enable the CSV output option:

  1. View the page in Page Designer:
    1. On the Workspace home page, click the App Builder icon.
    2. Select an application.
    3. Select a page.
    Page Designer appears.
  2. In the Rendering tab, locate the region containing the report.
  3. Under the region, select the Attributes node.

    The Property Editor displays the attributes. Attributes are organized in groups.

    Tip:

    To find a group or attribute, enter keywords in the Filter Properties field. The Property Editor displays the group or attributes. Or, you can click Go to Group and select the group.

  4. Find Download.
  5. Under Download, edit the following:
    1. CSV Export Enabled - Specify whether end users can download the report contents to a CSV file. To enable CSV Downloads, you must use a report template with a #CSV_LINK# substitution string and set this option to Yes.

    2. CSV Separator - Enter a column separator. If no value is entered, a comma or semicolon is used depending on your current NLS settings.

    3. CSV Enclosed By - Enter a delimiter character to delineate the starting and ending boundary of a data value. The default delimiter is double quotation marks.

    4. Link Text - Specify the text for the link to invoke the CSV download.

    5. Filename - Specify a name for the CSV download file. If no name is specified, the region name is used followed by the extension *.csv.

    Tip:

    To view help for an attribute, select the attribute in the Property Editor and click the Help tab in the central pane.

  6. To save your changes click Save. To save and run the page, click Save and Run Page.

9.7.2.5 Controlling Classic Report Column Breaks

You can control if a specific column repeats and how column breaks appear when printed using Break Formatting attributes. For example, suppose your report displays employee information by department number. If multiple employees are members of the same department, you can increase the readability by specifying that the department number only appears once.

To create this type of column break:

  1. View the page in Page Designer:
    1. On the Workspace home page, click the App Builder icon.
    2. Select an application.
    3. Select a page.
    Page Designer appears.
  2. In the Rendering tab, locate the region containing the report.
  3. Under the region, select the Attributes node.

    The Property Editor displays the attributes. Attributes are organized in groups.

    Tip:

    To find a group or attribute, enter keywords in the Filter Properties field. The Property Editor displays the group or attributes. Or, you can click Go to Group and select the group.

  4. Specify Break Formatting:
    1. Find Break Formatting.
    2. Break Columns - Select how many report columns are incorporated into the break formatting. The columns must be consecutive columns, starting from the first column displayed in the report.
  5. To save your changes click Save. To save and run the page, click Save and Run Page.