10.4 Managing Cards

A cards page features colorful boxes, which resemble index cards, laid out on a page.

10.4.1 Example Cards Page

View an example cards page.

A cards page consists of colorful boxes, which resemble index cards, laid out on a page. Each card displays three pieces of information pulled from columns in the underlying table. First, you select a table or view on which to build the page. Second, you select the information to display on each card: Card Title, Description Column, and Additional Text Column. The Create Application Wizard supports the creation of cards pages.

The following is an example of a cards page built on the SAMPLE$PROJECTS table.

Description of cards.png follows
Description of the illustration cards.png

In this example, the information displayed on the card is from the NAME, DESCRIPTION, and STATIS_ID columns.

See Also:

"Managing Cards"

10.4.2 Creating Cards Using the Create Application Wizard

Run the Create Application Wizard to create a new application that contains a cards page.

A cards page consists of individual boxes, which resemble index cards, laid out on a page. Each card displays three pieces of information.

To create an application that contains cards page:

  1. On the Workspace home page, click the App Builder icon.
  2. Click the Create button.
  3. Click New Application.
  4. For Name, enter the name used to identify the application to developers.
  5. For Appearance, accept the default Theme Style and menu layout (Vita, Side Menu), or change it by clicking the Set Appearance icon adjacent to the Appearance field.
  6. Under Pages:
    1. Click Add Page.
    2. Select Cards.
  7. On Add Card Page:
    1. Page Name - Enter a name for this page.
    2. Set Icon - Select an icon to display in the navigation menu for this page.
    3. Table or View - Select a table or view on which to build the page.

      Next select the columns to display as the Card Title, Description, and an additional Text columns.

    4. Select the information to display on each card:
      • Card Title

      • Description Column

      • Additional Text Column

    5. Advanced - Expand Advanced to configure these options:
      • Set as Home Page - Enable this to make this page the home page for the application.

      • Set as Administration Page - Enable this to have this page display under Administration.

      • Page Help - Enter text to be displayed when the user selects Page Help.

    6. Click Add Page.
  8. Features - Select features to include with the application. Features provide application-level functionality and can only be added once per application. To learn more, click the Help icon adjacent to Features.
  9. Settings - Specify settings used to generate this application. To learn more about an attribute, click the Help icon adjacent to Settings.
  10. Click Create Application.

10.4.3 Editing a Cards Page

Review the components that comprise a cards page by viewing attibutes in Page Designer.

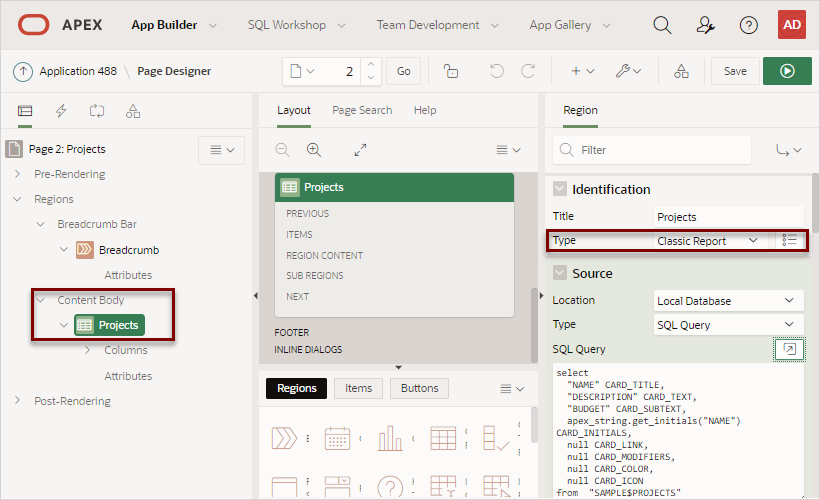
A cards page is actually a special type of classic report that uses special aliases in the SQL query.

To edit a cards page:

  1. View the cards page in Page Designer:
    1. On the Workspace home page, click the App Builder icon.
    2. Select an application.
    3. Select a page.
    Page Designer appears.
  2. Find the report region.
    1. In the Rendering tab under Content Body, locate and select report region (for example, Projects).

      In Property Editor, note that the Type attribute indicate the report is a Classic Report.

  3. In Property Editor, edit the appropriate attributes.
  4. Click Save or Save and Run Page.

10.4.4 Linking from a Cards Page

Learn how to link from a cards page.

A cards page functions as a colorful way to display a subset of information and then enable the user to link to more detail. Each card displays three pieces of information pulled from columns in the underlying table. To make a cards page useful, you must update the underlying SQL query to link to another page such as a report or form.
The following example demonstrates how to update a SQL query for a cards page to call form using the APEX_PAGE.GET_URL API. Both the card page and the modal form are built on SAMPLE$PROJECTS table.

To call a form from a cards page:

  1. View the Cards page in Page Designer:
    1. On the Workspace home page, click the App Builder icon.
    2. Select an application.
    3. Select a page.
    Page Designer appears.
  2. Find the report region. In the Rendering tab under Content Body, locate and select the report region (for example, Projects).
  3. In Property Editor (right pane), in the Source group, locate the SQL Query attribute.Description of code_editor_icon.png follows
    Description of the illustration code_editor_icon.png
  4. Click the Code Editor: SQL Query icon to read the code more easily.
    The Code Editor appears and displays the query:
    select
      "NAME" CARD_TITLE,
      "DESCRIPTION" CARD_TEXT,
      "BUDGET" CARD_SUBTEXT,
      apex_string.get_initials("NAME") CARD_INITIALS,
      null CARD_LINK,
      null CARD_MODIFIERS,
      null CARD_COLOR,
      null CARD_ICON
    from  "SAMPLE$PROJECTS"

    Note that the SQL query includes special aliases such as CARD_MODIFIERS and CARD_LINK. To link a card to a new page, you must update CARD_LINK in the underlying SQL query to point to the appropriate target.

  5. Modify the SQL query:
    1. Replace the existing SQL query with the following:
      select ' ' card_modifiers
        , apex_page.get_url( p_page => '4', p_clear_cache => '4', p_items => 'P4_ROWID', p_values => rowid ) card_link
        , ' ' card_color
        , ' ' card_icon
        , apex_string.get_initials(name) card_initials
        , name card_title
        , description card_text
        , 'Budget '|| to_char(budget,'L99G999') card_subtext
      from sample$projects

      The second line of the previous example uses the APEX_PAGE.GET_URL function to call the form on page 4.

    2. Click the Validate icon to validate the code.Description of validate_icon_in_editor.png follows
      Description of the illustration validate_icon_in_editor.png
      The message Validation successful displays at the top of the window.
    3. Click OK.
  6. Click Save.
  7. Click Save and Run Page.
    The Cards Example loads.
  8. Click a project to view the Maintain Project form.

See Also:

"GET_URL Function" in Oracle Application Express API Reference