8.7.4 Managing Interactive Report Attributes

Edit report Attributes to control how an interactive report works.

8.7.4.1 Editing Interactive Report Attributes

To edit interactive report Attributes in Page Designer:

  1. View the page in Page Designer:
    1. On the Workspace home page, click the App Builder icon.
    2. Select an application.
    3. Select a page.
    Page Designer appears.
  2. In the Rendering tab, select the region containing the interactive report.
  3. In the Property Editor, select the Attributes tab.

    The Property Editor displays the attributes. Attributes are organized in groups. To find a group or attribute, enter keywords in the Filter Properties field. The Property Editor displays the group or attributes. Or, you can click Go to Group and select the group.

  4. Edit the appropriate attributes.

    Tip:

    To view help for an attribute, select the attribute in the Property Editor and click the Help tab in the central pane.

  5. To save your changes click Save. To save and run the page, click Save and Run Page.

8.7.4.2 Managing Link Columns

A Link Column displays on the left side of an interactive report. Developers can configure a Link Column to link to a single row view, a custom target, or be excluded from the report.

Tip:

A Link Column cannot be sorted, hidden, or moved by an end user and does not interact with the standard column link defined on the Column Attributes page.

8.7.4.2.1 Linking to a Single Row View

To link to a single row view in an interactive report:

  1. View the page in Page Designer:
    Page Designer appears.
  2. In the Rendering tab, select the region containing the report.
  3. In the Property Editor, select the Attributes tab.
    The Property Editor displays the attributes. Attributes are organized in groups
  4. Find the Link group and edit the following:
    1. Link Column - Select Link to Single Row View.
    2. Uniquely Identify Rows by - Select ROWID or Unique Column.
      If you select, Unique Column, specify the column in the Unique Column field.
    3. Link Icon - Accept the default or specify the path to another icon.
    4. Link Attributes - Optionally specify additional column link attributes to be included in the <a href= > tag (for example, a link target, classes, or styles).
    5. Authorization Scheme - Select an authorization scheme to associate with the Link Column. This authorization scheme must evaluate to TRUE in order for the Link Column to be rendered in the report.
    6. Condition Type - Select a condition type from the list that must be met in order for this link to be rendered.
  5. Find the Single Row View group and edit the following:
    1. Exclude Null Values - Specify whether null columns are hidden on the Single Record View
    2. Only Displayed Columns - Specify whether only those columns currently displayed are displayed in the Single Record View. If you select Off, then hidden report columns may also be shown on the Single Record View.
  6. To save your changes click Save. To save and run the page, click Save and Run Page.

Tip:

If an interactive report links to single row view and the link icon is missing ALT text or has empty ALT text, the alt="Single Row View" gets included automatically to improve accessibility. This can be further improved by making the ALT text something specific to the row, for example alt="View Row: #COLUMN_NAME#" (where COLUMN_NAME should be a column that helps uniquely identify the current row).

8.7.4.2.2 Linking to a Specific Page

To link to a specific page:

  1. View the page in Page Designer:
    Page Designer appears.
  2. In the Rendering tab, locate the region containing the report.
  3. In the Property Editor, select the Attributes tab.
    The Property Editor displays the attributes. Attributes are organized in groups
  4. Find the Link group and edit the following:
    1. Link Column - Select Link to Custom Target.
    2. Target - Click No Link Defined.

      The Link Builder - Target dialog appears.

      • Target Type - Select Page in this Application.

      • Page - Select the target page number.

      • Set Items - Select a Name and Value to specify session state for an item.

      • Clear/Reset, Clear Cache - Specify the page numbers on which to clear cache. To specify multiple pages, enter a comma-delimited list of page numbers.

      • Clear/Reset, Action - Select one of the following:

        • None - No clear or reset action when page loads.

        • Clear Regions - Clears all region settings on the page.

        • Reset Regions - Resets all regions on the page back to the default state, including sort orders, hidden columns and so on.

        • Reset Pagination - This option enables backwards compatibility.

      • Advanced, Request - Specify the request to be used.

      • Click OK.

    3. Link Icon - Enter the HTML to be used for the link. Use an image tag to display images, or pick from the list of default images. If not defined, #IMAGE_PREFIX#ws/small_page.gif is used.
    4. Link Attributes (Optional) - Enter additional column link attributes to be included in the <a href= > tag (for example, a link target, classes, or styles).
      To view examples, select the attribute in the Property Editor and click the Help tab in the central pane.
  5. To save your changes click Save. To save and run the page, click Save and Run Page.

8.7.4.2.3 Linking to a URL

To link to a URL:

  1. View the page in Page Designer:
    Page Designer appears.
  2. In the Rendering tab, select the region containing the report.
  3. In the Property Editor, select the Attributes tab.
    The Property Editor displays the attributes. Attributes are organized in groups
  4. Find the Link group and edit the following:
    1. Link Column - Select Link to Custom Target.
    2. Target - Click the No Link Defined.

      The Link Builder - Target dialog appears.

      • Target Type - Select URL.

      • Click OK.

    3. Link Icon - Enter the HTML to be used for the link. Use an image tag to display images, or pick from the list of default images. If not defined, #IMAGE_PREFIX#ws/small_page.gif is used.
    4. Link Attributes (Optional) - Enter additional column link attributes to be included in the <a href= > tag (for example, a link target, classes, or styles).
      To view examples, select the attribute in the Property Editor and click the Help tab in the central pane.
  5. To save your changes click Save. To save and run the page, click Save and Run Page.

8.7.4.2.4 Excluding a Link Column

To exclude a column link:

  1. View the page in Page Designer:
    Page Designer appears.
  2. In the Rendering tab, select the region containing the report.
  3. In the Property Editor, select the Attributes tab.
    The Property Editor displays the attributes. Attributes are organized in groups
  4. Configure Link attributes:
    1. Find the Link group.
    2. Link Column - Select Exclude Link Column.
  5. To save your changes click Save. To save and run the page, click Save and Run Page.

8.7.4.3 Customizing the Interactive Report Search Bar

All interactive reports include a search bar at the top of the page. Developers can customize what controls display or remove the search bar.

8.7.4.3.1 Interactive Report Search Bar

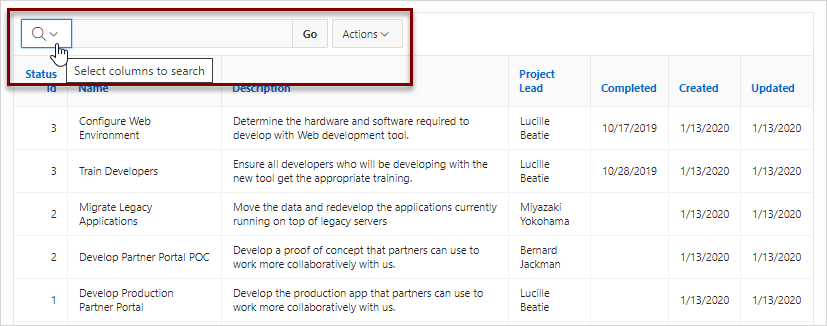
All interactive reports include a search bar at the top of the page which includes the following controls: a Select columns to search button, Text area, Go button, and Actions menu.

If users have saved multiple reports, a saved report select list displays to the right of the Go button. Users can use this list to select a specific saved report. If multiple views are configured, a view selection button group also displays which enables the end user to switch views. You can remove or customize the search bar in Page Designer by configuring report attributes in the Property Editor.

8.7.4.3.2 Customizing the Search Bar

To customize the search bar:

  1. View the page in Page Designer:
    Page Designer appears.
  2. In the Rendering tab, select the region containing the report.
  3. In the Property Editor, select the Attributes tab.
    The Property Editor displays the attributes. Attributes are organized in groups
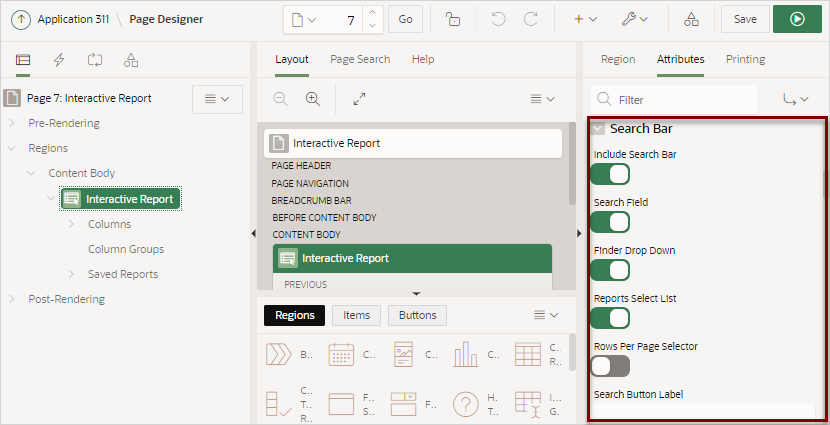
  4. In the Property Editor, find the Search Bar group.
  5. Under Search Bar, determine which options to include by selecting On or Off:
    • Include Search Bar - Select On to include a search bar above the report. If you include the search bar, you can also fully customize which functions to display. Select Off to not include the Search bar.
    • Search Field - Specify whether the search field is included within the search bar.
    • Finder Drop Down - Specify whether the Finder drop down is included at the beginning of the Search field within the search bar. The Finder drop down is a list of columns that enables users to limit their search to a specific column. If a column is selected then the search is only performed against the values in the selected column. Within a running interactive report, this option is identified as Select columns to search.
    • Reports Select List - Specify whether the Reports select list displays in the search bar. The Reports select list only displays if a report, other than the primary report, is accessible to the user.
    • Rows Per Page Selector - Specify whether a separate drop down row selector is included within the search bar. Do not select both this attribute and Rows Per Page.
    • Search Button Label - Enter the text for the search button label.
    • Maximum Rows Per Page - Enter the maximum number to display in the Rows Per Page selector.
  6. To save your changes click Save. To save and run the page, click Save and Run Page.

8.7.4.3.3 Removing the Interactive Report Search Bar

To remove the search bar from in interactive report:

  1. View the page in Page Designer:
    Page Designer appears.
  2. In the Rendering tab, select the region containing the report.
  3. In the Property Editor, select the Attributes tab.
    The Property Editor displays the attributes. Attributes are organized in groups
  4. Turn the Search Bar off:
    1. In the Property Editor, find the Search Bar group.
    2. Include Search Bar- Select Off.
  5. To save your changes click Save. To save and run the page, click Save and Run Page.

8.7.4.4 Customizing the Interactive Report Actions Menu

The Actions menu appears to the right of the Go button on the Search bar in an interactive report. Users use the Actions menu to customize how report information displays. Developers control what options display on the Actions menu in an interactive report.

Tip:

The structure of the interactive report Actions menu changed in release 5.1 to be consistent with interactive grids. To alter an interactive report Actions menu to use the previous (or legacy) structure, go to Shared Components, Component Settings, and configure the Interactive Report component. See "Configuring Interactive Report Action Menu Structure".

To customize the Actions menu:

  1. View the page in Page Designer:
    Page Designer appears.
  2. In the Rendering tab, select the region containing the report.
  3. In the Property Editor, select the Attributes tab.
    The Property Editor displays the attributes. Attributes are organized in groups
  4. In the Property Editor, find the Actions Menu group.
  5. Under Actions Menu, enable and disable options by selecting On or Of
    • Include Actions Menu - Specify whether the Actions menu is included within the Search Bar.
    • Filter - Specify whether end users can define filters on this report.
    • Select Columns - Specify whether end users can use Select Columns in the Actions menu to change the columns displayed in this report. User can select (or show), deselect (or hide) and reorder multiple columns using this option.
    • Rows Per Page - Specify whether end users can change the number of rows displayed for this report.
    • Sort - Specify whether end users can define sort columns for this report.
    • Control Break - Specify whether end users can define control breaks for this report.
    • Highlight - Specify whether end users can define highlights for this report.
    • Compute - Specify whether end users can define computational columns for this report.
    • Aggregate - Specify whether end users can define aggregates for this report.
    • Chart - Specify whether end users can define charts for this report.
    • Group By - Specify whether end,users can define group by break-downs for this report.
    • Pivot - Specify whether end users can define pivot break-downs for this report.
    • Flashback - Specify whether end users can utilize flashback queries for this report.
    • Save Report - Specify whether end users can save their current report definition as a Private report. Private reports are displayed in a select list of available reports in the Search Bar, and are only displayed to the user who saved the report, providing they are authenticated. The option on the Actions menu is only available to authenticated users.
    • Save Public Report - Specify whether end users can save their current report definition as a Public report. Public reports are displayed in a select list of available reports in the Search Bar, and are displayed to everyone. The option on the Actions menu is only available to authenticated users and is further restricted if you also populate the Save Public Report Authorization.
    • Save Public Report Authorization - Select an authorization scheme to restrict who can save public report definitions. To enable an end user to save a public report, this authorization scheme must evaluate to TRUE. If no authorization scheme is provided then reports may be saved by any user.
    • Reset - Specify whether end users can reset their reports from the Actions menu. Resetting the report reverts all customizations made by the user, or specified by the calling URL, and displays the Primary Report.
    • Help - Specify whether end users can invoke the built-in help modal dialog for interactive reports. The help dialog only outlines those options available to the current user.
    • Subscription - Specify whether end users can define subscription settings for this report.
    • Download - Specify whether end users can download the report to one of the download formats specified.
  6. To save your changes click Save. To save and run the page, click Save and Run Page.

8.7.4.5 Configuring Interactive Report Actions Menu Download Options

The Download option on the Actions menu enables users to download an interactive report as a comma-delimited file (CSV) format, HTML, Microsoft Excel (XLSX) format, Adobe Portable Document Format (PDF), Microsoft Word Rich Text Format (RTF), or as one of the formats attached to an email. Microsoft Word Rich Text Format (RTF) requires the configuration of a print server. Microsoft Word format also requires BI Publisher.

WARNING:

There is a 32K limit on downloads from the reports to Word. If the end user has too many columns displayed then they may encounter an error when attempting to download the data to these advanced formats. Downloads may also take considerable time to complete for large data sets.

Note:

The Pivot view does not support download formats of PDF and RTF even if they are enabled and report server is configured..

8.7.4.5.1 Configuring Interactive Report Download Formats

Email is only available to authenticated users, and requires the SMTP Server to be configured within Application Express Administration Services application (Administration Services), by an Instance Administrator.

To configure download formats:

  1. View the page in Page Designer:
    Page Designer appears.
  2. In the Rendering tab, select the region containing the report.
  3. In the Property Editor, select the Attributes tab.
    The Property Editor displays the attributes. Attributes are organized in groups
  4. Edit the following attributes:
    1. Search Bar, Include Search Bar - Select On.
    2. Actions Menu, Download - Select On.

      Tip:

      Setting Download to Off prevents the Download menu from displaying on the Actions menu. To fully prevent users from downloading data, deselect all Download Formats described in the next step.

    3. Download, Authorization - Select an authorization scheme to restrict who can download. To enable an end user to download, this authorization scheme must evaluate to TRUE for that user.
    4. Download, Download Formats - Select download formats:
      • CSV

      • HTML

      • Excel

      • PDF

      • RTF

      • Email

      Tip:

      The Download option only appears on the Actions menu if a file format is selected. If a report server has not been defined within Instance Administration then certain options do not display. To learn more, see "Configuring Report Printing" Oracle Application Express Administration Guide.

    5. CSV Separator - (CSV only) Define the column separator. If no value is entered, a comma or semicolon is used depending on your current NLS settings.
    6. CSV Enclosed By - (CSV only) Enter a delimiter character. This character delineates the starting and ending boundary of a data value. Default delimiter is double quotation marks (" ").
    7. Filename - Enter a name for the downloaded document. Do not specify a file extension, the extension is added automatically. If you leave this blank, the region name is used as the file name.
    8. Supplemental Text - Enter text that displays at the top of the download files. You can enter data classification, legal, or warning messages about the data in the file.

      WARNING:

      Do not use the Supplemental Text attribute with CSV download. If you enable CSV download, the defined text will invalidate the CSV file format.

  5. To save your changes click Save. To save and run the page, click Save and Run Page.

8.7.4.5.2 Enabling Interactive Report CSV Download

To enable support for CSV download, you must first enable Automatic CSV Encoding on the Edit Globalization Attributes page. See "Accessing the Globalization Page" and "Automatic CSV Encoding."

To enable the Enable CSV download in an interactive report:

  1. View the page in Page Designer:
    Page Designer appears.
  2. In the Rendering tab, select the region containing the report.
  3. In the Property Editor, select the Attributes tab.
    The Property Editor displays the attributes. Attributes are organized in groups
  4. Search Bar, Include Search Bar - Select On.
  5. Actions Menu, Download - Select On.

    Tip:

    Setting Download to Off prevents the Download menu from displaying on the Actions menu. To fully prevent users from downloading data, deselect all Download Formats described in the next step.

  6. Under Download:
    1. Download Formats - Select CSV.

      Tip:

      The Download option only appears on the Actions menu if a file format is selected.

    2. CSV Separator - (CSV only) Define the column separator. If no value is entered, a comma or semicolon is used depending on your current NLS settings.
    3. CSV Enclosed By - (CSV only) Enter a delimiter character. This character delineates the starting and ending boundary of a data value. Default delimiter is double quotation marks (" ").
    4. Filename - Enter a name for the downloaded document. Do not specify a file extension, the extension is added automatically. If you leave this blank, the region name is used as the file name.

      WARNING:

      Do not use the Supplemental Text attribute with CSV download. If you enable CSV download, the defined text will invalidate the CSV file format.

  7. To save your changes click Save. To save and run the page, click Save and Run Page.

8.7.4.5.3 Enabling Interactive Report Email Download

Email is only available to authenticated users, and requires the SMTP to be configured within Application Express Administration Services application (Administration Services), by an Instance Administrator.

Interactive reports support email of all formats except Word (RTF). Note this only applies to Download dialog, not the Subscription dialog.

Tip:

Email download is only supported on authenticated pages. If you enable Email download on a public page, the Email download option does not display in Download dialog.

To enable support for email download, an Oracle Application Express administrator must configure email at the Instance level. See "Configuring Mail" in Oracle Application Express Administration Guide.

To enable email download:

  1. View the page in Page Designer:
    Page Designer appears.
  2. In the Rendering tab, select the region containing the report.
  3. In the Property Editor, select the Attributes tab.
    The Property Editor displays the attributes. Attributes are organized in groups
  4. Search Bar, Include Search Bar - Select On.
  5. Actions Menu, Download - Select On.

    Tip:

    Setting Download to Off prevents the Download menu from displaying on the Actions menu. To fully prevent users from downloading data, deselect all Download Formats described in the next step.

  6. Under Download:
    1. Download Formats - Select Email.

      Tip:

      The Download option only appears on the Actions menu if a file format is selected.

    2. Filename - Enter a name for the downloaded document. Do not specify a file extension, the extension is added automatically. If you leave this blank, the region name is used as the file name.
    3. Supplemental Text - Enter text that displays at the top of the download files. You can enter data classification, legal, or warning messages about the data in the file.

      WARNING:

      Do not use the Supplemental Text attribute with CSV download. If you enable CSV download, the defined text will invalidate the CSV file format.

  7. To save your changes click Save. To save and run the page, click Save and Run Page.

    Note:

    Email sent from an Email Download contains a system generated email signature identifying who sent the email. This signature cannot be removed.

8.7.4.6 Controlling Interactive Report Pagination

Pagination provides the end user with information about the number of rows and the current position within the result set. You control how pagination displays by making selections from Pagination attributes on the Attributes page in the Property Editor.

To edit interactive report pagination:

  1. View the page in Page Designer:
    Page Designer appears.
  2. In the Rendering tab, select the region containing the report.
  3. In the Property Editor, select the Attributes tab.
    The Property Editor displays the attributes. Attributes are organized in groups
  4. Configure Pagination attributes:
    1. Find Pagination.
    2. Type - Select the pagination type for this report. Often only a certain number of rows of a report display on a page. In order to include additional rows, the application end user must to navigate to the next page of the report.
    3. Display Position - Select where the report pagination displays.
      Pagination can be shown above or below the report (or both) and can be positioned on the left or right.
  5. To save your changes click Save. To save and run the page, click Save and Run Page.

8.7.4.7 Enabling Icon View

By default, most interactive reports display as a report. You can optionally display columns as icons. When configured to display columns as icons, a View Icons icon displays on the Search bar.

To use Icon view, you must identify the columns used to identify the icon, the label, and the target (that is, the link). As a best practice, set these columns to display as hidden since they are typically not useful for end users.

8.7.4.7.1 Adding a View Icon Button

To add Icon view to an interactive report:

  1. View the page in Page Designer:
    Page Designer appears.
  2. In the Rendering tab, select the region containing the report.
  3. In the Property Editor, select the Attributes tab.
    The Property Editor displays the attributes. Attributes are organized in groups
  4. Find Icon View. Configure the following attributes:
    1. Show - Select On to add a View Icons icon to the Search bar.
    2. Custom - Specify whether you wish to define a custom link for the Icon View. This option provides greater flexibility in defining the content of the Icon View, including the ability to utilize more than one column. Select On or Off.
    3. Columns Per Row - Select the number of icons to display per row in Icon View. A value of 5 displays 5 icons per row of the report.
    4. Link Column - Select the column that returns the link target of the icon.
    5. Image Source Column - Identify the column that returns the image source.
    6. Label Column - Select the column that returns the image label.
  5. To save your changes click Save. To save and run the page, click Save and Run Page.

8.7.4.7.2 Adding a Custom Icon View Link

A custom Icon View link provides greater flexibility in defining the content of the Icon View, including the ability to utilize more than one column.

To add a custom Icon View link:

  1. View the page in Page Designer:
    Page Designer appears.
  2. In the Rendering tab, select the region containing the report.
  3. In the Property Editor, select the Attributes tab.
    The Property Editor displays the attributes. Attributes are organized in groups
  4. Find Icon View. Configure the following attributes:
    1. Show - Select On.
    2. Custom - Select On.
    3. Columns Per Page - Select the number of icons to display per row in Icon View. A value of 5 displays 5 icons per row of the report.
    4. Custom Link - Enter the column link for the Icon view. Use substitution strings for column names, for example:
      <a href="#EMP_LINK#"><img src="#EMP_IMG#" title="#ENAME#" alt=""><br>#ENAME#</a>
  5. To save your changes click Save. To save and run the page, click Save and Run Page.

8.7.4.8 Enabling Detail View

Be default, most interactive reports display as a report. You can optionally display details about each column. When configured, a View Details icon displays on the Search bar.

To add Details view to an interactive report:

  1. View the page in Page Designer:
    Page Designer appears.
  2. In the Rendering tab, select the region containing the report.
  3. In the Property Editor, select the Attributes tab.
    The Property Editor displays the attributes. Attributes are organized in groups
  4. Find Detail View. Configure the following attributes:
    1. Show - Select On.
    2. Before Rows - Enter the HTML to be displayed before report rows. For example:
      <table>
    3. For Each Row - Enter the body for report rows in the Detail View. Use #COLUMN_NAME# substitution strings for column names and column labels. For example:
      <tr><td class="u-textRight">#ENAME_LABEL#:</td><td>#ENAME#</td></tr>
      <tr><td class="u-textRight">#JOB_LABEL#:</td><td>#JOB#</td></tr>
    4. After Rows - Enter the HTML to be displayed after report rows. For example:
      </table>
  5. To save your changes click Save. To save and run the page, click Save and Run Page.

8.7.4.9 Configuring Advanced Attributes for Interactive Reports
By configuring advanced interactive report attributes, developers can define the region alias, specify an item whose value stores the saved report ID, and define a from address in an interactive report subscription or email download.

8.7.4.9.1 About Emailing from an Interactive Report

You can define the from address for emails sent from an interactive report in two ways:

  • Application-level — Edit the Application Email From Address attribute on the Edit Application Definition page.

  • Report-level — Access the report Attributes. Under Advanced, edit the Email from Address attribute.

In either case, the value can be a literal string containing a valid email or an application substitution defined at the application-level using substitution syntax or &APP_EMAIL. substitution which returns the Application Email From Address defined at the application-level. Examples:

john.doe@abc.com
&MY_APP_EMAIL_FROM.
&APP_EMAIL.

Note:

Oracle does not recommend using an item substitution at the application or page-level since it only works in email download, but not for subscriptions.

8.7.4.9.2 Configuring Advanced Attributes

To configure Advanced Attributes:

  1. View the page in Page Designer:
    Page Designer appears.
  2. In the Rendering tab, select the region containing the report.
  3. In the Property Editor, select the Attributes tab.
    The Property Editor displays the attributes. Attributes are organized in groups
  4. Find Advanced and configure the appropriate options.
    1. Region Alias - Enter an alphanumeric alias for this interactive report region.

      The alias must be unique within the application. You can use an alias to reference an interactive report region in your custom API call. For example, you can write a function to return the INTERACTIVE_REPORT_ID by querying the ALIAS column in the APEX_APPLICATION_PAGE_IR view. Since the INTERACTIVE_REPORT_ID value can change when you export or import the application to different instance, referencing interactive report regions using an alias may be preferable.

    2. Report ID Item - Select a page or application item whose value stores the saved report ID.

      Interactive report uses this item value to link to a saved report. For example, you can define list of saved reports with links with defined item name and saved report ID as its value to link to a saved default reports, public or private reports. The saved report IDs can be retrieved from the APEX_APPLICATION_PAGE_IR_RPT view.

    3. Email From Address - Enter a valid email address to use as the From address when sending email from this report.

      Emails are sent from this report for Downloads of type Email and for Subscriptions. The value can be a literal string containing a valid email address or a static substitution reference defined in the application using substitution syntax.

      Oracle does not recommend using an item substitution at the application or page-level since it only works in an email download, but not for subscriptions.

      Examples:

      john.doe@abc.com
      &MY_APP_EMAIL_FROM.
      &APP_EMAIL.
      
    4. Oracle Text Index Column - Select a column where the column is indexed by an Oracle Text index.

      Row Search returns results based on the Oracle Text operator entered, providing the corresponding Oracle Text index has been created for the column. This option should only be enabled if the necessary index exist, and the end users have been trained in how to utilize the Oracle Text search operators. To simplify Oracle Text syntax for end users, you can specify a function for the Oracle Text PL/SQL Function Name Component Setting of Interactive Grids in Shared Components.

  5. To save your changes click Save. To save and run the page, click Save and Run Page.