5.6.3 Creating a Progressive Web Application (PWA)
Learn about Progressive Web (PWA) app features and requirements.

5.6.3.1 About Progressive Web App Support

Progressive Web Applications (PWA) are designed to be fast, responsive, installable to a home screen, reliable (online or offline), and engaging (providing support for push notifications).

To enable Progressive Web App, an Oracle APEX application must be served over a secured HTTPS environment, or localhost. If using an unsecured environment, PWA features will not be rendered

You create a Progressive Web App by running the Create Application Wizard and enabling the Install Progressive Web App feature.

Enabling Install Progressive Web App:

  • Adds the ability to install the app as a Progressive Web App (PWA).

  • Within the application, adds a new navigation bar entry, Install App

  • Provides a customizable offline page when users are offline and cannot request the network. See Progressive Web App (PWA) Messages Requiring Translation.

  • Optimizes page loading speed on the mobile device. Improves page load rendering time with a new browser cache architecture for static files (APEX core files and app files).

5.6.3.2 Creating a Progressive Web App

Create a Progressive Web App by running the Create Application Wizard and enabling the Install Progressive Web App feature.

Tip:

To include mobile friendly reports and forms, create your application and then add pages to it. See Reports and Forms Optimized for Mobile Environments.

To create a Progressive Web App:

  1. On the Workspace home page, click the App Builder icon.
  2. Click the Create button.
  3. Click New Application.

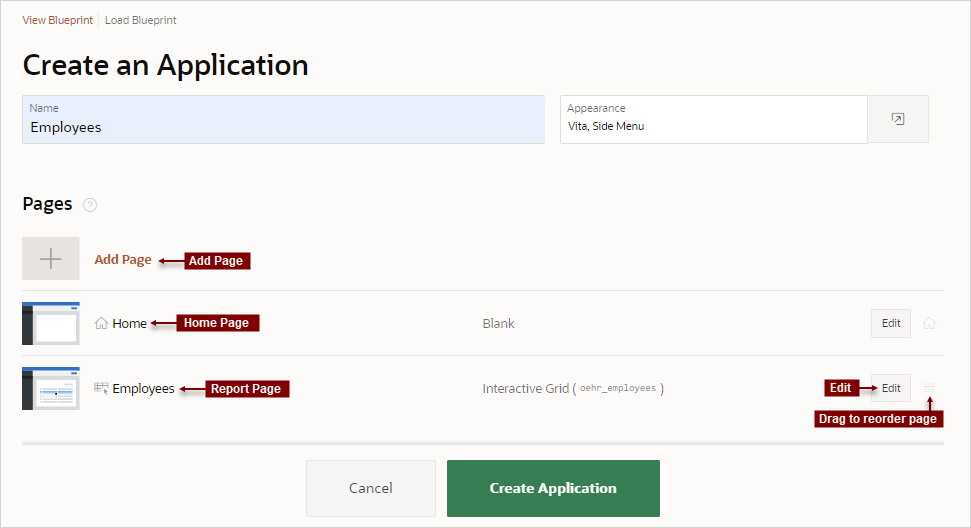
    The Create an Application page appears.

  4. For Name, enter the name used to identify the application to developers.
  5. For Appearance, accept the default or click Set Appearance to change it.

    In the Appearance dialog, configure the following:

    • Theme Style - Select the default theme style used to display the application.

      Tip:

      You can change the style to another pre-defined style, or modify it post generation. To change the style run the application and then click Theme Roller in the Developer toolbar.
    • Navigation - Select a type of navigation menu.

    • Application Icon - Click Choose New Icon to change the icon. Your selection displays on the home page of the application.

    • Click Save Changes.

  6. To add a page, click Add Page and select the desired page type. The user interface changes based on the selected page type.

    Tip:

    The Create Page Wizard supports the creation of a number of mobile friendly reports and forms. SeeReports and Forms Optimized for Mobile Environments.

    Pages you create display under Pages.

    You can edit existing pages as follows:

    • Change the page order. To change the order in which pages appear in your application, click and hold the Drag to reorder page icon and drag and drop it to a new location in the list.

      The Home page always displays first and cannot be reordered. For administrative pages, the page order dictates the order they appear in the Application Administration list on the Administration page.

    • Edit a page. To edit a page click Edit. In the dialog, edit the attributes and click Save Changes.

    • Delete a page. To delete a page, click Edit and the click Delete .

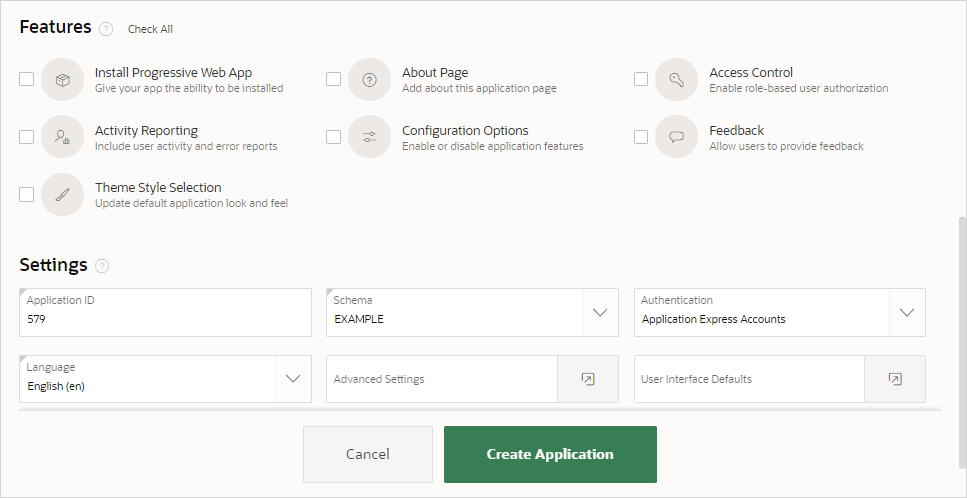
  7. For Features, select features to include with your application. To create Progressive Web Application, select Install Progressive Web App.

    Features provide application-level functionality and can only be added once per application. To learn more, see Help. To select all features, click Check All.

  8. For Settings:
    1. Application ID - Enter a unique, numeric identifier for your application. This field contains an automatically generated identifier by default. Application IDs between 3000 to 9000 are reserved for internal use by Oracle APEX.
    2. Schema - Select the database schema which stores the database objects you want to use in this application. Each application obtains its privileges by parsing all SQL as a specific database schema.
    3. Languages - The primary language used in the app. To change the primary language, click the Select Languages icon.
    4. Authentication - Select how you want users to authenticate into your application..
    5. Advanced Settings - Click the icon adjacent to the Advanced Settings to edit the application definition settings and preferences and security and globalization attributes. To learn more, see Help.
    6. User Interface Defaults - Click the icon to apply User Interface Defaults to this application.
  9. Click Create Application.
  10. Configure Progressive Web App attributes as described in the next topic.

5.6.3.3 Configuring Progressive Web App Attributes

Configure Progressive Web App attributes by editing the Application Definition.

Note:

Prior to configuring Progressive Web App attributes, create a new application by running the Create Application Wizard and enabling the Install Progressive Web App feature as described in the previous topic.

To configure Progressive Web App attributes:

  1. On the Workspace home page, click the App Builder icon.
  2. Select an application.
  3. Navigate to the Edit Application Definition page. From the Application home page, you can access the Edit Application Definition page in two ways:
    • From Shared Components:
      1. Click Shared Components.

      2. Under Appliction Logis, click Application Definition Attributes.

    • Use the Edit Application Properties button:
      1. Click Edit Application Properties to the right of the application name.

      2. Click the Definition tab (if not already selected).

  4. Edit the attributes under Progressive Web App:
    1. Enable Progressive Web App - This option is enabled.
    2. Installable - This option is enabled.
    3. App Description - Enter description which explains what the application does. This option provides more information to users when they are prompted to install the application
    4. Display - Select the display mode for the application. Options include:
      • Fullscreen

      • Standalone

      • Minimal UI

      • Browser

      Note: Some devices and browsers ignore this attribute. APEX is only relaying this information to the device which handles the Progressive Web App appropriately.

    5. Screen Orientation - Select the preferred screen orientation when using this Progressive Web App. This option applies mostly for mobile devices.

      Note: Some devices and browsers ignore this attribute. APEX is only relaying this information to the device which handles the Progressive Web App appropriately.

    6. Theme Color - Defines the default theme color for the application.

      This attribute affects how the operating system displays the application (for example, for an Android's task switcher, the theme color surrounds the application).

      Note: Some devices and browsers ignore this attribute. APEX is only relaying this information to the device which handles the Progressive Web App appropriately.

    7. Background Color - Select the background color.

      The background color defines a placeholder background color for the application to display before its stylesheet is loaded. Therefore, the background color should match the theme body background color for a smooth transition between launching the web application and loading the application content.

      Note: Some devices and browsers ignore this attribute. APEX is only relaying this information to the device which handles the Progressive Web App appropriately.

    8. Icon URL - This icon can be used on the home screen of a mobile device or desktop among a list of other applications, or to integrate the web application with an OS's task switcher and/or system preferences.

      The icon should be a *.png or *.svg file. If the icon is a *.png file, the prefered size is 512x512 pixels.

    9. Custom Manifest - Used to store additional JSON properties for the Web App Manifest file. The properties found here will be used to extend the declarative options above, by overriding existing properties or appending new properties.

      For more information on building a Custom Manifest, you can read the Web App Manifest specifications: https://www.w3.org/TR/appmanifest/.

  5. Click Apply Changes.