5.1.7 Loading Data From the Oracle Cloud (Autonomous Database Only)
Load data from the Oracle Cloud using Object Store References. (This function is only available for Autonomous Database users.)
- Granting Privileges to the Workspace Schema
Before you can load data from the cloud, you must grant privileges to the workspace schema. - User Interface Differences for Oracle Cloud Users
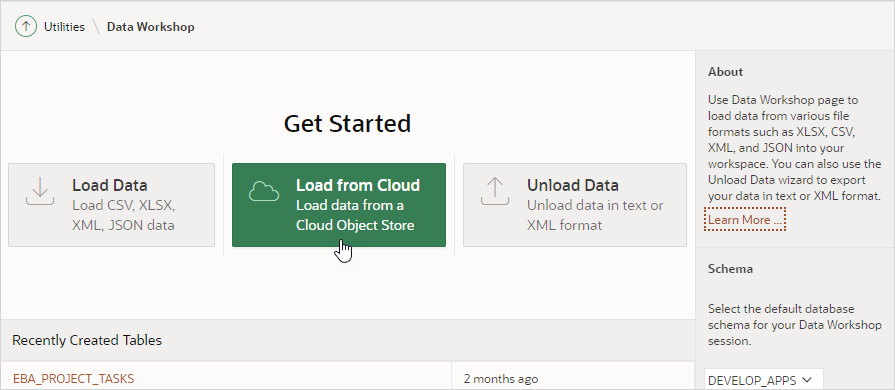
For Oracle Cloud users, Data Workshop includes an additional Load from Cloud button on the Data Workshop home page. - About Object Store References
Data Workshop uses Object Store References to reference cloud-based URLs for loading data. Use Object Store References to create External Tables from the Cloud, which you can then import into your workspace or connect to your applications. - Creating an Object Store Reference
Create a new Object Store Reference. - Creating an External Table from Cloud
Create a table from an external source with an Object Store Reference. - Loading Avro or Parquet Files into Object Browser from Cloud
For Avro and Parquet files, first prepare an external table then load it into your workspace for local use. - Loading Other Files into Object Browser from Cloud
For non-Avro and non-Parquet files, view the Object Store Reference in Data Workshop then import the file into your workspace for local use.
Parent topic: Using Data Workshop
5.1.7.1 Granting Privileges to the Workspace Schema
Before you can load data from the cloud, you must grant privileges to the workspace schema.
Grant the following privileges to the workspace schema:
-
EXECUTE ON DBMS_CLOUD -
READ,WRITE ON DIRECTORY DATA_PUMP_DIR
For example, run the following as ADMIN:
GRANT EXECUTE ON DBMS_CLOUD TO {schema};
GRANT READ,WRITE ON DIRECTORY DATA_PUMP_DIR TO {schema};schemais the workspace schema
See Also:
-
DBMS_CLOUD Subprograms and REST APIs in Using Oracle Autonomous Database on Shared Exadata Infrastructure
-
GRANT in Oracle Database SQL Language Reference
5.1.7.2 User Interface Differences for Oracle Cloud Users
For Oracle Cloud users, Data Workshop includes an additional Load from Cloud button on the Data Workshop home page.
APEX On-premise users only see Load Data and Unload Data buttons on the Data Workshop home page.
Oracle Cloud users also see the Load from Cloud button.
5.1.7.3 About Object Store References
Data Workshop uses Object Store References to reference cloud-based URLs for loading data. Use Object Store References to create External Tables from the Cloud, which you can then import into your workspace or connect to your applications.
Creating an Object Store Reference is the first step to creating external tables in the cloud. Essentially, the Object Store Reference preserves the necessary credentials to authorize your APEX workspace to access external data, and therefore enable your apps to access external data.
You can store the following types of credentials in an Object Store Reference:
- Username/Password - Basic two-field username and password.
- OCI Native - Use the Oracle Cloud Infrastructure (OCI) protocol: User OCID, Private Key, Tenancy OCID, and Fingerprint.
- Web Credential - Reuse a web credential already stored in the workspace.
- DBMS_CLOUD Credential - Reuse a DBMS_CLOUD credential already stored in the workspace.
For Parquet and Avro files, Data Workshop asks for an external table name and where to derive the schema. Other file types can be up to 50MB.
DBMS_CLOUD.CREATE_EXTERNAL_TABLE procedure.
See Also:
DBMS_CLOUD CREATE_EXTERNAL_TABLE Procedure in Using Oracle Autonomous Database on Shared Exadata Infrastructure5.1.7.4 Creating an Object Store Reference
Create a new Object Store Reference.
Required
Before you begin, ensure you know the URL of the Object Store Bucket you want to call from Autonomous Data Warehouse.
Procedure
To create a new Object Store Reference:
Object Store Reference saved.
5.1.7.5 Creating an External Table from Cloud
Create a table from an external source with an Object Store Reference.
To view an Object Store Reference:
To create an external table:
5.1.7.6 Loading Avro or Parquet Files into Object Browser from Cloud
For Avro and Parquet files, first prepare an external table then load it into your workspace for local use.
To create an external table:
To load the data to a local table:
