Generating Vector Embeddings
This topic describes the procedure for generating vector embeddings through the Vector Toolbox.
- Selecting a data source (can be a file or database table)
- Selecting a staging location (only applicable for File System data sources)
- Configuring the chunk parameters
- Selecting an embedding model
- Selecting the embedding destination to store the embeddings
Selecting a Data Source
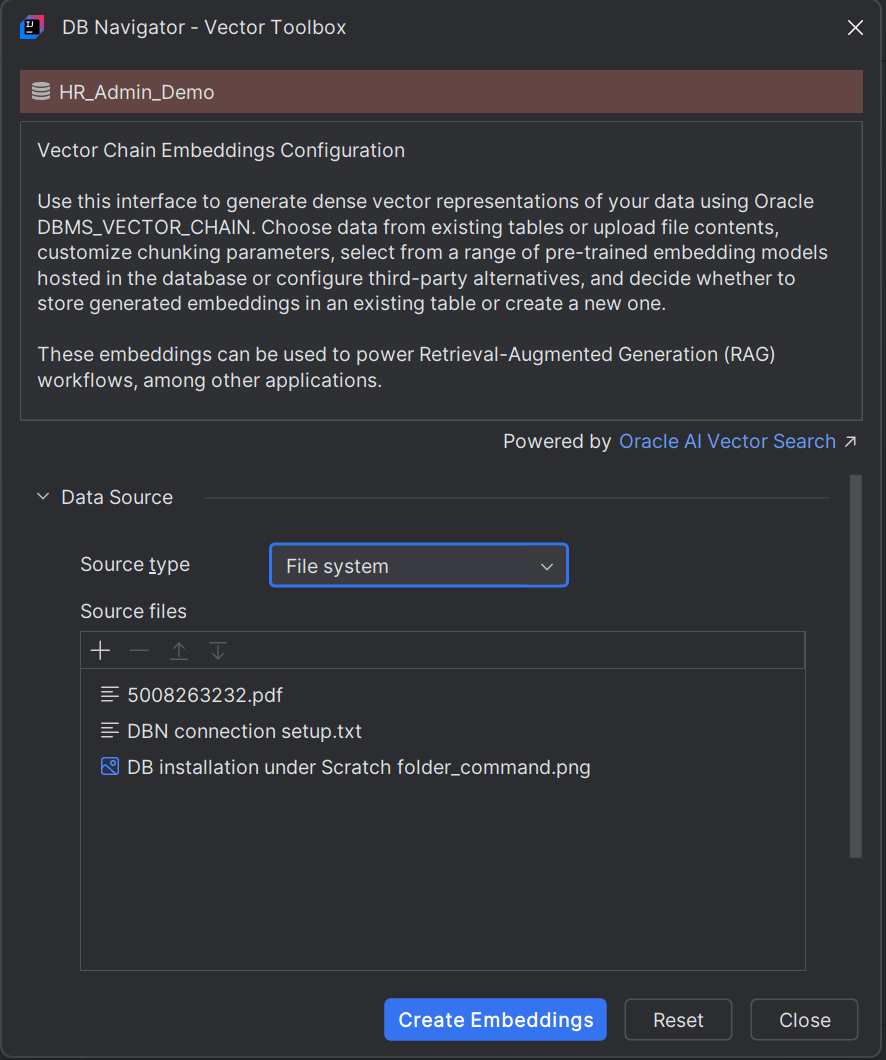
- File System - If you select File System as the source type, you can upload any file type as the Source File. Click the Add (+) icon in the Source File section and select one or more files from your workstation. You can remove a selected file or change the order in which the source files will be processed.
Selecting a Staging Location
If you select File System as the Source type, the Staging Location section is displayed.
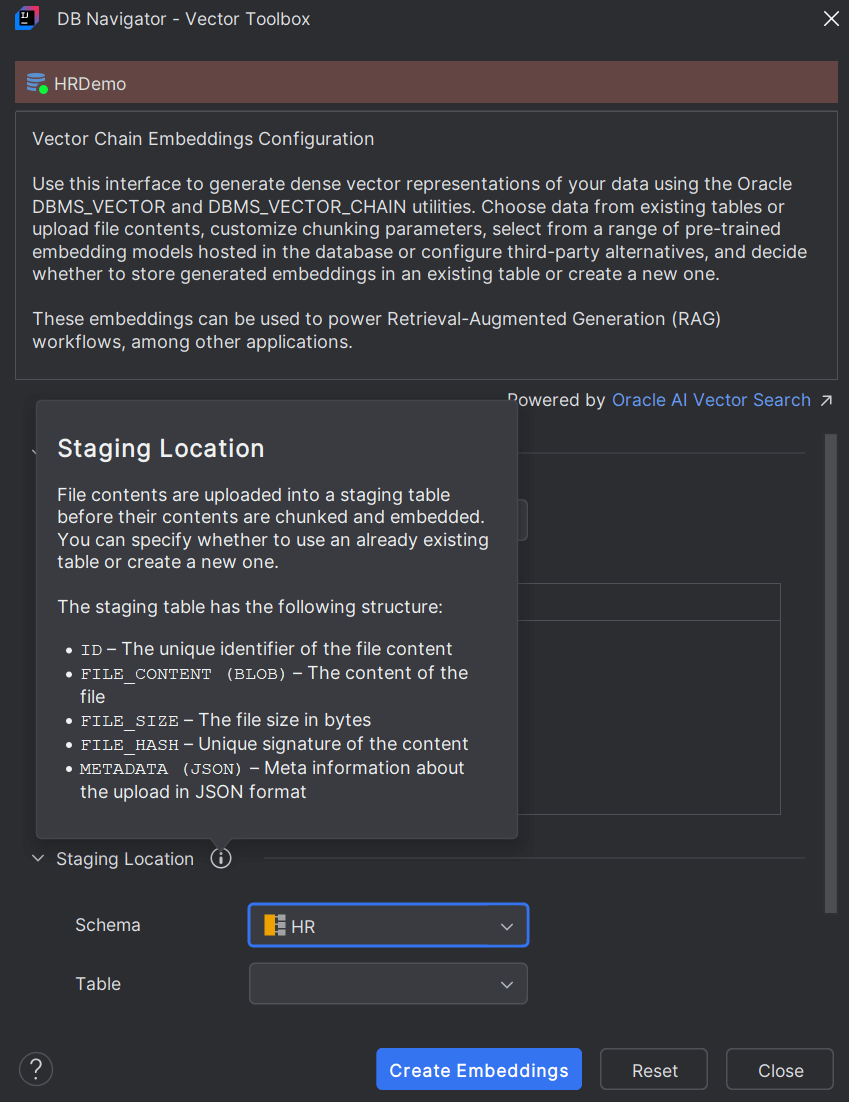 Set the following Staging parameters for the selected file(s) to stage the file contents before chunking and embedding takes place:
- Schema - From the list schemas, select the one in which you want to stage the file contents.
- Table - Click + Table to create a new table in the selected schema for staging the file embeddings.
The DB Navigator - Create Table dialog box displays a default table name that you can change.
The DB Connection and DB Schema displays along with the table structure comprising of following Columns: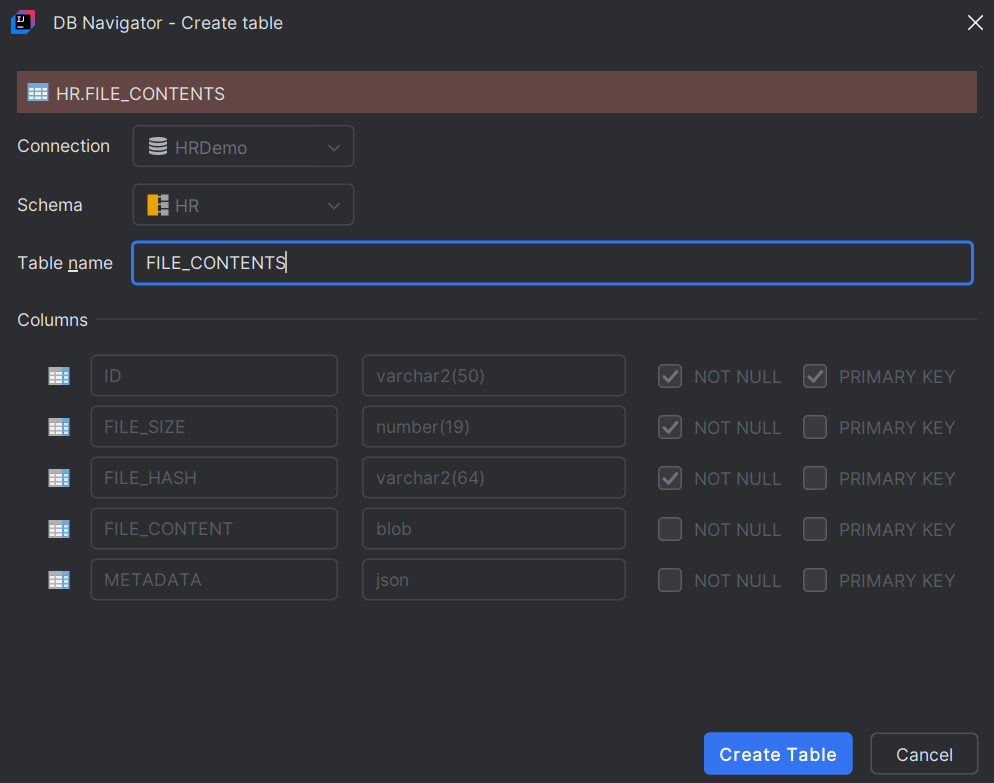
- ID (VARCHAR 2(50))
- FILE_SIZE (NUMBER (19))
- FILE_HASH (VARCHAR 2(64))
- FILE_CONTENT (BLOB)
- METADATA (JSON)
Clicking Create Table adds the new table to the list of tables in the Staging Location. Select a table as the destination to stage the file data.
- Database Table - If you select Database Table as the source type, you have to further select the following:
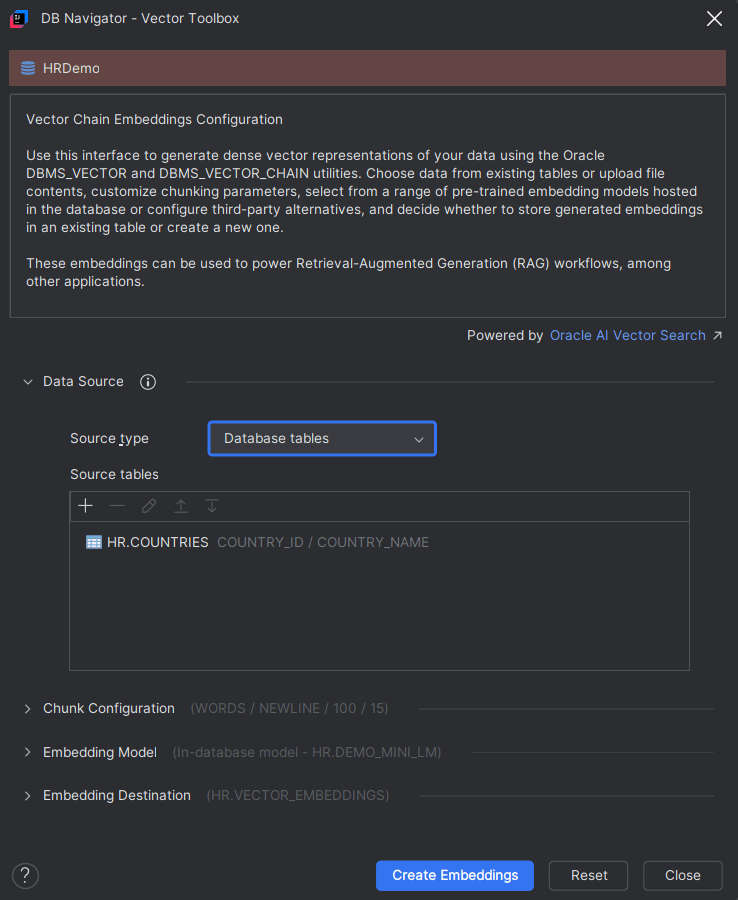
To create a new database table to store the vector embeddings, click the + icon in the Source tables section and set the following parameters in the Add Source Table window:
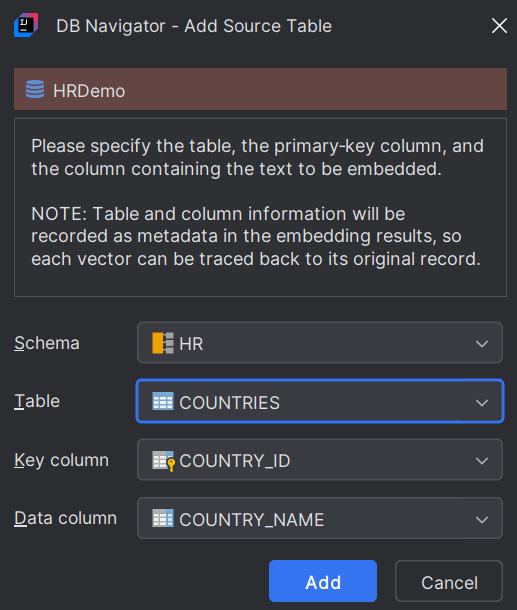
| Field | Description |
|---|---|
| Schema | Select the database schema in which you want creating the new data source table. |
| Table | Select the database table in the schema you selected. |
| Key Column | Select the column ID of the table for which you want to generate the embeddings. |
| Data Column | Select the data column of the table for which you want to generate the embeddings. |
Click Add to add the new table to the list of Source tables that you can select as Data Source.
- Database Queries - If you select Database Queries as the Source type, you can add one or more
SELECTstatements as the Data Source. The output of the executedSELECTstatement will be converted into vector embeddings.
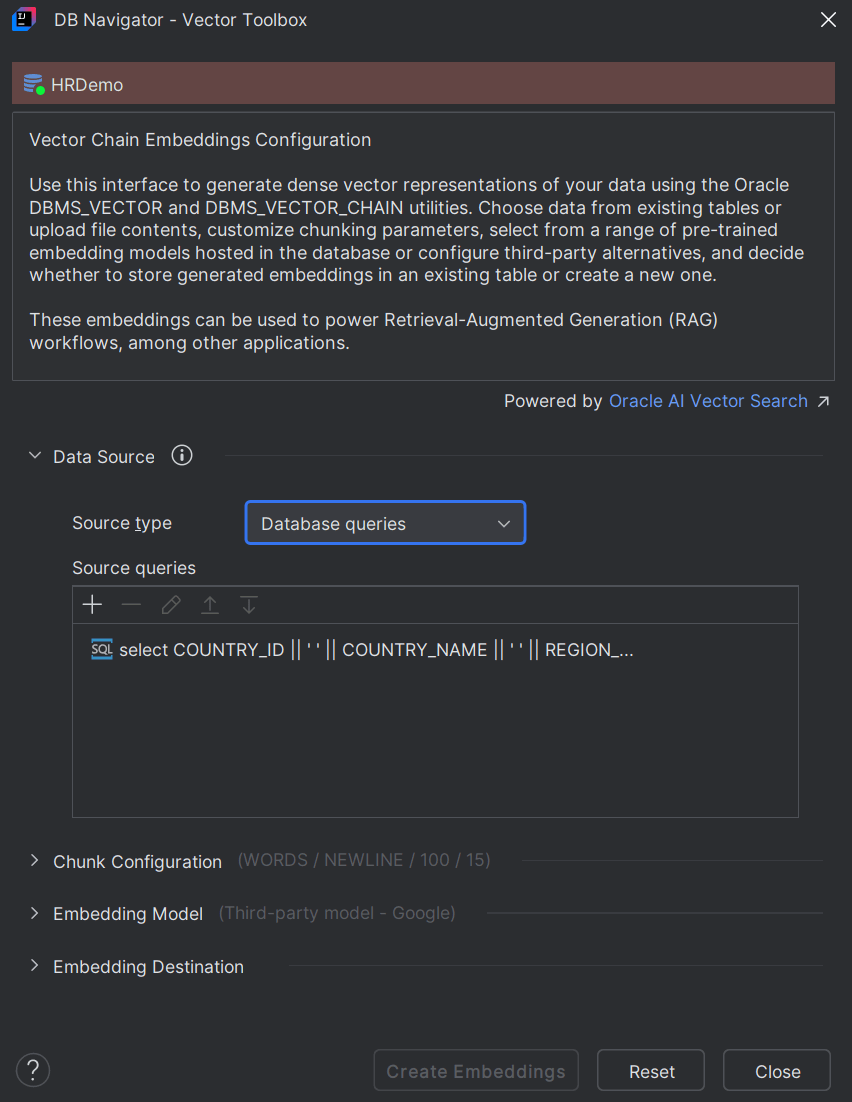
In the Source Queries section, click the + icon to open the DB Navigator - Add Source Query window.
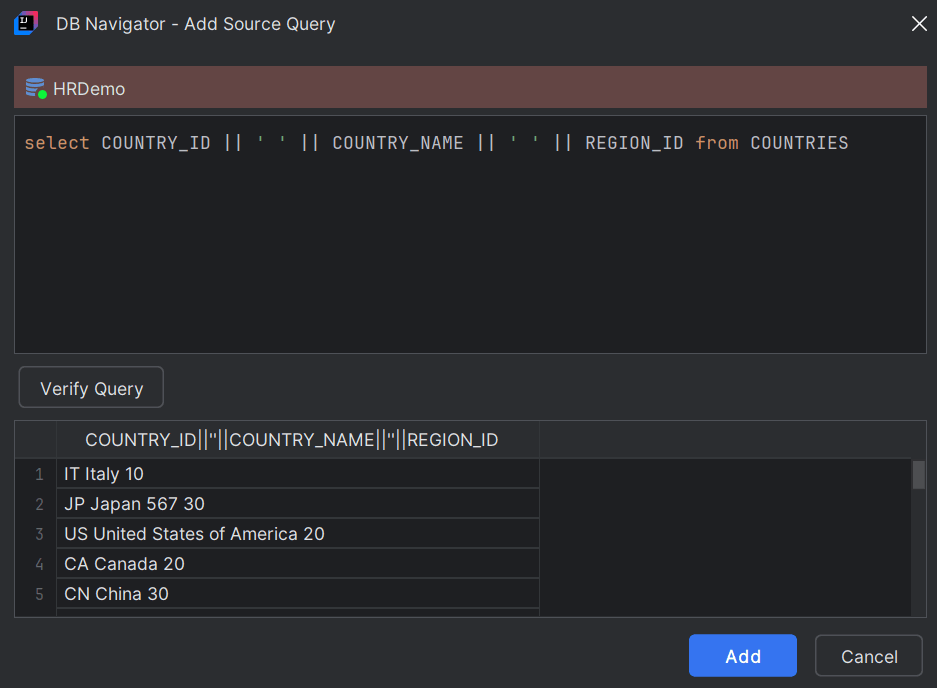
Enter the SELECT statement and click Verify Query to execute the statement. The query result is displayed in the separate panel. Click Add to list the query as a data source in the Source Queries section.
Configuring Chunk Parameters
To chunk or split the selected source file into smaller segments, in the Chunk Configuration section of the Database Navigator - Vector Toolbox, set the following parameters:
| Field | Description |
|---|---|
| Chunk by | Select the separator or breakpoint to create chunks of the source data. Options include by Words or by Characters. |
| Max Size | Set the maximum length of each chunk. Smaller chunks result in more precise search matches while larger chunks can lead to less precise results. |
| Split by |
Select the chunking strategy to split the source text. Options include:
|
| Overlap | Set the overlap percentage indicating the number of tokens or characters shared between consecutive chunks. This parameter helps in maintaining continuity and ensuring that important data near chunk boundaries are not lost. 10% - 25% overlap of chunk size is considered ideal. |
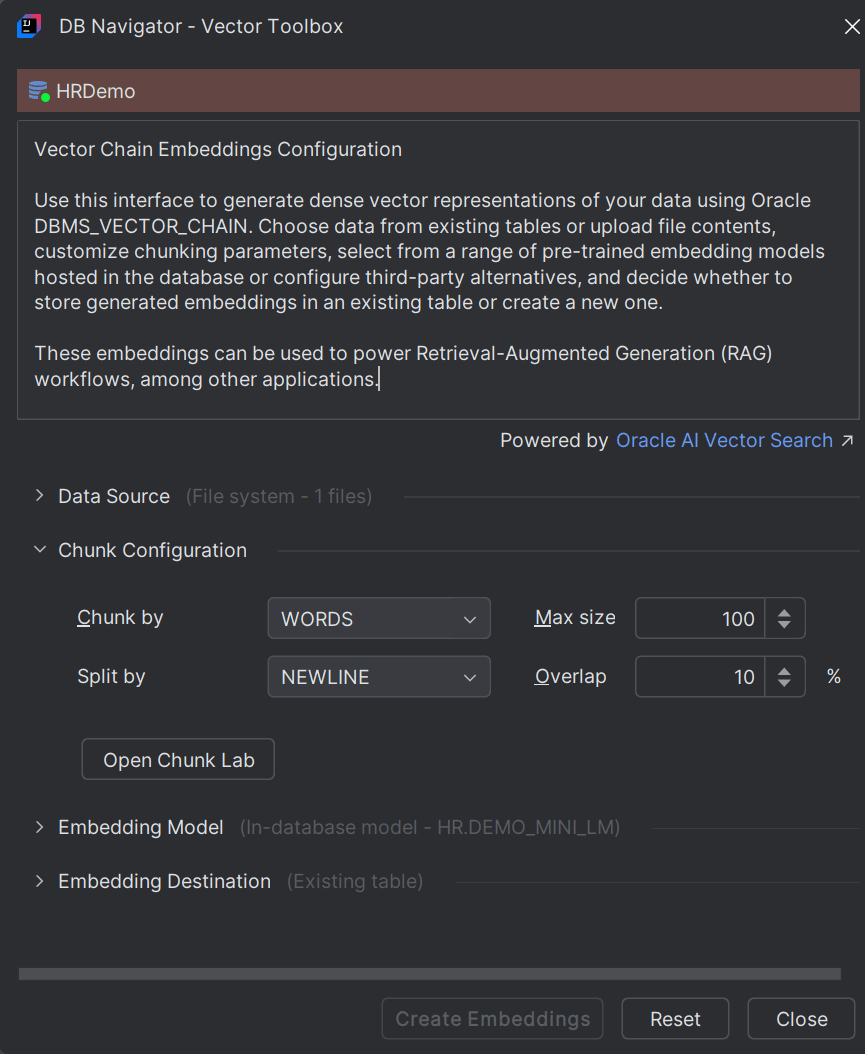
To test the effects of chunking on your source file, click Chunk Lab button to open the DB Navigator - Chunk Lab dialog box.
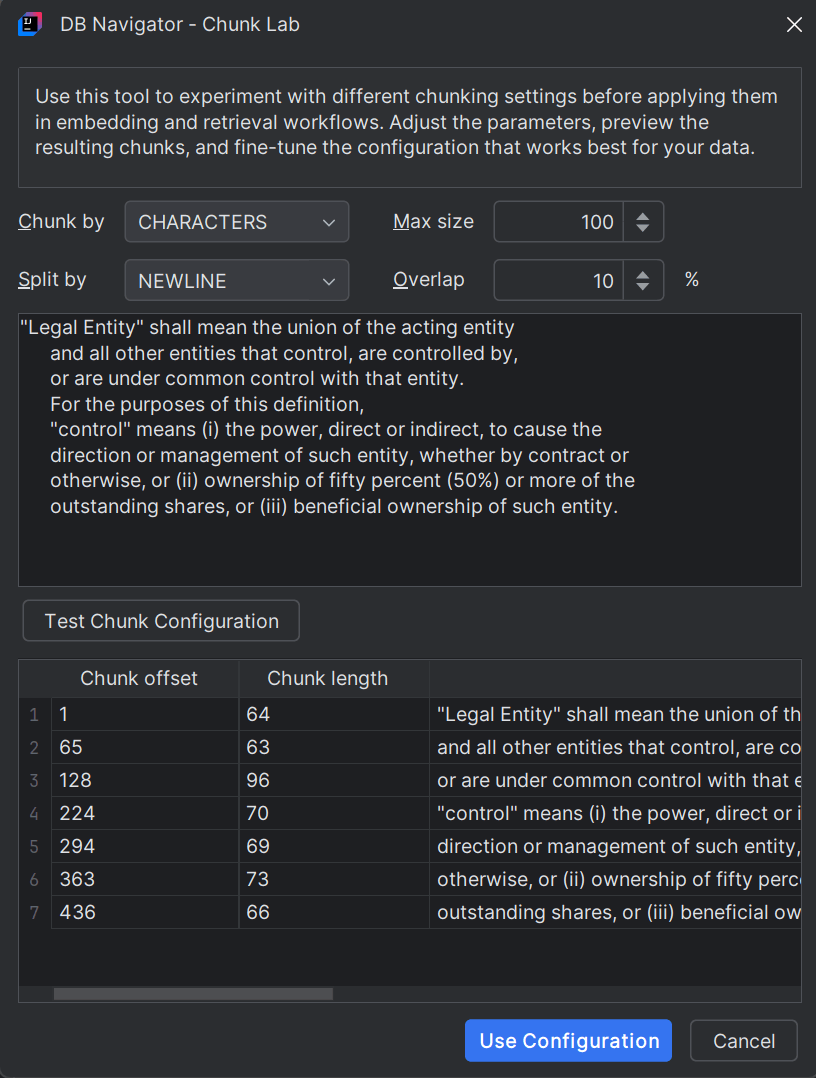
You can set the chunking parameters and paste a sample text of your source file and click Test Chunk Configuration to get a preview of the output before applying them in the actual embeddings. Once satisfied with the chunk output, click Use Configuration to apply the same for generating final embeddings.
Selecting an Embedding Model
| Model Location | Description |
|---|---|
| In-database Model | In-database AI embedding models are integrated or closely coupled within the database system so that the database itself handles the transformation of raw data stored within into vector embeddings. As a user (with adequate privileges), you have direct control over the in-database model's configuration and updates. |
| Third-party Model | Third-party AI embedding models are offered by external vendors (LLM providers) as a service or a platform, such as a cloud-based API, deployed separately from the database. Raw data is sent from the database to the third-party service for generating vector embeddings and then sent back to the database for storage. |
- Schema - Select the database schema where the embedding model is located.
- Model - Select the Model name to use for generating the vector
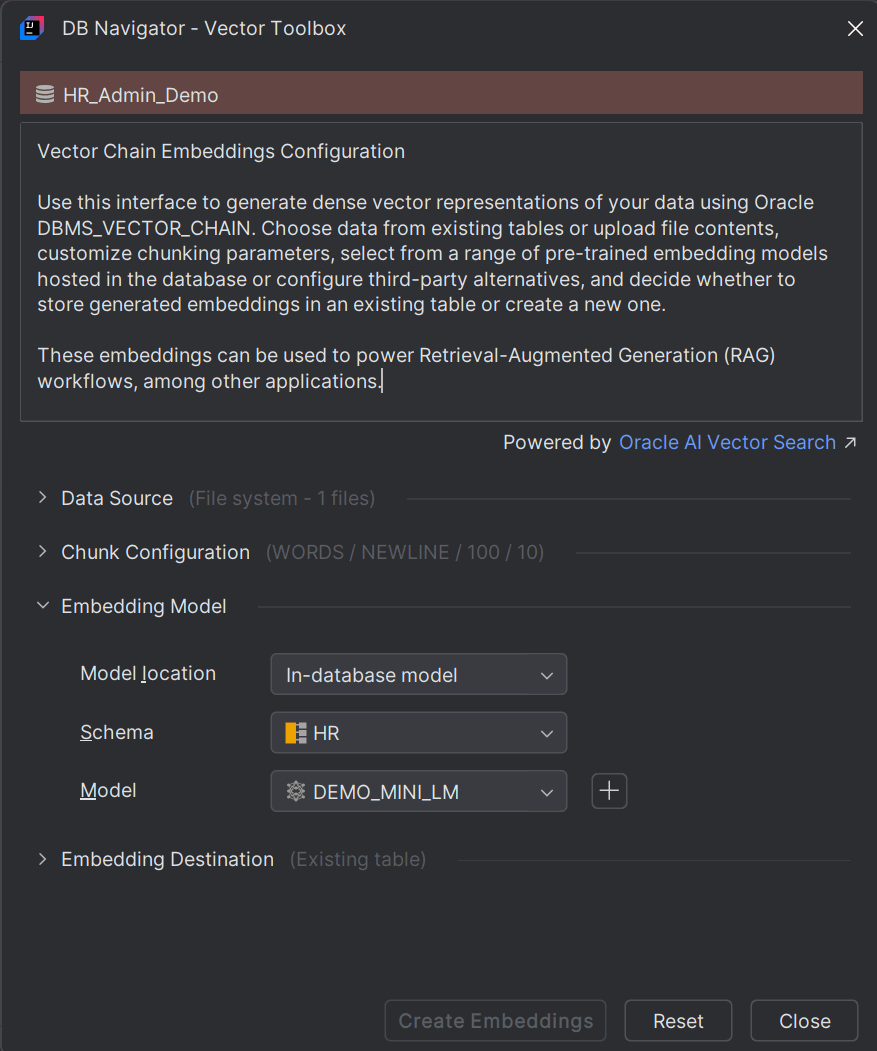
If an embedding model does not exist, you can create a new model by clicking the Create AI Model (+) icon next to the Model field. The DB Navigator - Create AI Model dialog box opens.
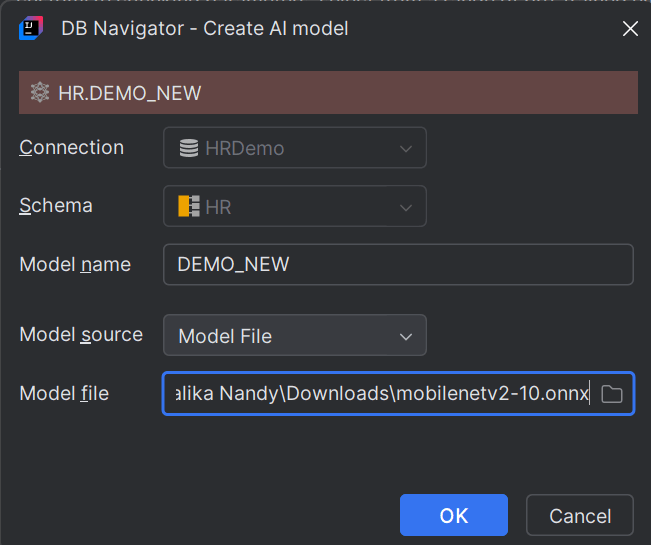
| Field | Description |
|---|---|
| Connection | This field is pre-filled with the DB connection in which you are adding the AI model. |
| Schema | This field is pre-filled with the DB schema in which you are adding the AI model. |
| Model Name | Enter a name for the new AI model. |
| Model Source | Choose between Model File or Object Resource:
|
| Model File | Browse through the model source file (such as a .onnx file) saved in your local system and upload it. This field is displayed only if you select Model File as the model source.
|
| Object URL | Type the URL of the platform from where the embedding model can be downloaded. This field is displayed only if you select Object Resource as the model source. |
| Credential | Select one from the available credentials for supported LLMs. If a credential is not available, click the Create Credential icon (+) to open the DB Navigator - Create Credential dialog box and create a new credential corresponding to an LLM (such as those provided by OCI Generative AI, Open AI, Google, Anthropic, Mistral AI, etc.). For more information on creating credentials, see "Creating Credentials for Public LLMs" |
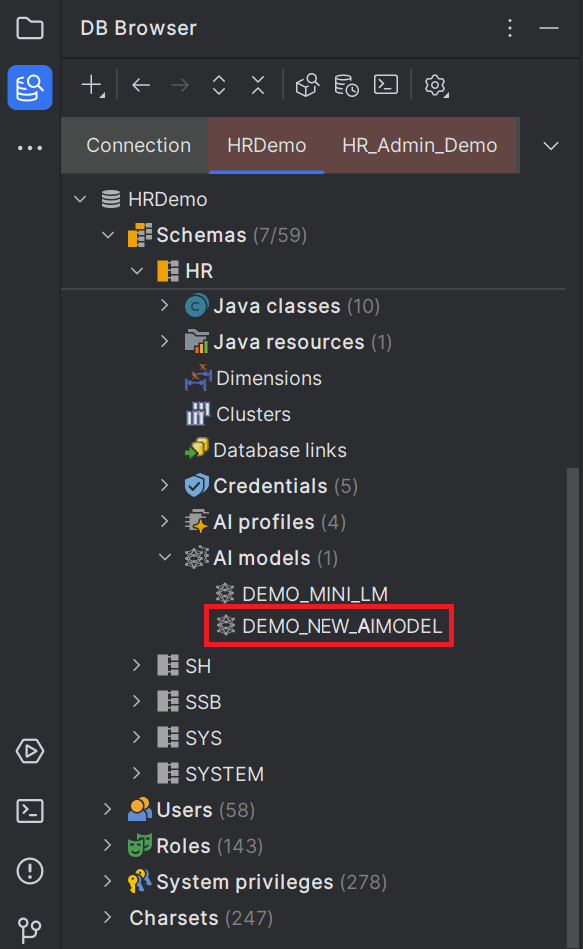
Click OK to start AI model creation. The model is added to the selected schema and visible on the DB Browser connection tree.
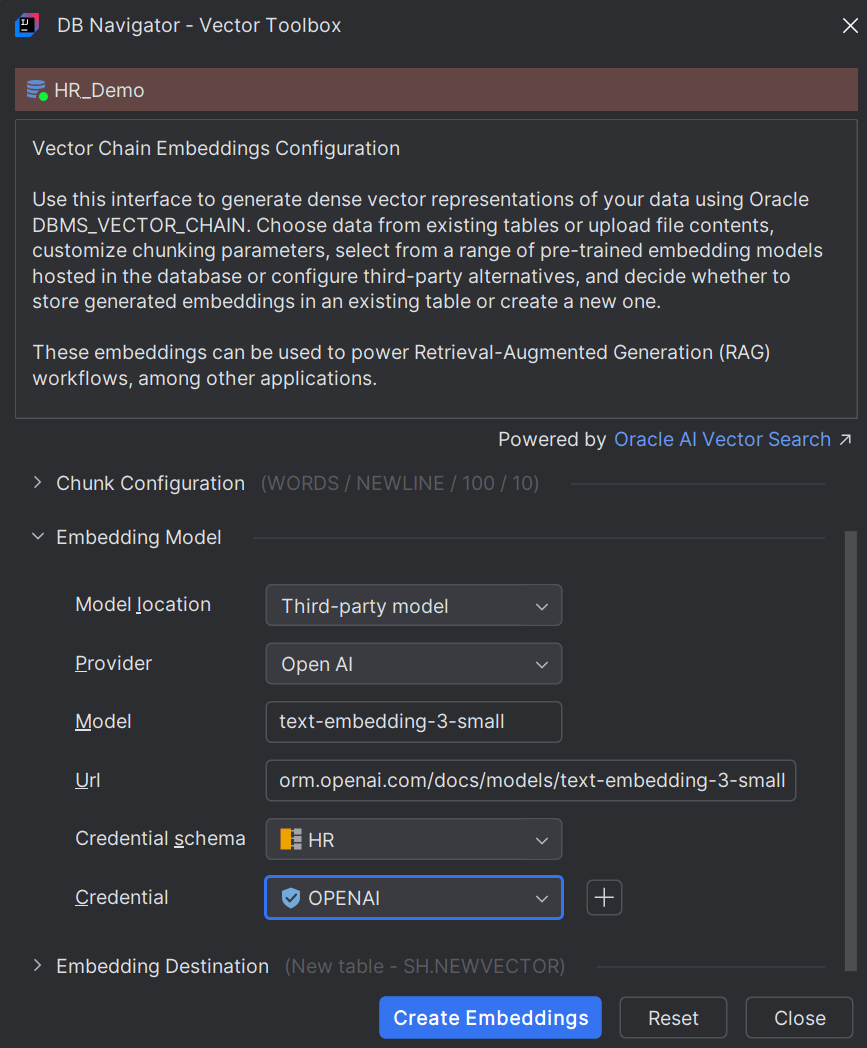
| Field | Description |
|---|---|
| Provider |
Select from one of the supported third-party AI embedding model providers. Options include:
|
| Model | Mention the embedding model to be used, for example, Gemini Embedding-001, or text-embedding-3-small.
|
| URL | Provide the URL of the platform from where the third-party embedding model file can be accessed or downloaded/subscribed. |
| Credential Schema | Select the database schema where the AI credential corresponding to the selected Model (or Model provider) is stored. |
| Credential | Select one from the list of available credentials that can be used with the selected Model. |
Selecting an Embedding Destination
To set the destination where you want the generated embeddings to get stored, in the Embedding Destination section of the DB Navigator - Vector Toolbox, first select the destination Schema, where the vector embeddings will be stored. You can either store the generated vector embeddings in an existing database table (if available) or create a new table.
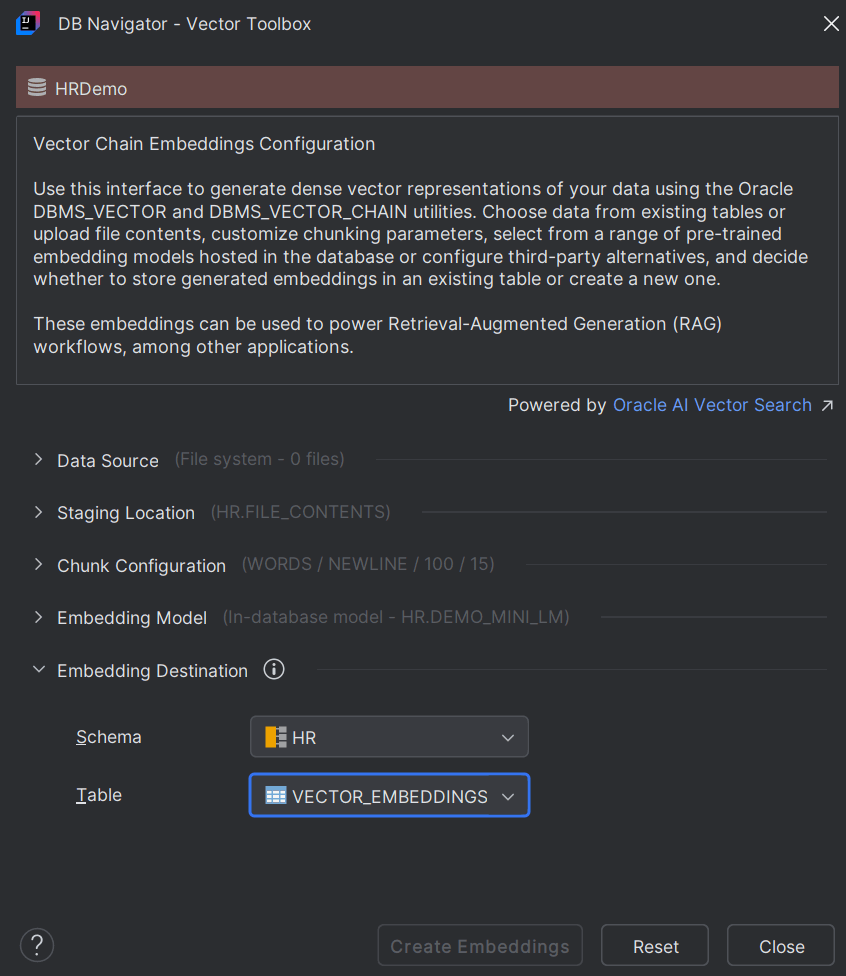
- Schema - Select the database schema where the vector embeddings will be stored.
- Table - Select the database table within the schema where the vector embeddings will be stored.
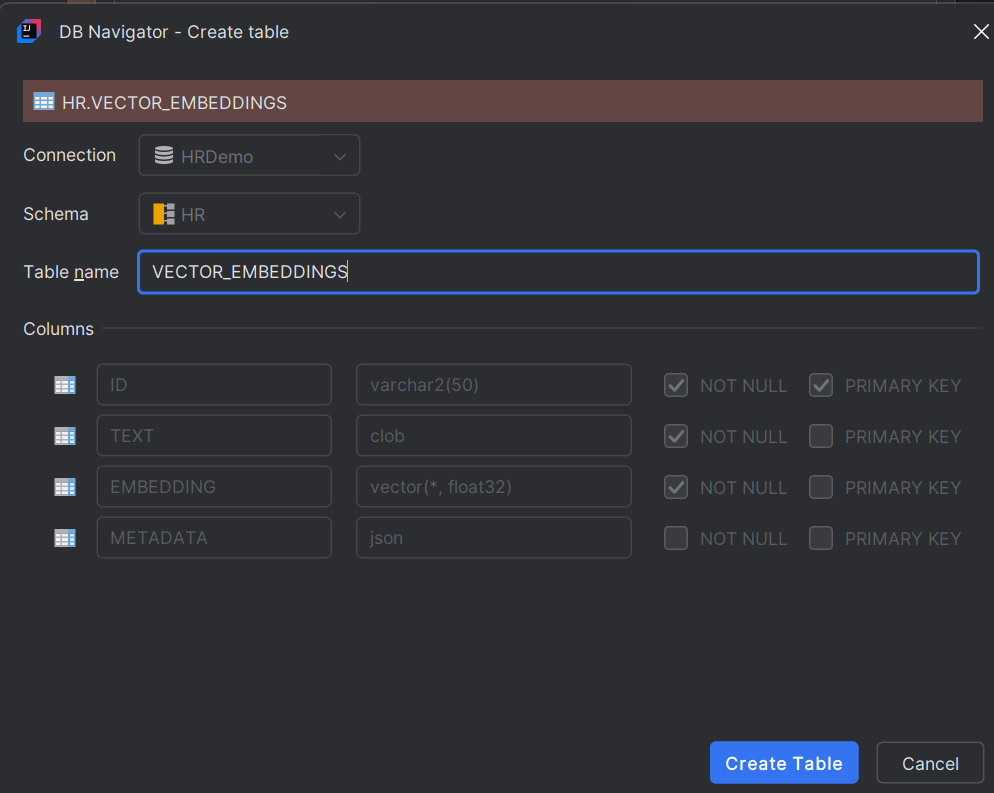
If you select New Table as your preferred Embedding Destination, enter the following in the DB Navigator - Create Table window:
| Field | Description |
|---|---|
| Connection | This field is pre-filled with the database connection. |
| Schema | Select the database schema in which you want to create the embedding destination table. |
| Table Name | Enter the table name where the vector embeddings will be stored. |
| Columns | Following columns are part of the table structure along with column values:
|
Once you have configured all the fields for Data Source, Chunk Configuration, Embedding Model, and Embedding Destination in the Vector Toolbox, click Create Embeddings to start generating vector embeddings.
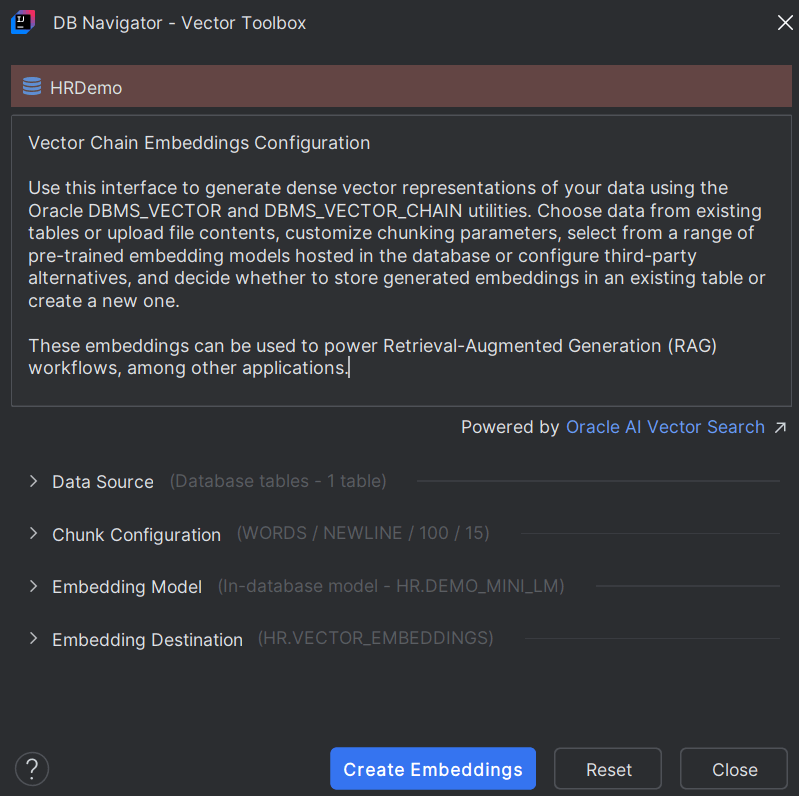
After successful generation, the vector embeddings get stored in the destination table you configured. The Embedding Result of the created vector embeddings is displayed in the DB Execution Console window.
- Vector Embedding Results
This topic explains the results of vector embeddings as seen in the DB Execution console window of the Database Navigator plug-in.
Parent topic: Vector Toolbox