2 Configuring HSM

The HSM can be configured to protect keys, work in a classic primary-standby setup, or in a Multi-Master Cluster.

2.1 Protect the Oracle Key Vault TDE Master Key with the HSM

To protect the TDE master key with the HSM, do the following:
  1. Log into the Oracle Key Vault management console as a user with system administrative privileges.
    The Oracle Key Vault Home page appears.
  2. Click the System tab.
    The Status page appears.
  3. Click Hardware Security Module in the left sidebar.
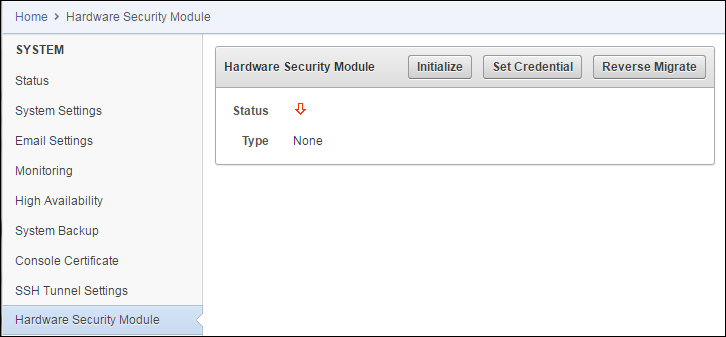
    The Hardware Security Module page appears. The red downward arrow shows the non-initialized Status . The Type field displays None.
    Description of hsm_page.png follows
    Description of the illustration hsm_page.png
  4. Click Initialize.
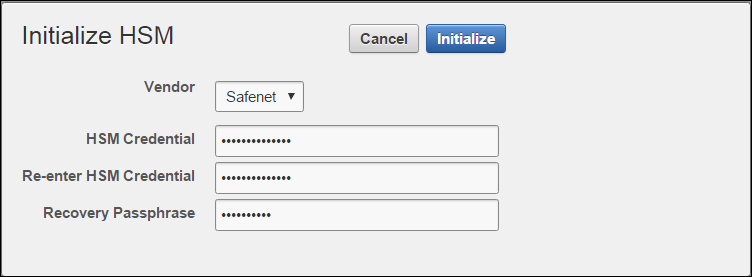
    The Initialize HSM screen appears.
    Description of hsm_init_bp3.png follows
    Description of the illustration hsm_init_bp3.png
  5. Enter the HSM credential two times: first in HSM Credential and second in Re-enter HSM Credential.
  6. Enter the Recovery Passphrase for Oracle Key Vault.
  7. Click Initialize.
    At the end of a successful initialize operation, the Hardware Security Module page appears. The initialized Status is indicated by an upward green arrow. The Type field displays details of the HSM in use.
    Description of hsm_post_init.png follows
    Description of the illustration hsm_post_init.png
  8. If you have implemented nCipher Hardware Security Module (HSM), run the following command as user oracle:
    oracle$ /opt/nfast/bin/rfs-sync --commit 
If the initialize operation fails you will be redirected to the Hardware Security Module page with non-initialized Status and Type None.

Note:

If you change the HSM credential on the HSM after initialization, you must also update the HSM credential on the Oracle Key Vault server using the Set Credential command.

2.2 Enable HSM in a Primary-Standby Oracle Key Vault Installation

In a primary-standby Oracle Key Vault installation you must enable HSM separately on the servers you mean to designate as primary and standby before pairing them in a primary-standby configuration.

If you are enabling primary-standby using a nCipher HSM, see Vendor Specific Notes - nCipher for more instructions.

To enable HSM in a primary-standby deployment, do the following:

  1. Install two separate Oracle Key Vault instances.
  2. Choose one to be the primary node and the other to be the standby node.
  3. Install the HSM client software on both the primary and the standby node.
  4. Enroll the primary and standby nodes as clients of HSM.
  5. Initialize HSM use on the primary. Log in to the designated primary server through SSH as user support, switch user (su) to root, then switch user (su) to oracle.
    $ ssh support@okv_primary_instance
    <Enter password when prompted>
    $ su root
    root# su oracle
  6. Perform the following manual steps on the primary server as user oracle:
    oracle$ cd /usr/local/okv/hsm/wallet
    oracle$ scp cwallet.sso support@okv_standby_instance:/tmp
    oracle$ scp enctdepwd support@okv_standby_instance:/tmp
    oracle$ cd /usr/local/okv/hsm/restore
    oracle$ scp ewallet.p12 support@okv_standby_instance:/tmp
  7. Log in to the designated standby server through SSH as user support, then switch user (su) to root.
    $ ssh support@okv_standby_instance
    <Enter password when prompted>
    $ su root
    
  8. Open the okv_security.conf file.

    A sample okv_security.conf file before enabling HSM mode:

    SNMP_ENCRYPTION_PWD="snmp_encryption_password" 
    SNMP_AUTHENTICATION_PWD="snmp_auth_password" 
    SNMP_USERNAME="snmpuser" 
    SMTP_TRUSTSTORE_PWD="smtp_truststore_password" 
    HSM_ENABLED="0" 
    FIPS_ENABLED="0" 
    HSM_FIPS_ENABLED="1"

    In Oracle Key Vault 12.2.0.6.0 and later, the file okv_security.conf contains FIPS_ENABLED="0". In 18.1.0.0.0 and later, the file okv_security.conf contains HSM_FIPS_ENABLED="1". The FIPS_ENABLED option did not exist for versions prior to 12.2.0.6.0.

  9. Enable the HSM_ENABLED parameter in the okv_security.conf file.
    $ cd /usr/local/okv/hsm/wallet
    $ mv /tmp/enctdepwd .
    $ mv /tmp/cwallet.sso .
    $ chown oracle *
    $ chgrp oinstall *
    $ cd /usr/local/okv/hsm/restore
    $ mv /tmp/ewallet.p12 .
    $ chown oracle *
    $ chgrp oinstall *
    $ vi /usr/local/okv/etc/okv_security.conf
       Set HSM_ENABLED="1"
       Set HSM_PROVIDER="<provider value>"
    

    Save and quit by entering the following sequence of characters in the vi file: :wq!

    After enabling HSM the okv_security.conf file should look like this:

    SNMP_ENCRYPTION_PWD="snmp_encryption_password" 
    SNMP_AUTHENTICATION_PWD="snmp_auth_password" 
    SNMP_USERNAME="snmpuser" 
    SMTP_TRUSTSTORE_PWD="smtp_truststore_password" 
    HSM_ENABLED="1" 
    HSM_PROVIDER="<provider value>"

    In Oracle Key Vault 12.2.0.6.0 and later, the okv_security.conf file contains an additional parameter:

    FIPS_ENABLED="0"

    In Oracle Key Vault 12.2.0.6.0 and later, the file okv_security.conf contains FIPS_ENABLED="0". In 18.1.0.0.0 and later, the file okv_security.conf contains HSM_FIPS_ENABLED="1". The FIPS_ENABLED option did not exist for versions prior to 12.2.0.6.0.

    Check vendor-specific notes for the specific provider value to use.

  10. Then, without restarting the OKV instances, navigate to the primary and standby management consoles and configure primary-standby.

2.3 HSM in a Multi-Master Cluster

In an Oracle Key Vault installation with HSM enabled, the HSM stores a top-level encryption key, thereby acting as a Root of Trust (RoT) that protects encryption keys used by OKV. HSMs are built with specialized tamper-resistant hardware which is harder to access than normal servers. This protects the RoT and makes it difficult to extract, lowering the risk of compromise. In addition HSMs can be used in FIPS 140-2 Level 3 mode which can help meet certain compliance requirements.

Note:

An existing Oracle Key Vault deployment cannot be migrated to use an HSM as a Root of Trust.

In a Multi-Master OKV installation, any OKV node in the cluster can use any HSM. The nodes in the Multi-Master cluster may use different TDE wallet passwords, Root of Trust keys, and HSM credentials.

Note:

To ensure complete security, all OKV nodes within the cluster must be HSM-enabled.

2.3.1 Set up HSM for a Multi-Master Cluster with a Single Node

If you want to use a HSM with a Multi-Master Cluster, it is strongly recommended that you start with a single HSM-enabled node and add additional HSM-enabled nodes, as described in this section.

The following are the recommended steps to set up HSM for a Multi-Master cluster with a single node:

  • Configure the first node of the cluster.
  • Configure HSM on the first node before adding any new nodes. If there is already more than one node in the cluster, follow the steps described below.
  • HSM-enable the Oracle Key Vault servers that are going to be added to the cluster.
  • Add the HSM-enabled nodes to the cluster. If any node in the cluster is already HSM-enabled, you cannot add a new node that is not HSM-enabled.

2.3.2 Set up HSM for a Multi-Master Cluster with Multiple Nodes

Please note that Set up HSM for a Multi-Master Cluster with a Single Node is the recommended method for setting up HSM for a Multi-Master Cluster.

If the first node to be HSM-enabled is in a cluster that already has multiple nodes, information has to be manually copied from that HSM-enabled OKV to all of the other OKVs in the cluster before HSM-enabling any other nodes.

If the first node to be HSM-enabled has a downstream peer, the downstream peer will not be able to decrypt the information from the HSM-enabled node until the bundle is copied and applied successfully to the downstream peer.

The following are the recommended steps to set up HSM for a Multi-Master cluster with multiple nodes:

  • Configure HSM on a node of the cluster.

  • On the HSM-enabled node, click Create Bundle on the HSM page.

  • Log in to the HSM node through SSH as user support.

    ssh support@hsm_enabled_node
    <Enter password when prompted>
  • Switch to the root user.
    su root
    <Enter password when prompted>
  • To copy the bundle to the /usr/local/okv/hsm location on each of the other nodes using the IP address:

    scp /usr/local/okv/hsm/hsmbundle support@ip_address:/tmp
  • Log in to each node in the cluster using the IP address (except the original HSM-enabled node):

    ssh support@ip_address
    <Enter password when prompted>
    
  • Switch to the root user.
    su root
    <Enter password when prompted>
  • Perform the following steps on each node:

    cp /tmp/hsmbundle /usr/local/okv/hsm/
    chown oracle:oinstall /usr/local/okv/hsm/hsmbundle
  • On each node except the original HSM-enabled node, click Apply Bundle on the HSM page. The bundle must be applied immediately on all nodes before reverse migrating this node. Proceed to HSM-enable each of these nodes in the same way that the first node was HSM-enabled. After all of the nodes have been HSM-enabled and replication between all nodes has been verified, remove the hsmbundle files from all of the nodes.

2.4 Backup and Restore in HSM Mode

You can backup and restore Oracle Key Vault with HSM mode enabled.

2.4.1 Backup in HSM Mode

Backing up Oracle Key Vault data in HSM mode is the same as backing up in non-HSM mode. So proceed in the usual way to take a backup.

2.4.2 Restore in HSM Mode

Only backups taken in HSM mode can be restored onto an HSM-enabled Oracle Key Vault. Before you restore a backup onto a system, you must ensure that the system can access both the:
  • HSM

  • Root of Trust used to take the backup

You must therefore have installed the HSM on the Oracle Key Vault server and enrolled Oracle Key Vault as a client of HSM prior to this step. If the backup was taken on an HSM-enabled cluster node, then when restoring the backup to a standalone server, the server must have access to the same HSM as the node on which the backup was taken.
To prepare the system for restore, do the following:
  1. Log into the Oracle Key Vault management console as a user with system administrative privileges.
    The Oracle Key Vault Home page appears.
  2. Click the System tab.
    The Status page appears.
  3. Click Hardware Security Module in the left sidebar.
    The Hardware Security Module page appears. On restore, the Status is disabled first, then enabled after the restore completes.
  4. Click Set Credential.
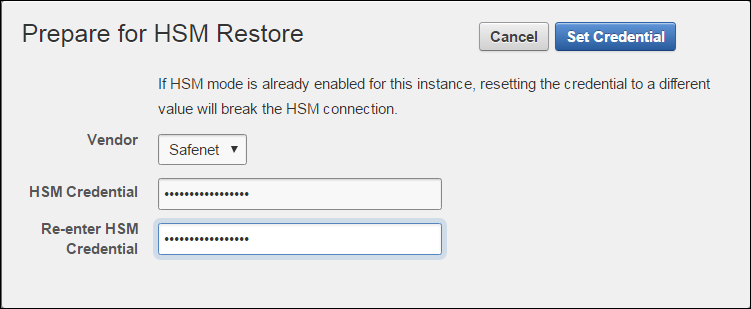
    The Prepare for HSM Restore screen appears.
    Description of hsm_set_cred_bp3.png follows
    Description of the illustration hsm_set_cred_bp3.png
  5. Enter the HSM credential two times: first in HSM Credential and second in Re-enter HSM Credential.
  6. Click Set Credential.

    Caution:

    In Oracle Key Vault 12.2.0.5.0 and earlier, to successfully restore HSM, you must enter the HSM credential correctly. If you enter an incorrect credential for the HSM, you will disable the HSM. In this situation you must reset the credential to its proper value immediately, by re-entering the correct HSM credential and clicking Set Credential. If the Oracle Key Vault server is rebooted before resetting the credential, Oracle Key Vault will become inoperable and will need to be restored from backup.

    In Oracle Key Vault 12.2.0.6.0 and later with HSM mode enabled, if you enter an incorrect credential for the HSM, the previous credential will continue to be stored and used. If HSM mode is not enabled, and you enter an incorrect credential for the HSM, the incorrect credential is not stored.

    The HSM credential will be stored in the system. This HSM credential must be entered manually to do an HSM restore because it is not stored in the backup itself.
  7. Go to the Restore page via the Oracle Key Vault user interface and restore the backup as usual.

2.5 Reverse Migrating to Local Wallet

The HSM reverse migrate procedure allows you to disable the HSM and go back to a local wallet protected by the Recovery Passphrase. The purpose of reverse migrate is to revert back to a local wallet protected by the Recovery Passphrase. This will be necessary if an HSM currently protecting Oracle Key Vault needs to be decommissioned.

2.5.1 Reverse Migrating a Standalone Deployment

To reverse migrate a standalone deployment, do the following:
  1. Log into the Oracle Key Vault management console as a user with system administrative privileges.
    The Oracle Key Vault Home page appears.
  2. Click the System tab.
    The Status page appears.
  3. Click Hardware Security Module in the left sidebar.
    The Hardware Security Module page appears.
  4. Click Reverse Migrate.

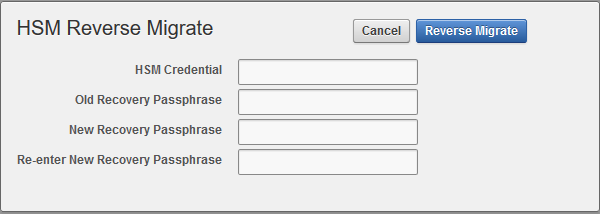
    The HSM Reverse Migrate screen is displayed.


    Description of hsm_reverse_migrate.png follows
    Description of the illustration hsm_reverse_migrate.png

    On the HSM Reverse Migrate screen, enter the following details:

    • Enter the HSM credential.

    • Enter the old Recovery Passphrase.

    • Enter the new Recovery Passphrase in the New Recovery Passphrase and Re-enter New Recovery Passphrase fields.

  5. Click Reverse Migrate
    The Hardware Security Module page appears. The red downward arrow indicates the Status.

2.5.2 Reverse Migrating a Primary-Standby Deployment

Perform the following procedure to reverse migrate a primary-standby deployment (Oracle Key Vault 12.2.0.6.0 and later).

To reverse migrate a primary-standby deployment (Oracle Key Vault 12.2.0.6.0 and later), do the following:
  1. On the Primary server, log into the Oracle Key Vault management console as a user with system administrative privileges.
    The Oracle Key Vault Home page appears.
  2. Click the System tab.
    The Status page appears.
  3. Click Hardware Security Module in the left sidebar.
    The Hardware Security Module page appears.
  4. Click Reverse Migrate.

    The HSM Reverse Migrate screen is displayed.

    Description of hsm_reverse_migrate.png follows
    Description of the illustration hsm_reverse_migrate.png

    On the HSM Reverse Migrate screen, enter the following details:

    • Enter the HSM credential.

    • Enter the Recovery Passphrase.

  5. Click Reverse Migrate
    The Hardware Security Module page appears. The red downward arrow indicates the Status.
  6. On the Standby server, log in to the Oracle Key Vault Server through SSH as user support, then switch user (su) to root.
    $ ssh support@okv_standby_instance
    <Enter password when prompted> 
    $ su root
  7. Modify the okv_security.conf file.
    $ vi /usr/local/okv/etc/okv_security.conf
    • Delete the line HSM_PROVIDER="<provider value>".

    • Change the value of the parameter HSM_ENABLED to "0".

    Save and quit by entering the following sequence of characters in the vi file: :wq!

  8. On the standby server, remove the following files:
    $ cd /usr/local/okv/hsm/wallet
    $ rm -f cwallet.sso enctdepwd
    $ cd /usr/local/okv/hsm/restore
    $ rm -f cwallet.sso ewallet.p12
    $ cd /mnt/okvram
    $ rm -f cwallet.sso ewallet.p12
    $ cd /mnt/okvram/restore
    $ rm -f cwallet.sso ewallet.p12
    $ cd /usr/local/okv/tde
    $ rm -f cwallet.sso
  9. Switch user (su) to oracle:
    $ su oracle
  10. Run the following command:
    /var/lib/oracle/dbfw/bin/orapki wallet create -wallet /usr/local/okv/tde -auto_login
  11. Enter the new Recovery Passphrase specified in Step 4.
The primary-standby deployment is successfully reverse migrated.

2.5.3 Reverse Migrating a Multi-Master Cluster

To reverse migrate a node in a Multi-Master Cluster, do the following:
  1. Log into the Oracle Key Vault management console as a user with system administrative privileges.
    The Oracle Key Vault Home page appears.
  2. Click the System tab.
    The Status page appears.
  3. Click Hardware Security Module in the left sidebar.
    The Hardware Security Module page appears.
  4. Click Reverse Migrate.

    The HSM Reverse Migrate screen is displayed.


    Description of hsm_reverse_migrate_mmc.png follows
    Description of the illustration hsm_reverse_migrate_mmc.png

    On the HSM Reverse Migrate screen, enter the following details:

    • Enter the HSM credential.

    • Enter the Recovery Passphrase.

  5. Click Reverse Migrate
    The Hardware Security Module page appears. The red downward arrow indicates the Status.