9 Managing Oracle Key Vault Endpoints
Oracle Key Vault endpoints are computer systems like database or application servers, where keys and credentials are used to access data.
- Overview of Managing Endpoints
You can manage endpoints in both standalone environments and multi-master clusters in much the same way, except that multi-master clusters have more restrictions. - Managing Endpoints
You can enroll, reenroll, suspend, and delete endpoints. - Default Wallets and Endpoints
You can use a default wallet, which is a type of virtual wallet, with an endpoint. - Managing Endpoint Access to a Virtual Wallet
You can grant an endpoint access to a virtual wallet, and revoke or modify access when it is no longer necessary. - Managing Endpoint Groups
An endpoint group is a named group of endpoints that share a common set of wallets. - Managing Endpoint Details
Endpoint details refers to endpoint name, type, description, platform, and email, and adding the endpoint to a group, or upgrading the endpoint software. - Upgrading Endpoints
You can perform endpoint upgrades from either the Oracle Key Vault management console login page or from the endpoint.
9.1 Overview of Managing Endpoints
You can manage endpoints in both standalone environments and multi-master clusters in much the same way, except that multi-master clusters have more restrictions.
- About Managing Endpoints
You must register and enroll an endpoint to communicate with Oracle Key Vault. - How a Multi-Master Cluster Affects Endpoints
There are restrictions on endpoints in a multi-master cluster.
Parent topic: Managing Oracle Key Vault Endpoints
9.1.1 About Managing Endpoints
You must register and enroll an endpoint to communicate with Oracle Key Vault.
Afterward, keys in the endpoint can be uploaded to Oracle Key Vault and be shared with other endpoints and then downloaded from these endpoints so that users can access their data. Only a user with the System Administrator role can add an endpoint to Oracle Key Vault. After the endpoint is added, the endpoint administrator can enroll the endpoint by downloading and installing the endpoint software at the endpoint. The endpoint can then use the utilities packaged with the endpoint software to upload and download security objects to and from Oracle Key Vault.
All users can create virtual wallets but only a user with Key Administrator role can grant endpoints access to security objects contained in virtual wallets. The Key Administrator can also create endpoint groups to enable shared access to virtual wallets. When you grant an endpoint group access to a virtual wallet, all the member endpoints will have access to the virtual wallet. For example, you can grant all the nodes in an Oracle Real Application Clusters (Oracle RAC) database access to a virtual wallet by putting them in an endpoint group. This saves you the step of granting each node access to the virtual wallet.
If you have a large deployment, then install at least four Oracle Key Vault servers, and when you enroll the endpoints, balance them across these four servers to ensure high availability. For example, if a data center has 1000 database endpoints to register, and you have Oracle Key Vault four servers to accommodate them, then enroll 250 endpoints with each of the four servers.
When you name an endpoint, remember that an Oracle Key Vault user name cannot be the same as an Oracle Key Vault endpoint name.
The two administrative roles as they pertain to endpoints are as follows:
- A user with the System Administrator role:
- Manages the endpoint metadata such as the name, type, platform, description, and email notifications
- Manages the endpoint lifecycle, which consists of enrolling, suspending, reenrolling, and deleting endpoints
- A user with the Key Administrator role:
- Manages the endpoint group lifecycle, which consists of creating, modifying, and deleting endpoint groups
- Manages the lifecycle of security objects, which consists of creating, modifying and deleting security objects
Parent topic: Overview of Managing Endpoints
9.1.2 How a Multi-Master Cluster Affects Endpoints
There are restrictions on endpoints in a multi-master cluster.
- An endpoint can only be enrolled from the same node where it was most recently created or re-enrolled.
- An endpoint gets its initial and subsequent endpoint node scan list update based on the cluster subgroup to which the creator node belongs. Oracle Key Vault creates the endpoint node scan list when you first add nodes from the same cluster subgroup as the creator node. Oracle Key Vault adds the other nodes later.
- You cannot assign a default wallet to an endpoint if one or both of them (wallet and endpoint) is in the
PENDINGstate and if the assignment is attempted from a non-creator node. After both the endpoint and wallet are in theACTIVEstate, this restriction ends.
Parent topic: Overview of Managing Endpoints
9.2 Managing Endpoints
You can enroll, reenroll, suspend, and delete endpoints.
- Types of Endpoint Enrollment
The first step in enrolling an endpoint is to add the endpoint to Oracle Key Vault. - Endpoint Enrollment in a Multi-Master Cluster
Endpoints of a cluster are the client systems of the multi-master cluster. - Adding an Endpoint as an Oracle Key Vault System Administrator
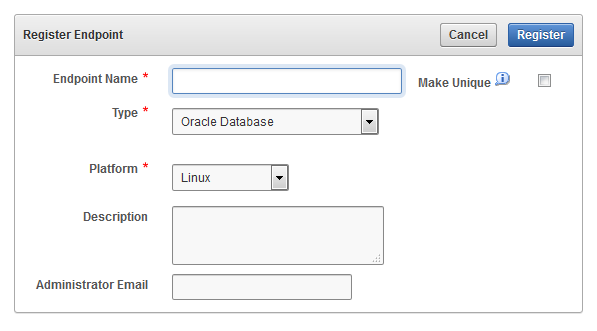
A user who has been granted the System Administrator role can add an endpoint by using the Endpoints tab. - Adding Endpoints Using Self-Enrollment
The self-enrollment process immediately sends the endpoint to the Enrolled status without the intermediate Registered status. - Deleting, Suspending, or Reenrolling Endpoints
When endpoints no longer use Oracle Key Vault to store security objects, you can delete them, and then re-enroll when they are needed.
Parent topic: Managing Oracle Key Vault Endpoints
9.2.1 Types of Endpoint Enrollment
The first step in enrolling an endpoint is to add the endpoint to Oracle Key Vault.
There are two methods for adding, also known as registering, an endpoint:
- Initiated by an administrator
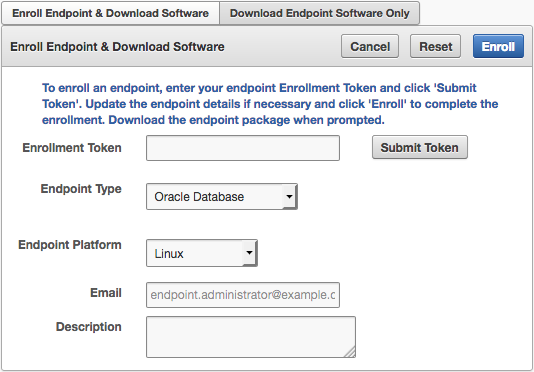
An Oracle Key Vault user who has the System Administrator role initiates the enrollment from the Oracle Key Vault side by adding the endpoint to Oracle Key Vault. When the endpoint is added, a one-time enrollment token is generated. This token can be communicated to the endpoint administrator in two ways:
- Directly from Oracle Key Vault by email. To use email notification you must configure SMTP in email settings.
- Out-of-band method, such as email or telephone.
The endpoint administrator uses the enrollment token to download the endpoint software and complete the enrollment process on the endpoint side. In a multi-master cluster, the same node that is used to add the endpoint must be used to enroll the endpoint.
After the enrollment token is used to enroll an endpoint, it cannot be used again for another enrollment. If you must reenroll an endpoint, then the reenrollment process will generate a new one-time enrollment token for this purpose.
- Self-enrolled
Endpoints may enroll themselves during specific times without human administrative intervention. Endpoint self-enrollment is useful when the endpoints do not share security objects, and use Oracle Key Vault primarily to store and restore their own security objects. Another use for endpoint self-enrollment is testing.
A self-enrolled endpoint is created with a generic endpoint name in this format:
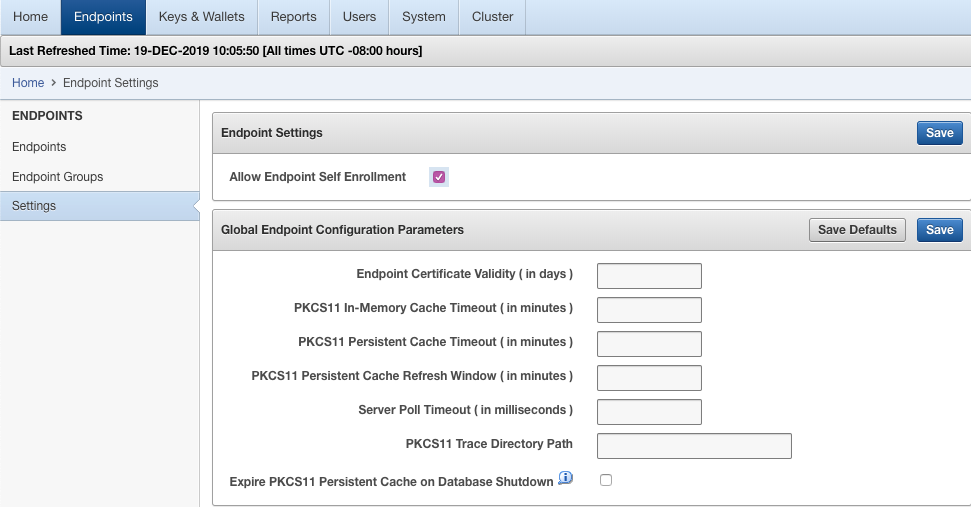
ENDPT_001. In a cluster, a self-enrolled endpoint is created with a generic endpoint name in this format:ENDPT_xx_001, wherexxis a 2-digit node identifier or node number. Initially, a self-enrolled endpoint has access only to the security objects that it uploads or creates. It does not have access to any virtual wallets. You can later grant the endpoint access to virtual wallets after verifying its identity.Endpoint self-enrollment is disabled by default, and must be enabled by a user with the System Administrator role. A best practice is to enable self-enrollment for short periods, when you expect endpoints to self enroll, and then disable it when the self-enrollment period ends.
Related Topics
Parent topic: Managing Endpoints
9.2.2 Endpoint Enrollment in a Multi-Master Cluster
Endpoints of a cluster are the client systems of the multi-master cluster.
Endpoint enrollment is divided into two steps. First you add the endpoint and then you enroll it.
The Oracle Key Vault server that becomes the initial node can have endpoints already enrolled, especially if it was upgraded from a previous release. These existing endpoints initialize, or seed, the cluster. During induction, the endpoints enrolled in the cluster are replicated to a newly added node. During induction, Oracle Key Vault removes endpoints that were previously enrolled in all candidate nodes added to the cluster.
Endpoints can only be enrolled on a read-write node.
Note:
An endpoint must be enrolled on the same node where it was most recently added or re-enrolled.New endpoints added concurrently to the multi-master cluster on different nodes could have name conflicts. Oracle Key Vault automatically resolves the endpoint name conflicts, and then displays the conflicts in a Conflicts Resolution page, similar to the following figure. From here, a system administrator can choose to rename them.
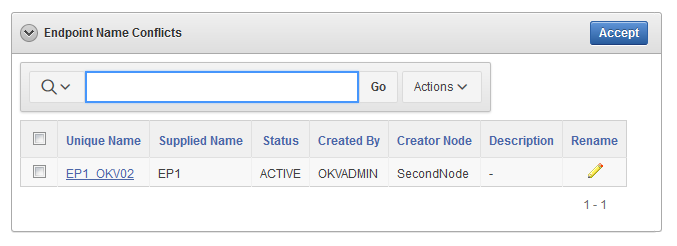
Description of the illustration endpoint-name-conflicts-screenshot.png
Related Topics
Parent topic: Managing Endpoints
9.2.3 Adding an Endpoint as an Oracle Key Vault System Administrator
A user who has been granted the System Administrator role can add an endpoint by using the Endpoints tab.
Parent topic: Managing Endpoints
9.2.4 Adding Endpoints Using Self-Enrollment
The self-enrollment process immediately sends the endpoint to the Enrolled status without the intermediate Registered status.
- About Adding Endpoints Using Self-Enrollment
Oracle Key Vault associates a self-enrolled attribute with all endpoints that are enrolled through endpoint self-enrollment. - Adding an Endpoint Using Self-Enrollment
You can configure the self-enrollment process for endpoints from the Oracle Key Vault management console.
Parent topic: Managing Endpoints
9.2.4.1 About Adding Endpoints Using Self-Enrollment
Oracle Key Vault associates a self-enrolled attribute with all endpoints that are enrolled through endpoint self-enrollment.
Self-enrolled endpoints go directly to Enrolled status without the intermediate Registered status when they download the endpoint software. You can recognize self-enrolled endpoints by their system generated names in the format ENDPT_001. In a multi-master cluster, system generated endpoint names are in the format ENDPT_node_id_sequential_number, where node_id is a value such as 01 or 02. For example, ENDPT_01_001 can be the generated name of an endpoint.
Endpoint self-enrollment is disabled by default and must be enabled by a user who has the System Administrator role.
A best practice is to enable endpoint self-enrollment for limited periods when you expect endpoints to enroll. After the expected endpoints have been enrolled, you should disable endpoint self-enrollment.
Parent topic: Adding Endpoints Using Self-Enrollment
9.2.4.2 Adding an Endpoint Using Self-Enrollment
You can configure the self-enrollment process for endpoints from the Oracle Key Vault management console.
Related Topics
Parent topic: Adding Endpoints Using Self-Enrollment
9.2.5 Deleting, Suspending, or Reenrolling Endpoints
When endpoints no longer use Oracle Key Vault to store security objects, you can delete them, and then re-enroll when they are needed.
- About Deleting Endpoints
Deleting an endpoint removes it permanently from Oracle Key Vault. - Deleting One or More Endpoints
The Endpoints page enables you to delete a group of endpoints from Oracle Key Vault at one time. - Deleting One Endpoint (Alternative Method)
The Endpoint Details page provides a consolidated view for the selected endpoint including a mechanism to delete the endpoint from Oracle Key Vault. - Suspending an Endpoint
You can suspend an endpoint temporarily for security reasons, and then reinstate the endpoint once the threat has passed. - Reenrolling an Endpoint
When you reenroll an endpoint, the enrollment process automatically upgrades the endpoint software.
Parent topic: Managing Endpoints
9.2.5.1 About Deleting Endpoints
Deleting an endpoint removes it permanently from Oracle Key Vault.
However, security objects that were previously created or uploaded by that endpoint will remain in Oracle Key Vault. Similarly, security objects that are associated with that endpoint also remain. To permanently delete or reassign these security objects, you must be a user with the Key Administrator role or authorized to merge these objects by managing wallet privileges. The endpoint software previously downloaded at the endpoint also remains on the endpoint until the endpoint administrator removes it.
You cannot delete an endpoint that is in the PENDING state unless you are the user who created it. You must delete it on the node on which it was created.
Parent topic: Deleting, Suspending, or Reenrolling Endpoints
9.2.5.2 Deleting One or More Endpoints
The Endpoints page enables you to delete a group of endpoints from Oracle Key Vault at one time.
Related Topics
Parent topic: Deleting, Suspending, or Reenrolling Endpoints
9.2.5.3 Deleting One Endpoint (Alternative Method)
The Endpoint Details page provides a consolidated view for the selected endpoint including a mechanism to delete the endpoint from Oracle Key Vault.
Related Topics
Parent topic: Deleting, Suspending, or Reenrolling Endpoints
9.2.5.4 Suspending an Endpoint
You can suspend an endpoint temporarily for security reasons, and then reinstate the endpoint once the threat has passed.
PENDING state unless you are the user who created it.
The following rules apply to suspending an endpoint in a multi-master cluster:
- For regular endpoints, the endpoint will continue to operate until all suspend operation requests have reached all nodes in the cluster.
- You can suspend the endpoint on any node.
- For cloud-based endpoints, the endpoint will continue to operate until the suspend operation has reached all nodes from where the reverse SSH tunnel is established.
- You can potentially suspend the endpoint on any node from the cloud-based endpoint from where the reverse SSH tunnel is established.
Related Topics
Parent topic: Deleting, Suspending, or Reenrolling Endpoints
9.2.5.5 Reenrolling an Endpoint
When you reenroll an endpoint, the enrollment process automatically upgrades the endpoint software.
okvclient.jar and deploy it in a directory that is separate from the existing deployment. When you deploy the software, use the -o option to overwrite the symbolic link pointing to the old okvclient.ora. You cannot reenroll an endpoint that is in the PENDING state unless you are the user who created it.
Related Topics
Parent topic: Deleting, Suspending, or Reenrolling Endpoints
9.3 Default Wallets and Endpoints
You can use a default wallet, which is a type of virtual wallet, with an endpoint.
- Associating a Default Wallet with an Endpoint
A default wallet is a type of virtual wallet to which security objects are uploaded when a wallet is not explicitly specified. - Setting the Default Wallet for an Endpoint
Setting a default wallet for an endpoint automatically uploads the endpoint's security objects to the wallet if another wallet is not explicitly specified.
Parent topic: Managing Oracle Key Vault Endpoints
9.3.1 Associating a Default Wallet with an Endpoint
A default wallet is a type of virtual wallet to which security objects are uploaded when a wallet is not explicitly specified.
Default wallets are useful for sharing with other endpoints such as nodes in an Oracle Real Application Clusters (Oracle RAC), or primary and standby nodes in Oracle Data Guard by having all endpoints use the same default wallet.
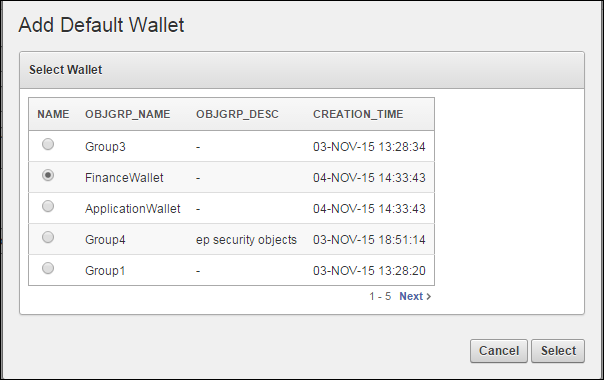
If you want to use the default wallet, then you must set after you register the endpoint before you enroll it. If you decide to use a default wallet after enrollment, then you must remove the default wallet and subsequently reenroll the endpoint.
An enrollment status of registered means that the endpoint has been added to Oracle Key Vault, but the endpoint software has not yet been downloaded and installed. When the status is registered, then you must associate the default wallet with the endpoint.
The endpoint's enrollment status becomes enrolled when you download and install the endpoint software to the endpoint. If you set the default wallet after you enroll the endpoint, then you must re-enroll the endpoint to ensure that all future security objects created by the endpoint are automatically associated with that wallet.
In a multi-master cluster, you can only assign the default wallet on the same node where the endpoint and wallet were created when either are still in the PENDING state. After both are in the ACTIVE state, then there are no restrictions. After the default wallet is assigned and the endpoint is enrolled, the default wallet can be accessed from any node, as long as both are in the ACTIVE state and the information has been replicated to that node.
Parent topic: Default Wallets and Endpoints
9.3.2 Setting the Default Wallet for an Endpoint
Setting a default wallet for an endpoint automatically uploads the endpoint's security objects to the wallet if another wallet is not explicitly specified.
Parent topic: Default Wallets and Endpoints
9.4 Managing Endpoint Access to a Virtual Wallet
You can grant an endpoint access to a virtual wallet, and revoke or modify access when it is no longer necessary.
- Granting an Endpoint Access to a Virtual Wallet
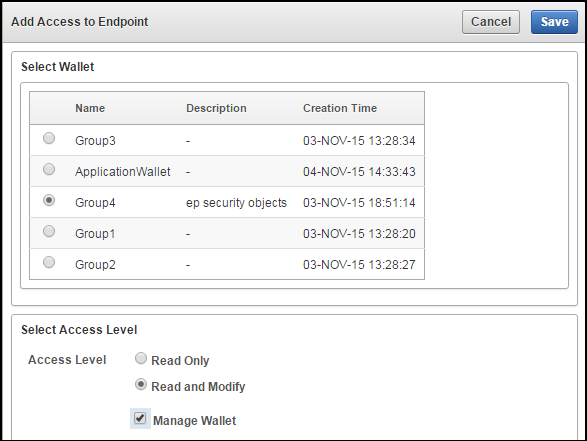
An endpoint must have Read and Modify and Manage Wallet privileges on the wallet before security objects can be uploaded or downloaded. - Revoking Endpoint Access to a Virtual Wallet
You can revoke access to a virtual wallet for an endpoint by using the Endpoints tab. - Viewing Wallet Items Accessed by Endpoints
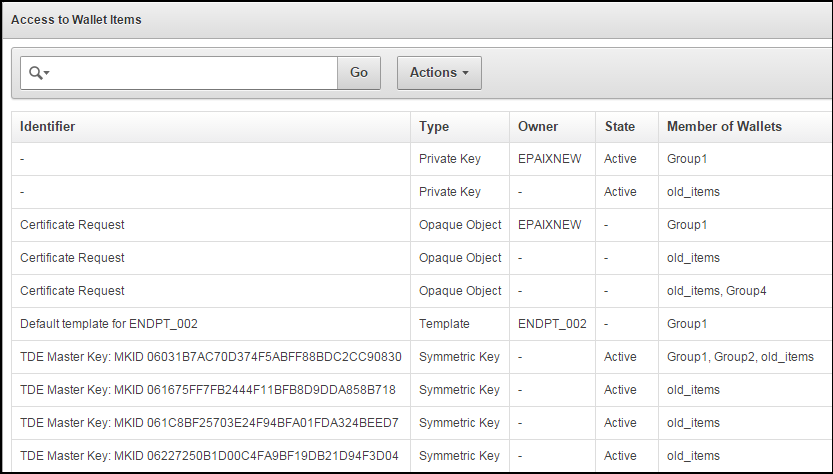
The term wallet items refers to the security objects to which the endpoint has access.
Parent topic: Managing Oracle Key Vault Endpoints
9.4.1 Granting an Endpoint Access to a Virtual Wallet
An endpoint must have Read and Modify and Manage Wallet privileges on the wallet before security objects can be uploaded or downloaded.
Related Topics
Parent topic: Managing Endpoint Access to a Virtual Wallet
9.4.2 Revoking Endpoint Access to a Virtual Wallet
You can revoke access to a virtual wallet for an endpoint by using the Endpoints tab.
Parent topic: Managing Endpoint Access to a Virtual Wallet
9.4.3 Viewing Wallet Items Accessed by Endpoints
The term wallet items refers to the security objects to which the endpoint has access.
Parent topic: Managing Endpoint Access to a Virtual Wallet
9.5 Managing Endpoint Groups
An endpoint group is a named group of endpoints that share a common set of wallets.
- How a Multi-Master Cluster Affects Endpoint Groups
You can create endpoint groups on any node and they will have a cluster-wide presence. - Creating an Endpoint Group
Endpoints that must share a common set of security objects stored in wallets can be grouped into an endpoint group. - Modifying Endpoint Group Details
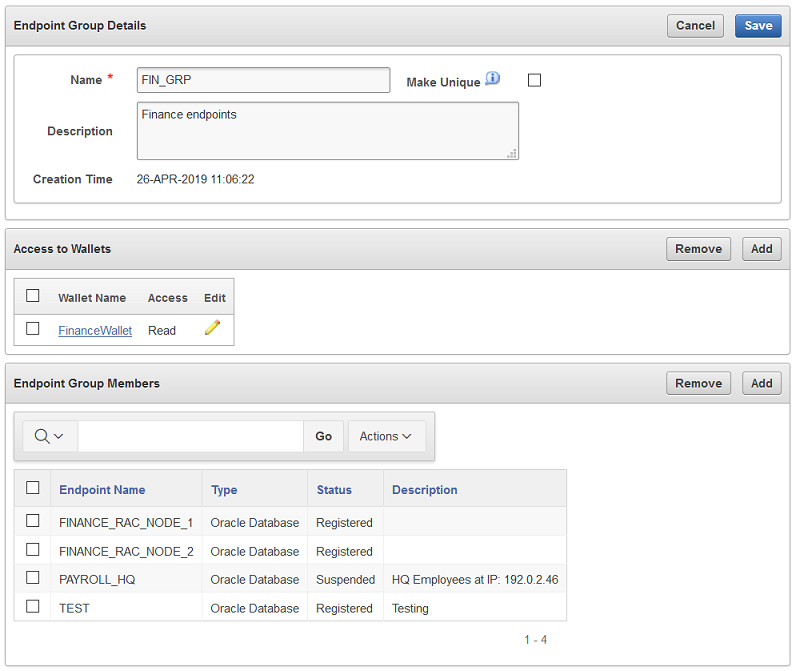
You can add endpoints and access mappings to an endpoint group after creating the endpoint group. - Granting an Endpoint Group Access to a Virtual Wallet
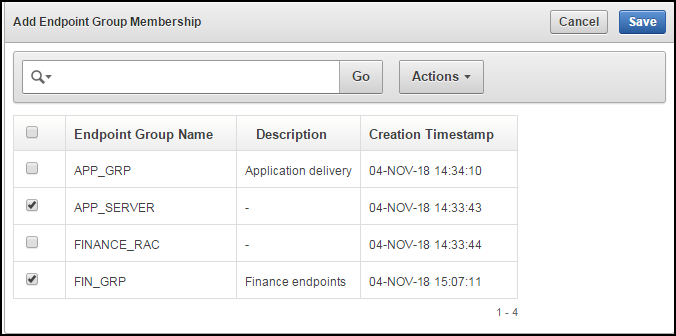
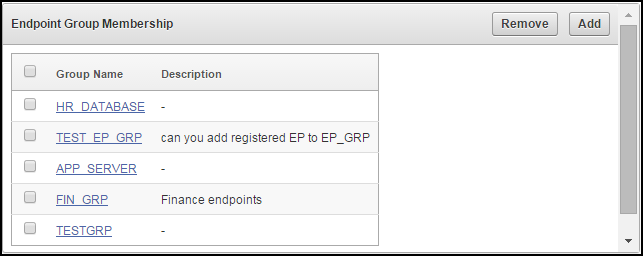
You can grant an endpoint group access to a virtual wallet. - Adding an Endpoint to an Endpoint Group
You can add an endpoint to a named endpoint group. - Removing an Endpoint from an Endpoint Group
When you remove an endpoint from an endpoint group, this removes access to wallets that are associated with that endpoint group. - Deleting Endpoint Groups
You can delete endpoint groups if their member endpoints no longer require access to the same virtual wallets.
Parent topic: Managing Oracle Key Vault Endpoints
9.5.1 How a Multi-Master Cluster Affects Endpoint Groups
You can create endpoint groups on any node and they will have a cluster-wide presence.
You can add, update, or delete endpoint groups in any node, but in read-write mode only.
The Oracle Key Vault server that becomes the initial node can have endpoints groups already created. These endpoint groups are used to initialize, or seed, the cluster. During induction, the endpoint groups in the cluster are replicated to a newly added node. Endpoint groups previously created in all other nodes added to the cluster will be removed during induction.
New endpoint groups added concurrently to the multi-master cluster on different nodes may have name conflicts. Oracle Key Vault automatically resolves any endpoint group name conflicts. These conflicts are displayed in a Conflicts Resolution page and key administrators can choose to rename them.
Related Topics
Parent topic: Managing Endpoint Groups
9.5.2 Creating an Endpoint Group
Endpoints that must share a common set of security objects stored in wallets can be grouped into an endpoint group.
For example, endpoints using Oracle Real Application Clusters (Oracle RAC), Oracle GoldenGate, or Oracle Active Data Guard may need to share keys for access to shared data.
- Log in to the Oracle Key Vault management console as a user who has the Key Administrator role.
- Select the Endpoints tab, then Endpoint Groups.
The Endpoint Groups page appears.
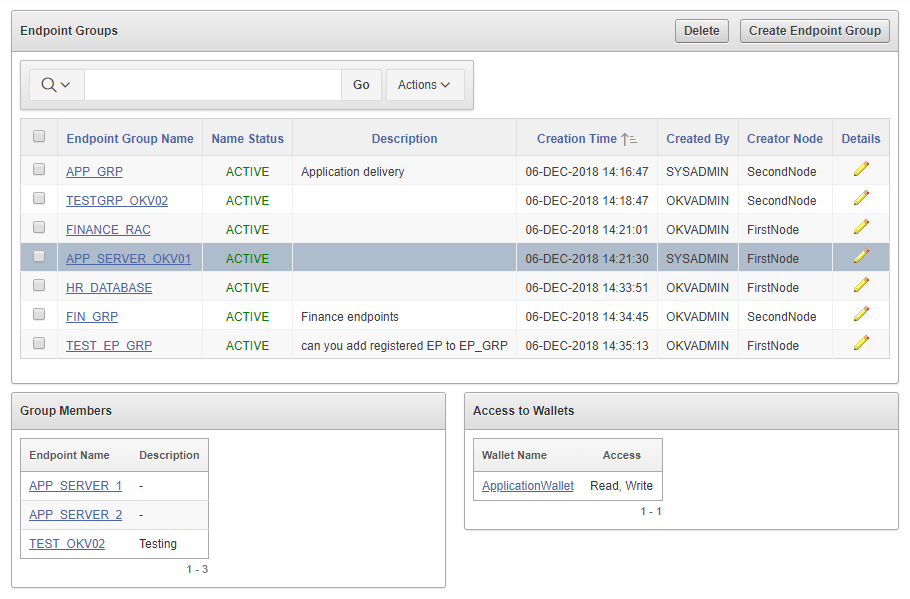
Description of the illustration endpoint-groups-screenshot.png - Click Create Endpoint Group.
The Create Endpoint Group page appears.
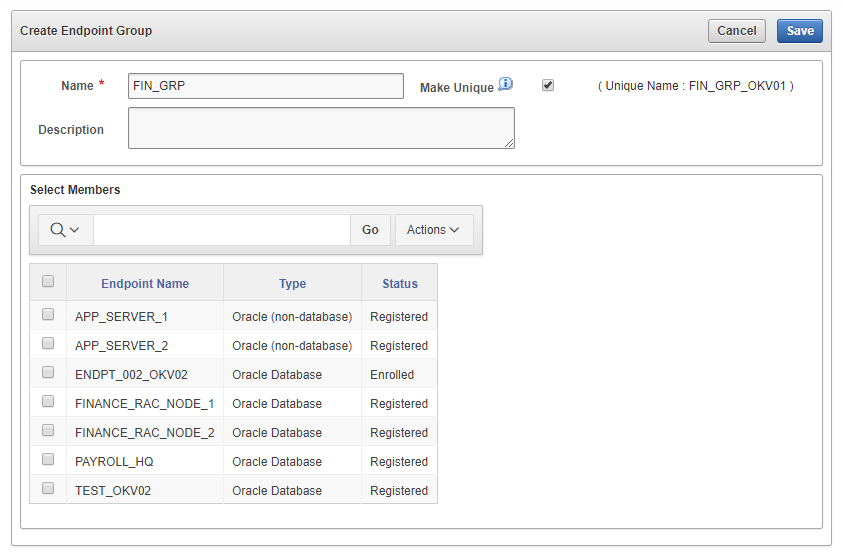
Description of the illustration create-endpoint-group-screenshot.png - Enter the name of the new group and a brief description.
- If you are using a multi-master cluster, then choose whether to select the Make Unique checkbox.
Make Unique helps to control naming conflicts with names across the multi-master cluster environment. Endpoint groups that were created before an Oracle Key Vault conversion to a cluster node are not affected by naming conflicts.
- If you select Make Unique, then the endpoint group will be active immediately and users can use this endpoint group. Clicking Make Unique also displays a list of endpoints that you can add to the endpoint group.
- If you do not select Make Unique, then the endpoint group will be created in the
PENDINGstate. Oracle Key Vault will then begin a name resolution operation and may rename the endpoint group to a name that is unique across the cluster. If there is a naming collision, then the collision will be reported on the Conflicts page on any node in the cluster. The endpoint group will then be renamed to a unique name. You will need to go to a read-write node of the cluster and either accept the renamed endpoint group or change the endpoint name. If you change the endpoint group name, then this will restart the name resolution operation and the endpoint group will return to aPENDINGstate. An endpoint group in thePENDINGstate cannot be used to perform most operations.
- In the Select Members pane, which lists all the endpoints, check the boxes to the left of each endpoint to add the endpoint to the group.
- Click Save to complete creating the endpoint group.
The new endpoint group now appears in the Endpoint Groups page.
Related Topics
Parent topic: Managing Endpoint Groups
9.5.3 Modifying Endpoint Group Details
You can add endpoints and access mappings to an endpoint group after creating the endpoint group.
Parent topic: Managing Endpoint Groups
9.5.4 Granting an Endpoint Group Access to a Virtual Wallet
You can grant an endpoint group access to a virtual wallet.
PENDING state to a virtual wallet.
Parent topic: Managing Endpoint Groups
9.5.5 Adding an Endpoint to an Endpoint Group
You can add an endpoint to a named endpoint group.
PENDING state to an endpoint group. Also, you cannot add an endpoint to an endpoint group that is in the PENDING state.
Related Topics
Parent topic: Managing Endpoint Groups
9.5.6 Removing an Endpoint from an Endpoint Group
When you remove an endpoint from an endpoint group, this removes access to wallets that are associated with that endpoint group.
PENDING state.
Parent topic: Managing Endpoint Groups
9.5.7 Deleting Endpoint Groups
You can delete endpoint groups if their member endpoints no longer require access to the same virtual wallets.
PENDING state if it has no members or access to wallets.
Parent topic: Managing Endpoint Groups
9.6 Managing Endpoint Details
Endpoint details refers to endpoint name, type, description, platform, and email, and adding the endpoint to a group, or upgrading the endpoint software.
- About Endpoint Details
The Endpoint Details page provides a consolidated view of the endpoint. - Modifying Endpoint Details
You can modify the endpoint name, endpoint type, description, platform, and email. - Global Endpoint Configuration Parameters
Oracle Key Vault provides endpoint-specific configuration parameters that you can set in the Oracle Key Vault management console.
Parent topic: Managing Oracle Key Vault Endpoints
9.6.1 About Endpoint Details
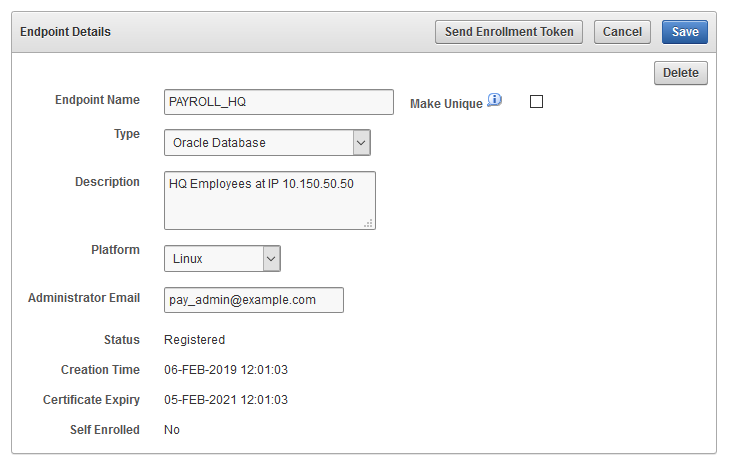
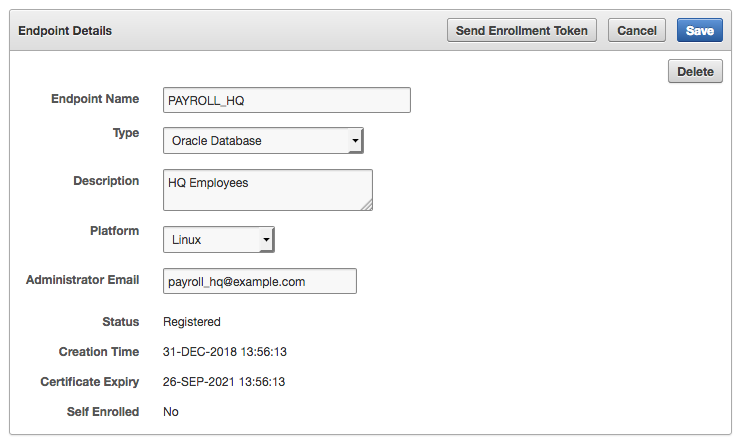
The Endpoint Details page provides a consolidated view of the endpoint.
To access this page, you can select the Endpoints tab and then click the name of an endpoint. From here you can modify endpoint details and complete endpoint management tasks.
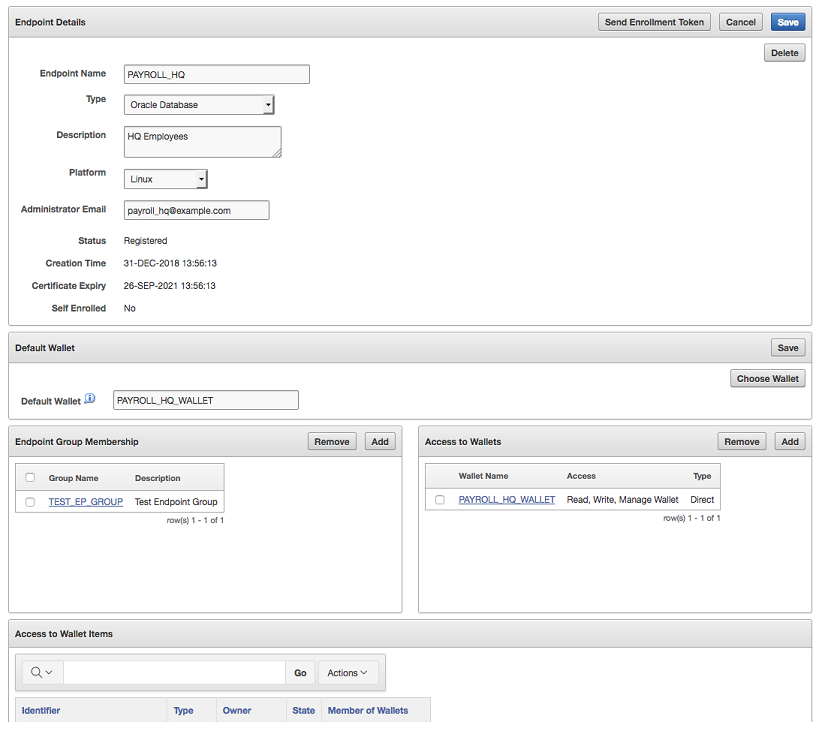
Description of the illustration screenshot-9.6.1.png
Parent topic: Managing Endpoint Details
9.6.2 Modifying Endpoint Details
You can modify the endpoint name, endpoint type, description, platform, and email.
PENDING state by the creator on the node on which it was created.
Parent topic: Managing Endpoint Details
9.6.3 Global Endpoint Configuration Parameters
Oracle Key Vault provides endpoint-specific configuration parameters that you can set in the Oracle Key Vault management console.
- About Global Endpoint Configuration Parameters
Users who have the System Administrator role can centrally update certain endpoint configuration parameters in the Oracle Key Vault management console. - Setting Global Endpoint Configuration Parameters
You can set global endpoint configuration parameters in the Oracle Key Vault management console.
Parent topic: Managing Endpoint Details
9.6.3.1 About Global Endpoint Configuration Parameters
Users who have the System Administrator role can centrally update certain endpoint configuration parameters in the Oracle Key Vault management console.
This feature enables system administrators to set certain endpoint configuration parameters globally, that is, for all endpoints, or on a per-endpoint basis. It simplifies the process of managing multiple endpoints for system administrators.
Endpoint-specific parameters take precedence over global parameters. Global parameters take effect when endpoint-specific parameters are cleared. Oracle Key Vault uses the default system parameters if both global and endpoint specific parameters are cleared or not set from Oracle Key Vault management console.
The configuration parameter values set in the Oracle Key Vault management console are applied to endpoints dynamically. The next time that the endpoint contacts Oracle Key Vault server, the updated configuration parameters are applied to the endpoint. If there is an error, then the update is not applied. Both okvutil and the PKCS11 library can access and apply the endpoint configuration updates.
In a multi-master cluster, replication of configuration parameters depends on the replication lag. It is possible that an endpoint will not be able to get an update immediately because the node to which it is connected may not yet have received the new values of the parameters. The endpoint will refresh its configuration when it connects to a node that has new values or if it hasn't refreshed its configuration in the past hour.
Parent topic: Global Endpoint Configuration Parameters
9.6.3.2 Setting Global Endpoint Configuration Parameters
You can set global endpoint configuration parameters in the Oracle Key Vault management console.
Parent topic: Global Endpoint Configuration Parameters
9.7 Upgrading Endpoints
You can perform endpoint upgrades from either the Oracle Key Vault management console login page or from the endpoint.
- Upgrading Endpoint Software from an Unenrolled Endpoint
You can upgrade the endpoint software from the Oracle Key Vault management console login window. - Upgrading Endpoint Software on an Enrolled Endpoint
You should upgrade the endpoint software on an enrolled endpoint any time you upgraded to a new release of Oracle Key Vault.
Parent topic: Managing Oracle Key Vault Endpoints
9.7.1 Upgrading Endpoint Software from an Unenrolled Endpoint
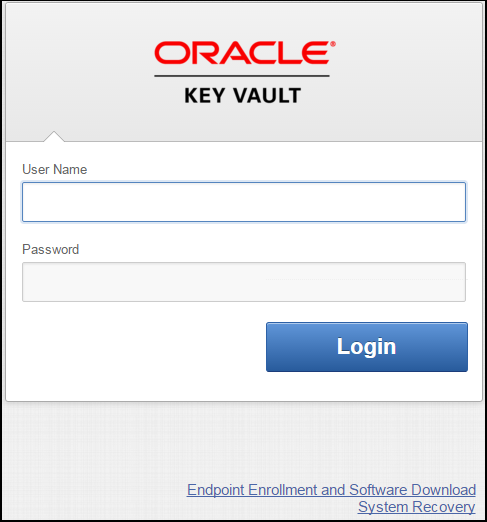
You can upgrade the endpoint software from the Oracle Key Vault management console login window.
- Step 1: Prepare the Unenrolled Endpoint Environment
Ensure that you have the correct privileges and that the endpoint has the correct configuration, such as Oracle environment variables. - Step 2: Download the Oracle Key Vault Software onto the Unenrolled Endpoint
To upgrade the endpoint software for an enrolled endpoint, you can download the endpoint software without having to reenroll the endpoint. - Step 3: Install the Oracle Key Vault Software onto the Unenrolled Endpoint
To upgrade the endpoint software for an enrolled endpoint, you can download the endpoint software without having to reenroll the endpoint. - Step 4: Perform Post-Installation Tasks
After you complete the installation, you can configure a TDE connection for the endpoint and verify that the endpoint software was installed correctly.
Parent topic: Upgrading Endpoints
9.7.1.1 Step 1: Prepare the Unenrolled Endpoint Environment
Ensure that you have the correct privileges and that the endpoint has the correct configuration, such as Oracle environment variables.
Parent topic: Upgrading Endpoint Software from an Unenrolled Endpoint
9.7.1.2 Step 2: Download the Oracle Key Vault Software onto the Unenrolled Endpoint
To upgrade the endpoint software for an enrolled endpoint, you can download the endpoint software without having to reenroll the endpoint.
9.7.1.3 Step 3: Install the Oracle Key Vault Software onto the Unenrolled Endpoint
To upgrade the endpoint software for an enrolled endpoint, you can download the endpoint software without having to reenroll the endpoint.
9.7.1.4 Step 4: Perform Post-Installation Tasks
After you complete the installation, you can configure a TDE connection for the endpoint and verify that the endpoint software was installed correctly.
Parent topic: Upgrading Endpoint Software from an Unenrolled Endpoint
9.7.2 Upgrading Endpoint Software on an Enrolled Endpoint
You should upgrade the endpoint software on an enrolled endpoint any time you upgraded to a new release of Oracle Key Vault.
okvclient.jar on the endpoint. You do not need to re-enroll the endpoint.
Parent topic: Upgrading Endpoints

