5 Managing Oracle Key Vault Multi-Master Clusters
You can create, configure, manage, and administer an Oracle Key Vault multi-master cluster by using the Oracle Key Vault management console.
- About Managing Oracle Key Vault Multi-Master Clusters
You can add or remove nodes from the cluster, disable or enable cluster nodes, and manage activities such as node conflicts and replication. - Creating the First (Initial) Node of a Cluster
To create a cluster, you must convert an existing standalone Oracle Key Vault server to become the first node in the cluster. - Adding a Node to the Cluster
You can create a read-write pair of nodes or a read-only node. - Terminating the Pairing of a Node
On the controller node, you can terminate the pairing process for a new node. - Disabling a Cluster Node
You can temporarily disable a cluster node, which is required for upgrades and maintenance. - Enabling a Disabled Cluster Node
You can enable any cluster node that was previously disabled. You must perform this operation from the disabled node. - Deleting a Cluster Node
You can permanently delete a node from the cluster. - Force Deleting a Cluster Node
You can permanently force delete a node from a cluster that is dead, unresponsive, or has exceeded the maximum disabled node time limit. - Managing Replication Between Nodes
You can enable and disable node replication from the Oracle Key Vault management console. - Cluster Management Information
The Cluster Management page provides a concise overview of the cluster and the status of each node. - Cluster Monitoring Information
The Cluster Monitoring page provides the replication health of the cluster and the current node. - Naming Conflicts and Resolution
Oracle Key Vault can resolve naming conflicts that can arise as users create objects such as endpoints, endpoint groups, and user groups. - Multi-Master Cluster Deployment Recommendations
Oracle provides deployment recommendations for deployments that have two or more nodes.
5.1 About Managing Oracle Key Vault Multi-Master Clusters
You can add or remove nodes from the cluster, disable or enable cluster nodes, and manage activities such as node conflicts and replication.
Parent topic: Managing Oracle Key Vault Multi-Master Clusters
5.2 Creating the First (Initial) Node of a Cluster
To create a cluster, you must convert an existing standalone Oracle Key Vault server to become the first node in the cluster.
This first node is called the initial node. The standalone Oracle Key Vault server can also be a server that has been upgraded to Oracle Key Vault release 18.1 or later from a previous release or can also be the server that is unpaired from a primary-standby configuration. Check Oracle Key Vault Release Notes for known issues about unpair operations and upgrades.
You can use this node to add one or more nodes to the cluster. The node operates in read-only restricted mode until it is part of a read-write pair.
5.3 Adding a Node to the Cluster
You can create a read-write pair of nodes or a read-only node.
- Creating a Read-Write Pair of Nodes in a Cluster
After you create the initial node, you must add an additional read-write peer to the cluster. - Creating a Read-Only Node in a Cluster
To add a new read-only cluster node, you pair any existing cluster node with a newly configured server. - Creating an Additional Read-Write Pair in a Cluster
Any node can be read-write paired with only one other node, and there can be multiple read-write pairs in a cluster.
Parent topic: Managing Oracle Key Vault Multi-Master Clusters
5.3.1 Creating a Read-Write Pair of Nodes in a Cluster
After you create the initial node, you must add an additional read-write peer to the cluster.
You can configure any two nodes as a read-write pair. However, any single node can be read-write paired with only one other node. A node can have one or more read-only nodes connected to it, as long as the total number of nodes in the cluster does not exceed 16.
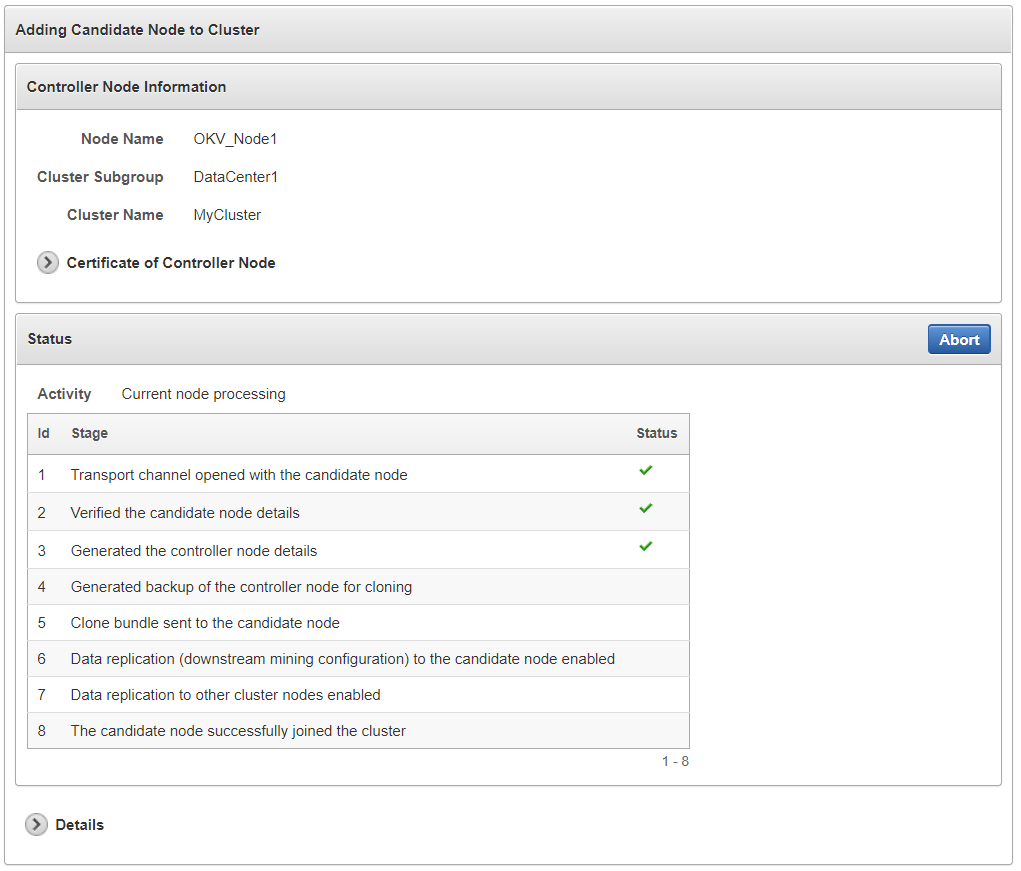
To create the read-write pair using two nodes in a cluster, you pair a node (referred to as the controller node) with a newly configured server (referred to as the candidate node). Note that this will take some time: an hour or more, depending on the speed of your server, network, and volume of data in the cluster.
Related Topics
Parent topic: Adding a Node to the Cluster
5.3.2 Creating a Read-Only Node in a Cluster
To add a new read-only cluster node, you pair any existing cluster node with a newly configured server.
The existing cluster node is referred to as the controller node, and the newly configured server is referred to as the candidate node. This process will take an hour or more, depending on the speed of your server, network, and volume of data in the cluster.
Related Topics
Parent topic: Adding a Node to the Cluster
5.3.3 Creating an Additional Read-Write Pair in a Cluster
Any node can be read-write paired with only one other node, and there can be multiple read-write pairs in a cluster.
- Select a read-only cluster node as the controller node to pair with a new candidate node.
- Follow the steps to create a read-write pair of nodes in a cluster.
Related Topics
Parent topic: Adding a Node to the Cluster
5.4 Terminating the Pairing of a Node
On the controller node, you can terminate the pairing process for a new node.
Parent topic: Managing Oracle Key Vault Multi-Master Clusters
5.5 Disabling a Cluster Node
You can temporarily disable a cluster node, which is required for upgrades and maintenance.
However, be aware that a node can only be disabled for a set period of time. When it exceeds that time, it cannot be enabled again. The default maximum disable node duration time is 24 hours, but you can set it for as high as 240 hours.
Related Topics
Parent topic: Managing Oracle Key Vault Multi-Master Clusters
5.6 Enabling a Disabled Cluster Node
You can enable any cluster node that was previously disabled. You must perform this operation from the disabled node.
Parent topic: Managing Oracle Key Vault Multi-Master Clusters
5.7 Deleting a Cluster Node
You can permanently delete a node from the cluster.
Deleted nodes cannot be added back to any cluster, not just to the current cluster from which they were deleted. However, you can reinstall the Oracle Key Vault appliance software on this server and add the deleted node to a cluster. All data will be synchronized with the cluster before the node is deleted. A node cannot delete itself. Be aware that if a deleted node has a read-write peer, then this read-write peer node will experience network changes that will temporarily prevent it from serving endpoints.
Parent topic: Managing Oracle Key Vault Multi-Master Clusters
5.8 Force Deleting a Cluster Node
You can permanently force delete a node from a cluster that is dead, unresponsive, or has exceeded the maximum disabled node time limit.
Forcefully deleting a node that is still a part of a cluster may cause inconsistency in the cluster. Be aware that if the read-write peer of the node that was forcefully deleted is also removed from the cluster before confirming that all critical data from the forcefully deleted node has reached other nodes, then data loss can result. When you forcefully delete a node, ensure that the node to be deleted has first been shut down. A node cannot be deleted from its own management console. When you must forcefully delete a node, ensure that the node to be deleted has first been shut down. Deleted nodes cannot be added back to the cluster. However, you can reinstall the Oracle Key Vault appliance software on a server and then add the deleted node to a cluster. Be aware that if a deleted node has a read-write peer, then this read-write peer node will experience network changes that will temporarily prevent it from serving endpoints.
Parent topic: Managing Oracle Key Vault Multi-Master Clusters
5.9 Managing Replication Between Nodes
You can enable and disable node replication from the Oracle Key Vault management console.
- Restarting Cluster Services
While managing replication between nodes, you can restart a node's cluster services when the cluster service status for the node is down. - Disabling Node Replication
You can disable the replication link between the current node and any other node in a cluster. - Enabling Node Replication
You can enable the replication link between the current node and any other node in a cluster.
Parent topic: Managing Oracle Key Vault Multi-Master Clusters
5.9.1 Restarting Cluster Services
While managing replication between nodes, you can restart a node's cluster services when the cluster service status for the node is down.
- Log into Oracle Key Vault management console of any cluster node as a user who has the System Administrator role.
- Select the Cluster tab, and then Monitoring from the left navigation bar.
- In the Node State pane, click the Restart Cluster Services button.
Parent topic: Managing Replication Between Nodes
5.9.2 Disabling Node Replication
You can disable the replication link between the current node and any other node in a cluster.
- Log into Oracle Key Vault management console of any cluster node as a user who has the System Administrator role.
- Select the Cluster tab, and then Monitoring from the left navigation bar.
- Select the nodes for which you want to disable replication.
- Click Disable.
- Click OK to confirm in the dialog box.
Parent topic: Managing Replication Between Nodes
5.9.3 Enabling Node Replication
You can enable the replication link between the current node and any other node in a cluster.
- As a user who has the System Administrator role, log in to the Oracle Key Vault management console of the node for which replication should be managed.
- Select the Cluster tab, and then Monitoring from the left navigation bar.
- Select the nodes for which you want to enable replication.
- Click Enable.
- Click OK to confirm in the dialog box.
Parent topic: Managing Replication Between Nodes
5.10 Cluster Management Information
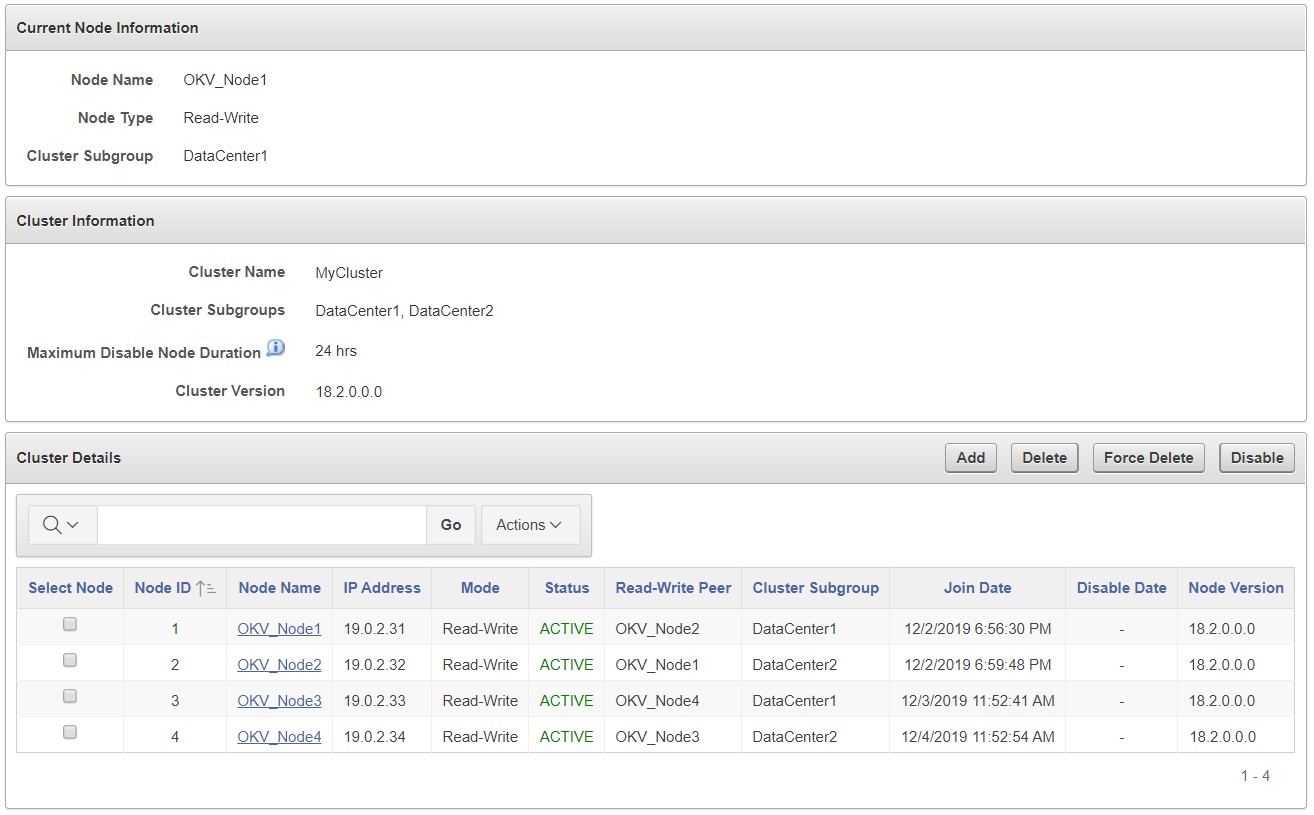
The Cluster Management page provides a concise overview of the cluster and the status of each node.
You can also manage the cluster from the cluster details section. When a node is performing a cluster operation it becomes the controller node.
Be aware that because the replication across the cluster takes time, there may be a delay before the Cluster Management page refreshes with the new cluster status. The replication lag in the monitoring page will help estimate the delay.
To view the Cluster Management page, click the Cluster tab, and then Management from the left navigation bar.

Description of the illustration cluster_management.png
Current Node Information
-
Node Name: The name of this node.
-
Node Type: The type of node, such as whether it is read-only or read-write.
-
Cluster Subgroup: The subgroup to which this node belongs.
Cluster Information
-
Cluster Name: The name of the cluster.
-
Cluster Subgroups: All subgroups within the cluster.
-
Maximum Disable Node Duration: The maximum time, in hours, that a node can be disabled before it is evicted from the cluster.
-
Cluster Version: The version of Oracle Key Vault in which the cluster is operating.
Cluster Details
-
Select Node: Used to select a node for a specific operation, such as delete, force delete, or disable.
-
Node ID: The ID of the node.
-
Node Name: The name of the node. Clicking the node name takes you to the Cluster Management page of that node.
-
IP Address: The IP address of the node.
-
Mode: The type of node, such as read-write, read-only, or read-only restricted.
-
Status: The status of the node, such as active, pairing, disabling, disabled, enabling, deleting, or deleted.
-
Read-Write Peer: The read-write peer of the node. If blank, it has no read-write peer.
-
Cluster Subgroup: The subgroup to which the node belongs.
-
Join Date: The date and time that the node was added to the cluster.
-
Disable Date: The date and time that the node was disabled.
-
Node Version: The current version of the Oracle Key Vault node.
Parent topic: Managing Oracle Key Vault Multi-Master Clusters
5.11 Cluster Monitoring Information
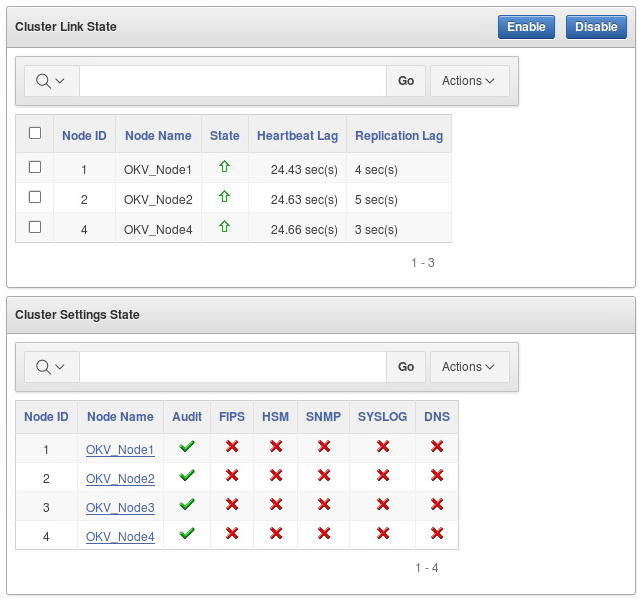
The Cluster Monitoring page provides the replication health of the cluster and the current node.
This page also provides a concise overview of the settings enabled in the cluster. You cannot update the settings on this page. Because the replication across the cluster takes time, there may be a delay before the Cluster Monitoring page refreshes with the new cluster state. Replication lag will help estimate the delay.
To view the cluster monitoring page, click the Cluster tab, and then Monitoring from the left navigation bar.
- Enabled in Cluster
- Enabled in Node
- Disabled in Cluster
- Disabled in Node

Description of the illustration cluster-monitoring-information.png
Cluster Link State
-
Select Node: Used to select nodes for a specific operation, such as enabling or disabling replication. You can click the checkbox on the label row to select all nodes.
-
Node ID: The ID of the node.
-
Node Name: The name of the node.
-
State: The current state of the node. The server is either up or down.
-
Heartbeat Lag: The average time of the heartbeat.
-
Replication Lag: The average time to replicate an object.
-
Enable: Enables the replication between the current node and the node selected.
-
Disable: Disables the replication between the current node and the node selected.
Cluster Settings State
-
Node ID: The ID of the node.
-
Node Name: The name of the node.
-
Audit: Indicates if auditing is enabled or disabled.
-
FIPS: Indicates if FIPS mode is enabled or disabled.
-
HSM: Indicates if HSM integration is enabled or disabled.
-
SNMP: Indicates if SNMP is enabled or disabled.
-
SYSLOG: Indicates if syslog is enabled or disabled.
-
DNS: Indicates if DNS is enabled or disabled.
Parent topic: Managing Oracle Key Vault Multi-Master Clusters
5.12 Naming Conflicts and Resolution
Oracle Key Vault can resolve naming conflicts that can arise as users create objects such as endpoints, endpoint groups, and user groups.
- About Naming Conflicts and Resolution
If you create an object that has the same name as another object on another node, Oracle Key Vault resolves this conflict. - Naming Conflict Resolution Information
The Cluster Conflict Resolution page provides a list of objects with names that conflict with objects created on different nodes. - Changing the Suggested Conflict Resolution Name
You can change the suggested name for an object that conflicts with another object of the same type. - Accepting the Suggested Conflict Resolution Name
You can accept the suggested name for an object name that conflicts with another object of the same type.
Parent topic: Managing Oracle Key Vault Multi-Master Clusters
5.12.1 About Naming Conflicts and Resolution
If you create an object that has the same name as another object on another node, Oracle Key Vault resolves this conflict.
You can create a new object with a name that conflicts with an object of the same type created on another node. If a conflict happens, then Oracle Key Vault will make the name of the conflicting object unique by adding _OKVxx, where xx is a node number, to the end of the user-supplied name. You can choose to accept this new name or change the object name.
Users who have the System Administrator role can resolve the following naming conflicts:
- User names
- Endpoint names
Users who have the Key Administrator role can resolve the following naming conflicts:
- Endpoint groups
- Security objects
- User groups
- Wallets
If an object is stuck in the PENDING state and will not transition to ACTIVE, then check for any broken replication links in the cluster. You can find cluster links in the Oracle Key Vault management console by selecting the Cluster tab and then selecting Monitoring.
Parent topic: Naming Conflicts and Resolution
5.12.2 Naming Conflict Resolution Information
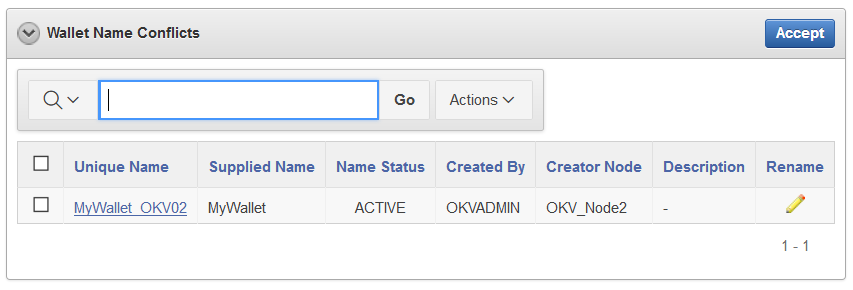
The Cluster Conflict Resolution page provides a list of objects with names that conflict with objects created on different nodes.
On this page, you can accept the suggested unique name or edit the object name. To view the Cluster Conflict Resolution page, click the Cluster tab, and then Conflict Resolution from the left navigation bar. Alternatively, you can click on the Click here for details button on a Naming Conflict alert from the Alerts table on the Home page.
Wallet Name Conflicts
-
Unique Name: The unique name assigned to the object by the system.
-
Supplied Name: The original name of the object that conflicts with another object of this type.
-
Name Status: The status of the object. The status can be
PENDINGorACTIVE. -
Created By: The user that created the conflicting object name.
-
Creator Node: The node that the conflicting object was created on.
-
Description: The description of the object as entered by the user.
-
Rename: The button that links to the object page where it can be renamed.
-
Accept: Allows you to accept the suggested name for the selected objects.
Parent topic: Naming Conflicts and Resolution
5.12.3 Changing the Suggested Conflict Resolution Name
You can change the suggested name for an object that conflicts with another object of the same type.
- As a user who has the appropriate administrator role, log in to the Oracle Key Vault management console.
- Select the Cluster tab, and then Conflict Resolution from the left navigation bar.
- Locate the object that requires a name change.
- Click the edit icon to the right of the object.
- On the object overview page, enter the new name for the object.
- Click Save.
Parent topic: Naming Conflicts and Resolution
5.12.4 Accepting the Suggested Conflict Resolution Name
You can accept the suggested name for an object name that conflicts with another object of the same type.
- As a user who has the appropriate administrator role, log in to the Oracle Key Vault management console.
- Select the Cluster tab, and then Conflict Resolution from the left navigation bar.
- Select the objects for which you want to accept the suggested name.
- Click Accept.
Parent topic: Naming Conflicts and Resolution
5.13 Multi-Master Cluster Deployment Recommendations
Oracle provides deployment recommendations for deployments that have two or more nodes.
Two-Node Deployment Recommendations
Use a two-node deployments for the following situations:
- Non-critical environments, such as test and development
- Simple deployment of read-write pairs with both nodes active, replacing classic primary-standby
- Single data center environments
Considerations for a two-node deployment:
- Availability is provided by multiple nodes.
- Maintenance will require down time.
- Good network connectivity between data centers is mandatory.
Three-Node Deployment Recommendations
Use a three-node deployment for the following situations:
- Single data center environments with minimal downtime requirement
- Single read-write pair with additional read-only node to handle load
- One read-only node is available for zero downtime during maintenance
Considerations for a three-node deployment:
- Take regular backups to remove destinations for disaster recovery.
Four or More Node Deployment Recommendations
Use a deployment of four or more nodes for the the following situations:
- Large data centers distributed across geographical locations
- Deployment of read-write pairs with pair members spanning geography
Considerations for a large deployment:
- Availability is provided by multiple nodes.
- Additional read-only nodes can be used to handle load.
- Good network connectivity between data centers is mandatory.
Parent topic: Managing Oracle Key Vault Multi-Master Clusters

