4 Oracle Key Vault Installation and Configuration

Installing Oracle Key Vault entails ensuring that the environment meets the necessary requirements before you begin the installation and configuration.

4.1 About Oracle Key Vault Installation and Configuration

Oracle Key Vault is a software appliance that is delivered as an ISO image.

The software appliance consists of a pre-configured operating system, an Oracle database, and the Oracle Key Vault application. You can install Oracle Key Vault onto its own dedicated server, as a VM guest into your virtualization platform, or as a compute instance in your OCI tenancy. See the Oracle Cloud Marketplace at https://cloudmarketplace.oracle.com/marketplace/app/OracleKeyVault.

Before you begin the installation or upgrade process for Oracle Key Vault, check the Oracle Key Vault Release Notes for any known issues that you should be aware of.

4.2 Oracle Key Vault Installation Requirements

The Oracle Key Vault installation requirements cover system requirements such as CPU, memory, disk space, network interfaces, and supported endpoint platforms.

4.2.1 System Requirements

System requirements include CPU, memory, disk, network interface, hardware compatibility, and RESTful services client.

The Oracle Key Vault installation removes existing software on a server.

Deployment on virtual machines is not recommended for production systems. However, virtual machines are useful for testing and proof of concept purposes.

The minimum hardware requirements for deploying the Oracle Key Vault software appliance are:

  • CPU: Minimum: x86-64 16 cores. Recommended: 24-48 cores with cryptographic acceleration support (Intel AESNI).

  • Memory: Minimum 16 GB of RAM. Recommended: 32–64 GB.

  • Disk: Both BIOS and UEFI boot mode. For a system with a boot disk size greater than 2 TB, Oracle Key Vault supports booting in UEFI mode only.

  • Network interface: One network interface.

  • Hardware Compatibility: Any Intel x86 64-bit hardware platform supported by Oracle Key Vault's embedded operating system. Oracle Key Vault uses Oracle Linux release 7 with the Unbreakable Enterprise Kernel (UEK) version 5. For a list of compatible hardware, refer to Hardware Certification List for Oracle Linux and Oracle VM in the Related Topics. This list contains the minimum version of Oracle Linux certified with the selected hardware. All Oracle Linux updates starting with Oracle Linux release 7 as the minimum are also certified unless otherwise noted. Refer to Oracle Linux documentation for more information on the operating system platform.

    Note:

    You can find the supported hardware from the hardware certification list for Oracle Linux and Oracle VM. Filter the results by selecting All Operating Systems and choosing Oracle Linux 7.9. However, be aware that Oracle Key Vault does not support the QLogic QL4* family of network cards.

    Oracle Key Vault supports both Legacy BIOS and UEFI BIOS boot modes. The support for UEFI BIOS mode allows the installation of Oracle Key Vault on servers that exclusively support UEFI BIOS only, such as Oracle X7-2 Server. Oracle Key Vault can be installed on Oracle X7–2 servers as a standalone server, a primary-standby configuration, or a multi-master cluster configuration.

  • RESTful Services Client: If RESTful Services are enabled, then each endpoint that connects to the Oracle Key Vault management console must have at least Java 1.7.0.21 installed.

Note:

For deployment with a large number of endpoints, the hardware requirement may need to scale to meet the workload.

4.2.2 Network Port Requirements

Network port requirements includes requirements for SSH/SCP, SNMP, HTTPS, listeners, KMIP, and TCP ports.

Oracle Key Vault and its endpoints use a set of specific ports for communication. Network administrators must ensure that these ports are open in the network firewall.

The following table lists the required network ports for Oracle Key Vault:

Table 4-1 Ports Required for Oracle Key Vault

Port Number Protocol Descriptions

22

SSH/SCP port

Used by Oracle Key Vault administrators and support personnel to remotely administer Oracle Key Vault

161

SNMP port

Used by monitoring software to poll Oracle Key Vault for system information

443

HTTPS port

Used by web clients such as browsers and RESTful Administrative commands to communicate with Oracle Key Vault

5695

HTTPS port

Used by RESTful Key Management commands to communicate with Oracle Key Vault

1521 and 1522

Database TCPS listener ports

In a primary-standby configuration, listener ports used by Oracle Data Guard to communicate between the primary and standby server. In a cluster configuration, listener ports used to communicate between read-write peer nodes.

7443

HTTPS port

Listener port used in a primary-standby configuration to run OS commands like synchronizing wallets and configuration files through HTTPS. This port is also used when you add a new node to a cluster.

5696

KMIP port

Used by Oracle Key Vault endpoints and third party KMIP clients to communicate with the Oracle Key Vault KMIP Server

7093

TCP port

Used by Oracle GoldenGate for transmitting data in a Multi-Master Cluster configuration.

4.2.3 Supported Endpoint Platforms

Oracle Key Vault supports both UNIX and Windows endpoint platforms.

Oracle supports 64-bit Linux endpoints, and only 64-bit endpoints are supported for Oracle databases that use the online master key. The operating systems on which the endpoint runs must be compatible with Transport Layer Security (TLS) 1.2, either directly or with appropriate patches.

The supported endpoint platforms in this release are as follows:

  • Oracle Linux (6 and 7)

  • Oracle Solaris x86 (10 and 11)

  • Oracle Solaris SPARC (10 and 11)

  • RHEL 6 and 7

  • IBM AIX (6.1, 7.1, and 7.2)

    If you used AIX 5.3 in the release that you are upgrading from, then you must move your endpoints off that platform, because it is no longer supported starting with Oracle Key Vault release 21.1.

  • HP-UX (IA) (11.31)

  • Windows Server 2012

4.2.4 Endpoint Database Requirements

Administrators can use online master keys and the Oracle Database COMPATIBLE initialization parameter to manage Oracle Database endpoints.

Administrators can use the online master key to manage TDE master encryption keys for endpoints that are Oracle Database 11.2 or later. Administrators who want to use Oracle Key Vault for wallet management only or who are migrating existing wallets deployments to Oracle Key Vault can use the okvutil upload command to upload Oracle wallets to Oracle Key Vault.

Administrators who manage endpoints that are Oracle Database may need to set the COMPATIBLE initialization parameter.

For an endpoint that is Oracle Database release 11.2 or later, set the COMPATIBLE initialization parameter to 11.2.0.0 or later. A COMPATIBLE setting of 11.2 or later enables Transparent Data Encryption to work with Oracle Key Vault. For example:

SQL> ALTER SYSTEM SET COMPATIBLE = '11.2.0.0' SCOPE=SPFILE;

This applies to an Oracle Database endpoint that use the online master key to manage TDE master encryption keys. This compatibility mode setting is not required for Oracle wallet upload or download operations.

Also note that after setting the COMPATIBLE parameter to 11.2.0.0, you cannot set it to a lower value such as 10.2. After you set the COMPATIBLE parameter, you must restart the database.

4.3 Installing and Configuring Oracle Key Vault

You must download the Oracle Key Vault application software, and then you can perform the installation.

4.3.1 Downloading the Oracle Key Vault Appliance Software

You can download executable files for both a fresh Oracle Key Vault installation or an upgrade.

For a fresh installation, you can download the Oracle Key Vault appliance software from Software Delivery Cloud. You cannot use this package to upgrade Oracle Key Vault. For an upgrade, you can download the Oracle Key Vault upgrade software from the My Oracle Support website.

  1. Use a web browser to access the Oracle Software Delivery Cloud portal:
  2. Click Sign In, and if prompted, enter your User ID and Password.
  3. In the All Categories menu, select Release. In the next field, enter Oracle Key Vault and then click Search.
  4. From the list that is displayed, select Oracle Key Vault 21.1.0.0.0 or click the +Add to Cart button next to the Oracle Key Vault 21.1.0.0.0.
    The download is added to your cart. (To check the cart contents, click View Cart in the upper right of the screen.)
  5. Click Checkout.
  6. On the next page, verify the details of the installation package, and then click Continue.
  7. In the Oracle Standard Terms and Restrictions page, select I have reviewed and accept the terms of the Commercial License, Special Programs License, and/or Trial License, and click Continue.

    The download page appears, which lists the following Oracle Key Vault ISO files:

    • Vpart_number.iso (Oracle Key Vault 21.1.0.0.0 - Part 1)

    • Vpart_number.iso (Oracle Key Vault 21.1.0.0.0 - Part 2)

    • Vpart_number.iso (Oracle Key Vault 21.1.0.0.0 - Part 3)

    • Vpart_number.iso (Oracle Key Vault 21.1.0.0.0 - Part 4)

  8. To the right of the Print button, click View Digest Details.

    The listing for the ISO files expands to display the SHA-1 and SHA-256 checksum reference numbers for each ISO file.

  9. Copy the SHA-256 checksum reference numbers and store them for later reference.
  10. Click Download and select a location to save the ISO files. 
    You can save each file individually by clicking its name and then specifying a location for the download.
  11. Click Save.

    The combined size of the ISO files exceeds 4 GB, and will take time to download, depending on the network speed. The estimated download time and speed are displayed in the File Download dialog box.

  12. After the ISO files are downloaded to the specified location, verify the SHA-256 checksums of the downloaded files:
    1. Generate a SHA256 checksum for the first Vpart_number.iso:
      $ sha256sum Vpart_number.iso

      Ensure that the checksum matches the value that you copied from the File Download dialog box in 9.

    2. Generate a SHA-256 checksum for the second Vpart_number.iso:
      $ sha256sum Vpart_number.iso

      Ensure that the checksum matches the value that you copied from the File Download dialog box in 9.

  13. Unzip the downloaded files and concatenate the .iso files to one .iso image
    cat okv_21.1_installer_disc_part1.iso okv_21.1_installer_disc_part2.iso okv_21.1_installer_disc_part3.iso okv_21.1_installer_disc_part4.iso > okv_21.1_installer_disc.iso
  14. Transfer the concatenated .iso image by using one of the following methods:
    • Burn the concatenated .iso image onto a bootable DVD.
    • Copy the concatenated .iso image onto a bootable USB stick.
    • Mount the concatenated .iso image with your virtualization software, in order to run Oracle Key Vault as a virtual machine, booting from the concatenated .iso image.
You now can install Oracle Key Vault on the server.

4.3.2 Installing the Oracle Key Vault Appliance Software

The Oracle Key Vault installation process installs all the required software components onto a dedicated server or virtual machine.

The installation process may take from 30 minutes or longer to complete, depending on the server resources where you are installing Oracle Key Vault.

If you are installing Oracle Key Vault on VMware, then set the VMX configuration parameter disk.EnableUUID to TRUE. In addition, you must set your virtual machine to use EFI boot. In some versions of VMware this is done by selecting the VM Options tab, then expanding Boot Options, and then setting the firmware to EFI. You must disable secure boot. Without this setting, the Oracle Key Vault installation on VMware will fail.

Caution:

The Oracle Key Vault installation wipes the server, repartitions the disk, and installs a hardened Oracle Linux 7 Update 9. The installation erases existing software and data on the server.

Ensure that you have met the following prerequisites.
  • Ensure that the server meets the recommended requirements.

  • Request a fixed IP address, network mask, and gateway address from your network administrator. You will need this information to configure the network.

To install the Oracle Key Vault appliance:

  1. Make the .iso image available to the computer where you want to install it, and then restart the computer.

    The .iso image can available in any of these ways:

    • Burned onto a bootable DVD
    • Copied onto a bootable USB stick
    • Mounted with your site's virtualization software

    You may need to change the boot order of your server to boot from the USB-stick or the DVD.

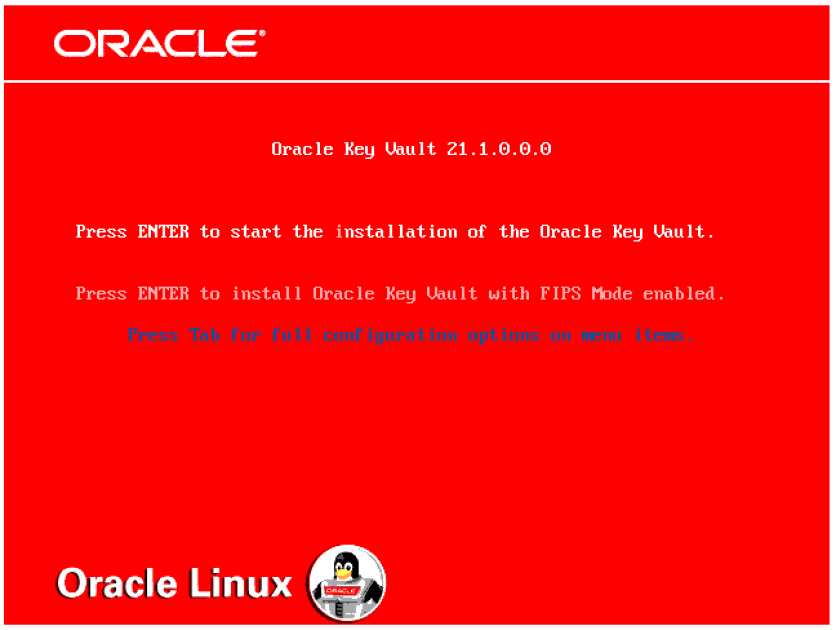
    Description of 21_initial_installation_screen.png follows
    Description of the illustration 21_initial_installation_screen.png

  2. Using the up and down arrow keys, select the desired installation option or the option to perform a memory test, and then press Enter.

    Choosing Press Enter to install the Oracle Key Vault with FIPS mode enabled automatically enables FIPS mode on the system.

    The installation begins, and after several minutes, you will be asked to set the root user password (with a second time to confirm it). It is important to store the root user password securely. You will need it later to authenticate yourself at the Oracle Key Vault management console and complete the post-installation tasks.

    Description of 21_set_root_user_password.png follows
    Description of the illustration 21_set_root_user_password.png

  3. After you set the root user password, when prompted, log in as the root to observe the installation status. Enter root , press Enter, enter the root user password, and then press Enter again.

    At this stage, if the installer prompts you, then re-insert the installation ISO disk. After you insert it, the following prompt appears:

    Description of 21_log_in_and_reinsert_disc.png follows
    Description of the illustration 21_log_in_and_reinsert_disc.png

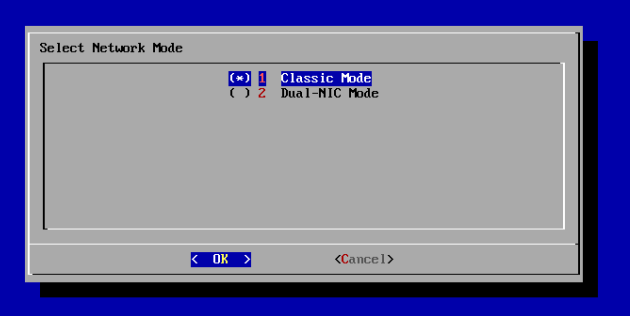
    Afterward, the Select Network Mode window appears.

    Description of 21_select_network_mode.png follows
    Description of the illustration 21_select_network_mode.png

  4. For the network mode, if you want Classic mode, then follow these steps:
    Classic mode, used in previous releases of Oracle Key Vault, allows one network interface to be used. If you later decide to switch to dual NIC mode, then you can do so, but only if you are using a standalone configuration. You cannot change the mode if you are using a primary/standby configuration, but you can with a multi-master cluster or standalone environment. Choose this option if the server has only one network card.
    1. Select 1 to choose Classic mode and then select OK.
    2. In the Select default network interface screen, select from the available options, and then select OK.
    3. In the Network settings screen, enter the IP address, Network mask, and Gateway settings for the default network interface. The network administrator for your site can provide this information.
    4. Select OK.
  5. If you want the dual NIC network mode, then follow these steps:
    Dual NIC mode enables you to configure Oracle Key Vault to use two network interfaces, or ethernet ports. It is useful as a guard against physical or software failures and adds redundancy to the network layer. Select the dual NIC mode if there is a greater need for operational continuity and to avoid eviction from the cluster due to prolonged unavailability of the network. Dual NIC mode helps to prevent situations where a node may lose connectivity and risk missing changes that have been made to data in the cluster.
    1. Select 2 to select Dual-NIC mode and then select OK.
    2. In the Select Bond Mode screen, select from the bond mode choices for the two network interfaces that you plan to use, and then select OK.
      • Round Robin configures the network interfaces such that network packets are transmitted and received sequentially from the first available interface through the last. This bonding mode is the default. This mode provides fault tolerance and load balancing and requires the links to be connected to a network switch with EtherChannel support.
      • Active-Backup configures the network interfaces as active and backup. Only one interface in the bond is active. A different interface becomes active if, and only if, the active interface fails. The network communication happens over the active interface. This mode provides fault tolerance and does not require any switch support.
      • 802.3ad creates aggregation groups that share the same speed and duplex settings. Network packets are transmitted and received on all interfaces. This mode provides fault tolerance and load balancing and requires a switch that supports IEEE 802.3ad dynamic link aggregation.
    3. In the Select two network interfaces screen, select the two network interfaces that you want, and then select OK.
    4. In the Network settings screen, enter the IP address, Network mask, Gateway, and Hostname settings for the default network interface. The network administrator for your site can provide this information. For the host name, use only lowercase characters. The host name can be the fully qualified host name or the short host name.
    5. Select OK.
  6. When prompted, select Reboot to complete installation and press Enter.

    The installer installs and configures the operating system, database, and Oracle Key Vault on the server to make it a self-contained hardened appliance. The installation and configuration process can take an hour or longer.

4.3.3 Performing Post-Installation Tasks

After you install Oracle Key Vault, you must complete a set of post-installation tasks.

These tasks include configuring the administrative user accounts and passwords for recovery, and operating system accounts and passwords for root and support.

  1. Use a web browser to connect to the Oracle Key Vault server.

    For example, to connect in to an Oracle Key Vault server whose IP address is 192.0.2.254, enter the following in the address bar:

    https://192.0.2.254

  2. If the web browser displays a security warning message stating that you are connecting to a website with an untrusted or self-signed security certificate, accept the security warning message and proceed to connect to the Oracle Key Vault server.

    This message is only temporary. When you configure third-party certificates, this message will no longer appear. After completing the post-installation tasks, you can upload a custom certificate or certificate chain that is trusted by the browser, so that you can connect to the Oracle Key Vault server without encountering the security warning message. For more information about uploading a custom certificate, see Managing Console Certificates.

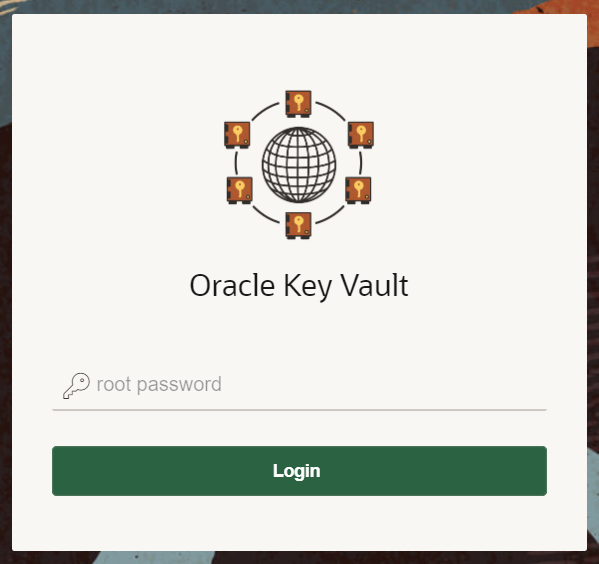
  3. In the root password screen, enter the root password.

    The root password screen is displayed when you connect to the Oracle Key Vault server for the first time, in order to complete the post-installation tasks. After you complete the post-installation tasks, the Oracle Key Vault login screen is displayed when you access the Oracle Key Vault management console through the web browser.

    After you log in with the root user password, the Post-Install Configuration screen is displayed.

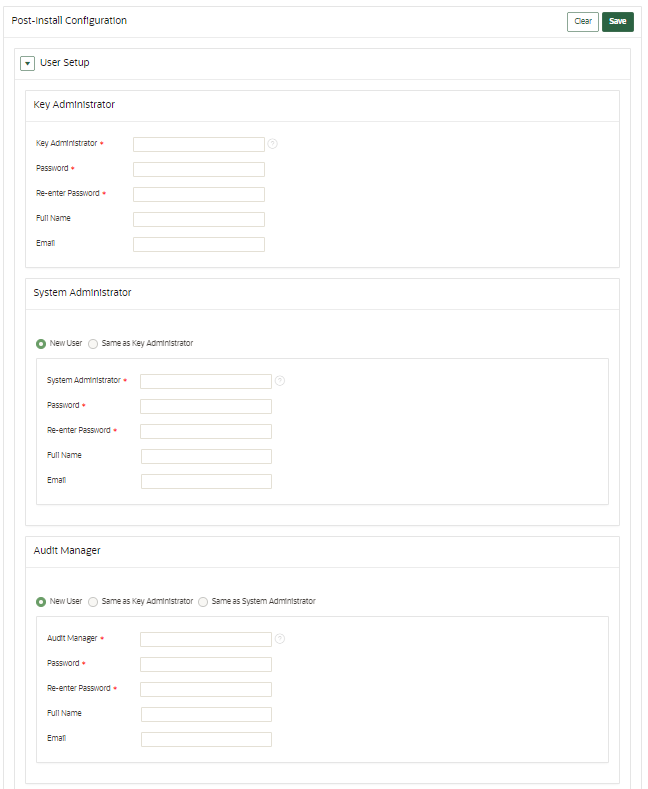
  4. In the User Setup pane, create three administrative user accounts for the Key Administrator, System Administrator, and Audit Manager.
    Description of 21_user_setup.png follows
    Description of the illustration 21_user_setup.png
    • Enter the user name and password, the full name (optional), and email (optional) for each administrative user account.

      Note that the passwords are one-time use passwords which must be changed when the user logs in the first time.

    • Ideally, create a different user account for each of these administrative roles for a strict separation of duties, or combine roles as necessary.

    • Ensure that passwords have 8 or more characters and contain at least one of each of the following: an uppercase letter, a lowercase letter, a number, and a special character from the set: period (.), comma (,), underscore (_), plus sign (+), colon (:), exclamation mark (!). In addition, the passphrase may include a space character ( ) provided it is not used as the first or last character of the passphrase.

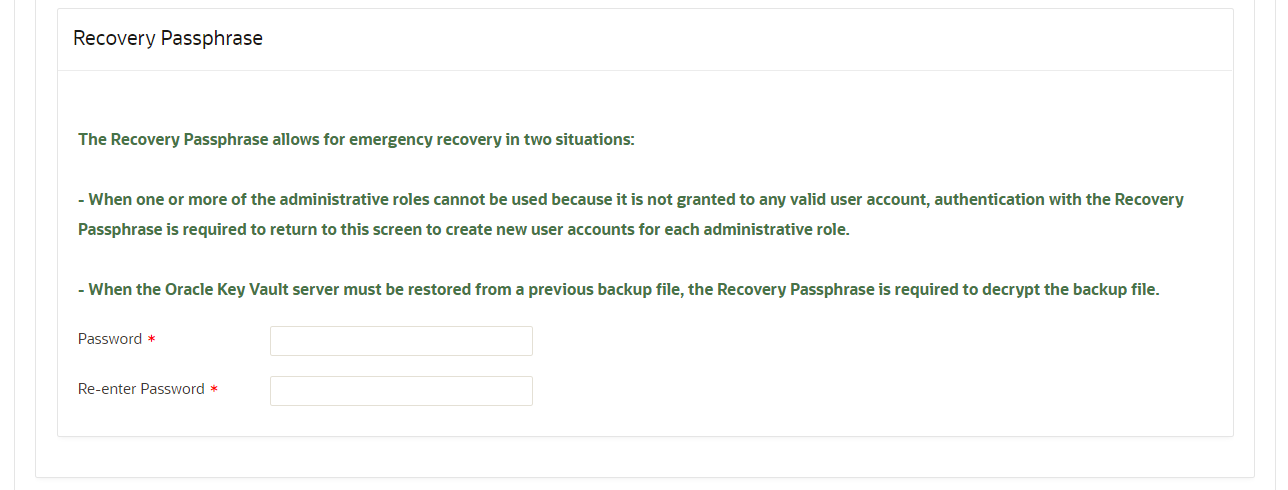
  5. In the Recovery Passphrase section, create the recovery password.

    Description of 21_recovery_password.png follows
    Description of the illustration 21_recovery_password.png

    The recovery passphrase has the same minimum requirements as user passwords. For greater security, Oracle recommends that you make the recovery passphrase longer and more complex. Because this is a critical password, you must properly secure and safeguard the recovery password. The recovery password is required in the following scenarios:

    • In an emergency, when there are no administrative users available to access Oracle Key Vault

    • To restore Oracle Key Vault data from a backup

    • To reset the recovery password

    • Induct a new node into a multi-master cluster

    • To configure a hardware security module (HSM)

    Caution:

    It is important to establish a secure process for the storage and retrieval of the recovery passphrase, including older recovery passphrases. The only way to recover from a lost recovery passphrase is to re-install Key Vault. Be aware that if you enter either of these passwords incorrectly three times in a row, then the account is locked for 15 minutes.
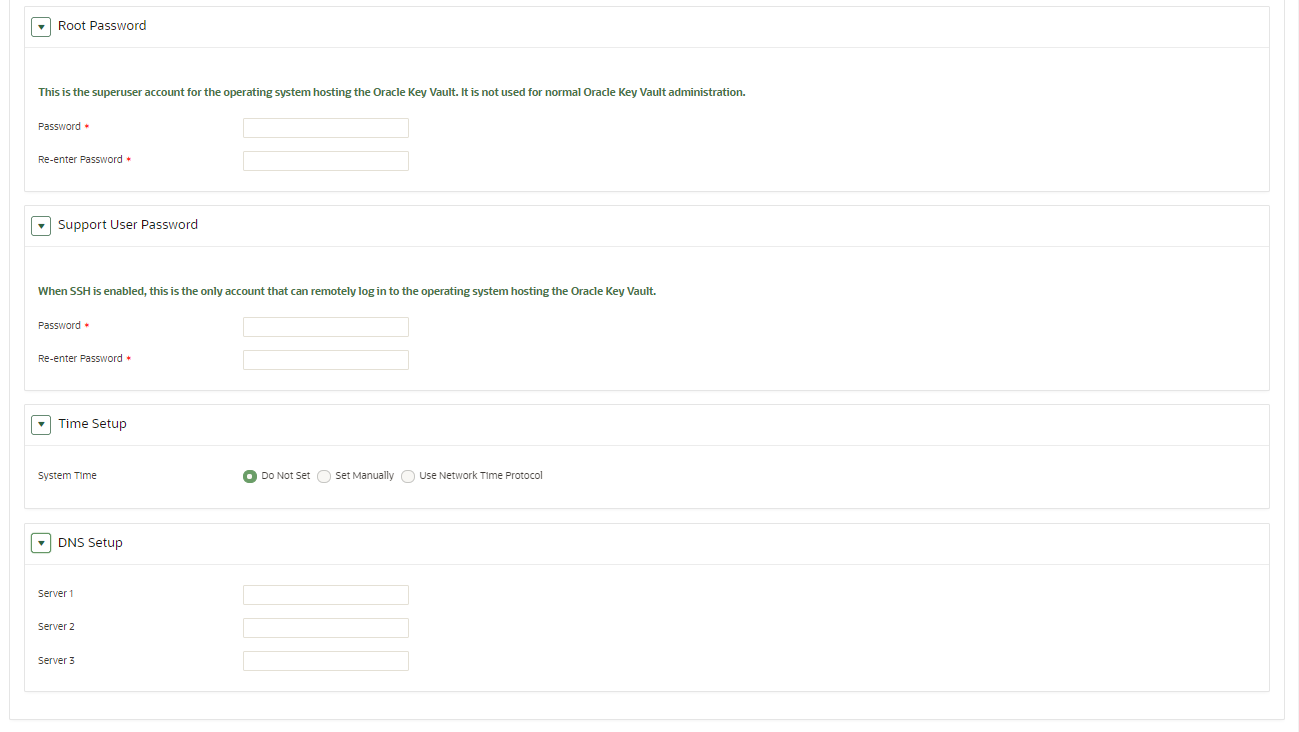
  6. Set the root and support user passwords.

    Description of 21_password_ntp_dns.png follows
    Description of the illustration 21_password_ntp_dns.png

    The root password is the super user account for the operating system hosting Oracle Key Vault. You will need the support password to log into Oracle Key Vault remotely using the SSH protocol.

    Caution:

    Keep the root and support user passwords safe because these passwords are set during post-installation only. After post-installation you cannot change them from the Oracle Key Vault management console.

    The Time Setup and DNS Setup settings are optional at this stage. The System Administrator can configure these later on.

  7. Click Save in the upper right corner of the Post-Install Configuration screen.

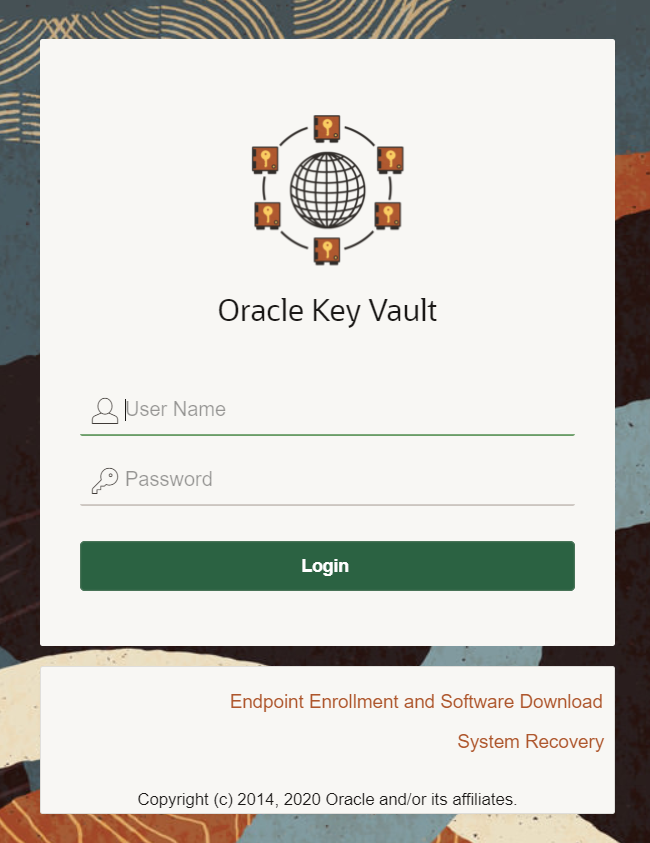
    The Oracle Key Vault management console login screen is displayed:

    Description of 21_new_login.png follows
    Description of the illustration 21_new_login.png

You can now log in to the Oracle Key Vault management console with the credentials of any of the user accounts that were created during the post-installation process.

4.4 Logging In to the Oracle Key Vault Management Console

To use Oracle Key Vault, you can log in to the Oracle Key Vault management console.

  1. Open a web browser.
  2. Connect using an HTTPS connection and the IP address of Oracle Key Vault.

    For example, to log in to a server whose IP address is 192.0.2.254, enter:

    https://192.0.2.254

  3. After the login screen appears, enter your user name and password.
  4. Click Login.

4.5 Upgrading a Standalone or Primary-Standby Oracle Key Vault Server

This upgrade includes the Oracle Key Vault server software and utilities that control the associated endpoint software.

4.5.1 About Upgrading the Oracle Key Vault Server Software

When you upgrade the Oracle Key Vault server software appliance, also upgrade the endpoint software to get access to the latest enhancements.

However, the endpoint software downloaded from the previous Oracle Key Vault release will continue to function with the upgraded Oracle Key Vault server. Be aware that while the old endpoint software will continue to work with the upgraded Oracle Key Vault server, the new endpoint functionality may not work.

You must upgrade in the order shown: first perform a full backup of Oracle Key Vault, upgrade the Oracle Key Vault server or server pair in the case of a primary-standby deployment, the endpoint software, and last, perform another full backup of the upgraded server. Note that upgrading requires a restart of the Oracle Key Vault server.

The Oracle Key Vault server is not available to endpoints for a limited duration during the upgrade. You can enable the persistent cache feature to enable endpoints to continue operation during the upgrade process.

Before you begin the upgrade, refer to Oracle Key Vault Release Notes for additional information about performing upgrades.

4.5.2 Step 1: Back Up the Server Before You Upgrade

Before you upgrade the Oracle Key Vault server, perform a one-time backup to a remote destination so that you can recover data in case the upgrade fails.

Caution:

Do not bypass this step. Back up the server before you perform the upgrade so that your data is safe and recoverable.

4.5.3 Step 2: Perform Pre-Upgrade Tasks

To ensure a smooth upgrade to Oracle Key Vault, you should prepare the server you are upgrading.

  • Use SSH to log in to the server where Oracle Key Vault is installed.
  • Ensure that the server meets the minimum disk space requirement for an upgrade. If the /usr/local/dbfw/tmp directory does not have sufficient free space, then delete any diagnostics .zip files that maybe stored in that directory.
  • Ensure that the disk size is not greater than 2 TB. If this is the case, then you cannot upgrade to the current release. Oracle recommends that you restore a backup of the current configuration onto a system with a disk that is less than 2 TB in size, and upgrade that to the new release instead.
  • If you need to increase available disk space, then remove the temporary jar files located in /usr/local/okv/ssl. Be careful in doing so. If you accidentally delete any files other than the jar files in /usr/local/okv/ssl, then the Oracle Key Vault server becomes non-functional.
  • Increase your disk space by extending the vg_root size:
    • For standalone and primary-standby deployments, you must increase the disk space by extending vg_root before you perform the upgrade.
    • For multi-master cluster deployments, you must increase the disk space by extending vg_root before the upgrade, but after the node has been disabled.
  • Ensure that no full or incremental backup jobs are running. Delete all scheduled full or incremental backup jobs before the upgrade.
  • Plan for downtime according to the following specifications:
    Oracle Key Vault Usage Downtime required

    Wallet upload or download

    NO

    Java Keystore upload or download

    NO

    Transparent Data Encryption (TDE) direct connect

    YES (NO with persistent cache)

    Primary Server Upgrade in a primary-standby deployment

    YES (NO with persistent cache)

  • Plan for downtimes:
    • If Oracle Key Vault uses an online master key, then plan for a downtime of 15 minutes during the Oracle Database endpoint software upgrades. Database endpoints can be upgraded in parallel to reduce total downtime.
    • For a primary server upgrade in a primary-standby deployment, plan for a downtime of a few hours. The persistent cache allows you to upgrade Oracle Key Vault servers without database downtime. The default duration of the persistent cache from the moment the Oracle Key Vault server becomes unavailable is 1,440 minutes (one day).
  • Set the $OKV_HOME to the location where endpoint is installed so that the upgrade process for the endpoint software can complete successfully.
  • If the Oracle Key Vault system has a syslog destination configured, ensure that the remote syslog destination is reachable from the Oracle Key Vault system, and that logs are being correctly forwarded. If the remote syslog destination is not reachable from the Oracle Key Vault system, then the upgrade process can become much slower than normal.
  • If you are performing an upgrade while using an HSM as a Root of Trust, then consult Oracle Key Vault Root of Trust HSM Configuration Guide for any additional steps that may be needed.
  • If you have STIG enabled, then disable STIG before performing an upgrade by executing the following command as the root user:
    /usr/local/dbfw/bin/stig --apply --disable

4.5.4 Step 3: Add Disk Space to Extend the vg_root for the Release 21.1 Upgrade

Before upgrading to Oracle Key Vault release 21.1, you will need to extend the vg_root to increase disk space.

Before you start this procedure, ensure that all endpoints have persistent cache enabled and in use.
  1. Log in to the server for which you will perform the upgrade and switch user as root.
  2. Ensure that the persistent cache settings for Oracle Key Vault have been set.
    You will need to ensure that the persistent cache has been enabled because in a later step in this procedure, you must shut down the server. Shutting down the Oracle Key Vault server will incur downtime. To avoid any downtime, Oracle recommends that you turn on persistent cache.
  3. Run the vgs command to determine the free space
    vgs

    The VFree column shows how much free space you have (for example, 21 GB).

  4. Power off the server in order to add a new disk
    /sbin/shutdown -h now
  5. Add a new disk to the server with a capacity of 100 GB or greater
  6. Start the server.
  7. Log in to the Oracle Key Vault server through SSH as user support, then switch user su to root.
    ssh support@okv_server_IP_address
    su - root
    
  8. Stop the Oracle Key Vault services.
    service tomcat stop;
    service httpd stop;
    service kmipus stop;
    service kmip stop;
    service okvogg stop;
    service javafwk stop;
    service monitor stop;
    service controller stop;
    service dbfwlistener stop;
    service dbfwdb stop;
    service rsyslog stop;
    
  9. Run the fdisk -l command to find if there are any available partitions on the new disk.
    fdisk -l
    At this stage, there should be no available partitions.
  10. Run the fdisk disk_device_to_be_added command to create the new partition.
    For example, to create a disk device named /dev/sdb:
    fdisk /dev/sdb

    In the prompts that appear, enter the following commands in sequence:

    • n for new partition
    • p for primary
    • 1 for partition number
    • Accept the default values for cylinder (press Enter twice).
    • w to write and exit
  11. Use the pvcreate disk_device_partition command to add the newly added disk to the physical volume.
    For example, for a disk device named /dev/sdb1, which is the name of the disk partition that you created (based on the name used for the disk device that was added).
    pvcreate /dev/sdb1

    Output similar to the following appears:

    Physical volume "/dev/sdb1" successfully created
  12. Use the vgextend vg_root disk_device_partition command to extend the logical volume with this disk space that you just added.
    For example, for the partition /dev/sdb1, you would run:
    vgextend vg_root /dev/sdb1

    Output similar to the following appears:

    Volume group "vg_root" successfully extended
  13. Run the vgs command again to ensure that VFree shows an increase of 100 GB.
    vgs

    Output similar to the following appears:

    VG      #PV #LV #SN Attr   VSize   VFree
    vg_root   2  12   0 wz--n- 598.75g <121.41g
    
  14. Restart the Oracle Key Vault server.
    /sbin/reboot

    For primary-standby deployments, ensure that the primary and standby nodes sync up before proceeding further with next steps.

4.5.5 Step 4: Upgrade the Oracle Key Vault Server or Primary-Standby Pair

You can upgrade a standalone Oracle Key Vault server or a pair of Oracle Key Vault servers in a primary-standby deployment.

4.5.5.1 About Upgrading an Oracle Key Vault Server or Primary-Standby Pair

In a standalone deployment you must upgrade a single Oracle Key Vault server, but in a primary-standby deployment you must upgrade both primary and standby Oracle Key Vault servers.

Note that persistent caching enables endpoints to continue to be operational during the upgrade process.

Note:

If you are upgrading from a system with 4 GB memory, first add an additional 12 GB memory to the system before upgrading.
4.5.5.2 Upgrading a Standalone Oracle Key Vault Server

A single Oracle Key Vault server in a standalone deployment is the most typical deployment in test and development environments.

  1. Ensure that you have backed up the server you are upgrading so your data is safe and recoverable.
    Do not proceed without completing this step.
  2. Log into the Oracle Key Vault management console as a user who has the System Administrator role.
  3. Ensure that SSH access is enabled.

    Log in to the Oracle Key Vault management console as a user who has the System Administrator role. Select the System tab, then Settings. In the Network Details area, click SSH Access. Select IP address(es) and then enter only the IP addresses that you need, or select All. Click Save.

  4. Ensure you have enough space in the destination directory for the upgrade ISO files.
  5. Log in to the Oracle Key Vault server through SSH as user support, then switch user su to root.
    If the SSH connection times out while you are executing any step of the upgrade, then the operation will not complete successfully. Oracle recommends that you ensure that you use the appropriate values for the ServerAliveInterval and ServerAliveCountMax options for your SSH sessions to avoid upgrade failures.
  6. Copy the upgrade ISO file to the destination directory using Secure Copy Protocol or other secure transmission method.
    Note that the upgrade ISO file is not the installation ISO file that you downloaded from eDelivery. You can download the Oracle Key Vault upgrade software from the My Oracle Support website at https://support.oracle.com/portal/.
    scp remote_host:remote_path/okv-upgrade-disc-new_software_release.iso /var/lib/oracle

    In this specification:

    • remote_host is the IP address of the computer containing the ISO upgrade file.
    • remote_path is the directory of the ISO upgrade file. Do not copy this file to any location other than the /var/lib/oracle directory.
  7. Make the upgrade accessible by using the mount command:
    /bin/mount -o loop,ro /var/lib/oracle/okv-upgrade-disc-new_software_release.iso /images
  8. Clear the cache using the clean all command:
    root# yum -c /images/upgrade.repo clean all
  9. Apply the upgrade with upgrade.rb command:
    root# /usr/bin/ruby /images/upgrade.rb --confirm

    If the system is successfully upgraded, then the command will display the following message:

    Remove media and reboot now to fully apply changes.

    If you see an error message, then check the log file /var/log/messages for additional information.

  10. Restart the Oracle Key Vault server by running reboot command:
    root# /sbin/reboot

    On the first restart of the computer after the upgrade, the system will apply the necessary changes. This can take a few hours. Do not shut down the system during this time.

    The upgrade is completed when the screen with heading: Oracle Key Vault Server new_software_release appears. The revision should reflect the upgraded release.

  11. Confirm that Oracle Key Vault has been upgraded to the correct version.
    1. Log in to the Oracle Key Vault management console as a user who has the System Administrator role.
    2. Select the System tab, and then select Status.
    3. Verify that the version displayed is the latest release number.
      The release number is also at the bottom of each page, to the right of the copyright information.
  12. If your site uses the Commercial National Security Algorithm (CNSA) suite, then re-install these algorithms onto the standalone server.
  13. Disable SSH access.

    Log in to the Oracle Key Vault management console as a user who has the System Administrator role. Select the System tab, then Settings. In the Network Details area, click SSH Access. Select Disabled. Click Save.

4.5.5.3 Upgrading a Pair of Oracle Key Vault Servers in a Primary-Standby Deployment

You should allocate several hours to upgrade the primary server after upgrading the standby.

You must perform the upgrade of standby and primary servers in one session with as little time between the standby and primary upgrade. The upgrade time is approximate and a function of the volume of data stored and managed by Oracle Key Vault. For large volumes of data, the upgrade time may be longer than several hours.
  1. For both primary and standby servers in the primary-standby configuration, prepare for upgrade.
    • Ensure that both the primary and standby systems have at least 16 GB memory.

    • Add disk space to extend the vg_root.

    • While the upgrade is in progress, do not change any settings or perform any other operations that are not part of the upgrade instructions below.

    • Upgrade the Oracle Key Vault server during a planned maintenance window because the upgrade process requires the endpoints to be shut down during the upgrade, if no persistent cache has been configured. With persistent cache enabled, endpoints will continue to be operational during the upgrade process.

  2. Ensure that you have backed up the server you are upgrading so your data is safe and recoverable.
    Ensure that in the time between the backup and shutting down the Oracle Key Vault servers for upgrade, that no databases perform a set or rekey operation (for example, using the ADMINISTER KEY MANAGEMENT statement), since these new keys will not be included in the backup.
    Do not proceed without completing this step.
  3. First, upgrade the standby server while the primary server is running.

    Follow Steps 2 through 10 of the standalone Oracle Key Vault server upgrade.

  4. Ensure that the upgraded standby Oracle Key Vault server is restarted and running.
  5. Upgrade the primary Oracle Key Vault server following Steps 2 through 10 of the standalone Oracle Key Vault server upgrade.

    After both the standby and primary Oracle Key Vault servers are upgraded, the two servers will automatically synchronize.

  6. Log in to the Oracle Key Vault management console as a user with the System Administrator role.
  7. Select the System tab, and then Status.
  8. Verify that the Version field displays the new software version.
  9. If your site uses the Commercial National Security Algorithm (CNSA) suite, then re-install these algrorithms onto the primary and standby servers.

4.5.6 Step 5: Upgrade the Endpoint Software

As part of the upgrade, you must reenroll endpoints created in earlier releases of Oracle Key Vault, or update the endpoint software.

If you are upgrading from an earlier release to the latest release of Oracle Key Vault, then you must reenroll the endpoint instead of upgrading the endpoint software. Reenrolling the endpoint automatically updates the endpoint software.
  1. Ensure that you have upgraded the Oracle Key Vault servers. If you are upgrading the endpoint software for an Oracle database configured for direct-connect, then shut down the database.
  2. Download the endpoint software (okvclient.jar) for your platform from the Oracle Key Vault server as follows:
    1. Go to the Oracle Key Vault management console login screen.
    2. Click the Endpoint Enrollment and Software Download link.
    3. In the Download Endpoint Software Only section, select the appropriate platform from the drop-down list.
    4. Click the Download button.
  3. Identify the path to your existing endpoint installation that you are about to upgrade (for example, /home/oracle/okvutil).
  4. Install the endpoint software by executing the following command:
    java -jar okvclient.jar -d existing_endpoint_directory_path

    For example:

    java -jar okvclient.jar -d /home/oracle/okvutil

    If you are installing the okvclient.jar file on a Windows endpoint system that has Oracle Database release 11.2.0.4 only, then include the -db112 option. (This option is not necessary for any other combination of endpoint platform or Oracle Database version.) For example:

    java -jar okvclient.jar -d /home/oracle/okvutil -v -db112
  5. Install the updated PKCS#11 library file.
    This step is needed only for online TDE master encryption key management by Oracle Key Vault.
    • On UNIX/Linux platforms: Run root.sh from the bin directory of endpoint installation directory to copy the latest liborapkcs.so file for Oracle Database endpoints.
      $ sudo $OKV_HOME/bin/root.sh

      Or

      $ su - root
      # bin/root.sh
    • On Windows platforms: Run root.bat from the bin directory of endpoint installation directory to copy the latest liborapkcs.dll file for Oracle Database endpoints. You will be prompted for the version of the database in use.
      bin\root.bat
  6. Restart the endpoint if it was shut down.

Related Topics

4.5.7 Step 6: If Necessary, Add Disk Space to Extend Swap Space

If necessary, extend the swap space. Oracle Key Vault release 21.1 requires a hard disk size greater than or equal to 1 TB in size with approximately 64 GB of swap space.

If your system does not meet this requirement, follow these instructions to extend the swap space. You can check how much swap space you have by running the swapon -s command. By default, Oracle Key Vault releases earlier than release 18.1 were installed with approximately 4 GB of swap space. After you complete the upgrade to release 18.1 or later, Oracle recommends that you increase the swap space allocation for the server on which you upgraded Oracle Key Vault. A new Oracle Key Vault installation is automatically configured with sufficient swap space. However, if you upgraded from a previous release, and your system does not have the desired amount of swap space configured, then you must manually add disk space to extend the swap space, particularly if the intention is to convert the upgraded server into the first node of a multi-master cluster.
  1. Log in to the server in which you upgraded Oracle Key Vault and connect as root.
  2. Check the current amount of swap space.
    [root@my_okv_server support]# swapon -s

    Output similar to the following appears. This example shows that the system has 4 GB of swap space.

    Filename Type Size Used Priority
    /dev/dm-0 partition 4194300 3368 -1
    

    There must be 64 GB of swap space if the disk is greater than 1 TB in size.

  3. Run the vgs command to determine how much free space is available.
    vgs

    The VFree column shows how much free space you have (for example, 21 GB).

  4. Power off the server in order to add a new disk.
    /sbin/shutdown -h now
  5. Add a new disk to the server of a size that will bring the VFree value to over 64 GB.
  6. Start the server.
  7. Log in to the Oracle Key Vault server through SSH as user support, then switch user su to root.
    ssh support@okv_server_IP_address
    su - root
    
  8. Run the fdisk -l command to find if there are any available partitions on the new disk.
    fdisk -l

    At this stage, there should be no available partitions.

  9. Run the fdisk disk_device_to_be_added command to create the new partition.
    For example, to create a disk device named /dev/sdc:
    fdisk /dev/sdc

    In the prompts that appear, enter the following commands in sequence:

    • n for new partition
    • p for primary
    • 1 for partition number
    • Accept the default values for cylinder (press Enter twice).
    • w to write and exit
  10. Use the pvcreate disk_device_partition command to add the newly added disk to the physical volume.
    For example, for a disk device named /dev/sdc1, which is the name of the disk partition that you created (based on the name used for the disk device that was added).
    pvcreate /dev/sdc1

    Output similar to the following appears:

    Physical volume "/dev/sdc1" successfully created
  11. Use the vgextend vg_root disk_device_partition command to extend the logical volume with this disk space that you just added.
    For example, for the partition /dev/sdc1, you would run:
    vgextend vg_root /dev/sdc1

    Output similar to the following appears:

    Volume group "vg_root" successfully extended
  12. Run the vgs command again to ensure that VFree shows an increase of 64 GB.
    vgs
  13. Disable swapping.
    [root@my_okv_server support]# swapoff -v /dev/vg_root/lv_swap
  14. To extend the swap space, run the lvresize command.
    [root@my_okv_server support]# lvresize -L +60G /dev/vg_root/lv_swap

    Output similar to the following appears:

    Size of logical volume vg_root/lv_swap changed from 4.00 GiB (128 extents) to 64.00 GiB (2048 extents)
    Logical volume lv_swap successfully resized.
    
  15. Format the newly added swap space.
    [root@my_okv_server support]# mkswap /dev/vg_root/lv_swap

    Output similar to the following appears:

    mkswap: /dev/vg_root/lv_swap: warning: don't erase bootbits sectors
    on whole disk. Use -f to force.
    Setting up swapspace version 1, size = 67108860 KiB
    no label, UUID=fea7fc72-0fea-43a3-8e5d-e29955d46891
    
  16. Enable swapping again.
    [root@my_okv_server support]# swapon -v /dev/vg_root/lv_swap
  17. Verify the amount of swap space that is available.
    [root@my_okv_server support]# swapon -s

    Output similar to the following appears:

    Filename Type Size Used Priority 
    /dev/dm-0 partition 67108860 0 -1
  18. Restart the Oracle Key Vault server.
    /sbin/reboot

    For primary-standby deployments, ensure that the primary and standby nodes sync up before proceeding further with next steps.

4.5.8 Step 7: If Necessary, Remove Old Kernels

Oracle recommends that you clean up the older kernels that were left behind after the upgrade.

While the older kernel is not in use, it may be marked as an issue by some code analysis tools.
  1. Log in to the Oracle Key Vault server as the support user.
  2. Switch to the root user.
    su - root
  3. Mount /boot if it was not mounted on the system.
    1. Check if the /boot is mounted. The following command should display /boot information if it was mounted.
      df -h /boot;
    2. Mount it if /boot is not mounted.
      /bin/mount /boot;
  4. Check the installed kernels and the running kernel.
    1. Search for any kernels that are installed.
      rpm -q kernel-uek | sort;

      The following example output shows that two kernels are installed:

      kernel-uek-4.1.12-103.9.4.el6uek.x86_64
      kernel-uek-4.1.12-112.16.7.el6uek.x86_64
    2. Check the latest kernel.
      uname -r;

      The following output shows an example of a kernel version that was installed at the time:

      4.1.12-112.16.7.el6uek.x86_64

      This example assumes that 4.1.12-112.16.7.el6uek.x86_64 is the latest version, but newer versions may be available by now. Based on this output, you will need to remove the kernel-uek-4.1.12-103.9.4.el6uek.x86_64 kernel. You should remove all kernels that are older than the latest kernel.

  5. Remove the older kernel and its associated RPMs.

    For example, to remove the kernel-uek-4.1.12-103.9.4.el6uek.x86_64 kernel:

    yum --disablerepo=* remove `rpm -qa | grep 4.1.12-103.9.4.el6uek`;

    Output similar to the following appears:

    Loaded plugins: security
    Setting up Remove Process
    Resolving Dependencies
    --> Running transaction check
    ---> Package kernel-uek.x86_64 0:4.1.12-103.9.4.el6uek will be erased
    ---> Package kernel-uek-devel.x86_64 0:4.1.12-103.9.4.el6uek will be erased
    ---> Package kernel-uek-firmware.noarch 0:4.1.12-103.9.4.el6uek will be erased
    --> Finished Dependency Resolution
    
    Dependencies Resolved
    
    =================================================================================================================
     Package               Arch    Version                Repository                                            Size
    =================================================================================================================
    Removing:
     kernel-uek            x86_64  4.1.12-103.9.4.el6uek  @anaconda-OracleLinuxServer-201410181705.x86_64/6.6  241 M
     kernel-uek-devel      x86_64  4.1.12-103.9.4.el6uek  @anaconda-OracleLinuxServer-201410181705.x86_64/6.6   38 M
     kernel-uek-firmware   noarch  4.1.12-103.9.4.el6uek  @anaconda-OracleLinuxServer-201410181705.x86_64/6.6  2.9 M
    
    Transaction Summary
    =================================================================================================================
    Remove        3 Package(s)
    
    Installed size: 282 M
    Is this ok [y/N]:
  6. Enter y to accept the deletion output.
  7. Repeat these steps starting with Step 4 for all kernels that are older than the latest kernel.

4.5.9 Step 8: If Necessary, Remove SSH-Related DSA Keys

You should remove SSH-related DSA keys left behind after the upgrade, because they can cause problems with some code analysis tools.

  1. Log in to the Oracle Key Vault management console as a user with the System Administrator role.
  2. Enable SSH.

    Log in to the Oracle Key Vault management console as a user who has the System Administrator role. Select the System tab, then Settings. In the Network Details area, click SSH Access. Select IP address(es) and then enter only the IP addresses that you need, or select All. Click Save.

  3. Login to the Oracle Key Vault support account using SSH.
    ssh support@OracleKeyVault_serverIPaddress
  4. Switch to the root user.
    su - root
  5. Change directory to /etc/ssh.
    cd /etc/ssh
  6. Rename the following keys.
    mv ssh_host_dsa_key.pub ssh_host_dsa_key.pub.retire
    mv ssh_host_dsa_key ssh_host_dsa_key.retire
  7. Disable SSH access.

    Log in to the Oracle Key Vault management console as a user who has the System Administrator role. Select the System tab, then Settings. In the Network Details area, click SSH Access. Select Disabled. Click Save.

4.5.10 Step 9: Back Up the Upgraded Oracle Key Vault Server

You must perform server backup and user password tasks after completing a successful upgrade.

  1. Take a full backup of the upgraded Oracle Key Vault Server Database to a new remote destination. Avoid using the old backup destination for the new backups.
  2. Schedule a new periodic incremental backup to the new destination defined in the preceding step.
  3. Change the Oracle Key Vault administrative passwords.
    Password hashing has been upgraded to a more secure standard than in earlier releases. This change affects the operating system passwords, support and root. You must change Oracle Key Vault administrative passwords after the upgrade to take advantage of the more secure hash.

4.6 Upgrading Oracle Key Vault in a Multi-Master Cluster Environment

Similar to a standalone or primary-standby upgrade, this type of upgrade includes the Oracle Key Vault server software and endpoint software-related utilities.

4.6.1 About Upgrading Oracle Key Vault in a Multi-Master Cluster Environment

To perform this upgrade, you must upgrade each multi-master cluster node.

There are different steps for upgrading the multi-master cluster depending on your deployment. A 2-node cluster, running Oracle Key Vault release 18.5 or earlier, configured as a single read-write pair would involve running a pre-upgrade script which no other deployment requires. Multi-master cluster nodes deployed in a read-write configuration must follow different upgrade steps than those deployed as read-only nodes.

Oracle does not support direct upgrades from Oracle Key Vault release 18.1 or earlier. You must upgrade to Oracle Key Vault release 18.2 or later before upgrading to release 21.1.

The upgrade process involves performing the upgrade on each multi-master cluster node. After you have begun a cluster upgrade, ensure that you upgrade all the nodes in the cluster one after the other, without too much intervening time between upgrades of two nodes.

Upgrading an Oracle Key Vault multi-master cluster includes upgrading each cluster node to the new later version. You must upgrade all nodes to the same Oracle Key Vault version. You should first upgrade the read-only nodes of the cluster, and then upgrade the read-write pairs. As each cluster node is upgraded, its node version is updated to the new version of the Oracle Key Vault. After you complete the upgrade of all cluster nodes, the cluster version is updated to the new version of the Oracle Key Vault. You can check node version or the cluster version by selecting the Cluster tab, then in the left navigation bar, selecting Management. Oracle Key Vault multi-master cluster upgrade is considered complete when node version and cluster version at each cluster node is updated to the latest version of Oracle Key Vault.

Before you perform the upgrade, note the following:

  • Perform the entire upgrade process on all multi-master cluster nodes, without interruption. That is, after you have started the cluster upgrade process, ensure that you try and upgrade all nodes, individually one after the other or in read-write pairs. Do not perform any critical operations or make configurational changes to Oracle Key Vault until you have completed upgrading all the nodes in your environment.
  • Be aware that you cannot use any new features that were introduced in this release until you have completed upgrading all of the multi-master cluster nodes. An error is returned when such features are used from the node that has been upgraded. Oracle recommends that you plan the upgrade of all cluster nodes close to each other to ensure availability of the new features sooner.

4.6.2 Step 1: Perform Pre-Upgrade Tasks

Similar to a standalone or primary-standby environment, you must prepare the Oracle Key Vault server for the pre-upgrade multi-master cluster process.

  1. Back up the server so that you can recover data in case the upgrade fails.
  2. Perform the pre-upgrade tasks that are described for standalone or primary-standby environments, which include tasks such as ensuring that the server meets the minimum disk space requirements by adding a new disk to extend vg_root, ensuring that no full or incremental backup jobs are running, planning for any down time, and disabling STIG. (To disable STIG, as root, execute the following command: /usr/local/dbfw/bin/stig --apply --disable) Adding a new disk to a multi-master cluster node requires that the node be disabled before it is shut down to add the new disk, and then enabled again after the disk has been successfully added.
  3. Check the disk size before you begin the upgrade. If any of the nodes in question have a disk size that is greater than 2 TB, then you cannot upgrade that system to the new release. Oracle recommends that you remove the node from the cluster and if possible, replace it with a node whose disk is less than 2 TB in size.
  4. Increase the Maximum Disable Node Duration setting as appropriate so that any disabled cluster nodes have sufficient time to be upgraded then enabled back into the cluster. Note that increasing the Maximum Disable Node Duration setting also increases disk space usage.

4.6.3 Step 2: Add Disk Space to Extend the vg_root for Upgrade to Oracle Key Vault Release 21.1

To upgrade to Oracle Key Vault release 21.1, you will need additional disk space by adding an additional disk to be able to extend the vg_root.

When you add disk space for upgrades to Oracle Key Vault 21.1 in a multi-master cluster configuration, you must perform this step after the node has been disabled. Before you start this procedure, ensure that all endpoints have persistent cache enabled and in use.
  1. Log in to the server for which you will perform the upgrade and switch user as root.
  2. Ensure that the persistent cache settings for Oracle Key Vault have been set.
    You will need to ensure that the persistent cache has been enabled because in a later step in this procedure, you must shut down the server. Shutting down the Oracle Key Vault server will incur downtime. To avoid any downtime, Oracle recommends that you turn on persistent cache.
  3. Run the vgs command to determine the free space
    vgs

    The VFree column shows how much free space you have (for example, 21 GB).

  4. Disable the node.
    Select the Cluster tab, and then Management in the left navigation bar. Under Cluster Details, select check box for the node to disable, and then click Disable. The node's status will change from DISABLING to DISABLED.
  5. Power off the server in order to add a new disk
    /sbin/shutdown -h now
  6. Add a new disk to the server with a capacity of 100 GB or greater
  7. Start the server.
  8. Log in to the Oracle Key Vault server through SSH as user support, then switch user su to root.
    ssh support@okv_server_IP_address
    su - root
    
  9. Stop the Oracle Key Vault services.
    service tomcat stop;
    service httpd stop;
    service kmipus stop;
    service kmip stop;
    service okvogg stop;
    service javafwk stop;
    service monitor stop;
    service controller stop;
    service dbfwlistener stop;
    service dbfwdb stop;
    service rsyslog stop;
    
  10. Run the fdisk -l command to find if there are any available partitions on the new disk.
    fdisk -l
    At this stage, there should be no available partitions.
  11. Run the fdisk disk_device_to_be_added command to create the new partition.
    For example, to create a disk device named /dev/sdb:
    fdisk /dev/sdb

    In the prompts that appear, enter the following commands in sequence:

    • n for new partition
    • p for primary
    • 1 for partition number
    • Accept the default values for cylinder (press Enter twice).
    • w to write and exit
  12. Use the pvcreate disk_device_partition command to add the newly added disk to the physical volume.
    For example, for a disk device named /dev/sdb1, which is the name of the disk partition that you created (based on the name used for the disk device that was added).
    pvcreate /dev/sdb1

    Output similar to the following appears:

    Physical volume "/dev/sdb1" successfully created
  13. Use the vgextend vg_root disk_device_partition command to extend the logical volume with this disk space that you just added.
    For example, for the partition /dev/sdb1, you would run:
    vgextend vg_root /dev/sdb1

    Output similar to the following appears:

    Volume group "vg_root" successfully extended
  14. Run the vgs command again to ensure that VFree shows an increase of 100 GB.
    vgs

    Output similar to the following appears:

    VG      #PV #LV #SN Attr   VSize   VFree
    vg_root   2  12   0 wz--n- 598.75g <121.41g
    
  15. Restart the Oracle Key Vault server.
    /sbin/reboot

    After you have successfully added the disk, re- enable the node. After you re-enable the disabled multi-master cluster node, its status changes from DISABLED to ENABLING, then to ACTIVE. The status of the node will remain at ENABLING and will not change to ACTIVE unless bidirectional replication between it and all other nodes is occurring successfully.

4.6.4 Step 3: Upgrade Multi-Master Clusters

Depending on your multi-master cluster configuration, you must follow the steps that are specific to your deployment.

4.6.4.1 About Upgrading Multi-Master Clusters

When upgrading a multi-master cluster, you may upgrade the read-only nodes one after the other and in the case of read-write pairs, you must upgrade both of the nodes simultaneously.

To perform the upgrade, you must upgrade each multi-master cluster node. There are different steps for upgrading the multi-master cluster depending on your deployment. A two-node cluster, running Oracle Key Vault release 18.5 or earlier, configured as a single read-write pair would involve running a pre-upgrade script which no other deployment requires. For multi-master cluster nodes that were deployed in a read-write configuration, you must follow different upgrade steps than those that were deployed as read-only nodes.

This section describes the upgrade methods for the various deployments. Choose the method that is appropriate for your configuration. When upgrading read-write pairs, after disabling both the nodes, you can upgrade the nodes at the same time. However, Oracle recommends that you upgrade the cluster nodes one at a time. If you have a multi-master cluster with three or more nodes, then you can upgrade two nodes at the same time with no down time.

When upgrading read-write pairs, it is critically important that you perform the steps in the proper order on the two nodes.

If your cluster consists of only two nodes in a read-write configuration and if you are upgrading from Oracle Key Vault release 18.2 through 18.5, then you must execute a pre-upgrade script before performing the upgrade. The pre-upgrade script is not to be executed in any other multi-master cluster configuration.

4.6.4.2 Upgrading Multi-Master Cluster Read-Only Nodes

Before upgrading multi-master cluster read-only nodes, ensure that you understand the requirements for performing this kind of upgrade.

Oracle recommends that you upgrade the read-only nodes one at a time. You must upgrade read-only nodes ahead of any read-write pairs. Direct upgrades from release 18.1 or earlier are not supported. You must upgrade to Oracle Key Vault release 18.2 or later before upgrading to release 21.1. Do not perform any critical operations or make configurational changes to Oracle Key Vault until you have completed upgrading all multi-master cluster nodes.
You must perform these steps on each read-only node of the cluster, one after the other.
  1. Ensure that you have performed the pre-upgrade steps.
  2. Log in to the management console as a user with the System Administrator role.
  3. Disable the multi-master cluster node.
    Select the Cluster tab, and then Management in the left navigation bar. Under Cluster Details, select check box for the node to disable, and then click Disable. The node's status will change from DISABLING to DISABLED
  4. Ensure that you have added disk space to extend the vg_root for the upgrade to release 21.1.
  5. Perform the upgrade as you would upgrade a standalone Oracle Key Vault server by performing steps 2 through 10 (but not a primary-standby pair).
    When you run the /usr/bin/ruby /images/upgrade.rb --confirm step during the upgrade, you may be asked to confirm that you completed the pre-upgrade steps.
  6. After the node has been successfully upgraded, re-enable it.
    To enable it, select the Cluster tab, and then Management in the left navigation bar. Under Cluster Details, select check box for the node to enable, and then click Enable.
    After you re-enable the disabled multi-master cluster node, its status changes from DISABLED to ENABLING, then to ACTIVE. The status of the node will remain at ENABLING and will not change to ACTIVE unless bidirectional replication between it and all other nodes is occurring successfully.
  7. As necessary, disable SSH access on this node.

    Log in to the Oracle Key Vault management console as a user who has the System Administrator role. Select the System tab, then Settings. In the Network Details area, click SSH Access. Select Disabled. Click Save.

  8. After you have successfully completed this procedure, repeat these upgrade steps on all remaining read-only multi-master cluster nodes.
4.6.4.3 Upgrading Multi-Master Cluster Read-Write Pairs

Before upgrading multi-master cluster read-write pairs, ensure that you understand the requirements for performing this kind of upgrade.

Do not perform any critical operations or make configuration changes to Oracle Key Vault until you have completed upgrading all multi-master cluster nodes.

You must perform these steps on both nodes of the cluster read-write pair in the order specified for all read-write pairs of your cluster. In order to perform the upgrade using this method, you must arbitrarily decide which of the read-write nodes of your pair will be Node A and which node will be Node B. The steps below will refer to Node A and Node B which correspond to your Node A and Node B.

Direct upgrades to Oracle Key Vault 21.2 from releases 18.1 or earlier are not supported. You must upgrade to Oracle Key Vault release 18.2 or later before upgrading to release 21.2. If you are upgrading a two-node cluster that runs Oracle Key Vault release 18.5 or earlier and is configured as a single read-write pair, then you must run the pre-upgrade script on each multi-master cluster node after mounting the ISO, but before performing the full upgrade.

Generally, once your cluster nodes are disabled, they become unavailable for use. Therefore, in order to allow operational continuity when you upgrade a two-node cluster that is configured as a read-write pair, applying the pre-upgrade script on both nodes allows the node to remain available in a read-only mode, even when the node is disabled. After both the nodes are disabled, you can upgrade the nodes one at a time; the order is at your discretion. However, when you enable the nodes after they have been upgraded, you must enable them in the reverse order that they were disabled.

If your deployment required running the pre-upgrade script, then after you run the pre-upgrade script, proceed with the standard upgrade process as follows. Disable both nodes (the order of disabling matters) of the read-write pair, add the extra disk space as necessary and then perform the upgrade and reboot. When you run the upgrade and reboot commands, Oracle recommends running them on one node of the pair before running it on the other node to avoid down time.

  1. Log into the Node A Oracle Key Vault management console as a user who has the System Administrator role.
  2. Ensure that SSH access is enabled.

    Log in to the Oracle Key Vault management console as a user who has the System Administrator role. Select the System tab, then Settings. In the Network Details area, click SSH Access. Select IP address(es) and then enter only the IP addresses that you need, or select All. Click Save.

  3. Ensure you have enough space in the destination directory for the upgrade ISO files.
  4. Log in to the Oracle Key Vault server through SSH as user support, then switch user su to root.
    If the SSH connection times out while you are executing any step of the upgrade, then the operation will not complete successfully. Oracle recommends that you ensure that you use the appropriate values for the ServerAliveInterval and ServerAliveCountMax options for your SSH sessions to avoid upgrade failures.
    Using the screen command prevents network disconnections interrupting the upgrade. If the session terminates, resume as follows:
    screen -r
  5. Copy the upgrade ISO file to the destination directory using Secure Copy Protocol or other secure transmission method.
    scp remote_host:remote_path/okv-upgrade-disc-new_software_release.iso /var/lib/oracle
    • remote_host is the IP address of the computer containing the ISO upgrade file.
    • remote_path is the directory of the ISO upgrade file. Do not copy this file to any location other than the /var/lib/oracle directory.
  6. Make the upgrade accessible by using the mount command:
    /bin/mount -o loop,ro /var/lib/oracle/okv-upgrade-disc-new_software_release.iso /images
  7. If your Oracle Key Vault deployment consists solely of two cluster nodes in a read-write configuration running Oracle Key Vault 18.5 or earlier, then you must prepare the cluster for the upgrade process by executing a pre-upgrade script on both nodes.
    You must run this pre-upgrade step only when you are upgrading a two-node cluster, running Oracle Key Vault 18.5 or earlier, configured as a single read-write pair. Do not run this pre-upgrade script on a cluster of any other configuration.
    1. Unzip the upgrade script and save it in /tmp. Perform this step on both nodes.
      /usr/bin/unzip -d /tmp/ /images/preupgrade/cluster_preupgrade_211.zip
    2. Execute the upgrade script on each node to be upgraded.
      /tmp/cluster_preupgrade_211.sh
    3. Check for errors on each node by executing the following command:
      echo $?
    4. Check the upgrade script log /tmp/cluster_preupgrade_211.log on each node for any errors.
  8. Disable Node A.
    Select the Cluster tab, and then Management in the left navigation bar. Under Cluster Details, select check box for the node to disable, and then click Disable. The node's status will change from DISABLING to DISABLED
  9. Wait until Node A is disabled before proceeding.
  10. Log into the Node B management console as a user with the System Administrator role.
  11. Disable Node B.
    Select the Cluster tab, and then Management in the left navigation bar. Under Cluster Details, select check box for the node to disable, and then click Disable. The node's status will change from DISABLING to DISABLED
  12. Wait until Node B is disabled before proceeding
  13. Ensure that you have added disk space to extend the vg_root for both nodes.
  14. For each node of the read-write pair, do the following:
    Complete these steps on each node of a read-write pair in turn. In other words, perform the steps on the disabled Node A, allow the upgrade to complete, and then perform the steps on the disabled Node B.
    1. Log in to the Oracle Key Vault server through SSH as user support, then switch user su to root.
      ssh support@okv_server_IP_address
      su - root
    2. Clear the cache using the clean all command:
      root# yum -c /images/upgrade.repo clean all
    3. Apply the upgrade with upgrade.rb command:
      root# /usr/bin/ruby /images/upgrade.rb --confirm

      When you run the /usr/bin/ruby /images/upgrade.rb --confirm step during the upgrade, you may be asked to confirm that you completed the pre-upgrade steps.

      When you run the upgrade.rb command, Oracle recommends that you execute this step and the next step (reboot) on one node first and then on the second after the first has completed. If your multi-master cluster deployment consists of three or more nodes, then you can upgrade both nodes of the read-write pair at the same time and avoid any down time.

      If the system is successfully upgraded, then the command will display the following message:

      Remove media and reboot now to fully apply changes.

      If you see an error message, then check the log file /var/log/messages for additional information.

    4. Restart the Oracle Key Vault server by running reboot command:
      root# /sbin/reboot

      On the first restart of the computer after the upgrade, the system will apply the necessary changes. This can take a few hours. Do not shut down the system during this time.

      The upgrade of the cluster node is completed when the screen with heading: Oracle Key Vault Server new_software_release appears, with new_software_release reflecting the release number of the upgraded version. Following the heading appears the menu item Display Appliance Info. Select Display Appliance Info and press the Enter key to see the IP address settings for the appliance.

  15. After each node has been upgraded, clear your browser's cache before attempting to log in.
  16. After both nodes has been successfully upgraded, re-enable Node B first (nodes must be enabled in the reverse order that they were disabled).
    After you re-enable the disabled multi-master cluster node, its status changes from DISABLED to ENABLING, then to ACTIVE. The status of the node will remain at ENABLING and will not change to ACTIVE unless bidirectional replication between it and all other nodes is occurring successfully.
  17. Re-enable Node A.
    After you re-enable the disabled multi-master cluster node, its status changes from DISABLED to ENABLING, then to ACTIVE. The status of the node will remain at ENABLING and will not change to ACTIVE unless bidirectional replication between it and all other nodes is occurring successfully.
  18. As necessary, disable SSH access on each node.

    Log in to the Oracle Key Vault management console as a user who has the System Administrator role. Select the System tab, then Settings. In the Network Details area, click SSH Access. Select Disabled. Click Save.

  19. After you have successfully completed this procedure, repeat these upgrade steps on all remaining multi-master cluster read-write pairs.

4.6.5 Step 4: Check the Node Version and the Cluster Version

After you complete the upgrade of at least one node, you can log into any of the upgraded nodes to check the node and cluster versions.

Oracle Key Vault tracks the version information of each cluster node as well as the version of the cluster as a whole. The node version represents the version of the Oracle Key Vault software on a given node. When a node is upgraded, its node version is updated to the new version of the Oracle Key Vault software. The cluster version is derived from the version information of the cluster nodes and is set to the minimum version of any cluster node. During cluster upgrade, node version is updated as each cluster node is upgraded to the later version. When all of the cluster nodes have been upgraded, the cluster version is then updated to the new version. (The Cluster Version and Node Version fields are available in Oracle Key Vault release 18.2 or later.)
  1. Log in to the Oracle Key Vault management console as a user who has the System Administrator role.
  2. Select the Cluster tab.
  3. In the left navigation bar, select Management.
  4. Check the following areas:
    • To find the node version, check the Cluster Details area.
    • To find the cluster version, check the Cluster Information area.

4.6.6 Step 5: If Necessary, Change the Network Interface for Upgraded Nodes

Nodes that were created in Oracle Key Vault releases earlier than release 21.1 use Classic mode, in which only one network interface was used.

If you prefer to use dual NIC network mode, which supports the use two network interfaces, then you can switch the node to use this mode, from the command line.

4.7 Overview of the Oracle Key Vault Management Console

The Oracle Key Vault management console provides a graphical user interface for Oracle Key Vault users.

The Oracle Key Vault management console is a browser-based console that connects to the server using the https secure communication channel. It provides the graphical user interface for Oracle Key Vault, where users can perform tasks such as the following:

  • Setting up and managing the cluster

  • Creating and managing users, endpoints, and their respective groups

  • Creating and managing virtual wallets and security objects

  • Setting system settings, like network and other services

  • Setting up primary-standby

  • Performing backups

4.8 Performing Actions and Searches
The Oracle Key Vault management console enables you to perform standard actions and search operations, as well as get help information.

Many of the tab and menu pages contain an Actions menu or Search bars that allow you to search and perform actions on lists and the results of searches. The Help selection of the Actions list provides detailed help for using these features.

4.8.1 Actions Menus

The actions available from an Actions drop-down menu can vary but typically include a set of standard menu items.

These items are as follows:

  • Select Columns: Select which column should be displayed.

  • Filter: Filter by column or row and a user-defined expression.

  • Rows Per Page: Choose how many rows you want to view .

  • Format: Choose formatting such as Sort, Control Break, Highlight, Compute, Aggregate, Chart, and Group By.

  • Save Report: Save reports.

  • Reset: Reset the report settings, removing any customizations.

  • Help: Get information about these actions.

  • Download: Download the result set in CSV or HTML.

4.8.2 Search Bars

Along with Actions menus, many tabs in the Oracle Key Vault management console contain search bars.

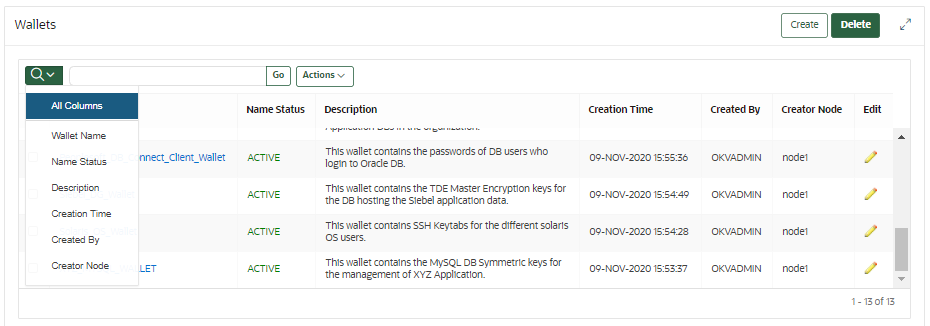
This demonstration searches for wallets, but the process is the same for other searches, except that the column headings are different. Wildcard characters are not supported, but the search does match any letter or phrase that you enter. You can use the Filter menu item under Actions to further fine-tune the search.
  1. Enter a name or other identifier in the search field or (optionally) place your cursor on the magnifying icon in the Search bar to select one of the table headings (in this case, All Columns, Wallet Name, Name Status, Description, Creation Time, Created By, and Creator Node) and then enter a search term.
  2. Click Go.

    A new wallet list appears, displaying the wallets that meet the search criteria. A filter icon (a funnel) indicates that a search has been performed and displays the search criteria.

  3. You can select or deselect the filter icon to disable search and view the entire list.