Deploying Oracle Key Vault on an Oracle Database Appliance
You can deploy Oracle Key Vault on Oracle Database Appliance to ensure hardware compatibility, streamline administration, and to take advantage of a fully validated and reliable solution.
You can deploy Oracle Key Vault on Oracle Database Appliance if you already have Oracle Database running on Oracle Database Appliance. Oracle recommends this option if your preferred vendor does not support Oracle Key Vault hardware requirements.
-
About Oracle Database Appliance
Oracle Database Appliance integrates software, compute, storage, and network resources to deliver database services for a wide range of custom and packaged online transaction processing (OLTP), in-memory database, and data warehousing applications.
-
Benefits of Running Oracle Key Vault on Oracle Database Appliance
When you run Oracle Key Vault on Oracle Database Appliance, you benefit from robust security, seamless integration, fully validated compatibility, and unified customer support.
-
Before deploying Oracle Key Vault on Oracle Database Appliance, Oracle recommends that you review and plan your Oracle Key Vault deployment configuration.
-
Deployment Options and Shape Selection
You can select the appropriate Oracle Database Appliance deployment and shape based on your Oracle Key Vault node requirements and whether you are deploying only Oracle Key Vault or both Oracle Key Vault and Oracle Database together.
-
Installing Oracle Key Vault on Oracle Database Appliance
Learn how to deploy a single node of Oracle Key Vault cluster or a standalone Oracle Key Vault server on Oracle Database Appliance in dedicated mode.
-
Managing Oracle Key Vault on Oracle Database Appliance
You can manage Oracle Key Vault on Oracle Database Appliance in the same way as on other platforms, with a few operational differences.
Related Topics
About Oracle Database Appliance
Oracle Database Appliance integrates software, compute, storage, and network resources to deliver database services for a wide range of custom and packaged online transaction processing (OLTP), in-memory database, and data warehousing applications.
By integrating hardware and software, Oracle Database Appliance eliminates complexities of non-integrated, manually assembled solutions, and significantly reduces installation and software deployment times. Oracle Database Appliance also prevents configuration and setup errors that often result in suboptimal, hard-to-manage database environments. High performance, availability, and automation provided by Oracle Database Appliance help you run crucial applications faster, with less downtime, and at a lower cost.
Related Topics
Benefits of Running Oracle Key Vault on Oracle Database Appliance
When you run Oracle Key Vault on Oracle Database Appliance, you benefit from robust security, seamless integration, fully validated compatibility, and unified customer support.
Security
Oracle Key Vault is a robust, security-hardened software appliance designed to centrally manage keys and other security objects, leveraging full stack and operating system hardening best practices.
When you deploy Oracle Key Vault on Oracle Database Appliance, you further strengthen security by leveraging the hardened operating system, secure boot, and reduced attack surface of Oracle Database Appliance, in addition to the robust safeguards provided by Oracle Key Vault.
Both products also receive regular release updates that include fixes for security vulnerabilities, thus helping you maintain a secure Oracle Key Vault deployment.
Certified Compatibility and Validation
You must deploy Oracle Key Vault on hardware that meets its compatibility requirements. Deploying Oracle Key Vault on Oracle Database Appliance is a convenient and reliable option, as it addresses the challenges of sourcing compatible hardware and reduces the effort to identify and resolve any hardware incompatibilities that may occur with other platforms.
All new releases of Oracle Key Vault are validated with the latest version of Oracle Database Appliance available at the time of release. This simultaneous validation of the hardware and software stack ensures reliable operation of the combined offering.
Streamlined User Experience
If you already use Oracle Database Appliance for your database deployments, you can leverage your existing hardware administration expertise and maintain operational consistency by deploying Oracle Key Vault on the same platform. Additionally, you benefit from a unified support channel for the combined offering.
Related Topics
Deployment Considerations
Before deploying Oracle Key Vault on Oracle Database Appliance, Oracle recommends that you review and plan your Oracle Key Vault deployment configuration.
Oracle Key Vault supports multiple deployment configurations. For production environments, Oracle recommends deploying a multi-master cluster to ensure high availability. You can also extend on-premises Oracle Key Vault deployments with cluster nodes in Oracle Cloud Infrastructure (OCI), Amazon Web Services, Microsoft Azure, or Google Cloud.
When planning the deployment, consider factors such as the number of cluster nodes and whether the deployment will span multiple regions. Oracle recommends deploying a cluster with a minimum of four nodes, configured as two read/write pairs. For deployments that span multiple regions, configure nodes across regions as read-write pairs.
- Recommendations Recommendations to consider before deploying Oracle Key Vault on Oracle Database Appliance.
Related Topics
Recommendations
Recommendations to consider before deploying Oracle Key Vault on Oracle Database Appliance.
-
Oracle recommends that you deploy only one Oracle Key Vault node per Oracle Database Appliance.
-
For a four-node cluster, you can deploy 2 cluster nodes on a single Oracle Database Appliance.
-
Never use the same Oracle Database Appliance to deploy 2 cluster nodes of the same read/write pair.
-
For a multi-region deployment, deploy cluster nodes of a read/write pair in different regions.
Deployment Options and Shape Selection
You can select the appropriate Oracle Database Appliance deployment and shape based on your Oracle Key Vault node requirements and whether you are deploying only Oracle Key Vault or both Oracle Key Vault and Oracle Database together.
You can deploy Oracle Key Vault on Oracle Database Appliance in one of the following ways:
-
Dedicated mode (Oracle Key Vault only): Use Oracle Database Appliance exclusively for Oracle Key Vault nodes.
-
Shared mode (Oracle Key Vault and Oracle Database): Deploy both Oracle Key Vault and Oracle Databases on the same Oracle Database Appliance instance.
Review Deploying Database Systems and Application VMs on Oracle Database Appliance to understand the different architectures for deploying applications such as Oracle Key Vault on Oracle Database Appliance. You must deploy Oracle Key Vault in a KVM virtual machine. In shared deployments, Oracle recommends that you deploy Oracle Database and Oracle Key Vault in separate KVM guest machines for isolation and resource management.
Oracle Database Appliance is available in different hardware configurations such as Oracle Database Appliance X11-S and Oracle Database Appliance X11-L. Oracle Database Appliance X11-S is a small configuration designed for smaller or entry-level deployments. Oracle Database Appliance X11-L is a large configuration designed for larger databases.
Related Topics
Shapes and Sizing Recommendations
Shape and sizing recommendations may vary depending on your Oracle Key Vault deployment scale (small, medium, large, or very large) and the specific appliance shape that you select. Use these configuration details as a guide and adjust them as needed for your environment.
-
Oracle Database Appliance X11-S Shape Specification Base configuration of the Oracle Database Appliance X11-S shape.
-
Sizing Recommendations for Common Deployment Options Hardware sizing recommendations for common deployment options of Oracle Key Vault on Oracle Database Appliance X11-S.
Oracle Database Appliance X11-S Shape Specification
Base configuration of the Oracle Database Appliance X11-S shape.
-
CPUs: 32 cores (64 vCPUs)
-
Memory: 256 GB
-
Storage: 6.2 TB
Related Topics
Sizing Recommendations for Common Deployment Options
The following table provides details of the hardware sizing recommendations for common deployment options of Oracle Key Vault on Oracle Database Appliance X11-S.
| Deployment Option | Oracle Key Vault Shape | Database Shape | Usage |
|---|---|---|---|
| Dedicated mode deployment of a single Oracle Key Vault node |
|
Not applicable | Recommended for large Oracle Key Vault production environments. |
| Dedicated mode deployment of two Oracle Key Vault nodes |
|
Not applicable | Recommended for small to medium Oracle Key Vault production deployments, and test and development environments. |
| Shared mode deployment of one Oracle Key Vault node with one or more Oracle Databases |
|
In this deployment mode, you can additionally run one Oracle Database Appliance 12 or equivalent databases on Oracle Database Appliance. However, database storage cannot exceed 1.5 TB. Oracle Database Appliance 12 shape:
|
Recommended for small to medium Oracle Key Vault production deployments, and test and development environments. |
Related Topics
Installing Oracle Key Vault on Oracle Database Appliance
Learn how to deploy a single node of Oracle Key Vault cluster or a standalone Oracle Key Vault server on Oracle Database Appliance in dedicated mode.
-
Step 1: Prerequisites and Assumptions
To deploy Oracle Key Vault on Oracle Database Appliance, ensure you meet the prerequisites for setting up Oracle Key Vault on Oracle Database Appliance.
-
Step 2: Download Oracle Key Vault Appliance Software
Use the link in this topic to understand the process for a fresh installation or upgrade of Oracle Key Vault.
-
Create a Virtual Machine (VM) storage with sufficient capacity to accommodate the Oracle Key Vault disk, installation software, and additional metadata.
-
Step 4: Host the Oracle Key Vault Appliance Software on Oracle Database Appliance
This topic lists the steps to host Oracle Key Vault on Oracle Database Appliance.
-
Step 5: Create a Virtual Network
This topic lists the steps to create a virtual network, if required.
-
Step 6: Reclaim Memory for Oracle Key Vault
If you are deploying only Oracle Key Vault on Oracle Database Appliance, you can reclaim memory reserved for HugePages, if required.
-
Step 7: Create a VM Instance for Oracle Key Vault
This topic describes how to create a VM instance for Oracle Key Vault.
-
Step 8: Start a VM Manager on Oracle Database Appliance
You must start a VM manager in a Virtual Network Computing (VNC) environment to complete the Oracle Key Vault installation steps that require user interaction.
-
Step 9: Install Oracle Key Vault
This topic lists the steps to install Oracle Key Vault.
Step 1: Prerequisites and Assumptions
To deploy Oracle Key Vault on Oracle Database Appliance, ensure you meet the prerequisites for setting up Oracle Key Vault on Oracle Database Appliance.
-
In this appendix, the Oracle Key Vault release number is denoted as 21.x.0.0.0, where x represents the release update number. When following the configuration steps and examples, substitute x with the current release update number.
-
Ensure that you have set up Oracle Database Appliance as described in the Oracle Database Appliance X11 Deployment and User’s Guide.
-
Determine the Oracle Key Vault shape to be deployed. Ensure that the appliance has sufficient resources to meet the requirements.
The steps documented in this section assume the installation of a single Oracle Key Vault node in dedicated mode on Oracle Database Appliance X11-S with the following shape:
-
CPUs: 28 cores (56 vCPUs)
-
Memory: 128 GB
-
Storage: 4 TB
If your deployment on Oracle Database Appliance is different, use the guidance in the sectionDeployment Options and Shape Selection to adjust the configuration values for CPU, memory, and disk, and modify the following steps as needed.
-
-
Decide the names that you will use for the Virtual Machine and VM Storage. The setup instructions in this section assume the following names and configuration:
-
<OKV VM NAME>:okv_node_1 -
<OKV VM STORAGE>:okvstorage -
<vCPUs>: 56 -
<Memory>: 128 GB -
<Disk size>: 4096 GB
-
-
Commands in the setup instructions in this section are run as
rooton Oracle Database Appliance. However, if you have provisioned Oracle Database Appliance using multi-user access (MUA), then you must use theodaadminuser to run ODACLI commands.
Step 2: Download Oracle Key Vault Appliance Software
Use the link in this topic to understand the process for a fresh installation or upgrade of Oracle Key Vault.
Download the Oracle Key Vault installation ISO file using the steps described in unresolvable-reference.html#GUID-0B41BC20-AD49-4DE0-A0E7-AD4D1AE23570.
Step 3: Create VM Storage
Create a Virtual Machine (VM) storage with sufficient capacity to accommodate the Oracle Key Vault disk, installation software, and additional metadata.
This setup creates a VM storage with a total size of 4128 GB, assuming:
-
4 TB for Oracle Key Vault disk size.
-
22 GB for Oracle Key Vault install ISO file.
-
10 GB for additional metadata.
Note: The size of the Oracle Key Vault installation ISO file changes with each release. Hence, you may have to allocate more space for later Oracle Key Vault versions.
To create VM storage, run the following ODACLI command:
odacli create-vmstorage --name <OKV VM STORAGE> --size <OKV VM storage size>For example:
# odacli create-vmstorage --name okvstorage --size 4128G

Job details
----------------------------------------------------------------
                     ID:  6a3f635d-5117-4c45-a2c1-6dfea0803609
            Description:  VM storage okvstorage creation
                 Status:  Created
                Created:  November 12, 2025 23:43:08 GMT
                Message:

Task Name                                Start Time
Time                                     Status
---------------------------------------- ----------------
Confirm that the VM storage is created using the following ODACLI command:
odacli describe-vmstorage --name <OKV VM STORAGE>For example:
# odacli describe-vmstorage --name okvstorage

VM Storage details
--------------------------------------------
ID:  402c1168-a7a7-41d8-b253-01e34a09b341
Name:  okvstorage
Created:  2025-11-13 06:54:58 GMT
Updated:  2025-11-13 06:54:58 GMT
Disk group:  DATA
Volume name:  OKVSTORAGE
Volume device:  /dev/asm/okvstorage-103
Size:
4.03 TB
Used:  8.55 GB
Used %:  0.21%
Available:  4.02 TB
Logical Available:  4.03 TB
Mount Point:  /u05/app/sharedrepo/okvstorage
Redundancy:  High
Step 4: Host the Oracle Key Vault Appliance Software on Oracle Database Appliance
This topic lists the steps to host Oracle Key Vault on Oracle Database Appliance.
Create a directory for the Oracle Key Vault installation ISO file on the VM storage okvstorage. The following instructions refer to this directory as Oracle Key Vault appliance software directory:
mkdir /u05/app/sharedrepo/<OKV VM STORAGE>/isoFor example:
# mkdir /u05/app/sharedrepo/okvstorage/isoCopy the Oracle Key Vault installation ISO file that you downloaded in Step 2 to the Oracle Key Vault appliance software directory. To do so, use scp or any other secure transmission method.
scp <OKV ISO image> root@<oda-machine>:/u05/app/sharedrepo/<OKV STORAGE NAME>/iso/For example:
# scp okv-installer-disc-21.x.0.0.0.iso root@scaoda11s01:/u05/app/sharedrepo/okvstorage/iso/# ls -l /u05/app/sharedrepo/okvstorage/iso
total 21929984
-rwxr-xr-x. 1 root 22453157888 Nov 12 23:39 okv-installer-disc-21.x.0.0.0.isoStep 5: Create a Virtual Network
This topic lists the steps to create a virtual network, if required.
You can use the default network pubnet, or you can create a custom network.
To create a custom network, use the following ODACLI command:
odacli create-vnetworkFor this setup, use the default network pubnet.
To list the available VM networks, run the ODACLI command:
odacli list-vnetworksFor example:
# odacli list-vnetworks
Name Type Interface Bridge Uniform Created Updated
---- ---- --------- ------ ------- ------- -------
pubnet Bridged btbond1 pubnet NO 2025-11-09 11:39:30 GMT 2025-11-09 11:39:30 GMT
Collect Network Details for Oracle Key Vault
Collect the required network information that you will need to specify later when you install Oracle Key Vault.
You must reserve a static IP address for the Oracle Key Vault server, as DHCP is not supported.
Network Information Using pubnet
Select an IP address that is reserved for the Oracle Key Vault node. For the gateway and network mask, use the gateway and subnet mask information from the pubnet vnetwork.
IP address: <IP address reserved for Oracle Key Vault>
Gateway: <from pubnet vnetwork>
Network mask: <from pubnet vnetwork>
Network Information When Using a Customer-defined Network
Select an IP address that is reserved for the Oracle Key Vault node. Additionally, note the gateway and network mask for this custom network.
Related Topics
Step 6: Reclaim Memory for Oracle Key Vault
If you are deploying only Oracle Key Vault on Oracle Database Appliance, you can reclaim memory reserved for HugePages, if required.
Run the following command to reclaim memory reserved for HugePages:
odacli modify-osconfigurations --number-hugepages 0For example:
# odacli modify-osconfigurations --number-hugepages 0
{
  "jobId" : "8526f4c7-f6d9-458f-b029-546f6f931c03",
  "status" : "Created",
  "message" : "Successfully submitted a request to configure OS parameters. Restart of nodes is required. ",
  "reports" : [ ],
  "createTimestamp" : "November 12, 2025 07:02:27 AM GMT",
  "resourceList" : [ ],
  "description" : "Configuring OS Parameter",
  "updatedTime" : "November 12, 2025 07:02:27 AM GMT",
  "jobType" : null,
  "cpsMetadata" : null
}
Reboot Oracle Database Appliance for the new settings to take effect. For example:
# /sbin/rebootStep 7: Create a VM Instance for Oracle Key Vault
This topic describes how to create a VM instance for Oracle Key Vault.
Use the following ODACLI command to create a virtual machine:
odacli create-vm --name <OKV VM NAME>
                 --vcpus <vCPUs>
                 --memory <Memory>
                 --size <Disk size>
                 --vmstorage <OKV VM STORAGE>
                 --vnetworks pubnet
                 --boot-options UEFI
                 --os-variant ol8.10
                 --source <Oracle Key Vault appliance software directory>
Guidelines to Create a Virtual Machine
-
Use the same operating system version and its variant that is used for Oracle Key Vault. For more information, see Critical Patch Updates Included in This Release.
-
Ensure that boot options are in UEFI mode only.
-
The VM size should only include storage space reserved for the Oracle Key Vault disk, and not the total size of VM storage created previously in Step 3: Create VM Storage. The VM storage
okvstorageincludes space for other objects such as metadata and the Oracle Key Vault installation ISO file.For example, to create a virtual machine, specify the VM size as 4096 GB, 56 virtual CPUs, and 128 GB of memory for the new VM to meet the Oracle Key Vault shape assumptions described inStep 1: Prerequisites and Assumptions.
#odacli create-vm --name okv_node_1

                  --vcpus 56

                  --memory 128G

                  --size 4096G

                  --vmstorage okvstorage

                  --vnetworks pubnet

                  --boot-options UEFI

                  --os-variant ol8.10

                  --source /u05/app/sharedrepo/okvstorage/iso/okv-installer-disc-21.x.0.0.0.iso

 Job details

----------------------------------------------------------------
ID:  74de535e-716e-4f36-b0f7-bbb1cc0914c9
Description:  VM okv_node_1 creation
Status: Created
Created: November 12, 2025 07:03:35 GMT
Message:

Task Name                                Start Time
End Time                                 Status

---------------------------------------- -----------------------

---------------------------------------- ----------------
Use the following ODACLI command to confirm that the Oracle Key Vault virtual machine (
okv_node_1) is created:odacli describe-vm --name <OKV VM NAME>For example:
# odacli describe-vm --name okv_node_1

VM details

--------------------------------------------------------------------------------
               ID:  1c99d7ce-0659-46d5-98b6-d99bcf772d84
             Name:  okv_node_1
          Created:  2025-11-12 23:47:41 GMT
          Updated:  2025-11-12 23:47:41 GMT
       VM Storage:  okvstorage
      Description:  NONE
    VM image path:  /u05/app/sharedrepo/okvstorage/.ACFS/snaps/vm_okv_node_1/okv_node_1
          VM size:  4.00 TB
           Source:  okv-installer-disc-21.x.0.0.0.iso
      Cloned from:  N/A
       OS Variant:  ol8.10
Graphics settings:  vnc,listen=127.0.0.1
     Display Port:  127.0.0.1:0

 Status

--------------------------
     Current node:  scaoda11s01
    Current state:  ONLINE
     Target state:  ONLINE

 Parameters

--------------------------
   Preferred node:  NONE
     Boot options:  uefi, hd
       Auto start:  YES
        Fail over:  NO
     NUMA enabled:  NO

                            Config                     Live

                            -------------------------  -------------------------
                   Memory:  128.00 GB                  128.00 GB
               Max Memory:  128.00 GB                  128.00 GB
                    count:  56                         56
           Max vCPU count:  56                         56
                 CPU Pool:  NONE
        Effective CPU set:  0-63                       0-63
                    vCPUs:  0:0-63                     0:0-63
                            1:0-63                     1:0-63
                            . . .
                            55:0-63                    55:0-63
                   vDisks:  NONE
                vNetworks:  pubnet:52:54:00:13:72:0e
Step 8: Start a VM Manager on Oracle Database Appliance
You must start a VM manager in a Virtual Network Computing (VNC) environment to complete the Oracle Key Vault installation steps that require user interaction.
Use the following command to start a VNC server:
# vncserver :1 -geometry 1600x900Note: If the display port :1 is not available, use another display port. Ensure that you use the same port in subsequent commands.
Run the following command to start the virtual machine manager (VM manager):
# export DISPLAY=:1
# virt-manager
Step 9: Install Oracle Key Vault
This topic lists the steps to install Oracle Key Vault.
Switch to the VM manager to begin the Oracle Key Vault installation.
-
In the VNC session, you can view the VM manager:
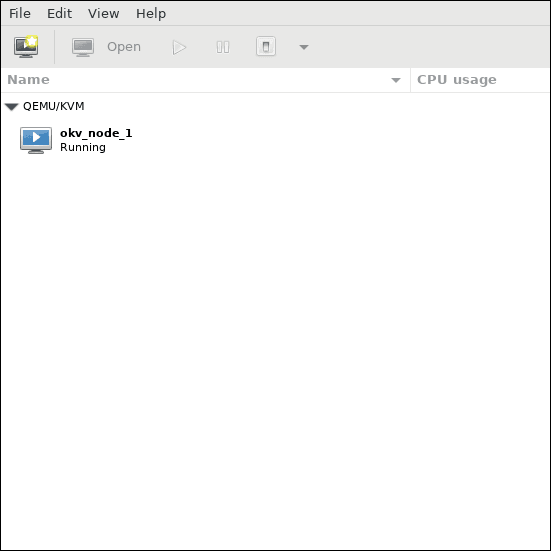
-
Double-click the Oracle Key Vault VM (
okv_node_1) which displays the Oracle Key Vault installation screen with two choices:-
Install Oracle Key Vault 21.x.0.0.0.
-
Install Oracle Key Vault 21.x.0.0.0 with FIPS Mode enabled.
Select one of the options to proceed with the installation. For more information, seeInstalling the Oracle Key Vault Appliance Software.
-
-
As part of the installation, Oracle Key Vault prompts you to provide the network details that you collected in Step 5: Create a Virtual Network.
-
After the network configuration is complete, the Oracle Key Vault server reboots.
Note:
After the reboot, the Oracle Key Vault log in prompt displays after approximately one minute.
To continue the installation, attach the Oracle Key Vault installation ISO file again.
-
In the VNC, the Virtual Machine manager is displayed.
-
Double-click the virtual machine to view the Oracle Key Vault console.
-
On the top-left of the screen, click Show virtual hardware details (the light bulb icon) to view the Oracle Key Vault virtual machine configuration.
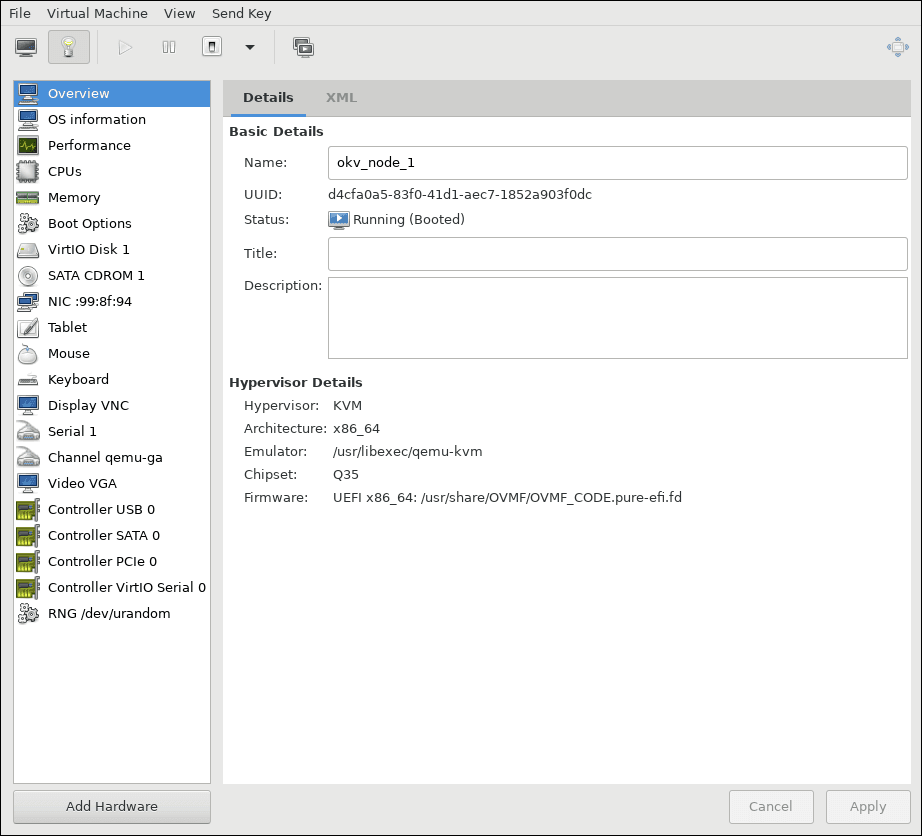
-
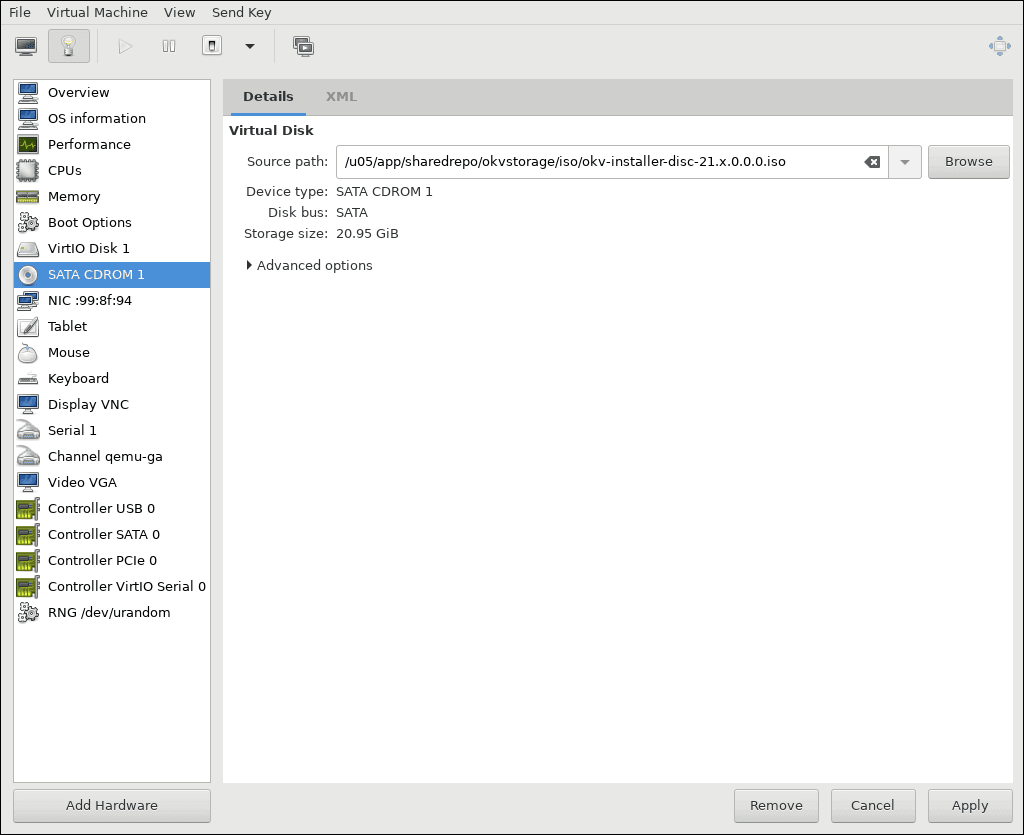
Click SATA CDROM 1 in the left pane and then click Browse. In the Details tab, select the Oracle Key Vault installation ISO file under
/u05/app/sharedrepo/okvstorage/iso/in the Source path field, and then click Apply.The following sequence of images displays this process:
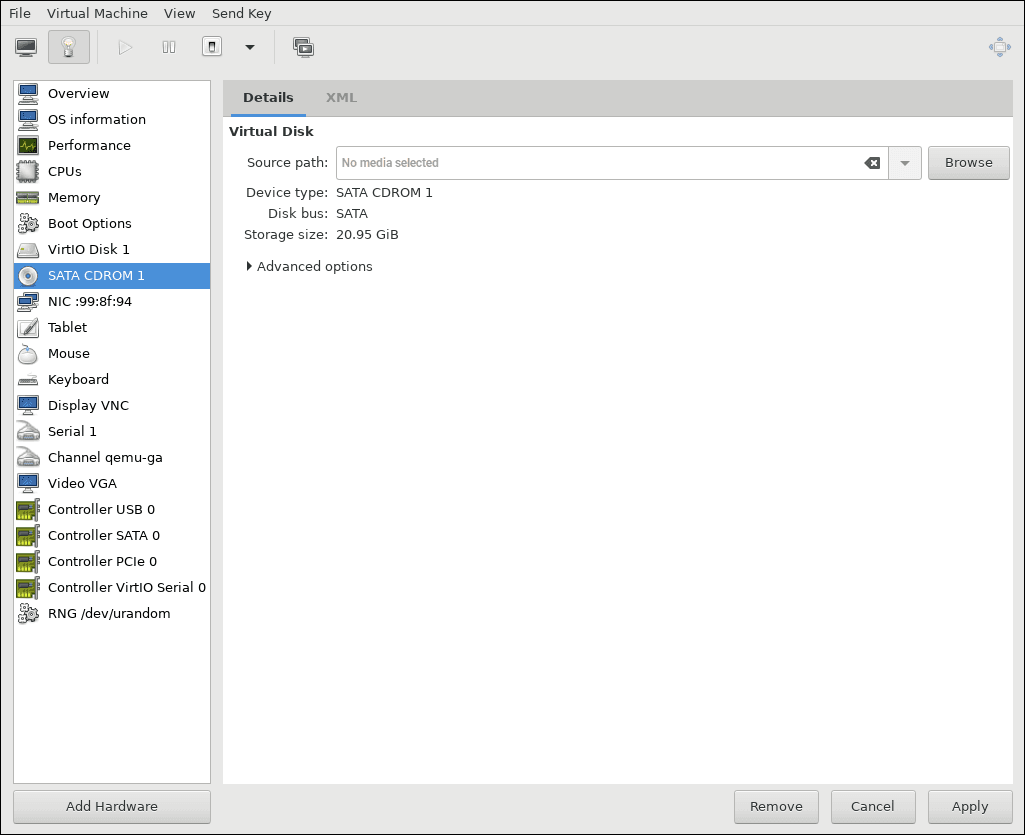
Description of the illustration oda_inst_image3.png
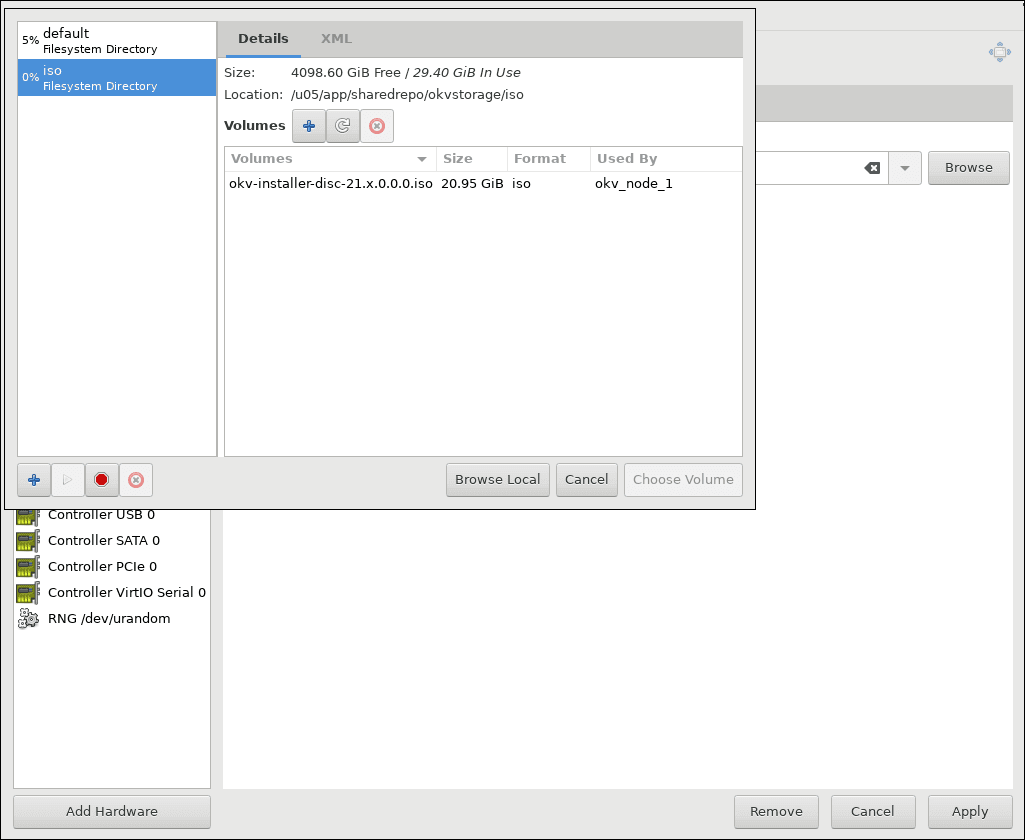
Description of the illustration oda_inst_image4.png
-
-
After Oracle Key Vault is installed, remove the Oracle Key Vault installation ISO file.
-
In the Virtual Machine manager, click SATA CDROM 1 in the left pane.
-
Clear the Source Path. To do this, either delete the entire path or click the backspace arrow as indicated in this image:

-
Click Apply.
Caution: Do not click Remove. Doing so will remove the SATA CDROM 1 device.
After the Oracle Key Vault node is installed, you can convert it into the first node of the cluster, add it to an existing node, or use it as a standalone server.
-
Related Topics
Managing Oracle Key Vault on Oracle Database Appliance
You can manage Oracle Key Vault on Oracle Database Appliance in the same way as on other platforms, with a few operational differences.
All Oracle Key Vault operations are supported when Oracle Key Vault is deployed on Oracle Database Appliance, except for shutdown using Oracle Key Vault management console. Additional operational differences that apply in this environment are described in the following sections.
Starting Oracle Key Vault on Oracle Database Appliance
To start Oracle Key Vault, run the following ODACLI command:
odacli start-vm --name <OKV VM name>Stopping Oracle Key Vault on Oracle Database Appliance
To shut down Oracle Key Vault, run the following ODACLI command:
odacli stop-vm --name <OKV VM name>Note: You must not use the Power Off button in the Oracle Key Vault management console to shut down Oracle Key Vault running on Oracle Database Appliance. If you use the Power Off button, then Oracle Database Appliance will restart Oracle Key Vault automatically assuming it has crashed.
Pausing or Resuming Oracle Key Vault on Oracle Database Appliance
You should not pause or resume Oracle Key Vault if it is running in a virtualized environment. This restriction also applies to Oracle Key Vault deployed on Oracle Database Appliance.
Cloning Oracle Key Vault on Oracle Database Appliance
Cloning Oracle Key Vault virtual machine for backup and restore purposes is not supported. Use the documented Oracle Key Vault backup and restore procedures instead.
Modifying System or Network Configuration of a Virtual Machine Running Oracle Key Vault on Oracle Database Appliance
You cannot change the IP address of an Oracle Key Vault cluster node. This restriction also applies to Key Vault deployed on Oracle Database Appliance.
Oracle does not recommend reducing the CPU, memory, and storage of virtual machines running Oracle Key Vault. This recommendation also applies to Oracle Key Vault deployed on Oracle Database Appliance.