2 Configuring an HSM for Oracle Key Vault

Oracle Key Vault can be configured to use the HSM as the Root of Trust in a standalone, primary-standby, or multi-master cluster environment.

2.1 HSM-Enabling in a Standalone Oracle Key Vault Deployment

You can use the Oracle Key Vault management console to HSM-enable Oracle Key Vault, which configures additional protection for the TDE master encryption key.

If you plan to use a multi-master cluster, then Oracle recommends that you perform this procedure before you configure the cluster environment. If you plan to use a vendor other than Thales Luna Network HSM version 7000, Entrust nShield Connect + and XC models, or Utimaco’s SecurityServer 4.31.1, then check with this vendor to see if there are any additional instructions to follow while doing this operation. Ensure that you complete the following steps on this server before you start these steps on another Oracle Key Vault server.
  1. If you have installed the Entrust client software, then run the following command as user oracle:
    oracle$ /opt/nfast/bin/rfs-sync --update
  2. Log into the Oracle Key Vault management console as a user with the System Administrator role.
    If you are using a multi-master cluster environment, then log into the Oracle Key Vault node that you want to HSM-enable.
  3. Select the System tab, then Settings in the left navigation bar.
  4. In Network Services, click HSM.
    The Hardware Security Module page appears. The red downward arrow shows the non-initialized Status. The Type field displays None.


    Description of 21_hsm_status.png follows
    Description of the illustration 21_hsm_status.png

  5. Click Initialize.
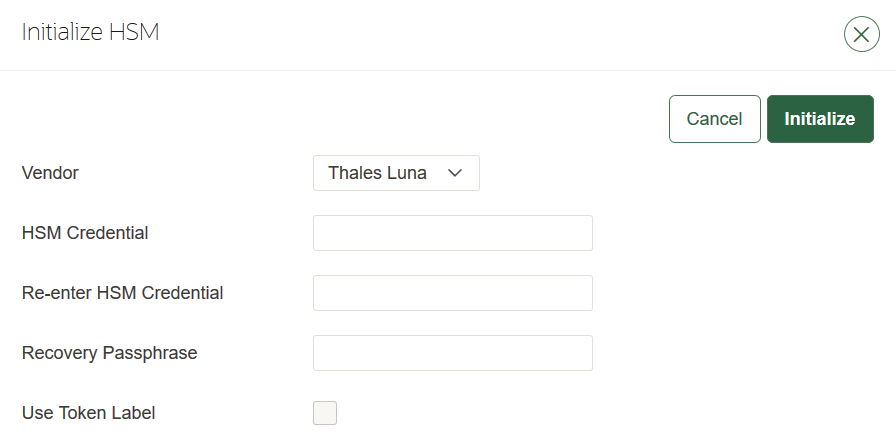
    The Initialize HSM window appears.


    Description of 21_hsm_initialize.png follows
    Description of the illustration 21_hsm_initialize.png

  6. Enter the HSM credential two times: first in HSM Credential and second in Re-enter HSM Credential.
    Consult the documentation that came with your HSM for this credential. The HSM credential for Thales is the Thales partition password. For Entrust, the credential is the password that is associated with the Operator Card Set or Softcard. For Utimaco, the credential is the PIN that was initialized when the token was configured. For other HSM vendors that have been certified, consult the vendor documentation. Oracle currently only supports HSM credentials up to 79 characters in length.
  7. Enter the Recovery Passphrase for Oracle Key Vault.
  8. If you want Oracle Key Vault to use a specific token to create and use objects in the HSM, then select the Use Token Label check box and enter the token label of the token that Oracle Key Vault should use.
    Oracle recommends that you select Use Token Label if Oracle Key Vault has access to more than one token. Oracle Key Vault does not support using a token that has the same name as one or more other tokens, nor does Oracle Key Vault support the use of tokens that have names with leading spaces.
  9. Click Initialize.
    At the end of a successful initialize operation, the Hardware Security Module page appears. The initialized Status is indicated by an upward green arrow. The Type field displays details of the HSM in use.
  10. If you are using an Entrust HSM, then run the following command as user oracle:
    oracle$ /opt/nfast/bin/rfs-sync --commit 

    If you do not perform this step after each initialization when using Entrust, then the multiple features will not be usable, including restoring backups and using the primary-standby configuration.

  11. Verify that the operation was successful by checking the most recent initialization log files in the /var/okv/log/hsm/ directory.
If the initialize operation fails, then you will be redirected to the Hardware Security Module page with non-initialized Status and Type None. You can find detailed information in the log files in the /var/okv/log/hsm directory.

Note:

If you change the HSM credential on the HSM after initialization, then you must also update the HSM credential on the Oracle Key Vault server using the Set Credential command before the system restarts. Oracle does not recommend that you change the HSM credential after HSM initialization if there are primary-standby Oracle Key Vault deployments using the HSM, because the standby does not have its credential set by the Set Credential command on the primary.

2.2 HSMs in a Multi-Master Cluster

You can configure HSMs in a multi-master cluster with a single node or multiple nodes.

2.2.1 About HSMs in a Multi-Master Cluster

You can configure each node in the cluster to use an HSM to store each node's Root of Trust (RoT) key.

This RoT protects master encryption keys that Oracle Key Vault uses. HSMs are built with specialized tamper-resistant hardware which is harder to access than normal servers. This protects the RoT and makes it difficult to extract encrypted data, lowering the risk of compromise. In addition, you can use HSMs in FIPS 140-2 level 3 mode, which enables you to meet certain compliance requirements.

In a multi-master Oracle Key Vault installation, any Key Vault node in the cluster can use any HSM. The nodes in the multi-master cluster will use different TDE wallet passwords and RoT keys and may or may not use different HSM credentials, depending on how you choose to configure each cluster node.

Note:

To ensure complete security, you must HSM-enable all Oracle Key Vault nodes in the cluster.

2.2.2 Configuring an HSM for a Multi-Master Cluster Starting with Single Node (Recommended)

Oracle recommends that to use an HSM with a multi-master cluster, you start with a single HSM-enabled node and add additional HSM-enabled nodes using the node induction process.

Oracle recommends the following steps to configure an HSM for a multi-master cluster with a single node:

  1. Convert an Oracle Key Vault server into the first node of the cluster.
  2. HSM-enable the first node before adding any new nodes.
  3. HSM-enable the candidate node before adding it to the cluster.
  4. Add the HSM-enabled candidate node to the cluster using a controller node that is also HSM-enabled.

    Note the following:

    • If any node in the cluster is already HSM-enabled, you cannot add a new node that is not HSM-enabled.
    • The Add Node to Cluster page on the controller node will require the controller node's HSM credential.

2.2.3 Configuring an HSM for a Multi-Master Cluster with Multiple Nodes

You can configure HSM for multiple nodes by copying a bundle from the first HSM-enabled node to the other nodes in the cluster before configuring HSM for the other nodes.

2.2.3.1 About Configuring an HSM for a Multi-Master Cluster with Multiple Nodes

The general procedure is to perform steps on first on one node of the cluster, then on the other nodes in the cluster.

The instructions for configuring an HSM for a multi-master cluster starting with a single node explain how to configure an HSM for a multi-master cluster, starting with a single node of the cluster and is the recommended way to configure a cluster to use HSM(s). However, if you have already configured a multi-master cluster, you can still configure the cluster to use HSMs. However, there are extra steps needed, involving manually copying a bundle from the first HSM-enabled node to all of the other nodes in the cluster and applying it before proceeding to HSM-enable any other node. Note that if the first node that is HSM-enabled has a read-write peer node, then the read-write peer will not be able to decrypt the replicated information from the HSM-enabled node until the bundle is copied and applied successfully to the read-write peer. This could result in data loss if the bundle is not immediately successfully created and applied to the read-write peer, even if the first node that is HSM-enabled is reverse-migrated afterwards.

After you HSM-enable the first node in the cluster, use the following steps to create the bundle on the HSM-enabled node and copy and apply it on all other nodes in the cluster before you proceed to HSM-enable any other node.

2.2.3.2 Step 1: Create and Copy the Bundle after HSM-Enabling the First Node

After HSM-enabling the first node in the multi-master cluster, you must create a bundle and copy it to the other nodes in the cluster.

You must HSM-enable the first node in the cluster similar to how you would HSM-enable a standalone Oracle Key Vault deployment, but with the additional steps in this section.
  1. Log in to the Oracle Key Vault management console as a user who has the System Administrator role.
  2. Select the System tab, then Settings in the left navigation bar.
  3. In Network Services, click HSM.
  4. On the HSM-enabled node, click Create Bundle on the HSM page.
  5. In the Create Bundle dialog box, do the following:
    1. In the HSM Credential field, enter the HSM credential.
    2. In the Recovery Passphrase field, enter the recovery passphrase.
    3. Click the Create Bundle button.
  6. Log in to the HSM-enabled node through SSH as user support.
    $ ssh support@hsm_enabled_node
  7. Switch to the root user.
    support$ su root
  8. To copy the bundle to the /usr/local/okv/hsm location on each of the other nodes using the IP address, use SCP.
    Ensure that you perform this step using the IP address of all other nodes in the cluster.
    root# scp /usr/local/okv/hsm/hsmbundle support@ip_address:/tmp
2.2.3.3 Step 2: Configure the Remaining Nodes

After you configure the first node, you are ready to install the bundle on the remaining nodes.

Complete this procedure as soon as possible after you have HSM-enabled the first node and copied the bundle to all other nodes.
  1. Log in to each node in the cluster using the IP address (except the original HSM-enabled node):.
    $ ssh support@ip_address
  2. On each node, switch to the root user.
    support$ su root
  3. Perform the following steps on each node:
    root# cp /tmp/hsmbundle /usr/local/okv/hsm/
    root# chown oracle:oinstall /usr/local/okv/hsm/hsmbundle
  4. On each node except the original HSM-enabled node, click Apply Bundle on the HSM page, and then follow these steps:
    1. In the Recovery Passphrase field, enter the recovery passphrase.
    2. Click the Apply Bundle button.
    You must apply the bundle immediately on all nodes before you reverse-migrate the original HSM-enabled node.
  5. Proceed to HSM-enable each of the remaining nodes in the cluster.
  6. After you have HSM-enabled all nodes and verified the replication between all nodes, remove the hsmbundle file from all of the nodes.

2.3 HSM-Enabling in a Primary-Standby Oracle Key Vault Deployment

In an Oracle Key Vault primary-standby deployment, you must perform the HSM-enabling tasks separately on the Oracle Key Vault servers that will be become primary and standby servers.

You must perform this task before pairing these two servers in a primary-standby configuration. If you have already HSM-enabled either the primary or the standby server, or both, but do not follow these steps and then do a primary-standby pairing, then the configuration will fail. If the servers are already paired but neither are HSM-enabled, then you must unpair them, reinstall the standby server, and the follow these steps.

  1. Install two separate Oracle Key Vault instances.
  2. Choose one to be the primary and the other to be the standby server.
  3. Install the HSM client software on both the servers that will be used as the primary and the standby servers.
  4. Enroll the designated primary and standby servers as clients of the same HSM.
  5. HSM-enable the designated primary server.
    If you are using Entrust, ensure that you have already executed /opt/nfast/bin/rfs-sync --commit on this server as user oracle before continuing.
  6. Perform the following steps on the primary server:
    1. Log in to the designated primary server through SSH as user support, switch user (su) to root, then switch user (su) to oracle.
      $ ssh support@okv_primary_instance_ip_address
      support$ su root
      root# su oracle
    2. Securely copy the following files to the designated standby server:
      oracle$ cd /usr/local/okv/hsm/wallet
      oracle$ scp cwallet.sso support@okv_standby_instance_ip_address:/tmp
      oracle$ scp enctdepwd support@okv_standby_instance_ip_address:/tmp
      oracle$ cd /usr/local/okv/hsm/restore
      oracle$ scp ewallet.p12 support@okv_standby_instance_ip_address:/tmp
  7. Perform the following steps on the designated standby server:
    1. Log in to the designated standby server through SSH as user support, then switch user (su) to root.
      $ ssh support@okv_standby_instance_ip_address
      support$ su root
      
    2. Set up the HSM-related files and in the okv_security.conf file, set the HSM_ENABLED and HSM_PROVIDER parameters.
      Earlier versions of Oracle Key Vault may not contain certain parameters in okv_security.conf that are present in later versions.
      root# cd /usr/local/okv/hsm/wallet
      root# mv /tmp/enctdepwd .
      root# mv /tmp/cwallet.sso .
      root# chown oracle *
      root# chgrp oinstall *
      root# cd /usr/local/okv/hsm/restore
      root# mv /tmp/ewallet.p12 .
      root# chown oracle *
      root# chgrp oinstall *
      root# vi /usr/local/okv/etc/okv_security.conf
         Set HSM_ENABLED="1"
         Set HSM_PROVIDER="provider_value"
         Set HSM_KEY_EXTRACTABLE="extractable_value"
         Set HSM_TOKEN_LABEL="token_label_value"

      In this specification:

      • HSM_ENABLED is set in this example to 1 to prepare the designated standby to use the HSM should a switchover or failover occur.
      • HSM_PROVIDER refers to the HSM provider. For Thales, set this value to 1. For Entrust, set it to 2. For Utimaco, set it to 3. For other HSM vendors that have been certified, enter 4.

        The HSM_PROVIDER may not be present in the okv_security.conf file. If this setting is present, then change it to the setting that is appropriate for the HSM provider. If it is not present, then add the following line. Ensure that the provider_value setting is in quotation marks.

        HSM_PROVIDER="provider_value"
      • HSM_KEY_EXTRACTABLE and HSM_TOKEN_LABEL should be set to the same value on the standby that is set on the primary server.
    3. Save and quit by entering the following sequence of characters in the vi file:
      :wq!
    4. If you are using Entrust, then execute the following commands:
      root# su - oracle
      oracle$ /opt/nfast/bin/rfs-sync --update
  8. Without restarting the Oracle Key Vault instances, navigate to the primary and standby Oracle Key Vault management consoles and configure primary-standby environment.

2.4 Backup and Restore Operations in an HSM-Enabled Oracle Key Vault Instance

You can back up and restore an HSM-enabled Oracle Key Vault instance.

2.4.1 Backup Operations in an HSM-Enabled Oracle Key Vault Instance

The steps to back up Oracle Key Vault data in an HSM-enabled instance are the same as the steps used to back up an instance that has not been HSM-enabled.

You can use the Oracle Key Vault management console to perform a backup operation.

2.4.2 Restore Operations in an HSM-Enabled Oracle Key Vault Instance

Backups taken from an HSM-enabled Oracle Key Vault instance can only be restored onto a standalone Oracle Key Vault server with access to the same Root of Trust key that was in use when the backup was taken.

Before you restore a backup onto a system, you must ensure that the system can access both the HSM and the Root of Trust (RoT) that was used to make the backup. You must therefore have installed the HSM client software on the Oracle Key Vault server and enrolled the Oracle Key Vault as a client of the HSM before proceeding with this step. If the backup was taken on an HSM-enabled cluster node, then when you restore the backup to a standalone server, you must ensure that the server has access to the same HSM and RoT as the node on which the backup was taken.
  1. Log into the Oracle Key Vault management console as a user with the System Administrator role.
    The Oracle Key Vault Home page appears.
  2. Select the System tab, then Settings in the left navigation bar.
  3. In Network Services, click HSM.
    The Hardware Security Module page appears. On restore, the Status is disabled first, then enabled after the restore completes.
  4. Click Set Credential.
    The Prepare for HSM Restore screen appears.
  5. Enter the HSM credential two times: first in HSM Credential and second in Re-enter HSM Credential.
    Consult the documentation that came with your HSM for this credential. The HSM credential for Thales is the Thales partition password. For Entrust, the credential is the password that is associated with the Operator Card Set or Softcard. The HSM-credential if you use an Operator Card Set is the Operator Card Set password. If you use a Softcard, then the password is the Softcard password. For other HSM vendors that have been certified, consult the vendor documentation.
  6. If the backup you are restoring was taken while Oracle Key Vault was HSM-enabled and given a specific token to use, select Use Token Label and enter the token label of the token that Oracle Key Vault was using when the backup was taken.
  7. Click Set Credential.

    Caution:

    If a credential has already successfully been set either via the Set Credential or Initialize operations, if you set an incorrect credential for the HSM, the previous credential, token label, and vendor will continue to be stored and used. If a credential has not been set previously and the Set Credential operation fails, the incorrect credential, token label, and vendor are not stored.

    The HSM credential will be stored in the system. It must be stored on the system so that it can be used to perform a backup restore operation because it is not stored in backup itself.
  8. If you are using Entrust, then run the following command as user oracle:
    oracle$ /opt/nfast/bin/rfs-sync --update

    This command is needed for an Entrust backup restore to complete successfully.

  9. In the Oracle Key Vault management console, go to the Restore page and then restore the backup.

2.5 Reverse Migration Operations

Reverse migrating an HSM-enabled Oracle Key Vault server reverts the Key Vault server to using the recovery passphrase to protect the TDE wallet.

This operation is necessary if you no longer want to use the HSM to protect the TDE wallet password (for example, if the HSM must be decommissioned).

2.5.1 Reverse Migrating a Standalone Deployment

You can reverse migrate a standalone deployment by using the Oracle Key Vault management console.

  1. Log into the Oracle Key Vault management console as a user with the System Administrator role.
    The Oracle Key Vault Home page appears.
  2. Select the System tab, then Settings in the left navigation bar.
  3. In Network Services, click HSM.
    The Hardware Security Module page appears.
  4. Click Reverse Migrate.

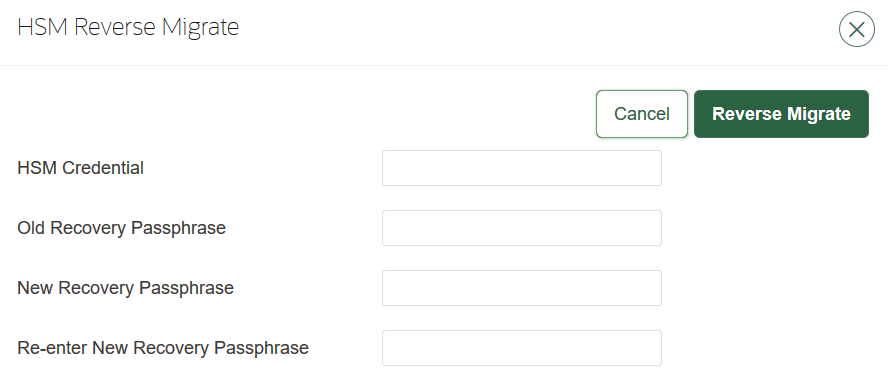
    The HSM Reverse Migrate window is displayed.


    Description of 21_hsm_reverse_migrate.png follows
    Description of the illustration 21_hsm_reverse_migrate.png

    Enter the following details:

    • Enter the HSM credential in the HSM Credential field. Consult the HSM documentation for this credential. The HSM credential for Thales is the Thales partition password. For Entrust, the credential is the password that is associated with the Operator Card Set or Softcard. For Utimaco, the credential is the PIN that was initialized when the token was configured. For other HSM vendors that have been certified, consult the vendor documentation

    • Enter the old recovery passphrase in the Old Recovery Passphrase field.

    • Enter the new recovery passphrase in the New Recovery Passphrase and Re-enter New Recovery Passphrase fields. If you do not want to change the recovery passphrase, then enter the same recovery passphrase in the New Recovery Passphrase and Re-enter New Recovery Passphrase fields as the one you entered in Old Recovery Passphrase.

  5. Click Reverse Migrate
    The Hardware Security Module page appears. The red downward arrow indicates the Status.

2.5.2 Reverse Migrating a Multi-Master Cluster

You can reverse migrate a multi-master cluster by using the Oracle Key Vault management console.

  1. Log into the Oracle Key Vault management console as a user with the System Administrator role.
    The Oracle Key Vault Home page appears.
  2. Select the System tab, then Settings in the left navigation bar.
  3. In Network Services, click HSM.
    The Hardware Security Module page appears.
  4. Click Reverse Migrate.

    The HSM Reverse Migrate window is displayed.

    Enter the following details:

    • In the HSM Credential field, enter the HSM credential. Consult the documentation that came with your HSM for this credential. The HSM credential for Thales is the Thales partition password. For Entrust, the credential is the password that is associated with the Operator Card Set or Softcard. For Utimaco, the credential is the PIN that was initialized when the token was configured. For other HSM vendors that have been certified, consult the vendor documentation

    • In the Recovery Passphrase field, enter the recovery passphrase.

  5. Click Reverse Migrate
    The Hardware Security Module page appears. The red downward arrow indicates the Status.

2.5.3 Reverse Migrating a Primary-Standby Deployment

To reverse migrate a primary-standby deployment, use both the Oracle Key Vault management console and the command line.

  1. Log into the Oracle Key Vault management console as a user with the System Administrator role.
    The Oracle Key Vault Home page appears.
  2. Select the System tab, then Settings in the left navigation bar.
  3. In Network Services, click HSM.
    The Hardware Security Module page appears.
  4. Click Reverse Migrate.

    The HSM Reverse Migrate screen is displayed.


    Description of 21_hsm_reverse_migrate.png follows
    Description of the illustration 21_hsm_reverse_migrate.png

    On the HSM Reverse Migrate screen, enter the following details:

    • Enter the HSM credential in the HSM Credential field. Consult the documentation that came with your HSM for this credential. The HSM credential for Thales is the Thales partition password. For Entrust, the credential is the password that is associated with the Operator Card Set or Softcard. For Utimaco, the credential is the PIN that was initialized when the token was configured. For other HSM vendors that have been certified, consult the vendor documentation.

    • Enter the old recovery passphrase in the Old Recovery Passphrase field.

    • Enter the new recovery passphrase in the New Recovery Passphrase and Re-enter New Recovery Passphrase fields. If you do not want to change the recovery passphrase, then enter the same recovery passphrase in the New Recovery Passphrase and re-enter the New Recovery Passphrase fields as the one you entered in Old Recovery Passphrase.

  5. Click Reverse Migrate
    The Hardware Security Module page appears. The red downward arrow indicates the Status.
  6. On the standby server, log in to the Oracle Key Vault Server through SSH as user support, then switch user (su) to root.
    $ ssh support@okv_standby_instance
    support$ su root
  7. Modify the okv_security.conf file.
    root# vi /usr/local/okv/etc/okv_security.conf
    • Delete the line HSM_PROVIDER="provider_value".

    • Change the value of the parameter HSM_ENABLED to "0".

    Save and quit by entering the following sequence of characters in the vi file: :wq!

  8. On the standby server, remove the following files:
    root# cd /usr/local/okv/hsm/wallet
    root# rm -f cwallet.sso enctdepwd
    root# cd /usr/local/okv/hsm/restore
    root# rm -f cwallet.sso ewallet.p12
    root# cd /mnt/okvram
    root# rm -f cwallet.sso ewallet.p12
    root# cd /mnt/okvram/restore
    root# rm -f cwallet.sso ewallet.p12
    root# cd /usr/local/okv/tde
    root# rm -f cwallet.sso
  9. Switch user (su) to oracle:
    root# su oracle
  10. Run the following command:
    oracle$ /var/lib/oracle/dbfw/bin/orapki wallet create -wallet /usr/local/okv/tde -auto_login
  11. Enter the new recovery passphrase that you specified in Step 4.
The primary-standby deployment is successfully reverse migrated.