7 Configuring Single Sign-On in Oracle Key Vault
You can configure Oracle Key Vault for Single Sign-On (SSO) once you have completed the configuration in Identity provider and Service provider.
- About Single Sign-On Authentication in Oracle Key Vault
Oracle Key Vault supports SAML based Single Sign-On (SSO) authentication. Single sign-on (SSO) is an authentication scheme that allows a user to log in with a single ID to any of several related, yet independent, software systems. The SSO feature allows Oracle Key Vault to join in the systems supporting SSO. - Configuring SAML Single Sign-On (SSO) Authentication
SSO is an access control solution that allows users to authenticate once and get access to all enterprise resources connected to the SSO system. Oracle Key Vault SAML SSO can take advantage of the Multi-Factor-authentication supported by Identity Provider (IDP) if necessary. - Managing Single Sign-On in Oracle Key Vault
You can easily manage the SSO configuration using the Oracle Key Vault management console. - Configuring Single Sign-On for Oracle Key Vault and Azure Active Directory
You can configure Oracle Key Vault and Azure Active Directory for SAML based Single Sign-On (SSO). - Configuring Single Sign-On for Oracle Key Vault and ADFS
Oracle Key Vault supports SSO on self-hosted platform Active Directory Federation Service (ADFS) server. - Guidelines for Managing Single Sign-On Configuration
Consider these Oracle Key Vault guidelines for managing SSO configuration.
7.1 About Single Sign-On Authentication in Oracle Key Vault
Oracle Key Vault supports SAML based Single Sign-On (SSO) authentication. Single sign-on (SSO) is an authentication scheme that allows a user to log in with a single ID to any of several related, yet independent, software systems. The SSO feature allows Oracle Key Vault to join in the systems supporting SSO.
- SSO authentication helps you in complying with the laid-out regulations, ensuring effective access reporting.
- SSO helps in securing the user credential data by reducing the number of login's required for each application.
- The IDP supported SSO provides Multi-Factor Authentication (MFA). In this case, user needs to figure out how to configure their Identity provider.
Parent topic: Configuring Single Sign-On in Oracle Key Vault
7.2 Configuring SAML Single Sign-On (SSO) Authentication
SSO is an access control solution that allows users to authenticate once and get access to all enterprise resources connected to the SSO system. Oracle Key Vault SAML SSO can take advantage of the Multi-Factor-authentication supported by Identity Provider (IDP) if necessary.
- About Configuring SAML Single Sign-On Authentication
You can configure the Single Sign-On (SSO) in Oracle Key Vault to enable users to log into Oracle Key Vault using their Identity Provider (IDP) credentials. - Configuring Identity Provider for Single Sign-On for Oracle Key Vault
You can configure the connection between Oracle Key Vault and IDP's to enable the Single Sign-On (SSO) in Oracle Key Vault. - Configuring Oracle Key Vault for Single Sign-On(SSO)
The configurations created in IDP's are required to be configured in Oracle Key Vault. - Logging in to Oracle Key Vault as an SSO User
An SSO user who is configured in Oracle Key Vault can log in to the Oracle Key Vault management console.
Parent topic: Configuring Single Sign-On in Oracle Key Vault
7.2.1 About Configuring SAML Single Sign-On Authentication
You can configure the Single Sign-On (SSO) in Oracle Key Vault to enable users to log into Oracle Key Vault using their Identity Provider (IDP) credentials.
- Active Directory Federation Services (ADFS)
- Microsoft Azure Active Directory
- Other
The user must be provisioned as SSO user type in Oracle Key Vault. In a multi-master cluster environment each node is required to be configured for enabling SSO.
Parent topic: Configuring SAML Single Sign-On (SSO) Authentication
7.2.2 Configuring Identity Provider for Single Sign-On for Oracle Key Vault
You can configure the connection between Oracle Key Vault and IDP's to enable the Single Sign-On (SSO) in Oracle Key Vault.
Oracle Key Vault supports SAML based SSO authentication. You can authenticate at one application and access the service providers at different locations without the need to login multiple times.
- SAML SSO Configuration
You need to configure the Identity Provider (IDP) before starting the SSO configuration in Oracle Key Vault. - SAML Signing Certificate
The SAML signing certificate is required for SSO user authentication. - User Provisioning and Authorization
Identity Provider (IDP) does the user provisioning and authorization for providing the user credentials to the Service Provider (SP). - SAML Request Signing
SAML Request Signing is required for user signature authentication.
Parent topic: Configuring SAML Single Sign-On (SSO) Authentication
7.2.2.1 SAML SSO Configuration
You need to configure the Identity Provider (IDP) before starting the SSO configuration in Oracle Key Vault.
The IDP shares the SAML authentication with Oracle Key Vault after receiving a request from Oracle Key Vault. For the SAML request authentication, IDP validates the signatures using the public certificate received from Oracle Key Vault.
7.2.2.2 SAML Signing Certificate
The SAML signing certificate is required for SSO user authentication.
The SAML signing certificate is one of the important steps during SSO configuration by IDP. The SAML certificate authenticates the IDP to pass the user data to the service provider for using the SSO functionality.
7.2.2.3 User Provisioning and Authorization
Identity Provider (IDP) does the user provisioning and authorization for providing the user credentials to the Service Provider (SP).
Before using SAML based SSO, the IDP user needs to be provisioned as SSO user type in Oracle Key Vault and needs to add proper roles or privileges.
7.2.3 Configuring Oracle Key Vault for Single Sign-On(SSO)
The configurations created in IDP's are required to be configured in Oracle Key Vault.
- Oracle Key Vault SAML SSO Configuration
Oracle Key Vault SAML SSO configuration is the next step once the SSO configuration is completed in Identity Provider (IDP). - Add Single Sign-On Configuration
The configurations created in IDP's are required to be added in Oracle Key Vault. - Creating Single Sign-On User
You need to create a SSO user in Oracle Key Vault by using the user name provided from Identity Provider (IDP). - Authenticating Single Sign-On (SSO) User
The Oracle Key Vault Single Sign-On user requires to be validated before using the SSO functionality.
Parent topic: Configuring SAML Single Sign-On (SSO) Authentication
7.2.3.1 Oracle Key Vault SAML SSO Configuration
Oracle Key Vault SAML SSO configuration is the next step once the SSO configuration is completed in Identity Provider (IDP).
Oracle Key Vault uses the public certificate from the IDP to validate the signature for incoming SAML response. Oracle Key Vault accepts the SAML response and redirect the response to the Oracle Key Vault management console.
Parent topic: Configuring Oracle Key Vault for Single Sign-On(SSO)
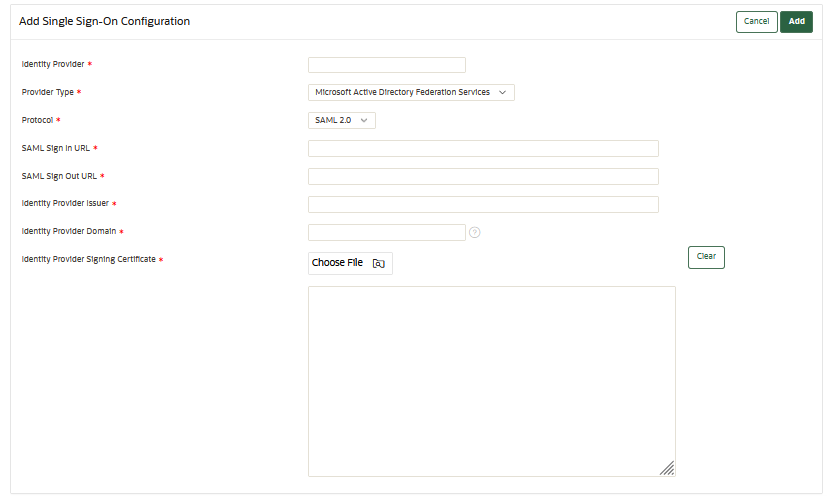
7.2.3.2 Add Single Sign-On Configuration
The configurations created in IDP's are required to be added in Oracle Key Vault.
Parent topic: Configuring Oracle Key Vault for Single Sign-On(SSO)
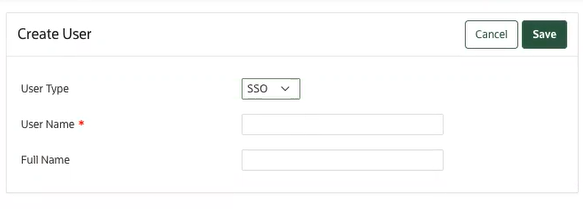
7.2.3.3 Creating Single Sign-On User
You need to create a SSO user in Oracle Key Vault by using the user name provided from Identity Provider (IDP).
- Log in to the Oracle Key Vault management console as a user with the System Administrator role.
- Select the Users tab, and then Manage Users from the left navigation bar.
- Click Create. The Create
User page displays.
- From the User Type drop-down list, select
SSO.
Note:
In order to see User Type in creating user, SSO configuration should be enabled first. - Enter the user name in User Name field.
- Enter Full Name.
- Click Save.
Parent topic: Configuring Oracle Key Vault for Single Sign-On(SSO)
7.2.3.4 Authenticating Single Sign-On (SSO) User
The Oracle Key Vault Single Sign-On user requires to be validated before using the SSO functionality.
- Log in to the Oracle Key Vault management console as a user with the System Administrator role.
- Select the Users tab, and then Manage Users from the left navigation bar.
- Select the User Type drop-down list, select SSO.
- Enter the user name in User Name
field.
Note:
The user name in case of SSO should be the user name as created in IDP. The SSO user name is an email address when the user type in Oracle Key Vault is SAML based SSO. - Enter Full Name.
- Click Save.
Parent topic: Configuring Oracle Key Vault for Single Sign-On(SSO)
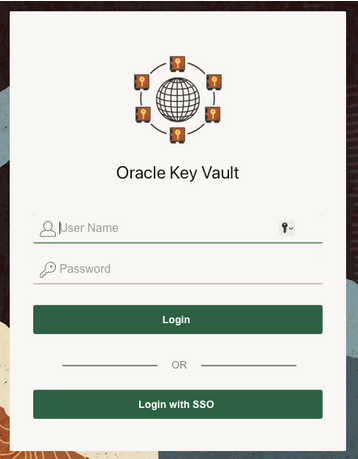
7.2.4 Logging in to Oracle Key Vault as an SSO User
An SSO user who is configured in Oracle Key Vault can log in to the Oracle Key Vault management console.
Parent topic: Configuring SAML Single Sign-On (SSO) Authentication
7.3 Managing Single Sign-On in Oracle Key Vault
You can easily manage the SSO configuration using the Oracle Key Vault management console.
- Download Oracle Key Vault Single Sign-On (SSO) Certificate
You need to download the SSO certificate from the Oracle Key Vault management console for completing the SSO configuration with the service provider. - Adding Single Sign-On (SSO) Configuration in Oracle Key Vault
Oracle Key Vault requires the configurations created in IDP's to be added. - Enabling Single Sign-On (SSO) Configuration
You are required to enable the SSO in Oracle Key Vault once the SSO configuration is complete. - Disabling Single Sign-On (SSO) Configuration
You can deactivate the existing SSO functionality using the disable function. - Deleting Single Sign-On Configuration
You can permanently delete the existing SSO functionality from the Oracle Key Vault management console using the delete function.
Parent topic: Configuring Single Sign-On in Oracle Key Vault
7.3.1 Download Oracle Key Vault Single Sign-On (SSO) Certificate
You need to download the SSO certificate from the Oracle Key Vault management console for completing the SSO configuration with the service provider.
Parent topic: Managing Single Sign-On in Oracle Key Vault
7.3.2 Adding Single Sign-On (SSO) Configuration in Oracle Key Vault
Oracle Key Vault requires the configurations created in IDP's to be added.
- Log in to the Oracle Key Vault management console as a user with the System Administrator role.
- Select the Systems tab, then Single Sign-On Configuration navigation bar.
- In the Manage Single Sign-On Configuration
page, click Add. The Add Single Sign-On
Configuration page appears.
- Enter the name of the identity provider name to save the SSO configuration in the Identity Provider field.
- From the Provider Type drop-down list, select the service provider.
- Provide the information in the SAML Sign in URL, Same Sign Out URL, and Identity Provider Issuers.
- Enter the URL for Identity Provider Domain.
- Click Choose File and upload or paste the
signing certificate issues by the identity provider in the Identity
Provider Signing Certificate field.
Note:
The information required for the SAML Sign in URL, Same Sign Out URL, Identity Provider Issuers, and Identity Provider Signing Certificate fields are obtained from the IDP. For more information, see, Configuring Single Sign-On for Oracle Key Vault and Azure Active Directory or Configuring Single Sign-On for Oracle Key Vault and ADFS. - Click Add to save the provided
information.
Note:
For the SSO configuration to come into effect, user needs to perform the enable function after saving the configuration.
Parent topic: Managing Single Sign-On in Oracle Key Vault
7.3.3 Enabling Single Sign-On (SSO) Configuration
You are required to enable the SSO in Oracle Key Vault once the SSO configuration is complete.
Parent topic: Managing Single Sign-On in Oracle Key Vault
7.3.4 Disabling Single Sign-On (SSO) Configuration
You can deactivate the existing SSO functionality using the disable function.
Parent topic: Managing Single Sign-On in Oracle Key Vault
7.3.5 Deleting Single Sign-On Configuration
You can permanently delete the existing SSO functionality from the Oracle Key Vault management console using the delete function.
Parent topic: Managing Single Sign-On in Oracle Key Vault
7.4 Configuring Single Sign-On for Oracle Key Vault and Azure Active Directory
You can configure Oracle Key Vault and Azure Active Directory for SAML based Single Sign-On (SSO).
- Adding User for Oracle Key Vault in Azure Active Directory (AD)
You need to add the user to Azure AD before using the Single Sign-On in Oracle Key Vault.
Parent topic: Configuring Single Sign-On in Oracle Key Vault
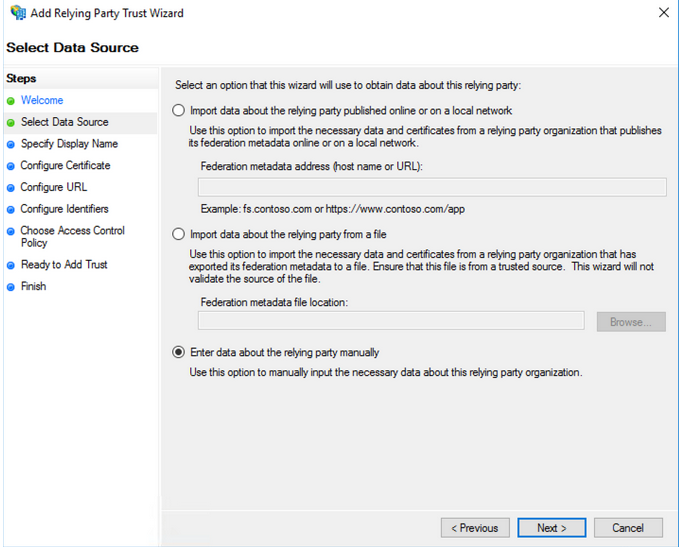
7.5 Configuring Single Sign-On for Oracle Key Vault and ADFS
Oracle Key Vault supports SSO on self-hosted platform Active Directory Federation Service (ADFS) server.
You need to configure ADFS for using SSO in Oracle Key Vault.
Parent topic: Configuring Single Sign-On in Oracle Key Vault
7.6 Guidelines for Managing Single Sign-On Configuration
Consider these Oracle Key Vault guidelines for managing SSO configuration.
Guidelines for Microsoft Azure Active Directory / Active Directory Federation Services
- The user must be provisioned as SSO user type in Oracle Key Vault.
- In a multi-master cluster environment, each node has its own SSO configuration. Each node should has its own enterprise application(Azure) or target(ADFS) because of different IP address for login or log out URL and SAL metadata.
- In a multi-master cluster environment, each node has its own SSO configuration. Each node should has its own enterprise application(Azure) or target(ADFS) because of different IP address for login or log out URL and SAL metadata.
Parent topic: Configuring Single Sign-On in Oracle Key Vault


