About Using RASADM to Run the Security HR Demo
Describes how to use RASADM to create Real Application Security data security policies using a graphical user interface.
Oracle Database Real Application Security Administration (RASADM) lets you create Real Application Security data security policies using a graphical user interface. For more information on installing and configuring RASADM, see Real Application Security Administration.
This section describes the following topics:
About Running the RASADM Application
Describes how to run the RASADM application.
The following URL is just an example and the real URL is based on your current Application Express configuration. Make sure the correct URL is provided. Then log in as the RASADM administrator using the same password given during the installation.
To run the RASADM application, you would enter in your browser a URL like the following: https://www.example.com:8080/apex/f?p=rasadm.
Oracle recommends that you turn on HTTPS.
You can log in as the RASADM admin user or any user created after installation using the password given during installation as shown in the following screen shot.
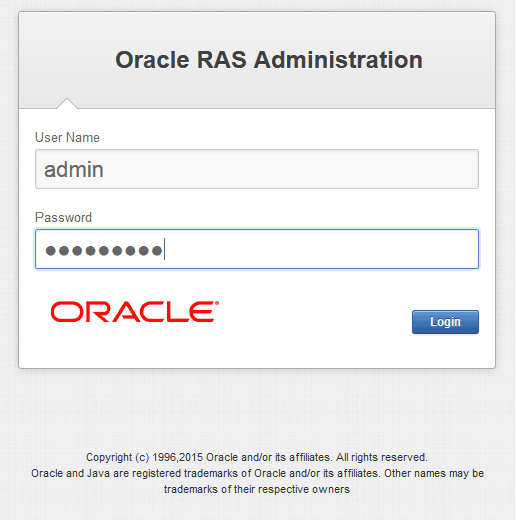
Description of the illustration ras_ui_login.png
For More Information
See the following resources for more information:
-
Real Application Security discussion forum: Database Security — General
-
Real Application Security Documentation: see Oracle Database Real Application Security Administration
Design Phase
In the design phase, you identify all the tasks an application performs that require application privileges to control data access.
For example, during the design phase, the application policy designer must identify:
-
The set of application-level operations that require access control.
-
The rows and columns of tables and views that can be accessed as part of the application-level operations.
-
The set of actors or principals (users and roles) that can perform these operations.
-
The runtime application session attributes that identity rows of a table or views. These attribute names are used within the predicates that selects the rows to be authorized, and their values are set during the execution of the application.
Development Flow
To develop data security policies using RASADM, you must follow some basic steps.
In the development phase, as the RASADM administrator, you use RASADM to develop your data security policies following these steps:
-
Create the corresponding application users and roles. If using an external directory server, create the application users and roles or user groups in the directory server. Follow this procedure to create these principals natively in the database:
-
Create the application roles and grant application roles to application roles, if needed. See the topic on creating application roles.
-
Create the application users and grant application roles to the application users. See the topic on creating application users.
-
Configure the directory server to fetch the users and role, when principals from external stores are used. See the topic on configuration.
-
For users and roles in the external Directory Server, manage parameter settings for using RASADM with a Directory Server. See the topic on managing settings.
-
-
Create each privilege class that you plan to use to develop the security policies for your application. Each privilege class consists of one or more appropriate privileges that you define and can reference in an ACL and also grant them to the application users and application roles. Each privilege class authorizes by means of ACLs the required application-level operations of a data security policy. See the topic on creating application privilege classes.
-
Create one or more session namespaces that can be used across different application sessions. This consists of defining for a session namespace its set of properties (application attributes) and its associated access control policy or ACL that you can choose from a list or create. See the topic on creating namespaces.
-
Create the data security policy by associating each data realm with an ACL, so as to create both data realm authorization and column authorization as needed. This process consists of four parts:
-
Policy Information - You choose the object to be protected and the privilege class to protect it as well as specify the policy name and select the policy schema. See Step 3 in the topic on creating data security policies.
-
Column Level Authorization - You choose the name of the column to be protected and select the privilege to be granted to access the column, which is associated with the privilege class you selected in Step 3a. See Step 4 in the topic on creating data security policies.
-
Data Realm Authorization - You create a SQL predicate to represent the data realm to be protected and add each to a data realm grant list. Then you choose or create the ACL to protect the data realm. Next, create privilege grants to be added to a privilege grants list consisting of each principal and whether it is allowed authorization or denied authorization by selecting the appropriate privilege. See Step 5 in the topic on creating data security policies.
-
Apply Policy - You can apply, remove, enable, or disable the data security policy you are creating and choose to specify certain apply options, allowing the owner of the table or view to bypass this data security policy, and whether to enforce statement types for this policy. See Step 6 in the topic on creating data security policies.
-
About Using RASADM to Create the HR Demo
Describes how to use RASADM to create the HR Demo application.
To begin, you should be running the RASADM application and be logged in as the ADMIN user as described in About Running the RASADM Application and shown in the following screen shots.
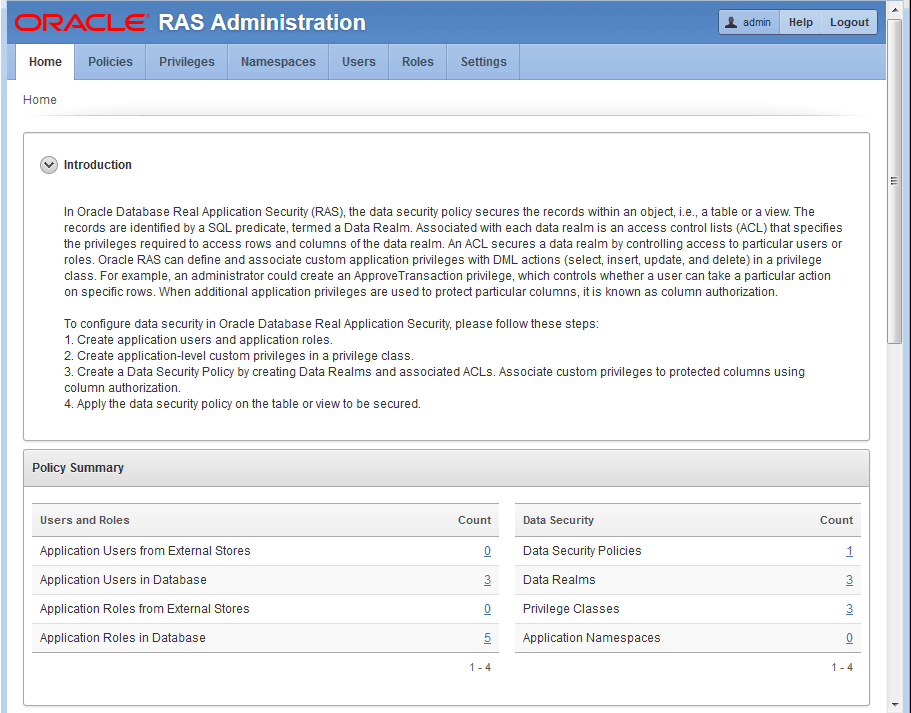
Description of the illustration ras_ui_home_part1.png
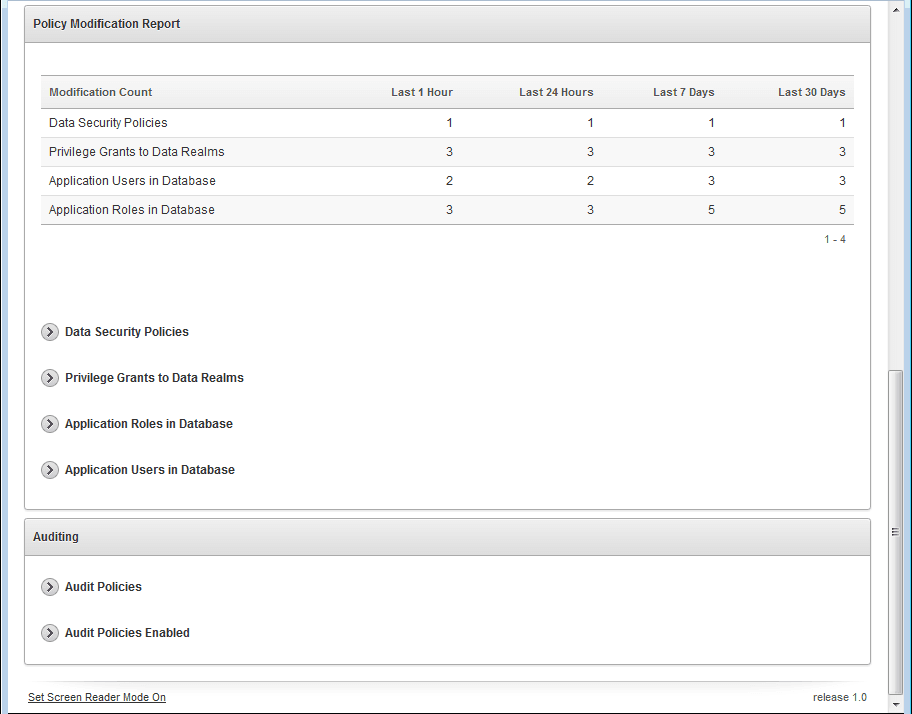
Description of the illustration ras_ui_part2.png
You will be performing the following tasks:
About Creating Application Roles
Describes how to create application roles and specifically the database DB_EMP role.
You must create a database DB_EMP role using SQL*Plus and grant this role SELECT, INSERT, UPDATE, and DELETE privileges in HR.EMPLOYEES as this code snippet indicates.
-- Create database role DB_EMP and grant necessary table privileges.
-- This role will be used to grant the required object privileges to
-- application users.
CREATE ROLE DB_EMP;
GRANT SELECT, INSERT, UPDATE, DELETE ON HR.EMPLOYEES TO DB_EMP;
See hrdemo_setup.sql for more information.
This next task involves creating the following application roles: EMP_ROLE, IT_ROLE, and HR_ROLE, and then enabling each application role.
This task can be performed in one of two ways:
-
Using RASADM to create these application roles.
-
Using an external directory server to create the application roles in the directory server.
In either case, for the HR Demo, the following application roles will be created:
-
EMP_ROLE -
IT_ROLE -
HR_ROLE
Finally, using SQL*Plus, you must grant each of these application roles the database DB_EMP role as indicated in the following code snippet.
-- Grant DB_EMP to the three application roles, so they have the required
-- object privilege to access the table.
GRANT DB_EMP TO EMP_ROLE;
GRANT DB_EMP TO IT_ROLE;
GRANT DB_EMP TO HR_ROLE;
See hrdemo_setup.sql for more information.
Using RASADM to Create Application Roles
Describes how to create application roles using RASADM.
To get started, click the Roles tab, then click Create Role.
-
On the
Application Rolepage, enter information in the following fields:-
Role Name: Enter
EMP_ROLE. -
Description: Enter a brief description.
-
Type of Role: Select the default,
ROLE. -
Enabled by Default: Select
Yes.
-
-
In Roles Grant section, in the Roles field, click ^ and select DB_EMP role from the list to add it as a direct role grant.
-
Click Apply Changes to create the
EMP_ROLEapplication role. -
Click the role
EMP_ROLEto see the edit view of this role as shown in the following screen shot. -
Repeat these steps to create the
IT_ROLEandHR_ROLEapplication roles. Again, there are no application roles to be granted to either of these application roles.
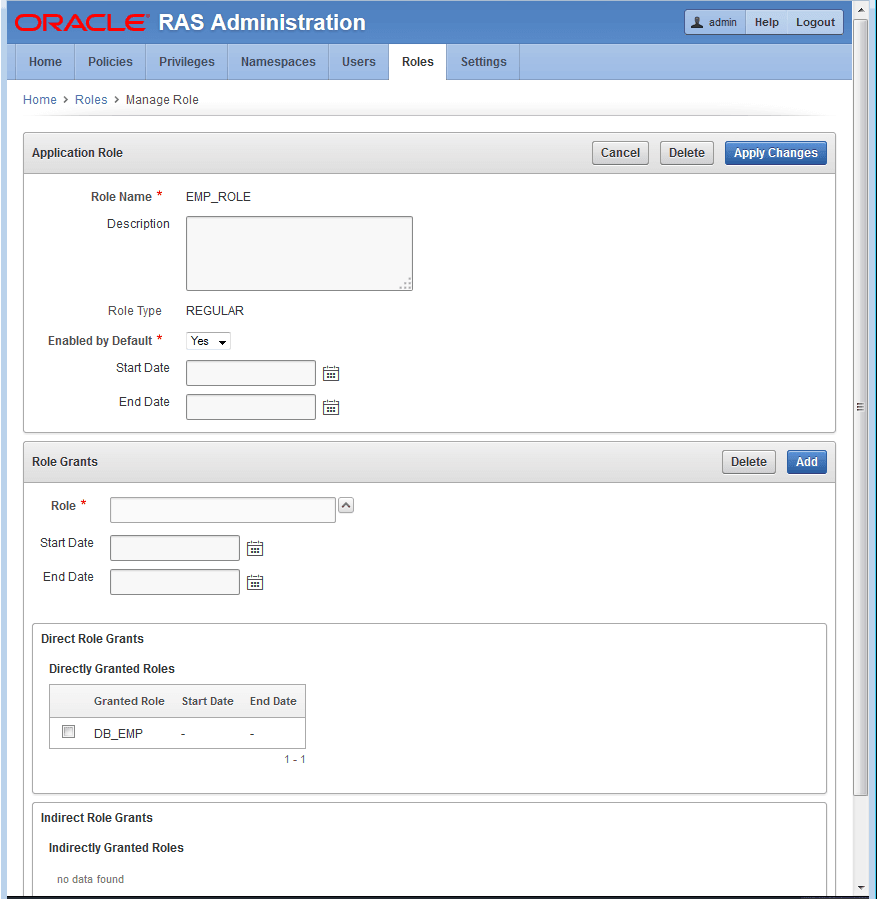
Description of the illustration application_role.png
About Creating Application Users
Describes creating application users and granting them roles.
This task involves creating each application user and granting each application user its respective application role.
This task can be performed in one of two ways:
-
Using RASADM to create application users:
DAUSTINandSMAVRIS.Next, perform the following grants:
-
Grant application roles
EMP_ROLEandIT_ROLEtoDAUSTIN. -
Grant application roles
EMP_ROLEandHR_ROLEtoSMAVRIS.
-
-
Using an external directory server to create the application users or application user groups in the directory server.
In either case, for this HR Demo, the following application users will be created:
-
DAUSTIN -
SMAVRIS
Next, you will perform the following grants:
-
Grant the application role
EMP_ROLEto userDAUSTINandSMAVRIS. -
Grant the application role
IT_ROLEto userDAUSTIN. -
Grant the application role
HR_ROLEto userSMAVRIS.
Using RASADM to Create Application Users
Describes creating application users using RASADM.
To get started, click the Users tab, then click Create User.
-
On the
Manage Userpage in the Application User section, enter information in the following fields:-
Name: Enter
DAUSTIN. -
Description: Enter a brief description.
-
Default Schema: Select
HR. -
Roles Default Enabled: Select
Yes. -
Status: Chose
Active.
-
-
In the Roles Grants section, select the application roles to be granted to the application user
daustin. Enter information in the Role: field by clicking ^ and selectingEMP_ROLE. -
Click Add to grant this role. Repeat this process to grant the
IT_ROLEtoDAUSTIN. -
Click Apply Changes to create the application user
DAUSTIN. -
Click user
DAUSTINto see the edit view of this user as shown in the following screen shot. -
Repeat these steps to grant the
EMP_ROLEandHR_ROLEto application userSMAVRIS.
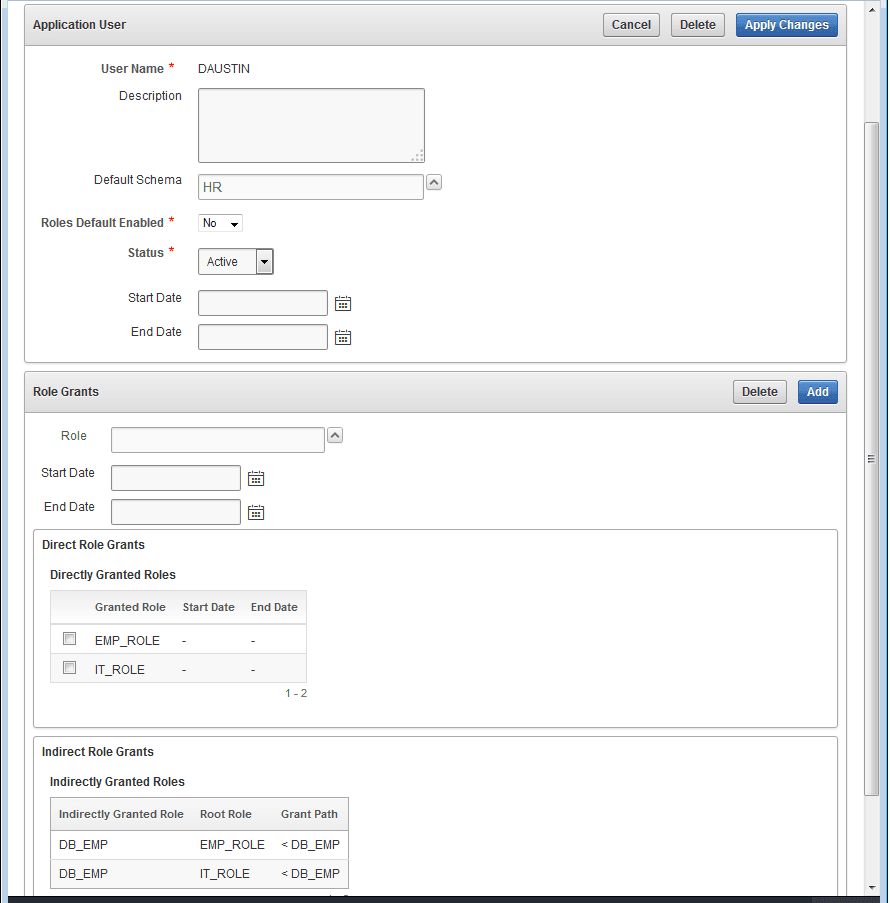
Description of the illustration application_user__daustin.png
About Creating the Data Security Policy
Describes the process flow for creating the data security policy.
This task involves creating the HRDEMO data security policy. It includes:
-
Entering the policy information.
-
Creating the
HRPRIVSprivilege class and itsVIEW_SALARYprivilege. -
Creating the
SALARYcolumn authorization and selecting theHRPRIVSprivilege class to be applied to the column. -
Creating the data realm authorization consisting of the three data realms, one for employee access, one for IT access, and one for HR access along with each associated ACL with its respective defined privilege grant for each principal to control its row access.
-
Applying the
HRDEMOdata security policy by enabling it.
This section includes the following topics:
Entering Policy Information
Describes entering data security policy information using the RASADM application.
To create a data security policy, click the Policies tab, then click Create to display the Policy Information page.
-
On the Policy Information page, enter the policy information in the following fields:
-
Policy Schema: Click ^ and select
HR. -
Policy Name: Enter the name
Employees_DS. -
Description: Enter a brief description for this policy.
-
Privilege Class: Click NEW to create the
HRPRIVSprivilege class.
-
-
On the Privilege Class page, enter the following information:
-
For Privilege Class. Privilege Class Name: Enter
HRPRIVS. -
For Privilege Class. Description: Enter a brief description.
-
For Application Privileges. Privilege Name: Enter the name
VIEW_SALARY. -
For Application Privileges. Description: Enter a brief description.
-
For Application Privileges. Implied Privileges: Click
Select. -
Click Add to add the
VIEW_SALARYprivilege to the Application Privileges list. See the following figure. -
Click Apply Changes to save the
HRPRIVSprivilege class.
-
-
On the same Privilege Class page, enter the following information:
-
Protected Object’s Schema: Click ^ and select
HR. -
Protected Object: Click ^ and select
EMPLOYEES.
The following screen shot shows the Policy Information page for the
Employees_DSdata security policy.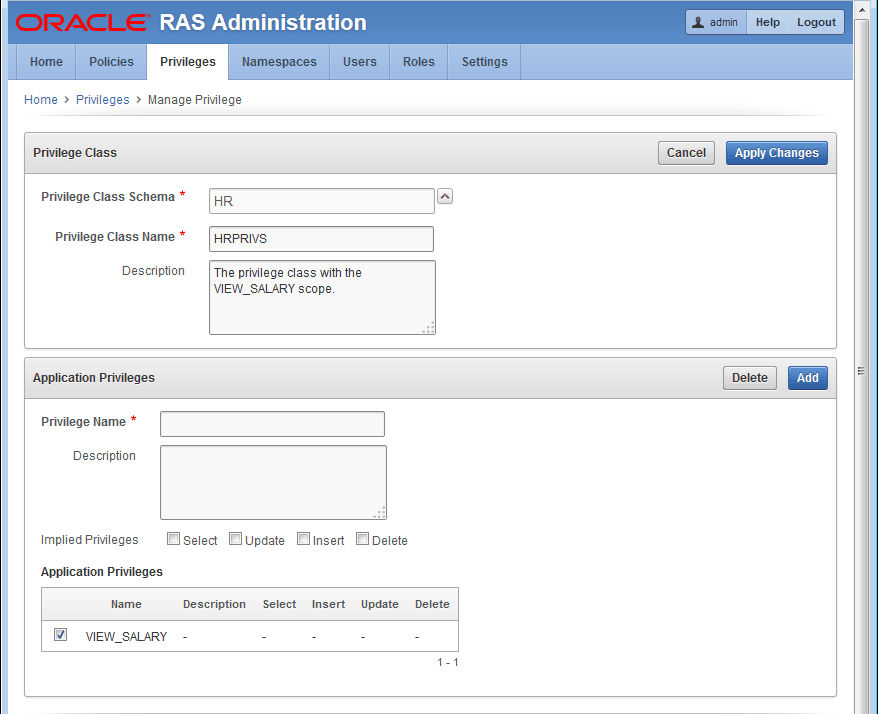
-
-
Click Next to go to the
Column Authorizationpage.
Creating the Column Authorization
Describes creating the column authorization part of the data security policy.
-
On the Column Authorization page, enter the following information to create a column authorization:
-
Column: Click ^ and select
SALARY. -
Privilege: Click ^ and select
VIEW_SALARY.
-
-
Click Add to add the column authorization to the Column Constraint list.
The following screen shot shows the Column Authorization page with the created
SALARYcolumn authorization protected by theVIEW_SALARYprivilege.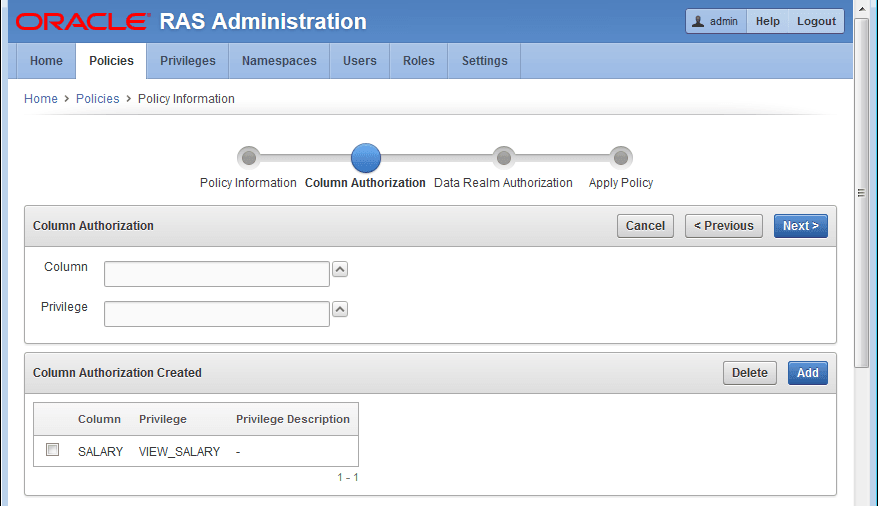
-
Click Next to go to the Data Realm Authorization page.
Creating the Data Realm Authorizations
Describes the creating the data realm authorizations part of the data security policy.
Three data realm authorizations will be created that:
-
Allows a user granted the
IT_ROLEto view records in the IT department excluding theSALARYcolumn. -
Allows a user granted the
EMP_ROLEto view their own record including theSALARYcolumn -
Allows a user granted the
HR_ROLEto view and update all records including theSALARYcolumn.
-
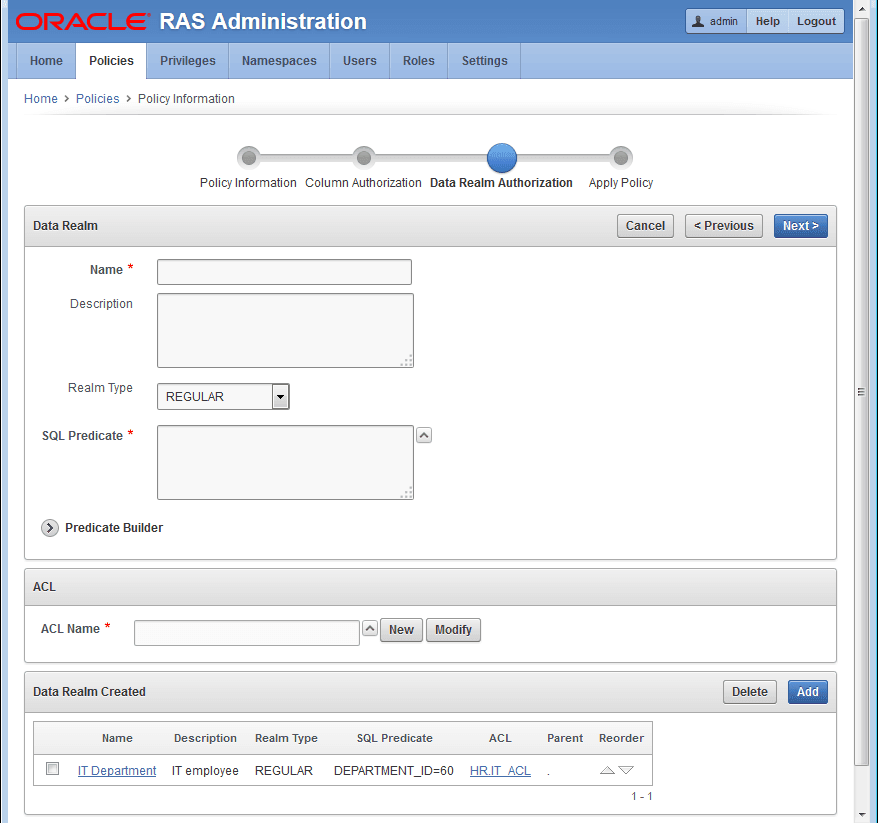
On the Data Realm Authorization page, enter information in the following fields to create the data realm to allow the IT department member access to their department records, excluding the
SALARYcolumn:-
Description: Enter a brief description.
-
SQL Predicate: Click > to expand the Predicate Builder field. Enter information in the following fields:
-
Column Name: Click ^ to select the
DEPARTMENTcolumn name. -
Operator: Click ^ to select the
=operator. -
Value: Enter the value
60. -
AND/OR: Ignore this option.
-
Click Apply to create the SQL predicate.
The following screen shows the completed IT Department data realm authorization..
-
-
ACL Name: Click + to create the
IT_ACL. Enter information in the following fields:-
For ACL Control Lists (ACL), ACL Name: Enter
IT_ACL. -
For ACL Control Lists (ACL), Description: Enter a brief description.
-
For ACL Control Lists (ACL), ACL Inheritance: Ignore this field.
-
For Privilege Grants, Principal: Click <- to select a principal.
-
For Privilege Grants, Principal Type: Click User.
-
For Privilege Grants, Principal Store: Click Database.
-
For Privilege Grants, Principal Filter: Enter
DAUSTINand click Search. Then click Select to select DAUSTIN as the principal. -
For Privilege Grants, Privilege: Choose the default option, SELECT.
-
For Privilege Grants, Grant: Choose the option Grant.
-
Click Add to add this privilege grant.
The following screen shot shows the completed
IT_ACLACL and its privilege grant of the SELECT privilege granted to the IT_ROLE role.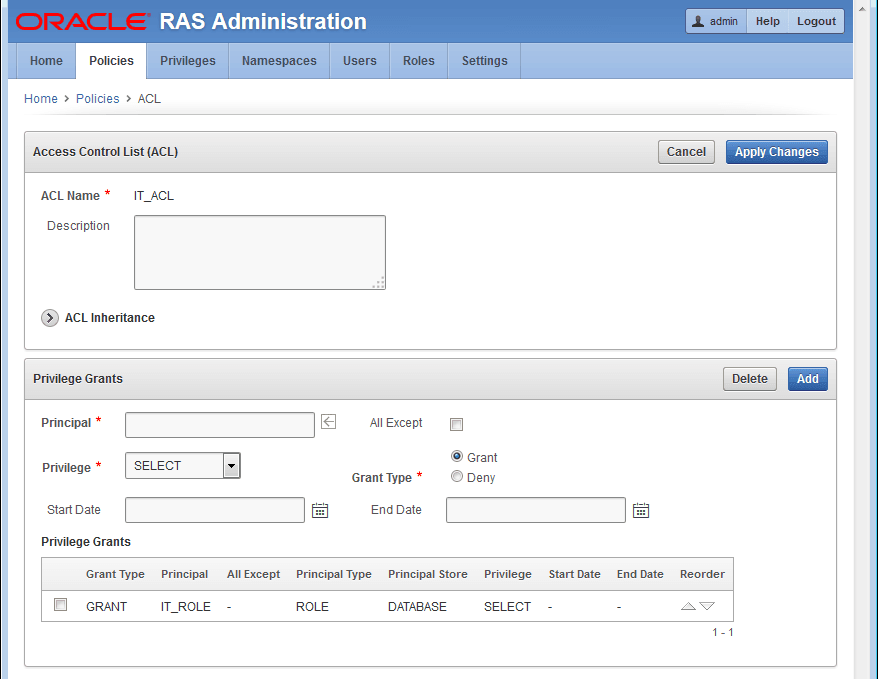
-
-
Data Realm Grant: Click Add to grant this data realm.
-
On the Data Realm Authorization page, Click Add to begin to add the next data realm authorization. Enter information in the following fields to create the data realm to allow the employee access to their own record, including the
SALARYcolumn.-
Description: Enter a brief description.
-
SQL Predicate: Enter
UPPER(email) = XS_SYS_CONTEXT('XS$SESSION','USERNAME'). -
Click Preview to view the results of the query and see if it is what you expected.
-
-
ACL Name: Click + to create the
EMP_ACL. Enter information in the following fields:-
For ACL Control Lists (ACL), ACL Name: Enter
EMP_ACL -
For ACL Control Lists (ACL), Description: Enter a brief description.
-
For ACL Control Lists (ACL), ACL Inheritance: Ignore this field.
-
For Privilege Grants, Principal: Click <- to select a principal.
-
For Privilege Grants, Principal Type: Click User.
-
For Privilege Grants, Principal Store: Click Database.
-
For Privilege Grants, Principal Filter: Enter
DAUSTINand click Search. Then click Select to select DAUSTIN as the principal. -
For Privilege Grants, Privilege: Choose the default option, SELECT
-
For Privilege Grants, Grant: Choose the option Grant.
-
Click Add to add this privilege grant.
-
Repeat these same two grants for user
SMAVRIS, so userSMAVRISis grantedSELECTandVIEW_SALARYapplication privileges.
-
-
Data Realm Grant: Click Add to grant this data realm.
-
On the Data Realm Authorization page, Click Add to begin to add the next data realm authorization. Enter information in the following fields to create the data realm to allow the HR personnel to access and update all employee records, including the
SALARYcolumn.-
Description: Enter a brief description.
-
SQL Predicate: Enter
UPPER(email) = XS_SYS_CONTEXT('XS$SESSION','USERNAME'). -
Click Preview to view the results of the query and see if it is what you expected.
-
-
ACL Name: Click + to create the
HR_ACL. Enter information in the following fields:-
For ACL Control Lists (ACL), ACL Name: Enter
HR_ACL -
For ACL Control Lists (ACL), Description: Enter a brief description.
-
For ACL Control Lists (ACL), ACL Inheritance: Ignore this field.
-
For Privilege Grants, Principal: Click <- to select a principal.
-
For Privilege Grants, Principal Type: Click User.
-
For Privilege Grants, Principal Store: Click Database.
-
For Privilege Grants, Principal Filter: Enter
SMAVRISand click Search. Then click Select to selectSMAVRISas the principal. -
For Privilege Grants, Privilege: Choose the default option, SELECT
-
For Privilege Grants, Grant: Choose the option Grant.
-
Repeat this Privileges Grants step to grant
UPDATEtoSMAVRIS. -
For Privilege Grants, Principal: Click <- to select a principal.
-
For Privilege Grants, Principal Type: Click User.
-
For Privilege Grants, Principal Store: Click Database.
-
For Privilege Grants, Principal Filter: Enter
SMAVRISand click Search. Then click Select to selectSMAVRISas the principal. -
For Privilege Grants, Privilege: Choose UPDATE
-
For Privilege Grants, Grant: Choose the option Grant.
-
Repeat this step two more times to grant
INSERTandDELETEtoSMAVRIS. -
Click Add to add this privilege grant.
-
-
Data Realm Grant: Click Add to add this data realm authorization to the list of data realm authorizations.
The following screen shot shows the three completed data realm authorizations and the completed column authorization.
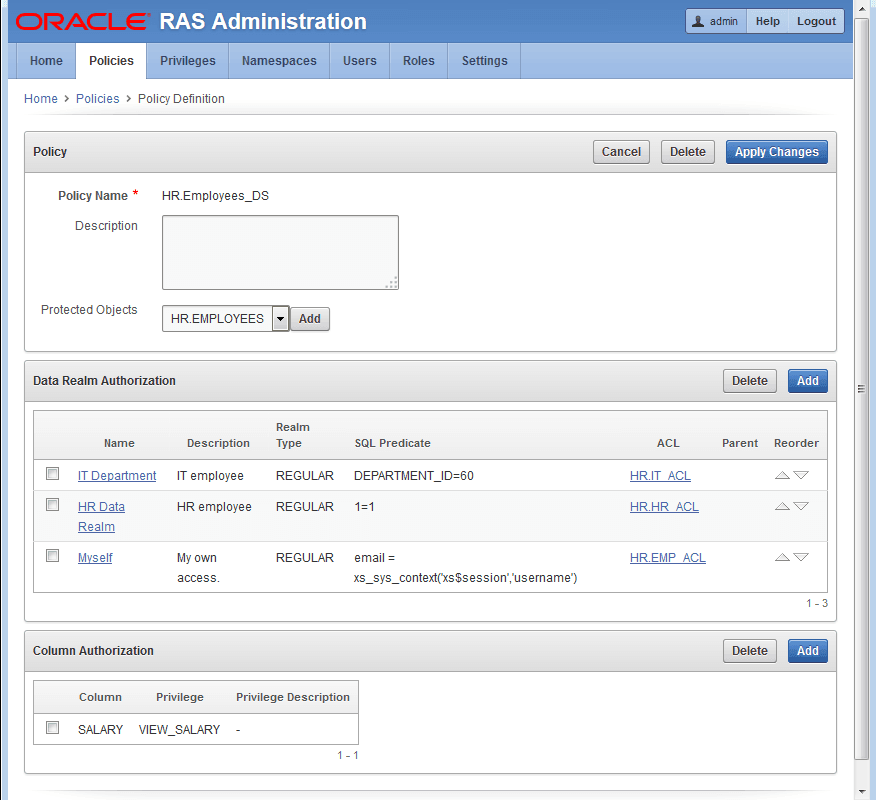
Description of the illustration employee_ds_policy.png
Applying the Policy
Describes applying the data security policy.
To apply the Employees_DS data security policy, perform the following steps:
-
On the Apply Policy page, enter information in the Apply Policy field by selecting
Enableto enable this data security policy.The following screen shot shows the completed
Employees_DSdata security policy on the Policies page with the policy already set to be enabled.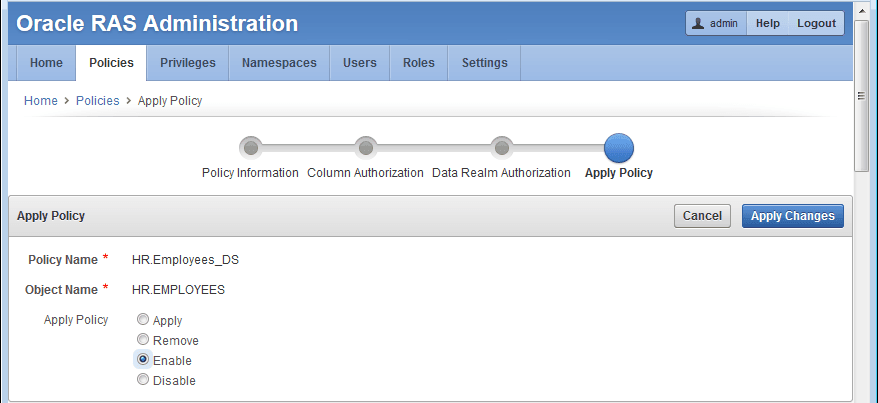
-
Click Apply Changes to create the
Employees_DSdata security policy.