Enabling Kerberos Authentication
To enable Kerberos authentication for Oracle Database, you must first install it, and then follow a set of configuration steps.
-
Step 1: Install Kerberos
You should install Kerberos Version 5. -
Step 2: Configure a Service Principal for an Oracle Database Server
You must create a service principal for Oracle Database before the server can validate the identity of clients that authenticate themselves using Kerberos. -
Step 3: Extract a Service Key Table from Kerberos
Next, you are ready to extract the service key table from Kerberos and copy it to the Oracle database server/Kerberos client system. -
Step 4: Install an Oracle Database Server and an Oracle Client
After you extract a service key table from Kerberos, you are ready to install the Oracle Database server and an Oracle client. -
Step 5: Configure Oracle Net Services and Oracle Database
After you install the Oracle Database server and client, you can configure Oracle Net Services on the server and client. -
Step 6: Configure Kerberos Authentication
You must set the required parameters in the Oracle database server and clientsqlnet.orafiles. -
Step 7: Create a Kerberos User
You must create the Kerberos user on the Kerberos authentication server where the administration tools are installed. -
Step 8: Create an Externally Authenticated Oracle User
Next, you are ready to create an externally authenticated Oracle user. -
Step 9: Get an Initial Ticket for the Kerberos/Oracle User
Before you can connect to the database, you must ask the Key Distribution Center (KDC) for an initial ticket.
Step 1: Install Kerberos
You should install Kerberos Version 5.
The source distribution for notes about building and installing Kerberos provide details. After you install Kerberos, if you are using IBM AIX on POWER systems (64-bit), you should ensure that Kerboros 5 is the preferred authentication method.
-
Install Kerberos on the system that functions as the authentication server.
Note:
After upgrading from a 32-bit version of Oracle Database, the first use of the Kerberos authentication adapter causes an error message:
ORA-01637: Packet receive failed.Workaround: After upgrading to the 64-bit version of the database and before using Kerberos external authentication method, check for a file named
/usr/tmp/oracle_service_name.RCon your computer, and remove it. -
For IBM AIX on POWER systems (64-bit), check the authentication method.
For example:
/usr/bin/lsauthentOutput similar to the following may appear:
Standard Aix-
Configure Kerberos 5 as the preferred method.
For example:
/usr/bin/chauthent -k5 -stdThis command sets Kerberos 5 as the preferred authentication method (`k5`) and Standard AIX as the second (`std`).
- To ensure that Kerberos 5 is now the preferred method, check the new configuration.
/usr/bin/lsauthent

Kerberos 5
Standard Aix
Step 2: Configure a Service Principal for an Oracle Database Server
You must create a service principal for Oracle Database before the server can validate the identity of clients that authenticate themselves using Kerberos.
- Decide on a name for the service principal, using the following format:
kservice/kinstance@REALMEach of the fields in the service principal specify the following values:
| Service Principal Field | Description |
| --- | --- |
| `kservice` | A case-sensitive string that represents the Oracle service. This can be the same as the database service name. |
| `kinstance` | Typically the fully qualified DNS name of the system on which Oracle Database is running. |
| `REALM` | The name of the Kerberos realm with which the service principal is registered. `REALM` must always be uppercase and is typically the DNS domain name. |
{: summary="This table lists and describes each field in the Kerberos service principal." }
The utility names in this section are executable programs. However, the Kerberos user name `krbuser` and the realm `EXAMPLE.COM` are examples only.
For example, suppose `kservice` is `oracle`, the fully qualified name of the system on which Oracle Database is running is `dbserver.example.com` and the realm is `EXAMPLE.COM`. The principal name then is:
oracle/dbserver.example.com@EXAMPLE.COM- Run
kadmin.localto create the service principal. On UNIX, run this command as the root user, by using the following syntax:
# cd /kerberos-install-directory/sbin
# ./kadmin.local
For example, to add a principal named `oracle/dbserver.example.com@EXAMPLE.COM` to the list of server principals known by Kerberos, you can enter the following:
kadmin.local:**addprinc -randkey oracle/dbserver.example.com@EXAMPLE.COM**Step 3: Extract a Service Key Table from Kerberos
Next, you are ready to extract the service key table from Kerberos and copy it to the Oracle database server/Kerberos client system.
For example, to extract a service key table for dbserver.example.com:
-
Ensure that you have domain administrative privileges.
-
Enter the following to extract the service key table:
kadmin.local:  **ktadd -k /tmp/keytab oracle/dbserver.example.com**
Entry for principal oracle/dbserver.example.com with kvno 2,
encryption type AES-256 CTS mode with 96-bit SHA-1 HMAC added to keytab WRFILE:
WRFILE:/tmp/keytab

kadmin.local: **exit**- To check the service key table, enter the following command:
oklist -k -t /tmp/keytab-
After the service key table has been extracted, verify that the new entries are in the table in addition to the old ones.
If they are not, or you need to add more, use
kadmin.localto append to them.If you do not enter a realm when using
ktadd, it uses the default realm of the Kerberos server.kadmin.localis connected to the Kerberos server running on thelocalhost. -
If the Kerberos service key table is on the same system as the Kerberos client, you can move it. If the service key table is on a different system from the Kerberos client, you must transfer the file with a program such as FTP. If using FTP, transfer the file in binary mode.
The following example shows how to move the service key table on a UNIX platform:
# mv /tmp/keytab /etc/v5srvtabThe default name of the service file is `/etc/v5srvtab`.
-
Verify that the owner of the Oracle database server executable can read the service key table (
/etc/v5srvtabin the previous example).To do so, set the file owner to the Oracle user, or make the file readable by the group to which Oracle belongs.
Do not make the file readable to all users. This can cause a security breach.
Step 4: Install an Oracle Database Server and an Oracle Client
After you extract a service key table from Kerberos, you are ready to install the Oracle Database server and an Oracle client.
- See the Oracle Database operating system-specific installation documentation for instructions on installing the Oracle database server and client software.
Step 5: Configure Oracle Net Services and Oracle Database
After you install the Oracle Database server and client, you can configure Oracle Net Services on the server and client.
-
See the following documentation for information on configuring Oracle Net Services on the Oracle database server and client.
-
Oracle Database operating system-specific installation documentation
-
Step 6: Configure Kerberos Authentication
You must set the required parameters in the Oracle database server and client sqlnet.ora files.
Note: Be aware that in a multitenant environment, the settings in the sqlnet.ora file apply to all pluggable databases (PDBs). However, this does not mean that all PDBs must authenticate with one KDC if using Kerberos; the settings in the sqlnet.ora file and Kerberos configuration files can support multiple KDCs.
-
Step 6A: Configure Kerberos on the Client and on the Database Server
First, you must configure Kerberos authentication service parameters on the client and on the database server. -
Step 6B: Set the Initialization Parameters
Next, you are ready to set theOS_AUTHENT_PREFIXinitialization parameter. -
Step 6C: Set sqlnet.ora Parameters (Optional)
You can set optionalsqlnet.oraparameters, in addition to the required parameters, for better security.
Step 6A: Configure Kerberos on the Client and on the Database Server
First, you must configure Kerberos authentication service parameters on the client and on the database server.
-
Start Oracle Net Manager.
- (UNIX) From $ORACLE_HOME
/bin, enter the following command at the command line:
- (UNIX) From $ORACLE_HOME
netmgr- (Windows) Select **Start**, **Programs**, **Oracle - HOME_NAME**, **Configuration and Migration Tools**, then **Net Manager**.
-
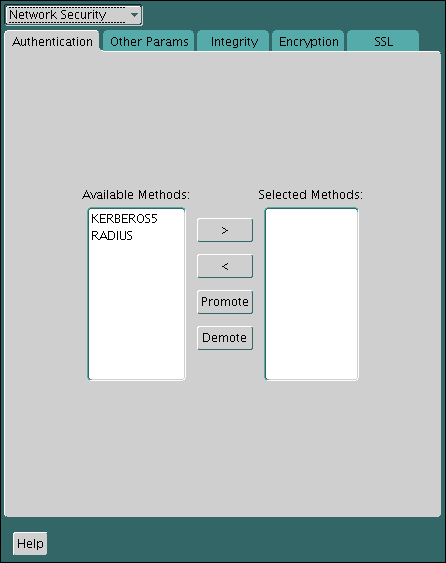
Expand Oracle Net Configuration, and from Local, select Profile.
-
From the Naming list, select Network Security.
The Network Security tabbed window appears.
-
Select the Authentication tab.
-
From the Available Methods list, select KERBEROS5.
Be aware that cross-realm Kerberos authentication is not supported using constraint delegation with the KERBEROS5 or KERKBEROS5PRE adapter.
-
Move KERBEROS5 to the Selected Methods list by clicking the right arrow (>).
-
Arrange the selected methods in order of use.
To do so, select a method in the Selected Methods list, then click Promote or Demote to position it in the list. For example, if you want
KERBEROS5to be the first service used, move it to the top of the list. -
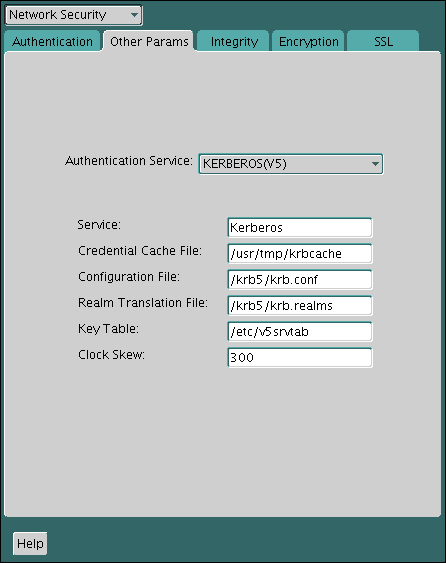
Select the Other Params tab.
-
From the Authentication Service list, select KERBEROS(V5).
-
Type Kerberos into the Service field.
Description of the illustration kerb0002.gif
This field defines the name of the service Oracle Database uses to obtain a Kerberos service ticket. When you provide the value for this field, the other fields are enabled.
-
Optionally enter values for the following fields:
-
Credential Cache File
-
Configuration File
-
Realm Translation File
-
Key Table
-
Clock Skew
See the Oracle Net Manager online Help, and Step 6C: Set sqlnet.ora Parameters (Optional), for more information about the fields and the parameters they configure.
-
-
From the File menu, select Save Network Configuration.
The
sqlnet.orafile is updated with the following entries in addition to any optional choices that you may have made in the previous step:
SQLNET.AUTHENTICATION_SERVICES=(KERBEROS5)
SQLNET.AUTHENTICATION_KERBEROS5_SERVICE=kservice
Step 6B: Set the Initialization Parameters
Next, you are ready to set the OS_AUTHENT_PREFIX initialization parameter.
-
Locate the
init.orafile.By default, the
init.orafile is located in the ORACLE_HOME/dbsdirectory (or the same location of the data files) on Linux and UNIX systems, and in the ORACLE_HOME\databasedirectory on Windows. -
In the
init.orafile, set the value ofOS_AUTHENT_PREFIXto null in theinit.orainitialization parameter file.For example:
OS_AUTHENT_PREFIX=""Set this value to null because Kerberos user names can be long, and Oracle user names are limited to 30 bytes. Setting this parameter to null overrides the default value of `OPS$`.
Note: You can create external database users that have Kerberos user names of more than 30 bytes. See Step 8: Create an Externally Authenticated Oracle User for more information.
Step 6C: Set sqlnet.ora Parameters (Optional)
You can set optional sqlnet.ora parameters, in addition to the required parameters, for better security.
- Optionally, set the following parameters on both the client and the Oracle database server.
SQLNET.KERBEROS5_CC_NAME
Parameter: SQLNET.KERBEROS5_CC_NAME=pathname_to_credentials_cache_file|OS_MEMORY
Description: Specifies the complete path name to the Kerberos credentials cache (CC) file. The default value is operating system-dependent. For UNIX, it is /tmp/krb5cc_userid.
Using the OS_MEMORY option indicates that an OS-managed memory credential cache is used for the credential cache file. This option is supported in all platforms.
You can use the following formats to specify a value for SQLNET.KERBEROS5_CC_NAME:
-
SQLNET.KERBEROS5_CC_NAME=complete_path_to_cc_fileFor example:
SQLNET.KERBEROS5_CC_NAME=/tmp/kcache SQLNET.KERBEROS5_CC_NAME=D:\tmp\kcache -
SQLNET.KERBEROS5_CC_NAME=FILE:complete_path_to_cc_fileFor example:
SQLNET.KERBEROS5_CC_NAME=FILE:/tmp/kcache -
SQLNET.KERBEROS5_CC_NAME=OSMSFT://Use this value if you are running Windows and using a Microsoft KDC.
You can also set this parameter by using the KRB5CCNAME environment variable, but the value set in the sqlnet.ora file takes precedence over the value set in KRB5CCNAME.
For example:
SQLNET.KERBEROS5_CC_NAME=/usr/tmp/krbcacheSQLNET.KERBEROS5_CLOCKSKEW
Parameter: SQLNET.KERBEROS5_CLOCKSKEW=number_of_seconds_accepted_as_network_delay
Description: This parameter specifies how many seconds can pass before a Kerberos credential is considered out-of-date. It is used when a credential is actually received by either a client or a database server. An Oracle database server also uses it to decide if a credential needs to be stored to protect against a replay attack. The default is 300 seconds.
For example:
SQLNET.KERBEROS5_CLOCKSKEW=1200SQLNET.KERBEROS5_CONF
Parameter: SQLNET.KERBEROS5_CONF=pathname_to_Kerberos_configuration_file|AUTO_DISCOVER
Description: This parameter specifies the complete path name to the Kerberos configuration file. The configuration file contains the realm for the default KDC (key distribution center) and maps realms to KDC hosts. The default is operating system-dependent. For UNIX, it is /krb5/krb.conf.
Using the AUTO_DISCOVER option in place of the configuration file enables Kerberos clients to auto-discover the KDC.
For example:
SQLNET.KERBEROS5_CONF=/krb/krb.conf
SQLNET.KERBEROS5_CONF=AUTO_DISCOVER
SQLNET.KERBEROS5_CONF_LOCATION
Parameter: SQLNET.KERBEROS5_CONF_LOCATION=path_to_Kerberos_configuration_directory
Description: This parameter indicates that the Kerberos configuration file is created by the system, and does not need to be specified by the client. The configuration file uses DNS lookup to obtain the realm for the default KDC, and maps realms to KDC hosts.
For example:
SQLNET.KERBEROS5_CONF_LOCATION=/krbSQLNET.KERBEROS5_KEYTAB
Parameter: SQLNET.KERBEROS5_KEYTAB=path_to_Kerberos_principal/key_table
Description: This parameter specifies the complete path name to the Kerberos principal/secret key mapping file. It is used by the Oracle database server to extract its key and decrypt the incoming authentication information from the client. The default is operating system-dependent. For UNIX, it is /etc/v5srvtab.
For example:
SQLNET.KERBEROS5_KEYTAB=/etc/v5srvtabSQLNET.KERBEROS5_REALMS
Parameter: SQLNET.KERBEROS5_REALMS=path_to_Kerberos_realm_translation_file
Description: This parameter specifies the complete path name to the Kerberos realm translation file. The translation file provides a mapping from a host name or domain name to a realm. The default is operating system-dependent. For UNIX, it is /etc/krb.realms.
For example:
SQLNET.KERBEROS5_REALMS=/krb5/krb.realmsStep 7: Create a Kerberos User
You must create the Kerberos user on the Kerberos authentication server where the administration tools are installed.
The realm must already exist.
Note: The utility names in this section are executable programs. However, the Kerberos user name krbuser and realm EXAMPLE.COM are examples only. They can vary among systems.
-
Run
/krb5/admin/kadmin.localas root to create a new Kerberos user, such askrbuser.For example, to create a Kerberos user is UNIX-specific:
# /krb5/admin/kadmin.local
kadmin.local: **addprinc krbuser**
Enter password for principal: "krbuser@example.com": (password does not display)
Re-enter password for principal: "krbuser@example.com": (password does not display)
kadmin.local: **exit**
Step 8: Create an Externally Authenticated Oracle User
Next, you are ready to create an externally authenticated Oracle user.
- Log in to SQL*Plus as a user who has the
CREATE USERprivilege.
sqlplus sec_admin - Or, CONNECT sec_admin@hrpdb
Enter password: password-
Ensure that the
OS_AUTHENT_PREFIXis set to null (""). -
Create an Oracle Database user account that corresponds to the Kerberos user. Enter the Oracle user name in uppercase and enclose it in double quotation marks.
For example:
CREATE USER krbuser IDENTIFIED EXTERNALLY AS 'krbuser@example.com';
GRANT CREATE SESSION TO krbuser;
Note: The database administrator should ensure that two database users are not identified externally by the same Kerberos principal name.
Step 9: Get an Initial Ticket for the Kerberos/Oracle User
Before you can connect to the database, you must ask the Key Distribution Center (KDC) for an initial ticket.
An initial ticket or ticket granting ticket (TGT) identifies the user as having the right to ask for additional service tickets. No tickets can be obtained without an initial ticket. An initial ticket is retrieved by running the okinit program and providing a password.
If more than one Kerberos principal will use this client to authenticate, then each Kerberos principal must get an initial ticket and store it in a credential cache in its own directory. Additional Kerberos users and the credential cache location (other than the one described in the sqlnet.ora file) can be specified either in the connect string or in tnsnames.ora.
Refer to How to Securely Use Database Links with Kerberos and Microsoft Active Directory for information on securely configuring TGT with Active Directory.
- To request an initial ticket, run the following command on the client:
% okinit usernameIf you want to enable credentials that can be used across database links, then include the -f option and provide the Kerberos password when prompted.
% services/okinit -f
Password for krbuser@EXAMPLE.COM:(password does not display)
Note: The following check is only required when using the KERBEROS5PRE adapter. It is not required for the KERBEROS5 adapter. The use of the KERBEROS5PRE adapter is deprecated with Oracle Database 21c. Oracle recommends that you use the KERBEROS5 adapter instead.
If you encounter an error such as okinit: Cannot contact any KDC for requested realm, then check the /etc/services file if there are the kerberos5 entries. For example:
kerberos        88/tcp          kerberos5 krb5  # Kerberos v5
kerberos        88/udp          kerberos5 krb5  # Kerberos v5
Related Topics
- Oracle Database Enterprise User Security Administrator’s Guide for information on migrating Kerberos users to Kerberos-authenticated enterprise users
- Oracle Database Net Services Administrator’s Guide
- Oracle Database Net Services Reference