Legacy Configuration
Learn how to configure RADIUS authentication using the legacy configuration. The API based on Request for Comments (RFC) 2138 is deprecated starting with Oracle AI Database 26ai.
To use the deprecated legacy configuration, add the following parameters to the sqlnet.ora file: SQLNET.RADIUS_ALLOW_WEAK_CLIENTS=TRUE and SQLNET.RADIUS_ALLOW_WEAK_PROTOCOL=TRUE.
-
Step 1: Configure RADIUS Authentication
To configure RADIUS authentication, you must first configure it on the Oracle client, then the server. Afterward, you can configure additional RADIUS features. -
Step 2: Create a User and Grant Access
After you complete the RADIUS authentication, you must create an Oracle Database user who is responsible for the RADIUS configuration. -
Step 3: Configure External RADIUS Authorization (Optional)
You must configure the Oracle server, the Oracle client, and the RADIUS server to RADIUS users who must connect to an Oracle database. -
Step 4: Configure RADIUS Accounting
RADIUS accounting logs information about access to the Oracle database server and stores it in a file on the RADIUS accounting server. -
Step 5: Add the RADIUS Client Name to the RADIUS Server Database
The RADIUS server that you select must comply with RADIUS standards. -
Step 6: Configure the Authentication Server for Use with RADIUS
After you add the RADIUS client name to the RADIUS server database, you can configure the authentication server to use the RADIUS. -
Step 7: Configure the RADIUS Server for Use with the Authentication Server
After you configure the authentication server for use with RADIUS, you can configure the RADIUS server to use the authentication server. -
Step 8: Configure Mapping Roles
If the RADIUS server supports vendor type attributes, then you can manage roles by storing them in the RADIUS server.
Step 1: Configure RADIUS Authentication
To configure RADIUS authentication, you must first configure it on the Oracle client, then the server. Afterward, you can configure additional RADIUS features.
Note: Unless otherwise indicated, perform these configuration tasks by using Oracle Net Manager or by using any text editor to modify the sqlnet.ora file. Be aware that in a multitenant environment, the settings in the sqlnet.ora file apply to all pluggable databases (PDBs).
-
Step 1A: Configure RADIUS on the Oracle Client
You can use Oracle Net Manager to configure RADIUS on the Oracle client. -
Step 1B: Configure RADIUS on the Oracle Database Server
You must create a file to hold the RADIUS key and store this file on the Oracle database server. Then you must configure the appropriate parameters in thesqlnet.orafile. -
Step 1C: Configure Additional RADIUS Features
You can change the default settings, configure the challenge-response mode, and set parameters for an alternate RADIUS server.
Step 1A: Configure RADIUS on the Oracle Client
You can use Oracle Net Manager to configure RADIUS on the Oracle client.
-
Start Oracle Net Manager.
- (UNIX) From $ORACLE_HOME
/bin, enter the following command at the command line:
- (UNIX) From $ORACLE_HOME
netmgr- (Windows) Select **Start**, **Programs**, **Oracle - HOME_NAME**, **Configuration and Migration Tools**, then **Net Manager**.
-
Expand Oracle Net Configuration, and from Local, select Profile.
-
From the Naming list, select Network Security.
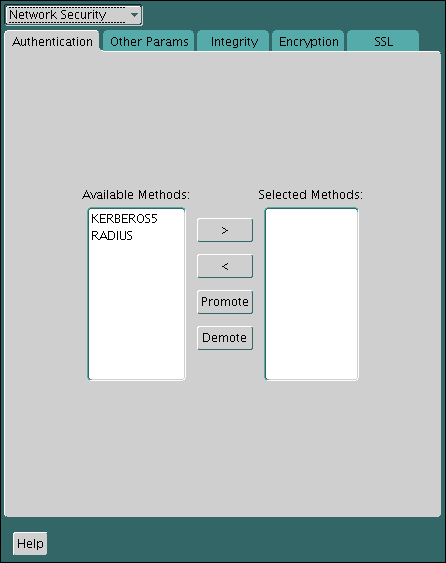
The Network Security tabbed window appears.
-
Select the Authentication tab. (It should be selected by default.)
-
From the Available Methods list, select RADIUS.
-
Select the right-arrow (>) to move RADIUS to the Selected Methods list.
Move any other methods you want to use in the same way.
-
Arrange the selected methods in order of required usage by selecting a method in the Selected Methods list, and clicking Promote or Demote to position it in the list.
For example, put RADIUS at the top of the list for it to be the first service used.
-
From the File menu, select Save Network Configuration.
The
sqlnet.orafile is updated with the following entry:
SQLNET.AUTHENTICATION_SERVICES=(RADIUS)Step 1B: Configure RADIUS on the Oracle Database Server
You must create a file to hold the RADIUS key and store this file on the Oracle database server. Then you must configure the appropriate parameters in the sqlnet.ora file.
-
Step 1B (1): Create the RADIUS Secret Key File on the Oracle Database Server
First, you must create the RADIUS secret key file. -
Step 1B (2): Configure RADIUS Parameters on the Server (sqlnet.ora file)
After you create RADIUS secret key file, you are ready to configure the appropriate parameters in thesqlnet.orafile. -
Step 1B (3): Set Oracle Database Server Initialization Parameters
After you configure the sqlnet.ora file, you must configure theinit.orainitialization file.
Step 1B (1): Create the RADIUS Secret Key File on the Oracle Database Server
First, you must create the RADIUS secret key file.
-
Obtain the RADIUS secret key from the RADIUS server.
For each RADIUS client, the administrator of the RADIUS server creates a shared secret key, which must be less than or equal to 16 characters.
-
On the Oracle database server, create a directory: - (UNIX) *$ORACLE_HOME*`/network/security` - (Windows) *ORACLE_BASE*``*ORACLE_HOME*`\network\security`
-
Create the file
radius.keyto hold the shared secret copied from the RADIUS server. Place the file in the directory you created in Step 2. -
Copy the shared secret key and paste it (and nothing else) into the
radius.keyfile created on the Oracle database server. -
For security purposes, change the file permission of
radius.keyto read only, accessible only by the Oracle owner.Oracle relies on the file system to keep this file secret.
Step 1B (2): Configure RADIUS Parameters on the Server (sqlnet.ora file)
After you create RADIUS secret key file, you are ready to configure the appropriate parameters in the sqlnet.ora file.
Note:
-
Starting with Oracle AI Database 26ai, users authenticating to the database using the legacy RADIUS API no longer are granted administrative privileges.
In previous releases, users authenticating with RADIUS API could be granted administrative privileges such as
SYSDBAorSYSBACKUP. In Oracle AI Database 26ai, Oracle introduces a new RADIUS API that uses the latest standards. To grant administrative privileges to users, ensure the database connection to the database uses the new RADIUS API, and that you are using the Oracle AI Database 26ai client to connect to the Oracle AI Database 26ai server. -
Starting with Oracle AI Database 26ai, the older RADIUS API that is based on Request for Comments (RFC) 2138 is deprecated.
Oracle AI Database 26ai introduces an updated RADIUS API based on RFC 6613 and RFC 6614. Oracle recommends that you start planning on migrating to use the new RADIUS API as soon as possible. The new API is enabled by default. These parameters associated with the older RADIUS API are also deprecated:
SQLNET.RADIUS_ALTERNATE,SQLNET.RADIUS_ALTERNATE_PORT,SQLNET.RADIUS_AUTHENTICATION, andSQLNET.RADIUS_AUTHENTICATION_PORT. Refer to the Radius API documentation for information on changing the default to use the older RADIUS API.
-
Log in to the Oracle Database server that will use RADIUS.
-
Modify the following parameters in the
sqlnet.orafile:
SQLNET.AUTHENTICATION_SERVICES=radius
SQLNET.RADIUS_TRANSPORT_PROTOCOL=[tls|udp]
SQLNET.RADIUS_AUTHENTICATION_TLS_HOST=RADIUS_host_name
SQLNET.RADIUS_AUTHENTICATION_TLS_PORT=Oracle_Database_server_port
In this specification:
- `SQLNET.AUTHENTICATION_SERVICES` sets the authentication service to be for RADIUS.
- `SQLNET.RADIUS_TRANSPORT_PROTOCOL` sets either Transport Layer Security (TLS) or User Datagram Protocol (UDP) as the protocol that the RADIUS server uses. If you omit this value, then TLS is used. If you must use UDP, then you must set the `SQLNET.RADIUS_ALLOW_WEAK_CLIENTS` and `SQLNET.RADIUS_ALLOW_WEAK_PROTOCOL` parameters to `TRUE`.
- `SQLNET.RADIUS_AUTHENTICATION_TLS_HOST` sets the host name of the RADIUS server. This value is mandatory.
- `SQLNET.RADIUS_AUTHENTICATION_TLS_PORT` sets the port of the Oracle Database server. The default port is `2083`. If the server uses a different port, then specify that value here.
If you need to use the earlier, deprecated RADIUS API parameters, then set the `SQLNET.RADIUS_ALLOW_WEAK_CLIENTS` and `SQLNET.RADIUS_ALLOW_WEAK_PROTOCOL` parameters to `TRUE`. The deprecated parameters are:
- `SQLNET.RADIUS_ALTERNATE`
- `SQLNET.RADIUS_AUTHENTICATION=RADIUS_SERVER_[host_name|IP_address]`
- `SQLNET.RADIUS_ALTERNATE_PORT`
- `SQLNET.RADIUS_AUTHENTICATION_PORT`
In this specification:
- `SQLNET.RADIUS_ALTERNATE` specifies an alternate RADIUS server if the primary server is unavailable.
- `SQLNET.RADIUS_AUTHENTICATION` specifies the host name or IP address of the RADIUS server. The `IP_address` can either be an Internet Protocol Version 4 (IPv4) or Internet Protocol Version 6 (IPv6) address. The RADIUS adapter supports both IPv4 and IPv6 based servers.
- `SQLNET.RADIUS_ALTERNATE_PORT` specifies the listening port of the alternate RADIUS server.
- `SQLNET.RADIUS_AUTHENTICATION` specifies a primary RADIUS server location, either by its host name or its IP address.
- `SQLNET.RADIUS_AUTHENTICATION_PORT` specifies the listening port of a primary RADIUS server.
This procedure does not configure the Transport Layer Security (TLS) connection between the Oracle Database server and client; additional configuration is required.
Step 1B (3): Set Oracle Database Server Initialization Parameters
After you configure the sqlnet.ora file, you must configure the init.ora initialization file.
- Add the following setting to the
init.orafile.
OS_AUTHENT_PREFIX=""By default, the `init.ora` file is located in the *ORACLE_HOME*`/dbs` directory (or the same location of the data files) on Linux and UNIX systems, and in the *ORACLE_HOME*`\database` directory on Windows.
-
Restart the database.
For example:
SQL> SHUTDOWN
SQL> STARTUP
Step 1C: Configure Additional RADIUS Features
You can change the default settings, configure the challenge-response mode, and set parameters for an alternate RADIUS server.
-
Step 1C(1): Change Default Settings
You can edit thesqlnet.orafile to change the default RADIUS settings. -
Step 1C(2): Configure Challenge-Response Mode
To configure challenge-response mode, you must specify information such as a dynamic password that you obtain from a token card. -
Step 1C(3): Set Parameters for an Alternate RADIUS Server
If you are using an alternate RADIUS server, then you must set additional parameters.
Step 1C(1): Change Default Settings
You can edit the sqlnet.ora file to change the default RADIUS settings.
-
Log in to the Oracle Database server that will use RADIUS.
-
Modify the following
sqlnet.oraparameters:
SQLNET.RADIUS_AUTHENTICATION_PORT=(port)
SQLNET.RADIUS_AUTHENTICATION_TIMEOUT=(number_of_seconds_to_wait_for_response)
SQLNET.RADIUS_AUTHENTICATION_RETRIES=(number_of_times_to re-send_to_radius_server)
SQLNET.RADIUS_SECRET=(path/.radius.key)
In this specification:
- `SQLNET.RADIUS_AUTHENTICATION_PORT` specifies the listening port of a primary RADIUS server. The default is `1812`.
- `SQLNET.RADIUS_AUTHENTICATION_TIMEOUT` specifies the amount of time in seconds that the database should wait for a response from a primary RADIUS server. The default is `5`.
- `SQLNET.RADIUS_AUTHENTICATION_RETRIES` specifies the number of times that the database should resend messages to a primary RADIUS server. The default is `3`.
- `SQLNET.RADIUS_SECRET` specifies the location of a file that contains the RADIUS secret key, which is a shared secret between a RADIUS client and server. The default is `radsec`, which points to `ORACLE_HOME/network/security/radius.key`. If you set a different RADIUS secret key file, then ensure that you set `SQLNET.RADIUS_SECRET` on the client as well as the database server. If the RADIUS server uses TLS as the protocol, then you can omit this parameter. For a RADIUS implementation that uses the User Datagram Protocol (UDP), the default parameter value cannot be used. The default value of `radsec` can only be used if you are using RADIUS with TLS over TCP.
Step 1C(2): Configure Challenge-Response Mode
To configure challenge-response mode, you must specify information such as a dynamic password that you obtain from a token card.
With the RADIUS adapter, this interface is Java-based to provide optimal platform independence.
Note: Third party vendors of authentication devices must customize this graphical user interface to fit their particular device. For example, a smart card vendor would customize the Java interface so that the Oracle client reads data, such as a dynamic password, from the smart card. When the smart card receives a challenge, it responds by prompting the user for more information, such as a PIN.
To configure challenge-response mode:
-
If you are using JDK 1.1.7 or JRE 1.1.7, then set the
JAVA_HOMEenvironment variable to the JRE or JDK location on the system where the Oracle client is run:- On UNIX, enter this command at the prompt:
% setenv JAVA_HOME /usr/local/packages/jre1.1.7B- On Windows, select **Start**, **Settings**, **Control Panel**, **System**, **Environment**, and set the `JAVA_HOME` variable as follows:
c:\java\jre1.1.7BThis step is not required for any other JDK/JRE version.
-
Start Oracle Net Manager.
- (UNIX) From $ORACLE_HOME
/bin, enter the following command at the command line:
- (UNIX) From $ORACLE_HOME
netmgr- (Windows) Select **Start**, **Programs**, **Oracle - HOME_NAME**, **Configuration and Migration Tools**, then **Net Manager**.
-
Expand Oracle Net Configuration, and from Local, select Profile.
-
From the Naming list, select Network Security.
The Network Security tabbed window appears.
-
From the Authentication Service list, select RADIUS.
-
In the Challenge Response field, enter ON to enable challenge-response.
-
In the Default Keyword field, accept the default value of the challenge or enter a keyword for requesting a challenge from the RADIUS server.
The keyword feature is provided by Oracle and supported by some, but not all, RADIUS servers. You can use this feature only if your RADIUS server supports it.
By setting a keyword, you let the user avoid using a password to verify identity. If the user does not enter a password, the keyword you set here is passed to the RADIUS server which responds with a challenge requesting, for example, a driver’s license number or birth date. If the user does enter a password, the RADIUS server may or may not respond with a challenge, depending upon the configuration of the RADIUS server.
-
In the Interface Class Name field, accept the default value of DefaultRadiusInterface or enter the name of the class you have created to handle the challenge-response conversation.
If other than the default RADIUS interface is used, then you also must edit the
sqlnet.orafile to enterSQLNET.RADIUS_CLASSPATH=(location), wherelocationis the complete path name of the jar file. It defaults to $ORACLE_HOME/network/jlib/netradius.jar:$ORACLE_HOME/JRE/lib/vt.jar -
From the File menu, select Save Network Configuration.
The
sqlnet.orafile is updated with the following entries:
SQLNET.RADIUS_CHALLENGE_RESPONSE=([ON | OFF])
SQLNET.RADIUS_DEFAULT_CHALLENGE_KEYWORD=(KEYWORD)
SQLNET.RADIUS_AUTHENTICATION_INTERFACE=(name of interface including the package name delimited by "/" for ".")
Step 1C(3): Set Parameters for an Alternate RADIUS Server
If you are using an alternate RADIUS server, then you must set additional parameters.
- Set the following parameters in the
sqlnet.orafile:
SQLNET.RADIUS_ALTERNATE=(hostname or ip address of alternate radius server)
SQLNET.RADIUS_ALTERNATE_PORT=(1812)
SQLNET.RADIUS_ALTERNATE_TIMEOUT=(number of seconds to wait for response)
SQLNET.RADIUS_ALTERNATE_RETRIES=(number of times to re-send to radius server)
Step 2: Create a User and Grant Access
After you complete the RADIUS authentication, you must create an Oracle Database user who is responsible for the RADIUS configuration.
-
Connect to the CDB root or to the PDB in which RADIUS is implemented.
For example:
CONNECT system@pdb_name;
Enter password: password- Create the user as a common user if you connected to the CDB root, or as a local user if you connected to a PDB..
CREATE USER username IDENTIFIED EXTERNALLY;
GRANT CREATE SESSION TO USER user_name;- Enter the user username in the RADIUS server’s users file.
Step 3: Configure External RADIUS Authorization (Optional)
You must configure the Oracle server, the Oracle client, and the RADIUS server to RADIUS users who must connect to an Oracle database.
-
Step 3A: Configure the Oracle Server (RADIUS Client)
You can edit theinit.orafile to configure an Oracle server for a RADIUS client. -
Step 3B: Configure the Oracle Client Where Users Log In
Next, you must configure the Oracle client where users log in. -
Step 3C: Configure the RADIUS Server
To configure the RADIUS server, you must modify the RADIUS server attribute configuration file.
Step 3A: Configure the Oracle Server (RADIUS Client)
You can edit the init.ora file to configure an Oracle server for a RADIUS client.
To do so, you must modify the init.ora file, restart the database, and the set the RADIUS challenge-response mode.
- Add the
OS_ROLESparameter to theinit.orafile and set this parameter toTRUEas follows:
OS_ROLES=TRUEBy default, the `init.ora` file is located in the *ORACLE_HOME*`/dbs` directory (or the same location of the data files) on Linux and UNIX systems, and in the *ORACLE_HOME*`\database` directory on Windows.
-
Restart the database so that the system can read the change to the
init.orafile.For example:
SQL> SHUTDOWN
SQL> STARTUP-
Set the RADIUS challenge-response mode to
ONfor the server if you have not already done so by following the steps listed in Step 1C(2): Configure Challenge-Response Mode. -
Add externally identified users and roles.
Step 3B: Configure the Oracle Client Where Users Log In
Next, you must configure the Oracle client where users log in.
- Set the RADIUS challenge-response mode to
ONfor the client if you have not already done so by following the steps listed in Step 1C(2): Configure Challenge-Response Mode.
Step 3C: Configure the RADIUS Server
To configure the RADIUS server, you must modify the RADIUS server attribute configuration file.
-
Add the following attributes to the RADIUS server attribute configuration file:
ATTRIBUTE NAME CODE TYPE VENDOR_SPECIFIC26 Integer ORACLE_ROLE1 String -
Assign a Vendor ID for Oracle in the RADIUS server attribute configuration file that includes the SMI Network Management Private Enterprise Code of
111.For example, enter the following in the RADIUS server attribute configuration file:
VALUE VENDOR_SPECIFIC ORACLE 111 -
Using the following syntax, add the
ORACLE_ROLEattribute to the user profile of the users who will use external RADIUS authorization:ORA_databaseSID_rolename[_[A]|[D]]In this specification.:
-
ORAdesignates that this role is used for Oracle purposes -
databaseSIDis the Oracle system identifier that is configured in the databaseinit.orafile.By default, the
init.orafile is located in the ORACLE_HOME/dbsdirectory (or the same location of the data files) on Linux and UNIX systems, and in the ORACLE_HOME\databasedirectory on Windows. -
rolenameis the name of role as it is defined in the data dictionary. -
Ais an optional character that indicates the user has administrator’s privileges for this role. -
Dis an optional character that indicates this role is to be enabled by default.
Ensure that RADIUS groups that map to Oracle roles adhere to the
ORACLE_ROLEsyntax.For example:
-
USERNAME     USERPASSWD="user_password",
             SERVICE_TYPE=login_user,
             VENDOR_SPECIFIC=ORACLE,
             ORACLE_ROLE=ORA_ora920_sysdba
Step 4: Configure RADIUS Accounting
RADIUS accounting logs information about access to the Oracle database server and stores it in a file on the RADIUS accounting server.
Use this feature only if both the RADIUS server and authentication server support it.
-
Step 4A: Set RADIUS Accounting on the Oracle Database Server
To set RADIUS accounting on the server, you can use Oracle Net Manager. -
Step 4B: Configure the RADIUS Accounting Server
RADIUS Accounting Server resides on the same host as the RADIUS authentication server or on a separate host.
Step 4A: Set RADIUS Accounting on the Oracle Database Server
To set RADIUS accounting on the server, you can use Oracle Net Manager.
-
Start Oracle Net Manager.
- (UNIX) From $ORACLE_HOME
/bin, enter the following command at the command line:
- (UNIX) From $ORACLE_HOME
netmgr- (Windows) Select **Start**, **Programs**, **Oracle - HOME_NAME**, **Configuration and Migration Tools**, then **Net Manager**.
-
Expand Oracle Net Configuration, and from Local, select Profile.
-
From the Naming list, select Network Security.
The Network Security tabbed window appears.
-
Select the Other Params tab.
-
From the Authentication Service list, select RADIUS.
-
In the Send Accounting field, enter ON to enable accounting or OFF to disable accounting.
-
From the File menu, select Save Network Configuration.
The
sqlnet.orafile is updated with the following entry:
SQLNET.RADIUS_SEND_ACCOUNTING= ONStep 4B: Configure the RADIUS Accounting Server
RADIUS Accounting Server resides on the same host as the RADIUS authentication server or on a separate host.
- See the administration documentation for the RADIUS server, for information about configuring RADIUS accounting.
Step 5: Add the RADIUS Client Name to the RADIUS Server Database
The RADIUS server that you select must comply with RADIUS standards.
You can use any RADIUS server that complies with the Internet Engineering Task Force (IETF) RFC #2138, Remote Authentication Dial In User Service (RADIUS), and RFC #2139 RADIUS Accounting standards. Because RADIUS servers vary, consult the documentation for your particular RADIUS server for any unique interoperability requirements.
-
Open the clients file, which is located in
/etc/raddb/clients.The following text and table appear:
@ (#) clients 1.1 2/21/96 Copyright 1991 Livingston Enterprises Inc
This file contains a list of clients which are allowed to make authentication requests and
their encryption key. The first field is a valid hostname. The second field (separated by
blanks or tabs) is the encryption key.
Client Name Key-
In the
CLIENT NAMEcolumn, enter the host name or IP address of the host on which the Oracle database server is running.In the
KEYcolumn, type the shared secret. The value you enter in theCLIENT NAMEcolumn, whether it is the client’s name or IP address, depends on the RADIUS server. -
Save and close the clients file.
Step 6: Configure the Authentication Server for Use with RADIUS
After you add the RADIUS client name to the RADIUS server database, you can configure the authentication server to use the RADIUS.
- Refer to the authentication server documentation for instructions about configuring the authentication servers.
Step 7: Configure the RADIUS Server for Use with the Authentication Server
After you configure the authentication server for use with RADIUS, you can configure the RADIUS server to use the authentication server.
- Refer to the RADIUS server documentation for instructions about configuring the RADIUS server for use with the authentication server.
Step 8: Configure Mapping Roles
If the RADIUS server supports vendor type attributes, then you can manage roles by storing them in the RADIUS server.
The Oracle database server downloads the roles when there is a CONNECT request using RADIUS.To use this feature, you must configure roles on both the Oracle database server and the RADIUS server.
-
Use a text editor to set the
OS_ROLESparameter in the initialization parameters file on the Oracle database server.By default, the
init.orafile is located in the ORACLE_HOME/dbsdirectory (or the same location of the data files) on Linux and UNIX systems, and in the ORACLE_HOME\databasedirectory on Windows. -
Stop and restart the Oracle database server.
For example:
SHUTDOWN
STARTUP-
Create each role that the RADIUS server will manage on the Oracle database server with the value
IDENTIFIED EXTERNALLY.To configure roles on the RADIUS server, use the following syntax:
ORA_DatabaseName.DatabaseDomainName_RoleNameIn this specification:
- `DatabaseName` is the name of the Oracle database server for which the role is being created. This is the same as the value of the DB_NAME initialization parameter.
- `DatabaseDomainName` is the name of the domain to which the Oracle database server belongs. The value is the same as the value of the `DB_DOMAIN` initialization parameter.
- `RoleName` is name of the role created in the Oracle database server.
For example:
ORA_USERDB.US.EXAMPLE.COM_MANAGER- Configure RADIUS challenge-response mode.
Related Topics
- The RADIUS server administration documentation, for information about obtaining the secret key
- Configuring Transport Layer Security Encryption
- Oracle Database Reference for information about setting initialization parameters
- Step 1B (1): Create the RADIUS Secret Key File on the Oracle Database Server
- Step 1B (1): Create the RADIUS Secret Key File on the Oracle Database Server
- Integrating Authentication Devices Using RADIUS for information about how to customize the challenge-response user interface
- Administration documentation for the RADIUS server
- The RADIUS server administration documentation for information about configuring the server.
- Challenge-Response (Asynchronous) Authentication Mode
- Step 1C(2): Configure Challenge-Response Mode