Transport Layer Security Connection with a Client Wallet
You must configure Transport Layer Security on the server, and then the client.
-
Step 1: Configure Transport Layer Security on the Server
During installation, Oracle sets defaults on the Oracle database server and the Oracle client for TLS parameters, except the Oracle wallet location. -
Step 2: Configure Transport Layer Security on the Client
When you configure SSL on the client, you configure the server DNs and use TCP/IP with TLS on the client. -
Step 3: Log in to the Database Instance
After you have completed the configuration, you are ready to log in to the database.
Step 1: Configure Transport Layer Security on the Server
During installation, Oracle sets defaults on the Oracle database server and the Oracle client for TLS parameters, except the Oracle wallet location.
-
Step 1A: Confirm Wallet Creation on the Server
Before proceeding to the next step, confirm that a wallet has been created and that it has a certificate. -
Step 1B: Specify the Database Wallet Location on the Server
Next, you are ready to specify a location on the server for the wallet. -
Step 1C: Set the Transport Layer Security Cipher Suites on the Server (Optional)
Optionally, you can set the Transport Layer Security cipher suites. -
Step 1D: Set the Required Transport Layer Security Version on the Server (Optional)
TheSSL_VERSIONparameter defines the version of TLS that must run on the systems with which the server communicates. -
Step 1E: Set Transport Layer Security Client Authentication on the Server (Optional)
TheSSL_CLIENT_AUTHENTICATIONparameter controls whether the client is authenticated using TLS. -
Step 1F: Set Transport Layer Security as an Authentication Service on the Server (Optional)
TheSQLNET.AUTHENTICATION_SERVICESparameter in thesqlnet.orafile sets the TLS authentication service. -
Step 1G: Disable SSLv3 on the Server and Client (Optional)
SSLv3 refers to Secure Sockets Layer version 3. -
Step 1H: Create a Listening Endpoint that Uses TCP/IP with Transport Layer Security on the Server
You can configure a listening endpoint to use TCP/IP with TLS on the server. -
Step 1H: Restart the Database
To complete the configuration of Transport Layer Security on the server, you must restart the database.
Step 1A: Confirm Wallet Creation on the Server
Before proceeding to the next step, confirm that a wallet has been created and that it has a certificate.
-
Start Oracle Wallet Manager.
- (UNIX) From $ORACLE_HOME
/bin, enter the following command:
- (UNIX) From $ORACLE_HOME
owm- (Windows) Select **Start**, **Programs**, **Oracle-****HOME_NAME**, **Integrated Management Tools**, **Wallet Manager**
Oracle Wallet Manager is deprecated with Oracle Database 21c. Instead of using Oracle Wallet Manager, Oracle recommends that you use the command line tools `orapki` and `mkstore`.
-
From the Wallet menu, select Open.
The wallet should contain a certificate with a status of
Readyand auto-login turned on. If auto-login is not on, then select it from the Wallet menu and save the wallet again. This turns auto-login on.
Step 1B: Specify the Database Wallet Location on the Server
Next, you are ready to specify a location on the server for the wallet.
-
Start Oracle Net Manager.
- (UNIX) From $ORACLE_HOME
/bin, enter the following command at the command line:
- (UNIX) From $ORACLE_HOME
netmgr- (Windows) Select **Start**, **Programs**, **Oracle - HOME_NAME**, **Configuration and Migration Tools**, then **Net Manager**.
-
Expand Oracle Net Configuration, and from Local, select Profile.
-
From the Naming list, select Network Security.
The Network Security tabbed window appears.
-
Select the SSL tab (which works for TLS) and then select Configure SSL for: Server.
-
In the Wallet Directory box, enter the directory in which the Oracle wallet is located or click Browse to find it by searching the file system.
Note that if you are configuring the database-to-directory TLS connection for Enterprise User Security, then Database Configuration Assistant automatically creates a database wallet while registering the database with the directory. You must use that wallet to store the database PKI credentials for TLS-authenticated Enterprise User Security.
Important:
-
Use Oracle Wallet Manager to create the wallet. See Oracle Database Enterprise User Security Administrator’s Guide for information about creating a new Oracle wallet.
-
Use Oracle Net Manager to set the wallet location in the
sqlnet.orafile. Be aware that in a multitenant environment, the settings in thesqlnet.orafile apply to all pluggable databases (PDBs).
Ensure that you enter the same wallet location when you create it and when you set the location in the
sqlnet.orafile. -
-
From the File menu, select Save Network Configuration.
The
sqlnet.oraandlistener.orafiles are updated with the following entries:
wallet_location =
 (SOURCE=
  (METHOD=File)
  (METHOD_DATA=
   (DIRECTORY=wallet_location)))
<div class="infoboxnote" markdown="1">
**Note:**
The listener uses the wallet defined in the `listener.ora` file. It can use any database wallet. When SSL is configured for a server using Net Manager, the wallet location is entered into the `listener.ora` and the `sqlnet.ora` files. The `listener.ora` file is not relevant to the Oracle client.
To change the listener wallet location so that the listener has its own wallet, you can edit `listener.ora` to enter the new location.
</div>
Step 1C: Set the Transport Layer Security Cipher Suites on the Server (Optional)
Optionally, you can set the Transport Layer Security cipher suites.
-
About the Transport Layer Security Cipher Suites
A cipher suite is a set of authentication, encryption, and data integrity algorithms used for exchanging messages between network entities. -
TLS Cipher Suite Authentication, Encryption, Integrity, and TLS Versions
Oracle Database supports a set of cipher suites that are set by default when you install Oracle Database. -
Specifying Transport Layer Security Cipher Suites for the Database Server
First, you must specify the Transport Layer Security cipher suites for the database server.
About the Transport Layer Security Cipher Suites
A cipher suite is a set of authentication, encryption, and data integrity algorithms used for exchanging messages between network entities.
During a Transport Layer Security handshake, two entities negotiate to see which cipher suite they will use when transmitting messages back and forth.
When you install Oracle Database, the Transport Layer Security cipher suites are set for you by default and negotiated in the order they are listed. You can override the default order by setting the SSL_CIPHER_SUITES parameter. Ensure that you enclose the SSL_CIPHER_SUITES parameter setting in parentheses (for example, SSL_CIPHER_SUITES=(tls_rsa_with_aes_128_cbc_sha256)). Otherwise, the cipher suite setting will not parse correctly.
You can prioritize the cipher suites. When the client negotiates with servers regarding which cipher suite to use, it follows the prioritization you set. When you prioritize the cipher suites, consider the following:
-
Compatibility. Server and client must be configured to use compatible cipher suites for a successful connection.
-
Cipher priority and strength. Prioritize cipher suites starting with the strongest and moving to the weakest to ensure the highest level of security possible.
-
The level of security you want to use.
-
The impact on performance.
Note:
Regarding Diffie-Hellman anonymous authentication:
-
If you set the server to employ this cipher suite, then you must also set the same cipher suite on the client. Otherwise, the connection fails.
-
If you use a cipher suite employing Diffie-Hellman anonymous, then you must configure the TLS client authentication on the server by setting the
SSL_CLIENT_AUTHENTICATIONparameter toFALSE. -
There is a known bug in which an OCI client requires a wallet even when using a cipher suite with DH_ANON, which does not authenticate the client.
-
TLS Cipher Suite Authentication, Encryption, Integrity, and TLS Versions
Oracle Database supports a set of cipher suites that are set by default when you install Oracle Database. The following table lists the authentication, encryption, and data integrity types each cipher suite uses.
| Cipher Suites | Authentication | Encryption | Data Integrity | TLS Compatibility |
|---|---|---|---|---|
TLS_ECDHE_ECDSA_WITH_AES_128_GCM_SHA256 |
ECDHE_ECDSA | AES 128 GCM | SHA256 (SHA-2) | TLS 1.2 only |
TLS_ECDHE_ECDSA_WITH_AES_128_CBC_SHA |
ECDHE_ECDSA | AES 128 CBC | SHA-1 | TLS 1.0 and later |
TLS_ECDHE_ECDSA_WITH_AES_128_CBC_SHA256 |
ECDHE_ECDSA | AES 128 CBC | SHA256 (SHA-2) | TLS 1.2 only |
TLS_ECDHE_ECDSA_WITH_AES_256_CBC_SHA |
ECDHE_ECDSA | AES 256 CBC | SHA-1 | TLS 1.0 and later |
TLS_ECDHE_ECDSA_WITH_AES_256_CBC_SHA384 |
ECDHE_ECDSA | AES 256 CBC | SHA384 (SHA-2) | TLS 1.2 only |
TLS_ECDHE_ECDSA_WITH_AES_256_GCM_SHA384 |
ECDHE_ECDSA | AES 256 GCM | SHA384 (SHA-2) | TLS 1.2 only |
TLS_RSA_WITH_AES_128_CBC_SHA256 |
RSA | AES 128 CBC | SHA256 (SHA-2) | TLS 1.2 only |
TLS_RSA_WITH_AES_128_GCM_SHA256 |
RSA | AES 128 GCM | SHA256 (SHA-2) | TLS 1.2 only |
TLS_RSA_WITH_AES_128_CBC_SHA |
RSA | AES 128 CBC | SHA-1 | TLS 1.0 only |
TLS_RSA_WITH_AES_256_CBC_SHA |
RSA | AES 256 CBC | SHA-1 | TLS 1.0 and later |
TLS_RSA_WITH_AES_256_CBC_SHA256 |
RSA | AES 256 CBC | SHA256 (SHA-2) | TLS 1.2 only |
TLS_RSA_WITH_AES_256_GCM_SHA384 |
RSA | AES 256 GCM | SHA384 (SHA-2) | TLS 1.2 only |
The following table lists cipher suites that you can use, but be aware that they do not the provide authentication of the communicating parties, and hence can be vulnerable to third-party attacks. Oracle recommends that you do not use these cipher suites to protect sensitive data. However, they are useful if the communicating parties want to remain anonymous or simply do not want the overhead caused by mutual authentication.
| Cipher Suites | Authentication | Encryption | Data Integrity | TLS Compatibility |
|---|---|---|---|---|
SSL_DH_anon_WITH_3DES_EDE_CBC_SHA |
DH anon | 3DES EDE CBC | SHA-1 | TLS 3.0 and later |
Specifying Transport Layer Security Cipher Suites for the Database Server
First, you must specify the Transport Layer Security cipher suites for the database server.
-
Start Oracle Net Manager.
- (UNIX) From $ORACLE_HOME
/bin, enter the following command at the command line:
- (UNIX) From $ORACLE_HOME
netmgr- (Windows) Select **Start**, **Programs**, **Oracle - HOME_NAME**, **Configuration and Migration Tools**, then **Net Manager**.
-
Expand Oracle Net Configuration, and from Local, select Profile.
-
From the Naming list, select Network Security.
The Network Security tabbed window appears.
-
Select the SSL tab and then select Configure SSL for: Server.
-
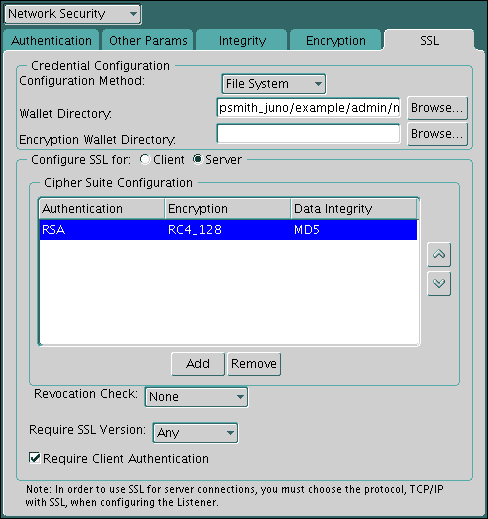
In the Cipher Suite Configuration area, click Add.
A dialog box displays available cipher suites. To see the US domestic cipher suites, click the Show US Domestic Cipher Suits check box.
-
Select a suite and click OK.
The Cipher Suite Configuration list is updated:
-
Use the up and down arrows to prioritize the cipher suites.
-
From the File menu, select Save Network Configuration.
The
sqlnet.orafile is updated with the following entry:
SSL_CIPHER_SUITES= (SSL_cipher_suite1 [,SSL_cipher_suite2])Step 1D: Set the Required Transport Layer Security Version on the Server (Optional)
The SSL_VERSION parameter defines the version of TLS that must run on the systems with which the server communicates.
Optionally, you can set the SSL_VERSION parameter in the sqlnet.ora or the listener.ora file.
You can require these systems to use any valid version. The default setting for this parameter in sqlnet.ora is undetermined, which is set by selecting Any from the list in the SSL tab of the Network Security window.
-
In the Require SSL Version list, the default is Any.
Accept this default or select the SSL version you want to use.
-
From the File menu, select Save Network Configuration.
If you chose Any, then the
sqlnet.orafile is updated with the following entry:
SSL_VERSION=UNDETERMINEDNote: SSL 2.0 is not supported on the server side.
Step 1E: Set Transport Layer Security Client Authentication on the Server (Optional)
The SSL_CLIENT_AUTHENTICATION parameter controls whether the client is authenticated using TLS.
You must set this parameter in the sqlnet.ora file on the server. The default value of SSL_CLIENT_AUTHENTICATION parameter is TRUE.
You can set the SSL_CLIENT_AUTHENTICATION to FALSE if you are using a cipher suite that contains Diffie-Hellman anonymous authentication (DH_anon).
Also, you can set this parameter to FALSE for the client to authenticate itself to the server by using any of the non-SSL authentication methods supported by Oracle Database, such as Kerberos or RADIUS.
Note: There is a known bug in which an OCI client requires a wallet even when using a cipher suite with DH_ANON, which does not authenticate the client.
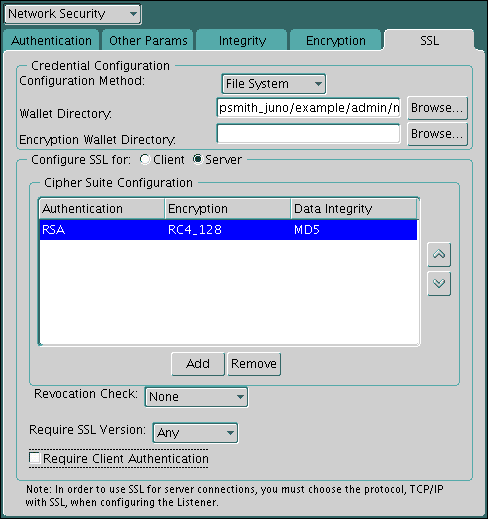
To set SSL_CLIENT_AUTHENTICATION to FALSE on the server:
-
In the SSL page Oracle Net Manager, deselect Require Client Authentication.
-
From the File menu, select Save Network Configuration.
The
sqlnet.orafile is updated with the following entry:
SSL_CLIENT_AUTHENTICATION=FALSEStep 1F: Set Transport Layer Security as an Authentication Service on the Server (Optional)
The SQLNET.AUTHENTICATION_SERVICES parameter in the sqlnet.ora file sets the TLS authentication service.
Set this parameter if you want to use TLS authentication in conjunction with another authentication method supported by Oracle Database. For example, use this parameter if you want the server to authenticate itself to the client by using TLS and the client to authenticate itself to the server by using Kerberos.
- To set the
SQLNET.AUTHENTICATION_SERVICESparameter on the server, add TCP/IP with TLS (TCPS) to this parameter in thesqlnet.orafile by using a text editor. For example, if you want to use SSL authentication in conjunction with RADIUS authentication, set this parameter as follows:
SQLNET.AUTHENTICATION_SERVICES = (TCPS, radius)If you do not want to use TLS authentication in conjunction with another authentication method, then do not set this parameter.
Step 1G: Disable SSLv3 on the Server and Client (Optional)
SSLv3 refers to Secure Sockets Layer version 3.
Applications that support Secure Sockets Layer version 3 (SSLv3) are vulnerable to Padding Oracle On Downgraded Legacy Encryption (POODLE) attacks, even if they use the most recent version of Transport Layer Security (TLS). To prevent POODLE attacks, you should set the ADD_SSLV3_TO_DEFAULT sqlnet.ora parameter to FALSE on both the server and the client. ADD_SSLV3_TO_DEFAULT only applies if the SSL_VERSION parameter is not set. (which means that you are using the default list of SSL versions).
-
Log in to the database server or the client server.
-
Edit the
sqlnet.oraparameter file, which by default is located in the$ORACLE_HOME/network/admindirectory, to include theADD_SSLV3_TO_DEFAULTparameter, as follows:
ADD_SSLV3_TO_DEFAULT=false`ADD_SSLV3_TO_DEFAULT` defaults to `FALSE`, and has no effect if `SSL_VERSION` is explicitly set. So, by default, without `SSL_VERSION` explicitly set, SSLv3 connections will not be allowed. Setting `ADD_SSLV3_TO_DEFAULT` to `TRUE` would allow SSLv3 connections to continue working by default.
Step 1H: Create a Listening Endpoint that Uses TCP/IP with Transport Layer Security on the Server
You can configure a listening endpoint to use TCP/IP with TLS on the server.
-
Configure the listener in the
listener.orafile. Oracle recommends using port number 2484 for typical Oracle Net clients. -
Restart the database.
Step 1H: Restart the Database
To complete the configuration of Transport Layer Security on the server, you must restart the database.
-
For example:
SHUTDOWN IMMEDIATE
STARTUP
Step 2: Configure Transport Layer Security on the Client
When you configure SSL on the client, you configure the server DNs and use TCP/IP with TLS on the client.
-
Step 2A: Confirm Client Wallet Creation
You must confirm that a wallet has been created on the client and that the client has a valid certificate. -
Step 2B: Configure Server DN Matching and Use TCP/IP with TLS on the Client
Next, you are ready to configure server DN matching and use TCP/IP with Transport Layer Security (TLS) on the client. -
Step 2C: Specify Required Client TLS Configuration (Wallet Location)
You can use Oracle Net Manager to specify the required client TLS configuration. -
Step 2D: Set the Client Transport Layer Security Cipher Suites (Optional)
Optionally, you can set the Transport Layer Security cipher suites. Oracle Database provides default cipher suite settings. -
Step 2E: Set the Required TLS Version on the Client (Optional)
TheSSL_VERSIONparameter defines the version of TLS that must run on the systems with which the client communicates. -
Step 2F: Set TLS as an Authentication Service on the Client (Optional)
TheSQLNET.AUTHENTICATION_SERVICESparameter in thesqlnet.orafile sets the TLS authentication service. -
Step 2G: Specify the Certificate to Use for Authentication on the Client (Optional)
If you have multiple certificates, then you can set theSQLNET.SSL_EXTENDED_KEY_USAGEparameter in thesqlnet.orafile to specify the correct certificate. -
Step 2H: Check That the Connections Are Using Transport Layer Security
You can query theV$SESSIONandV$SESSION_CONNECT_INFOdynamic views to ensure that the client connections are using Transport Layer Security (TLS). -
Step 2I: Restart the Database
To complete the configuration of Transport Layer Security on the client, you must restart the database.
Step 2A: Confirm Client Wallet Creation
You must confirm that a wallet has been created on the client and that the client has a valid certificate.
- Use Oracle Wallet Manager to check that the wallet has been created by selecting the Wallet menu, then Open. Oracle recommends that you use Oracle Wallet Manager to remove the trusted certificate in your Oracle wallet that is associated with each certificate authority that you do not use.
Step 2B: Configure Server DN Matching and Use TCP/IP with TLS on the Client
Next, you are ready to configure server DN matching and use TCP/IP with Transport Layer Security (TLS) on the client.
-
About Configuring the Server DN Matching and Using TCP/IP with TLS on the Client
In addition to validating the server certificate’s certificate chain, you can perform an extra check through server DN matching. -
Configuring the Server DN Matching and Using TCP/IP with TLS on the Client
You must edit thetnsnames.oraandlistener.orafiles to configure the server DN matching and user TCP/IP with TLS on the client. -
Use of the SSL_ALLOW_WEAK_DN_MATCH Parameter to Control SSL_SERVER_DN_MATCH
TheSSL_ALLOW_WEAK_DN_MATCHparameter controls how theSSL_SERVER_DN_MATCHparameter allows the service name for partial distinguished name matching and check the database server certificate.
About Configuring the Server DN Matching and Using TCP/IP with TLS on the Client
In addition to validating the server certificate’s certificate chain, you can perform an extra check through server DN matching.
You can configure the Oracle Net Service name to include server DN matching and to use TCP/IP with TLS on the client. To accomplish this, you must specify the server’s distinguished name (DN) and TCPS as the protocol in the client network configuration files to enable server DN matching and TCP/IP with TLS connections. Server DN matching is optional, but Oracle recommends it because it adds a layer of security to the client: the client can then perform this check against the server.
Due to changes in the CA certificate format where the Organization Unit (OU) field will be removed starting in 2022, you may need to update your server certificate DN if you have set SSL_SERVER_DN_MATCH to TRUE. After you receive the new server certificate with the OU removed from the DN, you must update the client SSL_SERVER_CERT_DN parameter to match the new DN.
You can configure either partial DN matching or full DN matching. After you set the SSL_SERVER_DN_MATCH parameter to TRUE, then partial DN matching is performed automatically. The client will then check the server certificate for the DN information. Full DN matching enables the client to match against the complete DN of the server. If you want to perform a full DN match, then you must specify the server’s DN in the SSL_SERVER_CERT_DN parameter. To enable either of these methods, you must set the SSL_SERVER_DN_MATCH parameter to TRUE.
The ability to use either partial or full DN matching enables more flexibility based on how you create and manage host certificates. For example, suppose the client tries to connect to a server with hostname=finance.us.example.com. With partial DN matching, the client checks the server’s certificate to verify that CN=finance.us.example.com is part of the server’s DN.
You must manually edit the tnsnames.ora client network configuration file to specify the server’s DN and the TCP/IP with SSL protocol. The tnsnames.ora file can be located on the client or in the LDAP directory. If it is located on the server, then it typically resides in the same directory as the listener.ora file. The tnsnames.ora file is typically located in the setting specified by the TNS_ADMIN environment variable. If TNS_ADMIN is not set, then tnsnames.ora resides in the following directory locations:
-
(UNIX) $ORACLE_HOME
/network/admin/ -
(Windows) ORACLE_BASE``ORACLE_HOME
\network\admin
Configuring the Server DN Matching and Using TCP/IP with TLS on the Client
You must edit the tnsnames.ora and listener.ora files to configure the server DN matching and user TCP/IP with TLS on the client.
-
In the client
tnsnames.orafile, search for theSSL_SERVER_CERT_DNparameter and do the following:- If you want to use full DN matching, then set
SSL_SERVER_CERT_DNto the complete DN, similar to the following:
- If you want to use full DN matching, then set
(SECURITY=
(SSL_SERVER_CERT_DN="finance,cn=OracleContext,c=us,o=example"))
The client uses this information to obtain the list of DNs it expects for each of the servers, enforcing the server's DN to match its service name. The following example shows an entry for the `finance` database in the `tnsnames.ora` file.
finance=
(DESCRIPTION=
(ADDRESS_LIST=
(ADDRESS= (**PROTOCOL = tcps**) (HOST = finance) (PORT = 1575)))
(CONNECT_DATA=
(SERVICE_NAME= finance.us.example.com))
(SECURITY=
(**SSL_SERVER_CERT_DN="cn=**finance,cn=OracleContext,c=us,o=example**"**))
By default, the `tnsnames.ora` and `listener.ora` files are in the `$ORACLE_HOME/network/admin` directory on UNIX systems and in *ORACLE_HOME*`\network\admin` on Windows.
- If you plan to use partial DN matching, then do not include the `SSL_SERVER_CERT_DN` parameter in `tnsnames.ora`.
-
In the client
tnsnames.orafile, entertcpsas thePROTOCOLin theADDRESSparameter.This specifies that the client will use TCP/IP with TLS to connect to the database that is identified in the
SERVICE_NAMEparameter. The following also shows an entry that specifies TCP/IP with TLS as the connecting protocol in thetnsnames.orafile.
LISTENER=
(DESCRIPTION_LIST=
(DESCRIPTION=
(ADDRESS= (**PROTOCOL = tcps**) (HOST = finance) (PORT = 1575))))- In the
listener.orafile, entertcpsas thePROTOCOLin theADDRESSparameter.
Use of the SSL_ALLOW_WEAK_DN_MATCH Parameter to Control SSL_SERVER_DN_MATCH
The SSL_ALLOW_WEAK_DN_MATCH parameter controls how the SSL_SERVER_DN_MATCH parameter allows the service name for partial distinguished name matching and check the database server certificate.
Starting in Oracle Database 23c, the behavior of the SSL_SERVER_DN_MATCH parameter has changed. Previously, only the database server certificate was checked for DN matching. With Oracle Database 23c, the listener and server certificates are both checked. Also, the SERVICE_NAME setting is not used to check during partial DN match anymore. The HOST setting can still be used for partial DN matching with the certificate DN and subject alternative name (SAN), on both the listener and server certificates.
You can set SSL_ALLOW_WEAK_DN_MATCH as follows:
-
TRUEenablesSSL_SERVER_DN_MATCHto check the database server certificate (but not the listener) and enable the service name to be used for partial DN matching. The search order on the client side is as follows: first, the host name, then the subject alternative name (SAN), and then the service name. -
FALSE(the default) disablesSSL_SERVER_DN_MATCHfrom checking service name matching. Instead, matching on the client side is based on a search for theHOSTsetting in the certificate DN, and if that is not available, then in the subject alternative name (SAN) field (but not the service name). The DN check is performed on the listener and the server.
If you used the service name for partial DN matching previously, then you must either get a new certificate or set SSL_ALLOW_WEAK_DN_MATCH to TRUE to revert to the pre-release 23c behavior. You are most likely using the same certificate for both the database server and listener, but if you are not, then you will either need to do one of the following:
-
Get a new certificate (use the
orapki cert createcommand for self-signed certificates). -
Change or remove the DN matching strategy.
-
Set the
SSL_ALLOW_WEAK_DN_MATCHparameter toTRUEto revertSSL_SERVER_DN_MATCHto its older behavior.
When you set SSL_ALLOW_WEAK_DN_MATCH to TRUE, note the following:
-
When the client performs a full DN match (
SSL_SERVER_MATCH=TRUE,SSL_SERVER_CERT_DN="certificate_DN"), then only the database server certificate DN will need to match theSSL_SERVER_CERT_DNvalue. -
When the client performs a partial DN match (
SSL_SERVER_MATCH=TRUE,SSL_SERVER_CERT_DNis not set), then Oracle Database will compare the connect string parameterHOSTto the common name (CN) of the database server certificate DN and the certificate subject alternate names field (SAN). If there is no partial match, then Oracle Database will continue and check theSERVICE_NAMEparameter with the CN.
Step 2C: Specify Required Client TLS Configuration (Wallet Location)
You can use Oracle Net Manager to specify the required client TLS configuration.
-
Start Oracle Net Manager.
- (UNIX) From $ORACLE_HOME
/bin, enter the following command at the command line:
- (UNIX) From $ORACLE_HOME
netmgr- (Windows) Select **Start**, **Programs**, **Oracle - HOME_NAME**, **Configuration and Migration Tools**, then **Net Manager**.
-
Expand Oracle Net Configuration, and from Local, select Profile.
-
From the Naming list, select Network Security.
The Network Security tabbed window appears.
-
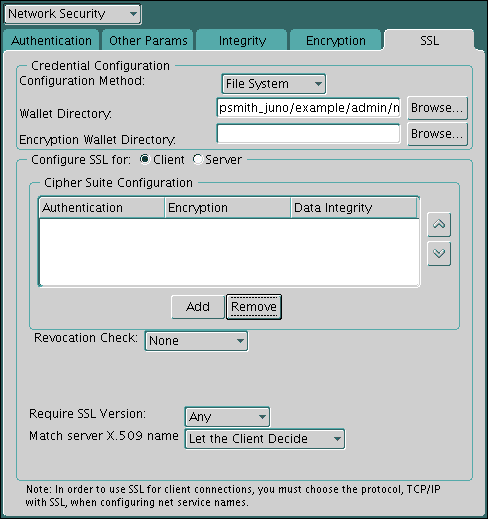
Select the SSL tab.
-
Select Configure SSL for: Client.
-
In the Wallet Directory box, enter the directory in which the Oracle wallet is located, or click Browse to find it by searching the file system.
-
From the Match server X.509 name list, select one of the following options:
-
Yes:Requires that the server’s distinguished name (DN) match its service name. TLS ensures that the certificate is from the server and connections succeed only if there is a match.
This check can be made only when RSA ciphers are selected, which is the default setting.
-
No (default):TLS checks for a match between the DN and the service name, but does not enforce it. Connections succeed regardless of the outcome but an error is logged if the match fails.
-
Let Client Decide:Enables the default.
The following alert is displayed when you select No:
-
Security Alert
Not enforcing the server X.509 name match allows a server to potentially fake its identity. Oracle recommends selecting YES for this option so that connections are refused when there is a mismatch.-
From the File menu, select Save Network Configuration.
The
sqlnet.orafile on the client is updated with the following entries:
SSL_CLIENT_AUTHENTICATION =TRUE
wallet_location =
 (SOURCE=
  (METHOD=File)
  (METHOD_DATA=
   (DIRECTORY=wallet_location)))

SSL_SERVER_DN_MATCH=(ON/OFF)
Step 2D: Set the Client Transport Layer Security Cipher Suites (Optional)
Optionally, you can set the Transport Layer Security cipher suites. Oracle Database provides default cipher suite settings.
-
About Setting the Client Transport Layer Security Cipher Suites
A cipher suite is a set of authentication, encryption, and data integrity algorithms used for exchanging messages between network entities. -
Setting the Client Transport Layer Security Cipher Suites
You can use Oracle Net Manager to set the client TLS cipher suites.
About Setting the Client Transport Layer Security Cipher Suites
A cipher suite is a set of authentication, encryption, and data integrity algorithms used for exchanging messages between network entities.
During an SSL handshake, two entities negotiate to see which cipher suite they will use when transmitting messages back and forth.
When you install Oracle Database, the TLS cipher suites are set for you by default. This table lists them in the order they are tried when two entities are negotiating a connection. You can override the default by setting the SSL_CIPHER_SUITES parameter. For example, if you use Oracle Net Manager to add the cipher suite SSL_RSA_WITH_RC4_128_SHA, all other cipher suites in the default setting are ignored.
You can prioritize the cipher suites. When the client negotiates with servers regarding which cipher suite to use, it follows the prioritization you set. When you prioritize the cipher suites, consider the following:
-
The level of security you want to use. For example, AES encryption is stronger than DES.
-
The impact on performance. For example, triple-DES encryption is slower than DES.
-
Administrative requirements. The cipher suites selected for a client must be compatible with those required by the server. For example, in the case of an Oracle Call Interface (OCI) user, the server requires the client to authenticate itself. You cannot, in this case, use a cipher suite employing Diffie-Hellman anonymous authentication, which disallows the exchange of certificates.
You typically prioritize cipher suites starting with the strongest and moving to the weakest.
The currently supported Transport Layer Security cipher suites are set by default when you install Oracle Database. The table also lists the authentication, encryption, and data integrity types each cipher suite uses.
Note: If the SSL_CLIENT_AUTHENTICATION parameter is set to true in the sqlnet.ora file, then disable all cipher suites that use Diffie-Hellman anonymous authentication. Otherwise, the connection fails.
Setting the Client Transport Layer Security Cipher Suites
You can use Oracle Net Manager to set the client TLS cipher suites.
-
Start Oracle Net Manager.
- (UNIX) From $ORACLE_HOME
/bin, enter the following command at the command line:
- (UNIX) From $ORACLE_HOME
netmgr- (Windows) Select **Start**, **Programs**, **Oracle - HOME_NAME**, **Configuration and Migration Tools**, then **Net Manager**.
-
Expand Oracle Net Configuration, and from Local, select Profile.
-
From the Naming list, select Network Security.
The Network Security tabbed window appears.
-
Select the SSL tab.
-
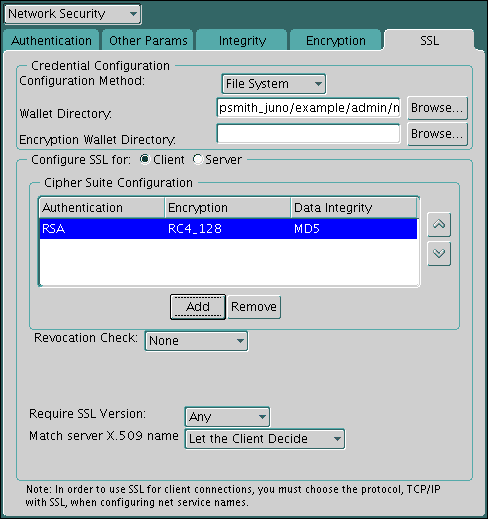
In the Cipher Suite Configuration region, click Add.
A dialog box displays available cipher suites.
-
Select a suite and click OK.
The Cipher Suite Configuration list is updated as shown as follows:
-
Use the up and down arrows to prioritize the cipher suites.
-
From the File menu, select Save Network Configuration.
The
sqlnet.orafile is updated with the following entry:
SSL_CIPHER_SUITES= (SSL_cipher_suite1 [,SSL_cipher_suite2])Step 2E: Set the Required TLS Version on the Client (Optional)
The SSL_VERSION parameter defines the version of TLS that must run on the systems with which the client communicates.
You must set the SSL_VERSION parameter in the sqlnet.ora file. You can require these systems to use any valid version.
The default setting for this parameter in sqlnet.ora is undetermined, which is set by selecting Any from the list in the SSL tab of the Network Security window. When Any is selected, TLS 1.0 is tried first, then TLS 3.0, and TLS 2.0 are tried in that order. Ensure that the client TLS version is compatible with the version the server uses.
-
In the Require SSL Version list, select the SSL version that you want to configure.
The default setting is Any.
-
From the File menu, select, Save Network Configuration.
The
sqlnet.orafile is updated. If you selected Any, then it is updated with the following entry:
SSL_VERSION=UNDETERMINEDStep 2F: Set TLS as an Authentication Service on the Client (Optional)
The SQLNET.AUTHENTICATION_SERVICES parameter in the sqlnet.ora file sets the TLS authentication service.
-
About the SQLNET.AUTHENTICATION_SERVICES Parameter
TheSQLNET.AUTHENTICATION_SERVICESparameter enables TLS authentication in conjunction with another authentication method supported by Oracle Database. -
Setting the SQLNET.AUTHENTICATION_SERVICES Parameter
You can set theSQLNET.AUTHENTICATION_SERVICESparameter in thesqlnet.orafile.
About the SQLNET.AUTHENTICATION_SERVICES Parameter
The SQLNET.AUTHENTICATION_SERVICES parameter enables TLS authentication in conjunction with another authentication method supported by Oracle Database.
For example, use this parameter if you want the server to authenticate itself to the client by using TLS and the client to authenticate itself to the server by using RADIUS.
To set the SQLNET.AUTHENTICATION_SERVICES parameter, you must edit the sqlnet.ora file, which is located in the same directory as the other network configuration files.
Depending on the platform, the sqlnet.ora file is in the following directory location:
-
(UNIX) $ORACLE_HOME
/network/admin -
(Windows) ORACLE_BASE``ORACLE_HOME
\network\admin
Setting the SQLNET.AUTHENTICATION_SERVICES Parameter
You can set the SQLNET.AUTHENTICATION_SERVICES parameter in the sqlnet.ora file.
-
To set the client
SQLNET.AUTHENTICATION_SERVICESparameter, add TCP/IP with TLS (TCPS) to this parameter in thesqlnet.orafile by using a text editor.For example, if you want to use TLS authentication in conjunction with RADIUS authentication, then set this parameter as follows:
SQLNET.AUTHENTICATION_SERVICES = (TCPS, radius)If you do not want to use TLS authentication in conjunction with another authentication method, then do not set this parameter.
Step 2G: Specify the Certificate to Use for Authentication on the Client (Optional)
If you have multiple certificates, then you can set the SQLNET.SSL_EXTENDED_KEY_USAGE parameter in the sqlnet.ora file to specify the correct certificate.
-
About the SQLNET.SSL_EXTENDED_KEY_USAGE Parameter
TheSQLNET.SSL_EXTENDED_KEY_USAGEparameter in the sqlnet.ora file specifies which certificate to use in authenticating to the database server -
Setting the SQLNET.SSL_EXTENDED_KEY_USAGE Parameter
You can set theSQLNET.SSL_EXTENDED_KEY_USAGEto set the client authentication.
About the SQLNET.SSL_EXTENDED_KEY_USAGE Parameter
The SQLNET.SSL_EXTENDED_KEY_USAGE parameter in the sqlnet.ora file specifies which certificate to use in authenticating to the database server
You should set the SQLNET.SSL_EXTENDED_KEY_USAGE parameter if you have multiple certificates in the security module, but there is only one certificate with extended key usage field of client authentication, and this certificate is exactly the one you want to use to authenticate to the database.
For example, use this parameter if you have multiple certificates in a smart card, only one of which has an extended key usage field of client authentication, and you want to use this certificate C to authenticate to the database. By setting this parameter on a Windows client to client authentication, the MSCAPI certificate selection box will not appear, and the certificate C is automatically used for the Transport Layer Security authentication of the client to the server.
Setting the SQLNET.SSL_EXTENDED_KEY_USAGE Parameter
You can set the SQLNET.SSL_EXTENDED_KEY_USAGE to set the client authentication.
- To set the client
SQLNET.SSL_EXTENDED_KEY_USAGEparameter, edit thesqlnet.orafile to have the following line:
SQLNET.SSL_EXTENDED_KEY_USAGE = "client authentication"If you do not want to use the certificate filtering, then remove the SQLNET.SSL_EXTENDED_KEY_USAGE parameter setting from the sqlnet.ora file.
Step 2H: Check That the Connections Are Using Transport Layer Security
You can query the V$SESSION and V$SESSION_CONNECT_INFO dynamic views to ensure that the client connections are using Transport Layer Security (TLS).
-
In SQL*Plus, perform the following query.
SELECT SYS_CONTEXT ('USERENV', 'NETWORK_PROTOCOL') FROM DUAL;Output similar to the following should appear:
SYS_CONTEXT('USERENV','NETWORK_PROTOCOL')

-------------------------------------------------------------------
tcps
Step 2I: Restart the Database
To complete the configuration of Transport Layer Security on the client, you must restart the database.
-
For example:
SHUTDOWN IMMEDIATE
STARTUP
Step 3: Log in to the Database Instance
After you have completed the configuration, you are ready to log in to the database.
-
Start SQL*Plus and then enter one of the following connection commands:
- If you are using Transport Layer Security authentication for the client (
SSL_CLIENT_AUTHENTICATION=truein thesqlnet.orafile):
- If you are using Transport Layer Security authentication for the client (
CONNECT/@net_service_name- If you are not using Transport Layer Security authentication (
SSL_CLIENT_AUTHENTICATION=falsein thesqlnet.orafile):
CONNECT username@net_service_name
Enter password: password
Related Topics
- Oracle Database Enterprise User Security Administrator’s Guide
- Step 1E: Set Transport Layer Security Client Authentication on the Server (Optional)
- Step 1E: Set Transport Layer Security Client Authentication on the Server (Optional)
- Oracle Database Net Services Reference
- Oracle Database Net Services Reference
- Step 1A: Confirm Wallet Creation on the Server
- Transport Layer Security X.509 Server Match Parameters
- Certificate Validation with Certificate Revocation Lists