Task 2: Prepare a Primary and Standby Base System for GGHub
Step 2.1 - Deploy an Oracle RAC 2-Node Cluster System
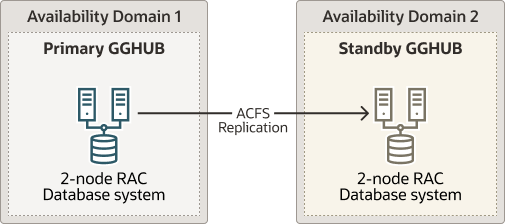
Deploy a minimum of two GGHubs (primary and standby). Each GGHub must be deployed as a 2-node Oracle RAC database system as described in Oracle Base Database Service.
Figure 20-3 Oracle GoldenGate Hub Hardware Architecture

Step 2.2 - Remove the Standard Database and Rearrange the Disk Group Layout
-
As the
oracleOS user on the first GGHub node, remove the standard database:[opc@gghub_prim1 ~]$ sudo su - oracle [oracle@gghubN-node1 ~]$ dbca -deleteDatabase -silent -sourceDB $ORACLE_UNQNAME Enter SYS user password: ############## [WARNING] [DBT-19202] The Database Configuration Assistant will delete the Oracle instances and datafiles for your database. All information in the database will be destroyed. Prepare for db operation 32% complete Connecting to database 39% complete ... 100% complete Database deletion completed. Look at the log file "/u01/app/oracle/cfgtoollogs/dbca/DB0502_fra2pr/DB0502_fra2pr.log" for further details. -
As the
gridOS user on the second GGHub node, dismount the RECO diskgroup:[opc@gghub_prim2 ~]$ sudo su - grid [grid@gghub_prim2 ~]$ sqlplus / as sysasm SQL> alter diskgroup RECO dismount; -
As the
gridOS user on the first gghub node, drop the RECO diskgroup and assign the disks to the DATA diskgroup:[opc@gghub_prim1 ~]$ sudo su - grid [grid@gghub_prim1 ~]$ sqlplus / as sysasm SQL> drop diskgroup RECO INCLUDING CONTENTS; alter diskgroup DATA add disk '/dev/RECODISK1'; alter diskgroup DATA add disk '/dev/RECODISK2'; alter diskgroup DATA add disk '/dev/RECODISK3'; alter diskgroup DATA add disk '/dev/RECODISK4'; -
As the
rootOS user on all GGhub nodes, reboot the node:[opc@gghub_prim1 ~]$ sudo reboot
Note:
Repeat this step in the primary and standby GGHubs.Step 2.3 - Download the Required Software
-
As the
opcOS user on all GGHub nodes, create the staging and scripts directories:[opc@gghub_prim1 ~]$ sudo mkdir -p /u01/oracle/stage sudo mkdir /u01/oracle/scripts sudo chown -R oracle:oinstall /u01/oracle sudo chmod -R g+w /u01/oracle sudo chmod -R o+w /u01/oracle/stage -
As the
opcOS user on all GGHub nodes, download the following software in the directory /u01/oracle/stage:-
Download the latest Oracle GoldenGate 21c (or later release) Microservices software from Oracle GoldenGate Downloads.
-
Download subsequent patches to the base release from the Patches and Updates tab of My Oracle Support.
- See Installing Patches for Oracle GoldenGate Microservices Architecture for more information.
-
Minimum required version is Patch 35214851: Oracle GoldenGate 21.9.0.0.2 Microservices for Oracle
-
Download the latest OPatch release, Patch 6880880, for Oracle Database 21c (21.0.0.0.0) from My Oracle Support Document 2542082.1.
- Download the Oracle Grid Infrastructure Standalone Agents for Oracle Clusterware 19c, release 10.2 or later, from Oracle Grid Infrastructure Standalone Agents for Oracle Clusterware.
- Download the python script
(
secureServices.py) from My Oracle Support Document 2826001.1 - Download the Oracle GGHUB Scripts from My Oracle Support Document 2951572.1
-
-
As the
gridOS user on all GGHub nodes, unzip the GGhub scripts file downloaded from My Oracle Support Document 2951572.1 into the directory/u01/oracle/scripts.Place the script in the same location on all primary and standby GGhub nodes
[opc@gghub_prim1 ~]$ sudo su - grid
[grid@gghub_prim1 ~]$ unzip -q /u01/oracle/stage/gghub_scripts_YYYYYMMDD.zip -d /u01/oracle/scripts/
Step 2.4 - Configure Oracle Linux To Use the Oracle Public YUM Repository
The Oracle Linux yum server hosts software for Oracle Linux and compatible distributions. These instructions help you get started configuring your Linux system for Oracle Linux yum server and installing software through yum.
-
As the
rootOS user in all GGHub systems, create the file/etc/yum.repos.d/oracle-public-yum-ol7.repowith the following contents:[opc@gghub_prim1 ~]$ sudo su - [root@gghub_prim1 ~]# cat > /etc/yum.repos.d/oracle-public-yum-ol7.repo <<EOF [ol7_latest] name=Oracle Linux $releasever Latest ($basearch) baseurl=http://yum$ociregion.oracle.com/repo/OracleLinux/OL7/latest/\$basearch/ gpgkey=file:///etc/pki/rpm-gpg/RPM-GPG-KEY-oracle gpgcheck=1 enabled=1 EOF