2.3 Configuring Oracle ORAchk and Oracle EXAchk

To configure Oracle ORAchk and Oracle EXAchk, use the procedures explained in this section.

2.3.1 Deciding Which User Should Run Oracle ORAchk and Oracle EXAchk

Run compliance checks as root. Also, run compliance checks as the Oracle Database home owner or the Oracle Grid Infrastructure home owner.

Most compliance checks do not require root access. However, you need root privileges to run a subset of compliance checks.

To run root privilege checks, Oracle ORAchk uses the script root_orachk.sh and Oracle EXAchk uses the script root_exachk.sh.

By default, the root_orachk.sh and root_exachk.sh scripts are created in the $HOME directory used by Oracle ORAchk and Oracle EXAchk. Change the directory by setting the environment variable RAT_ROOT_SH_DIR.

Specify a location for sudo remote access as follows:
export RAT_ROOT_SH_DIR=/mylocation
Add an entry in the /etc/sudoers as follows:
oracle ALL=(root) NOPASSWD:/mylocation/root_orachk.sh

For security reasons, create the root scripts outside of the standard temporary directory in a custom directory.

To decide which user to run Oracle ORAchk and Oracle EXAchk:

  1. Specify the custom directory using the RAT_ROOT_SH_DIR  environment variable.
    export RAT_ROOT_SH_DIR=/orahome/oradb/
  2. Specify a location for sudo  remote access.
    export RAT_ROOT_SH_DIR=/mylocation
  3. Add an entry in the /etc/sudoers  file.
    oracle ALL=(root) NOPASSWD:/mylocation/root_orachk.sh

    Note:

    Specify full paths for the entries in the /etc/sudoers  file. Do not use environment variables.

  4. (recommended) Run Oracle ORAchk and Oracle EXAchk as root.

    Use root user credentials to run Oracle ORAchk and Oracle EXAchk.

    The Oracle ORAchk and Oracle EXAchk processes that run as root, perform user lookups for the users who own the Oracle Database home and Oracle Grid Infrastructure home. If root access is not required, then the Oracle ORAchk and Oracle EXAchk processes use the su command to run compliance checks as the applicable Oracle Database home user or Oracle Grid Infrastructure home user. Accounts with lower privileges cannot have elevated access to run compliance checks that require root access.

    Running compliance checks as root has advantages in role-separated environments or environments with more restrictive security.

  5. Run Oracle ORAchk and Oracle EXAchk as Oracle Database home owner or Oracle Grid Infrastructure home owner:

    Use Oracle Database home owner or Oracle Grid Infrastructure home owner credentials to run Oracle ORAchk and Oracle EXAchk.

    The user who runs Oracle ORAchk and Oracle EXAchk must have elevated access as root to run compliance checks that need root access.

    Running compliance checks as Oracle Database home owner or Oracle Grid Infrastructure home owner requires multiple runs in role-separated environments. More restrictive security requirements do not permit elevated access.

    There are several other options:

    • Skip the checks that require root access.

    • Specify the root  user ID and password when prompted.

    • Configure sudo.

      If you are using sudo, then add an entry for the root script, located in $HOME in the /etc/sudoers file that corresponds to the user who is running the compliance checks.

      To determine what $HOME is set to, run the echo $HOME  command.

      For example:
      user ALL=(root) NOPASSWD:/root/root_orachk.sh
      user ALL=(root) NOPASSWD:/root/root_exachk.sh
    • Pre-configure passwordless SSH connectivity.

2.3.2 Handling of Root Passwords

Handling of root passwords depends on whether you have installed the Expect utility.

Expect automates interactive applications such as Telnet, FTP, passwd, fsck, rlogin, tip, and so on.

To handle root passwords:

  1. If you have installed the Expect utility, then specify the root password when you run the compliance checks for the first time.

    The Expect utility stores the password and uses the stored password for subsequent sessions.

    The Expect utility prompts you to check if the root password is same for all the remote components such as databases, switches, and so on.

  2. Specify the password only once if you have configured the same root password for all the components.

    If root password is not same for all the components, then the Expect utility prompts you to validate root password every time you run the compliance checks.

    If you enter the password incorrectly or the password is changed between the time it is entered and used, then Oracle Autonomous Health Framework:

    • Notifies you

    • Skips relevant checks

  3. Run the compliance checks after resolving the issues.

    If Oracle Autonomous Health Framework skips any of the compliance checks, then the tools log details about the skipped checks in the report output.

2.3.3 Configuring Email Notification System

Oracle Health Check Collections Manager provides an email notification system that users can subscribe to.

The setup involves:
  • Configuring the email server, port, and the frequency of email notifications.

  • Registering the email address

Note:

Only the users who are assigned Admin role can manage Email Notification Server and Job details.

To configure the email notification system:

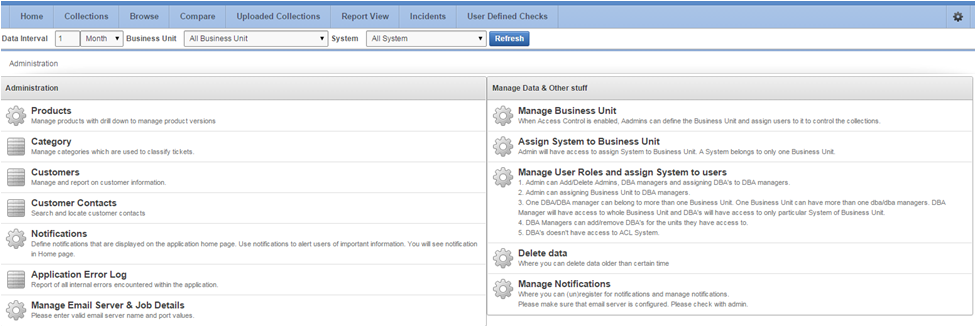
  1. Log in to Oracle Health Check Collections Manager, and then click Administration at the upper-right corner.

    Figure 2-1 Oracle Health Check Collections Manager - Administration

    Description of Figure 2-1 follows
    Description of "Figure 2-1 Oracle Health Check Collections Manager - Administration"
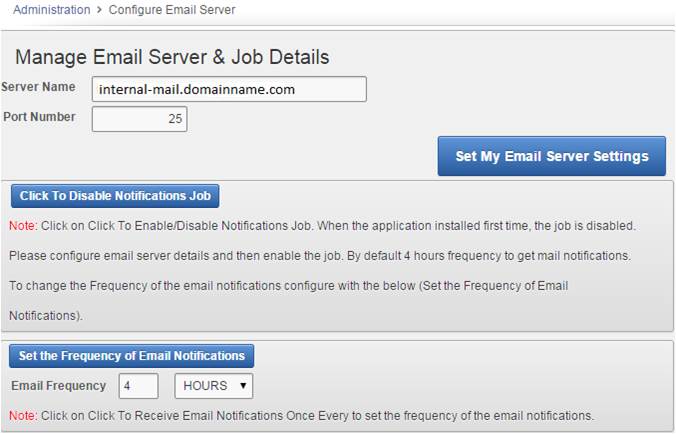
  2. Under Administration, click Manage Email Server & Job Details.

    Figure 2-2 Oracle Health Check Collections Manager - Configure Email Server

    Description of Figure 2-2 follows
    Description of "Figure 2-2 Oracle Health Check Collections Manager - Configure Email Server"
    1. Specify a valid Email Server Name, Port Number, and then click Set My Email Server Settings.
    2. Set Email Notification Frequency as per your needs.
      See the Notification Job Run Details on the same page.

      Figure 2-3 Oracle Health Check Collections Manager - Notification Job Run status details

      Description of Figure 2-3 follows
      Description of "Figure 2-3 Oracle Health Check Collections Manager - Notification Job Run status details"
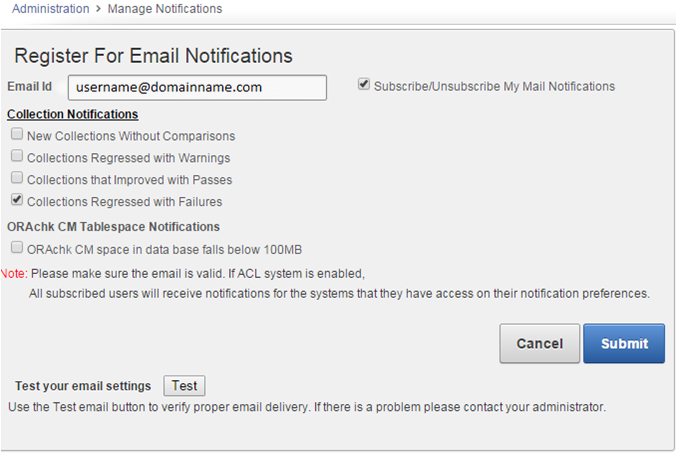
  3. Go back to the Administration page, and click Manage Notifications.

    Figure 2-4 Oracle Health Check Collections Manager - Manage Notifications

    Description of Figure 2-4 follows
    Description of "Figure 2-4 Oracle Health Check Collections Manager - Manage Notifications"
    1. If you are configuring for the first time, then enter your email address.
      Subsequent access to Manage Notifications page shows your email address automatically.
    2. By default, Subscribe/Unsubscribe My Mail Notifications is checked. Leave as is.
    3. Under Collection Notifications, choose the type of collections for which you want to receive notifications.
    4. Select to receive notification when the available space in ORAchk CM Tablespace falls below 100 MB.
    5. Validate the notification delivery by clicking Test under Test your email settings.

      If the configuration is correct, then you must receive an email. If you do not receive an email, then check with your administrator.

      Following is the sample notification:
      From: username@example.com
      Sent: Thursday, January 28, 2016 12:21 PM
      To: username@example.com
      Subject: Test Mail From Collection Manager
      
      Testing Collection Manager Email Notification System
    6. Click Submit.

Note:

Manage Notifications section under the Administration menu is available for all users irrespective of the role.

If the ACL system is enabled, then the registered users receive notifications for the systems that they have access to. If the ACL system is not configured, then all the registered users receive all notifications.

Depending on the selections, you made under Collection Notifications section, you receive an email with Subject: Collection Manager Notifications containing application URL with results.

Figure 2-5 Oracle Health Check Collections Manager - Sample Email Notification

Description of Figure 2-5 follows
Description of "Figure 2-5 Oracle Health Check Collections Manager - Sample Email Notification"

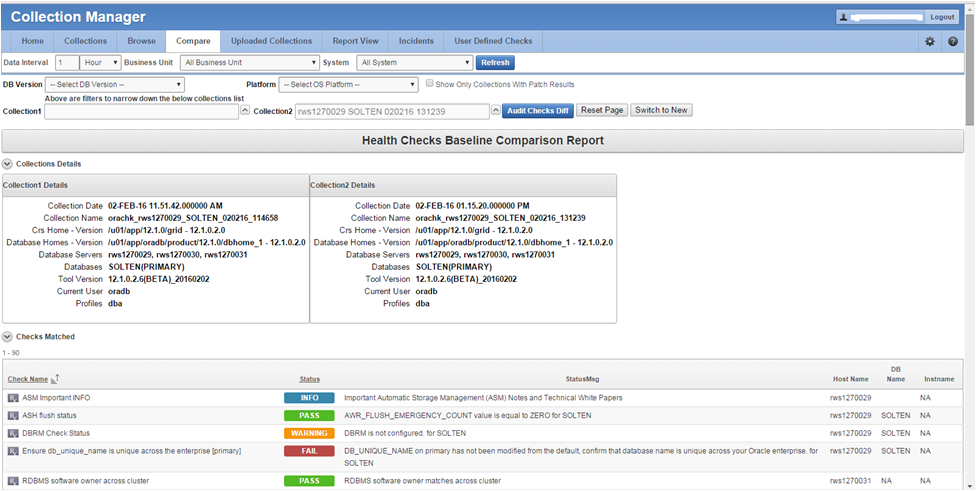
Under Comments column, click the Click here  links for details. Click the respective URLs, authenticate, and then view respective comparison report.

Figure 2-6 Oracle Health Check Collections Manager - Sample Diff Report
Description of Figure 2-6 follows
Description of "Figure 2-6 Oracle Health Check Collections Manager - Sample Diff Report"