10.5 Data Sources Page
The Data Sources page enables you to manage your data sources.
The Data Sources page allows you to create different types of data sources. Only administrator users can manage data sources. The RDF store can be linked to an Oracle AI Database or to an external RDF data provider. For Oracle data sources, there are three types of connections:
- JDBC data source defined with database parameters
- JDBC data source defined on an application server
- Oracle wallet connection defined in a zip file
These database connections must be available in order to link the RDF web application to the data source.
To create a data source, click Data Sources, then Create.
- Creating a JDBC URL Data Source
- Creating an Oracle Container Data Source
- Creating an Oracle Wallet Data Source
- Creating an Endpoint URL Data Source
Parent topic: RDF Graph Server and Query UI
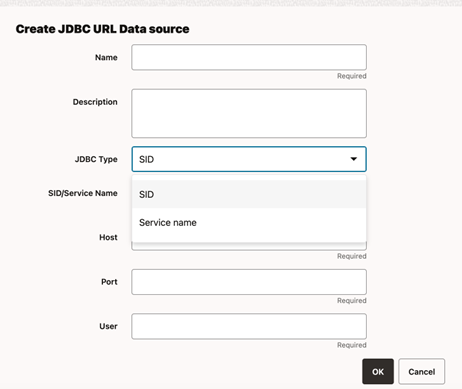
10.5.1 Creating a JDBC URL Data Source
You can perform the following steps to create a JDBC URL data source:
Parent topic: Data Sources Page
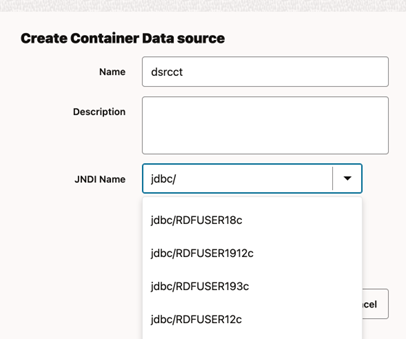
10.5.2 Creating an Oracle Container Data Source
As a prerequisite to create a container data source in the RDF Graph Server and Query UI application, the JDBC data source must exist in the application server. See Creating a JDBC Data Source in WebLogic Server and Creating a JDBC Data Source in Tomcat for more information.
You can then perform the following steps to create an Oracle Container data source:
Parent topic: Data Sources Page
10.5.2.1 Creating a JDBC Data Source in WebLogic Server
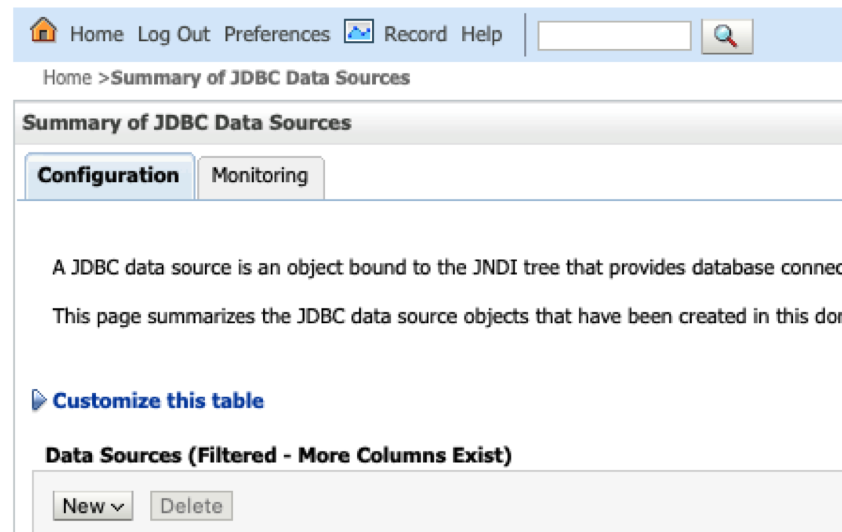
To create a JDBC data source in WebLogic Server:
-
Log in to the WebLogic administration console as an administrator:
http://localhost:7101/console. -
Click Services, then JDBC Data sources.
-
Click New and select the Generic data source menu option to create a JDBC data source.
-
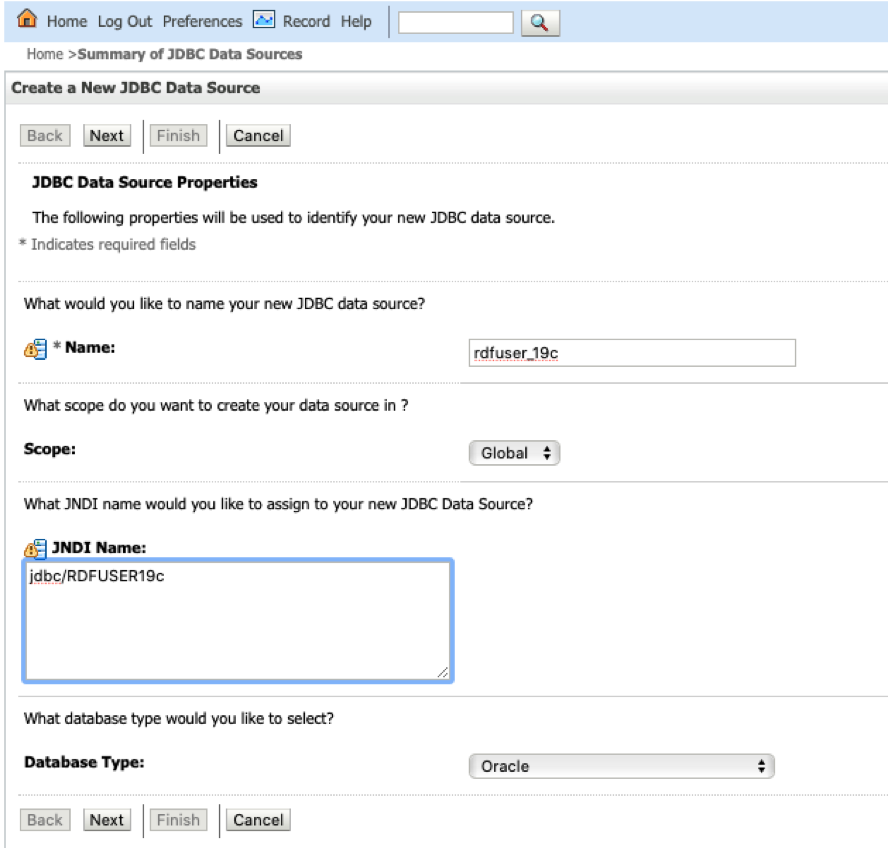
Enter the JDBC data source information (name and JNDI name), then click Next.
-
Accept the defaults on the next two pages.
-
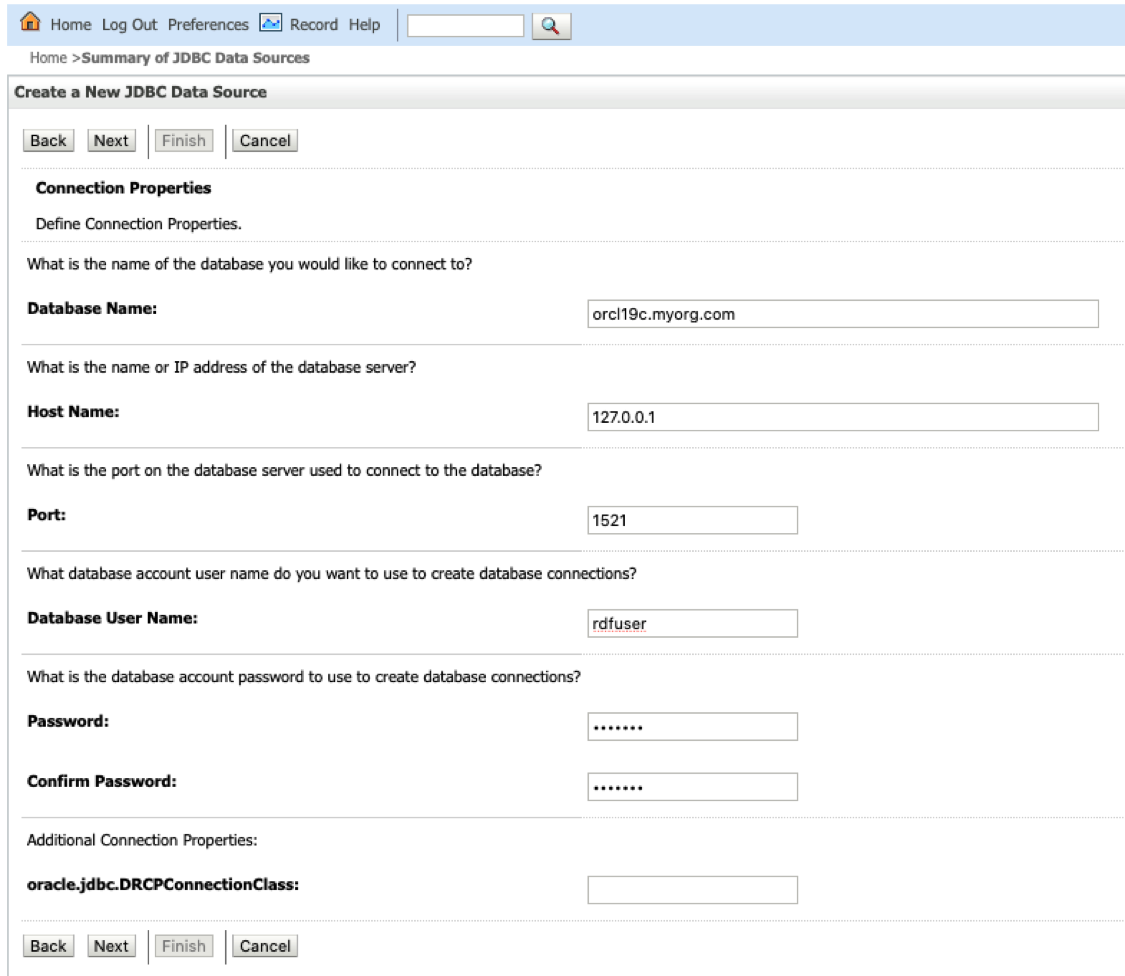
Enter the database connection information: service name, host, port, and user credentials.
-
Click Next to continue.
-
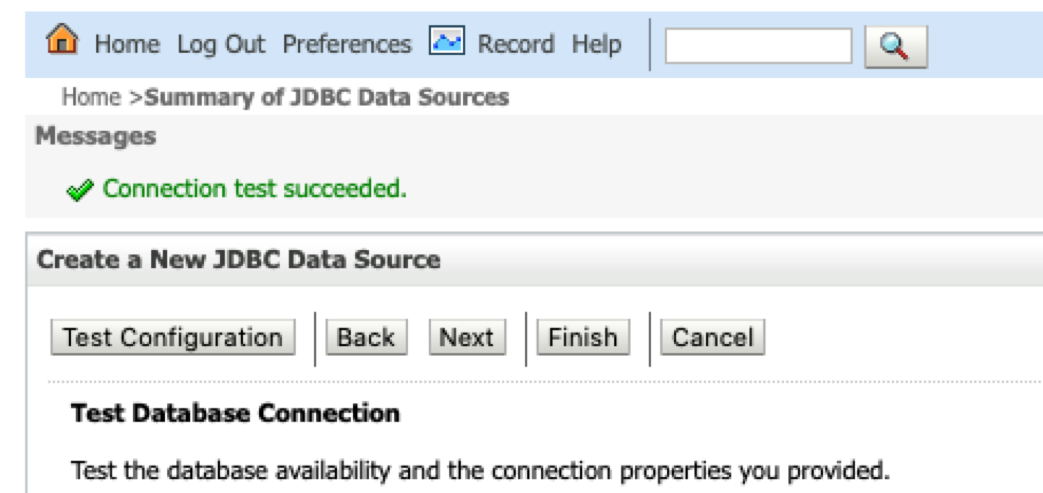
Click the Test Configuration button to validate the connection and click Next to continue.
-
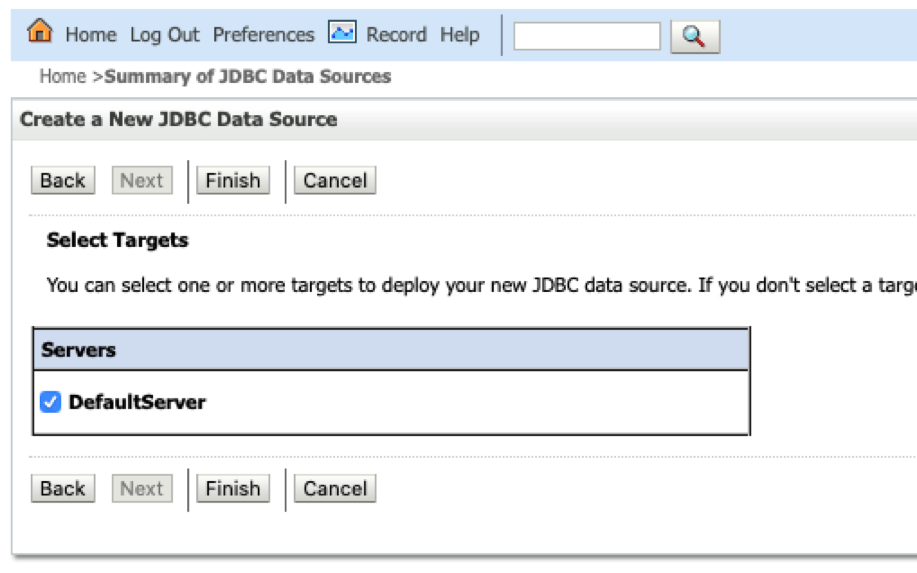
Select the server target and click Finish.
The JDBC data gets added to the data source table and the JNDI name is added to the combo box list in the create container dialog.
Parent topic: Creating an Oracle Container Data Source
10.5.2.2 Creating a JDBC Data Source in Tomcat
There are different ways to create a JDBC data source in Tomcat. See Tomcat documentaion for more details.
conf/server.xml and conf/content.xml.
-
Add global JNDI resources on
conf/server.xml.<GlobalNamingResources> <Resource name="jdbc/RDFUSER19c" auth="Container" global="jdbc/RDFUSER19c" type="javax.sql.DataSource" driverClassName="oracle.jdbc.driver.OracleDriver" url="jdbc:oracle:thin:@host.name:db_port_number:db_sid" username="rdfuser" password="rdfuserpwd" maxTotal="20" maxIdle="10" maxWaitMillis="-1"/> </GlobalNamingResources> -
Add the resource link to global JNDI’s on
conf/context.xml:<Context> <ResourceLink name="jdbc/RDFUSER19c" global="jdbc/RDFUSER19c" auth="Container" type="javax.sql.DataSource" /> </Context>
Parent topic: Creating an Oracle Container Data Source
10.5.3 Creating an Oracle Wallet Data Source
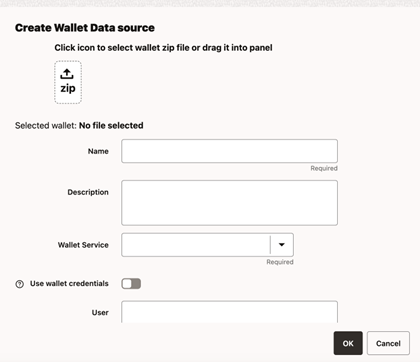
To create a wallet data source in the Query UI application, you must have a wallet zip file. It can be a simple wallet zip file created with Oracle orapki utility, or a wallet downloaded from Oracle Autonomous AI Database.
In general, wallets are obtained from the Autonomous AI Database. See Download Client Credentials (Wallets) for more information to download a wallet from Oracle Autonomous AI Database.
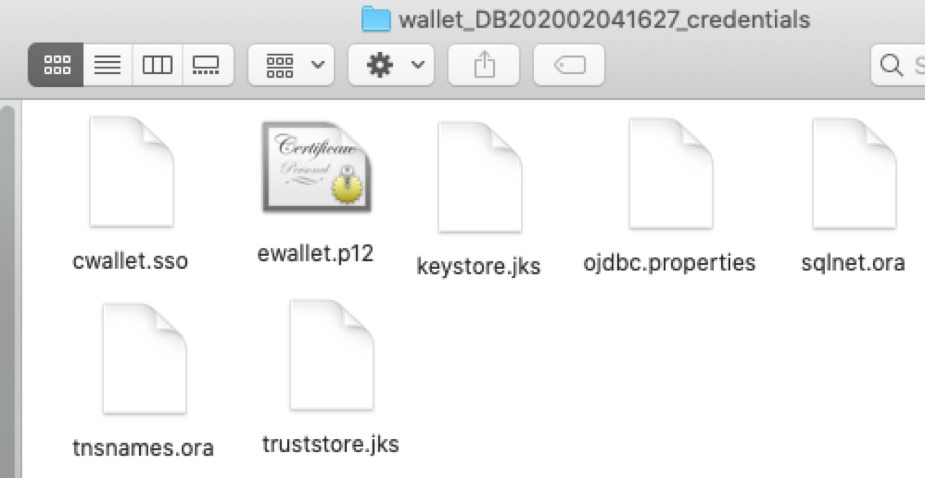
The following figure displays the contents of the wallet zip file:
Note that the tnsnames.ora file in the wallet zip file contains the wallet service alias names, and TCPS information. It does not contain the user credentials for each service.
Using this wallet zip file, you can define an RDF wallet data source in the Query UI web application by directly entering the user credentials. Optionally, you can also have the user credentials stored inside the wallet for each desired service. If you choose to store the user credentials in the wallet, then see Storing User Credentials in a Wallet for more information.
The following describes the steps to create a wallet data source:
Parent topic: Data Sources Page
10.5.3.1 Storing User Credentials in a Wallet
The following steps describe the process for adding the credentials to the wallet zip file. It is important that you store this wallet file along with the credentials in a safe location for security reasons.
- Unzip the cloud wallet zip file in a temporary directory.
- Use the service name alias in the tnsnames.ora to store
credentials by running the following command:
For example, if the service name alias is db202002041627_medium:
${ORACLE_HOME}/bin/orapki secretstore create_credential -wallet /tmp/cloudwallet -connect_string db202002041627_medium -username username -password password - Zip the cloud wallet files into a new zip file.
Parent topic: Creating an Oracle Wallet Data Source
10.5.4 Creating an Endpoint URL Data Source
External data sources are connected to the RDF data store using the endpoint URL.
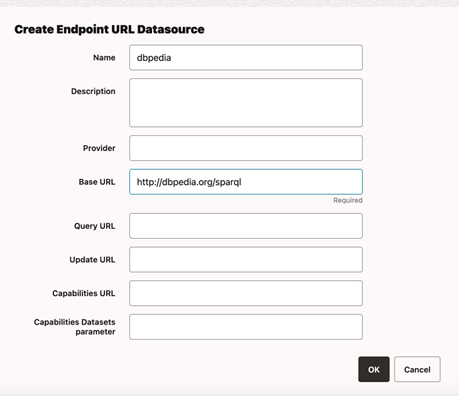
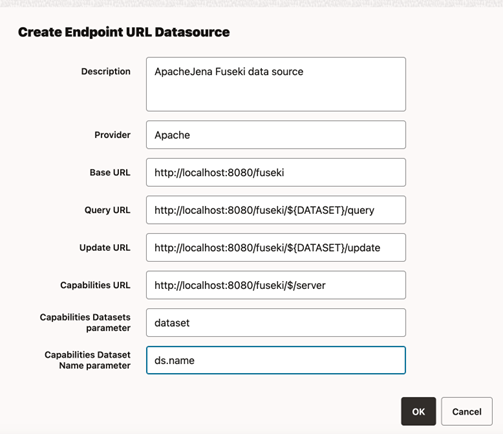
You can execute SPARQL queries and updates to the RDF data store using a base URL. In some cases, such as Apache Jena Fuseki, there are specific URLs based on the dataset name. For example:
-
DBpedia Base URL: http://dbpedia.org/sparql
-
Apache Jena Fuseki (assuming a dataset name
dset):-
Query URL:
http://localhost:8080/fuseki/dset/query -
Update URL:
http://localhost:8080/fuseki/dset/update
-
The RDF web application issues SPARQL queries to RDF datasets. These
datasets can be retrieved from provider if a get capabilities request is available.
For DBpedia, there is a single base URL to be used, and therefore a default single
dataset is handled in application. For Apache Jena Fuseki, there is a request that
returns the available RDF datasets in server:
http://localhost:8080/fuseki/$/server. Using this request, the
list of available datasets can be retrieved for specific use in an application.
You can perform the following steps to create an external RDF data source:
Parent topic: Data Sources Page

