2.2 Quick Start for Using RDF Data in Oracle Autonomous Database

You can use any of the following options to work with RDF data in Autonomous Database:

  • RDF feature of Oracle Graph is included in all versions of Oracle Autonomous Data Warehouse and Oracle Autonomous Transaction Processing in both shared and dedicated deployments.
  • RDF Graph Server and Query UI is supported with all versions of Oracle Autonomous Data Warehouse and Oracle Autonomous Transaction Processing in both shared and dedicated deployments. RDF Graph Server enables you to create a SPARQL endpoint and perform other RDF graph data management operations using the Query UI.
  • Graph Studio, a component of Autonomous Database in shared deployments, allows you to easily create, manage, query, analyze, and visualize RDF graphs. This web-based graph interface is supported on both Data Warehouse and Transaction Processing workload types.

2.2.1 Getting Started with RDF Data in Oracle Autonomous Database

This tutorial describes how you can quickly get started with RDF data in Autonomous database.

You can run the SQL statements in the steps through one of the following options:
  1. Connect to your autonomous database as a user with administrative privileges and create a network owner user.
    CREATE USER rdfuser
    IDENTIFIED BY <password-for-rdfuser>
    QUOTA 5G ON DATA;

    Note:

    If you are using Database Actions, you must REST Enable the user in order to enable the new user to access Database Actions. See Create User for more details.
  2. Grant the required privileges to the newly created network owner user.
    You must be connected as a user with administrative privileges to run the following statement:
    GRANT CONNECT, RESOURCE, CREATE VIEW TO rdfuser;

    Note:

    If you are using Database Actions to create the new user in the preceding step, the CONNECT and the RESOURCE privileges are provided by default. Hence, you must only grant the CREATE VIEW privilege to the new user.
  3. Connect as the network owner user.
    CONNECT rdfuser/<password-for-rdfuser>
  4. Create an RDF network by calling SEM_APIS.CREATE_RDF_NETWORK.

    You must create an RDF network as the intended owner of the schema-private network on the tablespace DATA.

    The following example creates a schema-private RDF network named net1 owned by network owner user rdfuser using the DATA tablespace.

    EXECUTE SEM_APIS.CREATE_RDF_NETWORK('DATA', network_owner=>'rdfuser', network_name=>'net1');
  5. Create an RDF graph by calling SEM_APIS.CREATE_RDF_GRAPH.
    The following example creates an RDF graph named articles in the net1 schema-private network.
    EXECUTE SEM_APIS.CREATE_RDF_GRAPH('articles', NULL, NULL, network_owner=>'rdfuser', network_name=>'net1');
    
  6. Insert triples into the RDF graph.
    You can insert triples into your RDF graph using the SQL INSERT statement. For example:
    INSERT INTO rdfuser.net1#rdft_articles(triple) VALUES (
      SDO_RDF_TRIPLE_S ('articles','<http://nature.example.com/Article1>',
        '<http://purl.org/dc/elements/1.1/title>','"All about XYZ"',
        network_owner=>'RDFUSER', network_name=>'NET1'));
    
    INSERT INTO rdfuser.net1#rdft_articles(triple) VALUES (
      SDO_RDF_TRIPLE_S ('articles','<http://nature.example.com/Article1>',
        '<http://purl.org/dc/elements/1.1/creator>','"Jane Smith"',
        network_owner=>'RDFUSER', network_name=>'NET1'));
    
    INSERT INTO rdfuser.net1#rdft_articles(triple) VALUES (
      SDO_RDF_TRIPLE_S ('articles',
        '<http://nature.example.com/Article1>',
        '<http://purl.org/dc/terms/references>',
        '<http://nature.example.com/Article2>',
        network_owner=>'RDFUSER', network_name=>'NET1'));
    
    INSERT INTO rdfuser.net1#rdft_articles(triple) VALUES (
      SDO_RDF_TRIPLE_S ('articles','<http://nature.example.com/Article2>',
        '<http://purl.org/dc/elements/1.1/title>','"A review of ABC"',
        network_owner=>'RDFUSER', network_name=>'NET1'));
    
    INSERT INTO rdfuser.net1#rdft_articles(triple) VALUES (
      SDO_RDF_TRIPLE_S ('articles','<http://nature.example.com/Article2>',
        '<http://purl.org/dc/elements/1.1/creator>','"Joe Bloggs"',
        network_owner=>'RDFUSER', network_name=>'NET1'));
    
    INSERT INTO rdfuser.net1#rdft_articles(triple) VALUES (
      SDO_RDF_TRIPLE_S ('articles',
        '<http://nature.example.com/Article2>',
        '<http://purl.org/dc/terms/references>',
        '<http://nature.example.com/Article3>',
        network_owner=>'RDFUSER', network_name=>'NET1'));
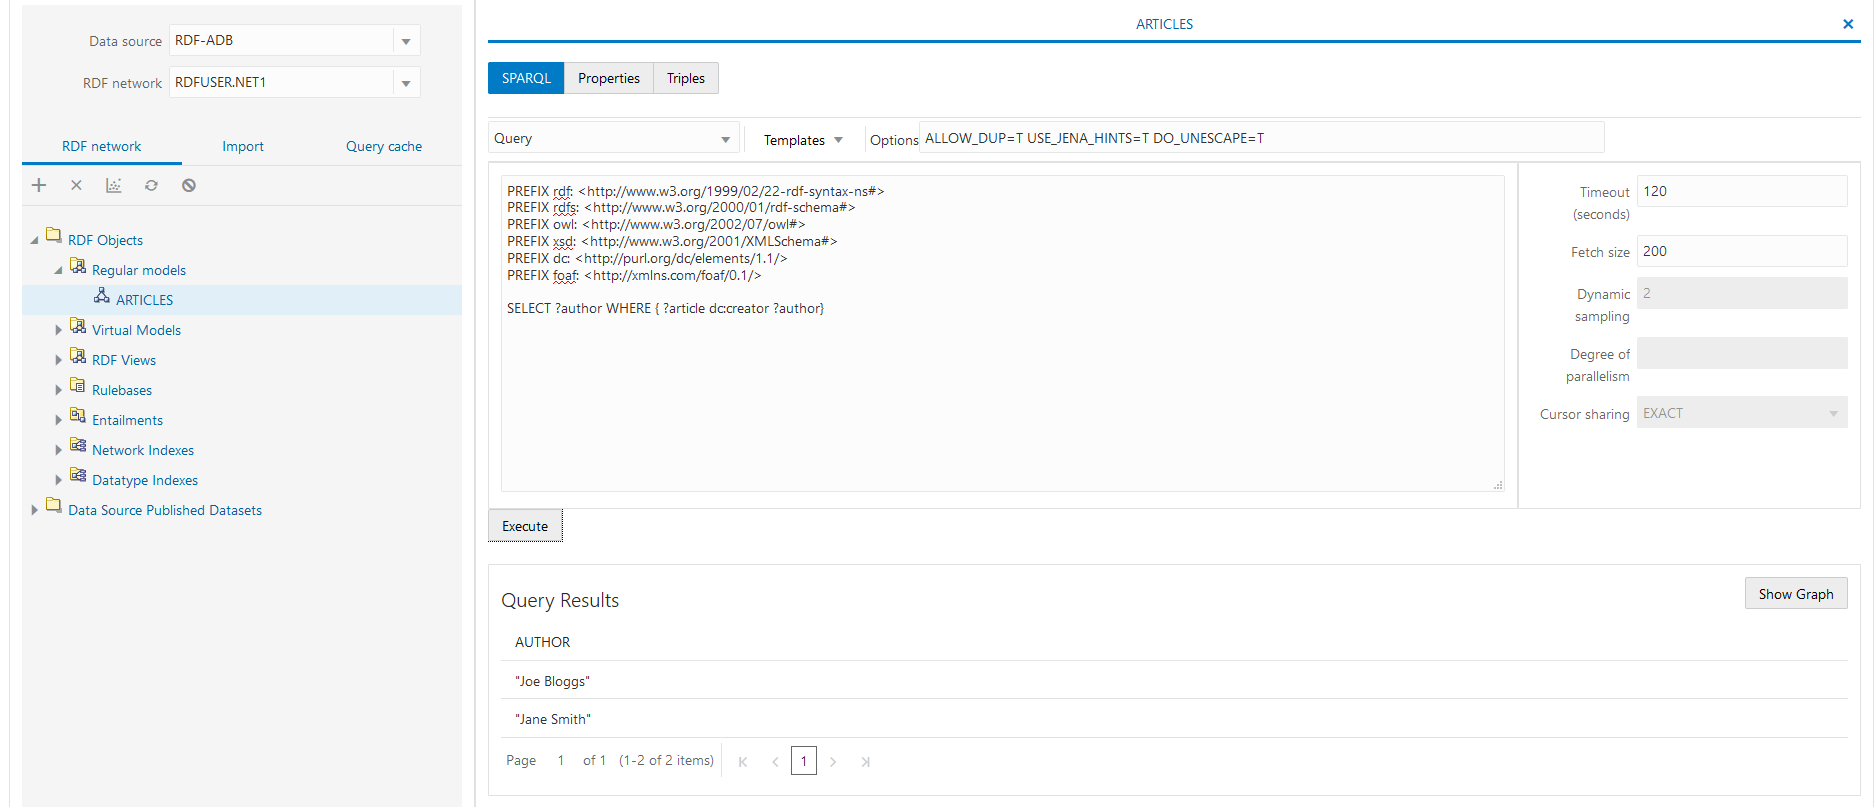
  7. Execute SPARQL queries on the inserted data using RDF Graph Server and Query UI.

    See Deploying RDF Graph Server and Query UI from Oracle Cloud Marketplace to launch the RDF Query UI application.

    You can query the inserted data by running SPARQL queries on the SPARQL query page in RDF Graph Query UI.

    Figure 2-1 Running SPARQL Query in RDF Graph Query UI

    Running SPARQL Query in RDF Query UI

    Alternatively, you can also execute SPARQL queries using SPARQL editor in SQL Developer in a dedicated Autonomous Database deployment. But if you are using Autonomous Database in a shared deployment, then the SPARQL editor is only supported in SQL Developer 21.2 or later. See Connect with Oracle SQL Developer for creating a connection to your autonomous database using Cloud Wallet.

2.2.2 Deploying RDF Graph Server and Query UI from Oracle Cloud Marketplace

You can set up RDF Graph Server and Query UI in your Autonomous Database instance using the Oracle Cloud Marketplace image.
As a prerequisite, you must have the following already created:
  • Oracle Autonomous Database (shared or dedicated infrastructure) created using your Oracle Cloud account
  • Virtual Cloud Network (VCN) in your tenancy
  • OCI compartment to create the stack instance
  • SSH Key pair for ssh access to the instance
The Oracle Cloud Infrastructure (OCI) Marketplace displays two listings for Oracle RDF Graph Server and Query UI. However, the deployment varies depending on the pricing model as shown:
  • Free: Apache Tomcat Server deployment
  • BYOL: Oracle WebLogic Server deployment

The following steps apply to both Autonomous Data Warehouse or Autonomous Transaction Processing workload types as applicable to your Autonomous Database.
  1. Sign in to the OCI console and navigate to Marketplace.
  2. Search RDF on the Cloud Marketplace page and click the RDF Graph Server and Query UI listing that applies to you.
  3. Review, accept the Oracle Standard Terms and Restrictions and click Launch Stack.
    The Stack setup wizard gets triggered.
  4. Enter the appropriate metadata, selecting the required options to create the Compute Instance and configure the Instance Network variables.
  5. Enter the ADMIN user credentials for your application server under Advanced Configuration.
  6. Review the information and click Create.
    The stack deployment gets invoked and you can monitor the job progress on the Job Details page.

    Once the job completes and the stack is created successfully, the status shows as SUCCEEDED on the Job Details page.

    The RDF Graph Server and Query UI instance is now provisioned.

  7. Scroll down to the bottom of the logs section and note the public URL to launch RDF Graph Server and Query UI.
    The URL follows the format as shown:
    • Apache Tomcat Deployment: https://<public_IP>:4040/orardf
    • WebLogic Server Deployment: https://<public_IP>:8001/orardf
  8. Launch the RDF Graph Server and Query UI application in your browser.
    The RDF Graph login screen appears. See RDF Graph Server and Query UI for more details.