Configuring the Oracle Database for Microsoft Entra ID Integration
The Microsoft Entra ID integration with the Oracle Database instance requires the database to be registered with Entra ID.
-
Oracle AI Database Requirements for the Microsoft Entra ID Integration
Before you can configure an Oracle AI Database instance with Microsoft Entra ID, you must ensure that your environment meets special requirements. -
Registering the Oracle AI Database Instance with a Microsoft Entra ID Tenancy
A user with Entra ID administrator privileges uses Microsoft Entra ID to register the Oracle AI Database instance with the Microsoft Entra ID tenancy. -
Enabling Microsoft Entra ID v2 Access Tokens
Oracle Database supports integration with the v1 and v2 Azure ADOAuth2access token. -
Managing App Roles in Microsoft Entra ID
In Entra ID, you can create and manage app roles that will be assigned to Azure users and groups and also be mapped to Oracle Database global schemas and roles. -
Enabling Entra ID External Authentication for Oracle Database
You need to enable Microsoft Entra ID external authentication with Oracle Database. -
Disabling Entra ID External Authentication for Oracle Database
To disable Entra ID External authentication for an Oracle Database instance, you must use theALTER SYSTEMstatement.
Oracle AI Database Requirements for the Microsoft Entra ID Integration
Before you can configure an Oracle AI Database instance with Microsoft Entra ID, you must ensure that your environment meets special requirements.
For an on-premises, non-cloud Oracle AI Database, follow the steps in this document. If your Oracle AI Database is in one of the following DBaaS platforms, then refer to the platform documentation for additional requirements.
-
Using Oracle Autonomous Database on Dedicated Exadata Infrastructure
-
Use Azure Active Directory Authentication with Oracle Base Database Service
Note the following:
-
The Oracle AI Database server must be able to request the Entra ID public key. Depending on the enterprise network connectivity setup, you may need to configure a proxy setting.
-
Users and applications that need to request an Entra ID token must also be able to have network connectivity to Entra ID. You may need to configure a proxy setting for the connection.
-
You must configure Transport Layer Security (TLS) between the Oracle AI Database client and the Oracle AI Database server so that the token can be transported securely. This TLS connection can be either one-way or mutual.
-
You can create the TLS server certificate to be self-signed or be signed by a well known certificate authority. The advantage of using a certificate that is signed by a well known Certificate Authority (CA) is that the database client can use the system default certificate store to validate the Oracle AI Database server certificate instead of having to create and maintain a local wallet with the root certificate. Note that this applies to Linux and Windows clients only.
Related Topics
Registering the Oracle AI Database Instance with a Microsoft Entra ID Tenancy
A user with Entra ID administrator privileges uses Microsoft Entra ID to register the Oracle AI Database instance with the Microsoft Entra ID tenancy.
-
Log in to the Azure portal as an administrator who has Microsoft Entra ID privileges to register applications.
-
In the Azure Active directory admin center page, from the left navigation bar, select Azure Active Directory.
-
In the MS - App registrations page, select App registrations from the left navigation bar.
-
Select New registration.
The Register an application window appears.
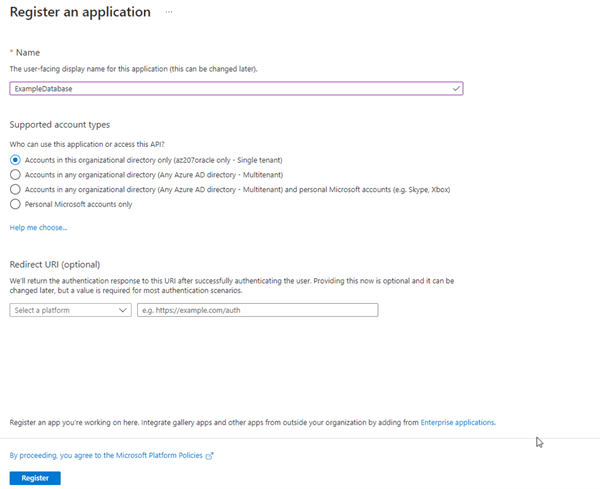
-
In the Register an application page, enter the following Oracle AI Database instance registration information:
-
In the Name field, enter a name for the Oracle AI Database instance connection (for example,
Example Database). -
Under Supported account types, select the account type that matches your use case.
-
Accounts in this organizational directory only (tenant_name only - Single tenant)
-
Accounts in any organizational directory (Any Entra ID directory - Multitenant)
-
Accounts in any organizational directory (Any Entra ID directory - Multitenant) and personal Microsoft accounts (e.g. Skype, Xbox)
-
Personal Microsoft accounts only
-
-
-
Bypass the Redirect URI (Optional) settings. You do not need to create a redirect URI because Entra ID does not need one for the database server.
-
Click Register.
After you click Register, Entra ID displays the app registration’s Overview pane, which will show the Application (client) ID under Essentials. This value is a unique identifier for the application in the Microsoft identity platform. Note the term Application refers to the Oracle AI Database instance.
-
Register a scope for the database app registration.
A scope is a permission to access the database. Each database will need a scope so that clients can establish a trust with the database by requesting permission to use the database scope. This allows the database client to get access tokens for the database.
-
In the left navigation bar, select Expose an API.
-
Under Set the App ID URI, in the Application ID URI field, enter the app ID URI for the database connection using the following format, and then click Save:
your_tenancy_url/application_(client)_idIn this specification:
-
your_tenancy_urlmust includehttpsas the prefix and the fully qualified domain name of your Entra ID tenancy. -
application_(client)_idis the ID that was generated when you registered the Oracle AI Database instance with Entra ID. It is displayed in the Overview pane of the app registration.
For example:
https://sales_west.example.com/1aa11111-1a1z-1a11-1a1a-11aa11a1aa1a -
-
Select Add a scope and then enter the following settings:
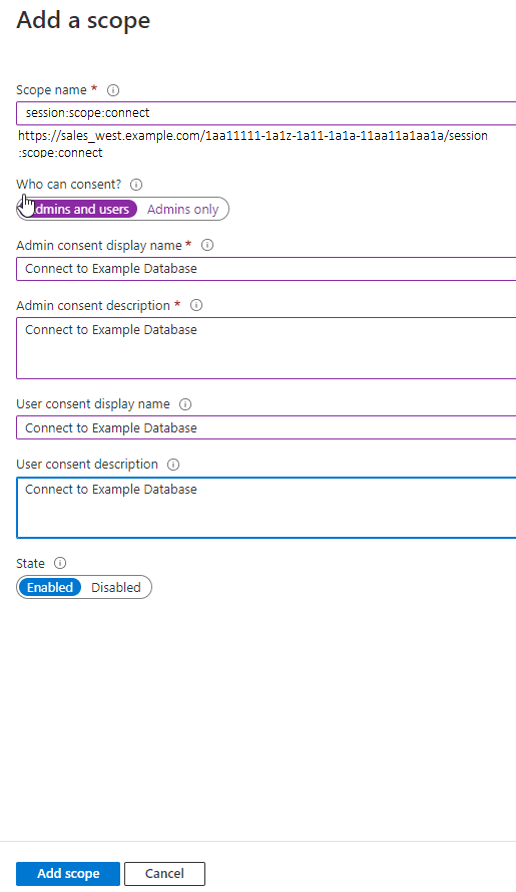
Description of the illustration azure-scope.png
-
Scope name specifies a name for the scope. Enter the following name:
session:scope:connectThis name can be any text. However, a scope name must be provided. You will need to use this scope name later when you give consent to the database client application to access the database.
-
Who can consent specifies the necessary permissions. Select Admins and users, or for higher restrictions, Admins only.
-
Admin consent display name describes the scope’s purpose (for example,
Connect to Oracle), which only administrators can see. -
Admin consent display name describes the scope’s purpose (for example,
Connect to Example Database), which only administrators can see. -
User consent display name is a short description of the purpose of the scope (for example,
Connect to Example Database), which users can see if you specify Admins and users in Who can consent. -
User consent description is a more detailed description of the purpose of the scope (for example,
Connect to Example Database), which users can see if you specify Admins and users in Who can consent. -
State enables or disables the connection. Select Enabled.
-
-
After you complete these steps, you are ready to add one or more Azure app roles, and then perform the mappings of Oracle schemas and roles.
Related Topics
Enabling Microsoft Entra ID v2 Access Tokens
Oracle Database supports integration with the v1 and v2 Azure AD OAuth2 access token.
Oracle Database supports the Entra ID v2 token as well as the default v1 token. However, to use the Entra ID v2 token, you must perform some additional steps to ensure it works with the Oracle Database. You can use this token with applications that are registered in the Azure portal using the App registrations experience.
When you use the Azure AD v2 OAuth2 access token, the credential flow continues to work as it did before without any changes. However, the upn: claim must be added when you use v2 tokens with the interactive flow.
-
Check the version of the Entra ID access token that you are using.
-
Log in to the Microsoft Entra ID portal.
-
Search for and select Entra ID.
-
Under Manage, select App registrations.
-
Choose the application for which you want to configure optional claims based on your scenario and desired outcome.
-
Under Manage, select Token configuration.
-
Click Add optional claim and select upn.
When you use v2 tokens, the aud: claim only reflects the APP ID value. You do not need to set the https:domain prefix to the APP ID URI when v2 tokens are being used. This simplifies the configuration for the database because the default APP ID URI can be used.
Related Topics
Managing App Roles in Microsoft Entra ID
In Entra ID, you can create and manage app roles that will be assigned to Azure users and groups and also be mapped to Oracle Database global schemas and roles.
-
Creating a Microsoft Entra ID App Role
Azure users, groups, and applications that need to connect to the database will be assigned to the database app roles. -
Assigning Users and Groups to the Microsoft Entra ID App Role
Before Microsoft Azure users can have access to the Oracle database, they must first be assigned to the app roles that will be mapped to Oracle Database schema users or roles. -
Assigning an Application to an App Role
An application that must connect to the database using the client credential flow must to be assigned to an app role.
Creating a Microsoft Entra ID App Role
Azure users, groups, and applications that need to connect to the database will be assigned to the database app roles.
See the Microsoft Azure article Create and assign a custom role in Azure Active Directory for detailed steps on how to create an app role. The following steps describe how to create the app role for use with an Oracle database.
-
Log in to Entra ID as an administrator who has privileges for creating app roles.
-
Access the Oracle Database app registration that you created.
-
Use the Directory + subscription filter to locate the Entra ID tenant that contains the Oracle Database app registration.
-
Select Azure Active Directory.
-
Under Manage, select App registrations, and then select the Oracle Database instance that you registered earlier.
-
-
Under Manage, select App roles.
-
In the App roles page, select Create app role.
-
In the Create app role page, enter the following information:
-
Display name is the displayed name of the role (for example,
HR App Schema). You can include spaces in this name. -
Value is the actual name of the role (for example,
HR_APP). Ensure that this setting matches exactly the string that is referenced in the database mapping to a schema or role. Do not include spaces in this name. -
Description provides a description of the purpose of this role.
-
Do you want to enable this app role? enables you to activate the role.
-
-
Click Apply.
The app role appears in the App roles pane.
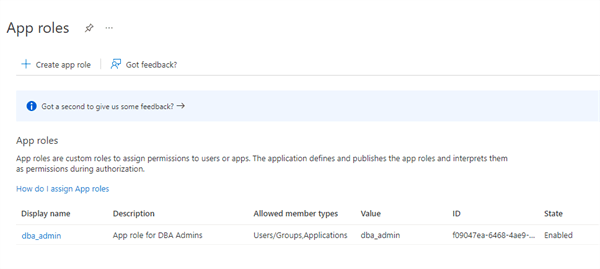
Description of the illustration azure-app-roles-creation.png
Assigning Users and Groups to the Microsoft Entra ID App Role
Before Microsoft Azure users can have access to the Oracle database, they must first be assigned to the app roles that will be mapped to Oracle Database schema users or roles.
See the Microsoft Azure article Add app roles to your application and receive them in the token for detailed steps assigning users and groups to an app role. The following steps explain how to do this for an Oracle database.
-
Log in to Entra ID as an administrator who has privileges for assigning Azure users and Entra ID groups to app roles.
-
In enterprise applications, find the name of the Oracle Database app registration that you created. This is automatically created when you create an app registration.
-
Use the Directory + subscription filter to locate the Azure Active Directory tenant that contains the Oracle connection.
-
Select Azure Active Directory.
-
Under Manage, select Enterprise applications, and then select the Oracle Database app registration name that you registered earlier.
-
-
Under Getting Started, select Assign users and groups.
-
Select Add user/group.
-
In the Add assignment window, select Users and groups to display a list of users and security groups.
-
From this list, select the users and groups that you want to assign to the app role, and then click Select.
-
In the Add assignment window, select Select a role to display a list of the app roles that you have created.
-
Select the app role and then select Select.
-
Click Assign.
Assigning an Application to an App Role
An application that must connect to the database using the client credential flow must to be assigned to an app role.
-
Log in to Entra ID as an administrator who has privileges for assigning Azure users and Entra ID groups to app roles.
-
Access the app registration for the application.
-
Under Manage, select API permissions.
-
In the Configured permissions area, select + Add a permission.
-
In the Request API permission pane, select the My APIs tab.
-
Select the Oracle Database app that you want to give permission for this application to access. Then select the Application permissions option.
-
Select the database app roles to assign to the application and then click the Add Permission box at the bottom of the screen to assign the app roles and close the dialog box. Ensure that the app roles that you just assigned appear under Configured permissions.
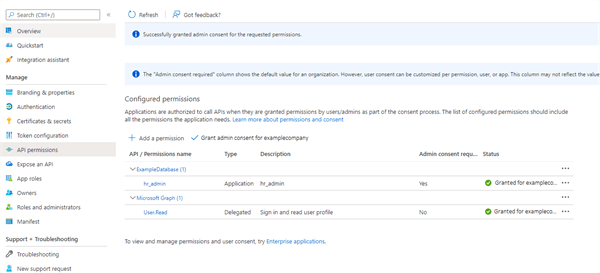
Description of the illustration azure-grant-consent.png
- Select Grant admin consent for tenancy to grant consent for the tenancy users, then select Yes in the confirmation dialog box.
Related Topics
Enabling Entra ID External Authentication for Oracle Database
You need to enable Microsoft Entra ID external authentication with Oracle Database.
For additional information about Entra ID authentication for your platform, see the documentation links below.
-
Log in to the Oracle Database instance as a user who has been granted the
ALTER SYSTEMsystem privilege. -
Set the
IDENTITY_PROVIDER_TYPEparameter as follows:ALTER SYSTEM SET IDENTITY_PROVIDER_TYPE=AZURE_AD SCOPE=BOTH; -
Ensure that you set the
IDENTITY_PROVIDER_TYPEparameter correctly.SELECT NAME, VALUE FROM V$PARAMETER WHERE NAME='identity_provider_type';The following output should appear:
NAME VALUE ---------------------- ------- identity_provider_type AZURE_AD -
Set the
IDENTITY_PROVIDER_CONFIGparameter by using the following syntax:ALTER SYSTEM SET IDENTITY_PROVIDER_CONFIG = '{ "application_id_uri": string , // from registered app, to be mapped in jwt "aud" claim; // Domain qualified to support cross tenancy resource access "tenant_id": string, // from tenant config "app_id": string // from registered resource app }' SCOPE=BOTH;For example:
ALTER SYSTEM SET IDENTITY_PROVIDER_CONFIG =
'{
  "application_id_uri" : "https://www.example.com/11aa1a11-aaaa-1111-1111-1111aa11111",
  "tenant_id" : "111a1111-a11a-111a-1a1a-1111111111a",
  "app_id" : "11aa1a11-aaaa-1111-1111-1111aa11111"
}' SCOPE=BOTH;
See the following platform-specific documentation for information about enabling Oracle Database for Entra ID external authentication, in addition to the information detailed in this document for on-premises (non-cloud) Oracle databases.
Disabling Entra ID External Authentication for Oracle Database
To disable Entra ID External authentication for an Oracle Database instance, you must use the ALTER SYSTEM statement.
In addition to Oracle Database, this procedure can be used for Oracle Autonomous Database on Dedicated Exadata Infrastructure and Oracle Exadata Cloud Service (Oracle ExaCS). If you want to disable Entra ID external authentication with these products, see their product documentation.
To disable Entra ID from Oracle Autonomous Database Serverless, see Using Oracle Autonomous AI Database Serverless. The following procedure applies to all other platforms:
-
Log in to the Oracle Database instance as a user who has been granted the
ALTER SYSTEMsystem privilege. -
Set the identity provider parameters as follows:
ALTER SYSTEM RESET IDENTITY_PROVIDER_CONFIG SCOPE=BOTH;
ALTER SYSTEM RESET IDENTITY_PROVIDER_TYPE SCOPE=BOTH;