On-Premises: Configuring Oracle GoldenGate Hub
Configure and deploy the MAA Oracle GoldenGate Hub architecture using the provided planning considerations, tasks, management, and troubleshooting information.
Overview of MAA GoldenGate Hub
To achieve the highest levels of availability, resulting in zero or near-zero downtime for both unplanned outages and planned maintenance activities, customers frequently use the combination of Oracle Real Application Clusters (Oracle RAC), Oracle Active Data Guard, and Oracle GoldenGate. Similar high availability benefits can also be achieved with Oracle RAC and Oracle GoldenGate without Oracle Active Data Guard, depending on the availability requirements.
This architecture, typically referred to as Never Down Architecture, delivers near zero Recovery Time Objective (RTO, or downtime incurred during outage) and potentially zero or near zero Recovery Point Objective (RPO, or data loss potential).
Traditionally, Oracle GoldenGate is installed and run locally on the database server that the GoldenGate processes connect to. When used with Oracle Grid Infrastructure Standalone Agent (XAG), Oracle GoldenGate processes can be configured to seamlessly relocate or fail over between Oracle RAC nodes and follow Oracle Active Data Guard switchover and failovers.
Using MAA Oracle GoldenGate Hub (MAA GGHub) moves the GoldenGate software and processes off of the Exadata database servers, reducing complexity and system resource utilization. MAA GGHub centralizes Oracle GoldenGate management and offloads the majority of the Oracle GoldenGate processing and associated CPU and storage resource utilization from the Exadata system resources. Connectivity between the GoldenGate processes and the databases they operate against is managed with Oracle Net Services.
Extreme availability that delivers zero or near zero downtime (RTO=0 or near zero) and zero or near zero data loss (RPO=0 or near zero) typically requires the following Platinum MAA architecture:
- A source database and target database in an Oracle GoldenGate architecture that allows your application to fail over immediately in cases of disaster (database, cluster, or site failure) or switch over in cases of database or application upgrade. This architecture enables the potential RTO of zero or near zero for disaster scenarios and database and application upgrade maintenance.
- Each source and target database is deployed on Exadata systems so that any local failures are tolerated or recovered almost instantly.
- Each source and target database is configured with a standby database with Data Guard Fast-Start Failover so that any failure of the database results in activating a new primary database in seconds to minutes. If synchronous (SYNC) transport is leveraged with Maximum Availability Protection mode, zero data loss Data Guard failover is achieved.
- Oracle GoldenGate replication is configured using MAA GGHub between the source and target databases. Bi-directional replication is commonly configured where the target database replicates other data back to the source using a second GoldenGate configuration.
- Any standby that becomes a primary database because of Data Guard switchover or failover automatically resynchronizes with its target GoldenGate database. If a zero-data-loss Data Guard switchover or failover occurs, GoldenGate resynchronization ensures zero data loss across the distributed database environment.
- For active-active Oracle GoldenGate configurations, MAA recommends Automatic Conflict Detection and Resolution (Auto-CDR) for tables that can be updated concurrently at multiple databases. Oracle recommends Integrated Parallel Replicat for Auto-CDR.
To achieve a Never Down Architecture on-premises, follow these high-level steps:
- Deploy or migrate your database onto Exadata Database Machine.
- Add symmetric standby databases.
- Configure and deploy Oracle Data Guard Fast Start Failover using the Oracle MAA best practice recommendations in OnPremises and Cloud: Oracle GoldenGate Microservices Architecture Integrated with Active Data Guard.
- Set up MAA GGHub, which is detailed in the topics that follow.
- Configure Bidirectional Replication and Automatic Conflict Detection and Resolution. See Bi-Directional Replication and Automatic Conflict Detection and Resolution.
- Decide on Application Failover Options such as Global Data Services (see Overview of Oracle GoldenGate Best Practices) or use your own customized application failover.
Understanding GGHub Clusters and Instances
GGHub Oracle GoldenGate Hub (GGHub) is a deployment architecture in which Oracle GoldenGate services run on hosts separate from the source and target database hosts. A GGHub can host one or more Oracle GoldenGate deployments, including Extract, Distribution, Receiver, and Replicat processes and their associated trail files. This architecture centralizes lifecycle management, avoids placing GoldenGate software on database servers, and provides a foundation for GoldenGate high availability and disaster recovery.
GGHub cluster A two-node Oracle Grid Infrastructure cluster at one site that provides node-level high availability for one or more GGHub instances. The cluster supplies Clusterware, application VIP, ACFS, relocation, and restart services for the GGHub resources hosted at that site.
GGHub instance An independently managed Oracle GoldenGate environment with its own deployment name, Service Manager, application VIP, port range, ACFS directory and replication resources, and Clusterware or XAG resources. Multiple GGHub instances can coexist on one GGHub cluster when their names, VIPs, ports, storage, and resource definitions are kept separate.
Paired GGHub instance The corresponding resource sets for one GGHub instance maintained on the primary and standby GGHub clusters for site-level disaster recovery. ACFS replication protects the instance data and configuration between the clusters. Only one side of a paired GGHub instance is active at a time.
Primary and standby GGHub clusters Two independent GGHub clusters in separate sites or equivalent independent failure domains. The primary GGHub cluster hosts the active side of a paired GGHub instance, and the standby GGHub cluster hosts its standby side. After a GGHub role reversal, these designations exchange.
Active side and standby side The active side runs the GGHub instance resources and services. The standby side maintains the replicated ACFS copy and corresponding resource definitions but does not run the same instance as an independently writable active copy.
For example, a paired instance named maahub1 can be active on GGHub cluster A and standby on cluster B. A separate paired instance named maahub2 can be active on cluster B and standby on cluster A to support the opposite replication direction. This is two distinct active instances distributed across the two clusters, not two active copies of the same paired instance.
The GGHub Ansible collection supports configuring and deploying multiple independently managed GGHub instances. The procedure for deploying multiple instances is described later in this chapter.
Planning GGHub Placement in the Platinum MAA Architecture
MAA GGHub uses two GGHub clusters. Each cluster can host the active side of one paired GGHub instance and the standby side of another. The number and active placement of GGHub instances depend on replication direction and measured network latency.
Use the following placement guidelines as design targets. Validate them with the expected transaction rate, transaction size, redo and trail volume, workload concurrency, and recovery objectives:
Place Replicat close to its target primary database. Use 4 milliseconds or less round-trip latency between the active GGHub instance and the target database as the Replicat placement design target. Use 90 milliseconds or less round-trip latency between Extract and its source primary database as the remote Extract design threshold. If latency exceeds 90 milliseconds, place Extract close to the source database and use a Distribution Path to send the trail data to the target GGHub instance. For bidirectional replication where the source and target primary databases are more than 4 milliseconds apart, use two distinct active GGHub instances: one active near each target database. Host the active instances on the appropriate opposite GGHub clusters and maintain the paired standby side of each instance on the other cluster. The following table summarizes the placement model. The latency values are design targets and must be validated with a representative workload.
| Round-trip latency between primary databases | Unidirectional replication | Bidirectional replication |
|---|---|---|
| 4 milliseconds or less | One active GGHub instance placed near the target database, with its paired standby instance on the other GGHub cluster. | One active or primary GGHub instance can host both replication directions when the Replicat latency target is met for both target databases. Maintain its paired standby instance on the other GGHub cluster. |
| Greater than 4 milliseconds | One active GGHub instance placed near the target database, with its paired standby instance on the other GGHub cluster. | Two distinct active or primary GGHub instances are required, one near each target database. Distribute the active instances across the two GGHub clusters and maintain each instance’s paired standby side on the opposite cluster. |
MAA GGHubs Located Within a Region
In this scenario, the network round-trip latency between the source and target primary databases is 4 milliseconds or less. This allows a single active GGHub instance to support both directions of GoldenGate replication while maintaining the Replicat placement target. The primary and standby GGHub clusters are located in separate independent failure domains within the same region, such as isolated facility, power, network, or equipment zones, as shown in the following figure. A same-data-center design does not protect against loss of the entire data center; use separate data centers within the region when site-level disaster recovery is required.
As shown below, you have the following architectural components:
- The primary database and associated standby database are configured with Oracle Active Data Guard Fast Start Failover (FSFO). FSFO can be configured with Data Guard protection mode with ASYNC or SYNC redo transport depending on your maximum data loss tolerance.
- Primary GGHub instance: The two-node cluster contains one active GGHub instance. The GGHub instance contains an Oracle GoldenGate software deployment. Select an Oracle GoldenGate release and bundle update certified for every source and target database release and platform in the configuration. Verify current certification and interoperability information before installation. This GGHub instance can support many primary databases and encapsulates the GoldenGate processes: GoldenGate Extract mines transactions from the source database and GoldenGate Replicat applies the same changes to target database. GoldenGate trail and checkpoint files also reside in the GGHub ACFS file system. The GGHub cluster provides high availability for the GGHub instance, including automatic relocation to the passive node and restart of the GoldenGate processes after a node failure.
- Standby GGHub instance: A standby GGHub instance is configured on the symmetric two-node cluster. ACFS replication is configured between the primary and standby GGHub instances to preserve the GoldenGate files. Manual GGHub failover to the standby GGHub instance, including ACFS failover, can be performed in the rare event that the entire primary GGHub cluster becomes unavailable.
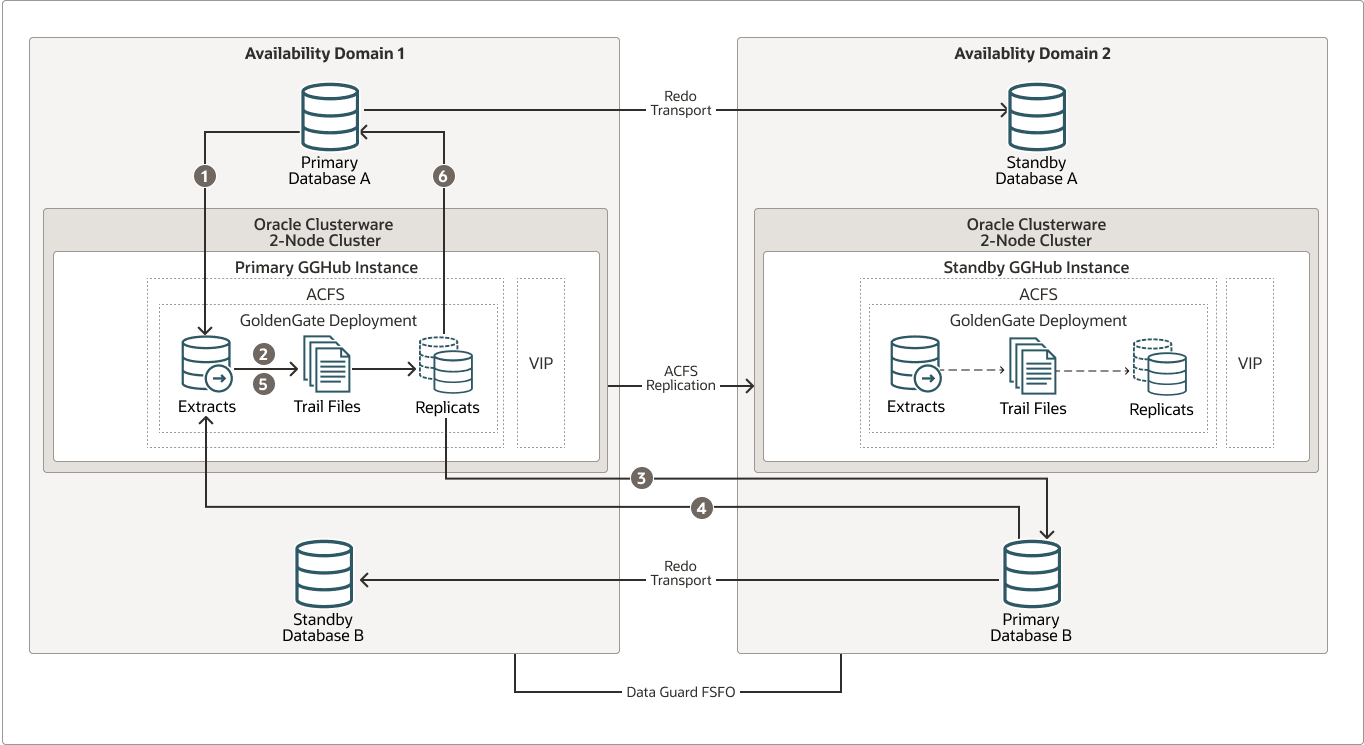
Description of the illustration primary-and-standby-gghubs-within-region.png
The figure above depicts bidirectional Oracle GoldenGate replication between Primary Database A and Primary Database B using a single primary GGHub instance.
The replication flow is as follows:
- Primary Database A: Primary Database A’s LogMiner server sends redo changes to a GGHub Extract process running in the primary GGHub instance.
- Primary GGHub instance: An Extract process writes the captured changes to Oracle GoldenGate trail files.
- Primary GGHub to Primary Database B: A Replicat process running on the primary GGHub instance applies the changes to the target database (Primary Database B).
- Primary Database B: Primary Database B’s LogMiner server sends redo changes to an Extract process running in the primary GGHub instance.
- Primary GGHub instance: A GGHub Extract process writes the captured changes to Oracle GoldenGate trail files.
- Primary GGHub to Primary Database A: A Replicat process running in the primary GGHub instance applies the changes to the target database (Primary Database A).
Note: One GGHub instance can support multiple source and target databases, even when the source and target databases are different Oracle Database releases.
| Outage Scenario | Application Availability and Repair | Restoring Redundancy and Pristine State |
|---|---|---|
| Primary Database A (or Database B) failure | Impact: Near-zero application downtime. GoldenGate replication resumes when a new primary database starts.
|
|
| Primary or standby GGHub cluster node failure | Impact: No application impact. GoldenGate replication resumes automatically after a couple of minutes. No action is required. The HA failover solution built into the GGHub cluster includes automatic failover and restart of GoldenGate processes and activity. Replication activity is blocked until GoldenGate processes are active again. GoldenGate replication blackout could last a couple of minutes. | Once the node restarts, active/passive configuration is re-established. |
| Primary GGHub cluster crashes and is not recoverable | Impact: No application impact. GoldenGate replication resumes after restarting the existing GGHub cluster or executing a manual GGHub failover operation.
|
If the previous GGHub eventually restarts, ACFS replication resumes in the other direction automatically. If the GGHub cluster is lost or unrecoverable, you need to rebuild a new standby GGHub. |
| Standby GGHub cluster crashes and not recoverable | Impact: No application or replication impact.
|
N/A |
| Availability Domain (AD1 or AD2) failure | **Impact:** Near-zero application downtime. GoldenGate replication resumes when the new primary database starts.
|
|
MAA GGHubs Located Across Regions
In this scenario, the network round-trip latency between the source and target primary databases is greater than 4 milliseconds, bidirectional Oracle GoldenGate replication requires two primary GGHub instances. The primary GGHub instance for each replication direction is located in the same region as its target primary database to maintain the recommended proximity between Replicat and the target database.
As shown in the following image, you have the following architectural components:
- The primary database and associated standby database are configured with Oracle Active Data Guard Fast Start Failover (FSFO). FSFO can be configured with Data Guard protection mode with ASYNC or SYNC redo transport depending on your maximum data loss tolerance.
- Primary GGHub instances: In this configuration, each two-node GGHub cluster contains two GGHub instances. Because a primary GGHub instance needs to be within 4 milliseconds of the target database, and the network latency between the sites is greater than 4 milliseconds, two GGHub instances are created for each GGHub cluster. Essentially, a primary GGHub instance is always in the same region as the target database. The GGHub instances are configured with an Oracle GoldenGate 26ai or higher software deployment that can support Oracle Database 11g and later releases. These GGHub instances can support many primary databases and encapsulate the GoldenGate processes: Extract mines transactions from the source database, and Replicat applies those changes to the target database. GoldenGate trail and checkpoint files for each GGHub instance reside in its associated ACFS file system. An HA failover solution is built in to the GGHub cluster, which includes automatic failover and restart of GoldenGate processes and activity after a node failure.
- Standby GGHub instances: A symmetric standby GGHub instance is configured in each site. ACFS replication is set up between the primary and standby GGHub instances to preserve all GoldenGate files. Manual GGHub failover, which includes ACFS failover, can be executed if you lose the entire primary GGHub cluster.
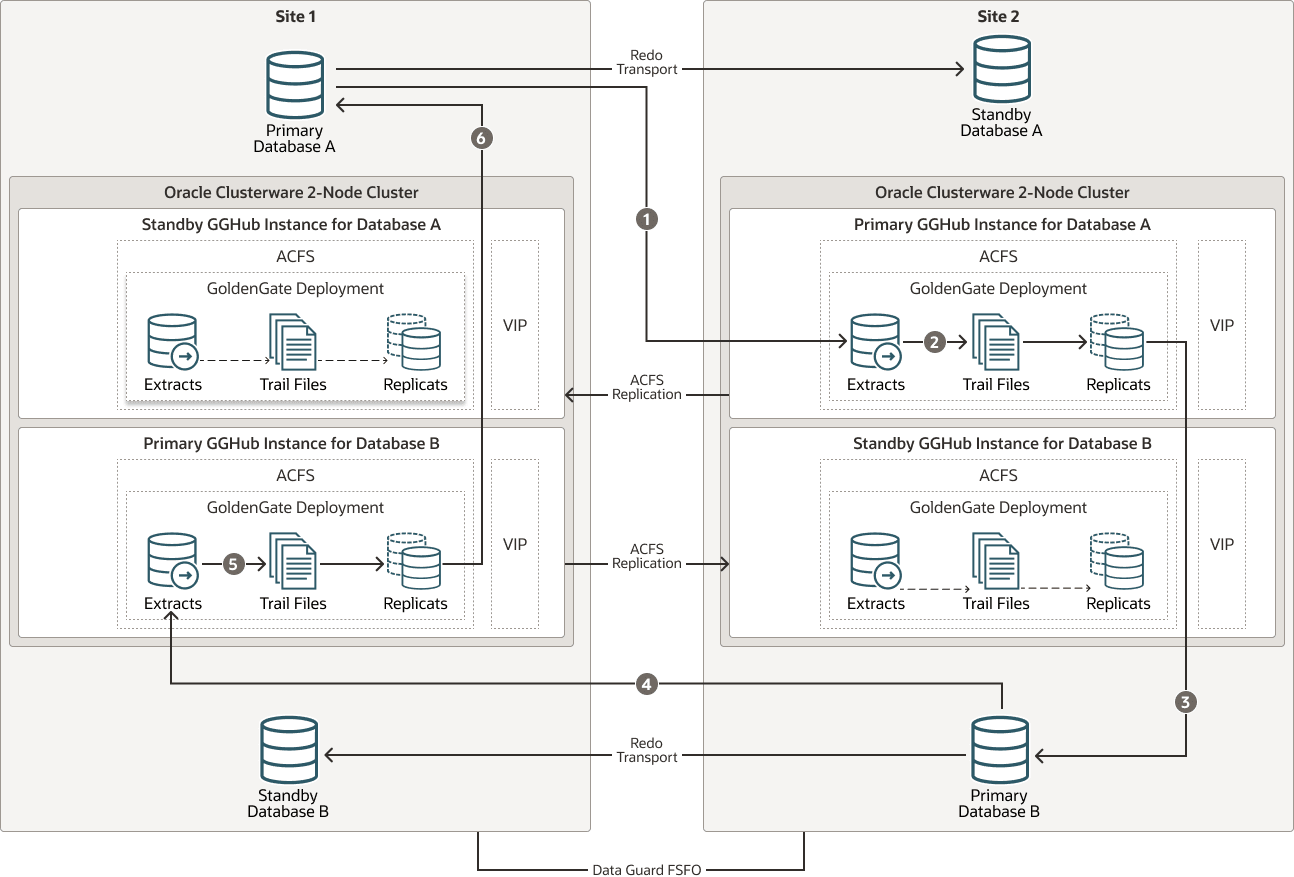
Description of the illustration primary-and-standby-gghubs-across-region.png
The figure above depicts bidirectional replication between Primary Database A in the PHX region and Primary Database B in the ASH region. Because the network round-trip latency between the primary databases is greater than 4 milliseconds, two primary GGHub instances are used. The primary GGHub instance supporting replication to each target database is located in the same region as that target database.
The replication flow is as follows:
- Primary Database A: Primary A’s LogMiner server sends redo changes to an Extract process running in the ASH region primary GGHub instance for Database A.
- Primary GGHub instance for Database A: The Extract process writes changes to trail files.
- Primary GGHub to Primary Database B: The ASH region primary GGHub instance runs a GoldenGate Replicat process that applies the changes to the target database, Primary B.
- Primary Database B: Primary B’s LogMiner server sends redo changes to an Extract process running in the PHX region primary GGHub instance for Database B.
- Primary GGHub instance for Database B: The Extract process writes the captured changes to trail files.
- Primary GGHub to Primary Database A: The PHX region primary GGHub instance runs a GoldenGate Replicat process that applies the changes to the target database, Primary A.
| Outage Scenario | Application Availability and Repair | Restoring Redundancy and Pristine State |
|---|---|---|
| Primary Database A (or Database B) failure | Impact: Near-zero application downtime. GoldenGate replication resumes when the new primary database starts.
|
|
| Primary or standby GGHub cluster single node failure | Impact: No application impact. GoldenGate replication resumes automatically after a couple of minutes. No action is required. An HA failover solution is built in to the GGHub cluster that includes automatic failover and restart of GoldenGate processes and activity. Replication activity is blocked until GoldenGate processes are active again. GoldenGate Replication blackout could last a couple of minutes. | Once the node restarts, active/passive configuration is re-established. |
| Primary GGHub cluster crashes and is not recoverable | Impact: No application impact. GoldenGate replication resumes after the existing primary GGHub cluster restarts or manual GGHub failover completes.
|
|
| Standby GGHub cluster crashes and is not recoverable | Impact: No application or replication impact.
|
N/A |
| Complete site failure | Impact: Near-zero application downtime. GoldenGate replication resumes once the new primary database starts.
|
|
Security Considerations for GoldenGate Hub
For detailed guidance on implementing security features and best practices in Oracle GoldenGate Microservices Architecture, see Oracle GoldenGate Security Feature: Implementation.
When configuring GGHub using the Ansible automation steps in the topics that follow, the security guidelines described at the link above are implemented as follows:
- Security guideline 1 is met by providing the latest Oracle GoldenGate software version in Step 2.3 - “Download the required Oracle GoldenGate software to the Ansible orchestration host” for Ansible automation to install.
- Security guideline 2 is met when Ansible automation configures the NGINX reverse proxy with SSL to ensure that external communication is secure. During GGHub instance deployment, Ansible automation can use user-provided certificates and private keys or generate self-signed certificates when user-provided certificates are not specified. NGINX certificates can later be replaced or rotated using Ansible automation as described in Step 3.5 - “Manage NGINX SSL Certificates Using Ansible”.
- Security guideline 3 is met by providing a strong password for Ansible automation in Step 3.1 - “Create GGHub Ansible inventory file”.
- The remaining security guidelines can be implemented after Ansible automation during GoldenGate configuration.
Set Up Oracle GoldenGate Environment and MAA GoldenGate Hub
Task 1: Configure the Source and Target Databases for Oracle GoldenGate
The source and target Oracle GoldenGate databases should be configured using the following recommendations.
Step 1.1 - Database Configuration
The source and target Oracle GoldenGate databases should be configured using the following recommendations:
| Configuration | Scope | Example |
|---|---|---|
| Enable Archivelog Mode | Source and Target | SQL> ARCHIVE LOG LIST Database log mode Archive Mode Automatic archival Enabled Archive destination USE_DB_RECOVERY_FILE_DEST Oldest online log sequence 110 Next log sequence to archive 113 Current log sequence 113 |
| Enable Force Logging | Source and Target | ALTER DATABASE FORCE LOGGING; |
| ENABLE_GOLDENGATE_REPLICATION | Source, Target, and Standbys | ALTER SYSTEM SET ENABLE_GOLDENGATE_REPLICATION=TRUE SCOPE=BOTH SID='*'; |
| Enable Subset Database Replication Logging | Source. Required on Target for cases when replication reverses | To enable subset database replication logging, follow the steps in the Oracle GoldenGate Microservices Architecture documentation to Enable Subset Database Replication Logging. |
| Configure the Streams Pool only when required by the selected GoldenGate process architecture. MAA recommends per-PDB Extract and Parallel Replicat. These configurations do not require STREAMS_POOL_SIZE to be explicitly configured for Oracle GoldenGate. For more information, see Managing Server Resources and My Oracle Support Knowledge Article KB130491 | Source. Required on Target for cases when replication reverses. | The value of STREAMS_POOL_SIZE should be set to the following value if required: STREAMS_POOL_SIZE = (((#Extracts + #Integrated Replicats) *1GB)* 1.25). For example, in a database with 2 Extracts and 2 integrated Replicats: STREAMS_POOL_SIZE = 4GB * 1.25 = 5GB.ALTER SYSTEM SET STREAMS_POOL_SIZE=5G SCOPE=BOTH SID='*'; |
Step 1.2 - Create the Database Replication Administrator User
A GoldenGate administrator user account is required in both source and target databases, where GoldenGate Extract and Replicat processes connect to.
Configure the Extract process to be a per-PDB Extract. Extract can be configured as a per-PDB Extract or a root CDB Extract. It is recommended that you use a per-PDB Extract, which does not require a c## common database user. A per-PDB Extract requires a local GoldenGate administrator user (for example, ggadmin) in the PDB it is extracting from. This can be the same GoldenGate administrator account that is used by Replicat, with additional privileges that Extract requires.
Create the GoldenGate administrator database user, and assign the appropriate privileges as detailed in Prepare Database Users and Privileges for Oracle.
Step 1.3 - Create the Database Services
If the source and target databases are running the recommended configuration on an Oracle RAC cluster with Oracle Data Guard, a role-based service must be created that allows the Extract or Replicat processes to connect to the correct Data Guard primary database instance.
When using a source multitenant database with a root level Extract, separate services are required for the root container database (CDB) and the pluggable database (PDB) that contains the schema being replicated. For a target multitenant database, a single service is required for the PDB. A root container database service is not required for a per-PDB Extract.
As the oracle OS user on the primary and standby database systems, create and start the CDB database service using the following command:
Add a database service for the CDB
$ srvctl add service -db <dbName> -service <dbName>_goldengate -preferred <ORACLE_SID1> -available <ORACLE_SID2> -role PRIMARY
As the oracle OS user on the primary and standby database systems, create and start the PDB database service using the following command:
Add a database service for the PDB
$ srvctl add service -db <dbName> -service <dbName>_<pdbName>_goldengate -preferred <ORACLE_SID1> -available <ORACLE_SID2> -pdb <pdbName> -role PRIMARY
As the oracle OS user on the primary and standby database systems, start and verify that the services are running, as shown here:
Check the status of the services
$ srvctl start service -db <dbName> -role
$ srvctl status service -db <dbName> |grep goldengate

Service <dbName>_goldengate  is running on instance(s) <SID1>
Service <dbName>_<pdbName>_goldengate is running on instance(s) <SID1>
Note: Repeat step 1.3 in the source and target database systems.
Task 2: Prepare GGHub Clusters and Ansible Orchestration Host
Step 2.1 - Deploy Primary and Standby Clusters for GGHub
Each GGHub cluster must be deployed as a 2-node Oracle Grid Infrastructure system with job role separation as described in Grid Infrastructure Installation and Upgrade Guide for Linux.
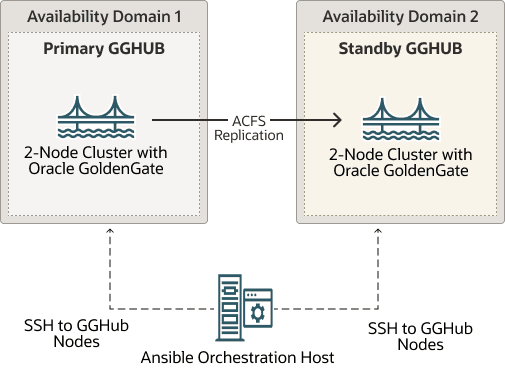
Description of the illustration gghub-hardware-onpremises.png
The figure shows a primary (active) GGHub instance on one GGHub cluster and its corresponding standby (non-active) GGHub instance on the second cluster. The GGHub instances and ACFS replication are deployed and configured using Ansible automation from the Ansible orchestration host.
Complete Requirements for GGHub Clusters
Primary and standby GGHub clusters must meet the following requirements:
Security and privilege requirement: Apply least privilege to the Ansible orchestration account and its remote GGHub account. Permit only the SSH and sudo operations required by the GGHub playbooks, preserve SSH host-key verification, audit privileged activity, and rotate keys according to corporate policy. Do not configure direct passwordless SSH login as root, grid, or oracle when the required operation can be performed through the controlled orchestration account and an approved sudo policy.
- Deploy GGHub clusters with Oracle Linux 8 operating system and 19c Grid Infrastructure software with the latest release update.
- Configure required OS users on the GGHub cluster nodes as follows:
- Oracle Clusterware software owner, typically “grid” for job role separation installations, which will exist as a result of the Clusterware installation.
- Oracle GoldenGate software owner, typically “oracle”, which is used by Ansible automation to install GoldenGate software.
- GGHub orchestration user, such as “opc”, which has privileged access (su/sudo) to root OS user.
- Configure required OS user on the Ansible orchestration host as follows:
- The Ansible orchestration user, such as “Ansible” from the Ansible orchestration host will log in to each GGHub node as the OS user “opc” using passwordless ssh key configuration to run commands as root, grid, or oracle, as required. This passwordless ssh key configuration is performed in a later step.
-
OS User, Location, and Purpose matrix
OS User Location Purpose Oracle Clusterware software owner (grid) All primary and standby GGHub cluster nodes Owns and manages Oracle Grid Infrastructure and ACFS resources. This user typically exists as part of a job role separation Grid Infrastructure installation. Oracle GoldenGate software owner (oracle) All primary and standby GGHub cluster nodes Owns the Oracle GoldenGate software and GGHub deployment. GGHub orchestration user (for example, opc) All primary and standby GGHub cluster nodes Provides the remote login account used by Ansible automation. Grant only the approved non-interactive sudo privileges required for the playbooks to perform specific tasks as root, grid, and oracle. Record and audit these privileges, and avoid unrestricted passwordless sudo where command-restricted rules are feasible. Ansible orchestration user (for example, ansible) Ansible orchestration host Runs the GGHub Ansible playbooks and connects to each GGHub cluster node as the GGHub orchestration user using key-based SSH with host-key verification enabled. Protect and rotate the SSH private key according to corporate policy.
- Allocate an unused application virtual IP address (APP VIP) for each GGHub instance in both the primary and standby GGHub clusters on the clusterware public network.
- The APP VIP is a cluster resource that Oracle Clusterware manages, and is migrated to another cluster node in the event of a node failure or planned maintenance.
- The APP VIP is used to ensure that the primary GGHub instance’s ACFS replication process sends GoldenGate trail files to the correct standby GGHub node where the file system is currently mounted. This is accomplished by co-locating the APP VIP and the ACFS CRS resources on the same node.
- Set up passwordless ssh key configuration for the grid OS user between the primary and standby GGHub clusters to support ACFS replication. Specifically this requires the following:
-
SSH key configuration
SSH from SSH to Purpose grid OS user on each primary GGHub node grid OS user on each standby GGHub cluster node using the APP VIP name. NOTE: In the grid user’s known_hosts file on all standby GGHub cluster nodes, add the primary cluster APP VIP name or address to each primary cluster node entry. ACFS snapshot based replication grid OS user on each standby GGHub node grid OS user on each primary GGHub cluster node using the APP VIP name. NOTE: In the grid user’s known_hosts file on all primary GGHub cluster nodes, add the standby cluster APP VIP name or address to each standby cluster node entry. ACFS snapshot based replication if the ACFS replication direction is reversed or GGHub standby is converted to primary. -
For additional guidance follow the instructions in Configuring ssh for Use With Oracle ACFS Replication to configure ssh connectivity between the primary and standby nodes.
-
- Allocate 10GB free disk space to support staging installation files. The software staging directory is supplied during GGHub deployment. Ansible automation copies the software files to the designated staging directory, but it temporarily uses the GGHub orchestration user’s home directory. Therefore, in addition to the staging directory, at least 10 GB of free space is required in the user’s home directory.
- On all nodes of the primary and standby GGHub clusters, install the required packages and Python modules listed in the following table:
-
Required modules and libraries
Required module or library on GoldenGate Hub cluster nodes Description python3.12 Ansible automation requires minimum python version 3.12 for compatibility. Python 3.12 interpreter path is required in a later step. python3.12-pip pip package manager associated with a python 3.12 installation. lxml, packaging, pexpect Python modules required by Ansible automation. Obtain the validated module versions from an approved Python package repository and record them in a controlled requirements file with exact version pins and, when supported by the repository process, package hashes. Install the controlled dependency set using:
$ python3.12 -m pip install --requirement <approved_gghub_requirements_file>iptables-services (Optional) Ansible automation configures iptables-services for NGINX when installed; otherwise, it is skipped. -
For more details refer to Oracle Linux documentation.
-
- Do not change the operating system’s system-wide python3 alternative solely for GGHub automation. Install the required Python release in an approved manner and set ansible_python_interpreter in each GGHub inventory to the explicit validated interpreter or virtual-environment path.
- Install NGINX version 1.24 or higher. Follow the steps provided in the NGINX documentation to install NGINX. NGINX configuration is performed by Ansible automation during the GGHub deployment.
- For compatibility and software requirements if SELinux is planned to be enabled on the GGHub cluster nodes, refer to My Oracle Support document Oracle Automatic Storage Management Cluster File System (ACFS) Replication and Security-Enhanced Linux (SELinux) (Doc ID 3102722.1).
Step 2.2 - Deploy Ansible Orchestration Host and Configure GGHub Ansible Collection
Provision a separate Oracle Linux 8 host to act as the Ansible orchestration host. This lightweight orchestration host is used to run Ansible playbooks or scripts and log in to GGHub nodes to execute specific tasks to help automate the GGHub deployment.
Step 2.2.1 - Install Packages Required for Ansible
Install the required packages listed in the table below. To install the required packages subscribe to the Oracle Linux 8 channel on the Unbreakable Linux Network, or configure a yum repository from the Oracle Linux yum server website.
Follow Configuring a System to Use Oracle Linux Yum Server to define the required repositories on the Ansible orchestration host.
| Packages for Ansible orchestration host | Repository |
|---|---|
| python3.12 | ol8_appstream |
| python3.12-pip | ol8_appstream |
| bzip2 | ol8_baseos_latest |
After defining the required yum repositories, install the required packages as a privileged user on the Ansible orchestration host.
$ sudo dnf install python3.12 python3.12-pip bzip2
Additional python packages and libraries are installed in a later step using pip package manager, which, by default, uses the python package index (PyPI) repository. Allow Ansible orchestration host to access python package index repository from https://pypi.org or use an approved internal package repository to install the required packages in your python environment.
Step 2.2.2 - Configure Ansible Environment and Install GGHub Ansible Collection
Perform the following sub-steps to complete this task:
Step 2.2.2.1 - Create or Identify Ansible Orchestration User Create or identify a non-privileged OS user on the Ansible orchestration host, such as “ansible”, that owns the Ansible installation and can be used to execute all Ansible orchestration tasks.
The Ansible orchestration user will log in to the GGHub orchestration user on each primary and standby GGHub node using passwordless ssh to run commands as root, grid, or oracle, as required.
All subsequent steps on the Ansible orchestration host are performed as the Ansible orchestration user.
Step 2.2.2.2 - Obtain GGHub Ansible Collection GGHub Ansible collection (Bundled Ansible automation assets such as playbooks, roles, scripts, plugins, in a single, versioned unit) can be downloaded from MOS article KB858669 - Oracle GoldenGate MicroServices Architecture High Availability with zero or near-zero downtime.
In this example /u01/maagghub/ is used as the top level directory for staging all of the files on the Ansible orchestration host.
Extract the downloaded Ansible collection under the /u01/maagghub/gghub-ansible-collection/ directory on the Ansible orchestration host.
$ mkdir -p /u01/maagghub

$ cd /u01/maagghub

e.g.
unzip gghub-onprem-yyyymmdd.zip -d /u01/maagghub/gghub-ansible-collection
Step 2.2.2.3 - Select the Python Interpreter on the Ansible Orchestration Host Use Python 3.12 or later for the GGHub Ansible environment. Do not change the operating system’s system-wide python3 alternative solely for GGHub automation. Invoke python3.12 explicitly when creating the virtual environment, or use an approved interpreter path dedicated to the GGHub automation environment.
$ python3.12 --version
Python 3.12.11
Step 2.2.2.4 - Ensure That the pip Package Manager is Installed Check if the pip package manager is installed using the following python command. The command should display the pip package manager version without errors.
$ python3.12 -m pip -V
pip 23.2.1 from /usr/lib/python3.12/site-packages/pip (python 3.12)
Step 2.2.2.5 - Execute the Script python_venv_activate.sh From the GGHub Collection Directory The python_venv_activate.sh script performs the following operations on the Ansible orchestration host:
- Creates venv, ansible and collections subdirectories under the /u01/maagghub/ directory, which is used as the Ansible base directory for creating the python virtual environment in this example.
- Creates the Python virtual environment named ‘venv’.
- If a virtual environment with the same name already exists, the script attempts to update the MAA GGHub collection in the virtual environment while skipping other steps.
- Copies the ansible.cfg environment configuration file under the directory /u01/maagghub/ with recommended parameter settings.
- Activates the python virtual environment.
- Installs GGHub required Ansible packages and libraries using pip package manager.
- By default the pip package manager uses the python package index (PyPI) repository. Allow Ansible orchestration host to access python package index repository from https://pypi.org or use an approved internal package repository.
- Updates python pip package installer.
- Installs the Ansible MAA GGHub collection under the /u01/maagghub/collections/ directory.
- Lists the GGHub collection version.
$ cd /u01/maagghub
$ sh gghub-ansible-collection/python_venv_activate.sh
Step 2.2.2.6 - Activate Python Virtual Environment Python virtual environment needs to be activated before running any Ansible commands on the Ansible orchestration host.
$ source /u01/maagghub/venv/bin/activate
After activation of virtual environment the prompt changes as shown here.
(gghub) [~]$
Verify that python and ansible executables are being used from the virtual environment home.
$ which python ansible
/u01/maagghub/venv/bin/python
/u01/maagghub/venv/bin/ansible
Update GGHub Ansible collection to newer version
To upgrade an already installed GGHub collection to the latest available version, extract the new collection in directory /u01/maagghub/gghub-ansible-collection-new/ and run the following command:
$ cd /u01/maagghub
(gghub) [~]$ ansible-galaxy collection install /u01/maagghub/gghub-ansible-collection-new --upgrade
To install a specific version of the GGHub collection, extract the collection in directory, for example /u01/maagghub/gghub-ansible-collection-version/, and use the following command:
(gghub) [~]$ ansible-galaxy collection install /u01/maagghub/gghub-ansible-collection-version:==X.Y.Z
Step 2.3 - Download the Required Oracle GoldenGate Software to the Ansible Orchestration Host
Create a software repository directory (for example, /u01/maagghub/stage) on the Ansible orchestration host and stage the following software on the Ansible orchestration host:
- Oracle GoldenGate software:
- Review My Oracle Support Knowledge Article KB159960 to identify the latest Oracle GoldenGate Software Availability document in the “OGG v23ai Patch Set Availability Notes” section.
- From the latest Software Availability document, download the software with description “Oracle GoldenGate
<OGGRU>for Oracle (Complete Install)”.
- Oracle Grid Infrastructure Standalone Agents for Oracle Clusterware 19c:
- Download the agent software version 10.2 or higher, using the Download section in document Oracle Grid Infrastructure Standalone Agents for Oracle Clusterware
Make a note of the software repository directory path as it is used in a later step.
Download Oracle GoldenGate, XAG, and related installation files only from approved Oracle or enterprise software repositories. Record the product release, bundle update, file name, source, and download date. Verify the published checksum or signature when one is supplied, restrict write access to the repository directory, and do not deploy a file whose provenance or integrity cannot be validated.
Task 3: Configure GGHub Instances on Primary and Standby GGHub Clusters Using Ansible Automation
The GGHub Ansible collection can be used to configure and deploy one or more GGHub instances on the same primary and standby GGHub clusters.
Step 3.1 - Create GGHub Instance Ansible Inventory File
GGHub instance configuration using Ansible automation requires an inventory file that contains all of the target GGHub cluster node names and the parameters required to configure the GGHub instance. Each GGHub instance is configured and managed independently using its own Ansible inventory file.
Each GGHub instance must have a unique GoldenGate deployment name and deployment number, and must use instance-specific application VIPs, Service Manager port, and ACFS configuration. The same GGHub cluster node groups can be used in multiple inventory files.
Ansible playbook oracle.gghub.onboarding is executed to generate the Ansible inventory file for each GGHub instance.
The oracle.gghub.onboarding playbook configures a separate Ansible vault for each GGHub instance to securely store the encrypted GoldenGate admin password used by that instance. This keeps the credentials for each GGHub instance separate and allows them to be used securely during subsequent Ansible orchestration tasks.
Vault file handling: A file such as maahub.key is an Ansible Vault-encrypted variables file; it is not an SSH private key or TLS private key. Restrict it to the Ansible orchestration account, use file permissions such as owner read/write only, maintain an encrypted and access-controlled backup, and test vault recovery. Protect the vault password through an approved enterprise secret-management or interactive prompt mechanism. Do not place the vault password or GoldenGate administrator password in an inventory file, command line, shell history, playbook output, or log.
- The oracle.gghub.onboarding playbook prompts for the Ansible vault password and GoldenGate admin user password for the GGHub instance.
- The Ansible deployment orchestration uses a system-generated GoldenGate admin password for the initial GoldenGate installation and then changes it to the user-supplied password at the end of the deployment.
- Both the system-generated and user-supplied GoldenGate admin passwords are stored in encrypted format in the Ansible vault associated with the GGHub instance.
- The Ansible vault for each GGHub instance is accessed using its configured vault password.
| Ansible inventory file onboarding prompt | Inventory parameter name | Description | Default value |
|---|---|---|---|
| GoldenGate deployment number | gg_deployment_number | Unique deployment number for the GGHub instance. Must be unique when multiple GGHub instances are deployed on the same cluster. | 1 |
| GoldenGate deployment name | gg_deployment_name | Unique GoldenGate deployment name for the GGHub instance. Deployment name is also used in ACFS and XAG clusterware resource names for the GGHub instance. Name must begin with a character and cannot be the GoldenGate Service Manager name. Special characters that are allowed in the name include [ - _/ . ]. | |
| GoldenGate oracle home | gg_oracle_home | GoldenGate software home on the GGHub cluster nodes. | |
| GoldenGate service manager port | gg_deployment_service_manager_port | Unique Service Manager port for the GGHub instance. The specified port and subsequent five ports must be available. | 9100 |
| XAG home | xag_home | Oracle Grid Infrastructure Standalone Agent (XAG) home on the GGHub cluster nodes. | |
| GoldenGate primary group | Specified under gghservers children | Ansible group name to identify the primary GGHub cluster nodes and associated variables. This name will be part of the primary App VIP clusterware resource name. | |
| GoldenGate primary group node 1 | Specified under primary group hosts | Primary cluster node 1 host name. Ansible orchestration host uses this name to log in. | |
| GoldenGate primary group node 2 | Specified under primary group hosts | Primary cluster node 2 host name. Ansible orchestration host uses this name to log in. | |
| GoldenGate primary AppVIP IP address | appvip_ip_address | App VIP for the primary GGHub instance. App VIP needs to be on the public network and registered in DNS. | |
| Primary ASM diskgroup name | asm_diskgroup | Disk group name for the primary cluster which is used to create ACFS file system. File system size is defined by Ansible inventory file parameter ASM_vol_size (see ASM_vol_size row at the bottom of this table). | |
| GoldenGate standby group | Specified under gghservers children | Ansible group name to identify the standby GGHub cluster nodes and associated variables. This name will be part of the standby App VIP clusterware resource name. | |
| GoldenGate standby group node 1 | Specified under standby group hosts | Standby cluster node 1 host name. Ansible orchestration host uses this name to log in. | |
| GoldenGate standby group node 2 | Specified under standby group hosts | Standby cluster node 2 host name. Ansible orchestration host uses this name to log in. | |
| GoldenGate standby AppVIP IP address | appvip_ip_address | App VIP for the standby GGHub instance. App VIP needs to be on the public network and registered in DNS. | |
| Standby ASM diskgroup name | asm_diskgroup | Disk group name for the GGHub cluster which will be used to create ACFS file system. | |
| ACFS mount point | acfs_mount_point | Full path of the ACFS mount point. This directory is created if it does not exist. The same path is used on both primary and standby GGHub clusters. | |
| Local software repository directory | stage_dir_local | Full path of the software repository directory on the Ansible orchestration host. | |
| NGINX local certificate directory (Optional) | nginx_certificates_dir | Optional parent directory on the Ansible orchestration host containing user-provided NGINX certificate and private key files. If not specified, Ansible automation configures self-signed certificates. See Step 3.5 for certificate requirements and directory structure. | |
| NGINX HTTPS port | nginx_listening_port | HTTPS listening port for NGINX for the GGHub instance. | |
| Remote directory in target machines | stage_dir_remote | Full path of the software staging directory on the GGHub cluster nodes. Ansible automation creates this directory if it does not exist during the deployment process, and copies the required software. | |
| Root owned remote directory on target machines | root_stage_dir_remote | Root owned directory on the GGHub cluster nodes used by Ansible automation to stage configuration files. | |
| GoldenGate software image file name | gg_software_image_file | GoldenGate software complete install patch file name which is copied to the Ansible orchestration host software repository directory. | |
| XAG software image file name | xag_software_image_file | Oracle Grid Infrastructure standalone agent patch file name which is copied to the Ansible orchestration host software repository directory. | |
| Login user for the target machines | ansible_user | GGHub orchestration OS user name on the GGHub cluster nodes with sudo privileges. Ansible orchestration host logs in to GGHub cluster nodes using this OS user. | |
| ansible_python_interpreter for the target machines | ansible_python_interpreter | Full path of the python interpreter that exists on the GGHub cluster nodes (for example, /usr/bin/python3.12 or /u01/app/oracle.ahf/common/venv/bin/python3.12). GGHub target nodes python interpreter must be 3.12 or higher version. Python version 3.12 is recommended. | |
| Ansible inventory full path | ansible_inventory_dir | Full path of the Ansible inventory directory on the Ansible orchestration host. Ansible vault files and Ansible inventory file are created in this directory during onboarding Ansible playbook execution. | |
| Password for Ansible Vault | Not included in the inventory file | Password which will be used to configure and access Ansible vault for the GGHub instance. Password needs to be between 8 and 30 characters with at least one lowercase character, one uppercase character and one number. | |
| Password for GoldenGate deployment | Not included in the inventory file | GoldenGate admin password set after initial GoldenGate installation and deployment. Password needs to be between 8 and 30 characters. Password needs to have at least one lowercase character, one uppercase character, one number and one special character from the list [- ! @ % & * . # _]. | |
| Below parameters are added to the inventory file automatically and can be modified if required | |||
| GoldenGate deployment admin user | gg_deployment_admin_user | Admin user for the GGHub deployment | oggadmin |
| ASM ACFS volume size | asm_vol_size | Size of the ASM volume which will be used for ACFS file system | 100G |
| NGINX port usage control | nginx_force_different_port | Controls whether a different NGINX listening port is required when the configured port is already used by another GGHub instance on the cluster. It is recommended to use default value so separate NGINX ports are enforced for GGHub instances. | True |
There are two methods to generate the Ansible inventory file using the Ansible playbook oracle.gghub.onboarding. The recommended method is to run the Ansible onboarding playbook and answer prompts which are explained in this section.
The alternate method, which uses a response file as input, is described in the Alternate Method to Generate Ansible Inventory File or Deployment section in this chapter.
This inventory file defines the configuration for one GGHub instance. To deploy another GGHub instance on the same GGHub clusters, create a separate inventory file with a different deployment name and deployment number, and provide the corresponding GGHub instance specific parameters.
Note: When using user-provided NGINX certificates during deployment, prepare the required certificate directory structure before running the oracle.gghub.deploy playbook. Each GGHub instance requires certificate and private key files for its primary and standby application VIPs. See Step 3.5 for certificate requirements and directory structure.
Execute the oracle.gghub.onboarding playbook using the supplied localhost Ansible inventory file from the collections directory on the Ansible orchestration host, as shown in the following example.
$ source /u01/maagghub/venv/bin/activate
(gghub) [~]$ cd /u01/maagghub
(gghub) [~]$ ansible-playbook oracle.gghub.onboarding -i /u01/maagghub/collections/ansible_collections/oracle/gghub/inventory/localhost
Ansible onboarding playbook prompts and example parameter values for the first GGHub instance
Example output:

GoldenGate - Enter the GoldenGate deployment number [1]:
GoldenGate - Enter the GoldenGate deployment name: maahub
GoldenGate - Enter the GoldenGate ORACLE_HOME: /u01/app/oracle/goldengate/gg26ai
GoldenGate - Enter ServiceManager port. This and the subsequent five ports should be available [9100]:
XAG - Enter the XAG HOME: /u01/app/grid/xag
Primary - Enter the GoldenGate primary group: maahuba
Primary - Enter the GoldenGate primary group node 1 (Ansible will ssh using this name): maahuba1
Primary - Enter the GoldenGate primary group node 2 (Ansible will ssh using this name): maahuba2
Primary - Enter the GoldenGate primary APPVIP IP address: 10.53.240.11
Primary - Enter the ASM DiskGroup name: DATA
Standby - Enter the GoldenGate standby group: maahubb
Standby - Enter the GoldenGate standby group node 1 (Ansible will ssh using this name): maahubb1
Standby - Enter the GoldenGate standby group node 2 (Ansible will ssh using this name): maahubb2
Standby - Enter the GoldenGate standby APPVIP IP address: 10.53.240.12
Standby - Enter the ASM DiskGroup name: DATA
GGHUB - Enter the path for acfs mount point: /opt/oracle/gghub
Staging - Enter the local software repository directory that stores software images: /u01/maagghub/stage
(Optional) Nginx certificates - Enter the local directory that stores the ssl certificates:
Nginx - Enter the port for nginx to listen to https connections. This port should be available: 443
Staging - Enter the remote directory in target machines for staging files: /u01/oracle/stage
Staging - Enter the root-owned remote directory in target machines for staging root files (e.g. /usr/local/libexec/oracle-gghub): /usr/local/libexec/oracle-gghub
Staging - Enter the GoldenGate software image file name: p39299258_2326201OGGRU_Linux-x86-64.zip
Staging - Enter the XAG software image file name: p31215432_190000_Generic.zip
Ansible - Sets the login user for the target machines: opc
Ansible - Sets the ansible_python_interpreter for the target machines: /u01/app/oracle.ahf/common/venv/bin/python3
Ansible - Enter the Ansible inventory full path directory: /u01/maagghub/inventory
Password - Enter the password for Ansible Vault (`[8=>length<=30][A-Z][a-z][0-9]`):
confirm Password - Enter the password for Ansible Vault (`[8=>length<=30][A-Z][a-z][0-9]`):
Password - Enter the password for GoldenGate deployment (`[8=>length<=30][A-Z][a-z][0-9][-!@%&*.#]`):
confirm Password - Enter the password for GoldenGate deployment '' (`[8=>length<=30][A-Z][a-z][0-9][-!@%&*.#]`):
For the second GGHub instance, execute the oracle.gghub.onboarding again to generate the Ansible inventory file and associated Ansible Vault.
Example output:

GoldenGate - Enter the GoldenGate deployment number [1]: 2
GoldenGate - Enter the GoldenGate deployment name: daahub
GoldenGate - Enter the GoldenGate ORACLE_HOME: /u01/app/oracle/goldengate/gg26ai
GoldenGate - Enter ServiceManager port. This and the subsequent five ports should be available [9100]: 9200
XAG - Enter the XAG HOME: /u01/app/grid/xag
Primary - Enter the GoldenGate primary group: daahubb
Primary - Enter the GoldenGate primary group node 1 (Ansible will ssh using this name): maahubb1
Primary - Enter the GoldenGate primary group node 2 (Ansible will ssh using this name): maahubb2
Primary - Enter the GoldenGate primary APPVIP IP address: 10.53.240.15
Primary - Enter the ASM DiskGroup name: DATA
Standby - Enter the GoldenGate standby group: daahuba
Standby - Enter the GoldenGate standby group node 1 (Ansible will ssh using this name): maahuba1
Standby - Enter the GoldenGate standby group node 2 (Ansible will ssh using this name): maahuba2
Standby - Enter the GoldenGate standby APPVIP IP address: 10.53.240.14
Standby - Enter the ASM DiskGroup name: DATA
GGHUB - Enter the path for acfs mount point: /opt/oracle/ggdhub
Staging - Enter the local software repository directory that stores software images: /u01/maagghub/stage
(Optional) Nginx certificates - Enter the local directory that stores the ssl certificates:
Nginx - Enter the port for nginx to listen to https connections. This port should be available: 444
Staging - Enter the remote directory in target machines for staging files: /u01/oracle/stage
Staging - Enter the root-owned remote directory in target machines for staging root files (e.g. /usr/local/libexec/oracle-gghub): /usr/local/libexec/oracle-gghub
Staging - Enter the GoldenGate software image file name: p39299258_2326201OGGRU_Linux-x86-64.zip
Staging - Enter the XAG software image file name: p31215432_190000_Generic.zip
Ansible - Sets the login user for the target machines: opc
Ansible - Sets the ansible_python_interpreter for the target machines: /u01/app/oracle.ahf/common/venv/bin/python3
Ansible - Enter the Ansible inventory full path directory: /u01/maagghub/inventory
Password - Enter the password for Ansible Vault (`[8=>length<=30][A-Z][a-z][0-9]`):
confirm Password - Enter the password for Ansible Vault (`[8=>length<=30][A-Z][a-z][0-9]`):
Password - Enter the password for GoldenGate deployment (`[8=>length<=30][A-Z][a-z][0-9][-!@%&*.#]`):
confirm Password - Enter the password for GoldenGate deployment '' (`[8=>length<=30][A-Z][a-z][0-9][-!@%&*.#]`):
The onboarding playbook generates a separate Ansible inventory file and Ansible vault for each GGHub instance. The Ansible vault securely stores the GoldenGate deployment password associated with that GGHub instance.
Note: In this example, the primary and standby GGHub cluster groups are reversed for the second GGHub instance. The cluster nodes that host the standby side of the first GGHub instance host the primary side of the second GGHub instance, allowing the two instances to have their primary roles on different GGHub clusters.
The Ansible inventory file <deployment_name>.yml can be updated to adjust any parameter values before executing the GGHub deployment using Ansible.
Validate the Ansible inventory file and associated Ansible vault file for the GGHub instance in the /u01/maagghub/inventory/ directory.
(gghub) [~]$ ls /u01/maagghub/inventory/maahub*

maahub.yml
maahub.key
Example GGHub Ansible inventory configuration file for the first GGHub instance For the second GGHub instance:
(gghub) [~]$ cat /u01/maagghub/inventory/maahub.yml

gghservers:
  children:
    maahuba:
      hosts:
        maahuba1:
        maahuba2:
      vars:
        appvip_ip_address: 10.53.240.11
        asm_diskgroup: DATA
        ansible_python_interpreter: /u01/app/oracle.ahf/common/venv/bin/python3
        ansible_user: opc
    maahubb:
      hosts:
        maahubb1:
        maahubb2:
      vars:
        appvip_ip_address: 10.53.240.12
        asm_diskgroup: DATA
        ansible_python_interpreter: /u01/app/oracle.ahf/common/venv/bin/python3
        ansible_user: opc
  vars:
    gg_deployment_name: maahub
    gg_deployment_number: 1
    gg_deployment_service_manager_port: 9100
    gg_deployment_admin_user: oggadmin
    gg_hub_groups: maahuba,maahubb
    acfs_name: maahub
    acfs_mount_point: /opt/oracle/gghub
    asm_vol_size: 100G
    gg_oracle_home: /u01/app/oracle/goldengate/gg26ai
    gg_software_image_file: p39299258_2326201OGGRU_Linux-x86-64.zip
    xag_home: "/u01/app/grid/xag"
    xag_software_image_file: p31215432_190000_Generic.zip
    stage_dir_local: /u01/maagghub/stage
    stage_dir_remote: /u01/oracle/stage
    root_stage_dir_remote: /usr/local/libexec/oracle-gghub
    ansible_inventory_dir: /u01/maagghub/inventory
    nginx_listening_port: 443
    nginx_certificates_dir:
    nginx_force_different_port: true
For the second GoldenGate Hub instance:
(gghub) [~]$ ls /u01/maagghub/inventory/daahub*

daahub.yml
daahub.key
Example GGHub Ansible inventory configuration file for the second GGHub instance
(gghub) [~]$ cat /u01/maagghub/inventory/daahub.yml

gghservers:
  children:
    daahubb:
      hosts:
        maahubb1:
        maahubb2:
      vars:
        appvip_ip_address: 10.53.240.15
        asm_diskgroup: DATA
        ansible_python_interpreter: /u01/app/oracle.ahf/common/venv/bin/python3
        ansible_user: opc
    daahuba:
      hosts:
        maahuba1:
        maahuba2:
      vars:
        appvip_ip_address: 10.53.240.14
        asm_diskgroup: DATA
        ansible_python_interpreter: /u01/app/oracle.ahf/common/venv/bin/python3
        ansible_user: opc
  vars:
    gg_deployment_name: daahub
    gg_deployment_number: 2
    gg_deployment_service_manager_port: 9200
    gg_deployment_admin_user: oggadmin
    gg_hub_groups: daahubb,daahuba
    acfs_name: daahub
    acfs_mount_point: /opt/oracle/ggdhub
    asm_vol_size: 100G
    gg_oracle_home: /u01/app/oracle/goldengate/gg26ai
    gg_software_image_file: p39299258_2326201OGGRU_Linux-x86-64.zip
    xag_home: "/u01/app/grid/xag"
    xag_software_image_file: p31215432_190000_Generic.zip
    stage_dir_local: /u01/maagghub/stage
    stage_dir_remote: /u01/oracle/stage
    root_stage_dir_remote: /usr/local/libexec/oracle-gghub
    ansible_inventory_dir: /u01/maagghub/inventory
    nginx_listening_port: 444
    nginx_certificates_dir:
    nginx_force_different_port: true
Step 3.2 - Configure and Validate SSH Connectivity and sudo Access for GGHub Cluster Nodes Using Ansible
Configure key-based SSH access from the Ansible orchestration account to the GGHub orchestration account on each cluster node. Keep strict host-key verification enabled, use an approved key type and key length, protect the private key, and grant only the command-scoped non-interactive sudo privileges required by the playbooks.
| SSH from | SSH to | Purpose |
|---|---|---|
| Ansible orchestration user (for example, ansible) on Ansible orchestration host | GGHub orchestration user (for example, opc) on each GGHub cluster node. This user must have privileged access (su/sudo) to root user. It is specified in the Ansible inventory file as parameter ansible_user. | For Ansible to connect to GGHub nodes to perform installation, setup, and administration. Commands run as root, grid, or oracle, as required. |
The SSH connectivity and sudo access configured for the cluster nodes can be used by all GGHub instance inventory files that reference those nodes.
Execute the below Ansible command to test the ssh connectivity from the Ansible orchestration host to GGHub nodes, and also validate sudo privileges on the GGHub nodes.
(gghub) [~]$ ansible gghservers -i /u01/maagghub/inventory/maahub.yml -m command -a 'sudo date'
(gghub) [~]$ ansible gghservers -i /u01/maagghub/inventory/daahub.yml -m command -a 'sudo date'
The Ansible command must return date output and return code 0 from every GGHub cluster host in the applicable inventory. Before accepting the connection, confirm that each host key matches the independently verified host identity. Review the sudo policy and audit log to confirm that the orchestration account can run the required commands but does not have broader access than intended.
Step 3.3 - Deploy and Configure GGHub Instance Using Ansible
To configure and deploy a GGHub instance on the primary and standby GGHub clusters, execute the oracle.gghub.deploy Ansible playbook using the inventory file created for the GGHub instance. The playbook configures the resources required for the GGHub instance on both clusters, including an application VIP and GoldenGate Service Manager.
The oracle.gghub.deploy playbook performs the following tasks on the primary and standby GGHub clusters for the specific GGHub instance:
- Executes prerequisite checks
- Installs Oracle GoldenGate software
- Configures ACFS file system and ACFS replication between primary and standby GGHub clusters
- Creates clusterware resources for APP VIPs
- Creates the Oracle GoldenGate Deployment
- Configures Oracle Grid Infrastructure Agent (XAG) for the GoldenGate deployment
- Configures NGINX Reverse Proxy with SSL certificates and creates the NGINX clusterware resource
- Secures GoldenGate Microservices to restrict non-secure direct access
Note: During deployment, Ansible automation uses user-provided NGINX certificates when the nginx_certificates_dir parameter is specified; otherwise, it generates and configures self-signed certificates.
Execute the oracle.gghub.deploy playbook using the Ansible inventory file as follows:
(gghub) [~]$ ansible-playbook oracle.gghub.deploy -i /u01/maagghub/inventory/maahub.yml -e @/u01/maagghub/inventory/maahub.key --ask-vault-passThe oracle.gghub.deploy playbook prompts for the Ansible vault password, displays all of the configuration information, and then asks for confirmation to continue with the deployment.
GGHub deployment playbook example output
Vault password:

PLAY [Play for deploying GGHUB] ***************************************************************************************************************************************************************

TASK [Gather server default minimum amount of facts] ******************************************************************************************************************************************
ok: [maahuba1]

TASK [oracle.gghub.oracle_meta : Assert GoldenGate deployment password] ***********************************************************************************************************************
ok: [maahuba1] => {
    "changed": false,
    "msg": "All assertions passed"
}

TASK [Show GoldenGate Deployment] *************************************************************************************************************************************************************
<snip>

[Confirm GGHUB deployment variables]

Are you sure you want to continue with the GGHUB deployment (yes/no):

<snip>

PLAY RECAP ************************************************************************************************************************************************************************************
maahuba1                   : ok=233  changed=121  unreachable=0    failed=0    skipped=65   rescued=0    ignored=0
maahuba2                   : ok=139  changed=47   unreachable=0    failed=0    skipped=145  rescued=0    ignored=0
maahubb1                   : ok=180  changed=85   unreachable=0    failed=0    skipped=104  rescued=0    ignored=0
maahubb2                   : ok=139  changed=48   unreachable=0    failed=0    skipped=145  rescued=0    ignored=0
The Ansible PLAY RECAP must show unreachable=0 and failed=0 for every host. This is a prerequisite, not proof that the GGHub instance is operational. The ok, changed, and skipped counts vary by environment and retry history.
After deployment is complete, the oracle.gghub.verify playbook runs automatically to display configuration information for the deployed GGHub instance and the status of its associated resources. Treat this output as one input to the acceptance test.
Deployment acceptance checklist:
- Verify the Clusterware and XAG resource definitions, dependencies, placement, restart policies, and ONLINE state on the primary and standby GGHub clusters.
- Verify the application VIP, ACFS mount ownership and permissions, ACFS replication direction and lag, Service Manager, NGINX resource, and TLS certificate and hostname validation.
- Perform a controlled application VIP and GGHub resource relocation between the two nodes of each cluster. Confirm that the VIP, ACFS, NGINX, Service Manager, and deployment resources relocate together and recover within the expected time.
- Before production use, perform a planned GGHub role reversal between the primary and standby clusters and then restore the intended topology. Confirm fencing, ACFS replication direction, resource state, and rollback procedures.
- After Extract, Distribution Paths, Replicat, and heartbeat tables are configured in Task 4, complete an end-to-end transaction and heartbeat-lag validation in every replication direction.
To configure and deploy the second GGHub instance, run the oracle.gghub.deploy playbook using the Ansible inventory file and Ansible vault file associated with that instance:
(gghub) [~]$ ansible-playbook oracle.gghub.deploy -i /u01/maagghub/inventory/daahub.yml -e @/u01/maagghub/inventory/daahub.key --ask-vault-passIf issues occur during deployment, or if the GGHub instance needs to be removed, see Troubleshooting GGHub deployment using Ansible.
Step 3.4 - Validate GoldenGate Microservices Connectivity
As the GoldenGate software owner on a GGHub cluster node, query the GGHub instance through its application VIP and NGINX HTTPS port. Allow curl to prompt for the oggadmin password; do not place the password on the command line.
Validate the GGHub health endpoint
$ curl --fail --silent --show-error --user oggadmin https://<application_vip_fqdn>:<nginx_https_port>/services/v2/config/health | python3 -m json.tool
The command must return exit status 0 and valid JSON. Confirm that response.healthy is true and that every required critical resource reports the expected running and healthy state. A successful TCP connection or HTTP response without the expected health values is not sufficient.
Relocate the GGHub resources to the other node and repeat the test. Perform the validation for every GGHub instance and for the active side at both sites during the planned role-reversal test.
Note: Use the –insecure option only during controlled bootstrap or troubleshooting. For normal validation and automation, install the appropriate CA certificates in the client trust store and verify both the server certificate chain and hostname. Do not use –insecure for routine production health checks.
When multiple GGHub instances are deployed on the same GGHub clusters, repeat the connectivity validation for each GGHub instance using its corresponding application VIP and NGINX HTTPS port.
Step 3.5 - Manage NGINX SSL Certificates Using Ansible
For production deployments, use certificates issued by an enterprise or publicly trusted certificate authority. Limit self-signed certificates to controlled installation bootstrap, troubleshooting, or explicitly approved nonproduction use. The oracle.gghub.update_certificates playbook manages NGINX SSL certificates for an existing GGHub instance and supports the following operations:
- Replace the existing NGINX certificates with user-provided certificates and private keys.
- Generate new self-signed certificates for controlled bootstrap, troubleshooting, or explicitly approved nonproduction use.
Step 3.5.1 - Replace NGINX Certificates with User-Provided Certificates
To replace the existing NGINX certificates with user-provided certificates, perform the following sub-steps:
Step 3.5.1.1 - Obtain Certificate and Private Key
Obtain a certificate and corresponding private key for the primary and standby application VIPs of the GGHub instance.
Each GGHub instance requires two certificate and private key pairs:
- One certificate and private key pair for the primary GGHub instance application VIP.
- One certificate and private key pair for the standby GGHub instance application VIP.
The certificate and private key for the primary GGHub instance application VIP are configured on both nodes of the primary GGHub cluster. Similarly, the certificate and private key for the standby application VIP are configured on both nodes of the standby GGHub cluster.
Note: For a CA-signed certificate, the .pem file must contain the leaf/server certificate first, followed by the intermediate certificates required to complete the server chain. Do not normally include the root CA trust anchor in the server certificate file.
Before deployment, verify that the certificate Subject Alternative Name (SAN) includes the application VIP DNS name, the private key matches the certificate, the certificate is within its validity period, and the chain validates against the approved CA trust store. Restrict access to private-key files to the required operating-system account.
Ansible automation requires the certificate and private key files to use the GoldenGate deployment name:
<deployment_name>.pem<deployment_name>.key
For the GGHub instance with deployment name maahub, the files must be named maahub.pem and maahub.key.
Step 3.5.1.2 - Prepare Certificate Directory Structure
Create a parent directory on the Ansible orchestration host to stage the user-provided NGINX certificates and private keys. The path to this directory is specified using the nginx_certificates_dir parameter in the GGHub instance inventory file.
Under the parent directory, create a subdirectory for each GGHub cluster node. Each subdirectory name must exactly match the corresponding node host name specified in the Ansible inventory file.
Place the certificate and private key files in each node directory using the required file names.
Place the primary application VIP certificate and private key in both primary cluster node directories. Place the standby application VIP certificate and private key in both standby cluster node directories.
Example directory structure for the GGHub instance with deployment name maahub
/u01/maagghub/certificates/maahub/
├── maahuba1/
│   ├── maahub.pem
│   └── maahub.key
├── maahuba2/
│   ├── maahub.pem
│   └── maahub.key
├── maahubb1/
│   ├── maahub.pem
│   └── maahub.key
└── maahubb2/
    ├── maahub.pem
    └── maahub.key
In the above example, the parent directory is /u01/maagghub/certificates/maahub/. The maahuba1 and maahuba2 directories contain the same maahub.pem and maahub.key files for the primary GGHub instance application VIP. The maahubb1 and maahubb2 directories contain the same certificate and private key files for the standby GGHub instance application VIP.
Step 3.5.1.3 - Replace NGINX Certificates Using Ansible
After preparing the certificate directory structure, execute the oracle.gghub.update_certificates playbook using the Ansible inventory file for the GGHub instance.
Set the nginx_certificates_dir parameter in the GGHub instance inventory file to the parent directory containing the certificate directory structure described in the previous step.
Replace NGINX certificates using Ansible
(gghub) [~]$ ansible-playbook oracle.gghub.update_certificates -i /u01/maagghub/inventory/maahub.yml
Alternatively, specify nginx_certificates_dir as an extra variable when running the playbook. This can be used when the parameter is left blank in the GGHub instance inventory file or to temporarily override its value.
Replace NGINX certificates using Ansible
(gghub) [~]$ ansible-playbook oracle.gghub.update_certificates -i /u01/maagghub/inventory/maahub.yml -e "nginx_certificates_dir=/u01/maagghub/certificates/maahub"
After the playbook completes successfully, validate the certificate chain, SAN hostname match, validity period, private-key match, NGINX configuration, and GoldenGate Microservices connectivity on both nodes of the primary and standby GGHub clusters. Perform client validation without –insecure. If validation fails, restore the previously backed-up certificate, key, and NGINX configuration, then reload NGINX. Monitor certificate expiration and begin renewal early enough to complete testing and rollback before the existing certificate expires.
Step 3.5.2 - Generate Self-Signed Certificates for Bootstrap or Nonproduction Use
The oracle.gghub.update_certificates playbook can generate and configure new self-signed certificates for controlled bootstrap, troubleshooting, or explicitly approved nonproduction use. Replace self-signed certificates with approved CA-signed certificates before placing a production GGHub instance into service.
To generate new self-signed certificates, ensure that the nginx_certificates_dir parameter is blank in the GGHub instance inventory file and do not specify the parameter on the command line.
Rotate NGINX certificates using Ansible
(gghub) [~]$ ansible-playbook oracle.gghub.update_certificates -i /u01/maagghub/inventory/maahub.yml
After the playbook completes successfully, perform the validation described in Step 3.4.
Task 4: Configure the Oracle GoldenGate Environment
Perform the following steps to complete this task:
Step 4.1 - Create the Database Connections
With the Oracle GoldenGate deployment created, use the Oracle GoldenGate Service Console to create the database connections using the TNS aliases created for the source and target databases.
As the oggadmin user, create the database connections:
- Log in to the Oracle GoldenGate Service Console and click on the deployment name.
- Click on the Administration Service under the Services section.
- From the left navigation menu, select DB Connections.
- On the DB Connections page, click Add DB Connections (plus).
- Add the required information for the source and target CDB and PDB as shown in the following table.
Note: The CDB level user is only required for a root-level Extract
| Region/Data Center | Container | Domain | Alias | User ID |
|---|---|---|---|---|
| DC 1 | CDB | GoldenGate | DC1_CDB | c##ggadmin@<tns_alias> |
| DC 1 | PDB | GoldenGate | DC1_PDB | ggadmin@<tns_alias> |
| DC 2 | CDB | GoldenGate | DC2_CDB | c##ggadmin@<tns_alias> |
| DC 2 | PDB | GoldenGate | DC2_PDB | ggadmin@<tns_alias> |
Step 4.2 - Create Oracle Net TNS Alias for Oracle GoldenGate Database Connections
To provide local database connections for the Oracle GoldenGate processes when switching between nodes, create a TNS alias on all nodes of the GGHub clusters where Oracle GoldenGate may be started. Create the TNS alias in the tnsnames.ora file in the TNS_ADMIN directory specified in the deployment creation.
Ansible automation configures the TNS_ADMIN environment variable for the GGHub instance deployment to use the <ORACLE_BASE>/goldengate/network/admin directory. Create the tnsnames.ora and sqlnet.ora files in this directory on all nodes of the primary and standby GGHub clusters.
To verify the TNS_ADMIN directory configured for the deployment, log in to the Oracle GoldenGate Service Console, select the deployment name, and then select Configuration. Verify the value of the TNS_ADMIN environment variable.
For the recommended per-PDB Extract configuration, create a TNS alias for the source PDB. If a root-level Extract is used, create TNS aliases for both the source CDB and PDB as required. For the target database, create a TNS alias for the target PDB. Set the SERVICE_NAME in each TNS alias to the corresponding role-based database service created in Step 1.3.
Obtain the SCAN names for the primary and standby database clusters and use the role-based database service names created in Step 1.3 to configure the Oracle Net TNS aliases.
As the oracle OS user on all nodes of the primary and standby GGHub clusters, create or update the sqlnet.ora file in the configured TNS_ADMIN directory with the recommended Oracle GoldenGate parameter:
sqlnet.ora
[opc@gghub_prim1]$ sudo su - oracle
[oracle@gghub_prim1]$ mkdir -p /u01/app/oracle/goldengate/network/admin

[oracle@gghub_prim1]$
cat > /u01/app/oracle/goldengate/network/admin/sqlnet.ora <<EOF
DEFAULT_SDU_SIZE = 2097152
EOF
As the oracle OS user on all nodes of the primary and standby GGHub clusters, create the required TNS alias definitions in the tnsnames.ora file in the configured TNS_ADMIN directory.
Create the TNS alias definition
[opc@gghub_prim1 ~]$ sudo su - oracle
[oracle@gghub_prim1 ~]$

cat > /u01/app/oracle/goldengate/network/admin/tnsnames.ora <<EOF

# Source
# CDB service TNS alias only required if root-level Extract is used

<source_cdb_service_name>=
 	(DESCRIPTION =
 		(CONNECT_TIMEOUT=3)(RETRY_COUNT=2)(LOAD_BALANCE=off)(FAILOVER=on)(RECV_TIMEOUT=30)
 		(ADDRESS_LIST =
 			(ADDRESS = (PROTOCOL = TCP)(HOST=<primary_scan_name>)(PORT=1521)))
 		(ADDRESS_LIST =
 			(ADDRESS = (PROTOCOL = TCP)(HOST=<standby_scan_name>)(PORT=1521)))
 		(CONNECT_DATA=(SERVICE_NAME = <source_cbd_service_name>.<domain_name>))

<source_pdb_service_name>=
	(DESCRIPTION =
		(CONNECT_TIMEOUT=3)(RETRY_COUNT=2)(LOAD_BALANCE=off)(FAILOVER=on)(RECV_TIMEOUT=30)
		(ADDRESS_LIST =
			(ADDRESS = (PROTOCOL = TCP)(HOST=<primary_scan_name>)(PORT=1521)))
		(ADDRESS_LIST =
			(ADDRESS = (PROTOCOL = TCP)(HOST=<standby_scan_name>)(PORT=1521)))
		(CONNECT_DATA=(SERVICE_NAME = <source_pdb_service_name>.<domain_name>)))

# Target
<target_pdb_service_name>=
	(DESCRIPTION =
		(CONNECT_TIMEOUT=3)(RETRY_COUNT=2)(LOAD_BALANCE=off)(FAILOVER=on)(RECV_TIMEOUT=30)
		(ADDRESS_LIST =
			(ADDRESS = (PROTOCOL = TCP)(HOST=<primary_scan_name>)(PORT=1521)))
		(ADDRESS_LIST =
			(ADDRESS = (PROTOCOL = TCP)(HOST=<standby_scan_name>)(PORT=1521)))
		(CONNECT_DATA=(SERVICE_NAME = <target_pdb_service_name>.<domain_name>)))

EOF

[oracle@gghub_prim1 ~]$ scp /u01/app/oracle/goldengate/network/admin/*.ora gghub_prim2:/u01/app/oracle/goldengate/network/admin
When multiple GGHub instances are configured with the same TNS_ADMIN directory, configure the required TNS aliases for all applicable GGHub instances in the shared tnsnames.ora file.
Note: After modifying tnsnames.ora or sqlnet.ora in the configured TNS_ADMIN directory, restart the GoldenGate deployment for the changes to take effect.
Step 4.3 - Set Up Supplemental Logging
Configure supplemental logging for every source database object that Oracle GoldenGate will replicate. Complete the database-level forced logging and subset database replication logging prerequisites described earlier in this chapter before enabling schema-level or table-level logging.
Configure Schema-Level or Table-Level Logging
- Log in to the Oracle GoldenGate Service Console and select the deployment.
- Select Administration Service, then select DB Connections.
- Select the source PDB database connection and use the connection action to connect to the database.
- Select Trandata for the database connection.
- Select Schema or Table, as required, and select the plus (+) action to add supplemental logging.
- Enter the schema or table name, select the logging options required by the replication design, and submit the change.
Use schema-level logging when all or most tables in a schema are replicated. Schema-level logging also protects newly created tables that match wildcard specifications and automatically follows key-column changes. When schema-level logging is not used, configure table-level logging for every replicated table before allowing DML.
| Replication design | Replication guidance |
|---|---|
| Active-active replication using Auto-CDR (MAA recommended) | Enable all-column supplemental logging using ADD SCHEMATRANDATA <schema> ALLCOLS or ADD TRANDATA <schema>.<table> ALLCOLS. Use Parallel Replicat in integrated mode. |
| Unidirectional replication | Use ADD SCHEMATRANDATA <schema> or ADD TRANDATA <schema>.<table>. Ensure that primary-key, unique-key, and foreign-key scheduling columns are logged. Use ALLCOLS when source and target scheduling columns are not identical or another GoldenGate feature requires all supported columns. |
| Active-active replication using manual conflict detection and resolution | Configure the required supplemental logging and manually configure conflict detection and resolution using COMPARECOLS and RESOLVECONFLICT. Use non-integrated Parallel Replicat with this configuration. |
For active-active replication, generate primary-key values that are unique across all writable databases. Review the documented conflict-detection limitations for LOB, JSON, and user-defined object columns, and account for the additional redo and trail volume created by all-column logging. Monitor conflict activity and the selected resolution outcome on every writable database.
Validate the result using INFO SCHEMATRANDATA <schema> or INFO TRANDATA <schema>.<table>. Do not start Extract until the required logging is enabled and verified for every replicated object.
Step 4.4 - Create the Autostart Profile
Create a managed process profile to automatically start the Extract and Replicat processes when the Oracle GoldenGate Administration Service starts and restart the processes if they fail. In Oracle GoldenGate Microservices Architecture, process autostart and restart behavior is managed using Managed Process Profiles.
Using the Oracle GoldenGate Service Console, create a managed process profile for the Extract and Replicat processes:
- Log in to the Oracle GoldenGate Service Console and select the deployment name.
- Select Administration Service.
- From the left navigation menu, select Managed Process Profiles.
- On the Managed Process Profiles page, click the plus (+) sign to add a profile.
- Enter the profile settings as follows:
- Profile Name: Start_Default
- Description: Default auto-start/restart profile
- Default Profile: Yes
- Auto Start: Yes
- Startup Delay Minutes: 1 min
- Auto Restart: Yes
- Max Retries: 5
- Retry Delay Seconds: 30 sec
- Retries Window Minutes: 30 min
- Restart on Failure only: Yes
- Disable Task After Retries: Yes
- Click Submit.
Step 4.5 - Configure Oracle GoldenGate Processes
When configuring Extract, Distribution Paths, and Replicat processes for a GGHub instance, the GoldenGate deployment files that must be available after relocation between GGHub cluster nodes are stored on the shared ACFS file system.
The following sections provide essential configuration recommendations for running Oracle GoldenGate Extract, Distribution Paths, and Replicat processes in a GGHub instance.
The following Extract parameter options help prevent data divergence after a Data Guard failover by ensuring that Extract does not advance beyond redo that has been applied at the designated Data Guard failover standby.
| GoldenGate Parameter | Description | Recommendations |
|---|---|---|
| TRANLOGOPTIONS HANDLEDLFAILOVER | Use this setting for an Oracle GoldenGate Extract whose source database is protected by Data Guard. HANDLEDLFAILOVER throttles Extract so that it does not write trail data beyond redo that has been applied at the designated failover standby. The HANDLEDLFAILOVER stands for handle DATA LOSS for Data Guard failover. This parameter must be added to the Extract process parameter file to avoid losing transactions and resulting in logical data inconsistencies after data loss Data Guard failover event. When the two primaries try to reconcile, this parameter ensures that all transactions can be reconciled because the new primary (old standby) is not further behind as expected. This parameter prevents Extract from extracting redo data from the source database, and writing to the trail file data that has not yet been applied to the Oracle Data Guard standby database. If this parameter is not specified, after a data loss failover, it is possible to have data in the target database that is not present in the source database, leading to data divergence and logical data inconsistencies. | MANDATORY when the source database is configured with Data Guard in Maximum Availaibility or Maximum Performance mode. |
| TRANLOGOPTIONS FAILOVERTARGETDESTID | When Fast-Start Failover (FSFO) is not enabled, use FAILOVERTARGETDESTID to identify the LOG_ARCHIVE_DEST_n destination for the designated Data Guard failover standby. Extract uses that standby’s apply progress when enforcing HANDLEDLFAILOVER. FAILOVERTARGETDESTID is not required when FSFO is enabled. When not using Data Guard Fast Start Failover (FSFO) in the source database, this parameter identifies which standby database the Extract process must remain behind, with regard to not extracting redo data that has not yet been applied to the Oracle Data Guard standby database. | MANDATORY when not using FSFO in the source database. To determine the correct value for FAILOVERTARGETDESTID, use the LOG_ARCHIVE_DEST_N parameter from the GoldenGate source database which is used for sending redo to the source standby database. For example, if LOG_ARCHIVE_DEST_2 points to the standby database, then use a value of 2. |
TRANLOGOPTIONS HANDLEDLFAILOVER STANDBY_WARNING <value> |
The amount of time before a warning message is written to the Extract report file, if Extract is stalled because it is unable to query the source database standby apply progress. This can occur after a Data Guard failover when the old primary database is not currently available. Default is 60 seconds. | OPTIONAL if you want to adjust the timing of when the warning message is written to the Extract report file. Add STANDBY_WARNING <value> to the TRANLOGOPTIONS HANDLEDLFAILOVER parameter. |
TRANLOGOPTIONS HANDLEDLFAILOVER STANDBY_ABEND <value> |
The amount of time before Extract abends, if Extract is stalled because it is unable to query the standby apply progress. Default is 30 minutes. | OPTIONAL if you want to adjust the amount of time it takes Extract to abend, when the source database standby is not accessible to enforce the HANDLEDLFAILOVER parameter. Add STANDBY_ABEND <value> to the TRANLOGOPTIONS HANDLEDLFAILOVER parameter. |
TRANLOGOPTIONS DLFAILOVER_TIMEOUT <value> |
DLFAILOVER_TIMEOUT specifies the time allowed for standby database reinstatement after a Data Guard role transition. Used with HANDLEDLFAILOVER, it allows Integrated Extract to start immediately on the new primary while the standby is being reinstated. At the end of the timeout, Extract terminates if the standby is still unavailable. Default is 300 seconds. NOTE: If, during normal operations of the source Oracle Data Guard configuration, the standby database becomes unavailable, Extract stops extracting data from the source database to prevent possible data divergence with the GoldenGate target database due to the HANDLEDLFAILOVER parameter. The DLFAILOVER_TIMEOUT parameter does not take effect when a Data Guard failover has not occurred, and there are no messages output to the Extract report file. |
OPTIONAL. Adjust this value when the expected standby reinstatement time after a role transition differs from the default. Monitor and alert if Extract terminates because the timeout expires. |
See the Oracle GoldenGate Parameters and Functions Reference Guide for more information about Extract TRANLOGOPTIONS parameters.
When creating an Extract using the Oracle GoldenGate Service Console, leave the Trail SubDirectory field blank so that the trail files are created in the default deployment directory on the shared ACFS file system. The default trail file location is <deployment_directory>/var/lib/data.
Note: For multitenant source databases, a per-PDB Extract is recommended and uses a local GoldenGate administrator user in the source PDB. A root-level Extract using a common C## GoldenGate administrator user can be used when required. Replicat connects to the target PDB using a local GoldenGate administrator user.
Step 4.5.1 - Extract Configuration
Using the Oracle GoldenGate Service Console, create a per-PDB Integrated Extract for each source PDB, including configurations where only one PDB is replicated:
- Log in to the Oracle GoldenGate Service Console, select the deployment, and navigate to Administration Service → Extracts. Click the plus (+) sign to add an Extract.
- On Extract Information, specify:
- Extract Type: Integrated Extract
- Process Name: EXT_1
- Description: Extract for DC 1 PDB
- Downstream Capture: Disabled
- On Extract Options, specify:
- Source Credential Domain: OracleGoldenGate
- Source Credential Alias:
<source_PDB_alias> - Trail Name: aa
- Trail Subdirectory: Leave blank
- Begin: Now Leave the Trail Subdirectory blank to use the default deployment trail location on the shared ACFS file system.
- On Managed Options, select the Start_Default profile created in Step 4.4 and leave Critical to deployment health option disabled.
- On Parameter File, review the automatically generated parameters and add only the additional parameters required for the Extract.
- For example:
TRANLOGOPTIONS HANDLEDLFAILOVER
TABLE <OWNER>.*; - Do not duplicate parameters automatically generated by the Service Console.
- For active-active replication using Auto-CDR, configure the Extract parameters required for conflict detection, including LOGALLSUPCOLS and MAPINVISIBLECOLUMNS.
- If Data Guard Fast-Start Failover (FSFO) is not configured, also add:
TRANLOGOPTIONS FAILOVERTARGETDESTID <log_archive_dest_number>. - Click Create and Run.
- For example:
For additional information about creating and configuring an Extract, see Add Extract in the GoldenGate Microservices Architecture documentation.
See Oracle GoldenGate Extract Failure or Error Conditions Considerations for more information.
Step 4.5.2 - Replicat Configuration
Select the Replicat mode according to the replication architecture and required functionality.
| Requirement | Recommended Replicat mode |
|---|---|
| Active-active replication using Auto-CDR | Parallel Replicat in integrated mode. |
| Active-active replication using manual conflict detection and resolution | Parallel Replicat in non-integrated mode. |
| General Oracle apply without an integrated-only feature | Parallel Replicat in non-integrated mode. |
| Procedural replication or DML handlers | Use an integrated-capable Replicat mode that supports the required feature. |
| Other feature or workload constraint | Select the documented compatible mode and validate it with a representative workload before production deployment. |
Place the active GGHub instance close to the target database. Before using Integrated Replicat or Parallel Replicat in integrated mode, ensure that foreign-key columns on the target are indexed and that source supplemental logging supports dependency computation.
Tune Parallel Replicat from a measured baseline. Evaluate apply lag, transaction dependencies, target CPU, GGHub CPU, database waits, commit throughput, mapper utilization, and idle appliers. Increasing parallelism beyond the concurrency available in the workload can add connections and resource consumption without improving throughput.
APPLY_PARALLELISMconfigures a fixed number of appliers and disables dynamic adjustment. The default is four appliers when no fixed or dynamic range is specified. Set a fixed value only after workload testing.MIN_APPLY_PARALLELISMand MAX_APPLY_PARALLELISM define the range in which Parallel Replicat can adjust the applier count dynamically. Do not specify these parameters together with APPLY_PARALLELISM.MAP_PARALLELISMcontrols mapper threads that read the trail. The default is 2. Increase it only when measurements show that mapper capacity or trail-read throughput is limiting the appliers; excessive mapper counts can create I/O contention.BATCHSQLcan improve throughput through array processing. Test it with the production transaction mix because constraint violations or conflicts cause failed batches to be rolled back and reapplied individually.
Record the tested parameter values, workload characteristics, and observed throughput and lag. Revalidate tuning after major workload, schema, database, network, or GGHub changes.
Using the Oracle GoldenGate Service Console, create an Integrated Parallel Replicat for the target PDB:
- Log in to the Oracle GoldenGate Service Console, select the deployment, and navigate to Administration Service → Replicats. Click the plus (+) sign to add a Replicat.
- On Replicat Information, specify:
- Replicat Type: Parallel Replicat
- Parallel Replicat Type: Integrated
- Process Name: REP_1
- Description: Replicat for DC 2 PDB
- On Replicat Options, specify:
- Trail Name: aa
- Trail Subdirectory: Leave blank
- Target Credential Domain: OracleGoldenGate
- Target Credential Alias:
<target_PDB_alias> - Checkpoint Table: Select the checkpoint table for the target PDB
- Begin: Position in Trail
- On Managed Options, select the Start_Default profile created in Step 4.4 and leave Critical to deployment health option disabled.
- On Parameter File, review the automatically generated parameters and add only the additional parameters required for the Replicat. For example:
MAP <SOURCE_OWNER>.*, TARGET <TARGET_OWNER>.*;
Do not duplicate parameters automatically generated by the Service Console. Configure APPLY_PARALLELISM, MAP_PARALLELISM, and BATCHSQL as appropriate for the workload using the recommendations described earlier in this section. - Click Create and Run.
Note: For configurations that do not use Auto-CDR or another feature requiring integrated apply, Parallel Replicat in non-integrated mode should be used where appropriate.
For additional information about creating and configuring a Replicat, see Add Replicat in the GoldenGate Microservices Architecture documentation.
Step 4.5.3 - Distribution Path Configuration
Distribution paths are required when trail files need to be sent to another Oracle GoldenGate deployment or GGHub instance across regions or in a different data center, as shown in the following image.
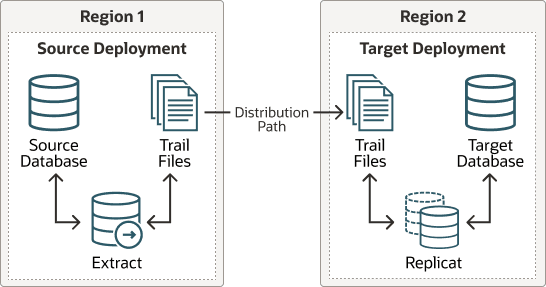
Description of the illustration gghub-trail-distribution-path.png
When a secure Distribution Path connects to a target GGHub instance through the NGINX reverse proxy, the source GoldenGate deployment must trust the certificate presented by the target NGINX endpoint and must be configured with credentials to authenticate to the target GoldenGate deployment.
More instructions about creating distribution paths are available in Add a Distribution Path. A step-by-step example is in the following video, Connect an on-premises Oracle GoldenGate to OCI GoldenGate using NGINX, showing how to correctly configure the certificates.
Step 4.5.3.1 - Configure Trust for the Target NGINX Certificate
For a target GGHub instance using a CA-signed NGINX certificate, obtain the Root CA certificate for the certificate presented by the target NGINX endpoint and import the Root CA certificate as a trusted certificate in the source GoldenGate deployment.
- Log in to the Administration Service on the Target GoldenGate.
- Follow “Step 2 - Download the target server’s root certificate” in the video “Connect an on-premises Oracle GoldenGate to OCI GoldenGate using NGINX.”
Step 4.5.3.2 - Create a User in the Target GoldenGate Deployment
Create a user in the target GoldenGate deployment for the source Distribution Service to use for authentication.
- Log in to the target GoldenGate Service Console.
- From the left navigation menu, select User Administration.
- Select Add New User.
- Specify:
- Authenticated By: Password
- Role: Operator
- Username: ggnet
- Password / Verify Password: Enter the password for the user.
- Click Submit.
Step 4.5.3.3 - Create a Path Connection in the Source GoldenGate Deployment
Create a Path Connection in the source GoldenGate deployment using the target deployment user created in Step 4.5.3.2. The Path Connection stores the credentials used by the Distribution Path to authenticate to the target deployment.
- Log in to the source GoldenGate Service Console.
- From the left navigation menu, select Path Connections.
- On the Path Connections page, click the plus (+) sign to add a Path Connection.
- Specify:
- Credential Domain: Network
- Credential Alias: wssnet
- User ID: ggnet
- Password / Verify Password: Enter the password for the ggnet user created in Step 4.5.3.2.
- Click Submit.
Step 4.5.3.4 - Create a Distribution Path
Using the Oracle GoldenGate Service Console, create a Distribution Path from the source GoldenGate deployment to the target GGHub instance:
- Log in to the source GoldenGate Service Console and select Distribution Service Paths from the left navigation menu. Click the plus (+) sign to add a Distribution Path.
- On Path Information, specify a Path Name and, optionally, a description.
- For the Source options:
- Source Extract: Select the Extract that generates the source trail.
- Trail Name: Select or enter the source trail name.
- Subdirectory: Leave blank when using the default trail location.
- Begin: Select the appropriate starting position.
- For the Target options:
- Target Protocol: wss
- Reverse Proxy Enabled: Yes
- Target Host: Target GGHub instance application VIP hostname
- Port Number: NGINX HTTPS listening port for the target GGHub instance
- Trail Name: Specify the target trail name.
- Target Authentication Method: UserIDAlias
- Domain: Network
- Alias: wssnet
- On Managed Options, enable Auto Restart and specify:
- Retries: 10
- Delay: 1 minute
- Review the Distribution Path configuration and click Create Path and Run.
Leave the remaining Distribution Path options at their default values unless different settings are required for the environment.
For additional information about creating and configuring a Distribution Path, see Add a Distribution Path in the GoldenGate Microservices Architecture documentation.
Step 4.5.3.5 - Distribution Path Recommendations
After a GGHub instance role reversal, any Distribution Paths on external source GoldenGate deployments that send trail files to the GGHub instance must be updated to use the application VIP of the new primary GGHub instance.
This can be done using the following example REST call:
curl -s -K src_access.cfg https://<Source VIP>/<Source Deployment Name>/distsrvr/services/v2/sources/<Distribution Path Name> -X PATCH --data '{"target":{"uri":"wss://<Target VIP>:9103/services/v2/targets?trail=dd"}}' | python -m json.toolIf desired, the changing of the source distribution path target address could be automated after a hub role transition using the sample shell script shown in Managing Outages for Oracle GoldenGate Hub, which is called by the acfs_standby CRS action script when a file system switchover/failover occurs.
The source distribution paths must be configured to restart automatically after they have failed so that in the event of the target GoldenGate deployment relocating between GGHub cluster nodes or to the standby GGHub, the distribution paths will restart. If a distribution path was created without automatic restart enabled, it can be enabled through the distribution server web UI or a REST call. For example:
$ curl -s -K access.cfg https://<Source VIP>/<Source Deployment Name>/distsrvr/services/v2/sources/ggs_to_gghub -X PATCH --data '{"options":{"autoRestart":{"delay": 2,"retries": 10}}}' | python -m json.toolTo check the current configuration of a distribution path, use the following example:
$ curl -s -K access.cfg https://<Source VIP>/<Source Deployment Name>/distsrvr/services/v2/sources/ggs_to_gghub -X GET | python -m json.tool

# Sample output:
"name": "scam_to_gghub",
  "options": {
     "autoRestart": {
     "delay": 2,
     "retries": 10
  },
Step 4.5.4 - Set up a Heartbeat Table for Monitoring Lag Times
Configure Oracle GoldenGate heartbeat tables to monitor end-to-end replication lag between the source and target databases. Heartbeat tables are recommended for all GoldenGate replication configurations to help identify where lag is introduced in the replication path.
For additional information about creating and configuring heartbeat tables, see Add Heartbeat Table in the GoldenGate Microservices Architecture documentation.
For additional information about monitoring end-to-end replication lag using automatic heartbeat tables, see Monitor Lag in the GoldenGate Microservices Architecture documentation.
Appendix
Alternate Method to Generate Ansible Inventory File for Deployment
The Ansible playbook oracle.gghub.onboarding can generate the Ansible inventory file for a GGHub instance using an alternate method.
The alternate method uses a response file instead of user prompts for all the required values. A template response file is provided in the GGHub collection directory which must be updated and used with the playbook oracle.gghub.onboarding.
Note: When deploying multiple GGHub instances on the same GGHub clusters, use a separate response file to generate the Ansible inventory file for each GGHub instance.
Make a copy of the provided template response file from the collection directory and fill in all the parameter values.
Note: A space is required before the parameter value in the response file following the YAML syntax. As per YAML specification, the key-value pairs are marked with a colon and space. For example, gg_deployment_name: maahub
(gghub) [~]$ cd /u01/maagghub
(gghub) [~]$ cp gghub-ansible-collection/gghub_deploy.yml gghub-ansible-collection/gghub_maahub.yml
(gghub) [~]$ vi gghub-ansible-collection/gghub_maahub.yml
Execute the playbook oracle.gghub.onboarding using the response file as follows to generate the Ansible inventory file.
(gghub) [~]$ ansible-playbook oracle.gghub.onboarding -i /u01/maagghub/collections/ansible_collections/oracle/gghub/inventory/localhost -e @/u01/maagghub/gghub-ansible-collection/gghub_maahub.ymlWhen the playbook oracle.gghub.onboarding is executed using a response file it will only prompt for the Ansible vault and GoldenGate admin user passwords.
Alternate Deployment Option to Configure Only Primary or Standby GGHub Instance
If there is a requirement to deploy only the primary or the standby GGHub instance initially, use the “limit” option and specify the primary or standby group name from the Ansible inventory file. The “limit” option restricts the execution of a playbook to a specific subset of hosts within the inventory.
In the following example, Ansible automation deploys the GGHub instance resources only on the primary GGHub cluster using the limit option. The ACFS file system for the GGHub instance is created on the primary cluster.
(gghub) [~]$ ansible-playbook oracle.gghub.deploy -i /u01/maagghub/inventory/maahub.yml --limit maahuba -e @/u01/maagghub/inventory/maahub.key --ask-vault-pass
Continuing with the example above where only the primary GGHub instance is deployed, to proceed with standby GGHub deployment and ACFS replication setup, run the deploy playbook without the “limit” option. Ansible skips the actions already performed for the primary GGHub instance and configures only the standby GGHub instance and ACFS replication.
(gghub) [~]$ ansible-playbook oracle.gghub.deploy -i /u01/maagghub/inventory/maahub.yml -e @/u01/maagghub/inventory/maahub.key --ask-vault-pass
Validate GGHub Deployment
After the deployment is complete, playbook oracle.gghub.verify can be executed to display the GGHub instance configuration information and status of some of the GGHub instance clusterware resources.
(gghub) [~] $ ansible-playbook oracle.gghub.verify -i /u01/maagghub/inventory/maahub.yml --ask-vault-password
Example output for the oracle.gghub.verify playbook
TASK [Display GoldeGate status] ***************************************************************************************************************************************************************
ok: [maahuba1] => {
    "msg": [
        {
            "grid": {
                "activeVersion": "19.0.0.0.0",
                "cluster_nodes": "maahuba1,maahuba2",
                "homePath": "/u01/app/19.0.0.0/grid",
                "master_node": "maahuba1",
                "orabase": "/u01/app/grid",
                "patchVersion": "19.26.0.0.0",
                "scanListenerTCPPorts": "1521",
                "state": "NORMAL",
                "user": "grid"
            },
            "system": {
                "crs": true,
                "inst_group": "oinstall",
                "inventory_loc": "/u01/app/oraInventory",
                "oracle_ahf_loc": "/u01/app/oracle.ahf",
                "scan_name": "maahuba-scan.clientsubnet.vcnfraans1.oraclevcn.com"
            }
        },
        {
            "acfs": {
                "device": "/dev/asm/maahub-207",
                "diskgroup": "data",
                "primary_hostname": "maahuba-app-vip1.clientsubnet.vcnfraans1.oraclevcn.com",
                "primary_path": "/opt/oracle/gghub/maahub",
                "retries_made": "0",
                "site": "primary",
                "standby_connect_string": "grid@maahubb-app-vip1.clientsubnet.vcnfraans1.oraclevcn.com",
                "standby_path": "/opt/oracle/gghub/maahub",
                "status": "running",
                "volume": "maahub"
            },
            "appvip": {
                "name": "maahuba-app-vip1"
            },
            "crs_status": {
                "acfs_primary": true,
                "acfs_standby": true,
                "ora_acfs": true,
                "sshd_restart": true,
                "xag_goldengate": true
            },
            "goldengate": {
                "admin_user": "oggadmin",
                "file_system": "acfs_primary,nginx",
                "homePath": "/u01/app/oracle/goldengate/gg23ai",
                "name": "maahub",
                "service_manager_port": "9100",
                "xag_home": " /u01/app/grid/xag"
            }
        },
        "",
        ""
    ]
}
GGHub Ansible Playbook oracle.gghub.maa_ha Functions
Playbook oracle.gghub.maa_ha provides multiple functions to perform different tasks.
These additional functions are available in the form of tags in the playbook oracle.gghub.maa_ha. List the available tags in the playbook as shown below.
(gghub) [~] $ ansible-playbook oracle.gghub.maa_ha -i /u01/maagghub/inventory/maahub.yml --list-tags
The following section describes some of the functions in the playbook oracle.gghub.maa_ha which are invoked using the specific tag names.
Relocate GGHub Clusterware Resources
It is highly recommended that you validate the GGHub instance clusterware resources high availability and successful role reversal functionality before configuring the GoldenGate extract and replicat processes.
The oracle.gghub.maa_ha playbook provides functionality to relocate the clusterware resources associated with the specific GGHub instance from the active node to the available node of the GGHub cluster.
The relocate feature of the playbook oracle.gghub.maa_ha can also facilitate the rolling planned maintenance of GGHub cluster nodes.
Perform the following steps to relocate the specific GGHub instance clusterware resources from the active node to the available node in the cluster:
Step 1. Relocate Primary GGHub Instance Clusterware Resources
Validate the status of the primary GGHub clusterware resources associated with the specific GGHub instance before relocating to the available node using the example command in the “Check the Primary and Standby GGHub Clusterware Resources Status” section of Chapter 12: Troubleshooting Oracle GoldenGate#ChecktheprimaryandstandbyGGHubclusterwareresourcesstatus.
Execute the Ansible playbook oracle.gghub.maa_ha with tag acfs_relocate_primary to relocate the primary GGHub instance clusterware resources from the active node to the available node in the primary cluster. Perform the relocation using the inventory file associated with the GGHub instance.
(gghub) [~]$ ansible-playbook oracle.gghub.maa_ha -i /u01/maagghub/inventory/maahub.yml --tags acfs_relocate_primary
Check the status of the GGHub instance clusterware resources after the relocate task is complete. Notice that all the resources should be online on the available node.
Step 2. Relocate Standby GGHub Instance Clusterware Resources
Validate the status of the standby GGHub clusterware resources associated with the specific GGHub instance before relocating to the available node using the example command in the “Standby GGHub Clusterware Resources Status” section of Chapter 12: Troubleshooting Oracle GoldenGate#StandbyGGHubCRSresourcesstatus.
Execute the Ansible playbook oracle.gghub.maa_ha with tag acfs_relocate_standby to relocate the standby GGHub instance clusterware resources from the active node to the available node in the standby cluster. Perform the relocation using the inventory file associated with the GGHub instance.
(gghub) [~]$ ansible-playbook oracle.gghub.maa_ha -i /u01/maagghub/inventory/maahub.yml --tags acfs_relocate_standby
Check the status of the GGHub clusterware resources after the relocate task is complete. Notice that all of the resources should be online on the available node.
Planned GGHub Instance Role Reversal
Use this procedure for planned maintenance, site evacuation, or a controlled GGHub role change. Coordinate the GGHub role reversal with any required database, application, and Distribution Path changes.
- Confirm that the primary and standby GGHub clusters and all resources for the paired GGHub instance are healthy. Verify that ACFS replication is operating normally and that replication lag is zero or within the approved recovery point objective.
- Quiesce GGHub configuration changes. Gracefully stop or hold the applicable GoldenGate processes when required by the operational runbook, and confirm that no pending configuration changes remain unsynchronized.
- Record the current Clusterware, ACFS replication, application VIP, Service Manager, GoldenGate process, Distribution Path, and heartbeat status. Back up the current GGHub configuration.
- Execute the role-reversal playbook for the inventory associated with the paired GGHub instance:
(gghub) [~]$ ansible-playbook oracle.gghub.maa_ha -i /u01/maagghub/inventory/maahub.yml --tags acfs_role_reversal
- Verify that the new primary side shows the acfs_primary resource ONLINE and that ACFS replication is running in the new direction. Confirm that the former primary is now the standby side and is not independently writable.
- Validate the application VIP, NGINX TLS endpoint, Service Manager, deployment services, and GoldenGate processes. Update or confirm Distribution Path targets and restart the appropriate processes.
- Verify end-to-end replication in every direction using heartbeat lag and an approved functional transaction. If validation fails before normal changes resume, use the approved rollback procedure to restore the original roles and configuration.
Unplanned GGHub Site Failover
Warning: Do not activate the standby ACFS copy until the former primary GGHub cluster is fenced or confirmed inaccessible. Concurrent writable access to both ACFS copies can corrupt the GGHub configuration and trail state.
- Confirm that the primary GGHub cluster cannot be recovered within the required recovery time. Record the last known ACFS replication status and assess possible configuration or trail-data exposure based on the last synchronized point.
- Fence the former primary cluster, its storage access, and its GGHub application VIP, or otherwise prove that it cannot start the same GGHub instance or write to the former primary ACFS copy.
- Verify that the standby cluster and standby ACFS copy are consistent and safe to activate. If consistency cannot be established, stop and follow the documented recovery or Oracle Support procedure.
- Execute the role-reversal playbook for the affected paired GGHub instance:
(gghub) [~]$ ansible-playbook oracle.gghub.maa_ha -i /u01/maagghub/inventory/maahub.yml --tags acfs_role_reversal
- Verify the new primary ACFS and Clusterware resource states, application VIP, NGINX TLS endpoint, Service Manager, deployment services, and GoldenGate processes. Confirm that no corresponding resources are active on the fenced site.
- Update all affected Distribution Path targets and restart the appropriate paths and processes. Validate Extract and Replicat checkpoints before allowing normal application changes to continue.
- Validate end-to-end heartbeat and functional replication in every direction. Document any data or configuration gap, restore monitoring and alerting, and begin reinstating the failed cluster as the new standby.
- After the failed site is repaired, re-establish ACFS replication from the surviving primary, validate the standby resource definitions, and perform a controlled failback only through the planned role-reversal procedure.
Stopping and Starting GGHub Instance Clusterware Resources
GGHub clusterware resources associated with the specific GGHub instance can be stopped and started on the primary and standby GGHub clusters using specific tags provided in Ansible playbook oracle.gghub.maa_ha.
Execute the playbook oracle.gghub.maa_ha to accomplish this task as below:
(gghub) [~]$ ansible-playbook oracle.gghub.maa_ha -i /u01/maagghub/inventory/maahub.yml  --tags gghub_stop

(gghub) [~]$ ansible-playbook oracle.gghub.maa_ha -i /u01/maagghub/inventory/maahub.yml  --tags gghub_start
To stop just the primary or the standby GGHub instance cluster resources use the below tags.
(gghub) [~]$ ansible-playbook oracle.gghub.maa_ha -i /u01/maagghub/inventory/maahub.yml  --tags gghub_stop_primary

(gghub) [~]$ ansible-playbook oracle.gghub.maa_ha -i /u01/maagghub/inventory/maahub.yml  --tags gghub_stop_standby
If one of the GGHub instance cluster resources are stopped use the gghub_start tag to restart. Ansible automation will detect and only start the GGHub clusterware resources that are stopped.
Change GoldenGate Microservices Deployment Password Using Ansible
To update the GoldenGate Microservices deployment password for a GGHub instance, execute the oracle.gghub.change_password Ansible playbook from the GGHub Ansible collection using the inventory file for that GGHub instance.
The playbook will prompt for the Ansible vault password and then prompt for the new GoldenGate Microservices deployment password.
The playbook uses the existing GoldenGate Microservices deployment password from the Ansible vault, and after successful change the GoldenGate Microservices deployment password will be updated in the Ansible vault.
(gghub) [~]$ ansible-playbook oracle.gghub.change_password -i /u01/maagghub/inventory/maahub.yml --ask-vault-password
Understanding NGINX Reverse Proxy and Certificate Configuration
This section explains the NGINX reverse proxy configuration and certificate usage for GGHub instances deployed on GGHub clusters.
The GoldenGate reverse proxy feature allows a single point of contact for all the GoldenGate microservices associated with a GoldenGate deployment. Without a reverse proxy, the GoldenGate deployment microservices are contacted using a URL consisting of a hostname or IP address and separate port numbers, one for each of the services. For example, to contact the Service Manager, you could use http://gghub.example.com:9100, then the Administration Service is http://gghub.example.com:9101, the second Service Manager may be accessed using http://gghub.example.com:9110, and so on.
When running Oracle GoldenGate in a High Availability (HA) configuration with the Grid Infrastructure agent (XAG), there is a limitation preventing more than one deployment from being managed by a GoldenGate Service Manager. Because of this limitation, creating a separate virtual IP address (VIP) for each Service Manager/deployment pair is recommended. This way, the microservices can be accessed directly using this VIP.
With a reverse proxy, port numbers are not required to connect to the microservices because they are replaced with the deployment name and the hostname’s VIP. For example, to connect to the console via a web browser, use the URLs:
| GoldenGate Service | URL |
|---|---|
| Service Manager | https://gghub.example.com:443 |
| Administration Service | https://gghub.example.com:443/<deployment_name>/adminsrvr |
| Distribution Service | https://gghub.example.com:443/<deployment_name>/distsrvr |
| Performance Metric Service | https://gghub.example.com:443/<deployment_name>/pmsrvr |
| Receiver Service | https://gghub.example.com:443/<deployment_name>/recvsrvr |
When multiple GGHub instances are deployed on the same GGHub cluster, each instance uses a separate Service Manager and VIP. NGINX uses the VIP to route HTTPS connection requests to the appropriate Service Manager.
An SSL certificate is required for clients to authenticate the server they connect to through NGINX. Each GGHub instance requires a separate certificate for its primary and standby application VIPs. Obtain the certificates according to your corporate security standards before proceeding.
Ansible automation configures the NGINX reverse proxy with SSL for each GGHub instance to secure external communication.
During GGHub instance deployment, Ansible automation can configure NGINX using user-provided certificates and private keys specified by the nginx_certificates_dir parameter. For production, provide certificates issued by an enterprise or publicly trusted certificate authority. If the parameter is not specified, Ansible generates self-signed certificates that are suitable only for controlled bootstrap, troubleshooting, or explicitly approved nonproduction use. Replace or rotate certificates using the oracle.gghub.update_certificates playbook described in Step 3.5.
For more details on the NGINX HTTPS configuration that the Ansible automation will deploy refer to NGINX documentation https://nginx.org/en/docs/http/configuring_https_servers.html.
Note: The certificate SAN must include the application VIP DNS name used to access the GGHub instance through NGINX. Before installation, verify the certificate validity period, complete trust chain, and private-key match.
Manually Replace NGINX SSL Certificates
Use the following procedure to manually replace the NGINX SSL certificate and private key files for a GGHub instance.
The automated method described in Step 3.5 is recommended for GGHub instances managed using Ansible automation.
Note: NGINX commands need to be run as a privileged user on the GGHub cluster nodes.
Step 1 - Validate NGINX configuration
Validate the NGINX configuration using the below command:
# nginx -t

nginx: the configuration file /etc/nginx/nginx.conf syntax is ok
nginx: configuration file /etc/nginx/nginx.conf test is successful
Step 2 - Identify the NGINX configuration file for the deployment
For a GGHub deployment the NGINX configuration files are located under the directory /etc/nginx/conf.d/ and the configuration file name follows the standard ogg_<GG_DEPLOYMENT_NAME>.conf.
The location of the NGINX configuration files is also specified in the /etc/nginx/nginx.conf file.
In this example the GGHub deployment NGINX configuration file name is ogg_maahub.conf.
# ls /etc/nginx/conf.d/

ogg_maahub.conf
Step 3 - Copy the certificate and key files
View the GGHub NGINX configuration file and note the ssl_certificate and ssl_certificate_key parameter values in the server block:
# view /etc/nginx/conf.d/ogg_maahub.conf

server {
    listen                  443 ssl;
    listen             [::]:443 ssl;
    proxy_read_timeout      600s;
    proxy_buffer_size       16k;
    proxy_buffers           8 16k;
    server_name             maahuba-app-vip1.clientsubnet.vcnfraans1.oraclevcn.com;
    ssl_certificate      /etc/nginx/ssl/maahuba-app-vip1.chained.pem;
    ssl_certificate_key  /etc/nginx/ssl/maahuba-app-vip1.key;
You should receive a certificate file and corresponding private key file from a Certificate Authority (CA) (for example: your_domain.crt and your_domain.key). If your CA provided a CA bundle or intermediate certificates make sure to create a chained certificate following the below guideline.
For a CA-signed certificate, the file referenced by the NGINX ssl_certificate directive must contain the leaf/server certificate first, followed by the intermediate certificates required to complete the server chain. Do not normally include the root CA trust anchor in the server certificate file. Use PEM encoding and a .pem file extension for the certificate chain.
Before installation, verify that the private key matches the leaf certificate. A private-key mismatch causes NGINX validation to fail with an X509_check_private_key:key values mismatch error.
Back up the existing certificate, private key, and NGINX configuration. Copy the new certificate chain and private key to the /etc/nginx/ssl/ directory identified in the NGINX configuration. Restrict private-key ownership and permissions to the operating-system account required by NGINX.
Step 4 - Update the NGINX configuration file
Edit the NGINX configuration file and update the ssl_certificate and ssl_certificate_key parameter values to use the new certificate and key files.
Step 5 - Validate NGINX configuration and reload service
Before reloading NGINX, verify the certificate validity period, SAN hostname, certificate-chain validation, and private-key match, and then run nginx -t. Reload NGINX only after all checks succeed. Validate the application VIP from a client without –insecure on both nodes of the primary and standby GGHub clusters. If validation fails, restore the backed-up certificate, key, and NGINX configuration and reload NGINX.
# nginx -t

nginx: the configuration file /etc/nginx/nginx.conf syntax is ok
nginx: configuration file /etc/nginx/nginx.conf test is successful

# systemctl reload nginx
# systemctl status nginx.service
Repeat the procedure on both nodes of the primary and standby GGHub clusters, using the certificate and private key associated with the corresponding GGHub instance application VIP.
Validate using the GGHub Service Console or follow Step 3.4 to validate GoldenGate Microservices connectivity after this change.
References
- Oracle GoldenGate 26ai Documentation
- Oracle Automatic Storage Management Cluster File system Administrator’s Guide 26ai (ACFS)
- Oracle Clusterware Administration and Deployment Guide 26ai
- Oracle Maximum Availability Architecture Best Practices
- Configure and Deploy Oracle Data Guard
- Real Application Clusters Administration and Deployment Guide