5 Installing Oracle Secure Backup on Windows
Follow these steps to learn how to install Oracle Secure Backup on hosts that run the Windows operating system.
Prerequisites for Installing on Windows
Before starting Oracle Secure Backup installation on Windows, check the following prerequisites.
-
Complete the planning tasks described in Preparing to Install Oracle Secure Backup.
-
While installing Oracle Secure Backup on a host, if you want to use the host as a media server, then physically attach each tape library and tape drive to the host. Restart the system if required.
Before adding Oracle Secure Backup tape libraries and drives to an administrative domain, disable or stop any system software that scans and opens arbitrary SCSI targets (for example, tape library monitoring software).
-
For installing the administrative server or media server role, verify the physical and network requirements for the host as discussed in Choosing Secure Hosts for the Administrative and Media Servers.
Oracle Secure Backup requires NDMP port 10000 for installing on your host. If this port is not available on your host, for example other applications are using this port, then the installation cannot complete successfully. Therefore, Oracle Secure Backup provides an option to manually specify the NDMP Port for installation.
For more information, see Table 5-1.
Obtain the Oracle Secure Backup installation media and store it in a directory that all hosts can access. You can download the installation media from Oracle Technology Network (OTN) and extract the contents of the archive file.
Options for Installing on Windows
For installing Oracle Secure Backup on Windows, you can use the following parameters.
Table 5-1 Installation Parameters for Windows
| Parameter | Description | Required for Unattended Installation |
|---|---|---|
ADD_HOST_INITIATOR_VALUE="myhostname.com"
|
Specifies the adding host ID. | Yes, if ADD_HOST_INITIATOR_ENABLE is
not specified
|
INSTALL_ROLE="Client" |
Disables user prompts for advanced settings and automatically selects the client host role. | Yes |
ADD_HOST_INITIATOR_ENABLE="No" |
Disables administrative host identification check while adding a client to the administrative domain. | Yes, if ADD_HOST_INITIATOR_VALUE is not
specified
|
NDMP_PORT="12345" |
Specifies the port used by Oracle Secure Backup for NDMP communication. | Yes, if the default port 10000 is not available |
DISABLE_WEB_TOOL="Yes" |
Installs only the Oracle Secure Backup administrative server with the web server disabled. | No |
Interactive Installation on Windows
Follow these steps to perform an interactive installation of Oracle Secure Backup on Windows.
-
Log in to your host as an administrator user.
-
Go to the directory where the installation software is stored and run the
setup.exeprogram to open Oracle Secure Backup setup wizard.Note:
To install Oracle Secure Backup on an alternate NDMP Port if the default port 10000 is not available, run the setup wizard with an additional optionNDMP_PORT.setup.exe NDMP_PORT="12345"On this host, if you have uninstalled Oracle Secure Backup earlier or if this is a fresh installation, then the Clean Install window appears. Click Next to continue.
Along with the install options, you can also use the following buttons in the setup wizard:
-
Help: to view detailed description for installation
-
Space: to check disk space for installation
-
-
Specify user information as follows:
-
User Name: Enter a user name
-
Organization: Enter the name of your company
-
Select who can use Oracle Secure Backup on this host.
-
Anyone who uses this computer: Provides access to all users
-
Only for me: Restricts using Oracle Secure Backup only to you
-
Click Next to continue.
-
-
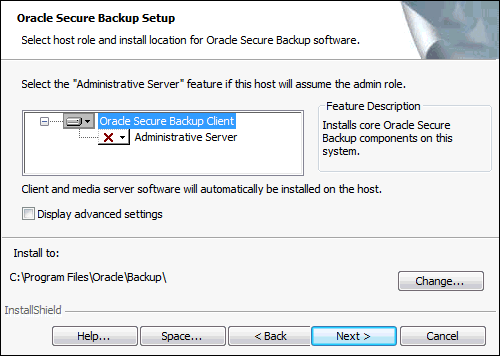
Select the host role as displayed in Figure 5-1.
Figure 5-1 Oracle Secure Backup Setup Window

Description of "Figure 5-1 Oracle Secure Backup Setup Window"You can select from the following:
- Administrator Server: Click the Administrative Server option and install. For more information, see Installing Administrative Server on Windows
- Client role: Leave the defaults and click next. For more information, see Installing Client Role on Windows
Note:
Installation of Oracle Secure Backup on Windows also includes the client and media server packages.
By default, a Windows host assumes the client role unless you specifically select the administrative role.
A single host can have multiple roles, which are additive rather than exclusive.
-
Verify that Oracle Secure Backup installs in the default directory,
C:\Program Files\Oracle\Backup. If you want to select a different directory for the installation, then click Change and specify the location.Click Next to continue. The setup wizard displays the Ready to Install the Program window.
-
Click Install to start the Oracle Secure Backup installation.
The setup wizard displays a confirmation message that the installation is complete. Click Finish to close the setup wizard.
The installation generates a log file, namely
osb_install.log, and stores it in the Windows temporary
directory.
If you have enabled Windows Installer logging, then the installation also creates an additional Windows log in the same directory. For more information, see Enabling Installer Logging on Windows.
Similarly, you can install Oracle Secure Backup in unattended mode on your Windows host. For more information, see Noninteractive or Unattended Installation on Windows.
Installing Administrative Server on Windows
While running the Oracle Secure Backup setup wizard on a Windows host, you can install the administrative server .
Now, continue the installation of Oracle Secure Backup on your Windows host.
When you install the Oracle Secure Backup administrative server, it also installs the web server. However, while installing the administrative server Oracle Secure Backup provides an option to disable the web server using the following command:
msiexec /i "Oracle Secure Backup.msi" /qn /L*V "msi_install.log" DISABLE_WEB_TOOL="Yes"Installing Client Role on Windows
While running the Oracle Secure Backup setup wizard on a Windows host, you can install the client or media server role.
Now, continue the installation of Oracle Secure Backup on your Windows host.
Enabling Installer Logging on Windows
The Windows Installer logging helps in troubleshooting issues while installing Oracle Secure Backup.
To enable Windows Installer logging
-
Open the Windows registry with
Regedit.exeand create the following path and keys:HKEY_LOCAL_MACHINE\Software\Policies\Microsoft\Windows\InstallerReg_SZ: LoggingValue: voicewarmupx -
Select the required logging mode. Table 5-2 displays the letters you can enter in the value field to enable the corresponding logging options.
These letters are not in a sequence, that is, you can enter them in any order.
Table 5-2 Windows Installer Logging Values
Value Description v
Verbose output
o
Out-of-disk-space messages
i
Status messages
c
Initial UI parameters
e
All error messages
w
Non-fatal warnings
a
Start up of actions
r
Action-specific records
m
Out-of-memory or fatal exit information
u
User requests
p
Terminal properties
+
Append to existing file
!
Flush each line to the log
x
Extra debugging information
*
Wildcard, log all information except for the
vand thexoptions. To include thevand thexoption, specify/l*vx.Note:
Use Windows Installer logging for troubleshooting purposes only. If you leave it running for a longer period, then it might affect the system performance and occupy more disk space.
Each time you use the Add/Remove Programs tool in Windows Control Panel, it creates a new
Msi*.logfile.
Configuring Advanced Settings for Windows
Oracle Secure Backup provides default values for configuration parameters during installation unless you modify them and specify a different value.
Configuration Parameters for Administrative Server
While running the setup wizard on Windows, you can use the Display advanced settings option to view and modify the configuration parameters. Depending on the host role, whether it is an administrative server or a client, the setup wizard displays the Admin Host Advanced Settings or Client Host Advanced Settings window respectively.
You can modify the following parameters for both administrative server and client role.
-
Temporary directory: Specify the location to store transient files used while performing various operations. For more information, see Oracle Secure Backup Temporary Directory.
-
Start Oracle Secure Backup Services automatically: Select this option to automatically start all services after the system restarts.
You can modify the following parameters in the Admin Host Advanced Settings, that is, only for an administrative server.
-
Minimum User Password Length: Specify the minimum length for Oracle Secure Backup user passwords. For more information, see Length of Oracle Secure Backup User Passwords.
-
Security Certificate Keysize: Specify the key size for identity certificates. For more information, see Identity Key Certificate Length.
To perform Oracle Database backup and restore operations with Recovery Manager (RMAN), Oracle Secure Backup requires a
preauthorized Oracle Secure Backup user on the administrative server. This
preauthorized user with the rights of the oracle
class can perform backup and restore operations with
RMAN.
Note:
-
Create the
oracleuser only for using Oracle Secure Backup with RMAN. -
To perform unprivileged backup operations on Windows clients using RMAN, you must modify the Oracle Secure Backup
adminandoracleusers and assign Windows credentials (a domain, user name, and password) to them. This is applicable to any platform that acts as the administrative server. -
Creating an
oracleuser provides convenience but can also affect the security.
See Also:
Oracle Secure Backup Reference for more
information about the oracle
class
Noninteractive or Unattended Installation on Windows
Oracle Secure Backup supports noninteractive or unattended installation of client role on a Windows host.
Oracle Secure Backup was
            installed.
Configuring Firewalls for Oracle Secure Backup on Windows
Windows contains a built-in Windows Firewall which, in the default configuration, blocks inbound traffic on ports used by Oracle Secure Backup.
If your Windows host is protected by a firewall, then the firewall must be configured to permit Oracle Secure Backup daemons on the host to communicate with the other hosts in your administrative domain. Oracle Secure Backup includes daemon components that listen on port 400, port 10000, and other dynamically assigned ports.
Because the dynamically assigned ports used by Oracle Secure Backup span a broad range of port numbers, your firewall must be configured to allow executables for the Oracle Secure Backup daemons to listen on all ports.
The Oracle Secure
Backup Windows installation provides a sample batch script called
obfirewallconfig.bat in the bin directory under the Oracle
Secure Backup home.
This script contains commands that make the required configuration changes for the Windows Firewall, the built-in firewall released with Windows. Review the script to determine whether it is suitable for your environment. You can run the script after the installation completes.
Local Policy for tcpkeepalive
As Oracle Secure Backup performs a backup, several network connections are opened across the nodes in the Oracle Secure Backup domain. For large backups, some of these connections may be idle for a long time. Your firewall or other network devices may be configured to terminate idle connections after a specific time. If a backup exceeds this time, the firewall terminates the idle connections, resulting in a failed backup.
The firewall terminates a connection in the following scenarios:
-
The firewall is configured to terminate network connections which are idle for a specified time, for example, 7200 seconds or 2 hours.
-
Oracle Secure Backup is performing large backups, which takes longer than the firewall setting for terminating connections.
Enable the local policy for tcpkeepalive to maintain the
network connections and prevent idle socket timeouts, which causes failure of the
backup jobs.
See Also:
See "Enable tcpkeepalive on local host" for more information about how to enable
tcpkeepalive for network connections.
For details on configuration of other firewalls, see the documentation provided by the vendor. You can refer to the sample script for the Windows Firewall to determine the names of executables that need permission to listen on ports.
See Also:
My Oracle Support note 727528.1 for more information on how to configure firewall ports for use with Oracle Secure Backup. My Oracle Support is available at http://support.oracle.com/.
