2.8 Enabling IDCS as Identity Provider in Spatial Studio
Starting from Oracle Spatial Studio Release 22.1.0, you can log into your Spatial Studio instance using users already managed by your own Oracle Cloud tenancy's IDCS identity domain.

The workflow to setup IDCS as the identity provider for Spatial Studio involves the following three steps:

  1. Adding Spatial Studio roles as Groups in IDCS.
  2. Creating an Application in IDCS.
  3. Copying IDCS settings into Spatial Studio's configuration file.

Before you begin, see Prerequisite Requirements for Setting Up IDCS with Spatial Studio to ensure that you meet all the prerequisite requirements.

2.8.1 Prerequisite Requirements for Setting Up IDCS with Spatial Studio

To integrate IDCS with Spatial Studio, you must obtain the following details:

Retrieving IDCS Instance details

You can obtain the IDCS instance details by inspecting any of the IDCS URLs. For instance, you can inspect the IDCS login URL which you receive in the email when you are added as a user in IDCS. For example, consider the following sample IDCS cloud account login URL:

https://idcs-54656e616e742d4578616d706c652121.identity.oraclecloud.com/ui/v1/signin

You can now derive the IDCS instance details from the preceding URL as shown:
  • IDCS tenant: idcs-54656e616e742d4578616d706c652121
  • IDCS host: identity.oraclecloud.com

2.8.1.1 Determining the IDCS Console URL

OCI tenancies include a default IDCS instance and you can obtain the IDCS console URL using the OCI console.

Perform the following steps to identify the URL to access IDCS console:
  1. Sign in to the OCI console using your Oracle Cloud credentials.
  2. Open the navigation menu and select Identity and Security.
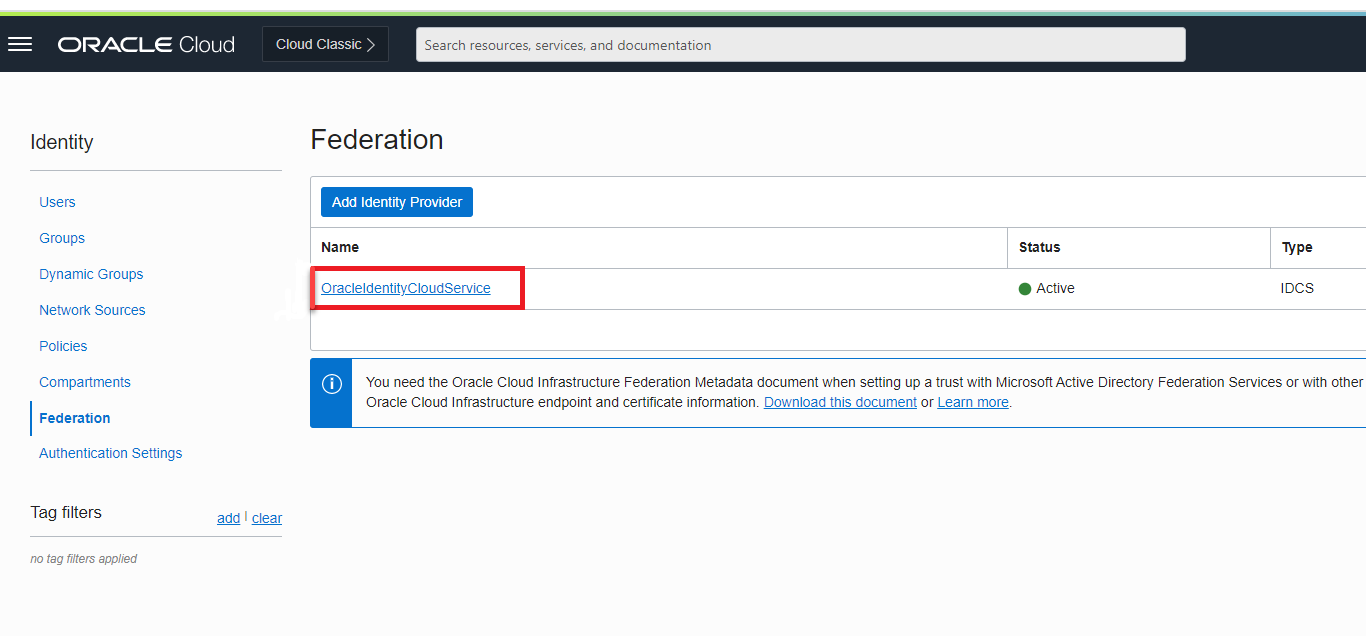
  3. Click Federation under Identity.
    The Federation page opens as shown:

    Figure 2-6 Default IDCS Instance on the Federation Page

    Description of Figure 2-6 follows
    Description of "Figure 2-6 Default IDCS Instance on the Federation Page"
  4. Click on the default IDCS instance, shown highlighted in the preceding figure.
    The Identity Provider Details page opens.
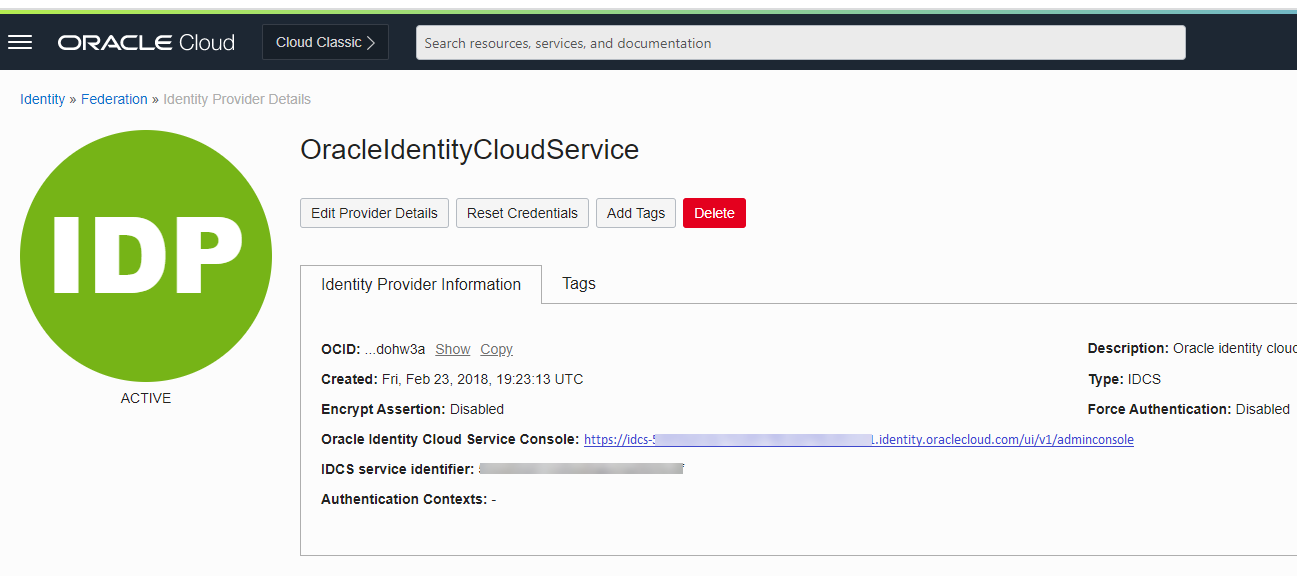
  5. Note the IDCS console URL in the Oracle Identity Cloud Service Console field as shown:

2.8.2 Adding Spatial Studio Role as a Group in IDCS

You must add the system administrator role supported in Spatial Studio as a group in IDCS.

The system administrator role in Spatial Studio is identified by SGTech_SystemAdmin. This implies that the administrator has full access to the entire system.

You need to add this role as an IDCS group. However, the following applies:

  • Users assigned to this group will have admin rights in the Spatial Studio instance that is being set up.
  • Users who do not belong to this group will have regular access to the Spatial Studio instance when added to the IDCS application.
As a prerequisite, you must obtain the IDCS console URL. See Determining the IDCS Console URL for details.

Perform the following steps to create the groups in IDCS:

  1. Open the IDCS login page using the IDCS console URL in your browser.
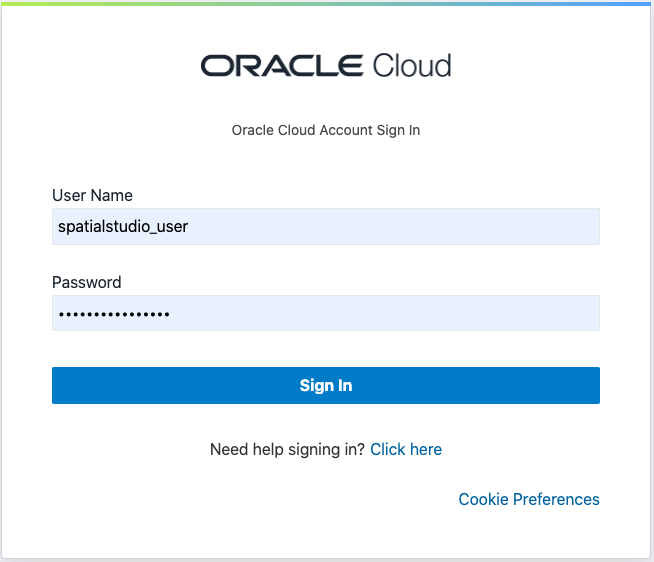
  2. Enter the ADMIN user credentials and sign in as shown:
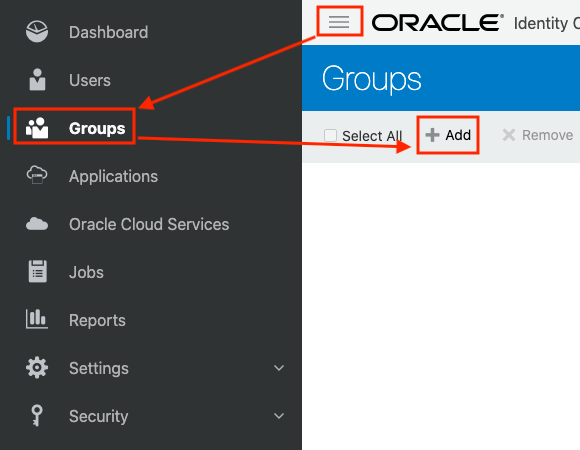
  3. Open the navigation menu on top left, select Groups and click Add to create a new group as shown:

    Figure 2-9 Adding an IDCS Group

    Description of Figure 2-9 follows
    Description of "Figure 2-9 Adding an IDCS Group"
    The Add Group dialog opens and displays the Step 1: Group Details page.
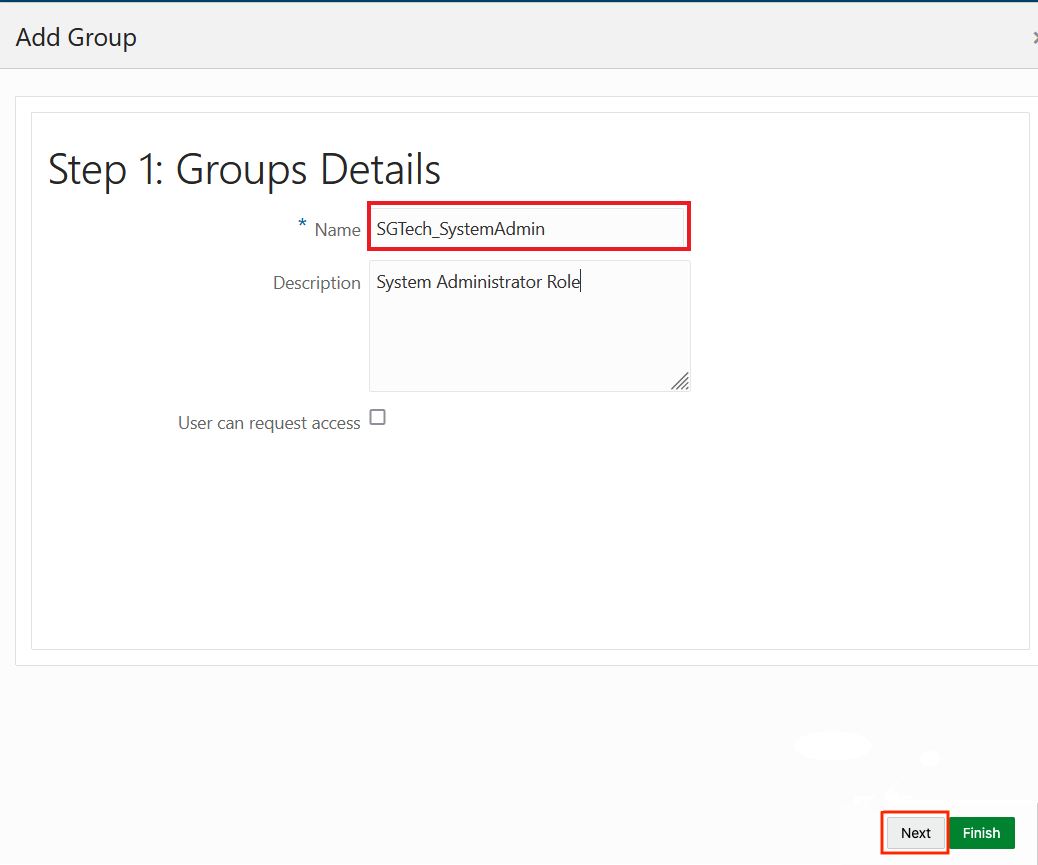
  4. Enter Name as SGTech_SystemAdmin.
    Note that the role name is case sensitive.
  5. Optionally, enter a Description.
  6. Click Next as shown:

    Figure 2-10 Step-1: Group Details

    Description of Figure 2-10 follows
    Description of "Figure 2-10 Step-1: Group Details"
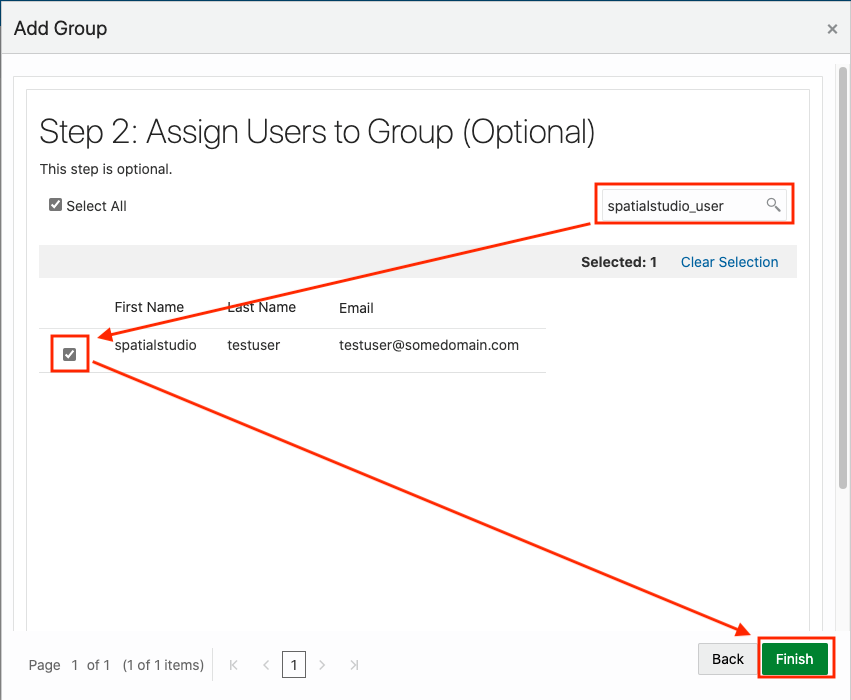
    Step 2: Assign Users to Group (Optional) page opens listing all the existing users.
  7. Select the required user and click Finish.
    For example, the following figure shows assigning spatialstudio_user to the group role SGTech_SystemAdmin:

    Figure 2-11 Step2: Assign Users to a Group

    Description of Figure 2-11 follows
    Description of "Figure 2-11 Step2: Assign Users to a Group"
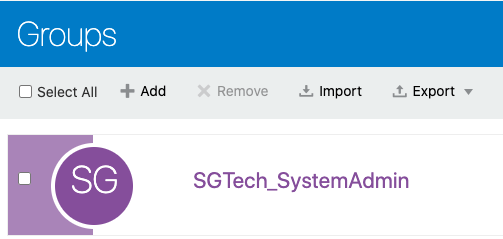
  8. Verify that the newly added group is listed on the Groups page:

2.8.3 Creating an Application in IDCS

This section describes the steps to add the Spatial Studio application in IDCS.

  1. Sign in to IDCS using ADMIN user credentials.
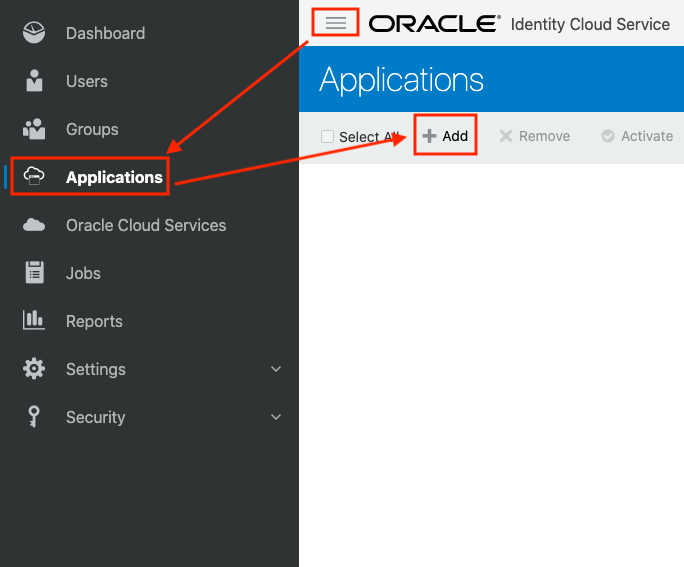
  2. Open the navigation menu on top left, select Applications and click Add to add a new application as shown:

    Figure 2-13 Adding an Application

    Description of Figure 2-13 follows
    Description of "Figure 2-13 Adding an Application"
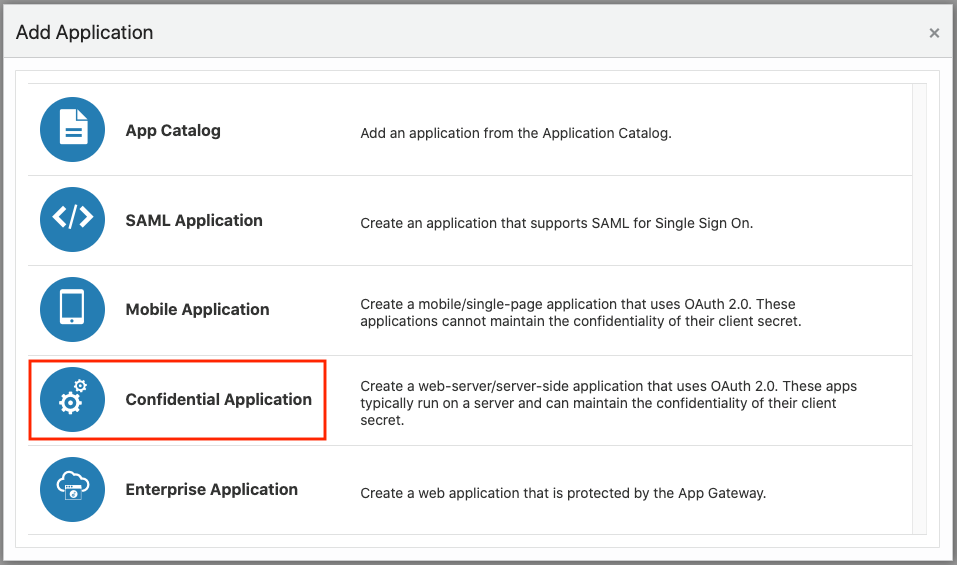
    The Add Application dialog opens.
  3. Select Confidential Application.

    Figure 2-14 Add Application Dialog

    Description of Figure 2-14 follows
    Description of "Figure 2-14 Add Application Dialog"
    The Add Confidential Application wizard opens displaying the Details page.
  4. Enter the application Name.
  5. Optionally, add a Description and click Next.

    Figure 2-15 Add Confidential Application: Details Page

    Description of Figure 2-15 follows
    Description of "Figure 2-15 Add Confidential Application: Details Page"
    The Client page opens.
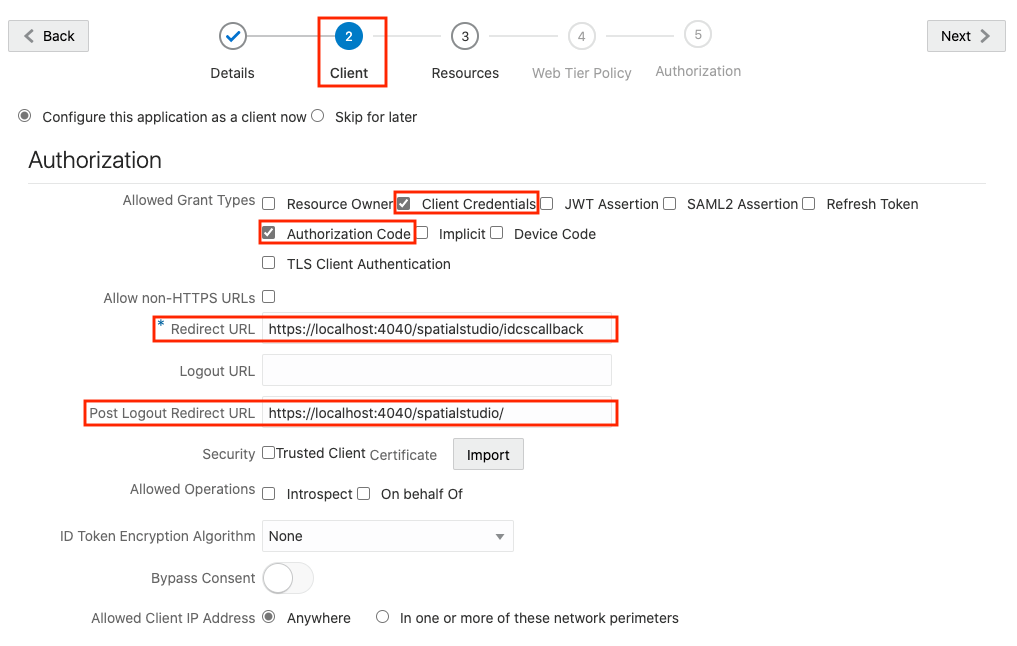
  6. Click Configure this application as a client now to configure the authorization information for the new application.
    Perform the following in the Authorization section:
    1. Enable Client Credentials and Authorization Code for Allowed Grant Types.
    2. Enter <spatial_studio_url>/idcscallback in Redirect URL.
    3. Enter <spatial_studio_url> in Post Logout Redirect URL.
    4. Optionally, for Security, you can enable Trusted Client to import a custom certificate.

    Figure 2-16 Configuring Client Details

    Description of Figure 2-16 follows
    Description of "Figure 2-16 Configuring Client Details"
    Perform the following in the Token Issuance Policy section:
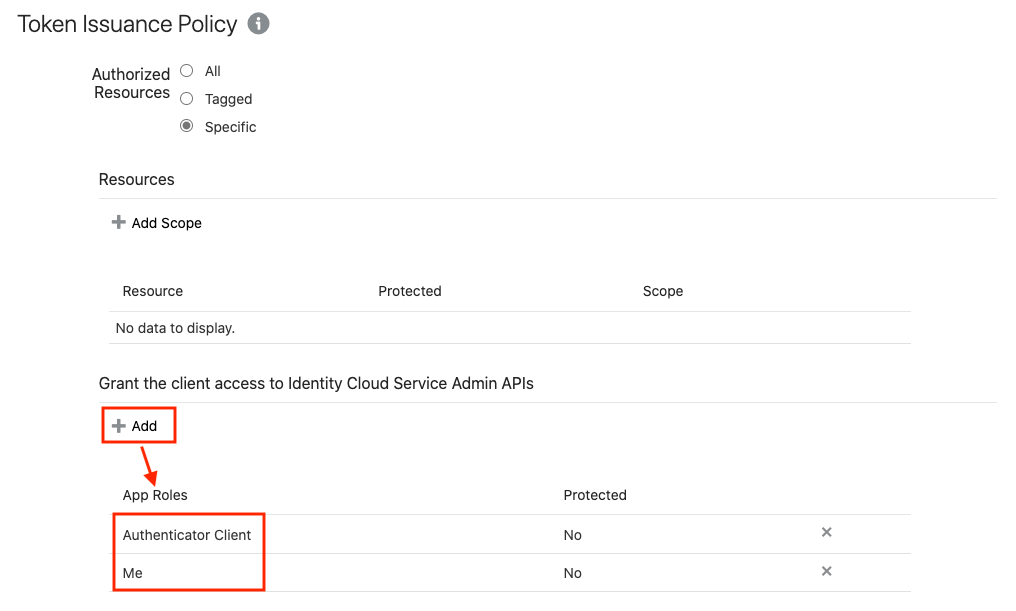
    1. Click Add under Grant the client access to Identity Cloud Service Admin APIs to enable the application to access IDCS APIs.

      The Add App Role window opens listing the application roles.

    2. Select Me and Authenticator Client and click Add to assign these application roles to the application as shown:

      Figure 2-17 Configuring Token Issuance Policy

      Description of Figure 2-17 follows
      Description of "Figure 2-17 Configuring Token Issuance Policy"
    3. Click Next on the top right of the page to continue.
  7. Skip Resources and Web Tier Policy by clicking the Next button and navigate to the Authorization page.
  8. Enable the Enforce Grants as Authorization option.
  9. Click Finish.

    Figure 2-18 Configuring Authorization

    Description of Figure 2-18 follows
    Description of "Figure 2-18 Configuring Authorization"
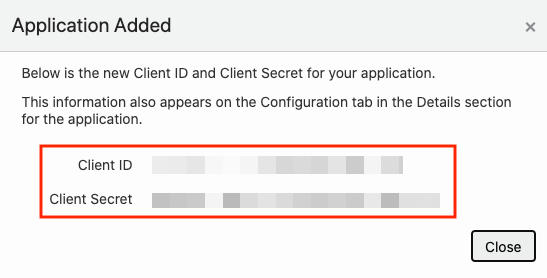
    The application is added and the Application Added dialog box opens.

    Figure 2-19 Confirmation Dialog

    Description of Figure 2-19 follows
    Description of "Figure 2-19 Confirmation Dialog"
  10. Note the Client ID and Client Secret to be used later to complete the configuration.

    Tip:

    You can also obtain the client credentials for the application from the Configuration tab in the General Information section, once the application is activated.
  11. Click Close.

    The new application’s Details page is displayed.

  12. Click Activate to grant users access to the application and confirm the operation on the prompt that follows.

    Figure 2-20 Confirmation for Activating Application

    Description of Figure 2-20 follows
    Description of "Figure 2-20 Confirmation for Activating Application"
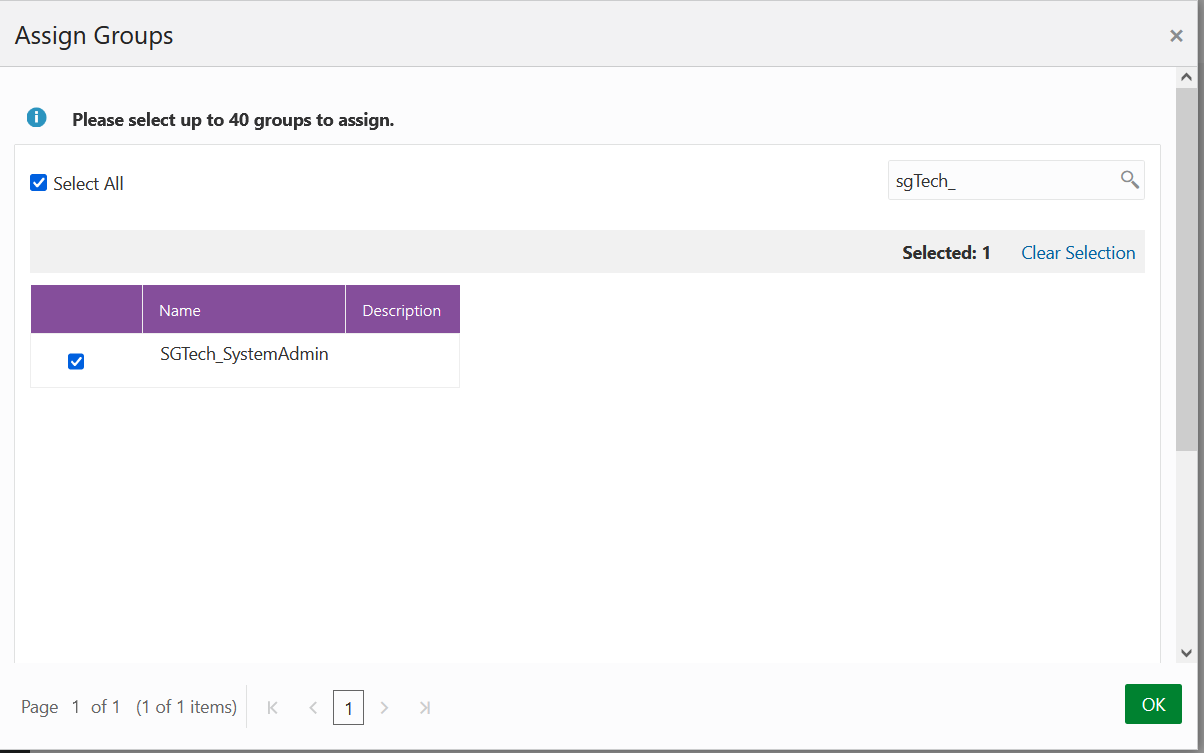
  13. Click the Groups tab and then click Assign to add the group created in Adding Spatial Studio Role as a Group in IDCS as shown:

    Figure 2-21 Assigning Groups to an Application

    Description of Figure 2-21 follows
    Description of "Figure 2-21 Assigning Groups to an Application"
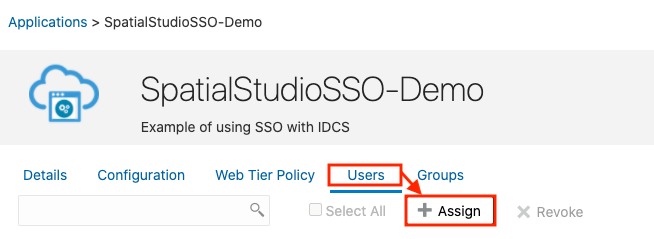
  14. Optionally, add non-admin users through the Users tab or using other groups.

    Figure 2-22 Assigning Non-Admin Users

    Description of Figure 2-22 follows
    Description of "Figure 2-22 Assigning Non-Admin Users"

2.8.4 Copying IDCS Settings into Spatial Studio's Configuration File

To integrate Spatial Studio with IDCS, you must add the IDCS settings into the sgtech_config.json configuration file.

The configuration file is located at ~/.sgtech/sgtech_config.json path. You can directly append the IDCS settings into the sgtech_config.json file. However, the best practice is to have the IDCS settings in a separate configuration file and then import this file into the main configuration file.
Perform the following steps to create a configuration file for the IDCS settings and to import this configuration in sgtech_config.json:
  1. Create a new empty JSON configuration file in the ~/.sgtech directory.
    For example:

    ~/.sgtech/sgtech_config.idcs.json

  2. Edit the created file with a file editor of your choice and add the IDCS settings information as shown:
    {
      "idcs" : {
        "Host" : "identity.oraclecloud.com",
        "ClientTenant" : "<tenant_id>",
        "ClientId" : "<client_id>",
        "ClientSecret" : "<client_secret>",
        "redirectURL" : "https://localhost:4040/spatialstudio/idcscallback",
        "postLogoutRedirectURL" : "https://localhost:4040/spatialstudio/"
      }
    }

    In the preceding file:

    • Host: IDCS host.
    • Client Tenant: IDCS tenant.
    • ClientId : Generated when creating the IDCS application.
    • ClientSecret : Generated when creating the IDCS application.
    • redirectURL : Same as the Redirect URL used when creating the IDCS application.
    • postLogoutRedirectURL : Same as the Post Logout Redirect URL used when creating the IDCS application.
  3. Save the sgtech_config.idcs.json file.
  4. Edit the main sgtech_config.json file and add the import configuration as shown:
    {
      "version" : "24.1.0",
      "work_dir" : "",
      ...
      "jobs" : {
        "init_threads_count" : 15
      },
      "imports" : {
        "idcsclient" : {
          "module" : "sgtech_config.idcs.json"
        }
      }

    It is important to note that there can be only one imports object in the main sgtech_config.json file. Therefore, if an imports configuration is already existing in the main sgtech_config.json file, then you can add the idcsclient entry to the imports block as shown:

    {
      "version" : "24.1.0",
      "work_dir" : "",
      ...
      "jobs" : {
        "init_threads_count" : 15
      },
      "imports" : {
        "idcsclient" : {
          "module" : "sgtech_config.idcs.json"
        },
        "rolesmapping" : {
          "module" : "sgtech_config.security.json"  
        }
      }
  5. Save the sgtech_config.json file.

2.8.5 Testing IDCS Login

After all the setup steps are completed, you can test and verify the IDCS login.

  1. Ensure you have logged out from IDCS.
  2. Ensure all Spatial Studio instances are stopped.
    You can stop a Spatial Studio instance by executing stop.sh for Linux and stop.cmd for Windows.
  3. Run Spatial Studio by executing start.sh (Linux) or start.cmd (Windows).
  4. Open the main URL in your browser, once Spatial Studio is running. For example:
    https://localhost:4040/spatialstudio/
    The IDCS login screen as shown in Figure 2-8 opens instead of Spatial Studio's standard login screen.
  5. Enter your credentials and click Sign In.
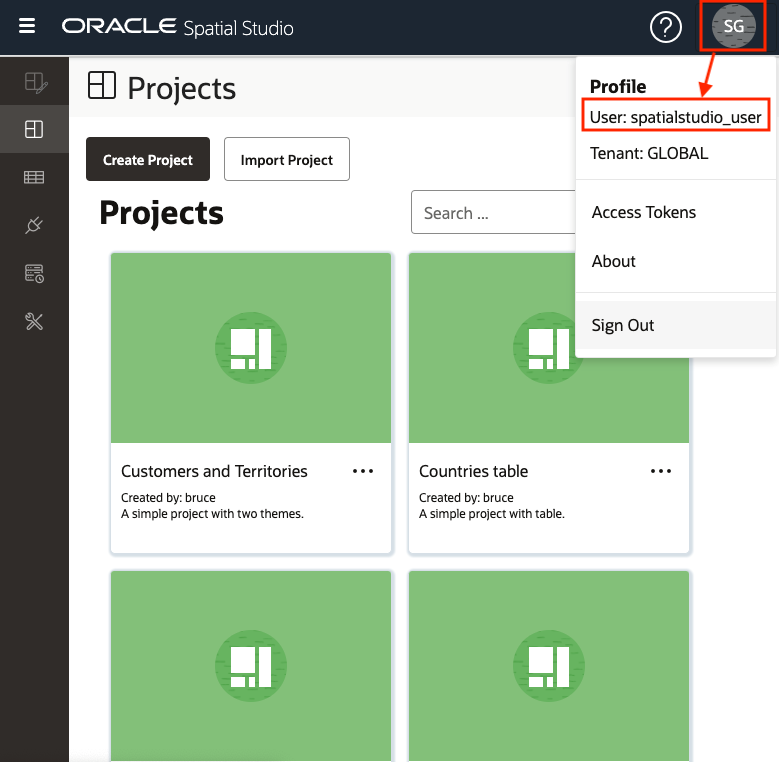
    You will be automatically redirected to the Spatial Studio instance. You can verify the logged in user by clicking on the Avatar icon as shown:
  6. Click Sign out in the Profile menu to logout from Spatial Studio.
    Note, this will also log you out from any other application that is running on IDCS.