Scheduler Jobs
Oracle SQL Developer for VS Code provides a Jobs node for creating, viewing, and managing Scheduler jobs. The Jobs Management Dashboard enables you to monitor job status, review run information, and perform common job management operations.
Jobs Management Dashboard
The Jobs Management Dashboard provides a centralized interface for viewing and managing Oracle Scheduler jobs in the current schema. It enables you to inspect job details and status information, search and filter jobs, and perform common job management operations such as creating, running, editing, enabling, disabling, and dropping Scheduler jobs.
To open the Jobs Management Dashboard:
-
Open SQL Developer for VS Code.
-
In the Connections panel, expand your database connection tree.
-
Expand DBA, and then expand Scheduler.
-
Right-click Jobs and select Jobs Management Dashboard.
Note: The DBA node is displayed only for connections configured with DBA (Database Administrator) option. For more information, see Creating a Connection.
The Jobs Management Dashboard opens and displays a grid of Scheduler jobs for the current schema. The grid includes job details such as job name, owner, state, job type, run count, failure count, and last start date.
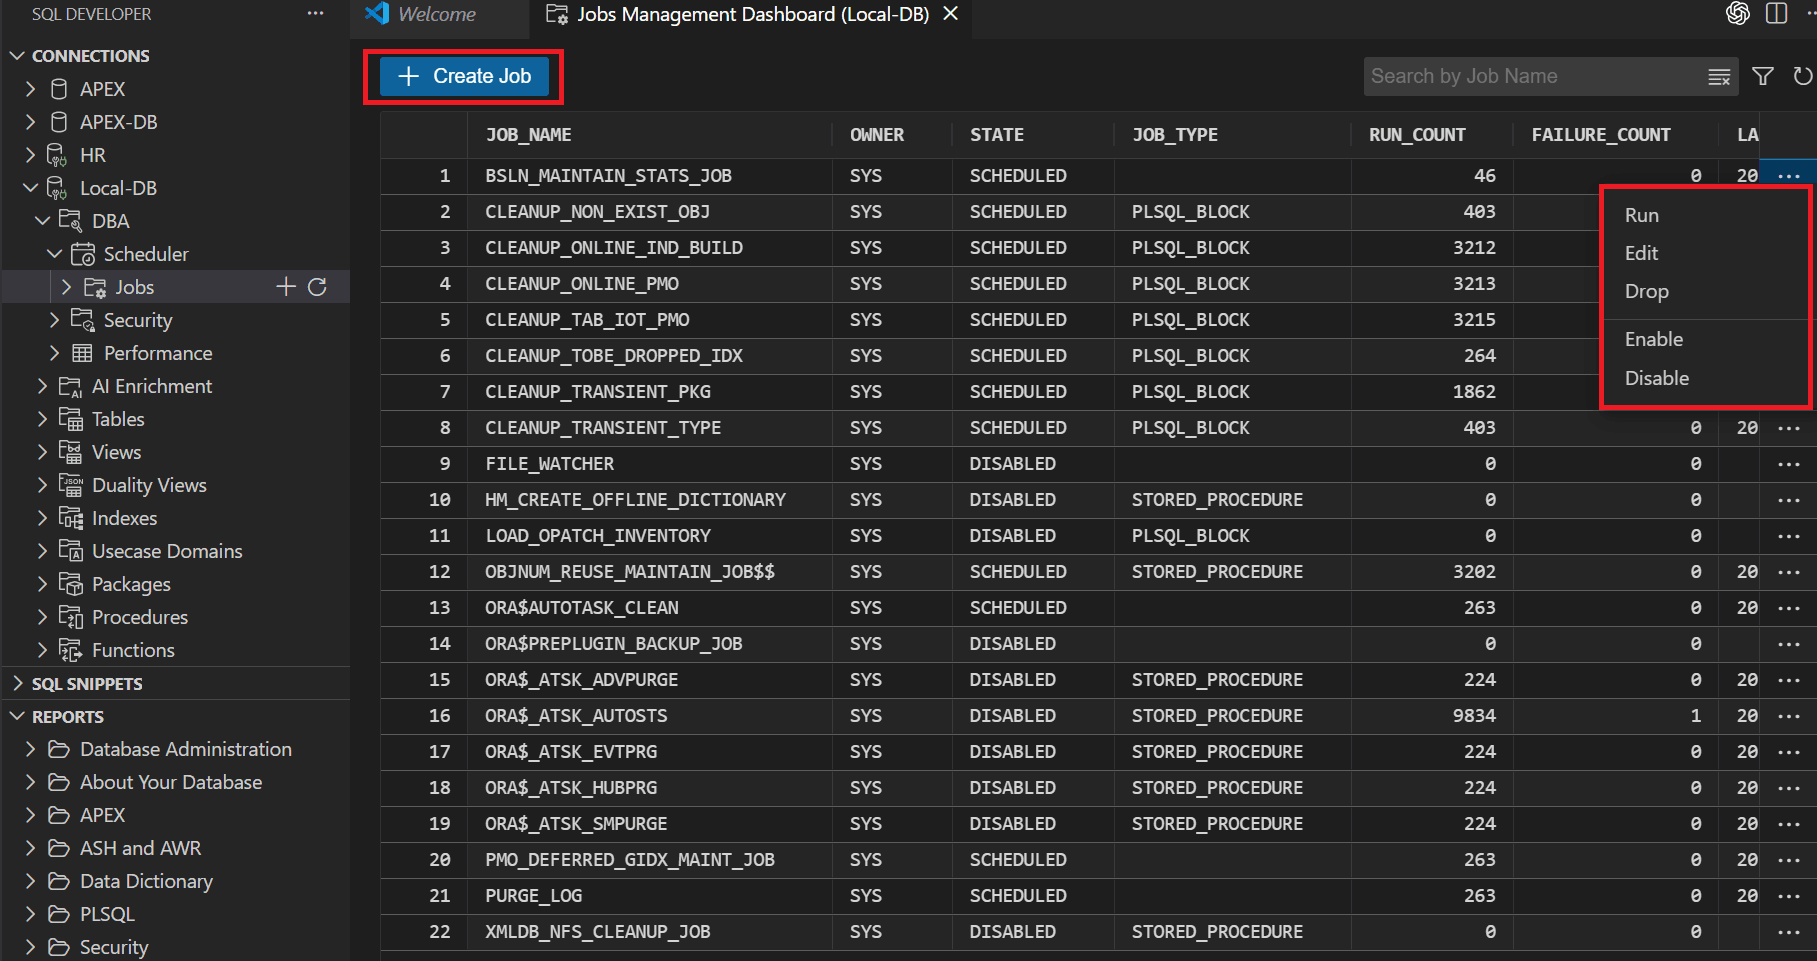
Description of the illustration job_scheduler_dashboard.png
Run and Manage Jobs
You can perform the following common operations from the dashboard:
-
Create Job: Opens the Job Editor with a blank job definition form.
-
Run: Runs the selected Scheduler job.
-
Edit: Opens the selected job in the Job Editor. Read-only fields remain non-editable.
-
Drop: Deletes the selected job after confirmation.
-
Enable: Enables a disabled job.
-
Disable: Disables an enabled job.
Creating or Editing a Job
Use the Job Editor to create a new Scheduler job or edit an existing one.
Perform the following steps to create or edit a job:
-
On the Jobs Management Dashboard, click Create Job.
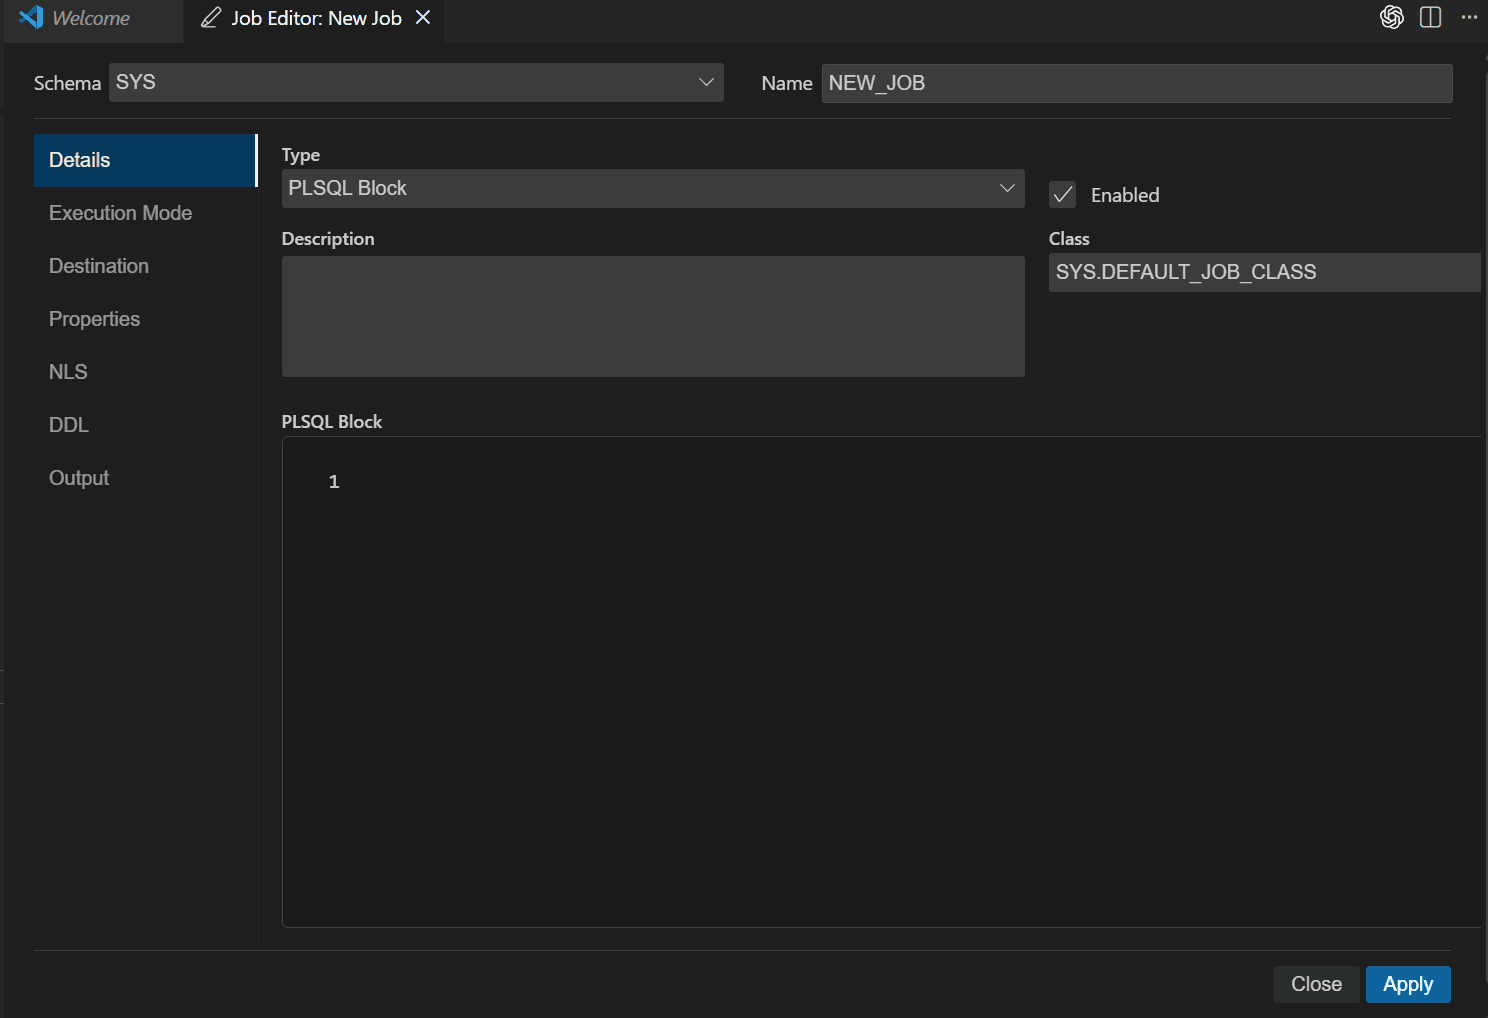
Alternatively, in the Connections panel, click the + icon next to Jobs. The Job Editor opens with the current schema name in the Schema drop-down list. The Name field displays the default job name NEW_JOB.
Note: To edit an existing job, locate the job in the Jobs Management Dashboard and select Edit from the actions menu (…). The Job Editor opens and displays the current job definition. Modify the job details as required.
-
On the Details page, specify the job details:
-
In the Name field, enter the job name.
-
In the Type field, select the job type. Available options are: PL/SQL Block, Stored Procedure, Chain, Named Program, Executable, and Script.
-
Select Enabled if you want the job to be enabled after creation.
-
In the Description field, enter a description.
-
In the Class field, select a job class. By default, SYS.DEFAULT_JOB_CLASS is selected.
-
In the editor below, specify the job action to be performed when the job runs. The content required depends on the selected Type. For example, for a PL/SQL block job, enter a valid PL/SQL block, for a Stored Procedure job, specify the procedure to execute. Ensure that the job action is valid for the selected job type.
-
-
On the Execution Mode page, select an execution mode and specify the required settings.
-
Immediate: Run the job as soon as it is enabled.
-
Once: Run the job one time at a specified start date and time.
-
Repeating: Run the job on a recurring schedule using a repeat interval.
-
Queue: Configure queue-based execution settings and conditions.
-
File Watcher: Trigger the job when a file watcher event occurs.
-
Schedule: Associate the job with an existing Scheduler schedule.
-
Window: Run the job within a specified Scheduler window.
-
Window Group: Run the job based on a Scheduler window group.
-
-
On the Destination page, specify where the job runs.
-
Select Local to run the job on the connected database.
-
Select Remote to run the job on a remote destination by selecting a credential and database destination.
-
Select Multiple to run the job across a destination group by selecting a default credential and destination group.
-
-
On the Properties page, configure additional job settings as required.
-
Options: Configure job behavior, such as automatic job removal, restart behavior, output storage, time zone handling, restricted mode execution, stopping a job when an associated Scheduler window closes, script error handling, and parallel execution.
-
Job Style: Select the job style. This field is enabled only when Type is set to Named Program. Available options are Regular and Lightweight.
-
Job Priority: Set the relative priority of the job when multiple jobs are eligible to run.
-
Logging Level: Specify how frequently Oracle Scheduler writes job execution information to the job log.
-
DBMS_SCHEDULER.LOGGING_OFF: No job execution information is written to the job log.
-
DBMS_SCHEDULER.LOGGING_FAILED_RUNS: Information is written to the job log only when the job fails.
-
DBMS_SCHEDULER.LOGGING_RUNS: Information is written to the job log each time the job runs.
-
DBMS_SCHEDULER.LOGGING_FULL: Information is written to the job log each time the job runs and whenever an operation is performed on the job, such as create, enable, disable, update, stop, or drop.
-
-
Instance ID: Specify the database instance on which the job should run, if applicable.
-
Max Runs: Specify the maximum number of times the job can run before it is automatically disabled.
-
Max Failures: Specify the maximum number of failures allowed before the job is automatically disabled.
-
Raise Events: Select the Scheduler events for which notifications should be generated, such as job start, success, or failure events.
-
-
On the NLS page, review the NLS settings used by the job.
-
On the DDL page, review the generated SQL statements before applying the change.
The Create tab displays the SQL statements used to create the Scheduler job. The Update tab displays the SQL statements used to update an existing Scheduler job. Review the generated SQL to verify the job definition, execution settings, destination configuration, scheduling information, and other job properties.
-
Click Apply to create or update the Scheduler job.
The Output page with review status messages, errors, or operation results opens.
The new job appears in the grid on the Jobs Management Dashboard.