5 The JSON Page

Note:

Available for Oracle Database release 19c and later releases and only if you signed in as a database user with the SODA_APP role.
Use the JSON page in Database Actions to view and manage JSON collections, search for collection items using Query-by-Example (QBE), create JSON search indexes and display data guide diagrams for collections.

To navigate to the JSON page, do either of the following:

  • In the Launchpad page, select the Development tab and click JSON.

  • Click Selector Selector to display the navigation menu. Under Development, select JSON.

About the JSON User Interface

The JSON user interface consists of the left pane for listing and searching saved collections and the right pane for viewing and managing documents in a collection.

Listing and Searching JSON Collections

The following figure shows the main items in the left pane of the JSON page.

Select the appropriate option in the drop-down list to display saved JSON collections or recently accessed JSON collections.

The search functionality is not case-sensitive, retrieves all matching entries, and does not require the use of wildcard characters.

Click the Create Collection icon to create a new collection. See Creating a Collection

Right-click a collection name to open the context menu. The available options are:

  • Indexes: Enables you to view existing JSON indexes and create search, functional or spatial indexes.

  • Drop: Removes the collection from the database completely.

Viewing the Contents of a Collection

When a specific collection is selected in the left pane, the JSON documents that belong to the collection are displayed in the lower part of the right pane. The top part of the right pane contains the JSON editor where you can run queries for filtering or sorting the documents.

The two icons in the right corner are:

  • Tour tour icon: Starts the JSON tour, which provides information about the features available.

  • Go to SQL SQL page icon: Navigates to the SQL page.

The icons in the toolbar are:

  • New JSON Document new document icon: Adds a new document to the collection. See About Adding or Editing a JSON Document

  • Import Document(s) import document icon: Imports one or more existing JSON files from your local computer into the collection.

  • Delete All Documents in the list delete documents icon: Deletes all JSON documents in the collection that match the current QBE search string. If the current string is {}, then all the documents in the collection are deleted.

  • Collection Details collection details icon: Enables you to view collection properties, JSON data guide (if created) and related statistics if they are gathered, size of search index, and page for managing JSON indexes.

  • Diagram diagram icon: Displays the the JSON data guide as a diagram in a hierarchical format. See Viewing the JSON Data Guide Diagram for a Collection

  • New Collection Viewcollection view icon: Creates relational views of documents in a collection.

  • Run Query run query icon: Filters documents using the QBE condition entered in the JSON editor. See About Querying Documents in a Collection

  • View Collection SQLview collection sql icon: Displays the JSON collection in SQL format. You can execute the SQL code, download it or copy to clipboard.

Each JSON document has the following icons:

  • Edit Document edit document icon: Edits the JSON document. See About Adding or Editing a JSON Document

  • Clone Document clone docment icon: Creates a clone of the document.

  • Copy Document copy document icon: Copies the document to the clipboard.

  • Export Document export document icon: Downloads the document as a .JSON file.

  • Delete Document delete document icon: Deletes the document.

Managing JSON Collections

You can add, view or drop collections, or browse, add, edit and delete JSON documents in a collection.

  • Create a Collection: See Creating a Collection

  • Add or Edit Documents in a Collection: See About Adding or Editing a JSON Document

  • View Documents in a Collection: Select the collection name in the left pane. The documents in the collection are displayed in the right pane.

  • View Collection Details: Select the specific collection in the left pane, and then click Collection Details collection details icon in the right pane toolbar to view collection properties, JSON data guide (if created) and related statistics if gathered, the size of search index, and the page for managing JSON indexes.

  • Drop a Collection: Right-click a collection name in the left pane to open the context menu. Select Drop to remove the collection from the database completely.

Creating a Collection

This section describes how to create a collection.

  1. When you navigate to the JSON page:
    • If there are no collections created, you see the JSON home page. Click Create Collection.

    • If there are existing collections available, then in the left pane, click Create Collection new collection icon.

  2. Enter the collection name, which is case sensitive.
  3. If the MongoDB Compatible option is selected, then the document IDs will be Embedded IDs.
    • Document IDs are part of the JSON document (field name is "_id"). If an _id field is missing, it is generated and added to the JSON document.

    • This collection is MongoDB compatible. MongoDB drivers connecting to the MongoDB API for the Oracle Database can read and write to this collection.

    • To use these collections from SODA, you need a SODA driver that supports the EMBEDDED_OID key assignment method.

    • This method is documented as EMBEDDED_OID.

    • The name of the content column (the column where JSON documents are stored) in the underlying table is DATA.

    Out of line IDs:

    • SODA always generates the ID for a new document.

    • The ID is not embedded in the JSON document but stored separately.

    • MongoDB drivers connecting to the MongoDB API for the Oracle Database can only read from this collection.

    • This method is documented as UUID.

    • The name of the content column in the underlying table is JSON_DOCUMENT.

  4. Click Create to create the collection.

    Click Cancel or press the Esc key to cancel the collection.

About Adding or Editing a JSON Document

You can add and edit JSON documents using the JSON editor.

To add a document, click New JSON Document New JSON Document icon in the right pane toolbar for a specific collection. In the JSON editor, you can copy and paste the JSON document or use the Import icon to import the JSON document.

To edit a document, click Edit Document edit document icon in the document card.

The following figure shows an open document in the JSON editor.

About Database Differences in JSON Documents

You can find differences in a JSON document that has been edited from two different connections.

At the time of saving an edited document, you are notified that there are differences between your edited document and the instance of the document in the database. The differences are also highlighted enabling a quick review.

Click Overwrite if you prefer to overwrite the changes to the document instance in the database.

Figure 5-1 Differences in the Document Displayed

Description of Figure 5-1 follows
Description of "Figure 5-1 Differences in the Document Displayed"

About Querying Documents in a Collection

You can search for one or more documents in a collection by using a filter specification or Query-by-Example (QBE).

A QBE is a pattern expressed in JSON. You use it to select, from a collection, the JSON documents whose content matches it, meaning that the condition expressed by the pattern evaluates to true for the content of only those documents. For more information about QBEs and how to use them, see Overview of SODA QBEs in Oracle Database Introduction to Simple Oracle Document Access (SODA).

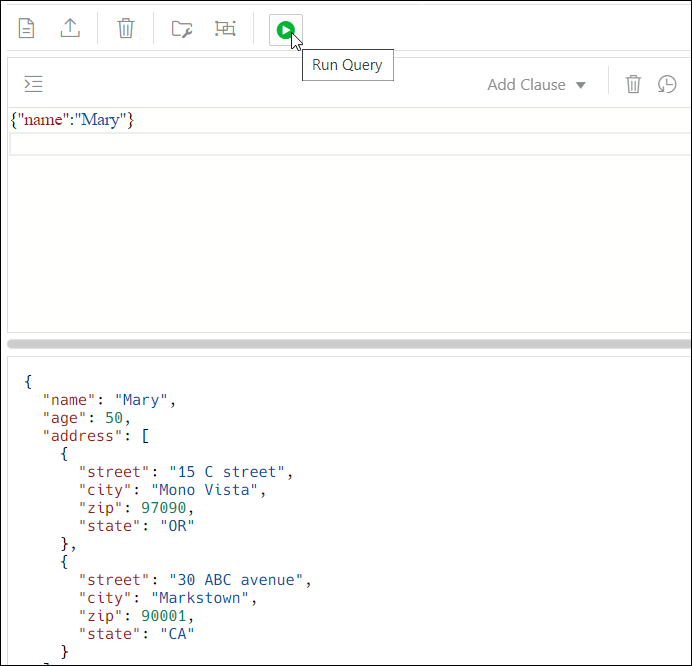
For a specific collection, enter the QBE string in the JSON editor. For example, to select documents where the name is Mary, enter {"name":"Mary"} and then click Run Query, as shown in Figure 5-2. The results of the query are displayed in the lower right pane.

The editor offers a comprehensive list of commands available through the Command Palette. To open the Command Palette, press Ctrl+Shift+P. For a list of keyboard shortcut keys, see Keyboard Shortcuts.

An error in the query is signified by a red dot in the left gutter and a squiggle line beneath the specific text. When you hover over it, you see a pop-up displaying possible fixes for resolving the error.

You can set editor preferences using the Preferences option in the top-right user drop-down list on the header. Some of the available options are Theme (Light, Dark and High contrast dark), Font size and family, Tab size, Word wrap, Ruler, Line numbers and so on.

The icons above the editor are:

  • Format JSON data format json icon: Enables indentation and line feeds for the QBE string.

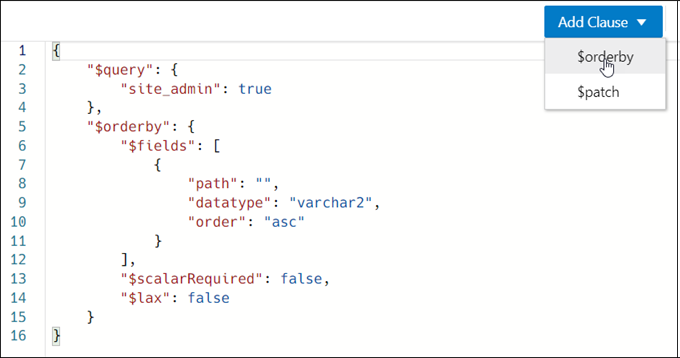
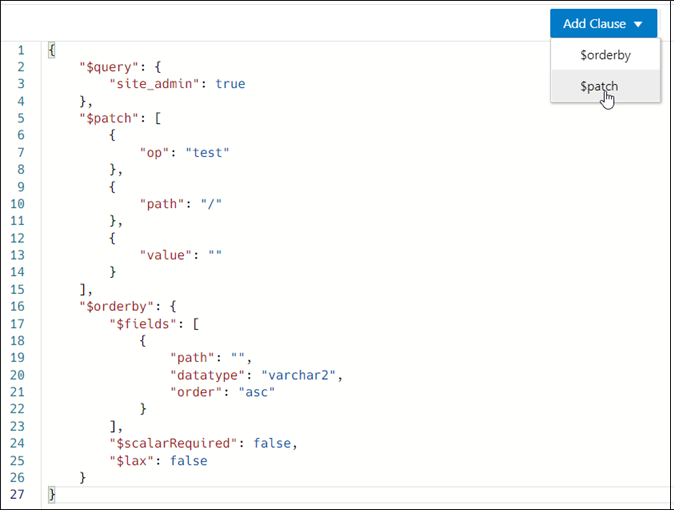
  • Add Clause: Adds a formatted template of the $orderby or $patch clause to the QBE string.

  • Clear clear icon: Clears the current QBE string.

  • History history icon: Retrieves previous QBE search strings.

Figure 5-2 QBE String in JSON Editor

Description of Figure 5-2 follows
Description of "Figure 5-2 QBE String in JSON Editor"

The QBE expression must be a valid JSON object and can contain $query and $orderby or $patch clauses. The QBE expression is treated as a $query clause if there are no clauses defined. Starting with the $query clause, add the $orderby or $patch clause later using the Add Clause list. The content is transformed and a template for the $orderby and $patch clause is provided. You need to set correct values in the templates. See Using the In-Context Autocomplete Feature in the JSON Editor

For example, this is a simple filtering query:

Description of plain_query.png follows
Description of the illustration plain_query.png

After the $orderby clause is added using Add Clause, you see the following entry:
Description of orderby_clause.png follows
Description of the illustration orderby_clause.png

After the $patch clause is added, the query changes to:
Description of patch_clause.png follows
Description of the illustration patch_clause.png

Using the In-Context Autocomplete Feature in the JSON Editor

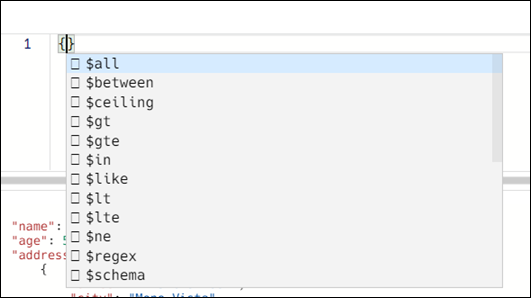
If you press Ctrl+Space, the editor provides you with a context-aware list of options from which you can select and autocomplete at the insertion point.
Description of json_code_completion.png follows
Description of the illustration json_code_completion.png

The following types of information appear in the list:

  • Filter comparison clauses

    A template is available for each clause and it is inserted at the cursor position. For example, when you select the $between clause from the autocomplete list, you see the following entry in the editor:

    Description of filter_clause.png follows
    Description of the illustration filter_clause.png

    where age is the property name and 49 and 70 are values. These are parameters that you can edit and they appear highlighted. You can type or use the autocomplete help to edit the property name. Press the Tab key to move to the next parameter.

  • Property names from JSON documents in the collection

    There are two sources for property names from JSON documents:

    • If a search index is created with support for data guide, then the JSON data guide from the database dictionary is scanned for property names.

    • Property names that are collected from viewed or edited documents are presented. It is possible that the property names are a subset from the whole namespace.

    Based on the type of property, the related template is inserted and the cursor is positioned at the expected place for insertion. The following is a list of property types, their templates and the corresponding cursor position for each:

    • Object

      "ShippingInstructions.Address": {
      <cursor_here>
      }
    • Array

      "LineItems": [<cursor_here>]
    • String
      "LineItems[*].Part.Description": "<cursor_here>]"
    • Number
      "PONumber": 0
    • Boolean
      "site_admin": true

    When the cursor is between double quotes (“”) and autocompletion is activated, then only the property name is inserted without templates or additional double quotes.

Creating Indexes for JSON Collections

You can create indexes for JSON collections in the JSON page.

See Also:

Indexes for JSON Data in Oracle Database JSON Developer's Guide

Open the Indexes Pane

In the JSON left pane, right-click the collection, and select Indexes.

The Indexes pane lists the existing indexes for the collection. Select the index row to display more information.

The icons at the top are Add JSON Index, Edit JSON Index, and Delete JSON Index.

The properties of the selected index appear in JSON format below the listed indexes. Select JSON from the TABLE - JSON option to view all indexes in JSON presentation.

Create an Index

  1. Click the + New JSON Index icon. The New Index pane appears.

  2. Enter the following fields to create an index:

    • Name: Enter a name for the index.

    • Type: Select the index type from the drop-down list. The different options are Functional, Spatial and Search. Based on the index type selected, the corresponding options appear.

    • For a functional type index, the fields to enter are:

      • Unique: Select this option to make all indexed values unique.

      • Index Nulls: Select this option to use the index in Order By queries.

      • Path Required: Select this option if the path must select a scalar value, even a JSON null value.

      • Properties: Type the property that you want to index on, or Type * to display all available document properties in the collection. To select a property, select the checkbox in the respective row.

        Note:

        You cannot index properties in arrays.
      • Composite Index: Select this option if you want to use more than one property.

      • Advanced: Select this option to change the storage properties of the indexed property. For each property, you can change the type (varchar2, number, date or timestamp), maximum length for indexing (for character properties), and sort order.

    • For search index, the options are:

      • Dataguide off-on: Select on to create JSON data guide for collection.

      • Text Search off-on: Select on to index all properties in documents to support full-text search based on string equality (every property is treated as string)

      • Range Search off-on: Select on to support range search when string-range search or temporal search (equality or range) is required.

    • Spatial index is used to index GeoJSON geographic data. The selected property should be of GeoJSON type. See Using GeoJSON Geographic Data

      For spatial index, the options are:

      • Path Required: Select this option if the path must select a value, even if it is a JSON null value.

      • Lax: Select this option if the targeted field does not need to be present or does not have a GeoJSON geometry object as its value.

        Note:

        You cannot enable Path Required and Lax at the same time.
  3. Click Create. A notification is displayed indicating that the index is created and the Indexes pane is populated.

Creating Relational Views of JSON Documents

You can create relational views of JSON documents.
  1. In the JSON page, click collection view icon New Collection View in the right pane.
  2. Enter the following fields:
    • View Name: Enter a name for the view.

    • Select columns to add: Click in this field to view the list of available properties and to select the required properties, adding them one at a time. Alternatively, select Add All to add all objects and arrays with all their properties. Select one or several properties and move them up or down to position them in the resulting view. Objects and arrays are moved or deleted together with all their properties.

      You can edit the Column Name attribute for each column, and for string types, you can also edit the Length attribute. Precision and scale can be set for numeric properties, for example, (10,2).

  3. Click Test Query to review the DDL statements before creating the view.

    Click Create to create the view, or click Definition to return to the previous screen and make changes to the corresponding attributes.

    The created view is now available in the SQL page.

Viewing the JSON Data Guide Diagram for a Collection

The diagram view displays the JSON data guide for a collection as a hierarchical structure using a format similar to entity-relationship diagrams.

The JSON data guide represents the JSON schema for documents that have a column with JSON content.

In the diagram, arrays are presented as one-to-many relationships, contained objects as one-to-one relationships, and "oneOf" constructs as a box that surrounds possible choices.

Click Diagramdiagram icon in the right pane toolbar to display the JSON data guide diagram for a specific collection.

The icons in the toolbar are Print Diagram, Save to SVG format. Zoom In, Zoom Out, Fit Screen and Actual Size.