Oracle Zero Downtime Migration – Logical Online Migration to ADB-D on Oracle Database@AWS
Purpose
Oracle customers are rapidly increasing their workload migration into the Oracle Cloud, Engineered Systems, and Oracle Database@AWS. However, migrating workloads has been a source of challenges for many years. Migrating database workloads from one system to another or into the Cloud is easier said than done.
Based on years of experience migrating Oracle workloads, Oracle has developed Zero Downtime Migration (ZDM). ZDM is Oracle’s premier solution for a simplified and automated migration experience, providing zero to negligible downtime for the production system depending on the migration scenario. ZDM allows you to migrate your on-premises Oracle Databases directly and seamlessly to and between Oracle Database@Azure, Oracle Database@Google Cloud, Oracle Database@AWS, and any Oracle-owned infrastructure, including Exadata Database Machine On-Premises, Exadata Cloud at Customer, and Oracle Cloud Infrastructure. Oracle ZDM supports a wide range of Oracle Database versions and, as the name implies, ensures minimal to no production database impact during the migration.
ZDM follows Oracle Maximum Availability Architecture (MAA) principles and incorporates products such as GoldenGate and Data Guard to ensure High Availability and an online migration workflow that leverages technologies such as the Recovery Manager, Data Pump, and Database Links.
This technical brief is a step-by-step guide for migrating your on-premises Oracle Databases to Oracle Autonomous AI Database Dedicated (ADB-D) on Oracle Database@AWS, with ZDM’s Logical Online workflow.
Oracle ZDM will run on a separate node and connect to Source and Target to perform the migration. This guide will cover all requirements for installing the Oracle ZDM Service Host, the Source Database, the Target Database recipient of the migration process, and the networking used. The migration process will be dissected and done in a step-by-step fashion. This guide will answer the most frequently asked questions regarding the product and the overall migration process.
For more information on Oracle Zero Downtime Migration, please visit ZDM’s product website and Oracle Database@AWS website.
Disclaimer
This document in any form, software or printed matter, contains proprietary information that is the exclusive property of Oracle. Your access to and use of this confidential material is subject to the terms and conditions of your Oracle software license and service agreement, which has been executed and with which you agree to comply. This document and information contained herein may not be disclosed, copied, reproduced or distributed to anyone outside Oracle without prior written consent of Oracle. This document is not part of your license agreement nor can it be incorporated into any contractual agreement with Oracle or its subsidiaries or affiliates.
This document is for informational purposes only and is intended solely to assist you in planning for the implementation and upgrade of the product features described. It is not a commitment to deliver any material, code, or functionality, and should not be relied upon in making purchasing decisions. The development, release, timing, and pricing of any features or functionality described in this document remains at the sole discretion of Oracle. Due to the nature of the product architecture, it may not be possible to safely include all features described in this document without risking significant destabilization of the code
Zero Downtime Migration
Oracle Zero Downtime Migration (ZDM) is the Oracle Maximum Availability Architecture (MAA)-recommended solution to migrate Oracle Databases to the Oracle Cloud. ZDM's inherent design keeps in mind the migration process as straightforward as possible to ensure the least impact on production workloads. The Source Database to be migrated can be on-premises, deployed on Oracle Cloud Infrastructure, or a 3rd Party Cloud. The Target Database deployment can be on Oracle Database@Azure, Oracle Database@Google Cloud, Oracle Database@AWS, Database Cloud Service on Oracle Cloud Infrastructure (OCI) Virtual Machine, Exadata Cloud Service, Exadata Cloud at Customer, and Autonomous AI Database. ZDM automates the entire migration process, reducing the chance of human errors. ZDM leverages Oracle Database-integrated high availability (HA) technologies such as Oracle Data Guard and GoldenGate and follows all MAA best practices that ensure no significant downtime of production environments. Oracle ZDM supports both Physical and Logical Migration workflows. This technical brief covers a step-by-step guide for the Logical Online Migration Workflow.
A standard Logical Online migration with Oracle GoldenGate and Data Pump Export and Import will take the following steps:
- Download and Configure ZDM.
- ZDM Starts Database Migration.
- ZDM Configures an Oracle GoldenGate Extract Microservice.
- ZDM Starts a Data Pump Export Job.
- ZDM Starts a Data Pump Import Job.
- ZDM Configures an Oracle GoldenGate Replicat Microservice.
- ZDM Monitors Oracle GoldenGate Replication.
- ZDM Switches Over.
- ZDM Validates, Cleans Up, and Finalizes.
Supported Configurations
Oracle ZDM supports Oracle Database versions 11.2.0.4, 12.1.0.2, 12.2.0.1, 18c, 19c, 21c, and 26ai. ZDM’s physical migration workflow requires the Source and Target Databases to be in the same database release.
Oracle ZDM supports Source Oracle Databases hosted on Linux, Solaris, and AIX operating systems. Oracle ZDM supports single-instance databases, Oracle RAC One Node databases, or Oracle RAC databases as sources. Oracle ZDM supports Oracle Database Enterprise & Standard Edition as Source and Target Databases. ZDM’s physical migration workflow supports only Source Databases hosted on Linux platforms.
Architecture
An architectural overview of the ZDM server, the source database on-premises, the target database on Oracle Autonomous AI Database Dedicated (ADB-D) on Oracle Database@AWS, the Oracle GoldenGate on Podman, and all networks and components required are described in the diagram below:
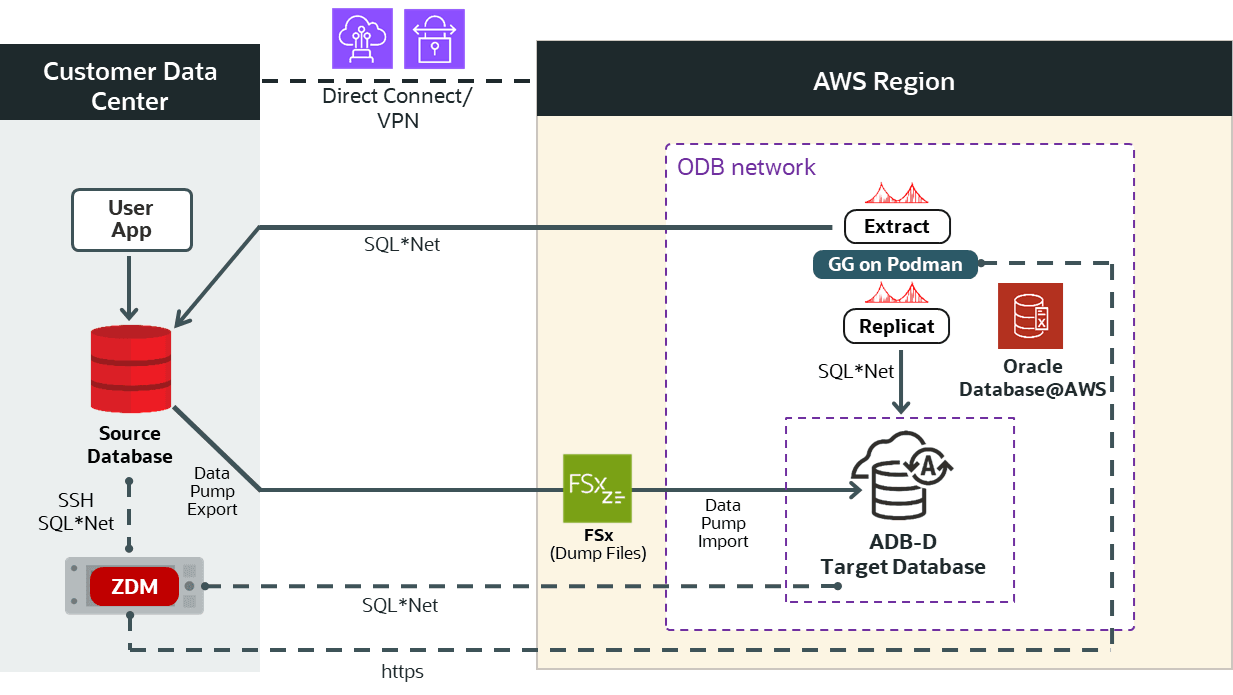
Figure 1. This is a High-Level Architectural overview showcasing the customer data center where the source database and ZDM’s server reside. It also shows all connectivity to the target Oracle Autonomous AI Database on Oracle Database@AWS.
Zero Downtime Migration Service Host
Zero Downtime Migration Service Host Requirements
Oracle Zero Downtime Migration installation must take place on a separate host, which must fulfill the following requirements:
- Linux host running on Oracle 7, 8, or RHEL 8 (only these OS platforms/versions are supported).
- 100 GB of free storage space. This space is required for all the logs that ZDM will generate.
- A zdm group and a zdmuser as part of this group.
- The following packages must be installed:
glibc-develexpectunziplibaiooraclelinux-developer-release-el7
- All hostnames and IP addresses to be used must be present as entries in the /etc/hosts
For more information on the ZDM Service Host requirements and setting up ZDM on RHEL platforms, please refer to Oracle ZDM’s product documentation, specifically “Setting Up Zero Downtime Migration Software” section.
For this step-by-step guide, the ZDM Service Host runs on-premises on an Oracle Linux Server 8.9. The host private IP is masked for this guide, but as an example, we will use the fictional zz.dd.mm.hh, and the hostname is zdmhost.
On the ZDM host, as root, add the ADB Private Endpoint URL, for example, xyz.adb.region-1.oraclecloud.com, to the /etc/hosts file to be resolved to the ADB Private Endpoint IP, for example, aa.bb.cc.dd. If you do not have access to this information yet, please configure it once it is available after provisioning the target Autonomous AI Database.
Network and Connectivity
AWS Region
AWS Regions are separate geographic areas. They consist of multiple, physically separated, and isolated Availability Zones that are connected with low latency, high throughput, highly redundant networking.
AWS Availability Zone
Availability zones are highly available data centers within each AWS region.
AWS Virtual Private Cloud
AWS Virtual Private Cloud (AWS VPC) enables you to launch AWS resources into a virtual network you've defined. This virtual network resembles a traditional network that you operate in your own data center, with the benefits of using the scalable infrastructure of AWS. After you create a VPC, you can add subnets.
AWS Subnet
A subnet is a range of IP addresses in your AWS VPC. You can create AWS resources, such as EC2 instances, in specific subnets.
ODB network
The ODB network is a private network that hosts Exadata VM clusters in a specified availability zone. You can set up peering between an ODB network and a VPC, which enables applications to connect to your Exadata databases.
Autonomous AI Database
Oracle Autonomous AI Database is a fully managed, preconfigured database environments that you can use for transaction processing and data warehousing workloads. You do not need to configure or manage any hardware, or install any software. Oracle Cloud Infrastructure handles creating the database, as well as backing up, patching, upgrading, and tuning the database.
Source Database
The source database runs on-premises on an Oracle Linux Server 7.7 for this step-by-step guide. The host's private IP is masked for this guide, but as an example, we will use the fictional aa.bb.sr.db address, and the hostname is onphost. The source Oracle database is a single-instance Enterprise Edition database version 19.22 with multitenant architecture. The database name is oradb, and its unique name is oradb_onp.
The HR schema to be migrated resides in the source PDB pdbsrc.
Target Database
Oracle Database@AWS offers the following products:
- Oracle Exadata Database Service on Dedicated Infrastructure (ExaDB-D)
- You can provision flexible Exadata systems that allow you to add database compute servers and storage servers to your system anytime after provisioning.
- You can provision flexible Exadata systems that allow you to add database compute servers and storage servers to your system anytime after provisioning.
- Oracle Autonomous AI Database on Dedicated Infrastructure (ADB-D)
- Autonomous AI Database provides an easy-to-use, fully autonomous database that scales elastically, delivers fast query performance, and requires no database administration.
Oracle Database@AWS integrates Oracle Exadata Database Service, Oracle Real Application Clusters (Oracle RAC), and Oracle Data Guard technologies into the AWS platform. The Oracle Database service runs on Oracle Cloud Infrastructure (OCI) and is co-located in AWS’s data centers. The service offers features and price parity with OCI.
Oracle Database@AWS service offers the same low latency as other AWS-native services and meets mission-critical workloads and cloud-native development needs. Users manage the service on the AWSconsole and with AWS automation tools.
For this step-by-step guide, the target platform is Oracle Autonomous AI Database on Oracle Database@AWS. ZDM requires configuring a placeholder database target environment before beginning the migration process.
Enhanced Security for Outbound Connections with Private Endpoints
Setting the ROUTE_OUTBOUND_CONNECTIONS database property to the value PRIVATE_ENDPOINT enforces that all outgoing connections to a target host are subject to and limited by the private endpoint's egress rules.
ALTER DATABASE PROPERTY SET ROUTE_OUTBOUND_CONNECTIONS = 'PRIVATE_ENDPOINT';
NFS File Share
ZDM Logical Online migration workflow uses Oracle Data Pump export and import to migrate the data from the source to the target database and Oracle GoldenGate to keep source and target databases in sync. An intermediate storage location is needed for the Data Pump dump files. For this purpose, an NFS file share can be provided via a customer-managed NFS Server, AWS S3 Storage Gateway, AWS FSx for OpenZFS, or AWS Elastic File Service (EFS). For this guide, AWS FSx for OpenZFS will be used. Make sure to add the no_root_squash to the NFS options of the FSx volume.
The IP address of the NFS share is masked for this guide, but as an example, we will use the fictional aa.an.fs.pe address. The NFS path is aa.an.fs.pe:/fsx
The NFS share must be mounted on both the source database host and the target database.
To mount the NFS Share on the source and target database hosts:
On the source database host, as root user:
mkdir -p /mnt/zdm_share
For Linux instance kernel version is 5.3 or above:
mount -t nfs -o noatime,nfsvers=3,sync,nconnect=16,rsize=1048576,wsize=1048576 aa.an.fs.pe:/fsx/ /mnt/zdm_share
For Linux instance kernel version is 5.2 or below:
mount -t nfs -o noatime,nfsvers=3,sync,rsize=1048576,wsize=1048576 aa.an.fs.pe:/fsx/ /mnt/zdm_share
Make sure the Oracle user has access to the NFS mount:
chown oracle:oinstall /mnt/zdm_share
Create a test file as oracle user:
touch /mnt/zdm_share/test.txt
On the source PDB:
create directory DATA_PUMP_DIR_NFS as '/mnt/zdm_share';
Prerequisites
Source Database Prerequisites
- Oracle GoldenGate requires a unique row identifier on the source and target tables to locate the correct target rows for replicated updates and deletes. See Ensuring Row Uniqueness in Source and Target Table for more information.
- The character set on the source database must be the same as the target database.
- If the source is Oracle Database 11.2, apply mandatory 11.2.0.4 RDBMS patches on the source database. See My Oracle Support note Oracle GoldenGate -- Oracle RDBMS Server Recommended Patches (Doc ID 1557031.1)
- If the source database is Oracle Database 12.1.0.2 or a later release, apply mandatory RDBMS patches.
- If the source is Oracle Database Standard Edition 2, available with Oracle Database 18c or 19c, and lower than DBRU 19.11, apply the RDBMS patch for bug 29374604 -- Integrated Extract not starting against Oracle RDBMS Standard Edition.
Source Database Preparation
For online logical migrations, set STREAMS_POOL_SIZE to at least 2GB. See MOS Note 2078459.1 for the recommendation 1GB STREAMS_POOL_SIZE per integrated extract + additional 25 percent.
As SYS user:
Set streams_pool_size to 2G:
alter system set streams_pool_size=2G scope=both;
Set global_names to false:
alter system set global_names=false;
Enable ARCHIVELOG mode:
select log_mode from v$database;
LOG_MODE------------NOARCHIVELOG
shutdown immediate;
startup mount
alter database archivelog;
alter database open;
select log_mode from v$database;
LOG_MODE------------ARCHIVELOG
Enable FORCE LOGGING to ensure that all changes are found in the redo by the Oracle GoldenGate Extract process:
select force_logging from v$database;
FORCE_LOGGING---------------------------------------NO
alter database force logging;
select force_logging from v$database;
FORCE_LOGGING ---------------------------------------YES
Enable database minimal supplemental logging:
select minimal from dba_supplemental_logging;
MINIMAL----------NO
alter database add supplemental log data;
select minimal from dba_supplemental_logging;
MINIMAL ----------YES
Enable initialization parameter ENABLE_GOLDENGATE_REPLICATION:
alter system set ENABLE_GOLDENGATE_REPLICATION=TRUE scope=both;
System altered.
In case of Multitenant, create the user c##ggadmin in CDB$ROOT:
create user c##ggadmin identified by VerySecretPw_22 default tablespace users temporary tablespace temp;
grant connect, resource to c##ggadmin;
grant unlimited tablespace to c##ggadmin;
alter user c##ggadmin quota 10G on users;
grant select any dictionary to c##ggadmin;
grant create view to c##ggadmin;
grant execute on dbms_lock to c##ggadmin;
grant set container to c##ggadmin container=all;
exec dbms_goldengate_auth.GRANT_ADMIN_PRIVILEGE('c##ggadmin',container=>'all');
Create a GoldenGate administration user, ggadmin (in the PDB in case of Multitenant):
alter session set container=pdbsrc;
create user ggadmin identified by VerySecretPw_22 default tablespace users temporary tablespace temp;
grant connect, resource to ggadmin;
grant unlimited tablespace to ggadmin;
alter user ggadmin quota 10G on users;
grant select any dictionary to ggadmin;
grant create view to ggadmin;
grant execute on dbms_lock to ggadmin;
exec dbms_goldengate_auth.GRANT_ADMIN_PRIVILEGE('ggadmin');
ZDM Service Host
On the ZDM host, as root, add the Autonomous AI Database Private Endpoint URL sample.adb.us-region-1.oraclecloud.com to the /etc/hosts file to be resolved to the Autonomous AI Database Private Endpoint IP aa.dd.bb.ss.
Access Network File System from Autonomous AI Database
You can attach a Network File System to a directory location in your Autonomous AI Database.
Depending on the Network File System version you want to access, both NFSv3 and NFSv4 are supported.
Step 1: Add NFS Server Name to OCI DNS VCN Resolver
Bear in mind that if the OCI tenancy is a new tenancy created within the Oracle Database@AWS provisioning process, the limits for OCI private DNS and A records might need to be increased. To increase the limits, open a Service Request with Oracle Support. A limit of at least three records is required.
Follow these steps to create an A-record in OCI DNS to resolve the NFS server name:
- From the Oracle Autonomous AI Database details page in AWS, click on the MANAGE IN OCI link.
- From the Oracle Autonomous AI Database details page in OCI, click on the virtual cloud network in the Network section.
- On the network details page, click on the DNS Resolver.
- On the private resolver details page, click on the default private view.
- Click the create zone button and create a new zone using the name of your choice, e.g., nfs.aws
- Click on the newly created zone, manage records, and add a record with the name of your choice, e.g., nfs-server. Replace aa.an.fs.pe with the actual IP address of the AWS-managed NFS server.
- Publish the changes.
- Update the Network Security Group (NSG) in OCI to allow network traffic flow from the VPC where the NFS server resides.
On the target database:
Step 2: Add the NFS Mount FQDN to the Access Control List (ACL)
exec DBMS_NETWORK_ACL_ADMIN.APPEND_HOST_ACE(host => 'nfs-server.nfs.aws', ace => xs$ace_type(privilege_list => xs$name_list('connect', 'resolve'), principal_name => 'ADMIN', principal_type => xs_acl.ptype_db));
PL/SQL procedure successfully completed.
Step 3: Create a Directory on the Autonomous AI Database
CREATE or replace DIRECTORY FSS_DIR AS 'fss';
Directory created.
Step 4: Attach NFS to Autonomous AI Database
Set the NFS version accordingly in the parameter "params => JSON_OBJECT('nfs_version' value <value>)".
BEGIN
DBMS_CLOUD_ADMIN.ATTACH_FILE_SYSTEM(
file_system_name => 'AWSNFS',
file_system_location => 'nfs-server.nfs.aws:/zdm_share',
directory_name => 'FSS_DIR',
description => 'Attach AWS NFS',
params => JSON_OBJECT('nfs_version' value 3)
);
END;
/
PL/SQL procedure successfully completed.

Check the access to the NFS file share:
SELECT object_name FROM DBMS_CLOUD.LIST_FILES('FSS_DIR');OBJECT_NAME
--------------------------------------------------------------------------------
test.txt
Additional Configuration
SSH Key
ZDM connects via SSH to the Source Database servers; hence, an SSH key pair for the zdmuser is required. As zdmuser, run the following:
[zdmuser@zdmhost ~]$ mkdir ~/.ssh
[zdmuser@zdmhost ~]$ chmod 700 ~/.ssh
[zdmuser@zdmhost ~]$ /usr/bin/ssh-keygen -t rsa
Generating public/private rsa key pair.Enter file in which to save the key (/home/zdmuser/.ssh/id_rsa):Enter passphrase (empty for no passphrase):Enter same passphrase again:Your identification has been saved in /home/zdmuser/.ssh/id_rsa.Your public key has been saved in /home/zdmuser/.ssh/id_rsa.pub.The key fingerprint is:SHA256:keyfingerprintsample zdmuser@zdmhost
[zdmuser@zdmhost ~]$ cd ~/.ssh
[zdmuser@zdmhost .ssh]$ cat id_rsa.pub
Insert the public key into the authorized_keys file on the source database host.
You can find more information on ZDM Product’s documentation section, “Generating a Private SSH Key Without a Passphrase.”
API Signing Public Key and Configuration File
ZDM uses an API Signing Public Key to call REST APIs. First, you need to create the API Keys. Do so by accessing the terminal on the ZDM Service Host, and as the zdmuser, run the following:
[zdmuser@zdmhost ~]$ mkdir .oci
[zdmuser@zdmhost ~]$ cd .oci
[zdmuser@zdmhost ~]$ openssl genrsa -out /u01/app/zdmhome/.oci/oci_api_key.pem 2048
[zdmuser@zdmhost ~]$ openssl rsa -pubout -in /u01/app/zdmhome/.oci/oci_api_key.pem -out /u01/app/zdmhome/.oci/oci_api_key_public.pem
[zdmuser@zdmhost ~]$ cat oci_api_key_public.pem
Copy the catted oci_api_key_public.pem file and save it; you will need it in the next step. Include the "Begin Public Key" and "End Public Key" lines during the copy. Go to your Oracle Cloud OCI Dashboard, navigate to the top right, click on your user profile icon, and select the top option representing your user. Select API Keys and Add API Key. Paste the public OCI API key file you copied above and click Add Key.
You will see a configuration file preview. Copy its contents; you will use them to populate your configuration file in the following step.
As the zdmuser in the ZDM Service Host, create a configuration file in the command prompt; you can use vi/vim or any editor you prefer. In the empty file, paste the configuration file contents copied from above. Replace < path to your private key file > # TODO with the line above; once done, save the file and quit the editor:
/u01/app/zdmhome/.oci/oci_api_key.pem
Oracle GoldenGate on Podman
For ZDM Logical Online migrations to Oracle Database@AWS, you will run Oracle GoldenGate on a Podman VM on-premises or on an AWS Compute VM. Oracle GoldenGate keeps your source and target databases in sync and enables you to achieve zero to negligible downtime for your Oracle database migrations across database versions and platforms. Please contact your account manager, Multicloud Product Manager, or the Zero Downtime Migration Product Manager for more details regarding GoldenGate usage for this use case.
For this step-by-step guide, the Podman container runs on an AWS EC2 Compute VM using RHEL version 9. The host's private IP is masked for this guide, but as an example, we will use the fictional aa.bb.gg.po address, and the hostname is ggpodmanvm.
Install Oracle GoldenGate on Podman
Step 1: Download the GoldenGate Container Image
On Oracle Cloud, create a VM using the Oracle GoldenGate image from the listing provided by your account manager, Multicloud Product Manager, and the Zero Downtime Migration Product Manager after contacting them to get GoldenGate usage. Once the stack is completed, a VM in OCI Compute Instances will be created with the details you provided during the stack launch. Log in to that VM via SSH and issue the shell list command:
-bash-4.2$ ls -l
lrwxrwxrwx. 1 opc opc 36 Oct 3 11:21 ora21c-2115001.tar -> /opt/dockerimages/ora23ai-23602410.tar
The file /opt/dockerimages/ora23ai-23602410.tar is the GoldenGate Container image. Copy it to your AWS Compute VM. Once done, the VM in OCI can be terminated. Its only purpose was to download the ora23ai-23602410.tar Container image file.
Step 2: Install Podman
Install Podman on the AWS Compute VM to host the GoldenGate Container image:
Install podman:
[ec2-user@ggpodmanvm ~]$ sudo dnf install podman
...
Complete!

Verify the podman installation:
[ec2-user@ggpodmanvm ~]$ sudo podman --version
podman version 5.2.2
Step 3: Load the Container Image
Load the Container image to Podman. The ora23ai-23602410.tar file is the one you copied to this VM in Step 1:
[ec2-user@ggpodmanvm ~]$ sudo podman load < ora23ai-23602410.tar
Getting image source signatures
Copying blob 67d008ba80bc done   |
Copying blob 56f9ec558e52 done   |
Copying blob 39169ef064c5 done   |
Copying blob 8f78a760013d done   |
Copying blob 0b8b528228f5 done   |
Copying blob d4118560d499 done   |
Copying config b0f5ef6c89 done   |
Writing manifest to image destination
Loaded image: docker.io/oracle/goldengate:23.6.0.24.10

List the images:
[ec2-user@ggpodmanvm~]$ sudo podman images
REPOSITORY                   TAG           IMAGE ID      CREATED       SIZE
docker.io/oracle/goldengate  23.6.0.24.10  b0f5ef6c8953  5 months ago  2.94 GB
Step 4: Run the Container Image
Run the Oracle GoldenGate image as a container with sudo privileges:
[ec2-user@ggpodmanvm ~]$ sudo podman run -p 443:443 -e OGG_ADMIN=oggadmin -e OGG_ADMIN_PWD=<oggadmin_password> docker.io/oracle/goldengate:23.6.0.24.10
Show the running containers:
[ec2-user@ggpodmanvm~]$ sudo podman ps
CONTAINER ID  IMAGE                                     COMMAND     CREATED      STATUS                PORTS
802a4481cb9a  docker.io/oracle/goldengate:23.6.0.24.10              2 weeks ago  Up 2 weeks (healthy)  0.0.0.0:443->443/tcp, 80/tcp, 443/tcp

Connect to the container if needed:
[ec2-user@ggpodmanvm~]$ sudo podman exec -it 802a4481cb9a /bin/bash
Stop the container if needed:
[ec2-user@ggpodmanvm~]$ sudo podman stop 802a4481cb9a
If you need to load and run the image using ec2-user, then map the port 443 to a non-reserved port, such as 6443. As user ec2-user:
[ec2-user@ggpodmanvm ~]$ podman run -p 6443:443 -e OGG_ADMIN=oggadmin -e OGG_ADMIN_PWD=<oggadmin_password> docker.io/oracle/goldengate:23.6.0.24.10
You will need the oggadmin password later when running the ZDM migration command.
For more information about the run parameters, visit Running Oracle GoldenGate in a Container.
You can log in to the GoldenGate deployment using your web browser, accessing the following URL: https://ggpodmanvm:443/
Step 5: Ensure Connectivity to Source and Target Databases
Ensure that the source and target database hostnames are resolvable and that you can connect to the source and target databases from within the Podman container.
Download Oracle Instant Client locally, and proceed to copy it and the ADB-D wallet to the podman container, and check connectivity to source and target databases from the podman container:
[ec2-user@ggpodmanvm ~]$ sudo podman cp instantclient_21_3.zip 802a4481cb9a:/
[ec2-user@ggpodmanvm ~]$ sudo podman cp Wallet_zdmadb.zip 802a4481cb9a:/
Connect to the Podman container:
[ec2-user@ggpodmanvm ~]$ sudo podman exec -it 802a4481cb9a /bin/bash
[root@802a4481cb9a /]# mv instantclient_21_3.zip /home/ogg/
[root@802a4481cb9a /]# mv Wallet_zdmadb.zip /home/ogg/
[root@802a4481cb9a /]# chown ogg:ogg /home/ogg/instantclient_21_3.zip
[root@802a4481cb9a /]# chown ogg:ogg /home/ogg/Wallet_zdmadb.zip
[root@802a4481cb9a /]# su - ogg
[ogg@802a4481cb9a /]# unzip instantclient_21_3.zip
[ogg@802a4481cb9a /]# chmod 744 instantclient_21_3/sqlplus
Ensure the wallet containing certificates for TLS authentication is in the correct location in the GoldenGate Hub as per ZDM’s documentation:
For an Autonomous AI Database, the wallet file should be in the following directory:
/u02/deployments/deployment_name/etc/adb
Log in as the Oracle GoldenGate user, create the required wallet directory, copy the wallet and instant client, and unzip them.
[ogg@802a4481cb9a /]$ mkdir /u02/Deployment/etc/adb
[ogg@802a4481cb9a /]$ mv Wallet_zdmadb.zip /u02/Deployment/etc/adb
[ogg@802a4481cb9a /]$ cd /u02/Deployment/etc/adb
[ogg@802a4481cb9a adb]$ unzip Wallet_zdmadb.zip
Open and edit the sqlnet.ora file:
$vi sqlnet.ora
Replace the wallet location with the directory where you have unzipped the ADB wallet:
WALLET_LOCATION = (SOURCE=(METHOD=FILE)(METHOD_DATA=(DIRECTORY="/u02/Deployment/etc/adb")))
Export the following environment variables:
export LD_LIBRARY_PATH=/home/ogg/instantclient_21_3
export TNS_ADMIN=/u02/Deployment/etc/adb
Edit the etc hosts file on the Podman container:
[root@802a4481cb9a /]# vi /etc/hosts
aa.bb.sr.db onphost
aa.dd.bb.ss sample.adb.us-region-1.oraclecloud.com
Check database connectivity to the source and target using the hostnames in the connection string:
[ogg@802a4481cb9a ]# sqlplus system@onphost:1521/oradb_onp
[ogg@802a4481cb9a ]# sqlplus admin@zdmadb_high
Database Migration Step by Step with ZDM
Step 1: Fill the response file
vi /home/zdmuser/logical_online_adb_nfs/logical_online_adb_nfs.rsp
Adjust the values according to your environment:
# migration method
MIGRATION_METHOD=ONLINE_LOGICAL
DATA_TRANSFER_MEDIUM=NFS

# data pump
DATAPUMPSETTINGS_JOBMODE=SCHEMA
DATAPUMPSETTINGS_METADATAREMAPS-1=type:REMAP_TABLESPACE,oldValue:USERS,newValue:DATA
INCLUDEOBJECTS-1=owner:HR
DATAPUMPSETTINGS_EXPORTDIRECTORYOBJECT_NAME=DATA_PUMP_DIR_NFS
DATAPUMPSETTINGS_IMPORTDIRECTORYOBJECT_NAME=FSS_DIR

# source db (pdb)
SOURCEDATABASE_CONNECTIONDETAILS_HOST=onphost
SOURCEDATABASE_CONNECTIONDETAILS_PORT=1521
SOURCEDATABASE_CONNECTIONDETAILS_SERVICENAME=pdbsrc
SOURCEDATABASE_ADMINUSERNAME=SYSTEM
SOURCEDATABASE_GGADMINUSERNAME=ggadmin

# source db (cdb)
SOURCECONTAINERDATABASE_CONNECTIONDETAILS_HOST=onhost2
SOURCECONTAINERDATABASE_CONNECTIONDETAILS_PORT=1521
SOURCECONTAINERDATABASE_CONNECTIONDETAILS_SERVICENAME=oradb
SOURCECONTAINERDATABASE_ADMINUSERNAME=SYSTEM
SOURCECONTAINERDATABASE_GGADMINUSERNAME=c##ggadmin

# target db (ADB)
TARGETDATABASE_OCID=ocid1.autonomousdatabase.oc1.iad.aaaa.bbb.cccc.ddddd
TARGETDATABASE_ADMINUSERNAME=ADMIN
TARGETDATABASE_GGADMINUSERNAME=ggadmin

# GoldenGate
GOLDENGATEHUB_ADMINUSERNAME=oggadmin
GOLDENGATEHUB_SOURCEDEPLOYMENTNAME=Local
GOLDENGATEHUB_TARGETDEPLOYMENTNAME=Local
# Private IP of the VM where Docker is running
GOLDENGATEHUB_URL=https://aa.bb.gg.do
GOLDENGATEHUB_ALLOWSELFSIGNEDCERTIFICATE=TRUE
The Zero Downtime Migration server should be allowed to make HTTPS over port 443 calls to an OCI REST endpoint. If there is no connectivity to OCI endpoints, then skip the following parameters:
TARGETDATABASE_OCID=
OCIAUTHENTICATIONDETAILS_USERPRINCIPAL_USERID=ocid1.user.oc1..aaaa.bbb.ccccc.ddddd
OCIAUTHENTICATIONDETAILS_USERPRINCIPAL_TENANTID=ocid1.tenancy.oc1.aaa.bbbbb
OCIAUTHENTICATIONDETAILS_USERPRINCIPAL_FINGERPRINT=12:ac:34:cc:aa
OCIAUTHENTICATIONDETAILS_USERPRINCIPAL_PRIVATEKEYFILE=/home/zdmuser/.oci/oci_api_key.pem
OCIAUTHENTICATIONDETAILS_REGIONID=us-ashburn-1
and add the following parameters:
TARGETDATABASE_DBTYPE=ADBCC
TARGETDATABASE_CONNECTIONDETAILS_HOST=example.adb.us-ashburn-1.oraclecloud.com
TARGETDATABASE_CONNECTIONDETAILS_PORT=1521
TARGETDATABASE_CONNECTIONDETAILS_SERVICENAME=adbzdm_high
TARGETDATABASE_CONNECTIONDETAILS_TLSDETAILS_CREDENTIALSLOCATION=/home/zdmuser/adbwallet
TABLESPACEDETAILS_EXCLUDE=UNDOTBS1,UNDO_2
In this example, /home/zdmuser/adbwallet is the directory where you have downloaded and unzipped the Autonomous AI Database Credentials Wallet file, and adbzdm_high is the TNS alias in the tnsname.ora file is this directory.
Step 2: Evaluate the Configuration
Execute the following command on the ZDM host as zdmuser to evaluate the migration. ZDM will check the source and target database configurations. The actual migration will not be started. On the ZDM host as zdmuser:
[zdmuser@zdmhost ~]$ $ZDMHOME/bin/zdmcli migrate database \
-rsp /logical_online_adb_nfs/logical_online_adb_nfs.rsp \
-sourcenode onphost \
-sourcesid oradb \
-srcauth zdmauth \
-srcarg1 user:onpuser \
-srcarg2 identity_file:/home/zdmuser/.ssh/id_rsa \
-srcarg3 sudo_location:/usr/bin/sudo \
-eval
Enter source database administrative user "SYSTEM" password:
Enter source database administrative user "ggadmin" password:
Enter source container database administrative user "SYSTEM" password:
Enter source container database administrative user "c##ggadmin" password:
Enter target database administrative user "ADMIN" password:
Enter target database administrative user "ggadmin" password:
Enter Oracle GoldenGate hub administrative user "oggadmin" password:
Enter Authentication Token for OCI user "ocid1.user.oc1...":
Enter Data Pump encryption password:
Operation "zdmcli migrate database" scheduled with the job ID "1".
If the source database uses ASM for storage management, use -sourcedb <db_unique_name> instead of -sourcesid <SID> in the zdmcli command.
Check the job status. On the ZDM host as zdmuser:
[zdmuser@zdmhost ~]$ $ZDMHOME/bin/zdmcli query job -jobid 1
Job ID: 1User: zdmuserClient: zdmhostJob Type: "EVAL"Scheduled job command: "zdmcli migrate database -rsp /home/zdmuser/logical_online_adb/logical_online_adb.rsp -sourcenode onphost -sourcesid oradb -srcauth zdmauth -srcarg1 user:sample_user_com -srcarg2 identity_file:/home/zdmuser/.ssh/id_rsa -srcarg3 sudo_location:/usr/bin/sudo -eval"Scheduled job execution start time: Equivalent local time: Current status: SUCCEEDEDResult file path: "/home/zdmuser/zdm/zdmbase/chkbase/scheduled/job-1.log"Metrics file path: "/home/zdmuser/zdm/zdmbase/chkbase/scheduled/job-1.json"Excluded objects file path: "/home/zdmuser/zdm/zdmbase/chkbase/scheduled/job-1.json"Job execution start time: Job execution end time: Job execution elapsed time: 2 minutes 14 secondsZDM_VALIDATE_TGT ...................... COMPLETEDZDM_VALIDATE_SRC ...................... COMPLETEDZDM_SETUP_SRC ......................... COMPLETEDZDM_PRE_MIGRATION_ADVISOR ............. COMPLETEDZDM_VALIDATE_GG_HUB ................... COMPLETEDZDM_VALIDATE_DATAPUMP_SETTINGS_SRC .... COMPLETEDZDM_VALIDATE_DATAPUMP_SETTINGS_TGT .... COMPLETEDZDM_PREPARE_DATAPUMP_SRC .............. COMPLETEDZDM_DATAPUMP_ESTIMATE_SRC ............. COMPLETEDZDM_CLEANUP_SRC ....................... COMPLETED
Detailed information about the migration process can be found by monitoring the log file:
[zdmuser@zdmhost ~]$ tail -f /home/zdmuser/zdm/zdmbase/chkbase/scheduled/job-1.log
Step 3: Initiate the Migration
To initiate the actual migration, execute the same command for evaluation, but this time without the -eval parameter.
Oracle ZDM allows you to pause the migration process at any given phase. For example, the migration process can be paused after Oracle GoldenGate keeps the target database in sync with the source. Upon executing the zdm migrate database command, the -pauseafter flag must be entered with the desired pausing stage, ZDM_MONITOR_GG_LAG.
On the ZDM host as zdmuser:
[zdmuser@zdmhost ~]$ $ZDMHOME/bin/zdmcli migrate database \
-rsp /logical_online_adb_nfs/logical_online_adb_nfs.rsp \
-sourcenode onphost \
-sourcesid oradb \
-srcauth zdmauth \
-srcarg1 user:onpuser \
-srcarg2 identity_file:/home/zdmuser/.ssh/id_rsa \
-srcarg3 sudo_location:/usr/bin/sudo \
-pauseafter ZDM_MONITOR_GG_LAG
Enter source database administrative user "SYSTEM" password:Enter source database administrative user "ggadmin" password:Enter source container database administrative user "SYSTEM" password:Enter source container database administrative user "c##ggadmin" password:Enter target database administrative user "ADMIN" password:Enter target database administrative user "ggadmin" password:Enter Oracle GoldenGate hub administrative user "oggadmin" password:Enter Authentication Token for OCI user "ocid1.user.oc1...":Enter Data Pump encryption password:Operation "zdmcli migrate database" scheduled with the job ID "2".
Check the job status. On the ZDM host as zdmuser:
[zdmuser@zdmhost ~]$ $ZDMHOME/bin/zdmcli query job -jobid 2
Job ID: 2User: zdmuserClient: zdmhostJob Type: "MIGRATE"Scheduled job command: "zdmcli migrate database -rsp /home/zdmuser/logical_online_adb/logical_online_adb.rsp -sourcenode onphost -sourcesid oradb -srcauth zdmauth -srcarg1 user:test_oracle_com -srcarg2 identity_file:/home/zdmuser/.ssh/id_rsa -srcarg3 sudo_location:/usr/bin/sudo -pauseafter ZDM_MONITOR_GG_LAG"Scheduled job execution start time: . Equivalent local time: Current status: PAUSEDCurrent Phase: "ZDM_MONITOR_GG_LAG"Result file path: "/home/zdmuser/zdm/zdmbase/chkbase/scheduled/job-2.log"Metrics file path: "/home/zdmuser/zdm/zdmbase/chkbase/scheduled/job-2.json"Excluded objects file path: "/home/zdmuser/zdm/zdmbase/chkbase/scheduled/job-2-filtered-objects.json"Job execution start time: Job execution end time: Job execution elapsed time: 9 minutes 11 secondsOracle GoldenGate replication metrics:Extract "EXTCWK4D" status: RUNNINGExtract "EXTCWK4D" trail files generated: 1Replicat "R6EV8" status: RUNNINGReplicat "R6EV8" trail files applied: 1End-to-end heartbeat lag 1.45 secondsReplication throughput: 0.0 GBphZDM_VALIDATE_TGT ...................... COMPLETEDZDM_VALIDATE_SRC ...................... COMPLETEDZDM_SETUP_SRC ......................... COMPLETEDZDM_PRE_MIGRATION_ADVISOR ............. COMPLETEDZDM_VALIDATE_GG_HUB ................... COMPLETEDZDM_VALIDATE_DATAPUMP_SETTINGS_SRC .... COMPLETEDZDM_VALIDATE_DATAPUMP_SETTINGS_TGT .... COMPLETEDZDM_PREPARE_DATAPUMP_SRC .............. COMPLETEDZDM_DATAPUMP_ESTIMATE_SRC ............. COMPLETEDZDM_PREPARE_GG_HUB .................... COMPLETEDZDM_ADD_HEARTBEAT_SRC ................. COMPLETEDZDM_ADD_SCHEMA_TRANDATA_SRC ........... COMPLETEDZDM_CREATE_GG_EXTRACT_SRC ............. COMPLETEDZDM_PREPARE_DATAPUMP_TGT .............. COMPLETEDZDM_DATAPUMP_EXPORT_SRC ............... COMPLETEDZDM_TRANSFER_DUMPS_SRC ................ COMPLETEDZDM_DATAPUMP_IMPORT_TGT ............... COMPLETEDZDM_POST_DATAPUMP_SRC ................. COMPLETEDZDM_POST_DATAPUMP_TGT ................. COMPLETEDZDM_ADD_HEARTBEAT_TGT ................. COMPLETEDZDM_ADD_CHECKPOINT_TGT ................ COMPLETEDZDM_CREATE_GG_REPLICAT_TGT ............ COMPLETEDZDM_START_GG_REPLICAT_TGT ............. COMPLETEDZDM_MONITOR_GG_LAG .................... COMPLETEDZDM_PREPARE_SWITCHOVER_APP ............ PENDINGZDM_ADVANCE_SEQUENCES ................. PENDINGZDM_SWITCHOVER_APP .................... PENDINGZDM_POST_SWITCHOVER_TGT ............... PENDINGZDM_RM_GG_EXTRACT_SRC ................. PENDINGZDM_RM_GG_REPLICAT_TGT ................ PENDINGZDM_DELETE_SCHEMA_TRANDATA_SRC ........ PENDINGZDM_RM_HEARTBEAT_SRC .................. PENDINGZDM_RM_CHECKPOINT_TGT ................. PENDINGZDM_RM_HEARTBEAT_TGT .................. PENDINGZDM_CLEAN_GG_HUB ...................... PENDINGZDM_POST_ACTIONS ...................... PENDINGZDM_CLEANUP_SRC ....................... PENDING
Pause After Phase: "ZDM_MONITOR_GG_LAG"
Pay attention to the current job status. It is in PAUSED status now. Also, the progress stopped after phase ZDM_MONITOR_GG_LAG was COMPLETED. At this stage, every change in the source database is immediately synchronized with the target database. Resume the job when your application is ready for migration.
Step 4: Complete the Migration
Resume the job from the previous step. On the ZDM host as zdmuser, resume the job and query the status until all phases are completed:
[zdmuser@zdmhost ~]$ $ZDMHOME/bin/zdmcli resume job -jobid 2
[zdmuser@zdmhost ~]$ $ZDMHOME/bin/zdmcli query job -jobid 2
...
ZDM_VALIDATE_TGT ...................... COMPLETEDZDM_VALIDATE_SRC ...................... COMPLETEDZDM_SETUP_SRC ......................... COMPLETEDZDM_PRE_MIGRATION_ADVISOR ............. COMPLETEDZDM_VALIDATE_GG_HUB ................... COMPLETEDZDM_VALIDATE_DATAPUMP_SETTINGS_SRC .... COMPLETEDZDM_VALIDATE_DATAPUMP_SETTINGS_TGT .... COMPLETEDZDM_PREPARE_DATAPUMP_SRC .............. COMPLETEDZDM_DATAPUMP_ESTIMATE_SRC ............. COMPLETEDZDM_PREPARE_GG_HUB .................... COMPLETEDZDM_ADD_HEARTBEAT_SRC ................. COMPLETEDZDM_ADD_SCHEMA_TRANDATA_SRC ........... COMPLETEDZDM_CREATE_GG_EXTRACT_SRC ............. COMPLETEDZDM_PREPARE_DATAPUMP_TGT .............. COMPLETEDZDM_DATAPUMP_EXPORT_SRC ............... COMPLETEDZDM_TRANSFER_DUMPS_SRC ................ COMPLETEDZDM_DATAPUMP_IMPORT_TGT ............... COMPLETEDZDM_POST_DATAPUMP_SRC ................. COMPLETEDZDM_POST_DATAPUMP_TGT ................. COMPLETEDZDM_ADD_HEARTBEAT_TGT ................. COMPLETEDZDM_ADD_CHECKPOINT_TGT ................ COMPLETEDZDM_CREATE_GG_REPLICAT_TGT ............ COMPLETEDZDM_START_GG_REPLICAT_TGT ............. COMPLETEDZDM_MONITOR_GG_LAG .................... COMPLETEDZDM_PREPARE_SWITCHOVER_APP ............ COMPLETEDZDM_ADVANCE_SEQUENCES ................. COMPLETEDZDM_SWITCHOVER_APP .................... COMPLETEDZDM_POST_SWITCHOVER_TGT ............... COMPLETEDZDM_RM_GG_EXTRACT_SRC ................. COMPLETEDZDM_RM_GG_REPLICAT_TGT ................ COMPLETEDZDM_DELETE_SCHEMA_TRANDATA_SRC ........ COMPLETEDZDM_RM_HEARTBEAT_SRC .................. COMPLETEDZDM_RM_CHECKPOINT_TGT ................. COMPLETEDZDM_RM_HEARTBEAT_TGT .................. COMPLETEDZDM_CLEAN_GG_HUB ...................... COMPLETEDZDM_POST_ACTIONS ...................... COMPLETEDZDM_CLEANUP_SRC ....................... COMPLETED
Known Issues
All common issues are documented and updated periodically in Oracle Zero Downtime Migration’s documentation, specifically on the product release note, Known Issues section:
https://docs.oracle.com/en/database/oracle/zero-downtime-migration/.
Troubleshooting Oracle GoldenGate Replication
During your migration, you can pause the ZDM migration job after the ZDM_MONITOR_GG_LAG phase.
At this stage, every transaction on the source database is replicated via GoldenGate to the target database. If this is not the case, log in to the Podman container and check the EXTRACT and REPLICAT deployments and log files:
Connect to the podman container and switch to ogg user:
[ec2-user@ggdockervm ~]$ sudo podman exec -it ogg2113 /bin/bash
[root@802a4481cb9a /]# su - ogg
Check the deployment files:
[ogg@802a4481cb9a ~]$ ls -l /u02/Deployment/etc/conf/ogg
total 16-rw-r-----. 1 ogg ogg 257 Jun 10 19:05 EXT4BL3P.prm-rw-r--r--. 1 ogg ogg 17 Jun 10 13:05 GLOBALS-rw-r-----. 1 ogg ogg 260 Jun 10 19:34 RN22M.prm-rw-r-----. 1 ogg ogg 260 Jun 10 19:57 RN22M.prm.backup
Check the deployments log files:
[ogg@802a4481cb9a ~]$ view /u02/Deployment/var/log/extract.log
[ogg@802a4481cb9a ~]$ view /u02/Deployment/var/log/replicat.log
Check the Deployment Status:
[ogg@135ed264e10c ~]$ /u01/ogg/bin/adminclient
Oracle GoldenGate Administration Client for OracleVersion 21.15.0.0.1 OGGCORE_21.15.0.0.1OGGRU_PLATFORMS_240108.2205
Copyright (C) 1995, 2024, Oracle and/or its affiliates. All rights reserved.Oracle Linux 7, x64, 64bit (optimized) on Jan 9 2024 09:04:36Operating system character set identified as US-ASCII.OGG (not connected) 1>
OGG (not connected) 1> connect http://127.0.0.1 as oggadmin password /<password>
Using default deployment 'Local'OGG (http://127.0.0.1 Local) 2> info allProgram Status Group Type Lag at Chkpt Time Since ChkptADMINSRVR RUNNINGDISTSRVR RUNNINGPMSRVR RUNNINGRECVSRVR RUNNINGEXTRACT RUNNING EXT4BL3P INTEGRATED 00:00:01 00:00:05REPLICAT ABENDED RN22M PARALLEL NONINT 00:04:21 00:00:21
In this case, the REPLICAT status was ABENDED. The replicat.log indicated insufficient privileges for the ggadmin user on the target database. After fixing the issue, start the deployment:
OGG (http://127.0.0.1 Local) 3> start RN22M
INFO OGG-00975 Replicat group RN22M starting.INFO OGG-15445 Replicat group RN22M started.
Troubleshooting Oracle ZDM & Other Resources
For Oracle ZDM log review:
- ZDM Server Logs:
$ZDM_BASE/crsdata/<zdm_service_node>/rhp/rhpserver.log.0
- Check source node logs:
<oracle_base>/zdm/zdm_<src_db_name>_<job_id>/zdm/log
- Check target node logs:
<oracle_base>/zdm/zdm_<tgt_db_name>_<job_id>/zdm/log
For all Oracle Support Service Requests related to Zero Downtime Migration, please be sure to follow the instructions in My Oracle Support Document:
- SRDC – Data Collection for Database Migration Using Zero Downtime Migration (ZDM) (DOC ID 2595205.1)
- https://support.oracle.com/epmos/faces/DocContentDisplay?id=2595205.1
Oracle® Database, Oracle Zero Downtime Migration, Release 21.5
G38897-04
January 14, 2026