3 Oracle Database Appliance Simulator Lab Exercises
Perform these simulator lab exercises.
The lab exercises use a mix of command line and web-based administration tools. On the BUI, if you encounter any certificate warnings, simply accept them. Note in the output examples below, the text you type is in bold, and the text output in the simulator is not. Note that some examples in the lab may show steps for a 2-node high-availability simulator, and if you are running a single-node simulator, then you can ignore the information for the second node.
- Lab 1 - Deploy Appliance
Simulator lab exercise to deploy Oracle Database Appliance. - Lab 2 - Manage Databases
In this lab, we will create and delete databases in the appliance. We can do this using the command line (CLI) or BUI. - Lab 3 - Patch and Update
If you just completed Lab 2, the simulator should have two databases,db3anddb4. - Lab 4 - Virtualization: Create Application and Database KVMs
Virtualization provides many benefits to customers such as cost savings through consolidation and better resource utilization, Virtual Machine (VM) isolation that provides better security, and KVM license hard partitioning support. - Lab 5 - Multi-User Access
Oracle Database Appliance Multi-User Access can enhance the security of your appliance and provide an efficient mechanism for role separation. - Lab 6 - Monitoring and Resources
Use either the command line or the BUI to monitor Oracle Database Appliance software, hardware, and feature usage.
Lab 1 - Deploy Appliance
Simulator lab exercise to deploy Oracle Database Appliance.
- Step 1 - Enable Multi-User Access
You can deploy the appliance using either the BUI or the command line. The command line is useful for scripted and silent installations. This lab uses the BUI. - Step 2 - Add the Appliance to the Network
On an actual appliance, after you first install Oracle Database Appliance into your data center rack, you must configure it to use the IP address your network administrator has assigned it. - Step 3 - Update the Repository with the Oracle Database Appliance Software
When you receive your Oracle Database Appliance, you must download the Oracle software prior to deployment from My Oracle Support. - Step 4 - Deploy the Appliance
You can deploy the appliance using either the BUI or the command line. The command line is useful for scripted and silent installations. This lab uses the BUI. - Step 5 - Validate the Deployment
Validate the deployment. - Step 6 - Networking
Check the network.
Parent topic: Oracle Database Appliance Simulator Lab Exercises
Step 1 - Enable Multi-User Access
You can deploy the appliance using either the BUI or the command line. The command line is useful for scripted and silent installations. This lab uses the BUI.
After you configure the firstnet and update the repository, log into
Oracle Database Appliance BUI using odaadmin and the
previously-created password (for example, WELcome12##)
Multi-User access can only be enabled during initial provisioning of
Oracle Database Appliance. Select the Enable Multi-User
Access checkbox. 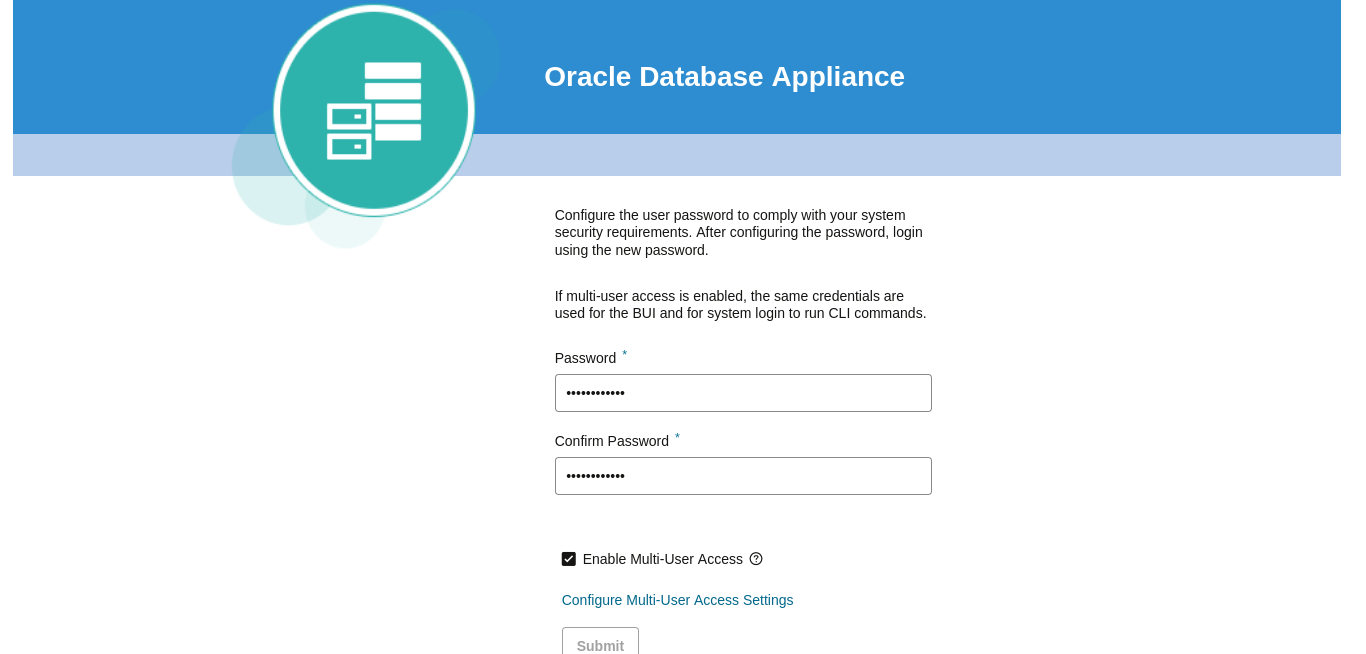
Description of the illustration configure_oma_bui_login.png
Log into BUI.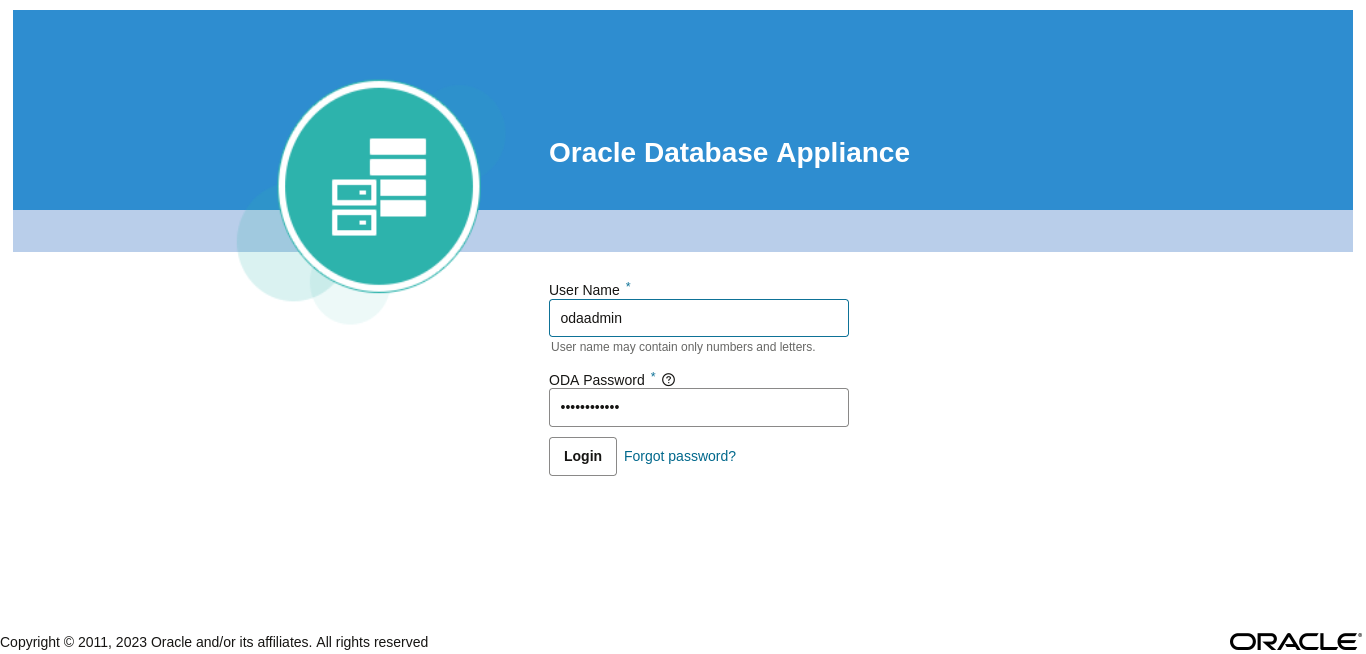
Description of the illustration login_after_configuring_oma.png
Parent topic: Lab 1 - Deploy Appliance
Step 2 - Add the Appliance to the Network
On an actual appliance, after you first install Oracle Database Appliance into your data center rack, you must configure it to use the IP address your network administrator has assigned it.
The easiest way to do this is to first configure Oracle ILOM using a network or serial connection. Oracle Database Appliance includes a command odacli configure-firstnet to make it very easy to get Oracle Database Appliance on the network. Once your appliance is on the network, you can complete the rest of the deployment steps from any networked computer.
[root@xx ~]$  odacli configure-firstnet
bonding interface is:
Using bonding public interface (yes/no) [yes]:
Select the Interface to configure the network on () [btbond1]:
Configure DHCP on btbond1 (yes/no) [no]:
INFO: You have chosen Static configuration
Use VLAN on btbond1 (yes/no) [no]:
Enter the IP address to configure : 192.168.0.100
Enter the Netmask address to configure : 255.255.255.0
Enter the Gateway address to configure[192.168.0.1] :
INFO: Restarting the network
Shutting down interface :           [  OK  ]
Shutting down interface em1:            [  OK  ]
Shutting down interface p1p1:           [  OK  ]
Shutting down interface p1p2:           [  OK  ]
Shutting down loopback interface:               [  OK  ]
Bringing up loopback interface:    [  OK  ]
Bringing up interface :     [  OK  ]
Bringing up interface em1:    [  OK  ]
Bringing up interface p1p1: Determining if ip address 192.168.16.24 is already in use for device p1p1...    [ OK  ]
Bringing up interface p1p2: Determining if ip address 192.168.17.24 is already in use for device p1p2...    [ OK  ]
Bringing up interface btbond1: Determining if ip address 192.168.0.100 is already in use for device btbond1...     [  OK  ]
INFO: Restarting the DCS agent
Note:
If this is an Oracle Database Appliance X8-2-HA system, then you must run the commandodacli configure-firstnet on the second node
(node1). Log into node1 and run the command
odacli configure-firstnet again. You can use 192.168.0.101 for
the IP address for node1.
Parent topic: Lab 1 - Deploy Appliance
Step 3 - Update the Repository with the Oracle Database Appliance Software
When you receive your Oracle Database Appliance, you must download the Oracle software prior to deployment from My Oracle Support.
Refer to the Oracle Database Appliance Release Notes for the latest Oracle Database Appliance release, for details about the patches to download. Specifically, you must download the Oracle Grid Infrastructure Clone files, Oracle Database Clone files, and the Server Patch Bundle.
For our lab exercises, the simulated versions of these files in the simulator already exist. For the labs, you will first deploy the Oracle Database Appliance with the Oracle Database Appliance release 19.22 patches, and then in the third lab you will patch the Oracle Database Appliance and databases to the latest 19.23 release.
odacli update-repository
command.
Table 3-1 Oracle Database Appliance Patches
| Filename | Description |
|---|---|
| odacli-dcs-19.22.0.0.0-date-DB-19.22.0.0.zip | Oracle Database 19.22 Clone Files |
| odacli-dcs-19.22.0.0.0-date-GI-19.22.0.0.zip | Oracle Grid Infrastructure 19.22 Clone Files |
| odacli-dcs-19.23.0.0.0-date-ODAVM-19.23.0.0.zip | DB 19.23 DB System Template (used in lab 4) |
| oda-sm-19.23.0.0.0-date-server.zip | Oracle Database Appliance 19.23 Patch Bundle (used in lab 3) |
| odacli-dcs-19.23.0.0.0-date-DB-19.23.0.0.zip | DB 19.23 Clone Files (used in lab 3) |
| odacli-dcs-19.23.0.0.0-date-GI-19.23.0.0.zip | Oracle Grid Infrastructure 19.23 Clone Files (used in lab 3) |
You must update the Oracle Database Appliance repository, so that Oracle Database Appliance knows about the files. Run the odacli update-repository command for each clone file.
Hint: to reduce amount of manual typing and typing errors, use copy and paste functions to copy the file name or tab function to auto complete a file name. Also, use the up arrow to repeat the previous command, and then edit the file name.
Note: On an actual Oracle Database Appliance, you must update the DCS agent first, before updating the repositories. It is release dependent, so check the patching steps in the Oracle Database Appliance Deployment and User's Guide for your hardware model.
On an actual Oracle Database Appliance, local boot drive storage space is limited. It is recommended that you copy only the Oracle Grid Infrastructure clone file first, update the repository, deploy the Oracle Database Appliance, and then copy the database clone files to Oracle ACFS storage to deploy databases. Check the latest Oracle Database Appliance documentation for the steps.
$ odacli update-repository -f /opt/oracle/dcs/patchfiles/odacli-dcs-19.22.0.0.0-date-GI-19.22.0.0.zip

{

  "jobId" : "4d428b05-a33f-4fe0-82ec-56849503aa28",
  "status" : "Running",
  "message" : "/opt/oracle/dcs/patchfiles/odacli-dcs-19.22.0.0.0-date-GI-19.22.0.0.zip",
  "reports" : [ ],
  "createTimestamp" : "April 8, 2024 00:05:38 AM UTC",
  "resourceList" : [ ],
  "description" : "Repository Update",
  "updatedTime" : "April 8, 2024 00:05:38 AM UTC"
}


$ odacli update-repository -f /opt/oracle/dcs/patchfiles/odacli-dcs-19.22.0.0.0-date-DB-19.22.0.0.zip
{
  "jobId" : "bb1caa66-7d19-4de1-a074-f475f4a2505a",
  "status" : "Running",
  "message" : "/opt/oracle/dcs/patchfiles/odacli-dcs-19.22.0.0.0-date-DB-19.22.0.0.zip",
  "reports" : [ ],
  "createTimestamp" : "April 8, 2024 00:08:58 AM UTC",
  "resourceList" : [ ],
  "description" : "Repository Update",
  "updatedTime" : "April 8, 2024 00:08:58 AM UTC"
}
When you run commands using the ODACLI command line tool, most operations are asynchronous, meaning that they return a job ID immediately while the job runs in the background. This means that to get information on long running background jobs, you can query the status of the job. At this point, the clone files are all loaded into the repository, so we are ready to deploy the appliance and create a database.
You can also use the Browser-based User Interface (BUI) to update the Oracle Database Appliance repository, by pasting the complete file path of the patch file or even clone file in the patch bundle location box of the Repository Manager in the web BUI. However, it is not necessary as you have used command line to update the repository (clone files) already.
Parent topic: Lab 1 - Deploy Appliance
Step 4 - Deploy the Appliance
You can deploy the appliance using either the BUI or the command line. The command line is useful for scripted and silent installations. This lab uses the BUI.
odaadmin
and previously created password (for example,
WELcome12##).https://OCI public IP Address>:xxxx/mgmt/index.html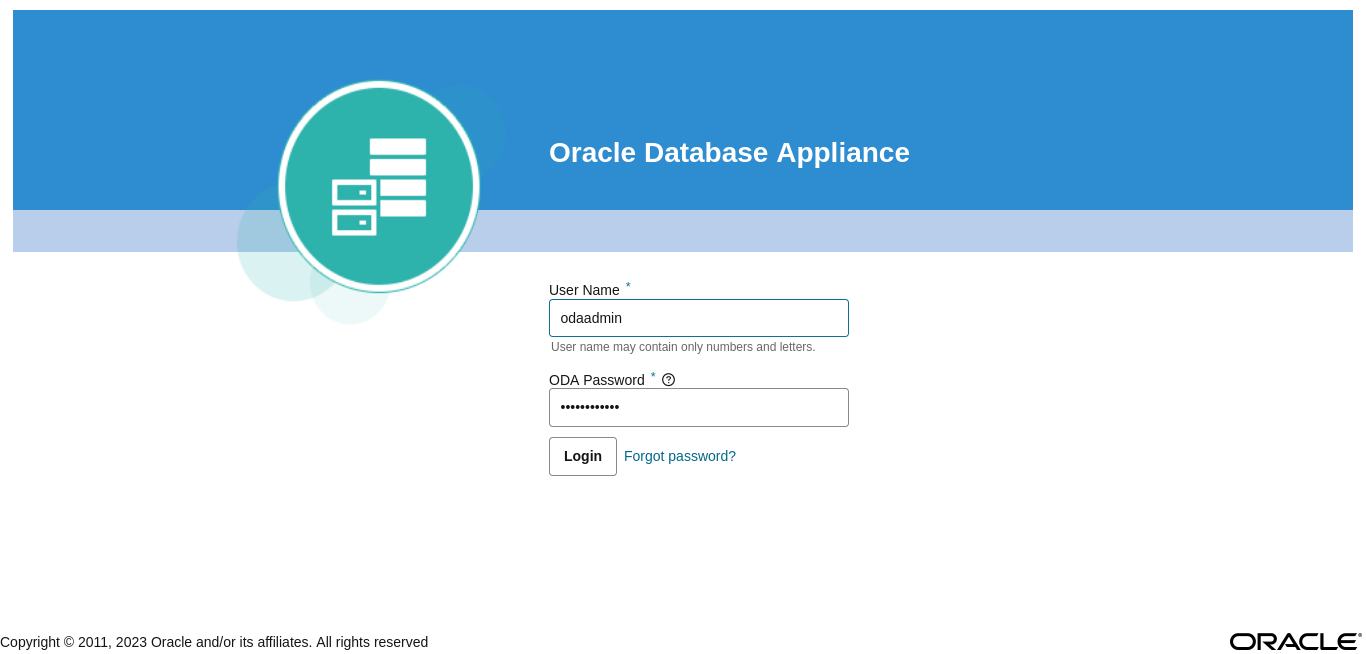
Description of the illustration bui_login_page.png
This takes you to the Appliance tab in the BUI. It should show that the appliance is not yet deployed.
Click
Create Appliance to start the deployment wizard. Fill in
the first page of the form as shown below. Most fields are self-explanatory. A
possible exception is the Data Storage Percentage. This will affect how much space
is allocated for backups. By default, 80% is allocated for data and 20% is allocated
for archive logs. You can also specify a different percentage. Select Disk Group
Redundancy as Flex. You can specify individual database storage redundancy later,
either Mirror (double mirroring) or High (triple mirroring). Create a password. Be
aware there is a password complexity test that will reject simple passwords such as
test and other common variants. However, WELcome12## will work if
you want to use that password for these lab exercises.
You can
also load a configuration file, for example, oda.json that was
saved previously to avoid manual entries. To create a configuration file, you
manually fill in all the information then click Save
Configuration at the end.
Click on each tab. In the Network Information page, you can configure the network for the public Client Access network here. Since this is a single node simulator, the information is pre-populated from the configure-firstnet process. You can also configure the Oracle ILOM network if you choose. Enter values for the IP Address, Subnet Mask, Gateway, and specify the interface to be used for the public network.
In the User and Group Selection screen, enter the 19xx ID. If multi-user access is enabled, you should enter the 9xxx IDs.
Next is the Database screen. Specify the database name and other database related information as shown below. Select DB Version as 19.23.0.0.240416.
To configure Oracle ASR, specify credentials here. This is also where
you can save the configuration file, for example, oda.json for
later use.
Click Submit to continue and click Yes in the confirmation box. This will bring up a link to the job status. Similar to ODACLI, operations are asynchronous, and return immediately with a job ID. That job ID can then be used to monitor progress. This allows the administrator to perform other tasks, if desired while the operations completes.
Click the job ID to see the status.
In the simulation, the deployment job status will complete within 1-2 minutes. You can see the various steps running, and their status changing to Success as they complete. Click the Refresh button to more quickly refresh the screen. In an actual appliance, the deployment takes about 60-90 minutes to complete.
Parent topic: Lab 1 - Deploy Appliance
Step 5 - Validate the Deployment
Validate the deployment.
Click on the Database tab at the top right of the BUI. The deployed database is displayed.
Click on the database name for more details about the database. Drill down to the Database Home to see information about the database home.
You can also verify that the appliance is properly deployed by clicking the Appliance tab to see more details.
Parent topic: Lab 1 - Deploy Appliance
Step 6 - Networking
Check the network.
You can check the network by clicking on the Network tab on the BUI Appliance page.
You can also create a new VLAN by clicking Create Network and specifying the network information.
Click on the Create button, then submit the job.
This concludes Lab 1.
Parent topic: Lab 1 - Deploy Appliance
Lab 2 - Manage Databases
In this lab, we will create and delete databases in the appliance. We can do this using the command line (CLI) or BUI.
You must complete Lab 1 before starting Lab 2.
- Step 1 - Create a new database using the BUI
Uses the BUI to create a new database. - Step 2 - Delete a Database
This lab uses the BUI to delete a database. - Step 3 - View the Databases and Database Homes Using the CLI
This lab uses ODACLI to view databases and database homes. - Step 4 - Create a Database with the CLI
This lab uses ODACLI to create a database. - Step 5 - Delete and Recreate a Database
This lab uses ODACLI to delete a database. - Step 6 - Create a CPU Pool for a Database
This lab uses the BUI to create a CPU pool. - Step 7 - Delete a Database Home
You can delete a database home using the BUI or the command line. This lab uses BUI to delete a database home. - Step 8 - Create Database Backups on Local Disk, External NFS Storage, or on Oracle Cloud
Backing up and restoring Oracle databases on Oracle Database Appliance involves two simple steps: Create a backup policy and attach the backup policy to a database.
Parent topic: Oracle Database Appliance Simulator Lab Exercises
Step 1 - Create a new database using the BUI
Uses the BUI to create a new database.
On the Oracle Database Appliance BUI, click the
Database tab in the web page. You will see the database
db1 created during deployment.
In the upper right-hand corner, there is a Create Database button. Click it. It brings up the Create Database wizard.
Choose Create Database, and click Next.
Specify the DB Name, for example,
db2, and if you are creating a CDB, a PDB
Name. Also remember to scroll down and enter a password that would
in an actual appliance be used for SYS, SYSTEM, and PDB Admin.
When finished, click on the Create button. Click
Yes to confirm. Beware of the password complexity
checker—“WELcome12##” will pass the test.
This will bring up a link to the job status. Similar to ODACLI, operations on the BUI are asynchronous, and return immediately with a job ID. That job ID can then be used to monitor progress. This allows the administrator to perform other tasks if desired while long running operations complete.
Click the job ID to see the status. In the simulation, the job will complete within 30 seconds. You can see the various steps running, and their status changing to Success as they complete. Click the Refresh button to refresh the screen more quickly.
On an actual appliance, these steps take about 20 minutes to complete.
Once the operation completes, click on the Database tab at the top right of the web page. This should show the newly-created database.
See detailed database information by clicking on the database name, for
example, db2. You can also view the newly-created home by clicking
on the Database Home link in the left-hand column of the
Database tab.
Parent topic: Lab 2 - Manage Databases
Step 2 - Delete a Database
This lab uses the BUI to delete a database.
You can also delete a database from the Database tab. Click the Database tab to view the list of databases.
Click the Action dropdown to the right of the
db1 database, and then select Delete.
Click Yes to confirm, and then close the status box.
The Database list should reflect the delete operation. Click
Refresh, if necessary. After the database delete
operation, only db2 is left.
Parent topic: Lab 2 - Manage Databases
Step 3 - View the Databases and Database Homes Using the CLI
This lab uses ODACLI to view databases and database homes.
$ odacli describe-database -i d1e615c3-5855-4b19-9ad0-40b620ac5f13

Database details
----------------------------------------------------------------
      ID: d1e615c3-5855-4b19-9ad0-40b620ac5f13
            Description: db2
                DB Name: db2
             DB Version: 19.22.0.0.240116
                DB Type: SI
                DB Role: PRIMARY
    DB Target Node Name: node_0
             DB Edition: EE
                   DBID:
 Instance Only Database: false
                    CDB: false
               PDB Name:
    PDB Admin User Name:
           SEHA Enabled: false
                  Class: OLTP
                  Shape: odb1
                Storage: ASM
          DB Redundancy: MIRROR
           CharacterSet: AL32UTF8
  National CharacterSet: AL16UTF16
               Language: AMERICAN
              Territory: AMERICA
                Home ID: a1314be1-2c6f-411f-b2c7-61444449f02b
        Console Enabled: false
  TDE Wallet Management:
            TDE Enabled: false
     Level 0 Backup Day: Sunday
     AutoBackup Enabled: true
                Created: April 8, 2024 1:18:48 AM UTC
         DB Domain Name: example.com
    Associated Networks:
Parent topic: Lab 2 - Manage Databases
Step 4 - Create a Database with the CLI
This lab uses ODACLI to create a database.
WELcome12## for this
lab.$ odacli create-database -n db3 -v 19.22.0.0.0
Job details
----------------------------------------------------------------
ID: 2051bf5b-4815-4cd2-8d85-e51367ba3269
Description: Database service creation with db name: db3
Status: Created
Created: April 8, 2024 1:45:49 AM UTC
Message:
Task Name Start Time End Time Status
---------------------------------------- ----------------------------------- ----------------------------------- ----------
$ odacli describe-job -i 2051bf5b-4815-4cd2-8d85-e51367ba3269
Job details
----------------------------------------------------------------
ID: 2051bf5b-4815-4cd2-8d85-e51367ba3269
Description: Database service creation with db name: db3
Status: Success
Created: April 8, 2024 1:45:49 AM UTC
Message:
Task Name Start Time End Time Status
---------------------------------------- ----------------------------------- ----------------------------------- ----------
Validating dbHome available space April 8, 2024 1:45:50 AM UTC April 8, 2024 1:45:50 AM UTC Success
Setting up ssh equivalance April 8, 2024 1:45:50 AM UTC April 8, 2024 1:45:50 AM UTC Success
Setting up ssh equivalance April 8, 2024 1:45:50 AM UTC April 8, 2024 1:45:50 AM UTC Success
Creating ACFS database home April 8, 2024 1:45:51 AM UTC April 8, 2024 1:45:51 AM UTC Success
Validating dbHome available space April 8, 2024 1:45:51 AM UTC April 8, 2024 1:45:51 AM UTC Success
Configuring user access to ACFS DBHome base storage April 8, 2024 1:45:51 AM UTC April 8, 2024 1:45:51 AM UTC Success
Creating DbHome Directory April 8, 2024 1:45:51 AM$ odacli list-databases
ID DB Name DB Type DB Version CDB Class Shape Storage Status DbHomeID
---------------------------------------- ---------- -------- -------------------- ---------- -------- -------- ---------------------- ----------------------------------------
d1e615c3-5855-4b19-9ad0-40b620ac5f13 db2 SI 19.22.0.0.240116 false OLTP odb1 ASM CONFIGURED a1314be1-2c6f-411f-b2c7-61444449f02b
324a42ea-bba2-477d-8bca-5a26af159f1c db3 SI 19.22.0.0.240116 false OLTP odb1 ASM CONFIGURED ecfa440e-2482-40c1-8ccd-67316cd48ba2Note:
When you log in as anodaadmin user and create a database, the
database runs with the odaadmin user as the owner. It is
recommended that you create the database logging in as an oracle
user.
Parent topic: Lab 2 - Manage Databases
Step 5 - Delete and Recreate a Database
This lab uses ODACLI to delete a database.
db2. Be sure to use the ID of your db2
database, which is likely different from the one in this workbook. Note that you can also
use the database name instead of the
ID.$ odacli delete-database -i d1e615c3-5855-4b19-9ad0-40b620ac5f13
{
"jobId" : "ccde4700-3c1e-423a-8079-477f49f8cd5f",
"status" : "Running",
"message" : null,
"reports" : [ {
"taskId" : "TaskZJsonRpcExt_10048",
"taskName" : "Validate db d1e615c3-5855-4b19-9ad0-40b620ac5f13 for deletion",
"taskResult" : "OK",
"startTime" : " April 8, 2024 01:49:40 AM UTC",
"endTime" : " April 8, 2024 01:49:40 AM UTC",
"status" : "Success",
"taskDescription" : null,
"parentTaskId" : "TaskSequential_10046",
"jobId" : "ccde4700-3c1e-423a-8079-477f49f8cd5f",
"tags" : [ ],
"reportLevel" : "Info",
$ odacli list-databases
ID DB Name DB Type DB Version CDB Class Shape Storage Status DbHomeID
---------------------------------------- ---------- -------- -------------------- ---------- -------- -------- ---------- ------------ ----------------------------------------
324a42ea-bba2-477d-8bca-5a26af159f1c db3 SI 19.22.0.0.240116 false OLTP odb1 ASM CONFIGURED ecfa440e-2482-40c1-8ccd-67316cd48ba2
db4.$ odacli create-database -n db4 -v 19.22.0.0.0
Enter SYS, SYSTEM and PDB Admin user password:
Retype SYS, SYSTEM and PDB Admin user password:
Job details
----------------------------------------------------------------
ID: aa259376-4ac0-474a-8730-8c8e1c8ac504
Description: Database service creation with db name: db4
Status: Created
Created: April 8, 2024 1:51:50 AM UTC
Message:
Task Name Start Time End Time Status
---------------------------------------- ----------------------------------- ----------------------------------- ----------
# odacli list-databases
ID DB Name DB Type DB Version CDB Class Shape Storage Status DbHomeID
---------------------------------------- ---------- -------- -------------------- ---------- -------- -------- ---------- ------------ ----------------------------------------
324a42ea-bba2-477d-8bca-5a26af159f1c db3 SI 19.22.0.0.240116 false OLTP odb1 ASM CONFIGURED ecfa440e-2482-40c1-8ccd-67316cd48ba2
deac01db-eaa8-4f4e-a511-aea042be3a18 db4 SI 19.22.0.0.240116 false OLTP odb1 ASM CONFIGURED c3c63738-703e-4c1d-98de-95b551b67468Parent topic: Lab 2 - Manage Databases
Step 6 - Create a CPU Pool for a Database
This lab uses the BUI to create a CPU pool.
You can create a CPU pool for a bare-metal database to improve CPU resource management and quality of service for a database.
Click the Appliance tab, then click CPU Pool on the left, and then click Create.
Specify the CPU Pool Name as cpupool1, select CPU Pool Type
as Bare Metal, and Number of CPU Cores as 2, then click
Create.
You can see that CPU Pool cpupool1 has been created.
Parent topic: Lab 2 - Manage Databases
Step 7 - Delete a Database Home
You can delete a database home using the BUI or the command line. This lab uses BUI to delete a database home.
Go to the Database tab, then click on the
Database Home to see all the database homes. Click on Actions, then click
Delete (for example, home1).
You can see that the database home is deleted.
Parent topic: Lab 2 - Manage Databases
Step 8 - Create Database Backups on Local Disk, External NFS Storage, or on Oracle Cloud
Backing up and restoring Oracle databases on Oracle Database Appliance involves two simple steps: Create a backup policy and attach the backup policy to a database.
To back up to an external NFS storage, you must create an NFS mount point first.
To back up to the Oracle Cloud, you must obtain and create Object Store credentials first. A default backup policy is created but it is not associated with the database unless you explicitly modify the database and attach the policy.
To create a new backup policy, click on the Backup Policy tab and then click Create.
Then, name the Backup Policy (for example, DiskBackup), Backup Destination (Internal FRA/Local Disk or External FRA/External NFS Storage or Object Store/Oracle Cloud), and Recovery Window in days, then click Create.
To back a database to an
external NFS storage, you need to specify a mount point such as
/u03/app/oracle/oradata/nfs_backup.
You can see the DiskBackup policy has been created.
Next, you select the database, for example, db4, that you want to
backup. Attach the bakup policy to the db4 database by clicking
Modify under Actions.
Assign a CPU pool to db4 at the same
time.
Select DiskBackup as the Backup Policy and cpupool1 as the CPU pool
for db4, and then click Modify.
Once the job is completed, you can verify that the
backup policy is listed under Database Information of the database, for example,
db4. You can also see that a CPU pool is assigned to
db4.
Once this configuration is completed, Oracle Database Appliance will start backing up the database to the disk regularly and produce backup reports. Click on the database name to view the database details and then switch to the Backup Information tab.
You can also click Manual Backup, then click Start to back up a database manually.
You can see the details of the Backup Report by clicking on the Backup Report ID.
In addition to backing up to local disk, you can back up to Oracle Cloud or NFS location. To back up databases in Oracle Database Appliance to Oracle Cloud, you must obtain Object Store credentials first.
Once you have your credentials, click the Object Store tab, then click Create.
Enter the required Object Store Credentials including the name.
You can now create a backup policy, specify the Object Store as the backup destination, and attach a database to the policy. Oracle Database Appliance will start backing up the database to the Oracle Cloud regularly.
This concludes Lab 2.
Parent topic: Lab 2 - Manage Databases
Lab 3 - Patch and Update
If you just completed Lab 2, the simulator should have two databases,
db3 and db4.
For Lab 3, you will use the CLI to update the repository and BUI to update the Oracle Database Appliance infrastructure including the server. You will also use the BUI to patch a database home from release 19.22 to 19.23.
Starting with Oracle Database Appliance release 19.11, patching of Oracle Database Appliance is out-of-place. The new Oracle Grid Infrastructure home will be placed on the local system/boot drive, and all new database homes will be placed on Oracle ACFS file system on the data drives. In an Oracle Database Appliance high-availability system, the database homes will be placed on the shared storage.
Note: On an actual Oracle Database Appliance, you may have to update the server repository and the DCS agent before updating the database and Oracle Grid Infrastructure clone files in the repositories. This is release dependent, so check the patching steps in the Oracle Database Appliance documentation first.
- Step 1 - Update the Oracle Database Appliance Repository with Latest Patches
You must download the server patch file for Oracle Database appliance release 19.23. - Step 2 - Update the DCS Agent (If not done already)
The next step is to update the DCS agent on both nodes for a high-availability system with the BUI, before updating the server. Use ODACLI to update the DCS agent. - Step 3 - Update the Server
The next step is to update the server. The server update includes firmware, operating system, and Oracle Grid Infrastructure updates. - Step 4 - Patch a Database: Update a Database to point to a New Database Home
Because you may not want to patch all databases at once, first identify which database home corresponds to which database.
Parent topic: Oracle Database Appliance Simulator Lab Exercises
Step 1 - Update the Oracle Database Appliance Repository with Latest Patches
You must download the server patch file for Oracle Database appliance release 19.23.
Refer to the Oracle Database Appliance Release Notes for the latest Oracle Database Appliance patches.
The server patch updates the firmware and operating system. You must patch the server before you patch the databases. When patching databases, you can choose to patch a subset, if required. However, it is recommended to patch all databases to keep them current.
For this lab, we have downloaded simulated release 19.23 patches for the server, Oracle Grid Infrastructure, and database clone files to your simulator.
You must update the repositories with the latest server patch, Oracle Grid Infrastructure, and database clone files, as well as additional applicable database clone files. For example, if you plan to patch Oracle Database from release 19.22 to 19.23, you must update the repository with the 19.22 Oracle Grid Infrastructure and database clone files first.
$ odacli update-repository -f /opt/oracle/dcs/patchfiles/oda-sm-19.23.0.0.0-date-server.zip

{
  "jobId" : "b3794603-4fbb-42a4-89ee-791d420e68a6",
  "status" : "Running",
  "message" : "/opt/oracle/dcs/patchfiles/oda-sm-19.23.0.0.0-date-server.zip",
  "reports" : [ ],
  "createTimestamp" : "April 8, 2024 06:29:42 AM UTC",
  "resourceList" : [ ],
  "description" : "Repository Update",
  "updatedTime" : "April 8, 2024 06:29:42 AM UTC"
}
For an actual Oracle Database Appliance, you may need to update the DCS agent first, before updating repository with the 19.23 Oracle Grid Infrastructure and database clone files, if you want to create a 19.23 database or patch a database to 19.23. See the Oracle Database Appliance Deployment and User's Guide for your hardware model.
$ odacli update-repository -f /opt/oracle/dcs/patchfiles/odacli-dcs-19.23.0.0.0-date-GI-19.23.0.0.zip

{
  "jobId" : "529141f1-c5fb-42a6-ad1e-0b5540781a71",
  "status" : "Waiting",
  "message" : "/opt/oracle/dcs/patchfiles/odacli-dcs-19.23.0.0.0-date-GI-19.23.0.0.zip",
  "reports" : [ ],
  "createTimestamp" : "April 8, 2024 06:32:43 AM UTC",
  "resourceList" : [ ],
  "description" : "Repository Update",
  "updatedTime" : "April 8, 2024 06:32:43 AM UTC"
}

$ odacli update-repository -f /opt/oracle/dcs/patchfiles/odacli-dcs-19.23.0.0.0-date-DB-19.23.0.0.zip

{
  "jobId" : "6478c708-bef8-4d5a-83a6-b411fe9b3e7d",
  "status" : "Running",
  "message" : "/opt/oracle/dcs/patchfiles/odacli-dcs-19.23.0.0.0-date-DB-19.23.0.0.zip",
  "reports" : [ ],
  "createTimestamp" : "April 8, 2024 06:33:13 AM UTC",
  "resourceList" : [ ],
  "description" : "Repository Update",
  "updatedTime" : "April 8, 2024 06:33:13 AM UTC"
}
After you update the repository, you can use the web console to see the 19.23.0.0.0 available component versions.
Parent topic: Lab 3 - Patch and Update
Step 2 - Update the DCS Agent (If not done already)
The next step is to update the DCS agent on both nodes for a high-availability system with the BUI, before updating the server. Use ODACLI to update the DCS agent.
From the BUI, go to the Appliance tab, click Infrastructure Patching, and click Refresh to check the DCS Agent status.
- In the BUI, click Appliance and then click Infrastructure Patching on the lefthand pane.
- Using ODACLI, update the DCS
agent:
[root@oda1 opt]# /opt/oracle/dcs/bin/odacli update-dcsagent -v 19.23.0.0.0
Parent topic: Lab 3 - Patch and Update
Step 3 - Update the Server
The next step is to update the server. The server update includes firmware, operating system, and Oracle Grid Infrastructure updates.
- Using ODACLI, update the DCS admin, DCS components, and DCS
agent:
[root@oda1 opt]# /opt/oracle/dcs/bin/odacli update-dcsadmin  -v 19.23.0.0.0
[root@oda1 opt]# /opt/oracle/dcs/bin/odacli update-dcscomponents -v 19.23.0.0.0
[root@oda1 opt]# /opt/oracle/dcs/bin/odacli update-dcsagent -v 19.23.0.0.0
If the DCS components are updated, then the message"status" : "Success"is displayed on the command line. For failed updates, fix the error and then proceed with the update.Note:
You must log into the Browser User Interface again after running theodacli update-dcscomponentscommand. -
In the BUI, click the Appliance tab, and then click Infrastructure Patching on the lefthand pane.
-
In the SERVER section, view the Component Details. If you just updated the Patch Repository, click Refresh.
After the patch is uploaded to the Patch Repository, the Component Details on the page are updated with the Installed Version and Available Version for each component.
-
Click Precheck to run patching prechecks. On an actual appliance, you must run the patching prechecks before updating the server and other components. Click View Pre-check Reports to view the patching prechecks report. If there are no errors in the report, then click Apply Patch to begin the job to patch the server components. For high-availability systems, when updating the server on the bare metal system, you can select the Node to Update. You can choose the node that you want to update or you can choose to update both nodes.
Note:
Since this is a simulator, the prechecks report is not generated. -
In the STORAGE section, click Refresh to refresh the Component Details. Click Precheck to run patching prechecks. You must run the patching prechecks before updating the storage components. Click View Pre-check Reports to view the patching prechecks report. If there are no errors in the report, then click Apply Patch to begin the job to patch the storage components. Click View Jobs for the job status.
Note:
Since this is a simulator, the prechecks report is not generated.For high-availability environment, you can select the Rolling check box to perform rolling patching of storage components.
Patching an actual Oracle Database Appliance will take some time, whereas the simulator speeds up the whole process. The Linux prompt returns immediately, and the patch runs in the background. You can monitor the progress of the patch job by checking the Activity tab.
Parent topic: Lab 3 - Patch and Update
Step 4 - Patch a Database: Update a Database to point to a New Database Home
Because you may not want to patch all databases at once, first identify which database home corresponds to which database.
You can use either the command odacli update-dbhome or the BUI to
update the database homes, and thus the databases, running on the appliance. Each
home is updated independently, giving you control over when you patch your
databases.
- Navigate to the Database Home tab.
- Select the database home you want to patch.
- Select the Patch Version for the database home.
- To patch multiple database homes, select each database home to be patched and the patch version for each database home.
- Select the Node to Update. You can choose the node that you want to update or you can choose to update all nodes.
- Click Patch. Select
Precheck to run pre-checks before patching the
database.
Note:
Since this is a simulator, the prechecks report is not generated. - On the Patch page, for the database to be patched, click Actions and select Apply to patch the database.
db4. The
odacli list-databases command displays details about each
database, its ID and its database home ID. Those database homes will be the ones we
will patch by supplying the database home ID to the patching command. You can also
see more information, such as the name of the database home, using the
odacli list-dbhomes
command. $ odacli list-databases
ID DB Name DB Type DB Version CDB Class Shape Storage Status DbHomeID
---------------------------------------- ---------- -------- -------------------- ---------- -------- -------- ---------- ------------ ----------------------------------------
324a42ea-bba2-477d-8bca-5a26af159f1c db3 SI 19.22.0.0.240116 false OLTP odb1 ASM CONFIGURED ecfa440e-2482-40c1-8ccd-67316cd48ba2
deac01db-eaa8-4f4e-a511-aea042be3a18 db4 SI 19.22.0.0.240116 false OLTP odb1 ASM CONFIGURED c3c63738-703e-4c1d-98de-95b551b67468
$ odacli list-dbhomes
ID Name DB Version Home Location Status
---------------------------------------- -------------------- ---------------------------------------- --------------------------------------------- ----------
a1314be1-2c6f-411f-b2c7-61444449f02b OraDB19000_home2 19.22.0.0.240116 /u01/app/odaorahomebase/odaadmin/product/19.0.0.0/dbhome_2 CONFIGURED
ecfa440e-2482-40c1-8ccd-67316cd48ba2 OraDB19000_home3 19.22.0.0.240116 /u01/app/odaorahomebase/odaadmin/product/19.0.0.0/dbhome_3 CONFIGURED
c3c63738-703e-4c1d-98de-95b551b67468 OraDB19000_home4 19.22.0.0.240116 /u01/app/odaorahomebase/odaadmin/product/19.0.0.0/dbhome_4 CONFIGURED
$ odacli update-dbhome -i c3c63738-703e-4c1d-98de-95b551b67468 -v 19.23.0.0.0
{
"jobId" : "af879f3e-9c50-4dfd-86db-5d380a42f8d2",
"status" : "Created",
"message" : null,
"reports" : [ ],
"createTimestamp" : " April 8, 2024 06:59:59 AM UTC",
"resourceList" : [ ],
"description" : "DB Home Patching: Home Id is c3c63738-703e-4c1d-98de-95b551b67468",
"updatedTime" : " April 8, 2024 06:59:59 AM UTC"
}db4. Then use the DB
home ID with the odacli update-dbhome command to update the home
for db4. Verify that the job has completed successfully using the
command odacli
describe-job.$ odacli describe-job -i af879f3e-9c50-4dfd-86db-5d380a42f8d2
Job details
----------------------------------------------------------------
ID: af879f3e-9c50-4dfd-86db-5d380a42f8d2
Description: DB Home Patching: Home Id is c3c63738-703e-4c1d-98de-95b551b67468
Status: Success
Created: April 8, 2024 6:59:59 AM UTC
Message:
Task Name Start Time End Time Status
---------------------------------------- ----------------------------------- ----------------------------------- ----------
Adding USER SSH_EQUIVALENCE April 8, 2024 7:00:02 AM UTC April 8, 2024 7:00:02 AM UTC Success
Adding USER SSH_EQUIVALENCE April 8, 2024 7:00:02 AM UTC April 8, 2024 7:00:02 AM UTC Successdb4 is updated to the release
19.23. You can use either the BUI or CLI for
verification.# odacli list-dbhomes
ID Name DB Version Home Location Status
---------------------------------------- -------------------- ---------------------------------------- --------------------------------------------- ----------
a1314be1-2c6f-411f-b2c7-61444449f02b OraDB19000_home2 19.22.0.0.240116 /u01/app/odaorahomebase/odaadmin/product/19.0.0.0/dbhome_2 CONFIGURED
ecfa440e-2482-40c1-8ccd-67316cd48ba2 OraDB19000_home3 19.22.0.0.240116 /u01/app/odaorahomebase/odaadmin/product/19.0.0.0/dbhome_3 CONFIGURED
c3c63738-703e-4c1d-98de-95b551b67468 OraDB19000_home4 19.23.0.0.240416 /u01/app/odaorahomebase/odaadmin/product/19.0.0.0/dbhome_4 CONFIGUREDYou can also use the BUI to update the database homes by navigating to
the Database tab and then selecting the Database Home on the
left panel. You have already updated database db4 by pointing to a
new home using the command line.
This concludes Lab 3.
Parent topic: Lab 3 - Patch and Update
Lab 4 - Virtualization: Create Application and Database KVMs
Virtualization provides many benefits to customers such as cost savings through consolidation and better resource utilization, Virtual Machine (VM) isolation that provides better security, and KVM license hard partitioning support.
Kernel-based VM (KVM) is an industry standard virtualization technology that is also used in Oracle Cloud and other public clouds.
You will use Oracle Database Appliance BUI to create an application KVM, called Compute Instance, and a database KVM, called Database System.
- Step 1 - Create an Application KVM (Compute Instance)
Understand the steps to create an application KVM. - Step 2 - Create a Database KVM (Database System)
Understand the steps to create a database KVM.
Parent topic: Oracle Database Appliance Simulator Lab Exercises
Step 1 - Create an Application KVM (Compute Instance)
Understand the steps to create an application KVM.
- CPU Pool
- VM Storage
- Virtual Disk
- Virtual Network
You must create a guest operating system (Linux or Windows) ISO image to create the application KVM instance. After that, you must configure the guest operating system, networking (set IP address) so that you can access the VM to install applications. You can also modify and delete an application KVM.
First, create a CPU Pool for the application KVM. In the BUI, click CPU Pool, and then click Create. Enter the following information, then click Create.
You can see the CPU pool cpupool1 is created. A CPU pool
is optional and not required to create an application KVM.
Next, create the VM Storage.
Select the VM Storage tab, and then click
Create VM Storage.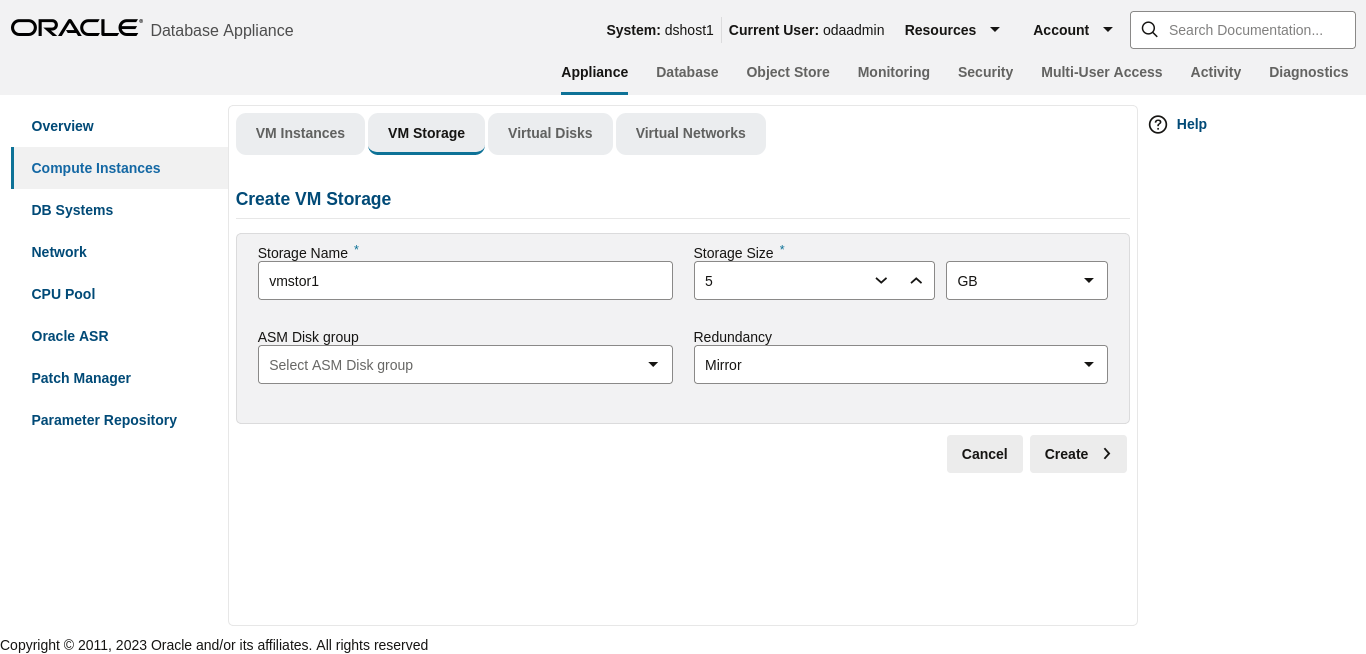
Description of the illustration bui_vm_storage_create.png
Enter the following information for vmstor1, and then
click Create. VM Storage can be used by different application
KVMs. You can see vmstor1 is created.
Next, create a virtual disk vdisk to be used by the application KVM.
Select the Virtual Disks tab and click Create
Virtual Disk. 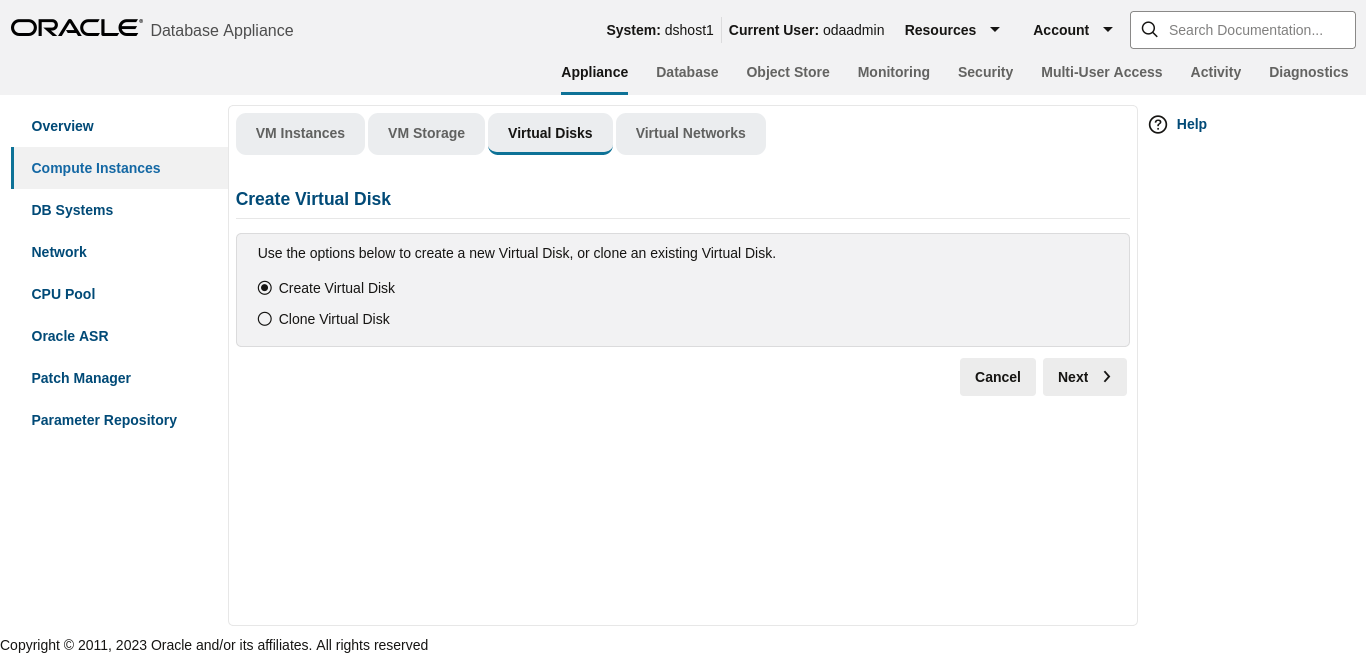
Description of the illustration bui_vdisk_select_option.png
Select Create Virtual Disk, then click
Next.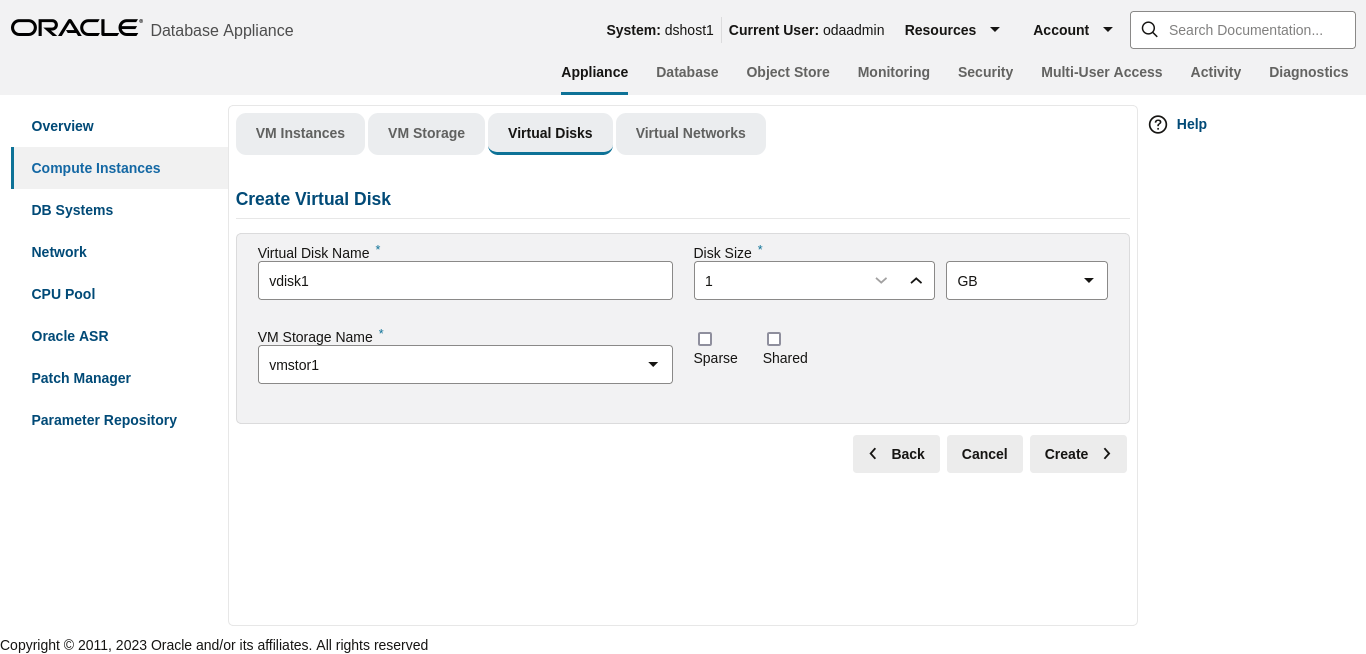
Description of the illustration bui_vdisk_create.png
Enter the following information for vdisk1, and then
click Create. You can see vdisk1 is
created.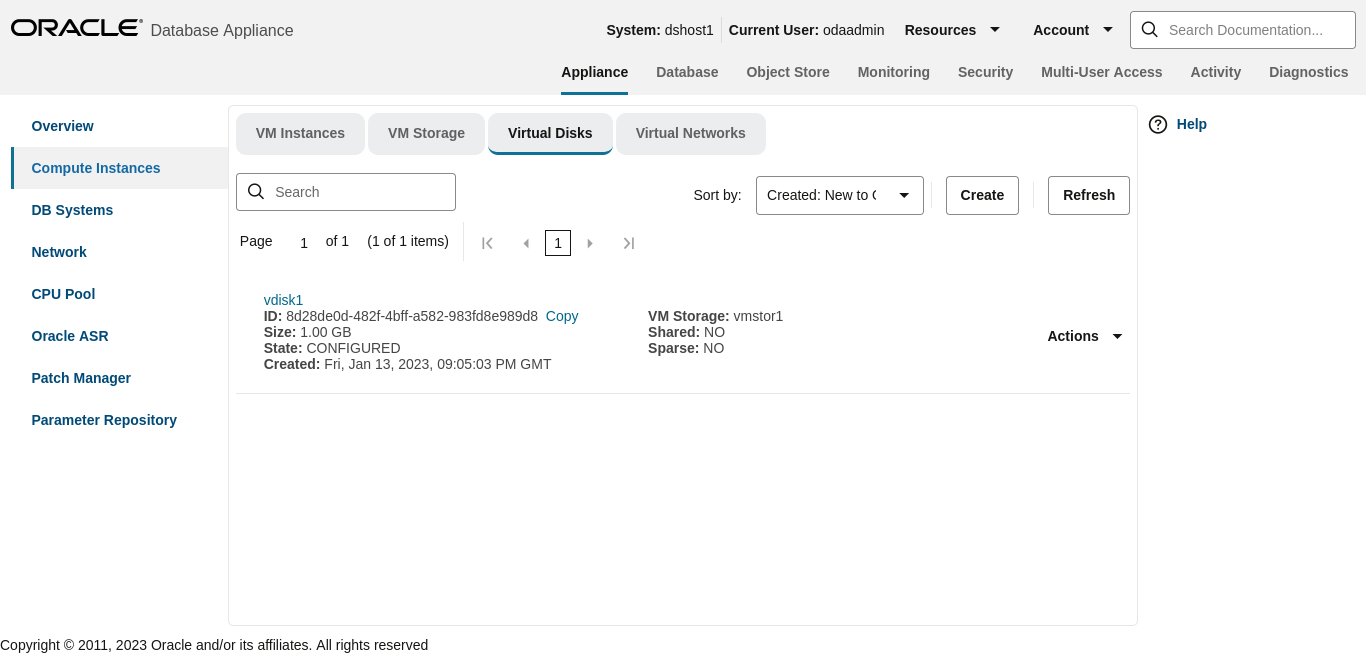
Description of the illustration bui_vdisk_created_successfully.png
Create a virtual network for the KVM:
Select the Virtual Networks tab, and then click Create Virtual Network.
Specify the Virtual Network information, then click
Create.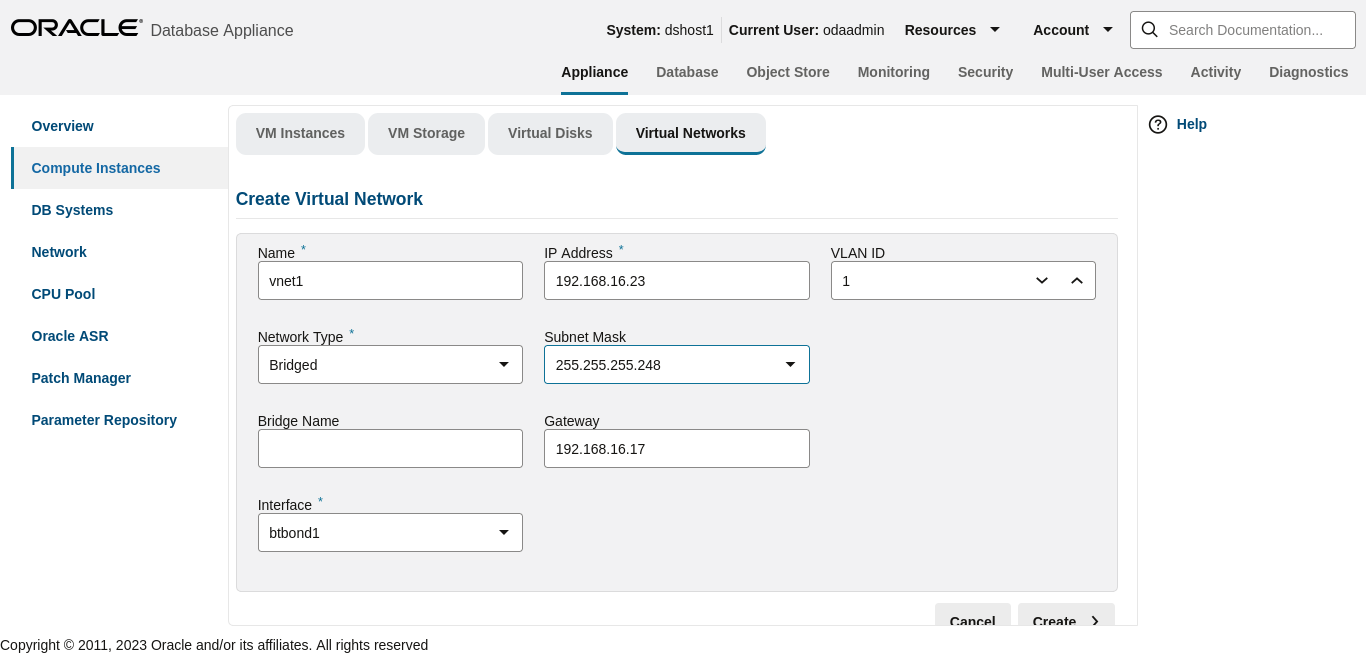
Description of the illustration bui_vnet_create.png
You can see the virtual network vnet1 is created.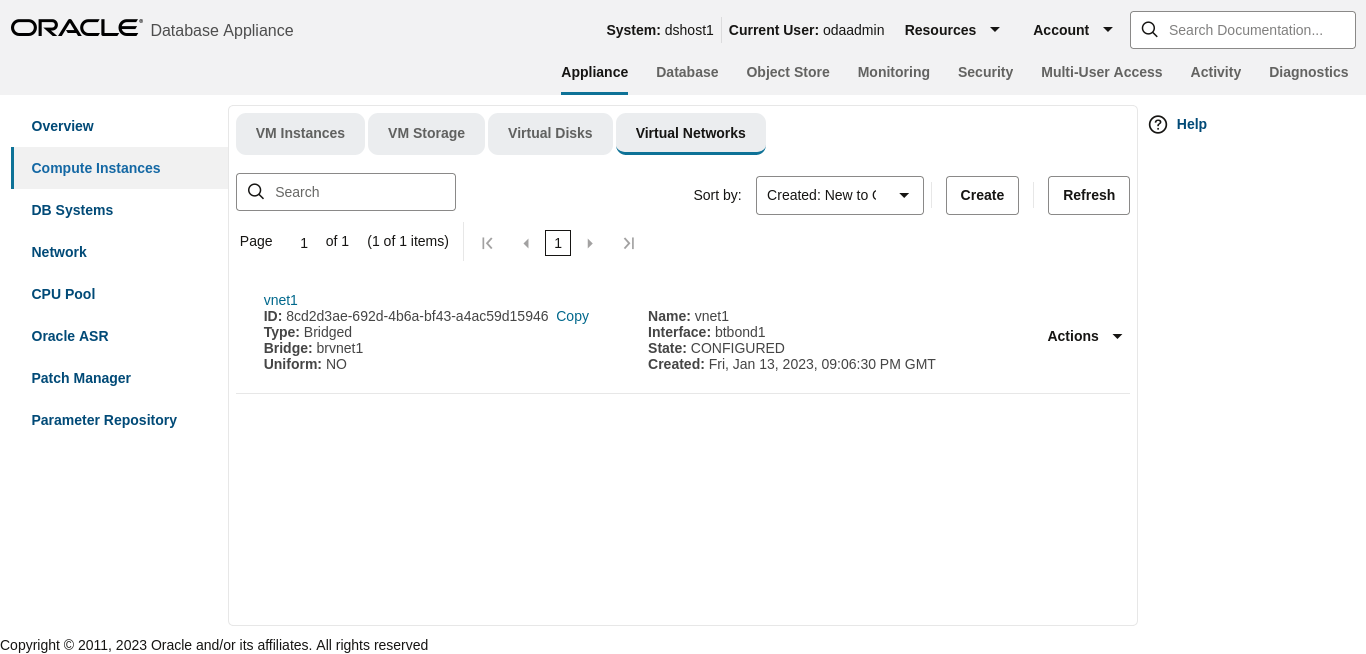
Description of the illustration bui_vnet_created_successfully.png
Create an application KVM (Compute Instance):
Select the VM Instances tab, and then click
Create.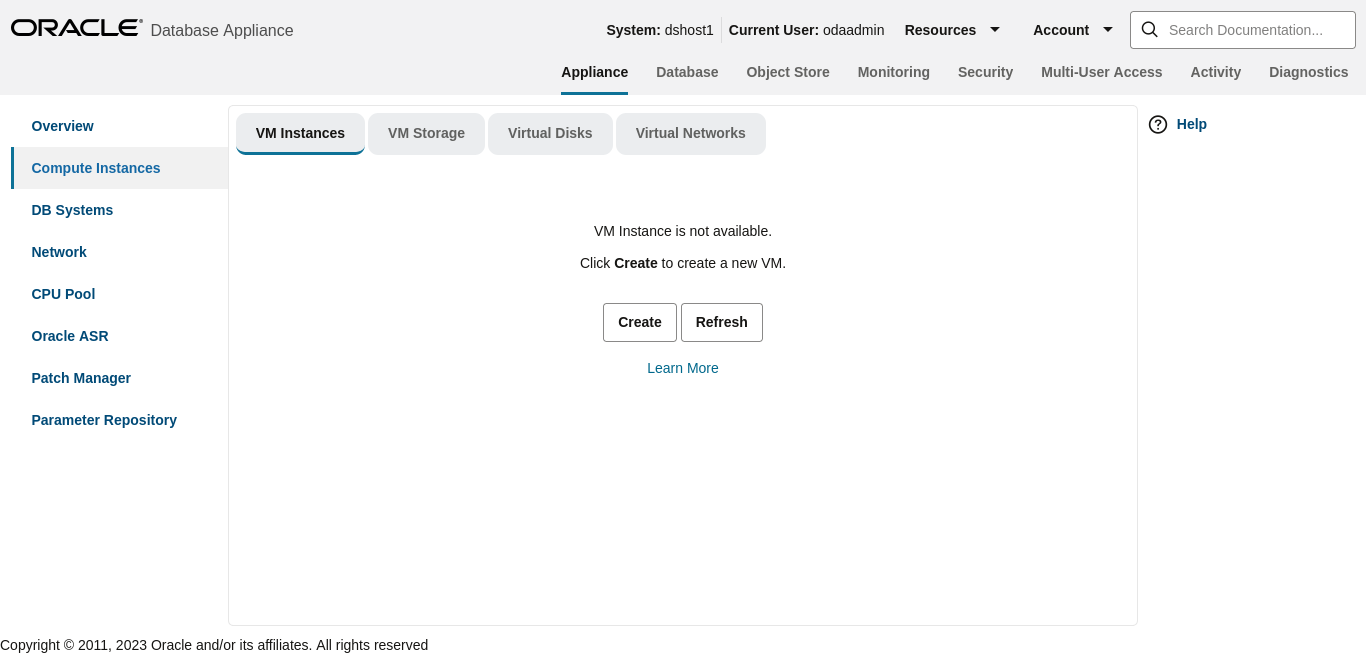
Description of the illustration bui_vm_list.png
Select Create VM Instance, then click
Next.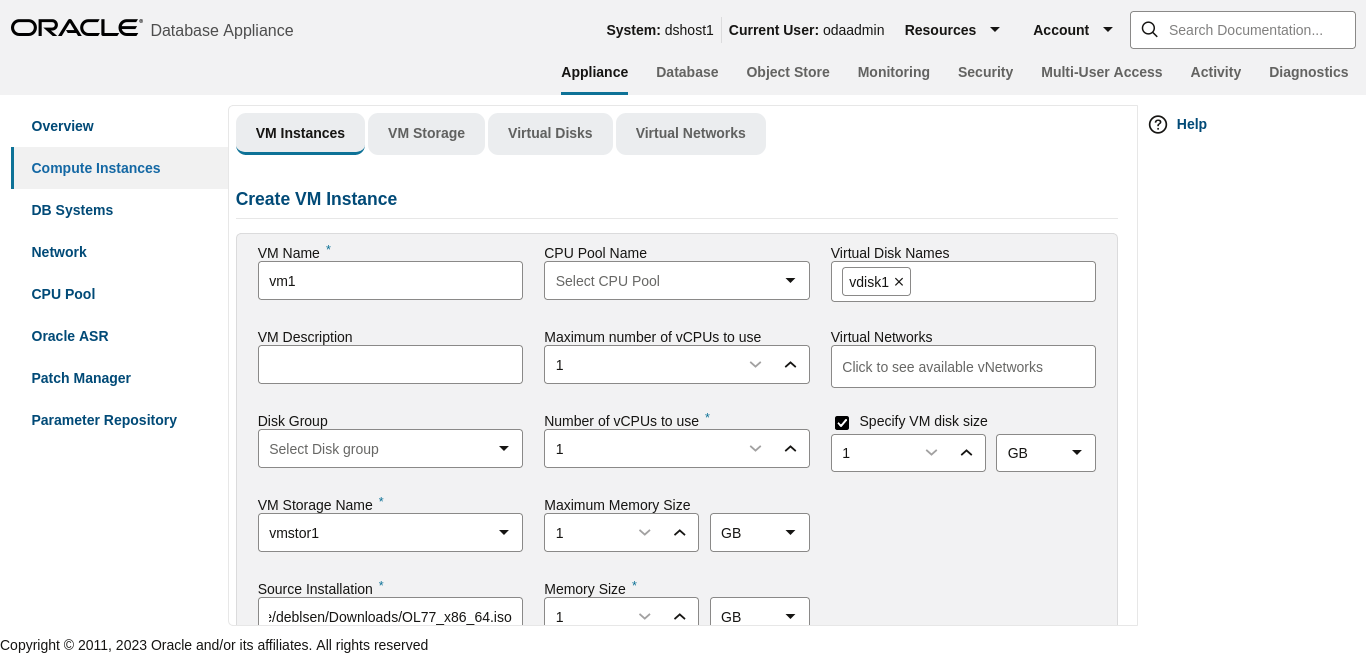
Description of the illustration bui_vm_create.png
Specify the information for vm1, then click
Create. Note the Source Installation path to the Linux
ISO image. Note that the VM disk size is 10GB. VM disk is the local system boot disk
where the Linux image is installed.
You can see vm1 instance is created.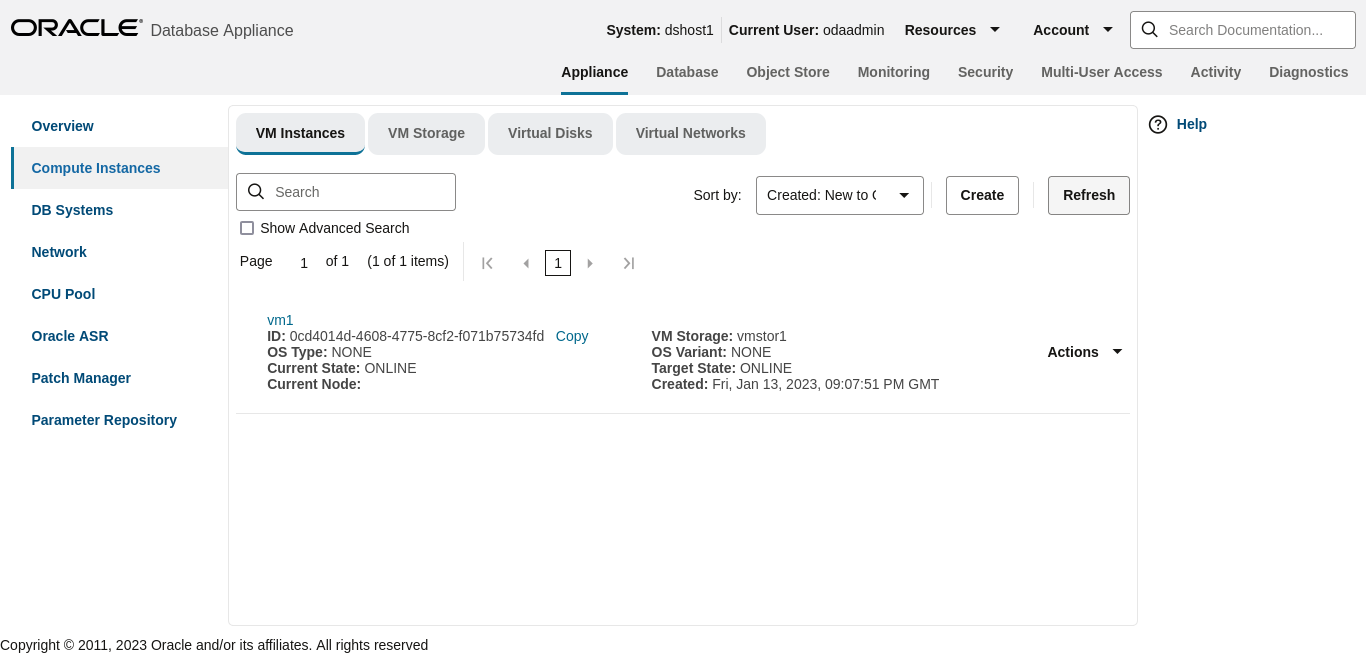
Description of the illustration bui_vm_created_successfully.png
You can see the detailed information by clicking on
vm1.
If you want to modify the VM instance, then click the VM
Instance tab. For vm1, click the Actions dropdown
and then click Modify.
To delete an application KVM, from the VM Instances tab, click the Actions dropdown, and then click Delete.
Step 2 - Create a Database KVM (Database System)
Understand the steps to create a database KVM.
$  odacli update-repository -f /opt/oracle/dcs/patchfiles/odacli-dcs-19.23.0.0.0-date-ODAVM-19.23.0.0.zip
{
  "jobId" : "2d45004d-923b-45d9-b27c-cfbda391edb6",
  "status" : "Running",
  "message" : "/opt/oracle/dcs/patchfiles/odacli-dcs-19.23.0.0.0-date-ODAVM-19.23.0.0.zip",
  "reports" : [ ],
  "createTimestamp" : "April 8, 2024 07:45:04 AM UTC",
  "resourceList" : [ ],
  "description" : "Repository Update",
  "updatedTime" : "October 26, 2022April 8, 2024 07:45:05 AM UTC"
}
In the BUI, select DB Systems on the left, and
click Create.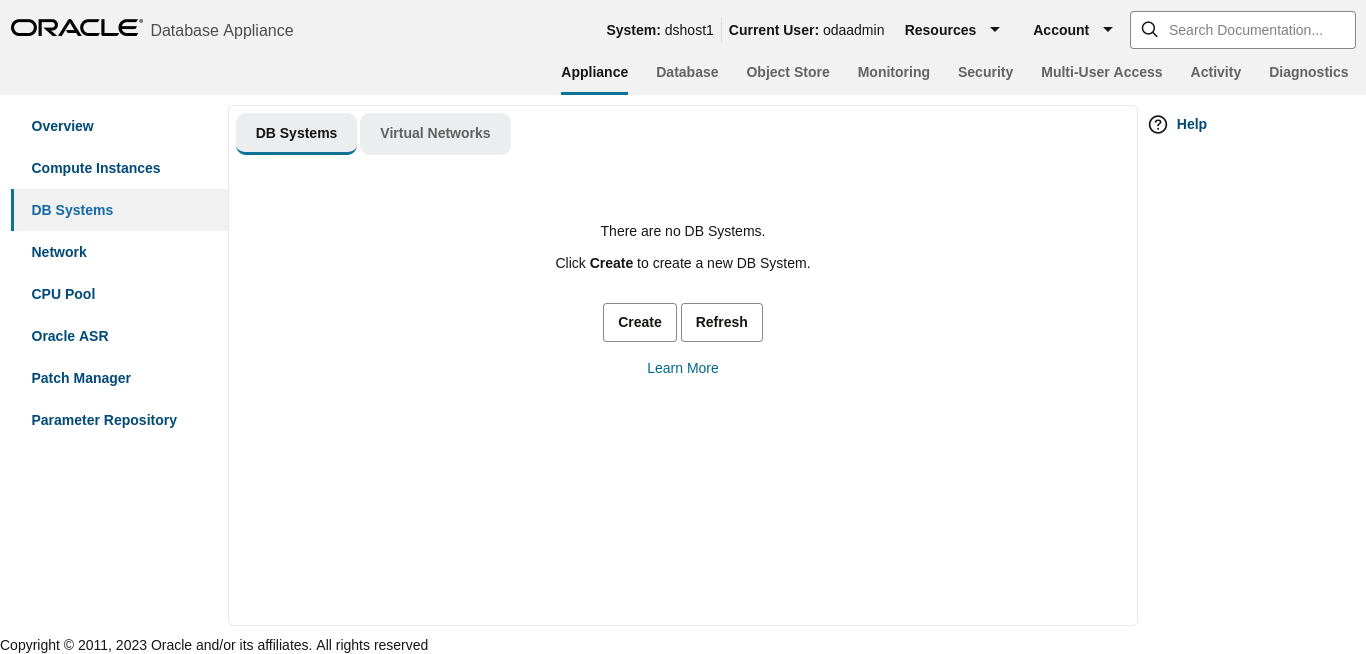
Description of the illustration bui_db_system_list.png
Enter the System Information, Network Information, CPU Pool and Database
Information, then click Create.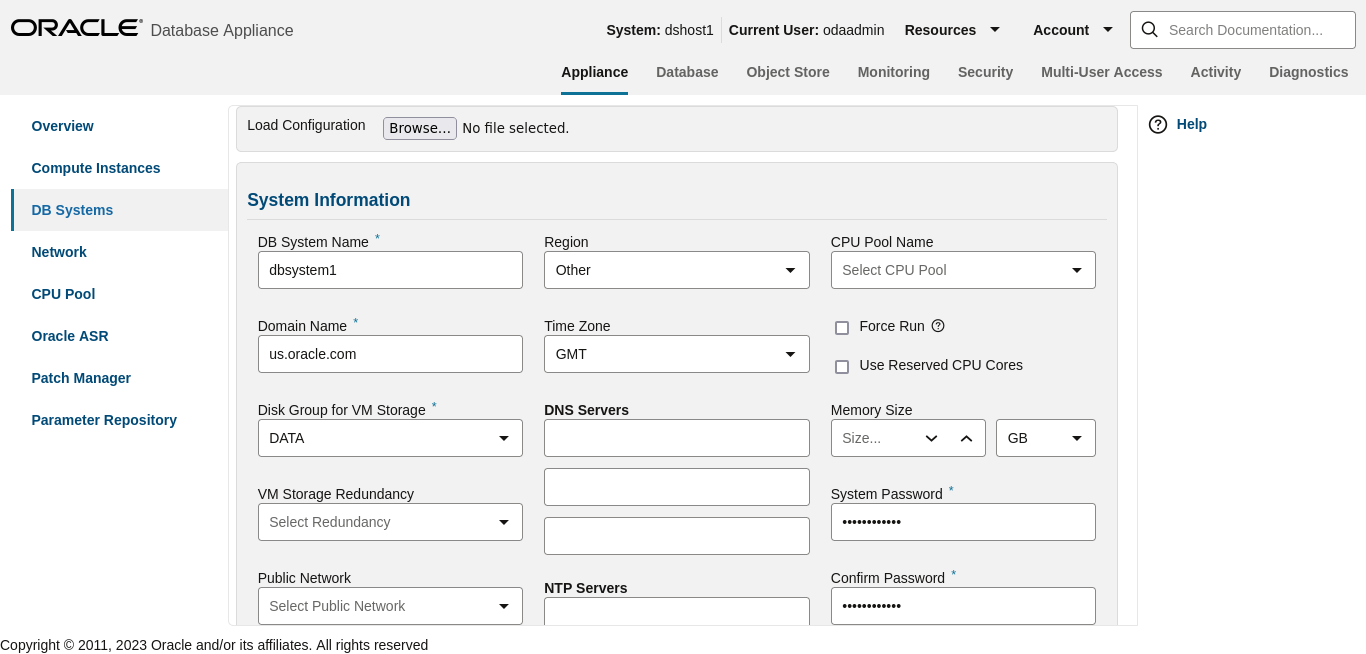
Description of the illustration bui_db_system_create.png
Note the database shape selected will determine the number of CPU cores assigned to the database. A database CPU pool is automatically created, or a database CPU Pool can be selected. A default network is also be automatically assigned to the database, or a network can be selected. Make sure CDB is selected.
You can see that a database KVM dbsystem1 is
created.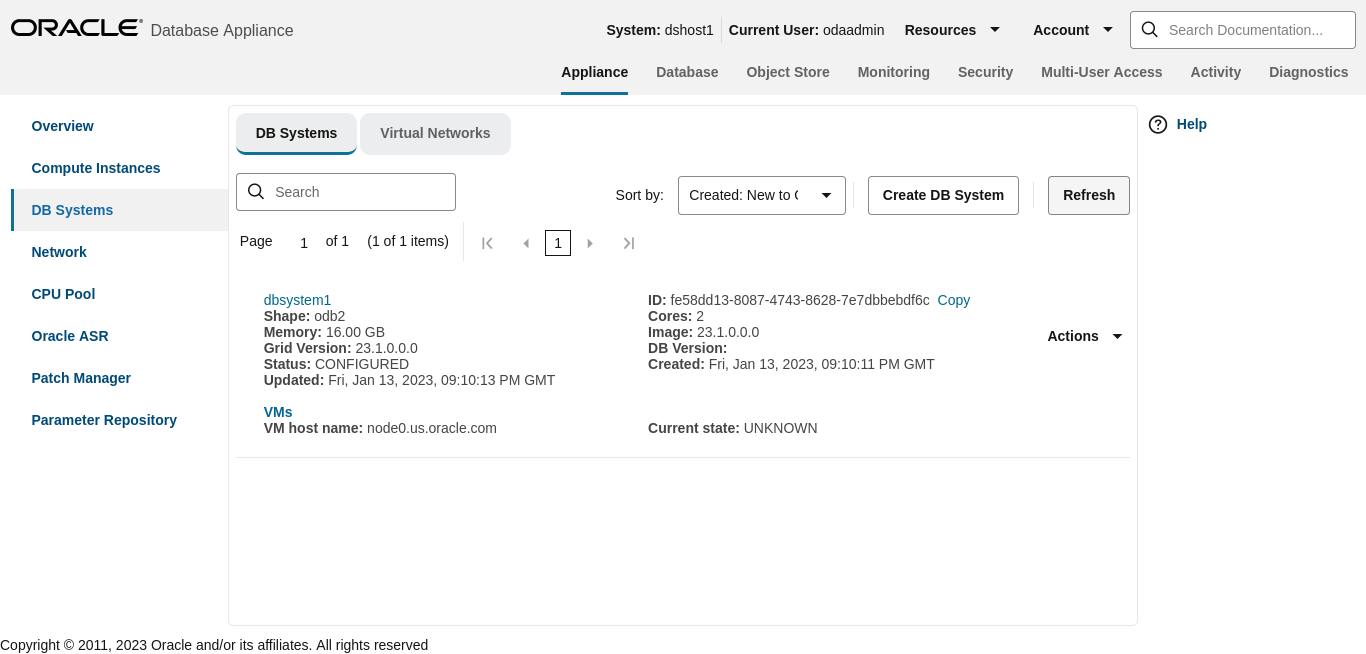
Description of the illustration bui_dbsystem_created_successfully.png
You can find the details for dbsystem1 by clicking on it.
You can modify the DB System by clicking Actions and then selecting Modify.
You can change the database shape from odb2 (2 cores) to
odb4 (4 cores).
Click the DB Systems tab on the left to verify that
dbsystem1 has 4 cores now.
This concludes Lab 4.
Lab 5 - Multi-User Access
Oracle Database Appliance Multi-User Access can enhance the security of your appliance and provide an efficient mechanism for role separation.
With multi-user access, you can provide separate access to database administrators to manage databases and create multiple users with different roles that restrict them from accessing resources created by other users and restrict the set of operations they can perform.
In this lab, you will create two new users, user1 and
user2, assign a resource, for example, database to
user1, then create a database using user2. You
will verify that both users have access to different resources.
- Step 1 - Create New Users
Understand the steps to create new users. - Step 2 - Grant a Resource to a User
Understand the steps to grant a resource to a user. - Step 3 - Create a Resource by a User
Understand the steps to create a resource.
Parent topic: Oracle Database Appliance Simulator Lab Exercises
Step 1 - Create New Users
Understand the steps to create new users.
Navigate to the Multi-User Access tab in the BUI.
Create a new user, user1, and provide a temporary password. The
password for user1 must be changed on the first login.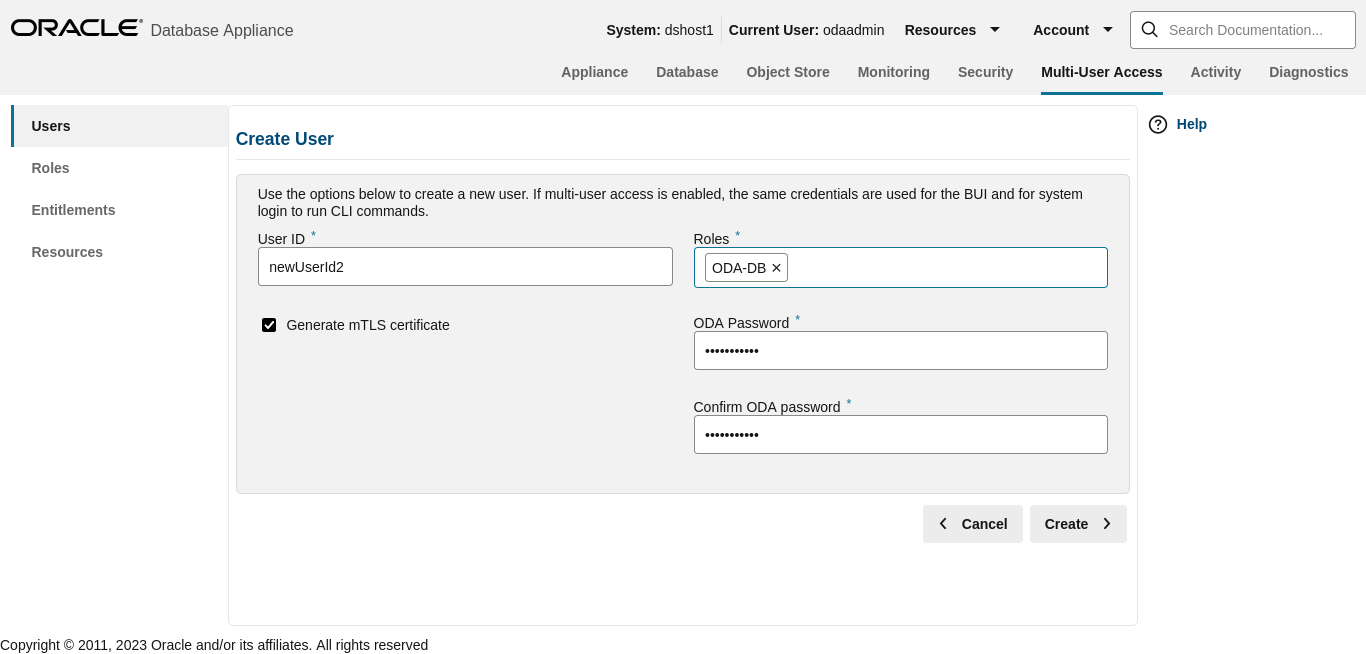
Description of the illustration bui_oma_create_user.png
Go to the Users tab on the left to verify that the new user,
user1, is created.
Create a second user, user2 using the same process.
Go to the Users tab on the left to verify that
user2 is created.
Parent topic: Lab 5 - Multi-User Access
Step 2 - Grant a Resource to a User
Understand the steps to grant a resource to a user.
You will grant a resource, db5, to
user1. Go the Resources tab on the left,
click on Show Advanced Search, select
ODA_DB, and click Search. On
db5, click Actions, and then select
Grant Resource Access.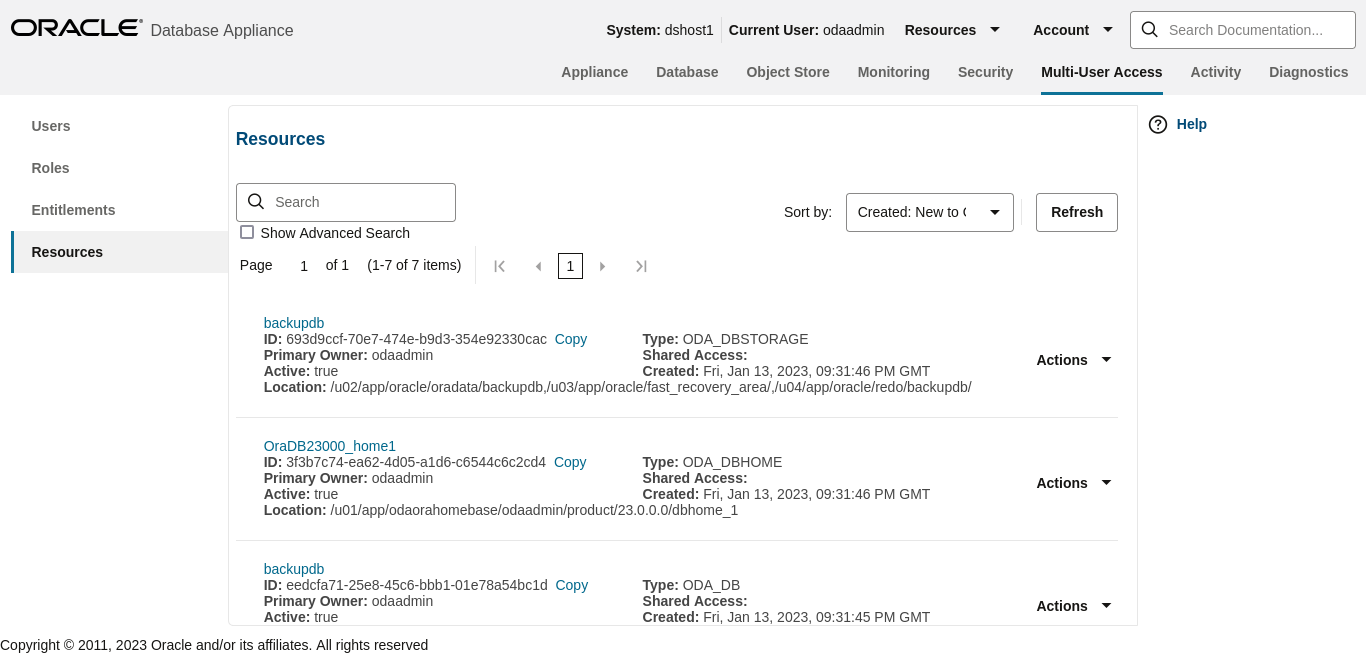
Description of the illustration bui_oma_resources_list.png
In the User Name drop-down, select user1, then click
Grant.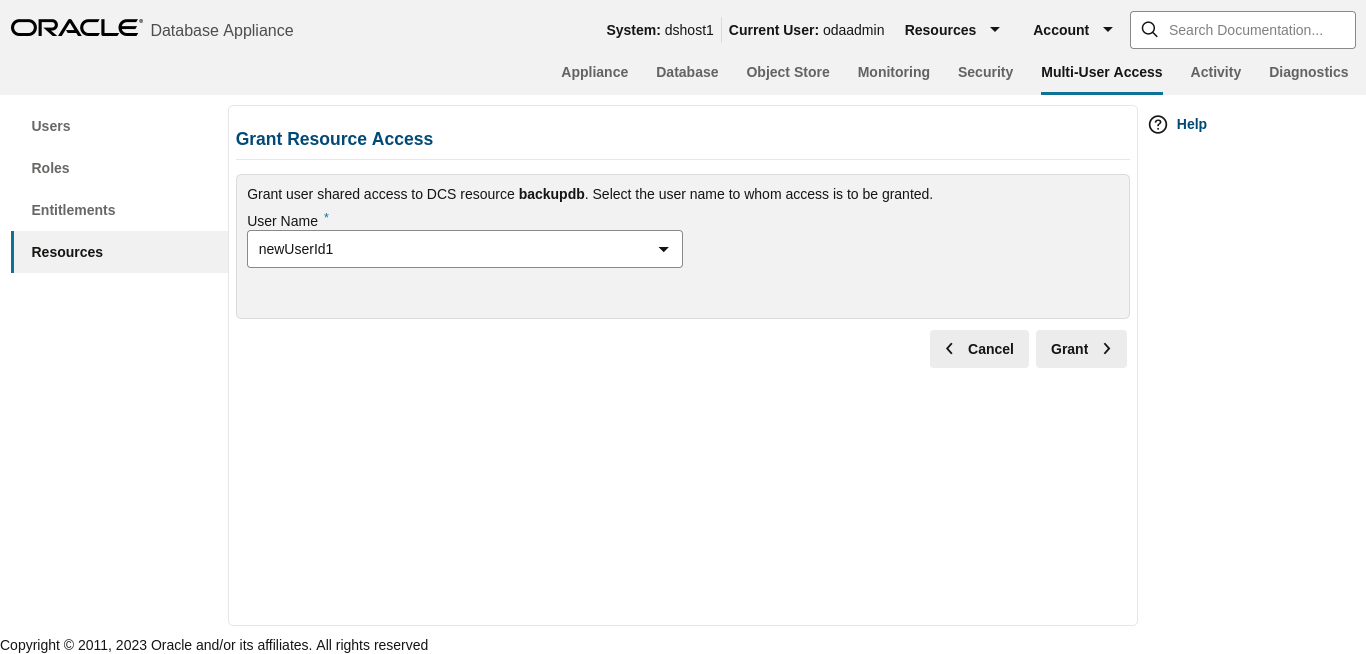
Description of the illustration bui_oma_grant_resource_access.png
To verify that user1 has access to db5,
click on the Resources tab on the left again. Note that
user1 now has shared access to db5. Note that
this database was originally created by the odaadmin user.
Log in as user1 to verify access to
db5.
Specify the temporary password created by the odaadmin user, and you
are prompted to provide a new password. You can use a password similar to
WELcome12## or create your own.
When you log in with the new password, note that the Current User is
displayed as user1. Note that there are fewer tabs on the top for
user1.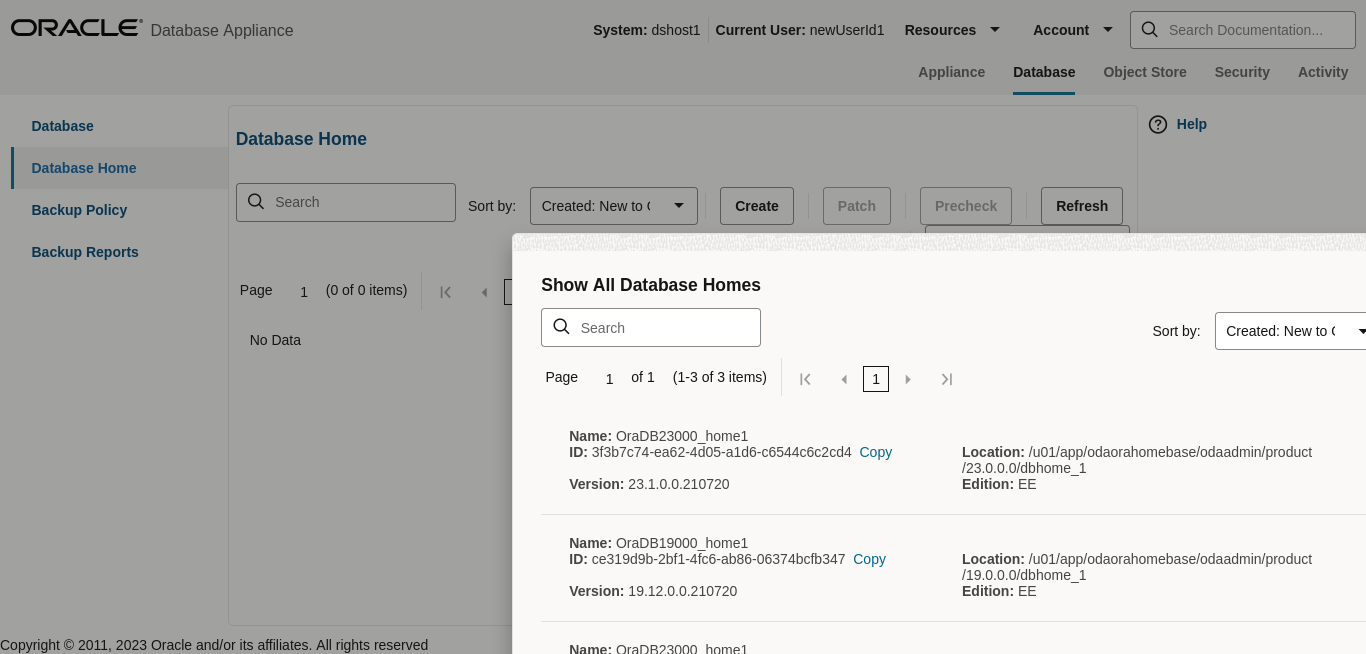
Description of the illustration bui_oma_show_all_dbdhomes.png
Click on the Database tab, and note that
user1 has access to db5.
Parent topic: Lab 5 - Multi-User Access
Step 3 - Create a Resource by a User
Understand the steps to create a resource.
Log in as user2, create a database, and have exclusive
access to the database. First, log in as user2 with the temporary
password created by odaadmin.
A new password for user2 is required. You can use a password similar
to WELcome12##, or create your own.
Log in as user2 with the new password.
Click on the Database tab. There are no database
available to user2. Click Create
Database.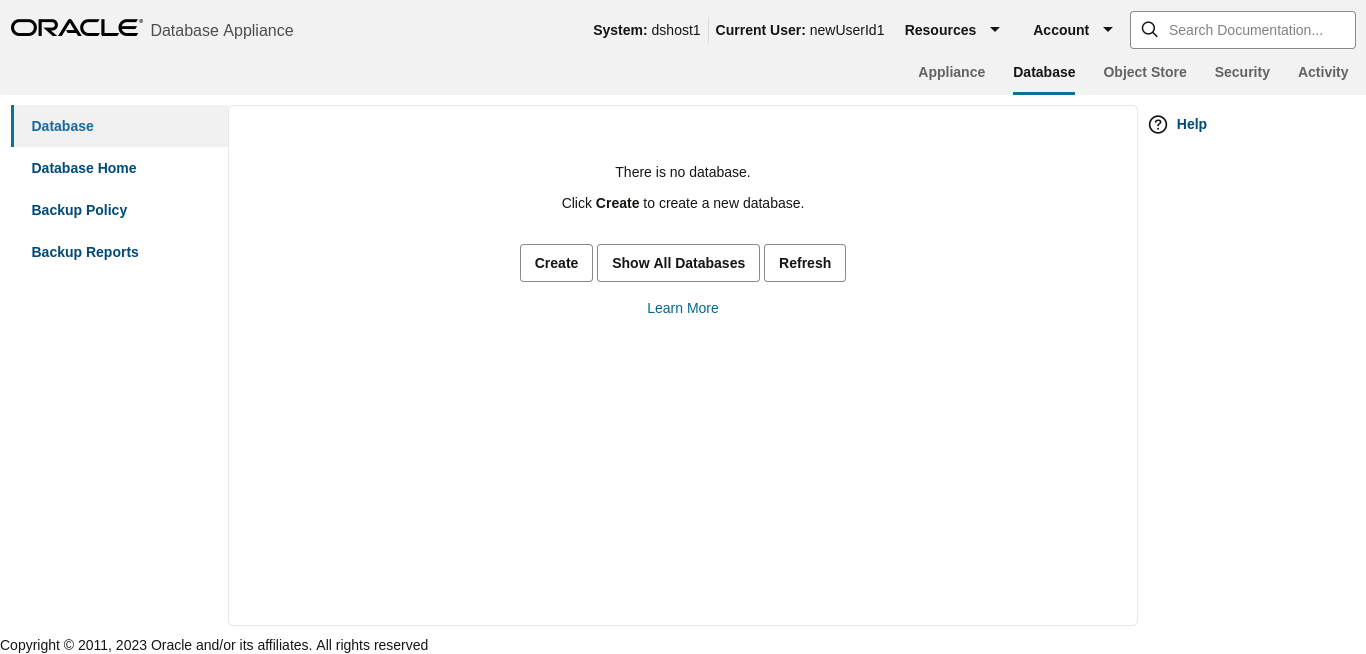
Description of the illustration bui_oma_database_landing_page.png
Create a new database, user2db1.
Click Create and verify that the database is created.
Log in as user1 to verify that user1 does not have
access to user2db1.
You can verify that user1 only has access to
db5.
Log in as odaadmin to review resources and user access.
When logged in as the odaadmin user, you can view all the
databases.
Click on the Multi-User Access tab, then click on the
Resources tab on the left. Use the Advanced Search
feature and search for ODA_DB, You can see the Primary Owner of the
database and Shared Access users for the databases. The user1 has
access to db5, and user2 has access to
user2db1.
This concludes Lab 5.
Parent topic: Lab 5 - Multi-User Access
Lab 6 - Monitoring and Resources
Use either the command line or the BUI to monitor Oracle Database Appliance software, hardware, and feature usage.
Oracle Database Appliance also provides security reports, diagnostic information, and context sensitive online help (documentation, FAQ, blogs). An Oracle Enterprise Manager plug-in is available if you want to use Oracle Enterprise Manager to monitor your IT infrastructure. This lab will demonstrate how to monitor Oracle Database Appliance with BUI and ODACLI commands.
- Step 1 - Advanced Information, Security Reports, Diagnostics, Online Help
Understand how to view resources in the BUI. - Step 2 - Hardware Monitoring and Feature Tracking
The BUI displays Oracle Database Appliance hardware status and tracks feature usage including High Water Marks. - Step 3 - Review Appliance Configuration
ODACLI assists in the fast deployment, patching, and easy management of Oracle Database Appliance. - Step 4 - Review Storage Configuration
Review the following odaadmcli commands that provide information about Oracle Database Appliance configuration. - Step 5 - Review Network Status
Review the following odaadmcli commands that provide information about Oracle Database Appliance configuration.
Parent topic: Oracle Database Appliance Simulator Lab Exercises
Step 1 - Advanced Information, Security Reports, Diagnostics, Online Help
Understand how to view resources in the BUI.
To view the Oracle Database Appliance software components, click on the
Advanced Information tab on the Appliance Overview
page.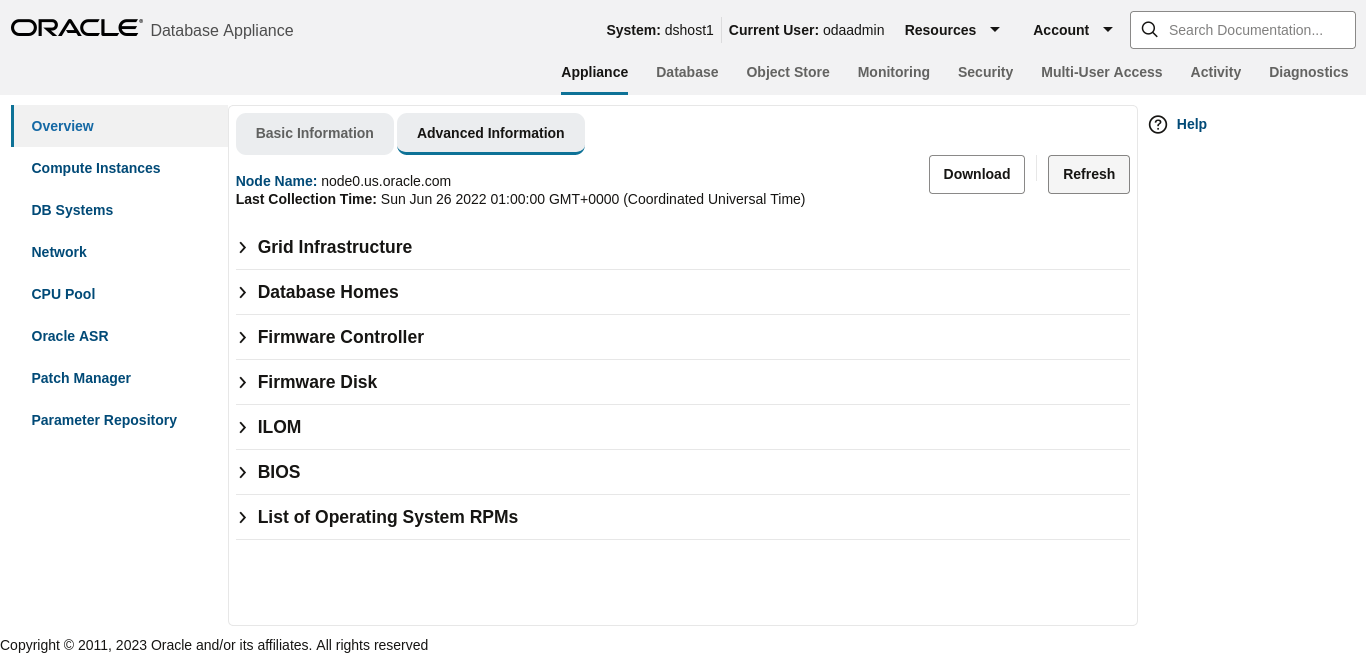
Description of the illustration bui_appliance_landing.png
To view security-related information, click on the
Security tab on the Appliance page.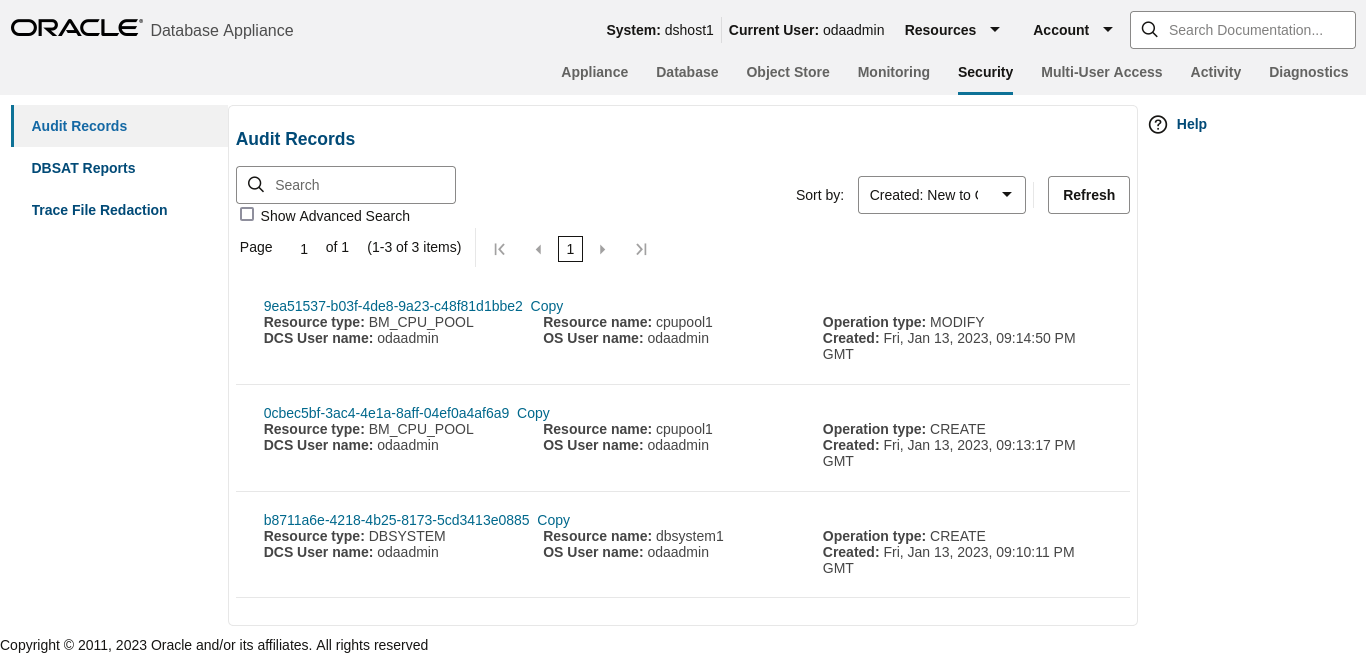
Description of the illustration bui_security_landing_page.png
To view diagnostic and log usage information, click on the
Diagnostics tab on the Appliance page.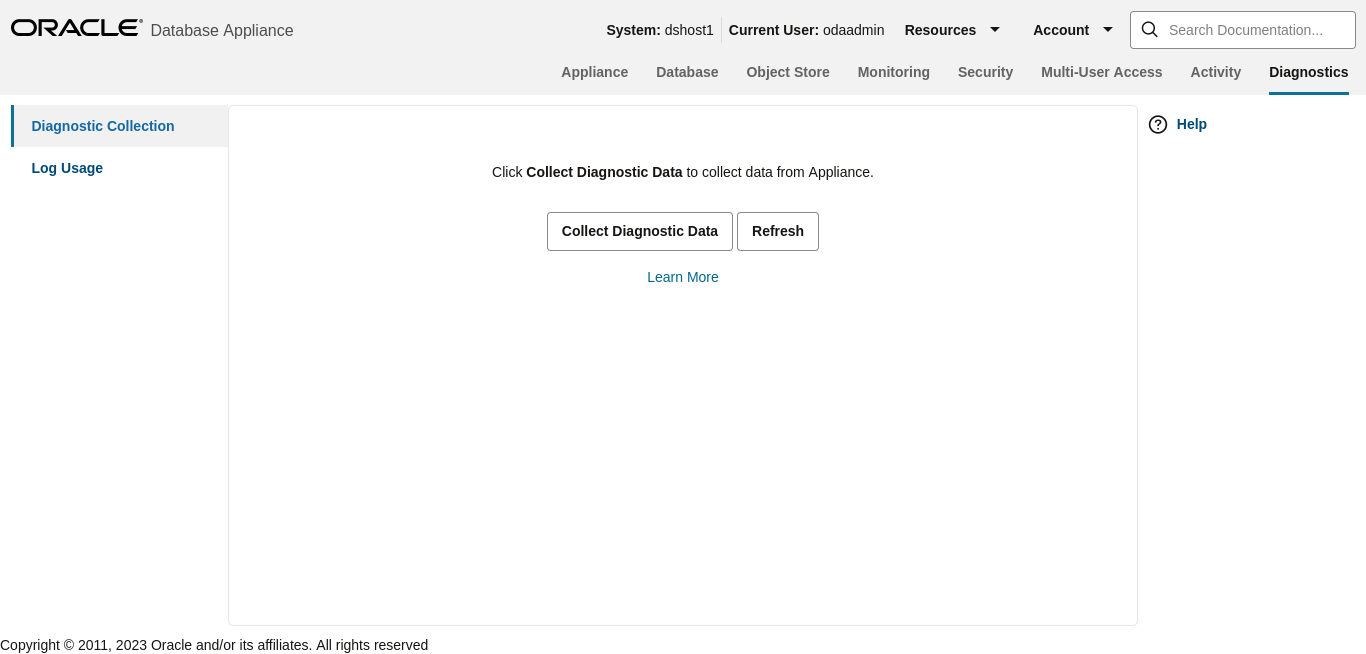
Description of the illustration bui_diagnostics_landing_page.png
To view context sensitive in-line help information, click on Help.
You can also click inside the search box on the top right corner to search the Oracle Database Appliance documentation by topics.
To view online help information such as Oracle Database Appliance documentation, FAQ, and blogs, click on the Resources tab on the Appliance page.
Parent topic: Lab 6 - Monitoring and Resources
Step 2 - Hardware Monitoring and Feature Tracking
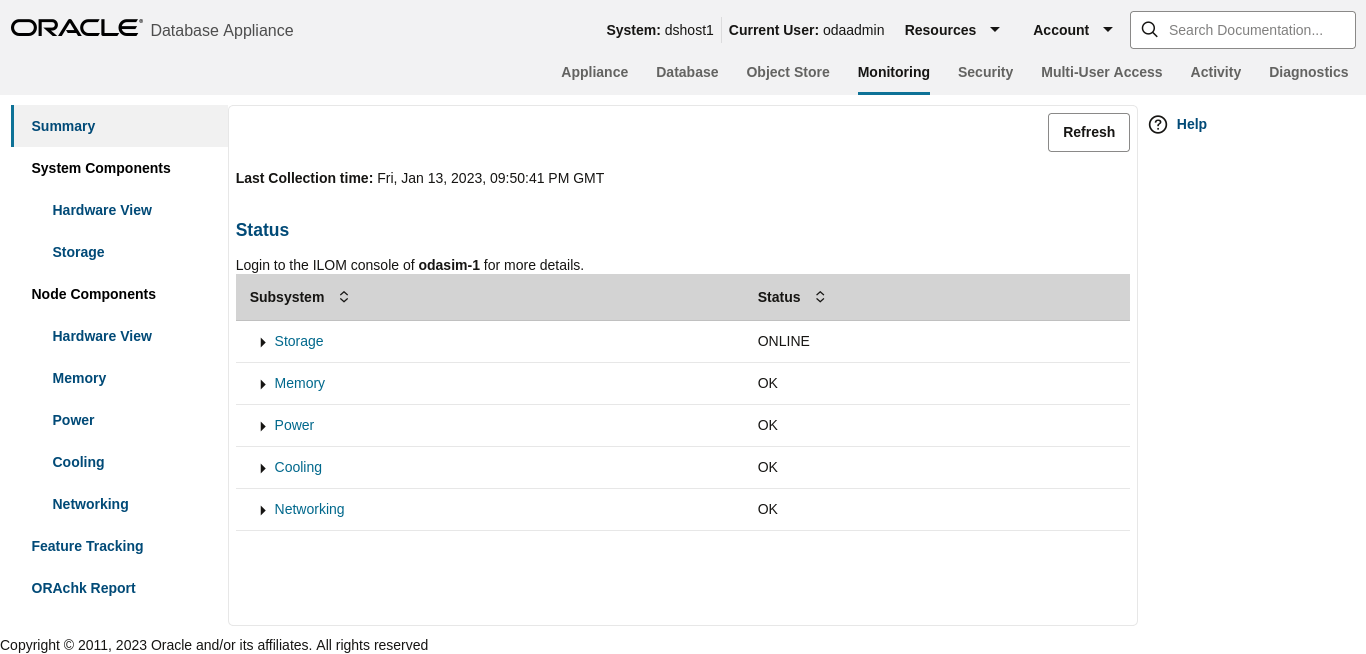
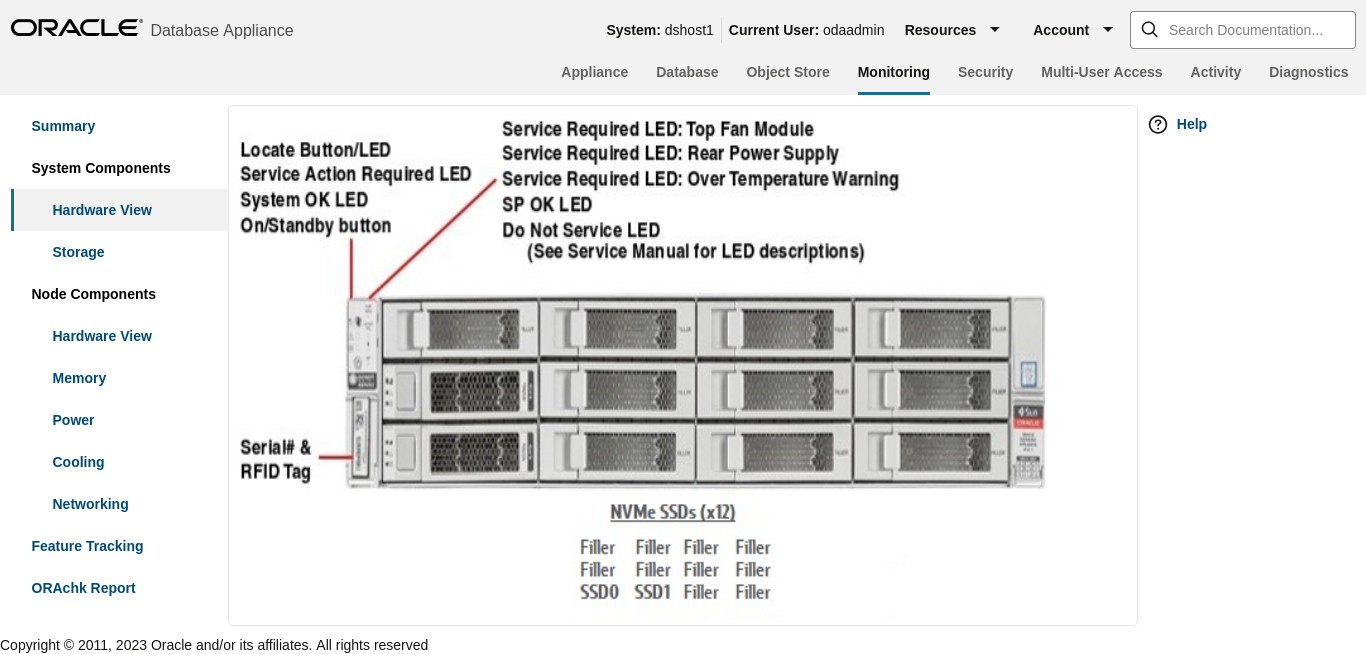
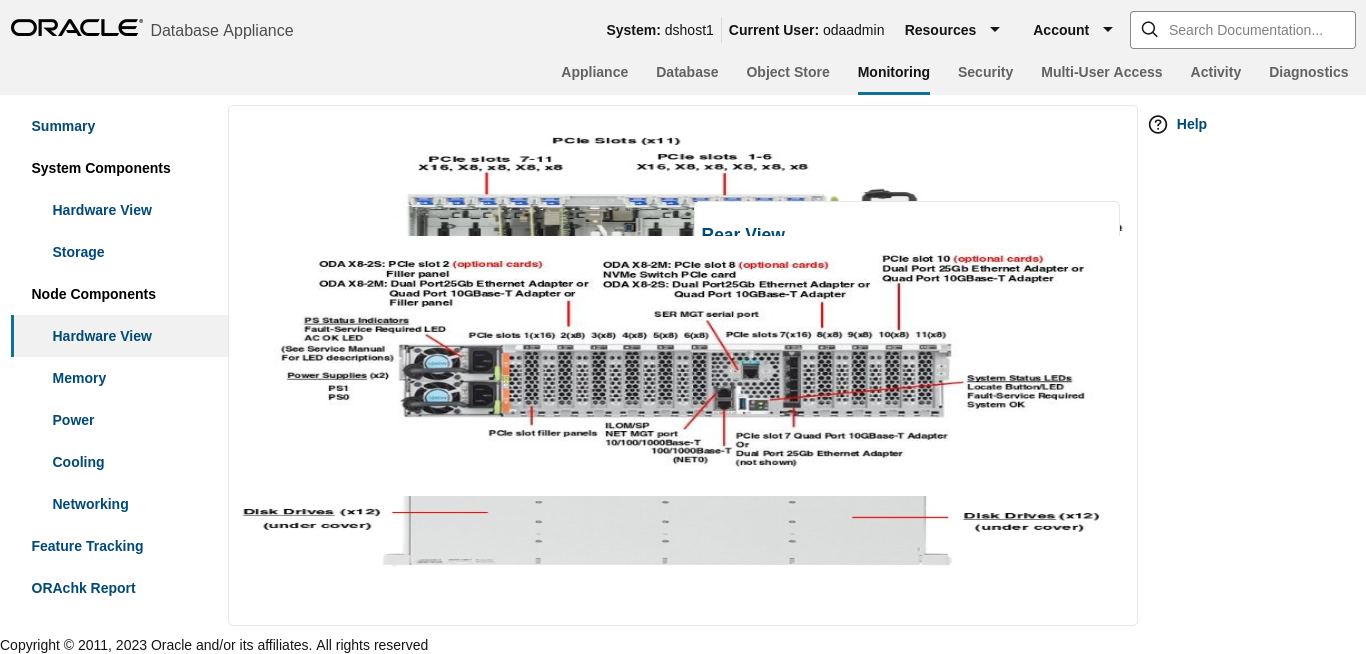
The BUI displays Oracle Database Appliance hardware status and tracks feature usage including High Water Marks.
Storage Configuration
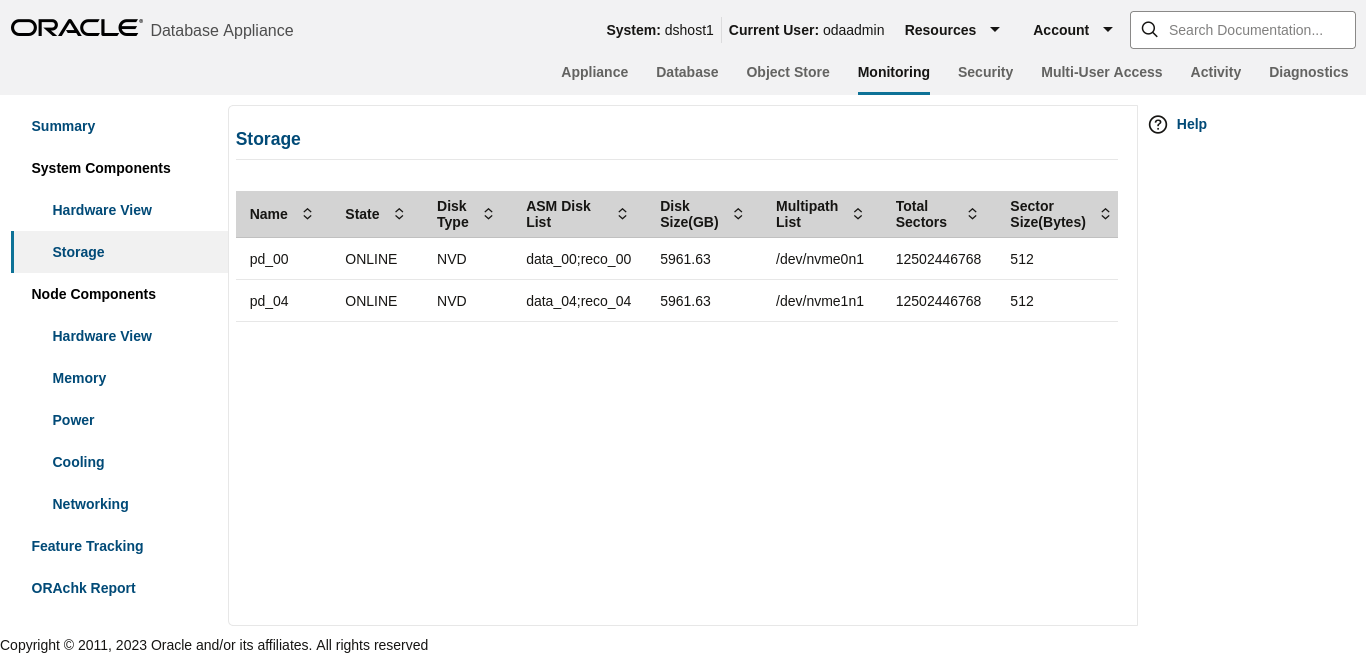
Description of the illustration bui_syscomponents_storage_status.png
Feature Tracking
The Feature Tracking output displayed in the simulator may not match the
display on an actual Oracle Database Appliance. Following is a sample output: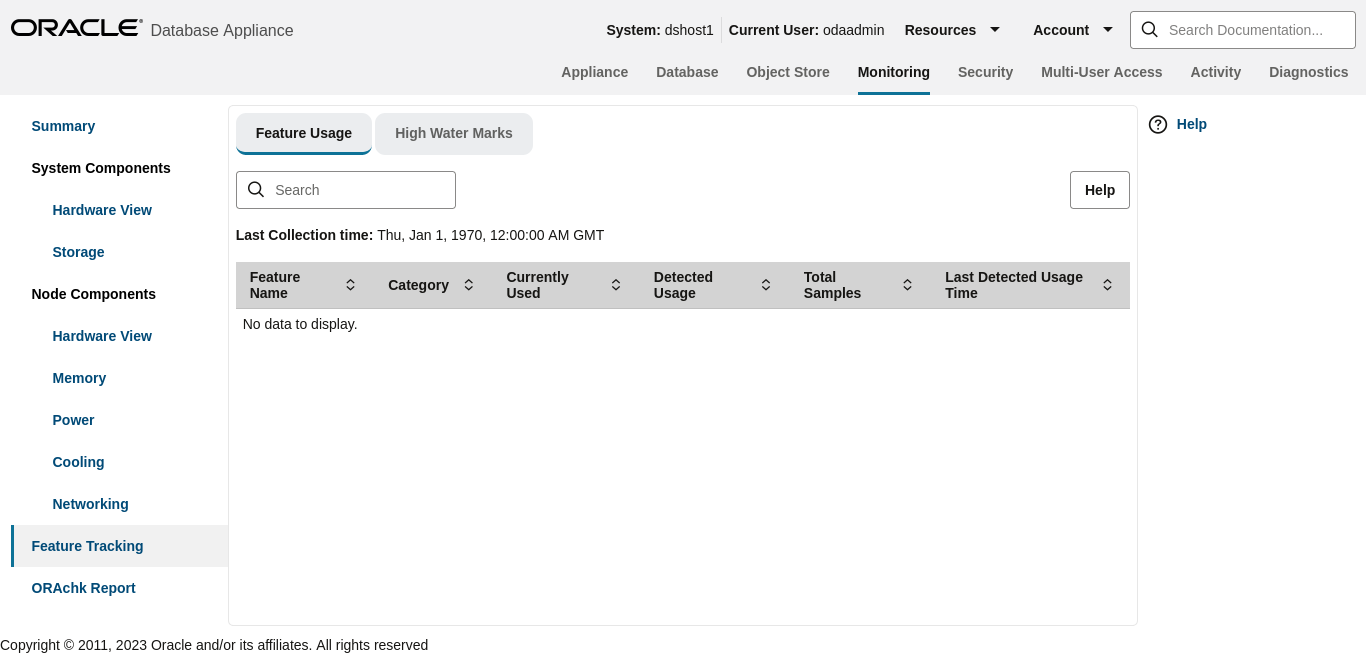
Description of the illustration bui_monitoring_feature_usage.png
High Water Marks
The High Water Marks output displayed in the simulator may not match the
display on an actual Oracle Database Appliance.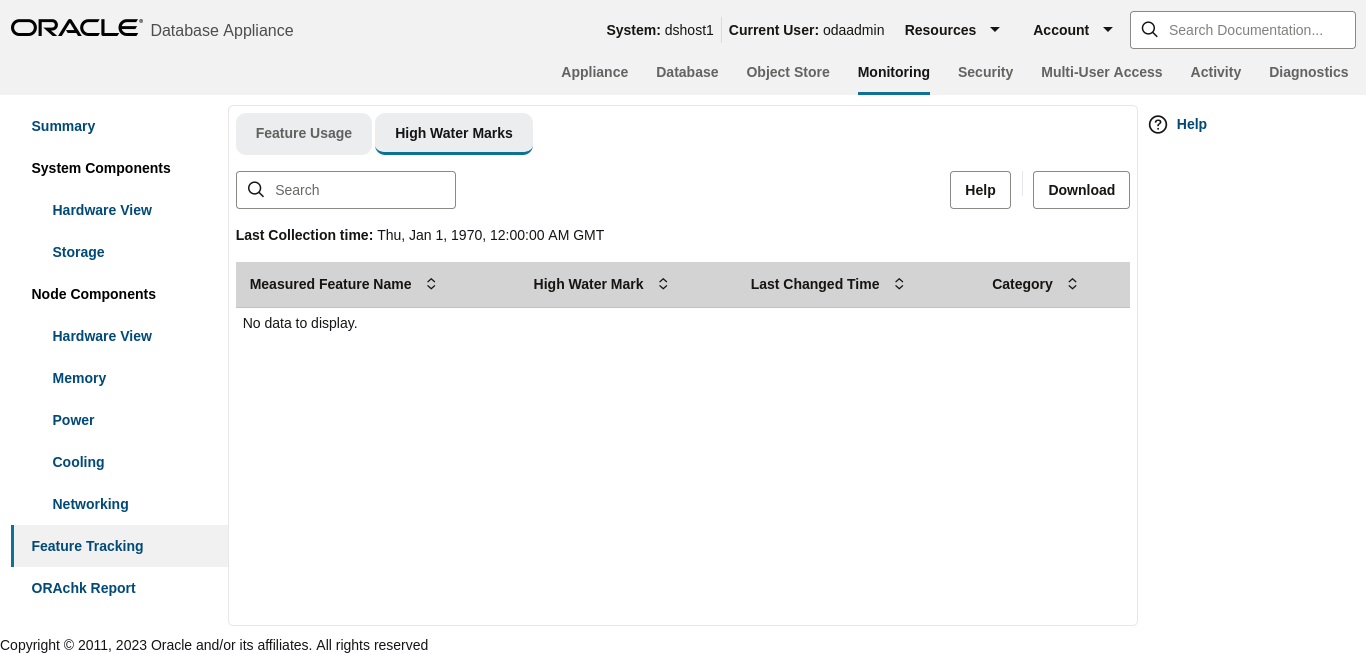
Description of the illustration bui_high_water_marks.png
Parent topic: Lab 6 - Monitoring and Resources
Step 3 - Review Appliance Configuration
ODACLI assists in the fast deployment, patching, and easy management of Oracle Database Appliance.
The Oracle Database Appliance command line interfaces (odacli, odaadmcli) are tools that can also be used to install, configure, and interrogate the status of Oracle Database Appliance.
odaadmcli commands that provide
information about Oracle Database Appliance configuration. The sample output
displayed in the simulator may not match exactly with the sample output on an actual
appliance. For more details, refer to the Oracle Database Appliance documentation
library for the latest release.
Note:
The Oracle Database Appliance simulator does not supportodaadmcli commands. The odaadmcli
command examples in this guide are representative of the sample output when
running the odaadmcli commands on an actual Oracle Database
Appliance deployment.
Command: odaadmcli show server
$ sudo odaadmcli show server

         Power State              : On
         Open Problems            : 0
         Model                    : ODA X7-2-HA
         Type                     : Rack Mount
         Part Number              : ODA X7-2-HA
         Serial Number            : 1750XD0003
         Primary OS               : Not Available
         ILOM Address             : 10.145.203.81
         ILOM MAC Address         : 00:10:E0:DA:CD:66
         Description              : Oracle Database Appliance X7-2 High Availability 1750XD0003
         Locator Light            : Off
         Actual Power Consumption : 302 watts
         Ambient Temperature      : 20.250 degree C
         Open Problems Report     : System is healthy
Command: odacli describe-system
$ sudo odacli describe-system

Appliance Information
----------------------------------------------------------------
                     ID: oda
               Platform:
        Data Disk Count: 9
         CPU Core Count: 36
                Created: April 8, 2024 8:25:14 PM GMT

System Information
----------------------------------------------------------------
                   Name: oda
            Domain Name: example.com
              Time Zone: GMT
             DB Edition: EE
            DNS Servers: 1.1.1.1
            NTP Servers:

Disk Group Information
----------------------------------------------------------------
DG Name                   Redundancy                Percentage
------------------------- ------------------------- ------------
Data                      Flex                      80
Reco                      Flex                      20
Redo                      High                      100
Flash                     Flex                      100
Command: odaadmcli show processor
$ sudo odaadmcli show processor

      NAME  HEALTH HEALTH_DETAILS PART_NO. LOCATION   MODEL                         MAX_CLK_SPEED TOTAL_CORES ENABLED_CORES
      CPU_0 OK     -              SR3AX    P0 (CPU 0) Intel(R) Xeon(R) Gold 6140 CP 2.300 GHz       18        NA
      CPU_1 OK     -              SR3AX    P1 (CPU 1) Intel(R) Xeon(R) Gold 6140 CP 2.300 GHz       18        NA
Command: odaadmcli show memory
$ sudo odaadmcli show memory

NAME HEALTH HEALTH_DETAILS PART_NO. SERIAL_NO. LOCATION MANUFACTURER MEMORY_SIZE CURR_CLK_SPEED ECC_Errors

DIMM_0 OK - 3A4K40BB2-CTD 00CE021743373400D8 P0/D0 Samsung 32 GB 2666 MHz 0
DIMM_11 OK - 3A4K40BB2-CTD 00CE02174337340065 P0/D1 Samsung 32 GB 2666 MHz 0
DIMM_12 OK - 3A4K40BB2-CTD 00CE0217433734000D P1/D0 Samsung 32 GB 2666 MHz 0
DIMM_14 OK - 3A4K40BB2-CTD 00CE02174237318364 P1/D2 Samsung 32 GB 2666 MHz 0
DIMM_16 OK - 3A4K40BB2-CTD 00CE0217423731A19A P1/D4 Samsung 32 GB 2666 MHz 0
DIMM_19 OK - 3A4K40BB2-CTD 00CE02174237318394 P1/D7 Samsung 32 GB 2666 MHz 0
DIMM_2 OK - 3A4K40BB2-CTD 00CE02174337340078 P0/D2 Samsung 32 GB 2666 MHz 0
DIMM_21 OK - 3A4K40BB2-CTD 00CE0217423731A195 P1/D9 Samsung 32 GB 2666 MHz 0
DIMM_23 OK - 3A4K40BB2-CTD 00CE02174237318365 P1/D1 Samsung 32 GB 2666 MHz 0
DIMM_4 OK - 3A4K40BB2-CTD 00CE0217433734007B P0/D4 Samsung 32 GB 2666 MHz 0
DIMM_7 OK - 3A4K40BB2-CTD 00CE02174337340013 P0/D7 Samsung 32 GB 2666 MHz 0
DIMM_9 OK - 3A4K40BB2-CTD 00CE02174337340101 P0/D9 Samsung 32 GB 2666 MHz 0
Command: odaadmcli show power
$ sudo odaadmcli show power
NAME           HEALTH HEALTH_DETAILS PART_NO. SERIAL_NO. LOCATION INPUT_POWER OUTPUT_POWER INLET_TEMP EXHAUST_TEMP
Power_Supply_0 OK - 7333459 465824T+1647D30456 PS0 Present 135 watts 20 degrees C 42.500 degree C
Power_Supply_1 OK - 7333459 465824T+1647D30762 PS1 Present 146 watts 20 degrees C 51.500 degree C
Command: odaadmcli show cooling
$ sudo odaadmcli show cooling

NAME HEALTH HEALTH_DETAILS LOCATION FAN % FAN SPEED

Fan_0 OK - FM0 35 % 6900 RPM
Fan_1 OK - FM0 34 % 5900 RPM
Fan_10 OK - FM2 32 % 6200 RPM
Fan_11 OK - FM2 31 % 5500 RPM
Fan_12 OK - FM3 32 % 6300 RPM
Fan_13 OK - FM3 31 % 5500 RPM
Fan_14 OK - FM3 32 % 6300 RPM
Fan_15 OK - FM3 31 % 5500 RPM
Fan_2 OK - FM0 36 % 6800 RPM
Fan_3 OK - FM0 34 % 5900 RPM
Fan_4 OK - FM1 35 % 6800 RPM
Fan_5 OK - FM1 34 % 5900 RPM
Fan_6 OK - FM1 32 % 6300 RPM
Fan_7 OK - FM1 29 % 5100 RPM
Fan_8 OK - FM2 32 % 6300 RPM
Fan_9 OK - FM2 31 % 5500 RPM
Parent topic: Lab 6 - Monitoring and Resources
Step 4 - Review Storage Configuration
Review the following odaadmcli commands that provide information about Oracle Database Appliance configuration.
Command: odaadmcli show disk
$ sudo odaadmcli show disk

              NAME                  PATH                   TYPE                     STATE                  STATE_DETAILS
              e0_pd_00              /dev/sdbv              HDD                      ONLINE                 Good
              e0_pd_01              /dev/sdbw              HDD                      ONLINE                 Good
              e0_pd_02              /dev/sdbx              HDD                      ONLINE                 Good
              e0_pd_03              /dev/sdby              HDD                      ONLINE                 Good
              e0_pd_04              /dev/sdbz              HDD                      ONLINE                 Good
              e0_pd_05              /dev/sdca              HDD                      ONLINE                 Good
              e0_pd_06              /dev/sdcb              HDD                      ONLINE                 Good
              e0_pd_07              /dev/sdcc              HDD                      ONLINE                 Good
              e0_pd_08              /dev/sdcd              HDD                      ONLINE                 Good
              e0_pd_09              /dev/sdce              HDD                      ONLINE                 Good
              e0_pd_10              /dev/sdcf              HDD                      ONLINE                 Good
              e0_pd_11              /dev/sdcg              HDD                      ONLINE                 Good
              e0_pd_12              /dev/sdch              HDD                      ONLINE                 Good
              e0_pd_13              /dev/sdci              HDD                      ONLINE                 Good
              e0_pd_14              /dev/sdcj              HDD                      ONLINE                 Good
              e0_pd_15              /dev/sdck              SSD                      ONLINE                 Good
              e0_pd_16              /dev/sdcl              SSD                      ONLINE                 Good
              e0_pd_17              /dev/sdcm              SSD                      ONLINE                 Good
              e0_pd_18              /dev/sdcn              SSD                      ONLINE                 Good
              e0_pd_19              /dev/sdco              SSD                      ONLINE                 Good
              e0_pd_20              /dev/sdcp              SSD                      ONLINE                 Good
              e0_pd_21              /dev/sdcq              SSD                      ONLINE                 Good
              e0_pd_22              /dev/sdcr              SSD                      ONLINE                 Good
              e0_pd_23              /dev/sdcs              SSD                      ONLINE                 Good
Command: odaadmcli show diskgroup
Description: Lists Oracle ASM disk groups configured on Oracle Database Appliance.
DATA is where the database data files are stored.
FLASH is where the hot files or small databases can be placed to improve performance.
RECO is where the backups, archive logs, and redo logs of the database are stored.
$ sudo odaadmcli show diskgroup

DiskGroups
----------
DATA
FLASH
RECO
REDO
Command: odaadmcli show fs
Description: Lists the details of the Oracle Database Appliance X8-2 file systems, including total Space, Free Space, Disk Group, and other details.
$ sudo odaadmcli show fs

 Type     Total Space      Free Space  Total DG Space   Free DG Space  Diskgroup Mount Point
 ext3          30109M          25254M               -               -            /
 ext3            476M            405M               -               -            /boot
 ext3          60347M          22117M               -               -            /opt
 ext3         100665M          72839M               -               -            /u01
 acfs           5120M           4625M      112116480M      111977204M       DATA /opt/oracle/dcs/commonstore
Command: odaadmcli show raidsyncstatus
$  sudo odaadmcli show raidsyncstatus

Raid Type  Raid Device      Partitions      RaidStatus Recovery        RecoveryPercentage
 S/W Raid          md0      sdb2 sda2            UU       No                       N/A
 S/W Raid          md1      sdb3 sda3            UU       No                       N/A
Command: odaadmcli show storage
$ sudo odaadmcli show storage


==== BEGIN STORAGE DUMP ========
Host Description: Oracle Corporation:ORACLE SERVER X7-2
Total number of controllers: 2
              Id         = 0
              Serial Num = 500605b00d3e88c0
              Vendor     = LSI Logic
              Model      = ORCL-EXT-SAS3
              FwVers     = 13.00.00.00
              strId      = mpt3sas:3b:00.0
              Id         = 1
              Serial Num = 500605b00d3e8450
              Vendor     = LSI Logic
              Model      = ORCL-EXT-SAS3
              FwVers     = 13.00.00.00
              strId      = mpt3sas:5e:00.0

Total number of expanders: 2
              Id         = 0
              Serial Num = 50800200022f163f
              Vendor     = ORACLE
              Model      = DE3-24C
              FwVers     = 0306
              strId      = Secondary
              WWN        = 50800200022e41be
              Id         = 1
              Serial Num = 50800200022f163f
              Vendor     = ORACLE
              Model      = DE3-24C
              FwVers     = 0306
              strId      = Primary
              WWN        = 50800200022e447e

Total number of PDs: 24
              /dev/sdaa       HGST              HDD 9796gb slot:  0  exp:  0   H7210A520SUN010T
              /dev/sdab       HGST              HDD 9796gb slot:  1  exp:  0   H7210A520SUN010T
              /dev/sdac       HGST              HDD 9796gb slot:  2  exp:  0   H7210A520SUN010T
              /dev/sdad       HGST              HDD 9796gb slot:  3  exp:  0   H7210A520SUN010T
              /dev/sdae       HGST              HDD 9796gb slot:  4  exp:  0   H7210A520SUN010T
              /dev/sdaf       HGST              HDD 9796gb slot:  5  exp:  0   H7210A520SUN010T
              /dev/sdag       HGST              HDD 9796gb slot:  6  exp:  0   H7210A520SUN010T
              /dev/sdah       HGST              HDD 9796gb slot:  7  exp:  0   H7210A520SUN010T
              /dev/sdai       HGST              HDD 9796gb slot:  8  exp:  0   H7210A520SUN010T
              /dev/sdaj       HGST              HDD 9796gb slot:  9  exp:  0   H7210A520SUN010T
              /dev/sdak       HGST              HDD 9796gb slot: 10  exp:  0   H7210A520SUN010T
              /dev/sdal       HGST              HDD 9796gb slot: 11  exp:  0   H7210A520SUN010T
              /dev/sdam       HGST              HDD 9796gb slot: 12  exp:  0   H7210A520SUN010T
              /dev/sdan       HGST              HDD 9796gb slot: 13  exp:  0   H7210A520SUN010T
              /dev/sdao       HGST              HDD 9796gb slot: 14  exp:  0   H7210A520SUN010T
              /dev/sdap       HGST              SSD 3200gb slot: 15  exp:  0   HBCAC2DH2SUN3.2T
              /dev/sdaq       HGST              SSD 3200gb slot: 16  exp:  0   HBCAC2DH2SUN3.2T
              /dev/sdar       HGST              SSD 3200gb slot: 17  exp:  0   HBCAC2DH2SUN3.2T
              /dev/sdas       HGST              SSD 3200gb slot: 18  exp:  0   HBCAC2DH2SUN3.2T
              /dev/sdat       HGST              SSD 3200gb slot: 19  exp:  0   HBCAC2DH2SUN3.2T
              /dev/sdau       HGST              SSD  800gb slot: 20  exp:  0   HBCAC2DH4SUN800G
              /dev/sdav       HGST              SSD  800gb slot: 21  exp:  0   HBCAC2DH4SUN800G
              /dev/sdaw       HGST              SSD  800gb slot: 22  exp:  0   HBCAC2DH4SUN800G
              /dev/sdax       HGST              SSD  800gb slot: 23  exp:  0   HBCAC2DH4SUN800G
==== END STORAGE DUMP =========
Parent topic: Lab 6 - Monitoring and Resources
Step 5 - Review Network Status
Review the following odaadmcli commands that provide information about Oracle Database Appliance configuration.
Command: odaadmcli show network
$ sudo odaadmcli show network

        NAME           HEALTH HEALTH_DETAILS LOCATION PART_NO MANUFACTURER MAC_ADDRESS        LINK_DETECTED DIE_TEMP
        Ethernet_NIC_0 OK     -              NET0     i210    INTEL        00:10:E0:DA:CD:62  no (em1)      N/A
        Ethernet_NIC_1 OK     -              NET1     BCM57417Broadcom     00:10:E0:DA:CD:63  yes (em2)     N/A
        Ethernet_NIC_2 OK     -              NET2     BCM57417Broadcom     00:10:E0:DA:CD:64  yes (em3)     N/A
        Ethernet_NIC_3 -      -              NET3     X540    INTEL        00:0A:F7:CF:36:38  yes (p1p2)    -
        Ethernet_NIC_4 -      -              NET4     X540    INTEL        00:0A:F7:CF:36:30  yes (p1p1)    -
This concludes Lab 6.
Parent topic: Lab 6 - Monitoring and Resources
