3 Configuring Protected Databases
This chapter describes how to configure protected databases for backup and recovery operations with Recovery Appliance.
This chapter contains the following topics:
-
Overview of Configuring Protected Databases for Recovery Appliance
-
Enrolling the Protected Database with Recovery Appliance (Cloud Control)
-
Enrolling the Protected Database with Recovery Appliance (Command Line)
-
Configuring Backup and Recovery Settings for Protected Databases (Cloud Control)
-
Configuring Backup and Recovery Settings for Protected Databases (Command Line)
Overview of Configuring Protected Databases for Recovery Appliance
To use Recovery Appliance as a centralized repository for your protected database backups, configuration is required both on the Recovery Appliance and on the protected database. You can use Enterprise Manager Cloud Control (Cloud Control) or RMAN to configure protected databases.
On the Recovery Appliance, the configuration steps include creating a protection policy that is assigned to the protected database, creating a Recovery Appliance user who owns the virtual private catalog, and granting access for the protected databases to a Recovery Appliance user. These steps are described in Zero Data Loss Recovery Appliance Administrator's Guide.
On the protected database, the configuration includes enabling the protected database to access the Recovery Appliance, adding protected database metadata to the Recovery Appliance, and specifying settings that will be used during backup and recovery operations.
Note:
Oracle recommends that you use a server parameter file for your protected database.
Note:
Oracle wallets created by Cloud Control support HTTP transport only. The Recovery Appliance does not support HTTPS transport at this time.
Steps to Configure Protected Databases for Recovery Appliance
Configuring protected databases performs the set up tasks required to back up and recover protected databases using Recovery Appliance.
To configure a protected database for Recovery Appliance:
-
Enroll the protected database with a Recovery Appliance.
Enrolling is a one-time task that must be performed the first time you set up a protected database to use the Recovery Appliance.
-
Configure backup and recovery settings for the protected database.
These settings are used during backup and recovery operations for the protected database. The settings can be modified according to the backup or recovery task that is being performed.
-
Perform a test backup to verify that your protected database configuration is successful as described in "Performing a Test Backup Using Cloud Control".
Overview of Recovery Appliance Backup Module
The Recovery Appliance backup module is an Oracle-supplied SBT library that functions as a media management library. RMAN uses the Recovery Appliance backup module to transfer backup data over the network to the Recovery Appliance. The backup module is referenced when allocating or configuring an RMAN SBT channel for backup or recovery operations to the Recovery Appliance. All backups to the Recovery Appliance, and all restores of complete backup sets, are performed by means of this backup module.
Install Location for the Recovery Appliance Backup Module
The Recovery Appliance backup module must be installed in the following locations:
-
In the Oracle home of every protected database that uses RMAN to backup protected databases to Recovery Appliance
If a particular Oracle home is used by more than one protected database, then the backup module must be installed only once in this Oracle home.
-
On every upstream Recovery Appliance that sends backups to downstream Recovery Appliances in replication environments
The library for the Recovery Appliance backup module,
libra.so, is preinstalled on Recovery Appliance. However, the Oracle wallet containing the replication user credentials must be created on the upstream Recovery Appliance.
Recovery Appliance Backup Module Configuration File
The Recovery Appliance backup module configuration file contains the configuration settings that are used when protected databases communicate with the Recovery Appliance. The configuration file is created automatically when the Recovery Appliance backup module is installed on the protected database host.
You can also set some Recovery Appliance backup module configuration parameters inline, while configuring or allocating RMAN SBT channels for the Recovery Appliance, as shown in Example 3-3 and Example 3-4.
See Also:
"Configuration Parameters for the Recovery Appliance Backup Module" for the configuration parameters that can be specified while installing the Recovery Appliance backup module
Configuration Parameters for the Recovery Appliance Backup Module
Table 3-1 describes the configuration parameters that are used when installing the Recovery Appliance backup module. These parameters are used by protected databases while backing up to and restoring from Recovery Appliance.
Table 3-1 Recovery Appliance Backup Module Installer Parameters
| Parameter Name | Mandatory/Optional | Description |
|---|---|---|
|
dbUser |
Mandatory |
User name of the Recovery Appliance user who has the privileges required to connect to, send, and receive backups for the protected database |
|
dbPass |
Mandatory |
Password for the |
|
host |
Mandatory |
SCAN host name of the Recovery Appliance |
|
port |
Mandatory |
Listener port number of the Recovery Appliance metadata database |
|
serviceName |
Mandatory |
Service name of the Recovery Appliance metadata database |
|
walletDir |
Mandatory |
Location of the Oracle wallet that stores the Recovery Appliance user credentials and the proxy information used to connect to the Recovery Appliance. Note: If an Oracle wallet already exists in this directory, then the Recovery Appliance backup module installer overwrites the existing wallet. |
|
proxyHost |
Optional |
Host name or IP address and TCP port of a proxy server through which to make an HTTP connection to the Recovery Appliance, in the form host:port. |
|
configFile |
Optional |
Location of the configuration file that stores the configuration parameters for the Recovery Appliance backup module. The default location on Linux/UNIX is |
|
libDir |
Optional |
Location where the shared library for the Recovery Appliance backup module is stored. This library is used to transfer backup data over the network to the Recovery Appliance. It is recommended that you store the shared library in When you omit this parameter, the installer does not download the shared library. Downloading the library is not required only when you regenerate the Oracle wallet and configuration file in an Oracle home where the backup module was previously installed. |
|
libPlatform |
Optional |
Platform name of the protected database host on which the Recovery Appliance backup module needs to be installed. Typically, the Recovery Appliance backup module installer automatically determines the platform on which it is run. You need to set this parameter only if the installer displays an error indicating the platform cannot be determined. Valid values for platform name are: linux64, windows64, solaris_sparc64, solaris_sparcx64, zlinux64, aix_ppc64, and hpux_ia64. |
|
argFile |
Optional |
File from which the remaining command-line parameters must be read during the Recovery Appliance backup module installation. |
See Also:
Overview of Enrolling Protected Databases
Enrolling a protected database enables a specific Recovery Appliance to receive backups from the protected database. This is a one-time task that must be performed the first time you set up a protected database to use Recovery Appliance. Enrolling requires steps to be performed on both the Recovery Appliance and the protected database.
Enrolling a protected database performs the following tasks:
-
Configures credentials required for the protected database to access the Recovery Appliance
The protected database administrator requires credentials to authenticate with the Recovery Appliance and perform backup and recovery operations. This is done by associating a protected database administrator user with a Recovery Appliance user (in the Recovery Appliance metadata database). These credentials are stored in an Oracle wallet that is created on the protected database.
-
Defines recovery window goals and allocates reserved space on the Recovery Appliance by associating the protected database with an appropriate protection policy
-
Grants access to the protected database to the Recovery Appliance user
-
Registers the protected database with the Recovery Appliance catalog
Metadata for protected database backups must be stored in the Recovery Appliance catalog. There are multiple virtual private catalogs within the Recovery Appliance catalog. You must specify the virtual private catalog owner that will manipulate metadata for this protected database.
-
When you use Cloud Control, an Enterprise Manager administrator must be provided access to the named credentials that are used to connect to a Recovery Appliance from Cloud Control. Enterprise Manager administrators that administer backup and restore operations for the protected database need access to these credentials in order to connect to the Recovery Appliance when configuring protected databases to backup to and restore from the Recovery Appliance.
Overview of Protected Database Backup Settings
Before you back up a protected database to Recovery Appliance, you must configure the protected database backup settings. These settings, described in Table 3-2, define the default behavior for your protected database backup environment. RMAN assigns default values for each backup setting. However, it is recommended that you configure settings according to the backup requirements of the protected database.
Table 3-2 Protected Database Backup Settings
| Backup Setting | Description |
|---|---|
|
Control file autobackup |
Specifies that the control file and server parameter file must be automatically backed up whenever a backup record is added or database structure metadata in the control file changes. |
|
Disk backup location |
When configuring backups for the Recovery Appliance, if backup polling is required, then specify the backup polling location. |
|
Backup optimization |
Skips the backup of files when an identical file has already been backed up to the Recovery Appliance. |
|
Retention policy |
Specifies which backups must be retained to meet your recovery goals. You can either specify a recovery window or a redundancy value. This setting needs to be specified when you use a parallel backup strategy and need to delete obsolete backups created by your existing (not Recovery Appliance) backup strategy. |
|
Archived redo log deletion policy |
Specifies when archived redo logs are eligible for deletion. This policy applies to all archiving destinations including the fast recovery area. |
Overview of Protected Database Recovery Settings
Table 3-3 describes the recovery settings for protected databases. The values of some settings (for example, fast recovery area), are assigned based on how the protected database is configured for the Recovery Appliance.
Table 3-3 Protected Database Recovery Settings
| Recovery Setting | Description |
|---|---|
|
Desired mean time to recover |
The Mean Time to Recover (MTTR) is the time required to recover the protected database. Plan your backup strategy based on an MTTR that is acceptable for your protected database. |
|
|
The Optionally, configure the following additional properties for the protected database:
Note: Running the protected database in See Also: Oracle Database Administrator's Guide for information about configuring your database to run in |
|
Fast recovery area |
A fast recovery area is a disk location that stores backup-related files such as RMAN backups, archived redo log files, control file and online redo log file copies. The fast recovery area automates management of backup-related files and minimizes the need to manually manage disk space for backup-related files. See Also: Oracle Database Backup and Recovery User's Guide for more information about configuring a fast recovery area. |
Enrolling the Protected Database with Recovery Appliance (Cloud Control)
Enrolling protected databases with a Recovery Appliance using Cloud Control includes the following high-level steps:
-
Create the Enterprise Manager administrator user who has the privileges required to back up and recover the protected database.
See "Creating the Enterprise Manager Administrator to Manage Protected Database Operations".
-
Enroll the protected database with a Recovery Appliance.
See "Enrolling a Protected Database with Recovery Appliance Using Cloud Control".
Creating the Enterprise Manager Administrator to Manage Protected Database Operations
The Enterprise Manager administrator is an Enterprise Manager user that has the roles and privileges required to manage the data protection of one or more protected databases.
To create an Enterprise Manager administrator named protdb_admin:
-
Log in to Cloud Control as an Enterprise Manager administrator who has the privileges to create other Enterprise Manager administrator accounts.
-
From the Setup menu, select Security, and then select Administrators.
The Administrators page is displayed.
-
Click Create to display the Create Administrator: Properties page.
-
Enter the credentials of the new Enterprise Manager administrator in the Name and Password fields. In this example, the name of the Enterprise Manager administrator is
protdb_admin.In the Password Profile field, DEFAULT is selected. This value need not be modified. Providing information in the other fields on this page is optional.
-
Click Next to display the Create Administrator protdb_admin: Roles page.
-
Move the EM_USER role from the Available Roles list to the Selected Roles list and click Next.
The Create Administrator protdb_admin: Target Privileges page is displayed.
-
In the Target Privileges section, add privileges for all the targets that the new Enterprise Manager administrator will require access to. The required target privileges for an administrator that will manage protected database operations are as follows:
-
Targets corresponding to the protected databases that will be managed by this Enterprise Manager administrator user: Full privilege.
-
Targets corresponding to the hosts of each protected database that will be managed by this Enterprise Manager administrator: Full privilege.
-
Target corresponding to the Recovery Appliance to which the protected databases will be sending backups: View privilege.
To add privileges for these targets:
-
Click Add to display the Search and Add: Targets dialog.
-
Search for the target(s) using the Target Name, Target Type, and On Host filters. Choose the target(s) and click Select.
The selected protected database is added to the list of targets in the Target Privileges section.
-
Privileges can be specified for all the targets in the list via the Grant to All button or by selecting individual targets and clicking the Grant to Selected button. Either way, in the subsequent Assign Privileges screen, select the appropriate privilege for the targets as specified above; then click Continue to return to the Target Privileges page.
Repeat these steps as needed for each target that will be managed by the new Enterprise Manager user.
-
-
Click Next to display the Create Administrator protdb_admin: EM Resource Privileges page.
-
Perform the following steps:
-
For the Job System privilege, click the Edit icon in the Manage Privilege Grants column. In the Resource Type Privileges section, select Create and then click Continue.
-
To provide the EM administrator user access to existing credentials, click the Edit icon in the Named Credential column. In the Resource Privileges section, click Add and select the named credentials that must be associated with this Enterprise Manager administrator.
-
-
Click Review to display the Create Administrator protdb_admin: Review page.
The properties, roles, and privileges for this new user are displayed. Review the settings and click Back to modify settings.
-
Click Finish to create the Enterprise Manager administrator.
Enrolling a Protected Database with Recovery Appliance Using Cloud Control
Cloud Control simplifies the process of enrolling protected databases by performing certain tasks automatically.
See Also:
Note:
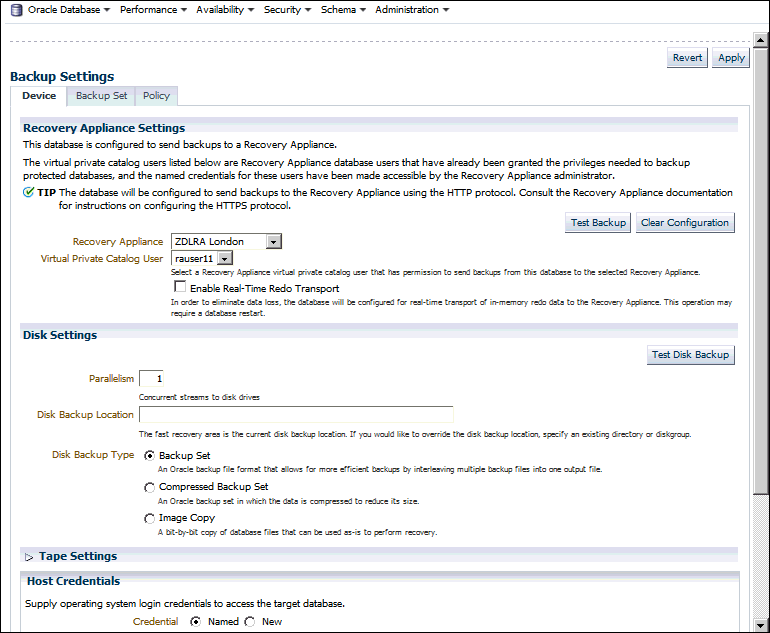
The Recovery Appliance Settings section that is used to register the protected databases is displayed only for protected databases using Oracle Database 11g Release 2 (11.2) or later. If the protected database release is lower than 11.2, then use the command line to register the protected database and configure virtual private catalog user credentials.
To enroll a protected database with a Recovery Appliance:
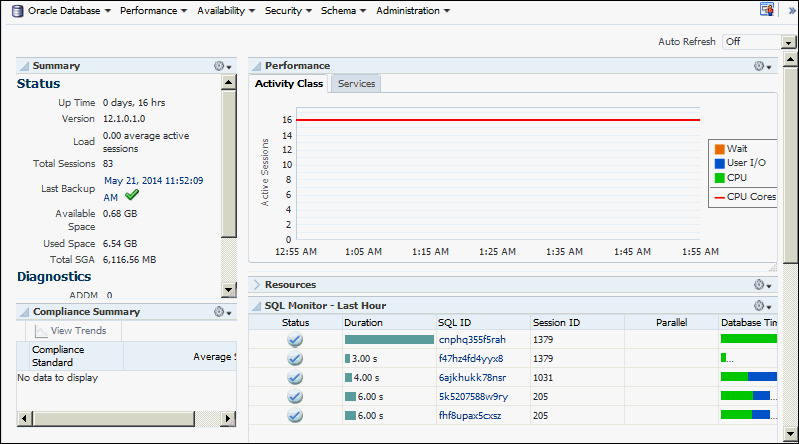
After the protected database is enrolled with a Recovery Appliance, you can use the home page for the protected database (shown in Figure 3-1) to perform configuration, backup, and recovery operations for the protected database.
Enrolling the Protected Database with Recovery Appliance (Command Line)
The enrollment steps on the Recovery Appliance are performed using procedures in the DBMS_RA package. The steps performed on the protected databases use RMAN or operating system commands.
To enroll a protected database with a Recovery Appliance using RMAN:
Making EM Aware of externally Configured Databases
This section is an exception case when Enterprise Manager (EM) did not perform the initial configuration of the protected database, but you want EM to manage it going forward. If you attempt to use EM's Backup Settings page to finish the configuration for these particular databases to send backups to the Recovery Appliance, you may run into a common error. The error is of the nature "this database has been figured outside of Backup Settings" or "virtual private catalog user settings cannot be determined".
The reasons for the error are:
- EM is not aware of configurations performed outside of EM, such as on the command line.
- EM is not aware of configurations performed inside of EM but by different EM users. EM maintains separate backup settings for each individual EM user. A configuration performed by one user cannot be accessed by another user.
To Make EM aware of database configurations made outside of EM:
EM becomes aware of Recovery Appliance VPCs when the Recovery Appliance administrator runs the EM Add Protected Database workflow. If that operation is performed outside of EM, EM is not be aware of the VPC and cannot perform the database-side configuration to send backups to the Recovery Appliance or schedule backups to the Recovery Appliance.
The problem will be apparent in the database Backup Settings page, if after selecting a Recovery Appliance, the desired VPC is not listed in the Virtual Private Catalog User choice list.
Enrolling the Protected Database with Recovery Appliance (Command Line)
The enrollment steps on the Recovery Appliance are performed using procedures in the DBMS_RA package. The steps performed on the protected databases use RMAN or operating system commands.
To enroll a protected database with a Recovery Appliance using RMAN:
Installing the Recovery Appliance Backup Module
Protected databases communicate with the Recovery Appliance through the Recovery Appliance backup module. You must install the backup module on the protected database host before you enroll the protected database with Recovery Appliance.
During the Recovery Appliance backup module installation, an Oracle wallet that contains credentials required to authenticate the protected database with Recovery Appliance is created. Additional Oracle wallets can be created.
Note:
Oracle 10g protected databases require alternate manual steps for installing the library and creating the wallet. See "Enrolling Oracle 10g Protected Databases" for instructions on how to complete these tasks.
To install the Recovery Appliance backup module:
- Complete the preparation tasks described in "Preparing to Install the Recovery Appliance Backup Module".
- Download the Recovery Appliance backup module installer as described in "Obtaining the Installer for the Recovery Appliance Backup Module".
- In each Oracle home that contains one or more protected databases, install the Recovery Appliance backup module as described in "Running the Recovery Appliance Backup Module Installer".
See Also:
-
"Overview of Recovery Appliance Backup Module" for the location where the Recovery Appliance backup module must be installed
Preparing to Install the Recovery Appliance Backup Module
Complete the following steps before you install the Recovery Appliance backup module:
-
Verify that you have Java version 1.5 or higher
-
Contact the Recovery Appliance administrator and obtain the following information:
-
Recovery Appliance host name and port number
-
Credentials of the Recovery Appliance user that will be used to authenticate the protected database with the Recovery Appliance
The permissions required to perform protected database backup and recovery operations need to be assigned to this Recovery Appliance user.
-
-
Ensure that the release of the protected database is Oracle Database 10g Release 2 or later.
Obtaining the Installer for the Recovery Appliance Backup Module
You can either download the Recovery Appliance backup module installer from the Oracle Technology Network (OTN) or obtain it from the Recovery Appliance.
On the Recovery Appliance, the installer is called ra_installer.zip and is available in the ORACLE_HOME/lib directory. During the installation, the Recovery Appliance backup module first attempts to download the modules required for your platform from OTN. If OTN access is unavailable, then the installer obtains the required libraries from the Recovery Appliance.
To download the Recovery Appliance backup module installer from OTN:
Running the Recovery Appliance Backup Module Installer
Install the Recovery Appliance backup module in the host file system of the protected database. Since the Recovery Appliance backup module is a shared library, it must be installed into a location within the shared library search path that is visible to every protected database instance. For example, $ORACLE_HOME/lib is the default location for shared libraries for the Oracle database.
The Recovery Appliance backup module location is used with the SBT_LIBRARY parameter in the ALLOCATE CHANNEL or CONFIGURE CHANNEL commands.
To run the Recovery Appliance backup module installer:
See Also:
-
"Creating an Oracle Wallet on the Protected Database" for steps to manually create an Oracle wallet
-
"Using RMAN Channels for Recovery Appliance Backup and Recovery Operations"
Enrolling Oracle 10g Protected Databases
Oracle 10g protected database enrollment requires alternate manual configuration steps for the first part of the enrollment process.
Perform the following tasks on the protected database server:
Registering a Protected Database with the Recovery Appliance Catalog
All protected databases must use the Recovery Appliance catalog on the target Recovery Appliance to store protected database backup metadata. Registering the protected database with the Recovery Appliance catalog ensures that metadata for the protected database and its backups is stored in the Recovery Appliance catalog. However, any existing backup metadata stored in an RMAN recovery catalog is not available in the Recovery Appliance catalog unless you import the RMAN recovery catalog into the Recovery Appliance catalog.
Use the REGISTER DATABASE command to register protected databases with the Recovery Appliance.
To register a protected database with the Recovery Appliance:
See Also:
-
"Importing Protected Database Metadata into the Recovery Appliance Catalog"
-
Oracle Database Backup and Recovery Reference for more information about the
REGISTERDATABASEcommand -
Oracle Database Backup and Recovery User's Guide for information about the RMAN recovery catalog
-
Oracle Database Net Services Administrator's Guide for more information about net service names
Configuring Backup and Recovery Settings for Protected Databases (Cloud Control)
Before you back up a protected database to the Recovery Appliance, you must configure backup and recovery settings for the protected database. These configured settings are used in subsequent backup and recovery operations.
Note:
You can use Cloud Control to enroll protected databases with Oracle Database 11g Release 2 (11.2) or later. For Oracle Database releases earlier than 11.2, use the command line to configure backup and recovery settings.
Configuring Backup Settings for Protected Databases Using Cloud Control
Backup settings define the default backup environment for the protected database. The settings that configure real-time redo transport and polling locations define how backups are created to the Recovery Appliance. Other settings, such as control file autobackups or backup optimization, define best practices and performance improvements for protected database backups. These settings may be configured based on your requirements.
To configure backup settings for a protected database using Cloud Control:
See Also:
Configuring Recovery Settings for Protected Databases Using Cloud Control
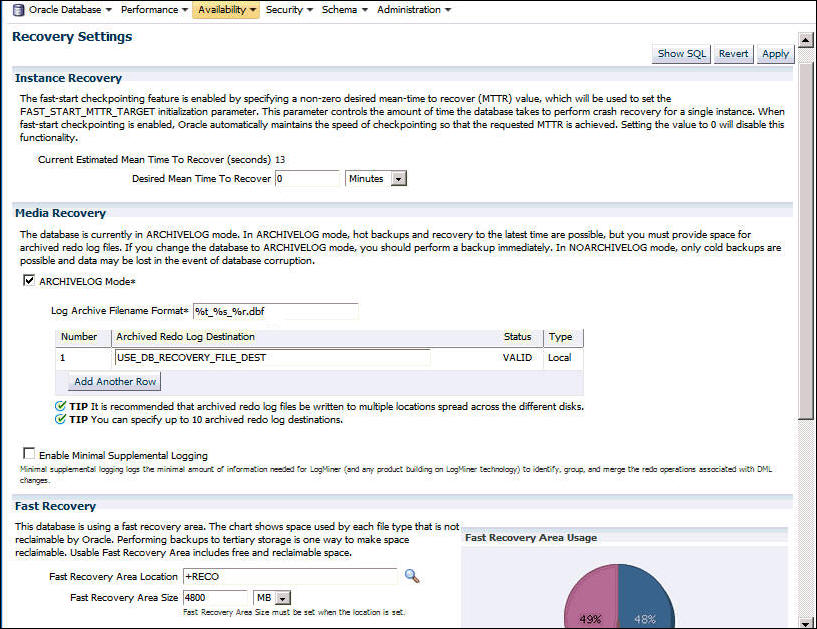
Recovery settings define the default recovery environment for the protected database. The only mandatory setting for Recovery Appliance is the Log Archive Filename Format. Configuring the remaining recovery settings is optional.
To configure recovery settings for a protected database using Cloud Control:
See Also:
-
Table 3-3 for a brief description of the recovery settings
Clearing the Backup Configuration of Protected Databases Using Cloud Control
You can clear the backup configuration of a protected database and remove its existing Recovery Appliance settings. Clearing the backup configuration removes the currently-configured Recovery Appliance and virtual private catalog user, any configured RMAN channels, and the real-time redo transport configuration.
To clear the backup configuration for a protected database using Cloud Control:
Configuring Backup and Recovery Settings for Protected Databases (Command Line)
You can use the regular RMAN commands to configure backup and recovery settings for protected databases. These configured settings are used in subsequent backup and recovery operations.
This section contains the following topics:
Configuring Backup Settings for Protected Databases Using the Command Line
RMAN assigns default values for protected database backup settings. You can use the CONFIGURE command to modify these settings according to the backup requirements of your protected database.
To configure backup settings for a protected database using the command line:
See Also:
-
Oracle Database Backup and Recovery User's Guide for information about configuring backup optimization
Configuring Real-Time Redo Transport
When you configure real-time redo transport, redo data from the protected database is directly transported and stored on the Recovery Appliance. This reduces the window of potential data loss that exists between successive archived log backups.
Configuring real-time redo transport for a protected database is a one-time step. After you set it up, the protected database asynchronously transports redo data to the Recovery Appliance.
Note:
-
The user you use for redo transport must be the same user you configured to send backups to the Recovery Appliance.
-
When you clear the real-time redo transport configuration for a protected database, you must manually force a redo log switch to maintain an accurate state for the protected database. The log switch forces the remote file server process (RFS) to stop sending redo data to Recovery Appliance.
To enable real-time redo transport for a protected database:
See Also:
-
"About Configuring Real-Time Redo Transport for Protected Databases"
-
Zero Data Loss Recovery Appliance Administrator's Guide for information about Oracle Database releases for which redo transport is supported
-
Deploying Zero Data Loss Recovery Appliance in a Data Guard Configuration for instructions on how to configure redo transport for Recovery Appliance with Oracle Data Guard
Creating an Oracle Wallet on the Protected Database
An Oracle wallet stores the credentials of the Recovery Appliance user that will be used by the protected database to authenticate with the Recovery Appliance. These same credentials are used for sending backups and redo, if configured. When you install the Recovery Appliance backup module, an Oracle wallet is automatically created. You can also create the wallet and add required entries manually.
Note:
The sqlnet.ora file in the protected database must contain the location of the Oracle wallet. Typically, the wallet location is automatically added to this file when you install the Recovery Appliance backup module.
Note:
Databases that use Enterprise User Security (EUS) WALLET_ROOT format are not supported for protected database configuration. Only WALLET_LOCATION is supported.
In the case of multiple ZDLRAs, store a single wallet in a centralized location and have the sqlnet.ora file on each ZDLRA reference that centralized wallet location.
If the wallet cannot be stored in a centralized location for multiple ZDLRAs, then it needs to be copied to all instances. Create the wallet and master key on the first instance, and then copy the wallet to the other instances. Further, set up the environment variable ORACLE_UNQNAME to separate your database wallets. Then you can refer to them dynamically from the sqlnet.ora as follows for Unix / Linux:
WALLET_LOCATION =
  (SOURCE=(METHOD=FILE)
    (METHOD_DATA =
       (DIRECTORY=/etc/oracle/wallets/$ORACLE_UNQNAME/)))
On Windows-based systems, you can refer to a database dynamically with:
WALLET_LOCATION =
    (SOURCE =
      (METHOD = FILE)
      (METHOD_DATA =
        (DIRECTORY = E:\oracle\%ORACLE_UNQNAME%)))
In addition on Windows, establish a Windows registry key for the database ORACLE_UNQNAME=<dbname> . However, this registry key can only be set for one database on Windows, so this approach is currently restricted to environments where there is only one database running on the Windows server.
Example 3-1 Creating an Oracle Wallet on the Protected Database
The following command creates an Oracle wallet that stores the credentials of the Recovery Appliance user named ravpc1:
$ mkstore                         \
  -wrl $ORACLE_HOME/oracle/wallet \
  -createALO                      \
  -createCredential zdlra01ingest-scan.acme.com:1521/zdlra01:dedicated ravpc1
Enter the password for the ravpc1 user when prompted. Here, zdlra01 is the net service name of the Recovery Appliance database. The directory $ORACLE_HOME/oracle/wallet must be created before the mkstore command is run.
Example 3-2 Creating an Oracle Wallet with Multiple User Credentials
The following command creates two sets of credentials in the Oracle wallet of a protected database. In this scenario, ra_user is used both by the Recovery Appliance for normal backup and recovery operations (and real-time redo transport, if enabled) and by the Data Guard standby database for data synchronization. The service name of the Recovery Appliance is zdlra2 and that of the primary database in the Data Guard set up is chicago.
$ mkstore                                             \
  -wrl $ORACLE_HOME/oracle/wallet                     \
  -createALO                                          \
  -createCredential chicagoingest-scan.acme.com:1521/chicago:dedicated ra_user            \
  -createCredential zdlra02ingest-scan.acme.com:1521/zdlra02:dedicated ra_user
Enter the password for ra_user when prompted. The directory $ORACLE_HOME/oracle/wallet must be created before the mkstore command is run.
Configuring Recovery Settings for Protected Databases Using the Command Line
Use the CONFIGURE command to modify the default values assigned by RMAN for the protected database recovery settings.
To configure recovery settings for a protected database using the command line:
Using RMAN Channels for Recovery Appliance Backup and Recovery Operations
To transfer backups to and from the Recovery Appliance, you must use an RMAN SBT (System Backup to Tape) channel that corresponds to the Recovery Appliance backup module.
The following techniques are available to use RMAN channels for protected database operations:
Configuring RMAN SBT Channels for Recovery Appliance
You configure RMAN SBT channels for Recovery Appliance using the RMAN CONFIGURE command. Configuring channels for a protected database creates persistent settings that are applicable to all backup, restore, and maintenance operations on that protected database. Configured settings remain in effect until they are explicitly cleared, changed, or overridden in a particular operation using an ALLOCATE command.
Example 3-3 configures an RMAN SBT channel for a Recovery Appliance. After this configuration, you need not explicitly allocate SBT channels that correspond to the Recovery Appliance backup module for each backup or recovery operation.
Example 3-3 Configuring an RMAN Channel for Recovery Appliance
In this example, an RMAN SBT channel is configured with the SBT_LIBRARY parameter pointing to the Recovery Appliance backup module. The complete path of the shared library libra.so is specified. The RA_WALLET parameter represents the location of the Oracle wallet that stores the credentials used to authenticate this protected database with the Recovery Appliance. ra-scan is the SCAN of the Recovery Appliance and zdlra5 is the service name of the Recovery Appliance metadata database.
CONFIGURE CHANNEL DEVICE TYPE 'SBT_TAPE'
PARMS 'SBT_LIBRARY=/u01/app/oracle/product/11.2.0.4.0/dbhome_1/lib/libra.so,
ENV=(RA_WALLET=location=file:/u01/app/oracle/product/11.2.0.4.0/dbhome_1/dbs/zdlra
credential_alias=ra-scan:1521/zdlra5:dedicated)' FORMAT '%U_%d';
Allocating RMAN SBT Channels for Recovery Appliance
Use the RMAN ALLOCATE command to allocate RMAN SBT channels that will be used to back up to or recover from the Recovery Appliance. For a particular operation, you can override the persistent configuration that was set using the CONFIGURE command by explicitly allocating an RMAN SBT channel before the operation. Enclose the ALLOCATE command and the other commands in a RUN block.
Example 3-4 allocates an RMAN SBT channel for the Recovery Appliance and then creates a full backup of the protected database including archived redo logs.
Example 3-4 Allocating RMAN Channels for Recovery Appliance
This example allocates an RMAN SBT channel with the SBT_LIBRARY parameter specifying the complete path of the Recovery Appliance backup module. The ENV setting is used to specify the configuration parameters used by the Recovery Appliance backup module. ra-scan is the SCAN of the Recovery Appliance and zdlra5 is the service name of the Recovery Appliance metadata database.
RUN
{
ALLOCATE CHANNEL c1 DEVICE TYPE sbt_tape
PARMS='SBT_LIBRARY=/u01/app/oracle/product/12.1.0.2/dbhome_1/lib/libra.so,
ENV=(RA_WALLET=location=file:/u01/app/oracle/product/12.1.0.2/dbhome_1/dbs
credential_alias=ra-scan:1521/zdlra5:dedicated)' FORMAT '%U_%d';
BACKUP INCREMENTAL LEVEL 1 DATABASE PLUS ARCHIVELOG;
}
Performing Test Backup and Recovery Operations
After you enroll the protected database with a Recovery Appliance, it is recommended that you perform a test backup and recovery operation. This testing helps confirm that your configuration settings are accurate and that the backup to and recovery from the Recovery Appliance are performed successfully. If you encounter any problem with the test backup or recovery, you may correct your settings and reconfigure your protected database.
Running a Test Backup Using the Command Line
After configuring a protected database for Recovery Appliance, you can test the connection to the Recovery Appliance by attempting a test backup.
To create a test backup of the protected database:
Running a Test Recovery Using the Command Line
After creating a test backup of the protected database to Recovery Appliance, you can test this backup by performing a test recovery.
To perform a test recovery of the protected database:
If these backup and recovery procedures succeed, then the client database is ready to perform regular backups to the Recovery Appliance.
Configuring Multiple Protected Databases to Send Backups to Recovery Appliance
Databases become "protected by a Recovery Appliance" when they are configured to send backups to the Recovery Appliance.
You can perform this procedure on individual databases using the Enterprise Manager (EM) Backup Settings page. However, the Enterprise Manager Command Line Interface (EMCLI) configure_db_ha command greatly facilitates configuring multiple databases concurrently.
Because protected databases can be hosted on a variety of hardware platforms, a corresponding RMAN backup module is required for each platform. When a new version of this module becomes available and it needs to be installed on many systems, the same emcli configure_db_ha command greatly simplifies this complex maintenance task.
- Update EM Software Library with Latest Version of RMAN Recovery Appliance Backup Module. This task is required for Scenario #2, and for some variants in Scenario #1.
- Scenario #1: Configure Multiple Protected Databases to Send Backups to Recovery Appliance.
- Scenario #2: Update the RMAN Recovery Appliance Backup Module for Multiple Protected Databases
These scenarios are independent. If EM handles the protected database management, scenario #1 is performed one time for each protected database, followed by periodic maintenance using variations of these scenarios.
Scenario #2 requires that the latest version of RMAN Recovery Appliance Backup module be uploaded to the EM software library. This can be accomplished manually as needed, or in a scheduled job.
Update EM Software Library with Latest Version of RMAN Recovery Appliance Backup Module
This section is required when Enterprise Manager (EM) maintains the RMAN Recovery Appliance backup module used by protected databases, because it supplies EM's software library with the latest RMAN module.
The RMAN Recovery Appliance Backup Module is different for each supported operating system where protected databases are hosted.
The steps in this section update the software library with the latest version of the RMAN Recovery Appliance Backup Module. Later EM installs from the software library the RMAN module appropriate for each protected database.
- Option 1: Configuring EM for Automatic Upload of RMAN Module to Software Library. Use this option to automatically maintain the software library with the latest RMAN backup module.
- Option 2: Using EMCLI to Manually Upload RMAN Backup Module to Software Library. Use this option if EM does not have direct access to Oracle Cloud (offline mode).
Option 1: Configuring EM for Automatic Upload of RMAN Module to Software Library
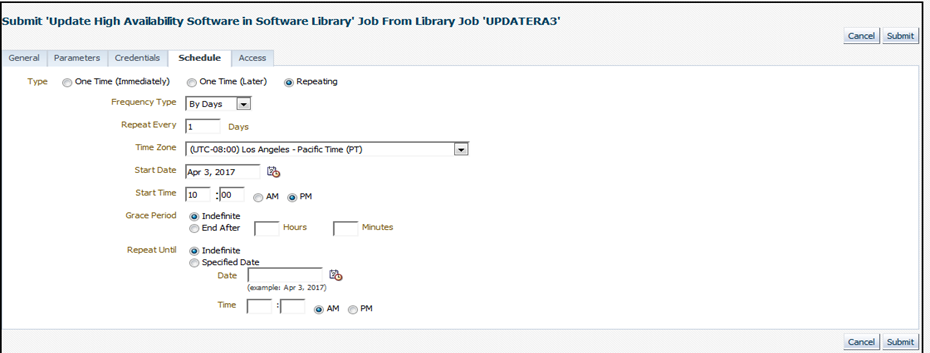
This option creates a re-occurring job in EM that locates and downloads new versions of the RMAN Recovery Appliance backup modules on Oracle Cloud to EM.
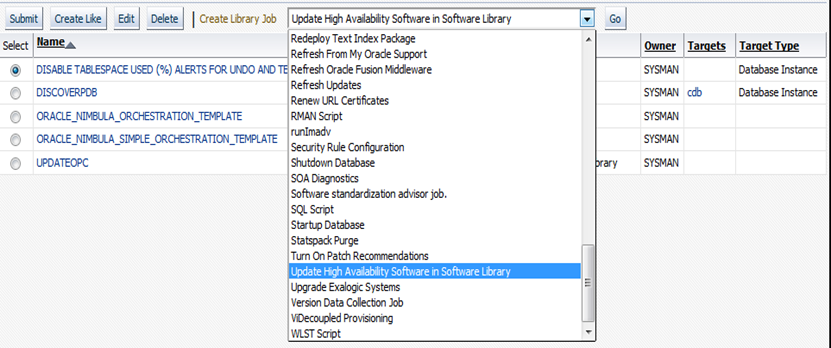
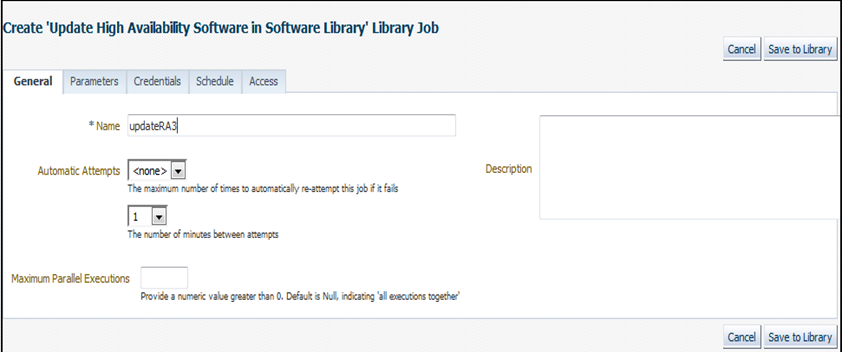
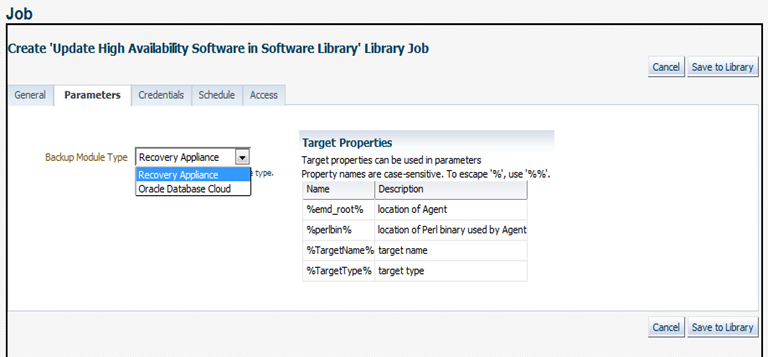
This option assumes that EM has direct access to Oracle Cloud in order to locate and download the RMAN Recovery Appliance backup modules. You schedule a job in EM for Update High Availability Software in Software Library
Later when this job is run at its scheduled time, it scans a designated location in the Oracle Cloud that contains the latest version of the RMAN Recovery Appliance backup module for all supported protected database platforms. It compares that version to the latest version maintained in the EM software library. If the version found in Oracle Cloud is newer, that version for all supported platforms is down-loaded into the software library. Older version of RMAN backup are archived in the software library.
Protected databases that are managed by EM have their RMAN backup modules updated to this new version with the emcli config_db_ha command.
Here is an example of the job output when a new backup module version is found and downloaded to the Software Library.
Figure 3-9 Job Output when new software module found
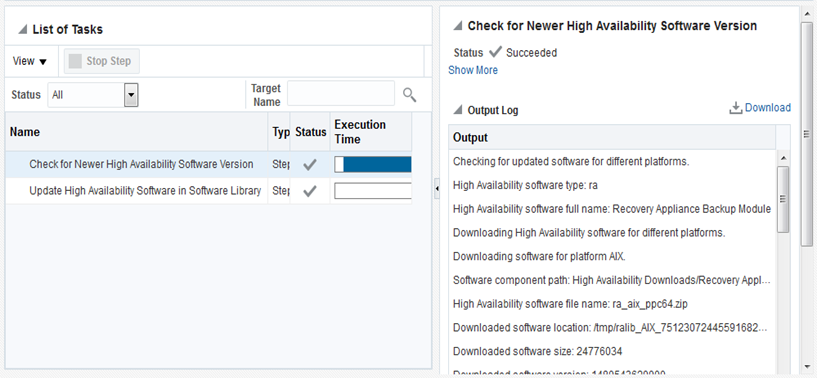
Description of "Figure 3-9 Job Output when new software module found"
Option 2: Using EMCLI to Manually Upload RMAN Backup Module to Software Library
This option is a manual step that is repeated whenever a new version of the RMAN Recovery Appliance backup module is needed for the EM software library to distribute.
This option is intended for "offline" mode when EM does not have direct access to Oracle Cloud.
Complete usage of this command and all other forms of the configure_db_ha verb discussed below can be found in Cloud Control Command Line Interface Guide.
Scenario #1: Configure Multiple Protected Databases to Send Backups to Recovery Appliance
Uses Enterprise Manager to manage the configuration of multiple protected databases.
After the Recovery Appliance administrator has enrolled a protected database, the database must be configured locally to send backups and redo to the Recovery Appliance. This configuration procedure can be performed for an individual database from the Enterprise Manage (EM) Backup Settings page. However, performing this procedure on multiple databases might not be practical through the EM user interface.
Enrolling multiple databases is more easily achieved through the EM command line interface (EMCLI) and the configure_db_ha -configureRABackup command. It performs the configuration procedure for multiple databases concurrently.
The following examples illustrate different usages of this command to perform the initial configuration for individual and multiple databases.
Single-instance Database
The following example of emcli configure_db_ha –configureRABackup configures one single-instance database to send backups to and ship redo to a Recovery Appliance.
If the RMAN backup module is already installed in the database Oracle home, it does not install the latest RMAN backup module from the software library. The command uses the EM named database and host credentials.
emcli configure_db_ha –configureRABackup –ra_target_name="Chicago ZDLRA" –ra_user="rauser1" –target_name="Finance" –target_type="oracle_database" –db_cred="DB_USER" –db_host_cred="DB_HOST_USER" –enable_redo_ship
One Cluster Database
The following example of emcli configure_db_ha –configureRABackup configures one cluster database to send backups to a Recovery Appliance.
The command does not use the –enable_redo_ship option, so redo logs are not shipped. The –force_backup_module_install option specifies that the latest RMAN backup module from the software library should be installed in the Oracle home of each cluster database instance. The command uses the EM named database and host credentials.
emcli configure_db_ha –configureRABackup –ra_target_name="Chicago ZDLRA" –ra_user="rauser1" –target_name="Finance" –target_type="rac_database" –force_backup_module_install
Single-Instance and Cluster Databases
The following example of emcli configure_db_ha –configureRABackup uses an input file, –input_file="/tmp/dblist", to specify the single-instance and cluster databases to be configured..
The –enable_redo_ship option is specified so that backups and redo logs are shipped to the Recovery Appliance. The –force_backup_module_install option specifies that the latest RMAN backup module from the software library should be installed in the Oracle home of each database. The command uses the same EM named database and host credentials for all databases.
emcli configure_db_ha –configureRABackup –ra_target_name="Chicago ZDLRA" –ra_user="rauser1" –input_file="/tmp/dblist" –db_cred="DB_USER" –db_host_cred=" DB_HOST_USER" –enable_redo_ship –force_backup_module_install –staging_directory=”/tmp/stage"
The content of the input file, /tmp/dblist, used by in this example specifies a single-instance database and a cluster database
target.0.target_name=db1
target.0.target_type=oracle_database
target.1.target_name=rac1
target.1.target_type=rac_database
Multiple Databases from an Input File
The following example of emcli configure_db_ha –configureRABackup uses an input file, –input_file="/tmp/dblist", to specify the databases to be configured.
The –enable_redo_ship option is specified so that backups and redo logs are shipped to the Recovery Appliance. If the RMAN backup module is already installed in the database Oracle home, then it does not install the latest RMAN backup module from the software library. The -schedule option sets a future time for the operation. The command uses the same EM named database and host credentials for all databases.
emcli configure_db_ha –configureRABackup –ra_target_name="Chicago ZDLRA" –ra_user="rauser1" –input_file="/tmp/dblist" –db_cred="DB_USER" –db_host_cred="DB_HOST_USER" –enable_redo_ship -schedule="start_time:2016/06/28 18:31;tz:PST;"
Maintaining Protected Database Configurations
Variations of emcli configure_db_ha -configureRABackup command can be re-run as needed against the same databases to update the configuration.
All aspects of the local database configuration (such as the wallet, backup module, RMAN configuration) are automatically updated if needed by the EM deployment procedure invoked by the command. In this way, ongoing maintenance of the configuration for multiple database can be accomplished with one command.
Example maintenance scenarios include the following:
-
Update the Virtual Private Catalog (VPC) credentials used by each protected database to send backups to Recovery Appliance after a VPC user password change: Assuming the EM named credentials corresponding to the VPC user have been updated (required for EM operations that use this VPC user), the EM deployment procedure automatically updates all the protected database wallets with the new credentials.
-
Update the Recovery Appliance RMAN backup module in all Oracle homes of each protected database: This can be done as part of a complete protected database configuration, or separately as a stand-alone operation. If the
-force_backup_module_installoption was specified during the database configuration, the EM deployment procedure updates the backup module in each Oracle home with the latest version present in the EM Software Library. -
Enable redo shipping to Recovery Appliance for databases where it was not previously enabled: This can be done by re-running the command with the
-enable_redo_shipoption and an input file listing the databases that need redo shipping enabled.
The complete syntax and input file format can be found in EM Command Line Interface .
Scenario #2: Update the RMAN Recovery Appliance Backup Module for Multiple Protected Databases
This scenario uses the command emcli configure_db_ha -installSoftware to update the RMAN Recovery Appliance Backup module for multiple protected databases.
The following examples illustrate different usages of this command for individual and multiple databases:
Installing RMAN Backup Module on a Single-Instance Database
The following example of emcli configure_db_ha –installSoftware installs the latest RMAN backup module from the software library into the Oracle home of a single-instance database if no RMAN module is already present.
The command uses the EM named database and host credentials.
emcli configure_db_ha –installSoftware –install_backup_module –module_type=“ra" –target_name=“db1" –target_type="oracle_database" –db_host_cred="OMS_HOST_CRED"
Installing RMAN Backup Module on a Cluster Database
The following example of emcli configure_db_ha –installSoftware installs the latest RMAN backup module from the software library into the Oracle homes of each instance of one cluster database.
The –force_backup_module_install option specifies that the latest RMAN backup module from the software library should be installed in the Oracle home of each database regardless of whether the module is already installed. The command uses the same EM named database and host credentials for all databases.
emcli configure_db_ha –installSoftware –install_backup_module –module_type=”ra” –target_name="Finance" –target_type="rac_database" –force_backup_module_install –db_host_cred="DB_HOST_USER"
Installing RMAN Backup Module on Multiple Databases
The following example of emcli configure_db_ha –installSoftware uses an input file to specify which databases should receive the latest RMAN backup module.
The –force_backup_module_install option specifies that the latest RMAN backup module from the software library should be installed in the Oracle home of each database regardless of whether the module is already installed. The operation is scheduled start time in the future.
emcli configure_db_ha –installSoftware –install_backup_module –module_type=“ra“ –force_backup_module_install –input_file=“/tmp/dblist“ -schedule="start_time:2016/06/28 18:31;tz:PST;
The content of –input_file="/tmp/dblist" specifies a single-instance and a cluster database that are used by this command.
target.0.target_name=db1
target.0.target_type=oracle_database
target.0.db_cred=DB_SYS_CRED
target.0.db_host_cred=HOST__CRED1
target.1.target_name=rac1
target.1.target_type=rac_database
target.1.db_cred=DB_SYS_CRED2
target.1.db_host_cred=HOST_CRED2
Note the input file specifies different database and host named credentials for each database, illustrating the flexibility offered by using an input file for multiple databases.
