Personalizing a Cloud Control Page
Pages in Cloud Control are laid out in a columnar format. Each column contains one or more regions, each of which contains data rendered as a bar chart, graph or other visual component.
You can modify the layout of columns within a page, as well as select the regions to display within each column, enabling you to personalize how the data on a page is arranged and displayed.
To personalize a page:
-
Navigate to the page you want to personalize.
-
Do one of the following:
-
Select Personalize Page from the menu item that displays the username of the currently logged-in user, just to the left of the Log Out menu item. In Figure 26-1, the menu item displays the SYSMAN user name.
Figure 26-1 Personalize Page Menu

-
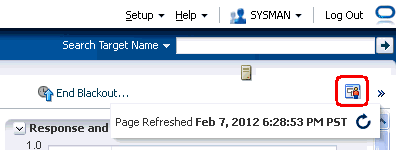
Or, click the “Personalize Page" icon on the right-hand side of the page, shown just above the “Page Refreshed" time stamp, as shown in Figure 26-2.
Figure 26-2 Personalize Page Icon

Note that the menu item or icon will only be enabled if the page you are currently on can be personalized.
-
-
You are now in page edit mode. Click the Change Layout button. A graphical menu of column layout options opens.
-
Select the column layout you want to use.
-
Next, add a region to each column. Click the Add Content button for a specific column. The Resource Catalog, which contains available components used to display data, opens.
-
Select a region, then click Add to add it to the column. Note that you can “stack" regions on top of one another.
-
Once a region has been added to a column, you can:
-
Customize the region. See Customizing a Region for details.
-
Click the View Actions menu in the upper right corner of the region to move the region up or down within the column.
-
Drag the region from one column to another.
-
-
Click Close to save your changes.