3 Discovering the Oracle AVDF Target

Before you can begin monitoring Oracle Audit Vault and Database Firewall, it must first be discovered by Oracle Enterprise Manager Cloud Control. This chapter describes the necessary steps for discovering the Oracle AVDF target:

  1. Deploy the Oracle AVDF Plug-in

  2. Discover Targets

    1. Discover Audit Vault Server Target

    2. Discover Database Firewall Target

    3. Discover Audit Vault Agent Target

Deploy the Oracle AVDF Plug-in

You can deploy plug-ins to an OMS instance using the Enterprise Manager Cloud Control interface or the EM Command Line Interface (EMCLI). While the graphical interface mode enables you to deploy one plug-in at a time, the command line interface mode enables you to deploy multiple plug-ins at a time, thus saving plug-in deployment time and downtime, if applicable.

The Managing Plug-ins chapter in the Oracle Enterprise Manager Cloud Control Administrators Guide provides instructions for deploying the plug-in.

Complete the following sections to deploy the AVDF plug-in on:

Once completed, return and continue with the instructions outlined in Discover Targets.

Discover Targets

After successfully installing the Management Agent and deploying the plug-in, follow the steps below to add the following targets to Enterprise Manager Cloud Control for central monitoring and management:

Discover Audit Vault Server Target

Follow the steps below to add the Oracle Audit Vault Server target:

  1. Log in to Enterprise Manager Cloud Control.
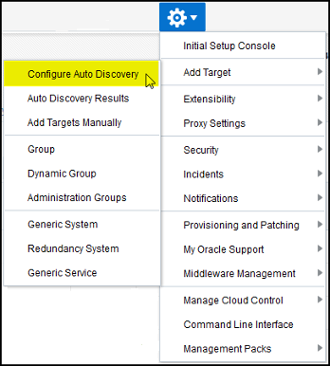
  2. Click Setup, then Add Target, and finally Configure Auto Discovery, as shown in Figure 3-1:

    Figure 3-1 Configure Auto Discovery Menu


    Menu option

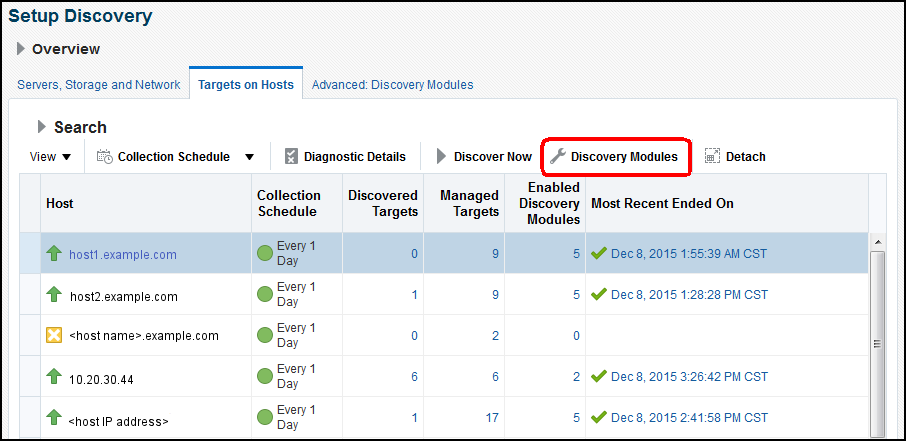
  3. On the Setup Discovery page, select a host on the Targets on Hosts tab and click Discovery Modules, as shown in Figure 3-2:

    Figure 3-2 Setup Discovery


    Discovery Modules button

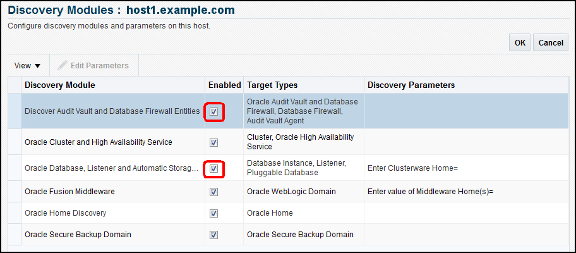
  4. On the Discovery Modules page, confirm that Discover Audit Vault and Database Firewall Entities and the Oracle Database, Listener and Automatic Storage Management options are enabled, as shown in Figure 3-3:

    Figure 3-3 Discovery Modules

    Discovery Modules options

    Click OK.

  5. Returning to the previous page, highlight the hostname of the Oracle Audit Vault Server and click Discover Now. A pop-up window will appear while the discovery is in progress.
  6. Rename the Audit Vault Server and Database Firewall instances:
    1. Click Setup, then Add Target, and finally Auto Discovery Results.

    2. Click the Targets on Hosts tab.

    3. In the Target Type column, look for Oracle Audit Vault and Database Firewall, this is your Audit Vault Server. Highlight the row and click Rename to rename it to any meaningful name, such as AVServer_Legal_and_HR.

    4. Next, highlight the row with Database Instance as a target type. Click Rename to rename it to any meaningful name, such as AVS_Repository.

  7. Promote the Audit Vault Server (AV Server):
    1. Highlight the row of the Audit Vault Server and click Promote.

    2. On the next page, provide user name and password of the AV Server user with AV_ADMIN privilege. The Preferred Connect String should be populated already. However, if it is not, go to the AV Server Web administration console and log in as a user with the AV_ADMIN privilege. Click Settings, then Status, and copy the preferred connect string from there. The ORACLE_HOME is:

      /var/lib/oracle/dbfw
      
    3. Click Promote.

  8. Promote AV Repository Database instance:
    1. Highlight the row with the AVS_Repository database instance. Click on Promote.

    2. On the next page, check AVS_Repository and click Configure.

    3. Enter the Monitor password (user is dbsnmp, unlock the account in the AVS repository database), change the port from 1522 to 1521, and change the Listener Machine Name to the fully qualified hostname of your AV Server.

    4. Click Test Connection; when successful, click Save.

  9. Back on the previous page, click Next. On the following page, click Save.
  10. To navigate to your new AV Server home page in Enterprise Manager Cloud Control:
    1. From the Targets menu, select All Targets.

    2. Expand the Others list item.

    3. Select Oracle Audit Vault and Database Firewall. The AV repository database is listed under Targets, Databases.

Discover Database Firewall Target

Follow the steps below to add the Oracle Database Firewall target:

  1. Log in to Enterprise Manager Cloud Control.
  2. Click Setup, then select Add Target, and finally Configure Auto Discovery.
  3. On the Setup Discovery page, select a host on the Targets on Hosts tab and click Discovery Modules, as shown in Figure 3-2.
  4. On the Discovery Modules page, confirm that Discover Audit Vault and Database Firewall Entities and the Oracle Database, Listener and Automatic Storage Management options are enabled.
  5. On the Discovery Modules page, confirm that Discover Audit Vault and Database Firewall Entities and the Oracle Database, Listener and Automatic Storage Management options are enabled.

    Click OK.

  6. Returning to the previous page, highlight the hostname of the Oracle Database Firewall Server and click Discover Now. A pop-up window will appear while the discovery is in progress.
  7. Rename the Audit Vault Server and Database Firewall instances:
    1. Click Setup, then Add Target, and finally Auto Discovery Results.

    2. In the Target Type column, look for Database Firewall, this is your Database Firewall Server. Highlight the row and click Rename to rename it to any meaningful name, such as DBFW_Legal_and_HR.

    3. Next, highlight the row with Database Instance as a target type. Click Rename to rename it to any meaningful name, such as DBFW_Repository.

  8. Promote the Database Firewall Server (DBFW Server):
    1. Highlight the row of the DBFW Server and click Promote.

    2. On the next page, provide user name and password of the AV Server user with AV_ADMIN privilege. The Preferred Connect String should be populated already. However, if it is not, go to the AV Server Web administration console and log in as a user with the AV_ADMIN privilege. Click Settings, then Status, and copy the preferred connect string from there. Replace the IP address with the hostname of the AV Server; confirm ports are set to 1521.

      Note:

      The DBFW Server is managed through the AV Server. When promoting the DBFW Server, you will still provide all the credentials for the AV Server.

    3. Click Promote. After clicking Promote, the console will ask for credentials again. Use the av_admin privilege credential of the AVDF Server.

    Note:

    There is no need to promote the Database Firewall Repository instance.

  9. Back on the previous page, click Next. On the following page, click Save.
  10. To navigate to your new AV Server home page in Enterprise Manager Cloud Control:
    1. From the Targets menu, select All Targets.

    2. Expand the Others list item.

    3. Select Database Firewall. The DBFW repository database is listed under Targets, Databases.

Discover Audit Vault Agent Target

Discovery of the Audit Vault (AV) Agent also can be done using automated discovery. Similar to other AVDF targets, you can run discovery on the host where the AV Agent is installed. The discovery script identifies the AV Agent and includes it with the discovered targets, which could be promoted by providing the Oracle home of the AV Agent and AVDF server AV_Admin credential.

Note:

In order to manage an Audit Vault agent with Enterprise Manager Cloud Control, a Management Agent needs to be present on the machine where the Audit Vault agent is about to be deployed.

Follow the steps below to add the Oracle Audit Vault agent target:
  1. Log in to Enterprise Manager Cloud Control.
  2. Click Setup, then Add Target, and finally Add Targets Manually.
  3. Select Add Targets Declaratively by Specifying Target Monitoring Properties.
  4. From the Target type drop-down select the Audit Vault Agent target type. Then, for the Monitoring Agent, select the Enterprise Manager agent installed on the host on which the AV Agent is installed.

    For example, if the AV Agent is installed on host1.mycompany.com, then you would need to search for the Enterprise Manager Agent (Monitoring Agent) on host1.mycompany.com. To search for the Monitoring Agent, click on the search icon to open a pop-up window with all the Enterprise Manager agents associated with this instance of Enterprise Manager.

  5. Click Add Manually.
  6. Follow the prompts for the Add Targets wizard to complete the process, including the following property settings:
    • AV Agent Name - The host agent name as it appears in AVDF console.

    • AV Agent Home - The location where the AV Agent is installed.

    • AVDF Monitor UserName - The user with the Super Administrator role on the AVDF repository.

    • AVDF Monitor Password.

    • AVDF Server Connect String.

      • For a single AVDF server setup, it should look like this:
        (DESCRIPTION=(ADDRESS=(PROTOCOL=TCP)(HOST=<host IP>)(PORT=1521))(CONNECT_DATA=(SERVICE_NAME=DBFWDB.DBFWDB)))
      • For a High Availability configuration of AVDF servers, the AVDF Connect string should look like this:
        (DESCRIPTION=(ENABLE=BROKEN)(FAILOVER=on)(RETRY_COUNT=3)(ADDRESS_LIST=(LOAD_BALANCE=on)(ADDRESS=(PROTOCOL=TCP)(HOST=<primary host ip>)(PORT=1521)))(CONNECT_DATA=(SERVICE_NAME=DBFWDB.DBFWDB))(ADDRESS_LIST=(LOAD_BALANCE=on)(ADDRESS=(PROTOCOL=TCP)(HOST=<secondary host ip>)(PORT=1521)))(CONNECT_DATA=(SERVICE_NAME=DBFWDB.DBFWDB)))
    • Associated Oracle AVDF Target - Optional. Name of the Enterprise Manager target of the corresponding AVDF.