Maintaining Software Library
To maintain the health and proper functionality of the Software Library, the administrator who configured the Software Library, or the Designer who has administration access on it must perform the tasks listed here.
This section includes:
Periodic Maintenance Tasks
Periodically, the Administrator must perform the following tasks for proper functioning of the Software Library:
-
Refresh the Software Library regularly to compute the available space, free space, and the space used by deleted entities. To do so, on the Administration page, in the upload file locations tab, select the storage location. From the Actions menu, select Refresh. On successful refresh, a confirmation is displayed. Alternately, you can search for the periodic refresh job
SWLIBREFRESHLOCSTATS, and edit the schedule and other attributes to suit your requirements. By default, this job is scheduled to run every 6 hours. -
Purge deleted entities to conserve disk space. To do so, see Scheduling Purge Job. Alternatively, you can search for the periodic purge job
SWLIBPURGE, and edit the schedule and attributes to suit your requirements. By default, this job is scheduled to run every 24 hours. -
Check accessibility of the configured Software Library locations. To do so, on the Administration page, in the upload file locations tab, select the storage location. From the Actions menu, select Check Accessibility.
Re-Importing Oracle Owned Entity Files
Note:
Re-importing metadata applies only to the Oracle owned files, which means all the entity files offered with the Enterprise Manager product by default. The metadata of User owned entity files cannot be recovered through the Re-import functionality.
Re-Importing the metadata of Oracle owned entity files is not a periodic activity. Re-import helps to recover the metadata files in one of the following situations:
-
If you delete the file system location where the metadata was imported. For example,
/scratch/swlib1/ -
If the import job submitted while creating the first upload location fails.
To re-import the metadata of Oracle owned files, do the following:
- In Cloud Control, from Setup menu, select Provisioning and Patching, and then click Software Library.
- On the Software Library Administration page, in the Upload File Location tab, from Actions menu, select Re-Import Metadata option to submit a job that re-initiates the re-import process.
Removing (and Migrating) Software Library Storage Location
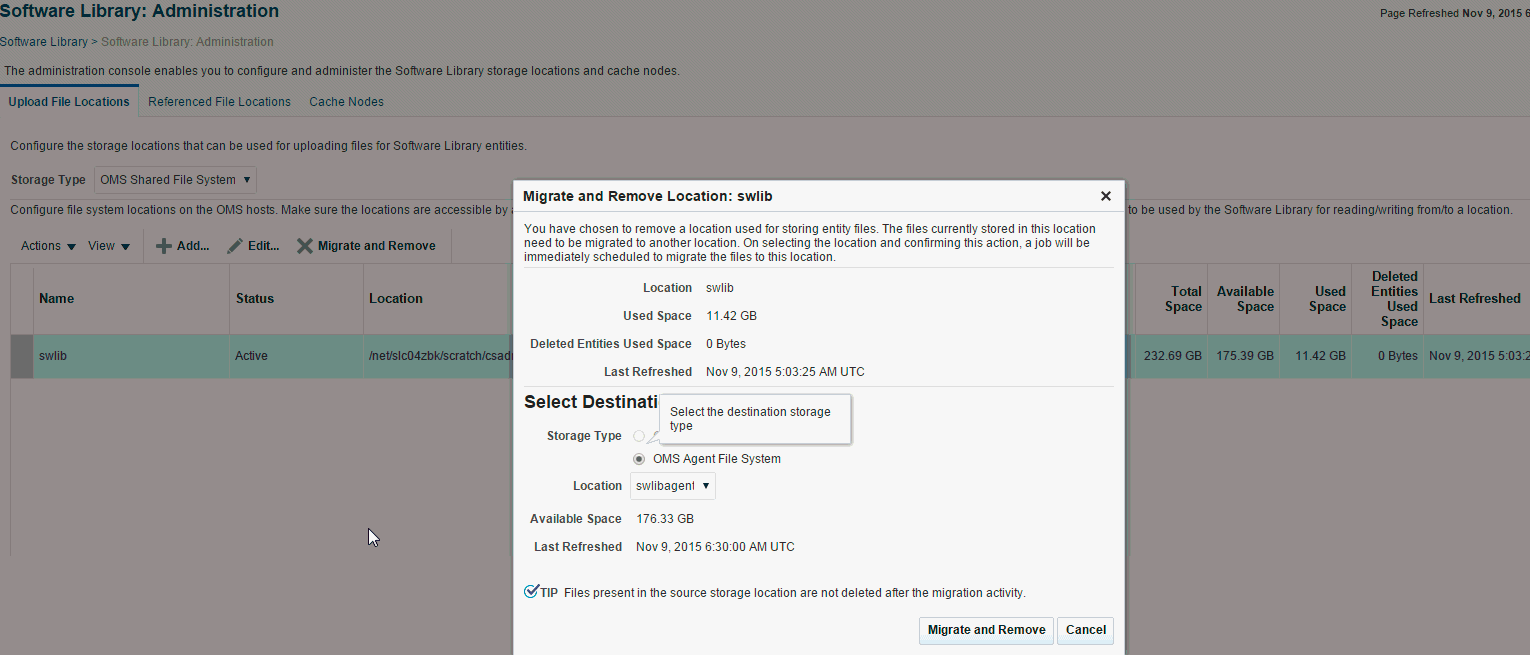
Software Library Storage Administrators have the required privileges to delete a storage location. If a storage location is not in use, then you can remove it instantly. However, if it is in use, then you must migrate the contents to another location so that the entities using these files continue to remain usable.
Before removing a storage location that is currently in use, you are prompted for an alternate location for the files. After you select an alternate location, a migration job is submitted, and the location is marked as Migrating. After successful migration of the entity files to the new location, the location configuration is deleted. In case of any errors during migration, the location is marked as Inactive. Once the errors are fixed, and the storage administrator ascertains that the location is good to use, the location is marked as Active.
Note:
To remove a location from OMS Agent File System or Referenced Agent File System storage, you must have a view privilege on the credentials for the location being removed, and the alternate location where the files are migrated.
To delete a configured storage location, perform the following steps:
Removing a Referenced Storage Location
To remove a configured reference storage location (HTTP/ NFS/ External Agent Location), perform the following steps:
Deactivating and Activating a Storage Location
An upload or reference storage location can be deactivated. Once deactivated, the status of the storage location becomes Inactive and no further uploads will be allowed to the upload storage location. A storage location in an inactive state can be activated to be put back in use.
To deactivate a storage location, follow these steps:
-
In Cloud Control, from Setup menu, select Provisioning and Patching, then select Software Library.
-
On the Software Library Administration page, select the storage location that is in an Active state, then from the Actions menu select Deactivate. A confirmation dialog is displayed.
-
Upon confirmation, the storage location is deactivated, and state changes to Inactive.
To activate a storage location, follow these steps:
- In Cloud Control, from Setup menu, select Provisioning and Patching, then select Software Library.
- On the Software Library Administration page, select the storage location that is in an inactive state, then from the Actions menu select Activate. A confirmation dialog is displayed.
- Upon confirmation, the storage location is activated, and state changes to Active.
Scheduling Purge Job
Starting with Enterprise Manager 12c the purge job can be scheduled. To do so follow these steps:
-
In Cloud Control, from Setup menu, select Provisioning and Patching, then select Software Library.
-
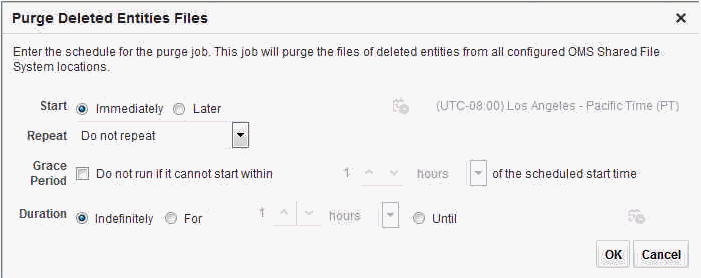
On the Software Library Administration page, select the storage location, and from the Actions menu select Purge. The following dialog box appears where you can schedule the purge job:

-
Enter all the details and click OK to submit the job, on successful completion of the job all the deleted entities are removed from the storage location.
However, you can also perform this operation in the following method:
- In Cloud Control, from Setup menu, select Provisioning and Patching, then select Software Library.
- On the Software Library Administration page, from the Actions menu, select Deleted Entities. The list of deleted entities with type, subtype, owner, and size is displayed.
- Click Purge to submit the job, on successful completion of the job all the deleted entities are removed from the storage location.

