Discover Autonomous Databases Using the Oracle Enterprise Manager Console

Autonomous Databases are treated as non-host targets in Oracle Enterprise Manager and are discovered manually using the declarative process.

Oracle Enterprise Manager supports a TCP connection and a secure TCP (TCPS) connection using the TLS protocol for Autonomous Databases – Dedicated, and only the TCPS connection using the TLS protocol for Autonomous Databases – Serverless.
  1. From the Setup menu, select Add Target, and then select Add Targets Manually.
  2. On the Add Targets Manually page, click Add Target Manually on the Add Non-Host Targets Manually tile.
  3. In the Add Target Manually dialog box, select the host on which the agent that you are using to discover the Autonomous Database is installed and running.
  4. In the Target Type field, enter and select the Autonomous Database type and click Add.
    Your options are Autonomous Data Warehouse and Autonomous Transaction Processing and Oracle Enterprise Manager discovers the selected target type on the host you selected in the previous step.
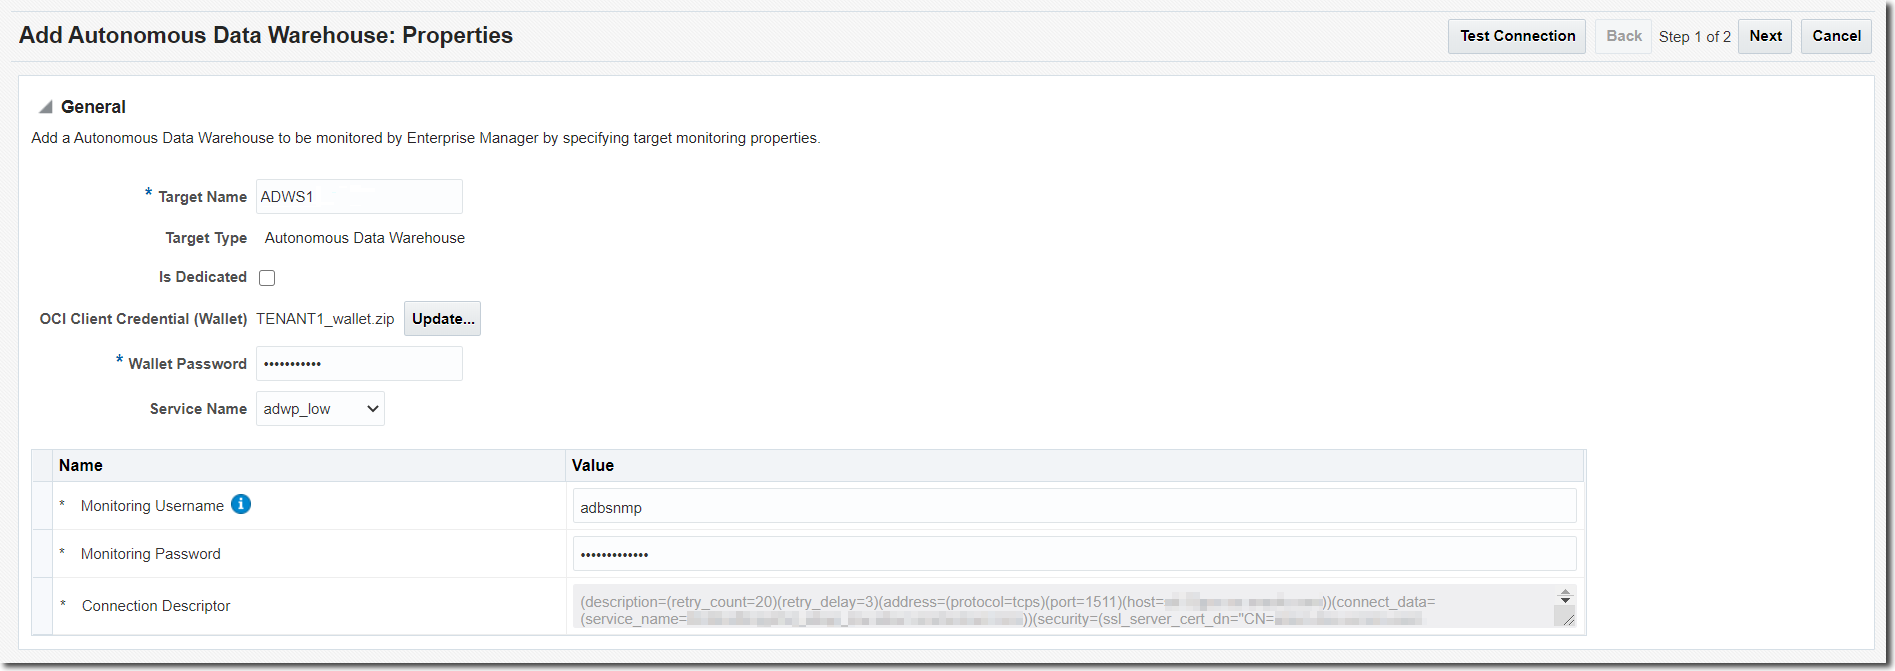
  5. On the Add <Autonomous Database Type>: Properties page, specify the following monitoring details:
    1. Enter a name to identify the Autonomous Database target in the Target Name field.
    2. Select the Is Dedicated check box for Autonomous Data Warehouse – Dedicated and Autonomous Transaction Processing – Dedicated targets. If you are discovering Autonomous Data Warehouse – Serverless and Autonomous Transaction Processing – Serverless targets, then leave this check box unchecked.
    3. Upload the OCI Client Credential (Wallet) .zip file, which contains the credentials to access data in your Autonomous Database.
      After you upload the OCI client credential wallet .zip file, the Service Name and Connection Descriptor fields are automatically populated.

      Note that you can change the Service Name value and opt for a secure TCP (TCPS) connection using the TLS protocol. It is recommended that you use the low or low_tls database service. For information on Database Service Names, see the Predefined Database Service Names for Autonomous Database section in the documentation for the Autonomous Database you are discovering.

    4. Enter the Wallet Password. This is the password you set in the Oracle Cloud Infrastructure Console when downloading the OCI client credential wallet .zip file.
    5. Enter the monitoring password. It is recommended that you use the adbsnmp user account and if you are a first time user, then you must enter a new password to reset it and unlock the adbsnmp user account. See About User Accounts.
  6. Click Test Connection to test the connection made to the Autonomous Database.

    Note:

    If the network is slow, the following connection message may be displayed:

    Connection failure may be due to a slow network, or due to the presence of an intervening firewall.

    You can opt to click OK and the discovery process will continue asynchronously.

  7. Click Next and review the displayed information.
  8. Click Submit.
After you have discovered the Autonomous Database in Oracle Enterprise Manager, you can verify if the discovery was successful by clicking the Targets menu > Databases option. The Autonomous Database you discovered should be listed on the Databases page.

You can also check connectivity between the OMS host and agent and the Autonomous Database target using JDBC. To do so, you must obtain the following information from the OCI Client Credential (Wallet) .zip file:

  • Host
  • Port

Run the following command from the OMS host and agent:

nc -zv <host> <port>

For example:

nc -zv host-awwwh-scan.exadatasubnet.exadatainfrast...com 1521