11 Integrating Enterprise Manager with OCI Services
Enterprise Manager allows Oracle Cloud Infrastructure's (OCI) cloud services to easily utilize target-level data managed by Enterprise Manager.
Note:
Extraction of data from Oracle Enterprise Manager Oracle Database targets into an Oracle Cloud Infrastructure service requires Oracle Diagnostics Pack on the Oracle Enterprise Manager Oracle Database targets.See Oracle Diagnostics Pack and Base Framework Feature Summary for more information.
Enterprise Manager lets you transfer data from Enterprise Manager targets and Oracle Management Repository (OMR) to OCI Object Storage, where it is easily accessed by one or more cloud-native services.
Once OCI connectivity is set up, your target data is automatically uploaded at frequent intervals to Object Storage so that OCI cloud services are always working with the most recent target data.
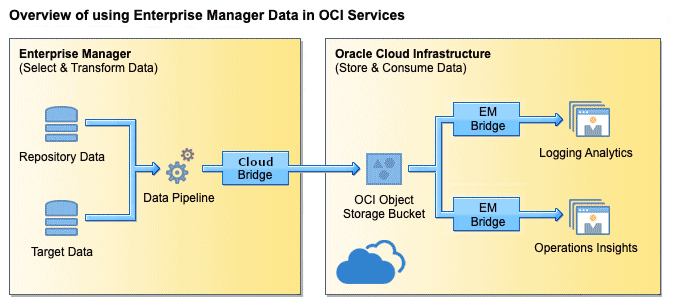
The following graphic illustrates how target data flows from Enterprise Manager to an OCI service once the configuration process has been completed.
Updating Enterprise Manager
Beginning with Enterprise Manager 13c Release 5, Update 3 (13.5.0.3), in addition to the OMS, Release Updates must also be applied to any agents monitoring targets whose data is being exported to Object Storage using the Cloud Bridge feature.
Prerequisites
Before you can set up Enterprise Manager to OCI connectivity, make sure the following prerequisites have been met.
- Ensure an OCI Object Storage Bucket has already been created
- Set up an exclusive user for the Enterprise Manager login
- Define a Host Preferred Credentials for all target hosts including the OMS host
- Define a Global Named Credential in Enterprise Manager for OCI
- Create an Enterprise Manager group containing the targets for which you want data exported
- Set up OCI Policies to allow Enterprise Manager to push data into Object Storage
- Access from OMS Hosts and Target Hosts
Note:
Learn more about connecting Enterprise Manager with OCI Ops Insights by watching these videos:Ensure an OCI Object Storage Bucket has already been created
Note:
The OCI Object Storage Bucket cannot have any retention policy.Set up an exclusive Enterprise Manager Super Administrator user for the Enterprise Manager login.
Oracle recommends that you set up an exclusive Enterprise Manager Super Administrator user login dedicated to exporting data from Enterprise Manager to OCI Object Storage, specifically a user name that identifies a particular Enterprise Manager instance. For example, you might define a user called EM-austin@mycompany.com instead of john_doe_admin. Creating an instance-specific user name allows for the data flowing into Object Storage to be attributed to an Enterprise Manager instance instead of an actual user.
Additionally, creating an instance-specific user name protects against security keys being invalidated if a user leaves the company.
For more information about creating users in Enterprise Manager, see Creating Enterprise Manager User Accounts.
Define a Host Preferred Credentials for all target hosts including the OMS host.
To facilitate data export, you must define Host Preferred Credentials for all hosts having agents that are monitoring targets as well as the host where the OMS is installed. The user provided in the preferred host credential should be the same as the user that was used to push the agent on the host. This user should have read, write and execute privileges on the content in the agent folder. In addition, create a Preferred Credential for the host(s) where the primary and any additional Oracle Management Services (OMS) are installed. For more information about Host Preferred Credentials, see Host Authentication Features.
Ensure that the Database Plug-in has been pushed to all OMS hosts. The Database Plug-in is usually pushed by default with an agent, so verify that it has not been removed.
Verify that the OMS host(s) and hosts that have agents monitoring the database targets that are included in the data extraction have connectivity to OCI/Object Storage.
Define a Global Named Credential in Enterprise Manager for OCI
A Named Credential allows you to create a user name/password pair that is stored in Enterprise Manager as a named entity, thus allowing the credential to be used without having to expose the actual password. A Named Credential can be defined on a single target, such as a single database or host. Global Named Credentials are defined as global in scope, which makes the credentials available on all targets of a specific type.
A Global Named Credential needs to be defined for use when exporting Enterprise Manager target data to OCI Object Storage. To create a Global Named Credential,
- From the Setup menu, choose Security and then Named Credentials.
- Click Create. The Create Credential page displays.
- From the Authenticating Target Type drop-down menu, select Oracle Cloud Infrastructure. Property details change according to the selected target type.
- Set Scope to Global.
- Fill in the requisite properties and click Save.
Note:
For more information about Named Credentials and their application, see Named Credentials.
Private key needs to be generated from the command line via openssl (as shown in OCI documentation). Currently the private key generated and downloaded directly from the OCI Console does not work for this feature. For more information about OCIDs and Keys, see Required Keys and OCIDs.
Create an Enterprise Manager group containing the targets for which you want data exported.
In order to export Enterprise Manager target data to OCI, the relevant targets must be members of a group. When defining a source for OCI Service Data Export, you will select a target group and not individual targets. Be sure to make note of this group name.
Note:
For Ops Insights, when adding an Exadata Database Machine to a group, ensure that theosm_cluster/osm_instance targets are listed. If they are not listed, then you must manually add them to the group being enabled for Ops Insights.
For information about groups, see Managing Groups.
Set up OCI Policies to allow Enterprise Manager to push data into Object Storage
- Least Restrictive
Allow group <GroupOfCloudBridgeUser> to manage object-family in compartment <BucketCompartment> where all {target.bucket.name='BucketA'} - More Restrictive
Allow group <GroupOfCloudBridgeUser> to manage objects in compartment <BucketCompartment where all {target.bucket.name='BucketA'}
Allow group <GroupOfCloudBridgeUser> to read buckets in compartment
- Least Restrictive:
Allow group <GroupOfCloudBridgeUser> to read opsi-family in <HighestCompartmentContainingOPSIResource> - More Restrictive:
Allowgroup <GroupOfCloudBridgeUser> to read opsi-family in compartment <OpsiResourceCompartment> where ALL{target.bucket.name='<Cloud Bridge Bucket>'}
Note:
Enter the policy statement for every compartment you wish to place Ops Insights resources in.For more details, see Let Object Storage admins manage buckets and objects..
Access from OMS Hosts and Target Hosts
The OCI Ops Insights service communicates with its own endpoints and Object Storage endpoints during the Enterprise Manager data export. These endpoints are derived from the Object Storage URL provided during the Cloud Bridge setup.
If there's a firewall or proxy server used to control access to the internet for the agents monitoring the targets, ensure that both the Object Storage URL as well as the Ops Insights URL are added to the allowlist of the firewall and proxy server to ensure seamless Enterprise Manager data export.
- For us-phoenix-1 (OC1):
https://objectstorage.us-phoenix-1.oraclecloud.com - For ap-chiyoda-1 (OC8):
https://objectstorage.ap-chiyoda-1.oraclecloud8.com
- For us-phoenix-1 (OC1):
https://operationsinsights.us-phoenix-1.oci.oraclecloud.com - For ap-chiyoda-1 (OC8):
https://operationsinsights.ap-chiyoda-1.oci.oraclecloud8.com
Setting Up OCI Service Connectivity
Configuring OCI service connectivity requires setup of both Enterprise Manager and the OCI service. The content of this chapter focuses primarily on the Enterprise Manager setup. Links to OCI service documentation that contains service-specific Enterprise Manager integration procedures are provided in Step 2.
Note:
Before you can complete these steps, ensure that the prerequisites have been met. For more information about these prerequisites, see PrerequisitesEnterprise Manager to OCI service connectivity configuration is performed in two steps:
Step 1: Export Enterprise Manager Data to OCI
To move target data from Enterprise Manager to OCI, you create a Cloud Bridge in Enterprise Manager. The Cloud Bridge defines a data connection to the OCI Object Storage bucket residing in OCI.
To create the Cloud Bridge in Enterprise Manager, do the following:
Note:
Bridge creation is a one-time setup. Once created, it can be edited, updated or deleted as needed.Log in as the newly created data exporting Super Administrator user recommended earlier and create a Cloud Bridge.
- From the Setup menu, choose Cloud Bridge. The Cloud Bridge page displays. This page will be empty the first time you access it.
- Click Manage OCI Connectivity.
OCI Bridge is selected by default.
Enter the following for the OCI Bridge:- OCI Credential: The credential name you created above.
- Base URL: The base URL for the Storage Bucket.
Syntax:
https://objectstorage.<region>.<domain>Examples:-
For us-phoenix-1 (OC1):
https://objectstorage.us-phoenix-1.oraclecloud.com -
For ap-chiyoda-1 (OC8):
https://objectstorage.ap-chiyoda-1.oraclecloud8.com -
For me-dcc-muscat-1 (OC9):
https://objectstorage.me-dcc-muscat-1.oraclecloud9.com
Note:
If using Ops Insights, the endpoints are also derived from the above Object Storage URL for data export jobs. See below some examples of Ops Insights URLs for different regions:- For us-phoenix-1 (OC1):
https://operationsinsights.us-phoenix-1.oci.oraclecloud.com - For ap-chiyoda-1 (OC8):
https://operationsinsights.ap-chiyoda-1.oci.oraclecloud8.com - For me-dcc-muscat-1 (OC9):
https://operationsinsights.me-dcc-muscat-1.oci.oraclecloud9.com
If there's a firewall or proxy server used to control access to the internet for the agents monitoring the targets, ensure that both the Object Storage URL as well as the Ops Insights URL are added to the allowlist of the firewall and proxy server.
-
- Bucket: The bucket name.
- Proxy Credentials: (Optional) The proxy credentials to be used when connecting to the object storage while transferring the files.
The proxy credentials are created from the Enterprise Manager console under Security, Named Credentials. Under Target Type, select Cloud Bridge. Under Credential Properties, enter the proxy details: host, port, username and password.
You can use an existing proxy server when using Cloud Bridge Proxy Credentials to capture the proxy details. Another option is to set up Cloud Bridge with OCI Management Gateway service if the proxy is not accessible/available where the EM instance is deployed. In this case, you need to install Management Gateway on the DMZ or Gateway server to send the data to OCI. For information about OCI Management Gateway service, see Management Gateway.
Note:
Starting with Enterprise Manager 13c Release 5 Update 15 (13.5.0.15), Cloud Bridge supports the specification of proxy details which are used for outbound connections to OCI. This release update (patch) needs to be applied to the OMS, central agent and all other participating agents. - Saved As: A name for the bridge you are about to create.
Then, click Create to create the new OCI Bridge.
You can also configure a data warehouse. To do so, click Warehouse.
Enter the following to define the warehouse:
- Select the OCI Service.
- Select an OCI Bridge that has been created for the service.
- Select the Warehouse Database. Ensure that the Object Store Bucket and the Warehouse Database share a common OCI region for seamless data movement.
- Select the credential (named credential) used to access the Warehouse Database. A named credential can be created from the Enterprise Manager console (Setup->Security->Named Credentials).
Then, click Configure to configure a new warehouse connection.
- Click OK.
- Click Enable Data Export.
- Under OCI Service, select a service type. For example Ops Insights: EM Warehouse.
- Select the group you created in a prior step that contains all the targets for which you want data exported.
- Select the Cloud Bridge and click Submit. Data from your Enterprise Manager instance should start uploading to the OCI bucket you defined.
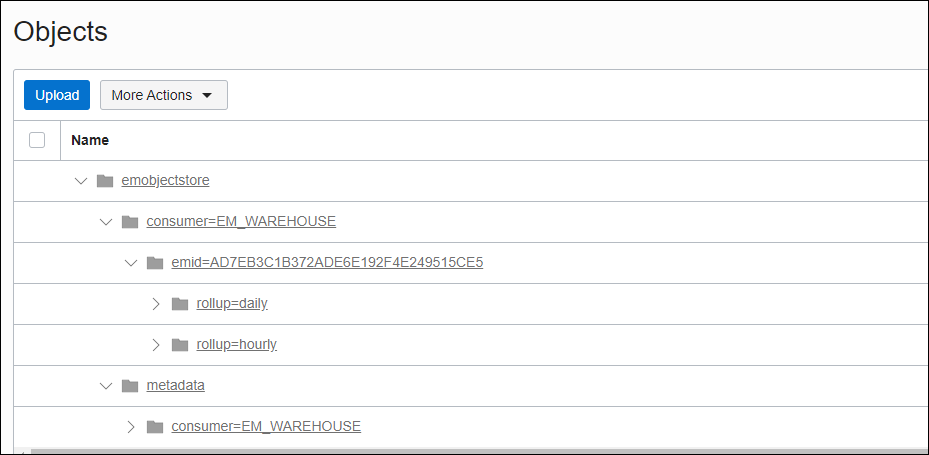
- In OCI, you can verify the data stored in your storage bucket. Navigate to OCI Storage, select Buckets and, in the compartment you created your bucket, click on the name of your bucket. The data in this bucket should look similar to the one shown below. Make a note of the name of your object store folder and emid.
Step 2: Import Data from the Object Storage Bucket to the OCI Service
Once you've set up the Cloud Bridge to move data from Enterprise Manager to the OCI Object Storage bucket, you will need to create an EM Bridge to move Enterprise Manager target data from the Object Storage bucket to your OCI service for processing.
See your OCI service documentation for more information about importing Enterprise Manager target data.
Viewing Data Upload Status for a Service
Once you've successfully created an Cloud Bridge in Enterprise Manager and selected one or more target groups for data export to OCI, the Cloud Bridge dashboard will show the current upload status for each service including the groups that have been added for each service.
The Summary graphs display target upload rollup data for each OCI Service while the table provides a granular view of upload data for each service.
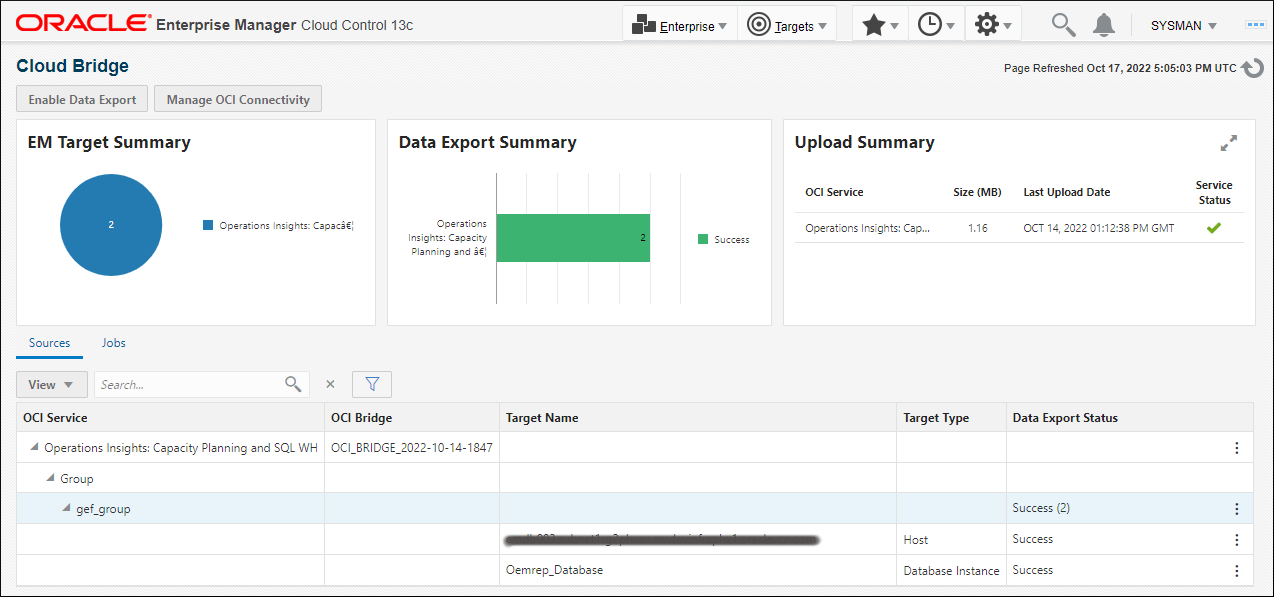
You can easily view which services are regularly uploading target data. Target data upload successes and failures appear in the Data Export Status column. The current data export status for each service is also shown in the Upload Summary region's Service Status column.
The following table shows all possible status conditions.
Table 11-1 Data Export Status
| Status Condition | Description |
|---|---|
| Success | No errors for the source. The source is participating in data export. |
| Extract Error | Source has extraction errors. The source is participating in data export. |
| Transfer Error | Source has transfer errors. The source is participating in data export. |
| Load Error | Source has load errors. Source is participating in data export. |
| Data export paused at service | Data export paused at the OCI service level. Data export jobs are not running. |
| Group excluded from data export |
Group is not participating in data export. Data export jobs are running. |
| Excluded from data export due to errors |
Source has extraction errors and has been excluded from data export. The source is not participating in data export. |
| Source excluded from data export |
Source is not participating in data export. Data export jobs are running. |
You can also perform actions specific to the OCI service, target groups associated with that service, and individual target members of each group by clicking the vertical ellipsis in the Data Export Status column.
You can perform the following:
For an OCI Service, you can:
- Pause data export at the OCI service will stop/remove data export for that service. Restarting data export at the OCI service will start data export for the service.
- Restart/Pause data export for all relevant target groups associated with the selected OCI service to the OCI Object Storage bucket. Pausing data export at the OCI service will stop/remove data export for that service.
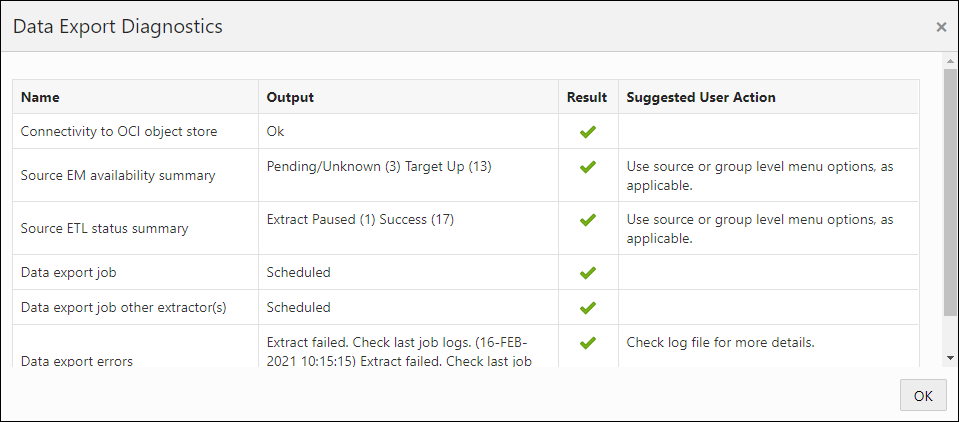
- Run Diagnostics: Enterprise Manager will run a series of diagnostics to check for
problems that may have occurred with the target data export process as shown in the
following graphic.
Note:
Beginning with Oracle Enterprise Manager 13c Release 5 Update 10 (13.5.0.10), the diagnostics table can be downloaded as a CSV file using the Save As option. - Show Errors from related entries in the OMS log files.
- Change the OCI Bridge currently being used by the service to a different OCI Bridge (Modify OCI Bridge). Important: Data export activity must paused in order to switch to another OCI Bridge.
- Remove the OCI service.
For a target group, you can:
- Pause/Restart target group data export to the OCI Storage bucket. Pausing/restarting data export at the group level only excludes/includes the group involved in the data export. Data export jobs are not affected.
- Remove the Group
For any target within a group, you can:
- Run Diagnostics: Enterprise Manager will run a series of diagnostics on
an individual target to check for problems that may have occurred with the target
data export process, as shown in the following graphic.
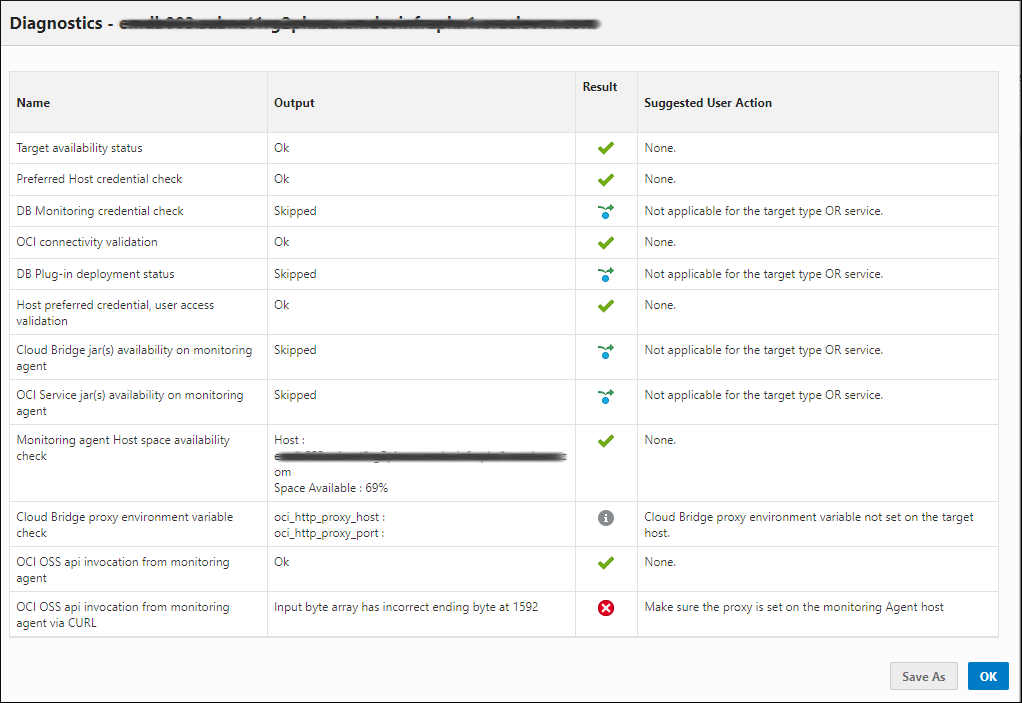
- Toggle Status: You can start or stop individual target data export.
- Show Errors
Jobs
Whenever you click Submit to create an Cloud Bridge or add target groups for data export, an Enterprise Manager jobs are submitted to perform the requisite actions. If necessary, you can check on the status for all OCI-related jobs by clicking on the Jobs tab (located to the right of the Sources tab) to view explicit information about all jobs related to the management of EM Data for OCI Services.
Typically, you will not need this level of information. When you perform Run Diagnostics for a specific OCI service, all jobs associated with target data export are checked.
Monitoring Data Uploads from Enterprise Manager
Data export from Enterprise Manager to OCI is carried out by the Job System. There are, however, several conditions where the data export job may not run to completion. You can use Enterprise Manager's incident and event management functionality to monitor data export jobs.
Data export jobs can fail for several reasons:
- Jobs can run into errors (system errors, Cloud Bridge issues, extractor related errors, etc.)
- Data export jobs can be stopped or terminated from the Enterprise Manager Job System UI.
- Data sources involved in the data export can run into problems due to availability, credential-related issues, and extract/transfer, or load-related errors.
Although all of these issues can be diagnosed via the Run Diagnostic function, you can take advantage of Enterprise Manager’s native monitoring functionality (Incident Manager) to notify administrators immediately and correct the issue or possibly automate the problem resolution process.
In order to allow Enterprise Manager to monitor OCI data export jobs, a specialized target has been created called Cloud Bridge Data Export which can be monitored as a regular Enterprise Manager target.
Setting Up OCI Data Export Monitoring
Note:
The Cloud Bridge Data Export target will be automatically removed if there are no OCI services configured for data export job monitoring.
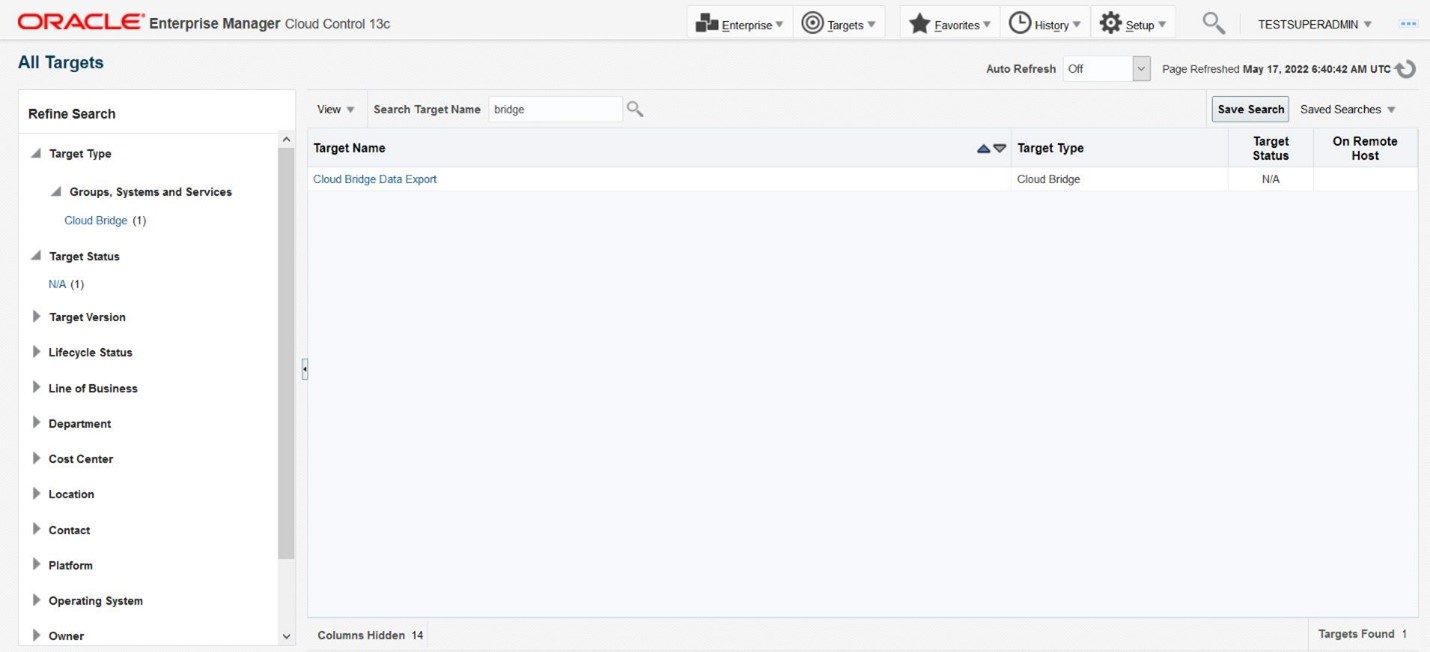
Click on the Cloud Bridge Data Export target in the list to view the target homepage.
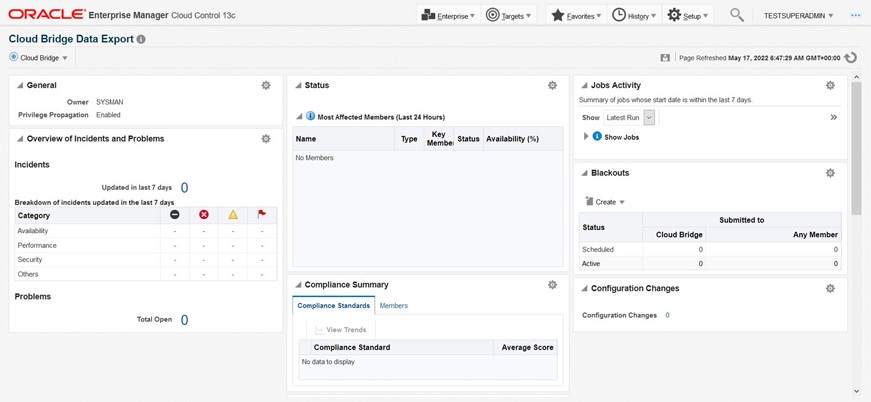
Note:
If data export has not been configured for at least one OCI service, no target will appear.
Enable Metric Collection
Metrics are disabled out-of-box. Navigate to the Metric and Collection Settings page of the Cloud Bridge Data Export target.
- From the Cloud Bridge drop-down menu, select
Monitoring and then Metric and Collection
Settings.

- From the Collection Schedule column, click Disabled. The Edit Collection Settings page displays.
- Click Enable.
- Set the desired Collection Frequency and click Continue.
- Click OK.
Monitoring Examples
An error occurs with an OCI service
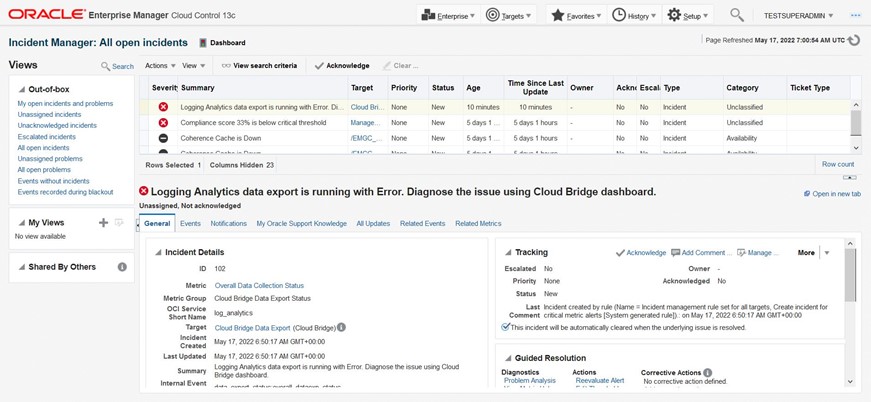
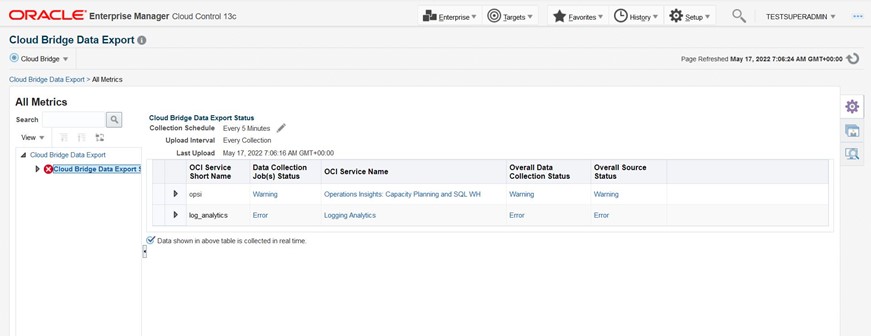
The following graphic shows that a data upload error has occurred with an OCI service (Ops Insights).
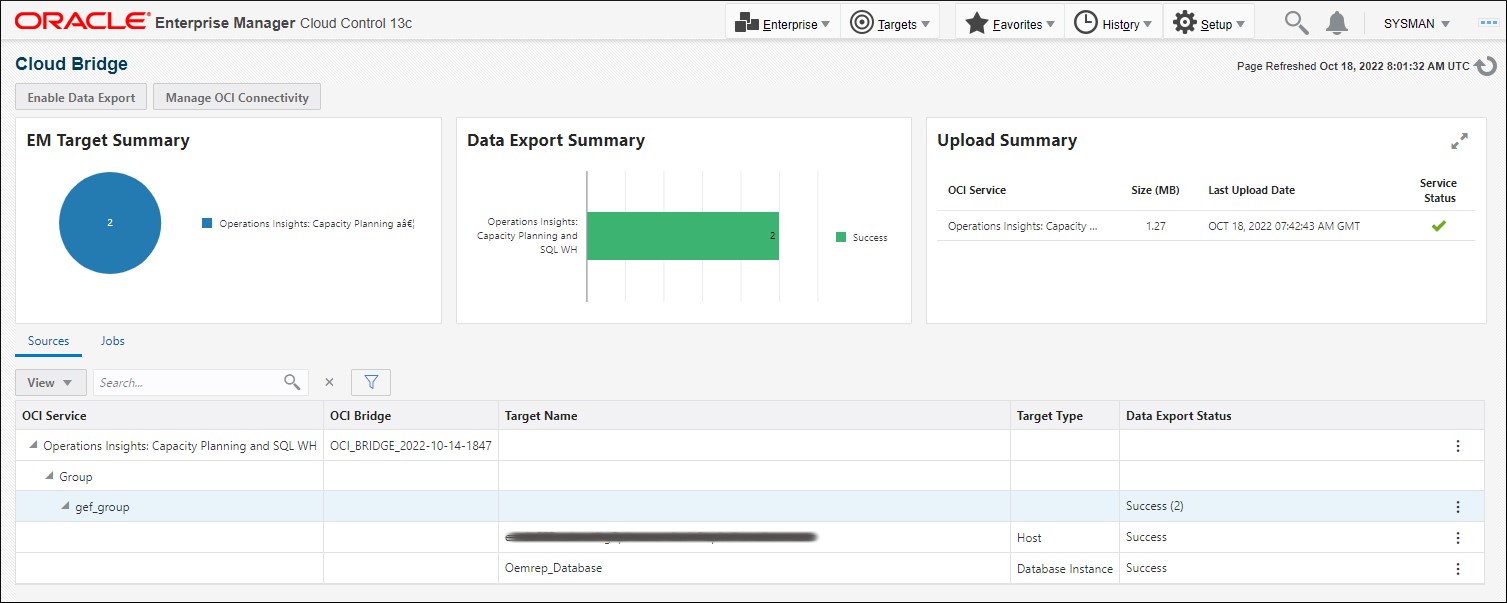
An incident (Error) is raised
An incident will be raised when a data export job is stopped or removed.
An event is raised without an incident
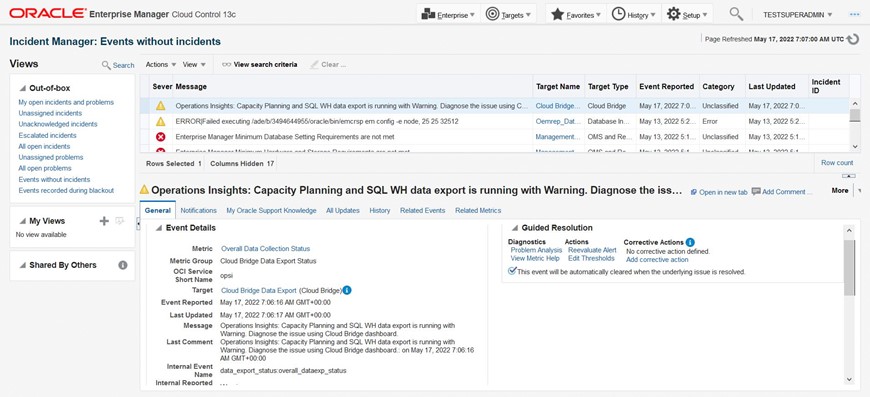
An event without incident will be raised when:
- Data export is paused at the service level
- The source participating in data export is in error status
Adding Target Groups to OCI Services
Once the Cloud Bridge has been created, you can export additional Enterprise Manager target data for OCI service consumption by creating additional OCI service/target group pairings.
Navigate to the OCI Service Data Export dialog.
- From the Setup menu, choose Cloud Bridge.
- Click the Enable Data Export tab to display the OCI Service Data Export dialog.
When you select an OCI service, the associated Cloud Bridge is automatically selected. Simply select a new Source (target group) and click Submit.
Managing Cloud Bridges
You can create a new Cloud Bridge or edit/delete an existing bridge via the Manage OCI Connectivity dialog.
Navigate to the OCI Service Data Export dialog.
- From the Setup menu, choose Cloud Bridge.
- Click the Manage OCI Connectivity tab to display the Manage OCI Connectivity dialog.
Note:
More than one OCI service can be associated with a single Cloud Bridge. Once a Cloud Bridge has been created for a service, it is no longer a selectable option from the OCI Service drop-down menu.Viewing Cloud Extension Data
You can use Cloud Extension to view the Oracle Cloud Infrastructure (OCI) Ops Insights database details in Enterprise Manager.
Cloud Extension allows OCI Ops Insights database-specific insights, such as Capacity Planning and SQL Insights, to be displayed directly in Enterprise Manager interface under the database home page. You can view SQL performance insights, database capacity planning, and forecasting information in the context of a database, right on the Enterprise Manager's Database Resource page.
Cloud Extension is available starting with Enterprise Manager 13c Release 5 Update 23 (13.5.0.23).
Supported Oracle Database Types
Cloud Extension is available in the Enterprise Manager database home page of the following database types:
- Standalone (non-CDB)
- RAC database (non-CDB)
- PDB
- PDB on RAC
Note:
Cloud Extension is not supported for the following database types: CDB, RAC instance, PDB on RAC instance, RAC database (CDB), Autonomous Database (ATP and ADW) and CDB$ROOT.Configuring Cloud Extension
You can configure Cloud Extension to be able to view Ops Insights database insights from the Enterprise Manager.
- Navigate to the Enterprise Manager database home page.
- From the left menu, click Capacity & SQL Insights.
The Capacity and SQL Insights pane is displayed on the right side.
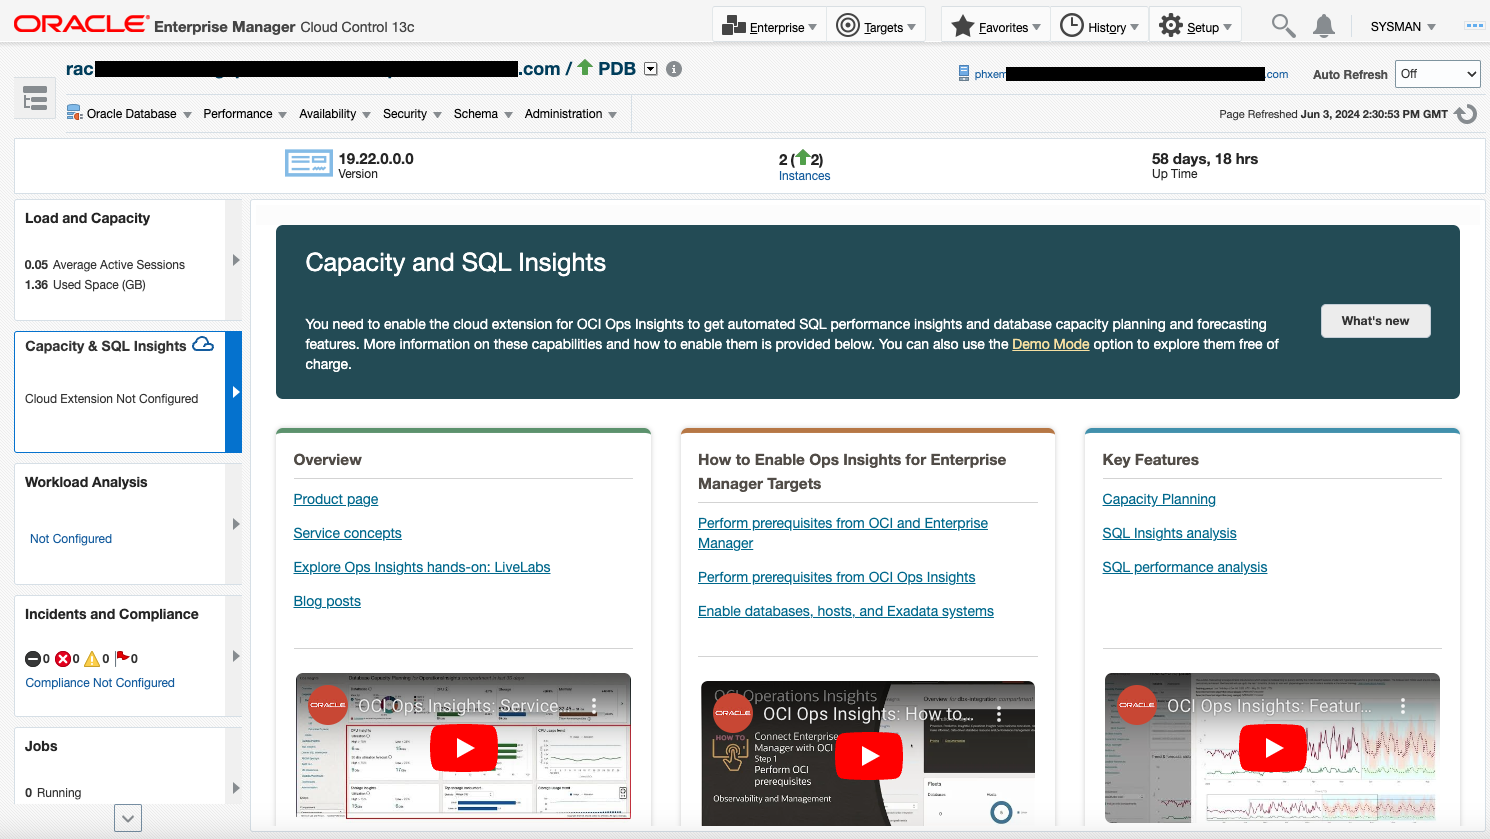
The first time you click it, you can see the "Cloud Extension Not Configured" message on the left menu.
The Capacity and SQL Insights pane contains different resources, such as videos and documentation links, to assist you understanding the Ops Insights service and configuring Cloud Extension. It looks similar to the following:
Figure 11-1 Cloud Extension Not Configured
Alternatively, you can configure Cloud Extension by following the below steps:
- Set up Enterprise Manager Cloud Bridge for OCI connectivity.
Use the Enterprise Manager Cloud Bridge to transfer data from Enterprise Manager to OCI Object Storage. For instructions, see:
- Enable the database in Ops Insights.
Use an Ops Insights EM Bridge to move data from the OCI Object Storage bucket to Ops Insights for analysis.
For instructions, see Adding Enterprise Manager Targets from Ops Insights documentation.
- Verify the configuration.
Navigate to the Enterprise Manager database home page and click Capacity & SQL Insights from the left side menu.
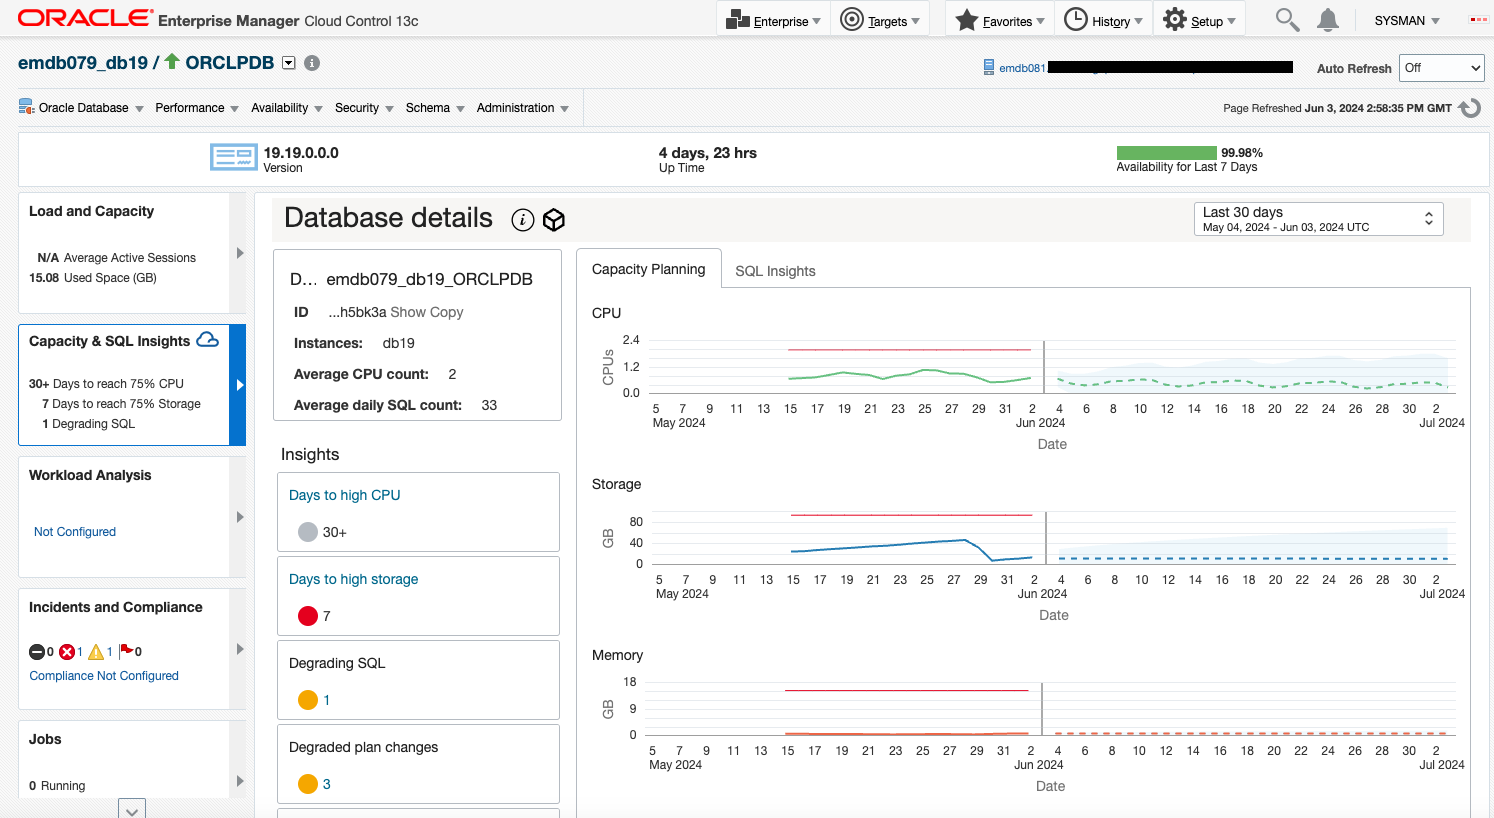
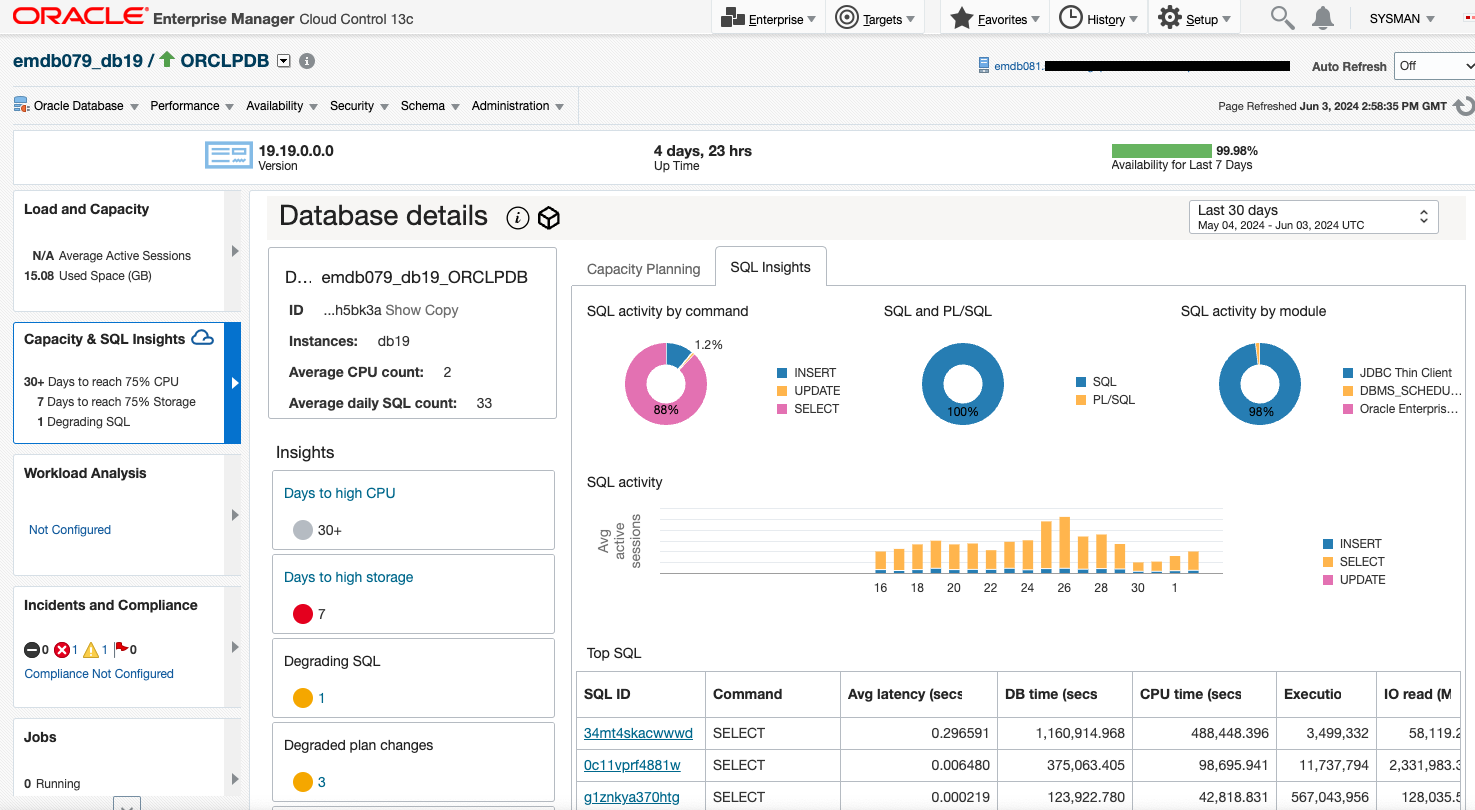
The Database details pane is displayed with the following tabs:- Capacity Planning
It allows you to analyze and forecast database resource consumption using long-term historic data and machine learning. You can optimize resource usage by identifying and managing resource utilization, such as underutilized or over-utilized servers, and moving workloads, or adjusting resource allocations to maximize future performance. You can review out-of-the-box insights related to the capacity of the underlying infrastructure, such as CPU, storage, memory and I/O, and also see any outliers across these metrics for a given period and utilize auto ML-based forecasting algorithms to predict future demand of complex workloads.
Figure 11-2 Ops Insights Capacity Planning
- SQL Insights
It provides a broad overview of the SQL workload executing in the database. This includes basic information about the database, such as version, cores and instances, and the SQL, such as unique and average daily counts, collected from the database. It also includes SQL activity breakdowns of total time by command and module, and the ratio of time in SQL or PL/SQL.
The Insights tiles at the database level quantify SQL by types of insights (degrading, degraded with plan changes, new, improving SQL and more). The SQL activity is shown by day, broken down by command type, exposing changes in workload over time. The charts: Execute to parse ratio and SQL count and invalidations expose important application workload characteristics over time.
Figure 11-3 Ops Insights SQL Insights
- Capacity Planning
Note:
The Database details pane is not displayed in the following scenarios:- If Cloud Extension is not configured for the selected database, you see the Capacity and SQL Insights pane with resources and videos on Capacity Planning and SQL Insights. This scenario only happens if the initial configuration hasn't been completed.
- If the Enterprise Manager user you are logged in as doesn’t have privileges to access Cloud Bridge, you see a landing page with resources and videos on Capacity Planning and SQL Insights.
- If the Enterprise Manager user you are logged in as doesn’t have privileges to see performance information for the selected database. For example, the user only has view access to the database.
- If the selected database is configured for OCI in Enterprise Manager, but it's not enabled in OCI Ops Insights.
- If Cloud Bridge was configured correctly, but after the database was disabled or inactive, Enterprise Manager shows the following message: Database Not Enabled for OCI Ops Insights.
- If the browser has no external access available (no access to internet), you see the following message: Unable to connect to OCI. Please check your internet connection or try again later.