JavaScript must be enabled to correctly display this content
Before you begin
This tutorial guides you through the required steps for creating
a stack on Oracle Cloud Infrastructure Resource Manager and using it to deploy either
Single or Multiple node Enterprise Manager setup. The time to complete this setup is
approximately 20 minutes for Single node and approximately 3 hours for a Multi-Node
deployment.
Overview
Oracle Enterprise Manager Cloud Control is a complete, integrated, business-driven
management solution for traditional and cloud environments. It takes advantage of the
built-in management capabilities of the Oracle stack and enables monitoring and
management of your entire infrastructure from a single console. This allows for
unprecedented efficiency gains and a dramatic increase in service levels.
This
version of Oracle Enterprise Manager 13.5 on Oracle Cloud Infrastructure can be deployed
on both Single and Multi-Node configurations allowing you to tailor Oracle Enterprise
Manager to your specific infrastructure needs. The features include:
Ability to create and define your own OCI resources.
Credentials for Enterprise Manager and Databases can be configured at spin up
time.
OMR is on the latest version of 19c Pluggable database that is also TDE (Transparent
Data Encryption) enabled, ensuring safety on the Cloud.
Scalability: OMS Nodes and Bastion can be scaled to fit your needs by re-running the
stack and selecting a new shape for both. This applies for both Single and Multi-Node
deployments.
Enterprise Manager 13.5 on Cloud Infrastructure uses the latest OCI Linux image: OL
8.
Review licensing requirements and ensure you have the appropriate licenses for the
environment you are going to manage.
License used Multi-Node deployments: Oracle Database Cloud Service Enterprise
Edition - Extreme Performance, the Oracle Database license is included in this edition; if
you already own a license for the included services you can also utilize said license.
Resources such as Load Balancer, Block Volumes, Compute Hosts and NFS will be charged as
infrastructure resources. Other EM packs functionalities (such as Diagnostics Pack
features) are included as well but will need to be deployed or enabled by the end user.
License used Single node deployments: Oracle Database Cloud Service
Enterprise Edition.
The patching process for Enterprise Manager deployed in the Cloud is the same as the one for Enterprise Manager installed on-premises. In both cases, a Customer Support Identifier (CSI) is required to connect to My Oracle Support and download patches.
For more information on pricing including Pay as you
go, Universal Credits-Monthly Flex and Bring Your Own License options, see Oracle Cloud
Infrastructure Pricing.
Component Descriptions and Definitions
Oracle Cloud Infrastructure Resource Manager: Component that allows you
orchestrate the resources needed to deploy Oracle Enterprise Manager Cloud Control. For
more information see Overview of Resource Manager.
Oracle Cloud Infrastructure Load Balancing Cloud: Load balancing service used to
deploy EM in high availability mode, only available for Multi-Node deployments. For more
information see Overview of Load Balancing.
High Availability (HA) mode - Level 3:
The Multi-Node setup that provides an EM single site with load balancing, OMS in
Active/Active configuration and a RAC repository. Data Guard support needs to be enabled
by the user, for more information see Steps to Enable Data Guard.
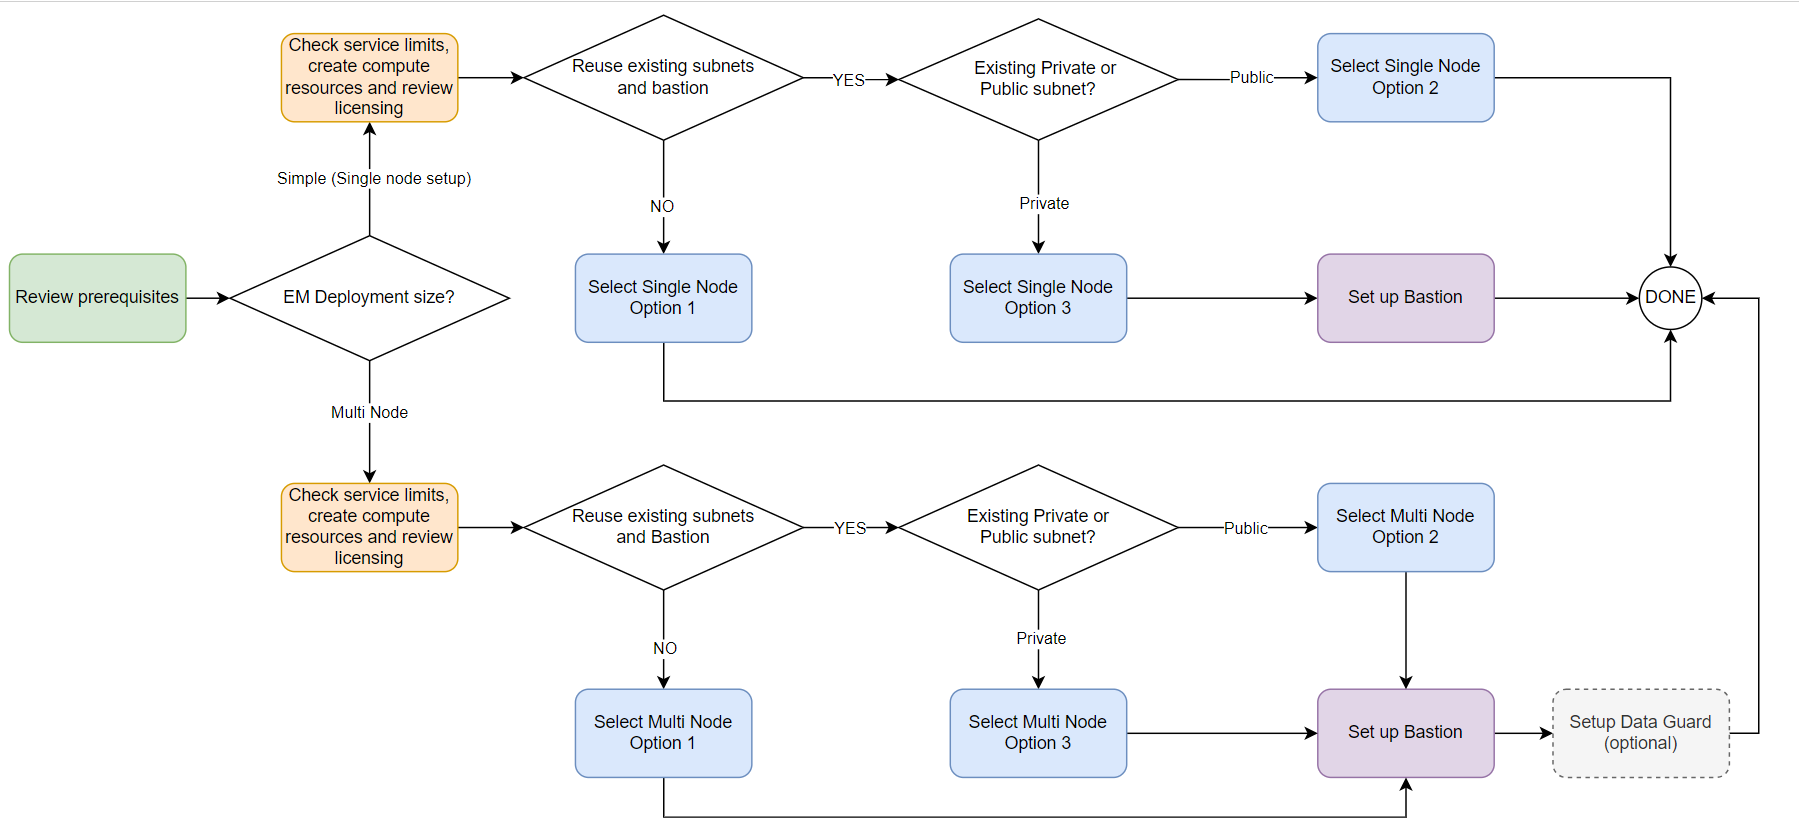
Choose your configuration option:
Find your configuration option and follow the instructions below to complete the steps
to create a stack on Oracle Cloud Infrastructure Resource Manager.
Before deploying Oracle Enterprise Manager, review the following information and
perform all prerequisite tasks described below.
Check OCI resources before you begin, the following is a list of supported and
recommended VM shapes and recommended sizing information for the different EM
Deployment sizes:
EM Deployment Size
Supported Compute Shapes (Management Server)
Recommended Compute Shape (Management Server)
Supported Compute Shapes (Database RAC Nodes)
Recommended Compute Shape (Database RAC Nodes)
Agent Count
Target Count
Concurrent User Sessions
Simple (Single node setup)
VM.Standard2.2, 2.4, 2.8, 2.16, 2.24
VM.DenseIO2.8, 2.16, 2.24
VM.Standard.E2.2, E2.4, E2.8
VM.Standard.E3.Flex, E4.Flex
VM.Standard2.4
N/A
N/A
<10
<100
<3
Small (Multi-Node)
VM.Standard2.2, 2.4, 2.8, 2.16, 2.24
VM.DenseIO2.8, 2.16, 2.24
VM.Standard.E2.2, E2.4, E2.8
VM.Standard.E3.Flex, E4.Flex
VM.Standard2.4
VM.Standard2.2, 2.4, 2.8, 2.16, 2.24
VM.Standard.E4.Flex
VM.Standard2.4
<100
<1000
<10
Medium (Multi-Node)
VM.Standard2.4, 2.8, 2.16, 2.24
VM.DenseIO2.8, 2.16, 2.24
VM.Standard.E2.4, E2.8
VM.Standard.E3.Flex, E4.Flex
VM.Standard2.8
VM.Standard2.4, 2.8, 2.16, 2.24
VM.Standard.E4.Flex
VM.Standard2.8
>=100,<1,000
>=1,000,<10,000
>=10,<25
Large (Multi-Node)
VM.Standard2.8, 2.16, 2.24
VM.DenseIO2.8, 2.16, 2.24
VM.Standard.E2.2, E2.4, E2.8
VM.Standard.E3.Flex, E4.Flex
BM.Standard2.52
BM.Standard.E2.64
BM.DenselO2.52
VM.Standard2.16
VM.Standard2.8, 2.16, 2.24
VM.Standard.E4.Flex
VM.Standard2.16
>=1,000
>=10,000
>=25,<50
Example: If you wanted to manage a deployment of up to 100 targets, choose the
Simple deployment.
The recommended compute shape is: VM.Standard2.4. For additional resources on Enterprise
Manager sizing information, see Enterprise Manager Cloud Control Sizing in Oracle Enterprise
Manager Cloud Control Advanced Installation and Configuration Guide.
2. Ensure
that your Oracle Cloud Infrastructure account has the correct Service Limits for the shapes
and block storage adequate for the Enterprise Manager sizing you wish to deploy. When you
sign up for Oracle Cloud Infrastructure, a set of service limits are configured for your
tenancy. The service limit is the quota or allowance set on a resource. For more information
on Service Limits including: Viewing Your Service Limits, Quotas, and Usage; see About Service Limits and Usage.
3. Create Compute resources, the
following is a comprehensive list of source requirements for Single node (Simple) and
Multi-Node (Small, Medium, and Large) configurations:
5. For public IPs, you can use the Reserved public IPv4 addresses. A reserved public IP can be created in any compartment in your tenancy. Make a note of its OCID. In the stack parameter editor (Bastion instance or Single node EM with public visibility, or Multi node EM with public LoadBalancer) enable the custom Public IP option first and then enter the reserved public IP OCID, as shown in the figure below.
Description of the illustration
publicIP.png
Note: If you have more than
one VCN in your environment, choose a CIDR that does not overlap for peering purposes.
Peering is not possible if VCN CIDR's match, for more information see VCNs and Subnets.
Deploy Enterprise Manager in a Single Node configuration
To deploy Oracle
Enterprise Manager on a Single Node, follow these steps. The prerequisites are outlined in
Perform Prerequisites.
Single node setup is very similar to
previous releases of Enterprise Manager on OCI Marketplace and supports Simple
Enterprise Manager size deployments.
Option 1 Single Node: Enterprise Manager deployment without reusing existing
subnets
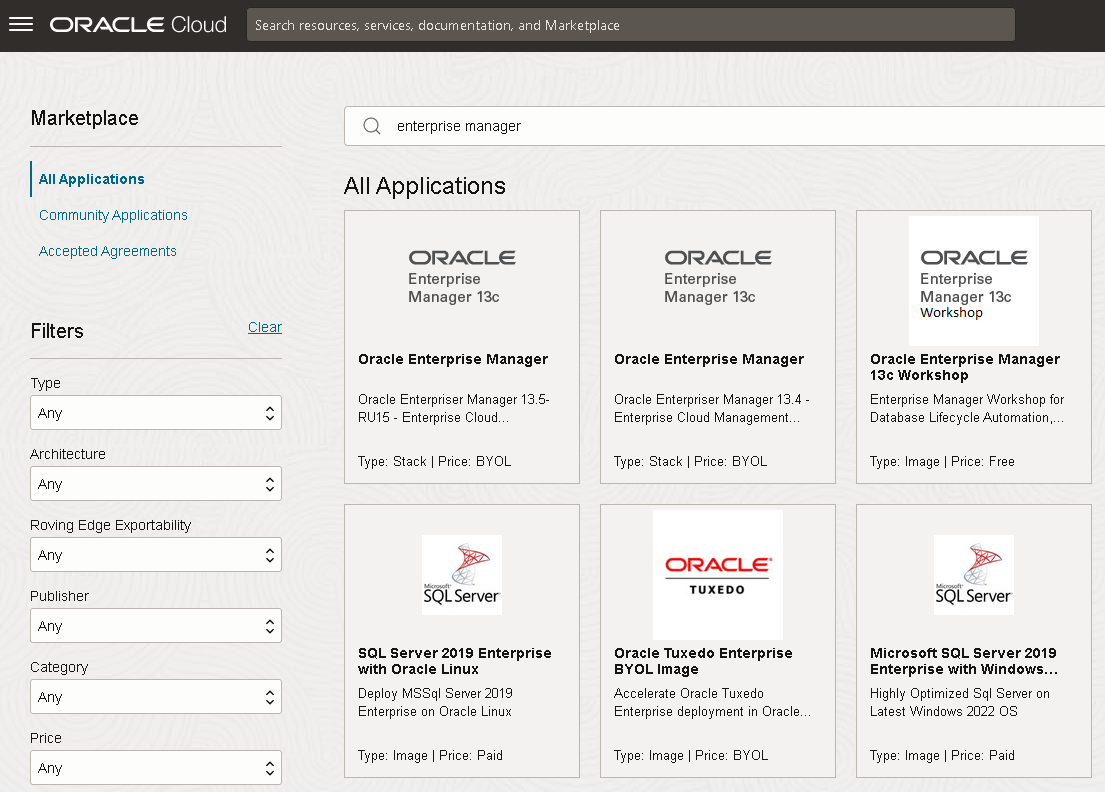
Sign in to OCI and from the OCI Main Menu and navigate to Marketplace. Search and
click on Oracle Enterprise Manager, for easier access you can filter by
Type: Stack.
Review the Oracle Enterprise Manager overview, select the compartment where the
stack will be located. Checkmark the Oracle Standard Terms and Restrictions and click
Launch Stack.
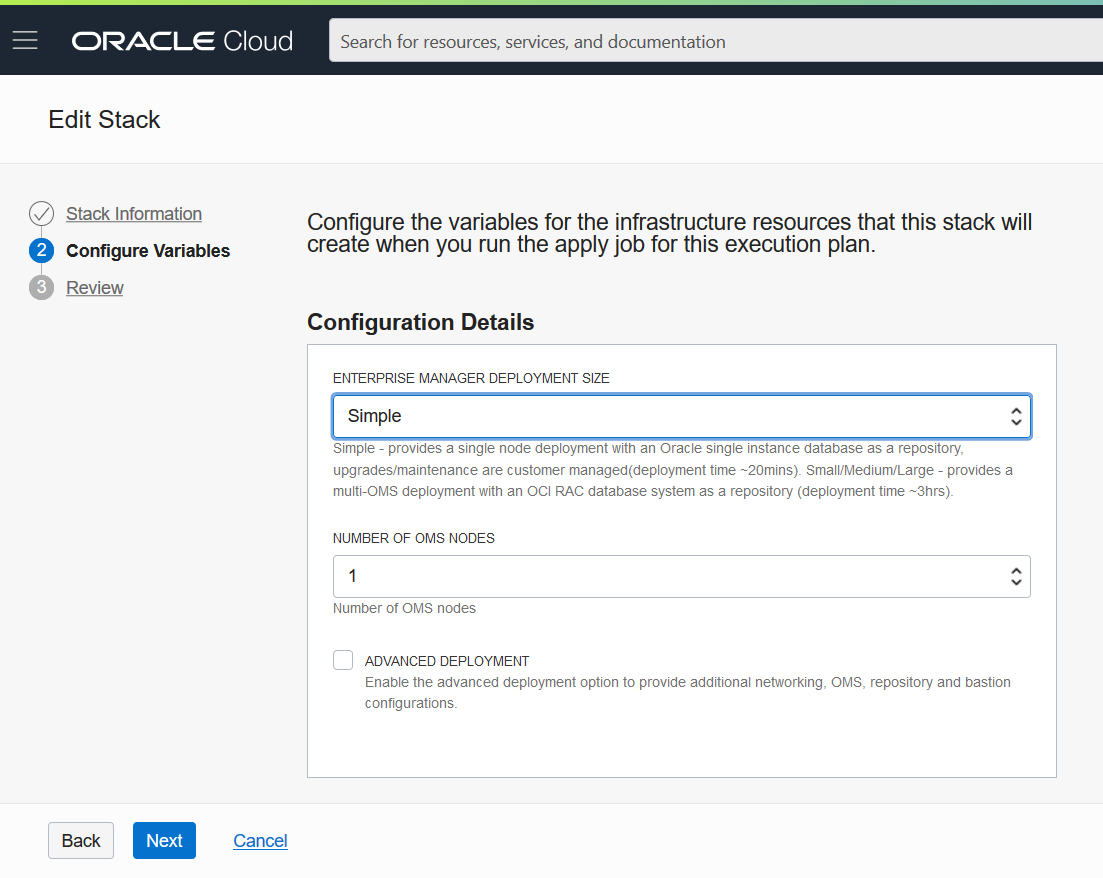
In Edit Stack, select your whether your Terraform configuration source will
be a Folder or Zip File and drag the corresponding option into the assigned
space.
Under Stack Information enter the Name and Description for your stack (optional).
The predetermined deployment name is: EnterpriseManager_Deploydate. Click
Next.
Specify the Deployment type Simple and Number of OMS Nodes (1). Enter the VCN
Network details, the OMS (Oracle Management Server) details (passwords, shape, storage
size), WebLogic password, the Oracle Repository Database System details (password,
license, shape, storage), and the Bastion details (compartments, name, CIDR)
Note: When re-running the stack, fields marked with an asterisk
(*) are user modifiable. When re-running the stack, you should not change
fields without an asterisk as this could generate problems during stack
deployment.
Create the VCN (optional, if VCN option is chosen)
Configure the security lists, network security groups, gateways and routing
tables
Create the OMS host
Create the Bastion host (optional, required only for private subnets)
Deploy and configure Enterprise Manager
Note: If you are re-running the stack, do not check RUN APPLY.
Instead, click on Save Changes, navigate to Terraform Actions and
click on Apply to begin stack re-deployment.
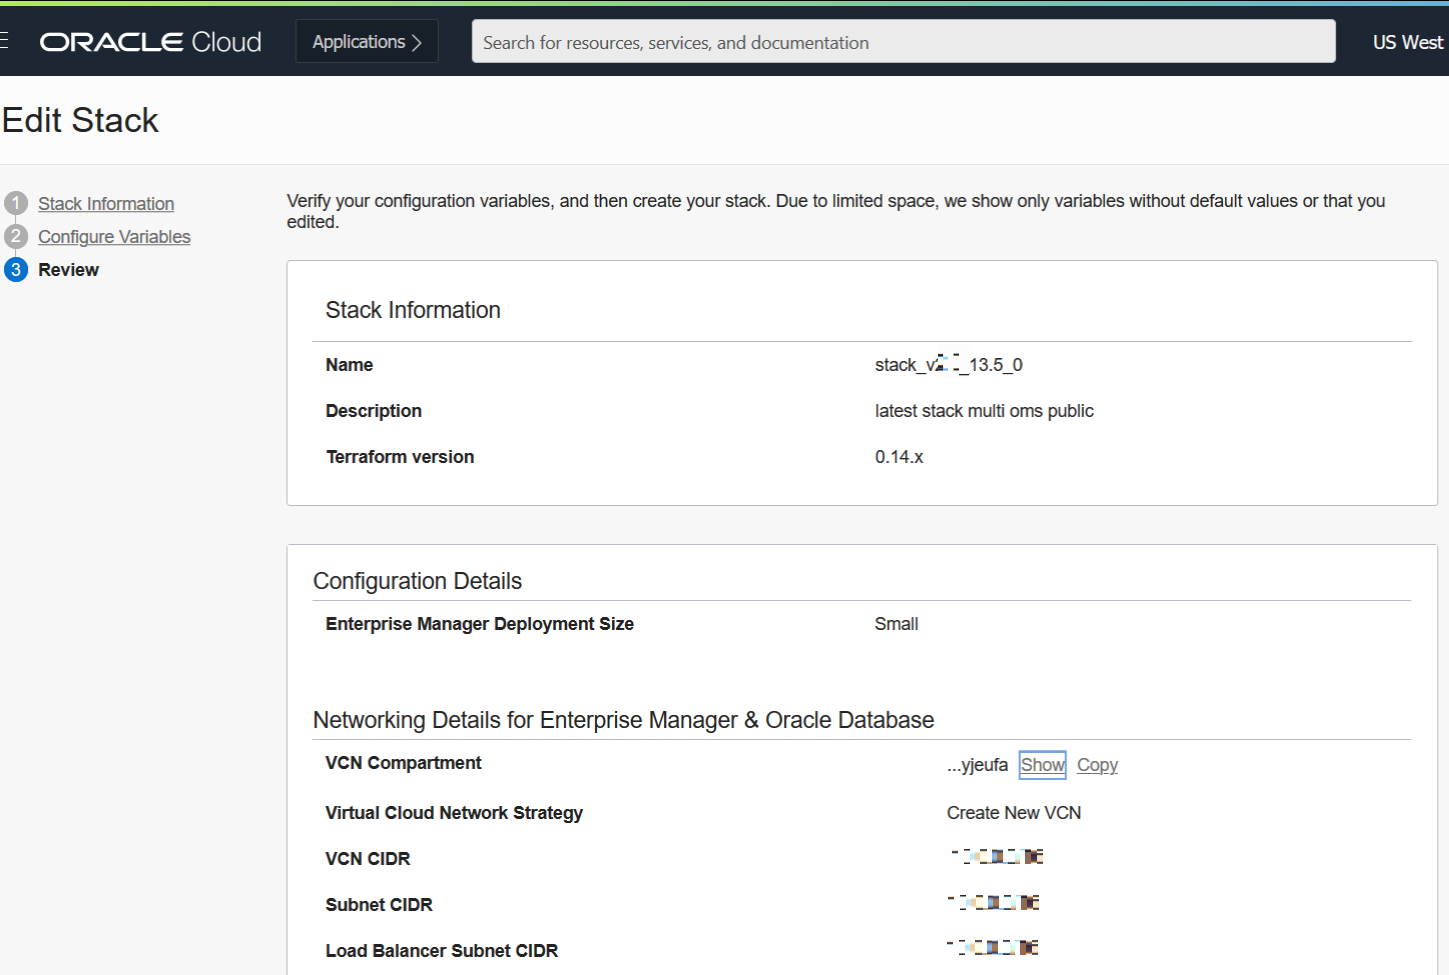
In the Apply screen the name, plan resolution and tags fields are visible. You can
change the job name and apply any Tags needed. Click Apply to create the OCI
Resources and deploy Enterprise Manager.
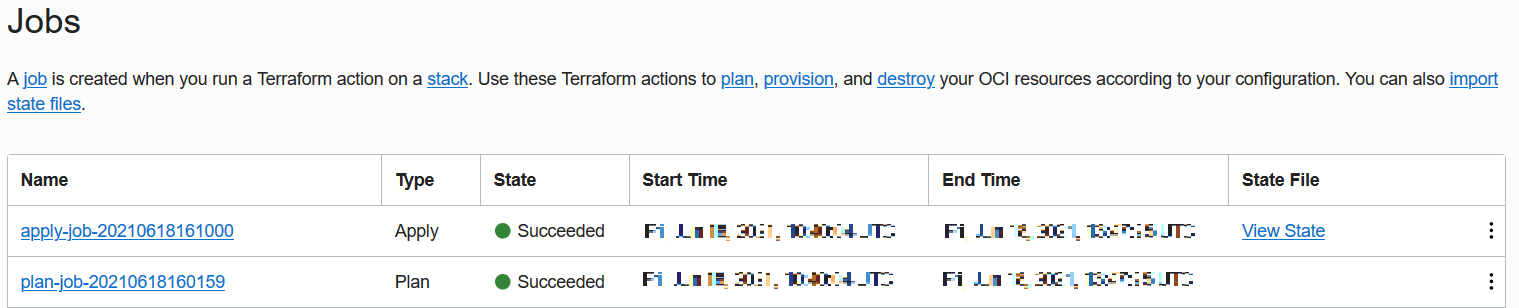
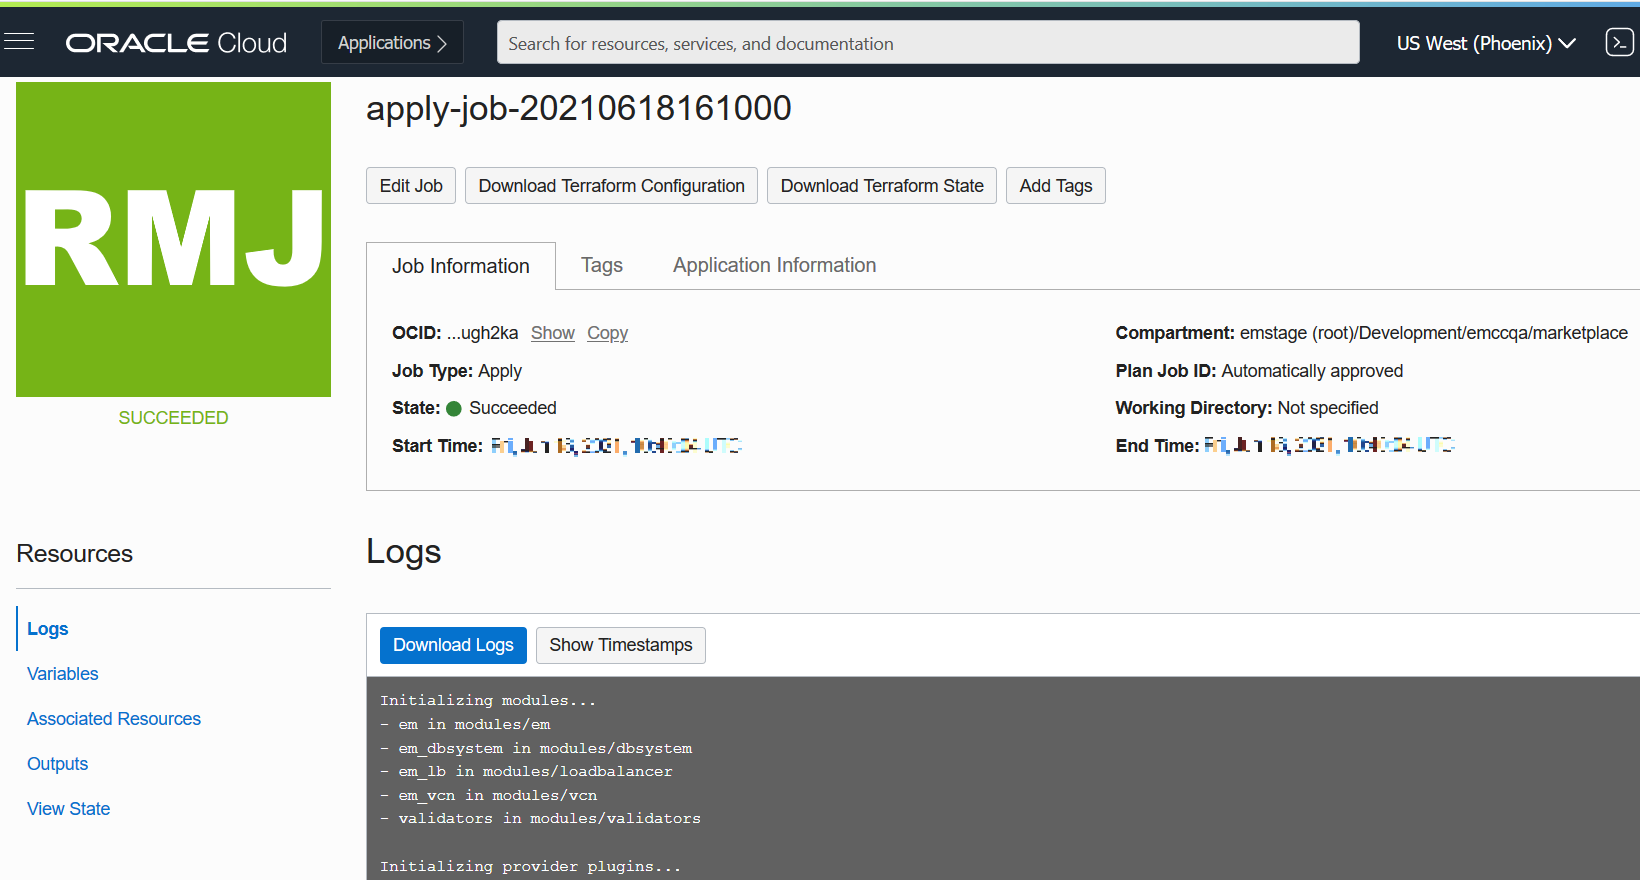
In the Resources section under Jobs you can track the Stack creation
process. These processes will show under the Type column as Apply. Description of the illustration
jobs.png
To view the Log file at any point, navigate to Resource manager, then
Click on a stack, then choose job type: Apply and click on
Logs.
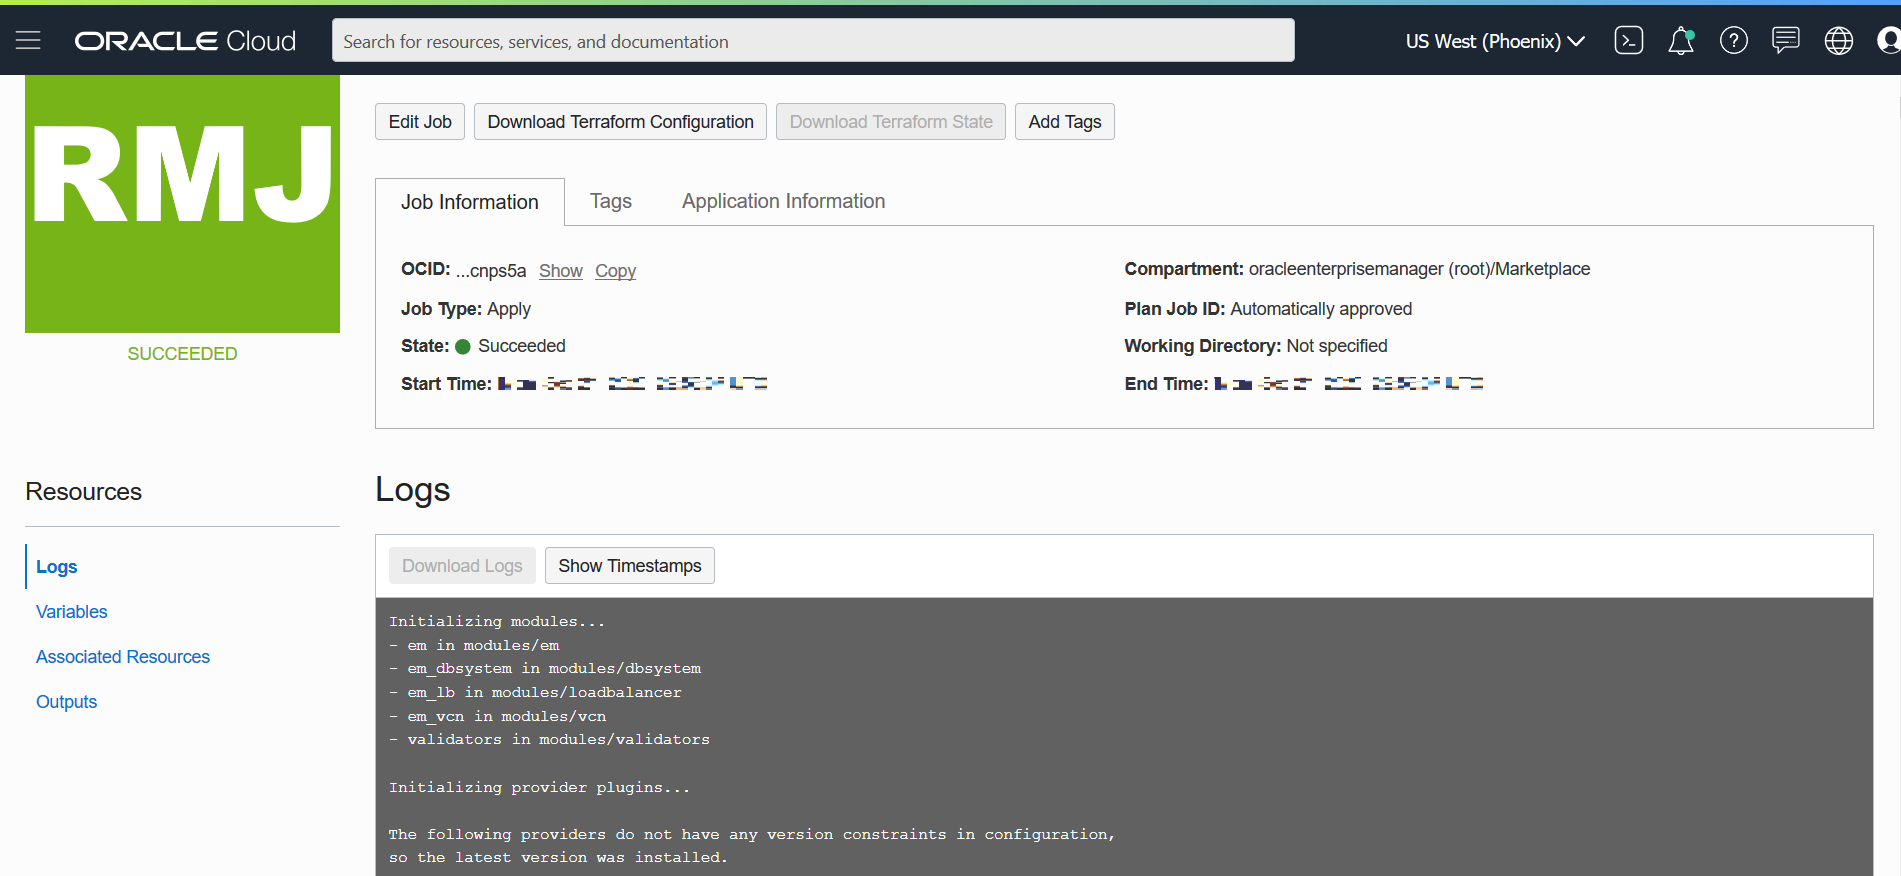
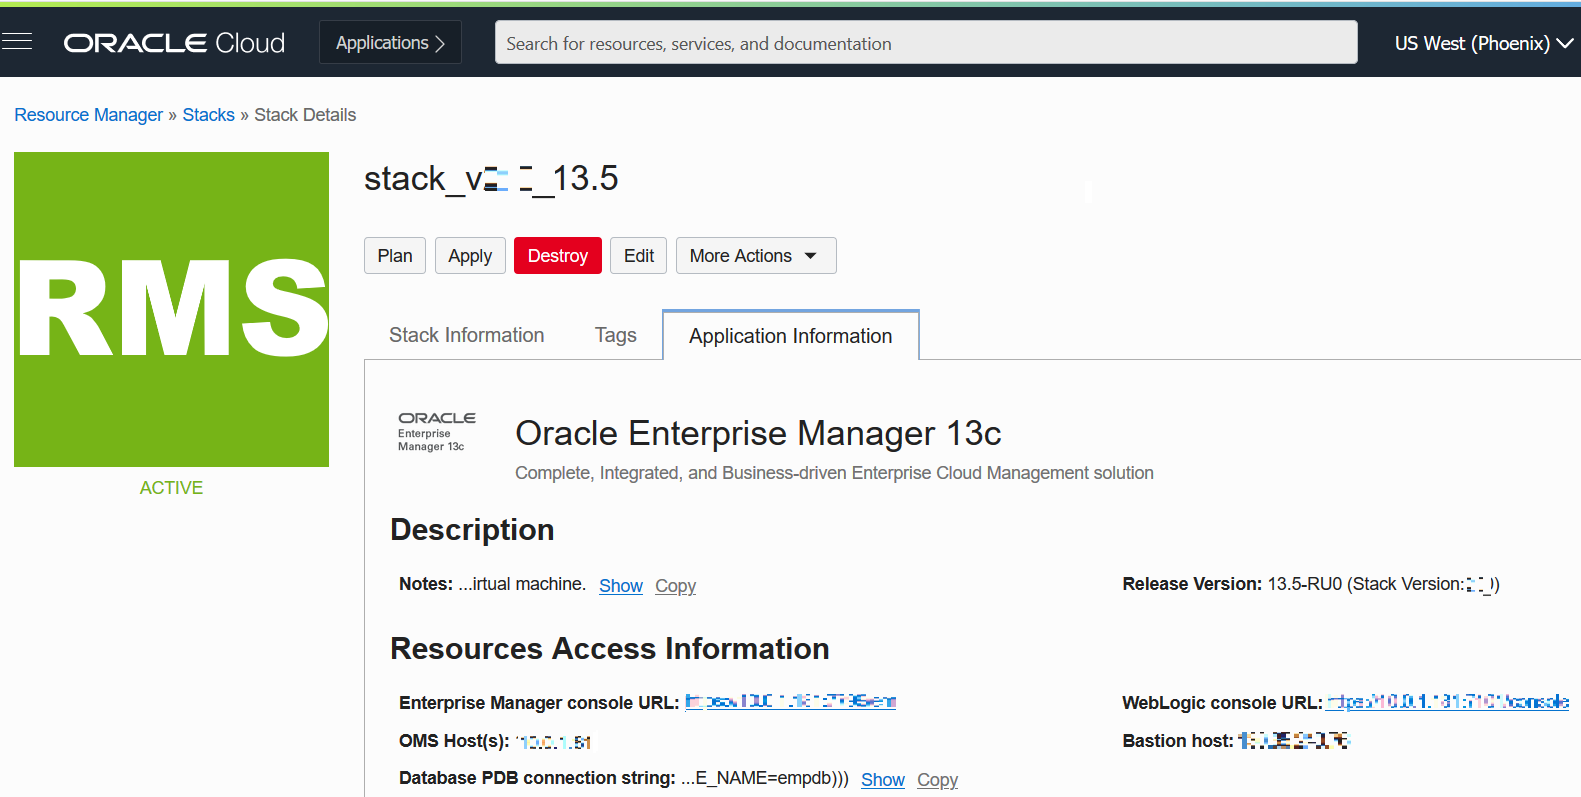
The Apply job takes 20 minutes for Single node. On successful completion of the
job, access to Enterprise Manager can be viewed in the Application
Information tab.
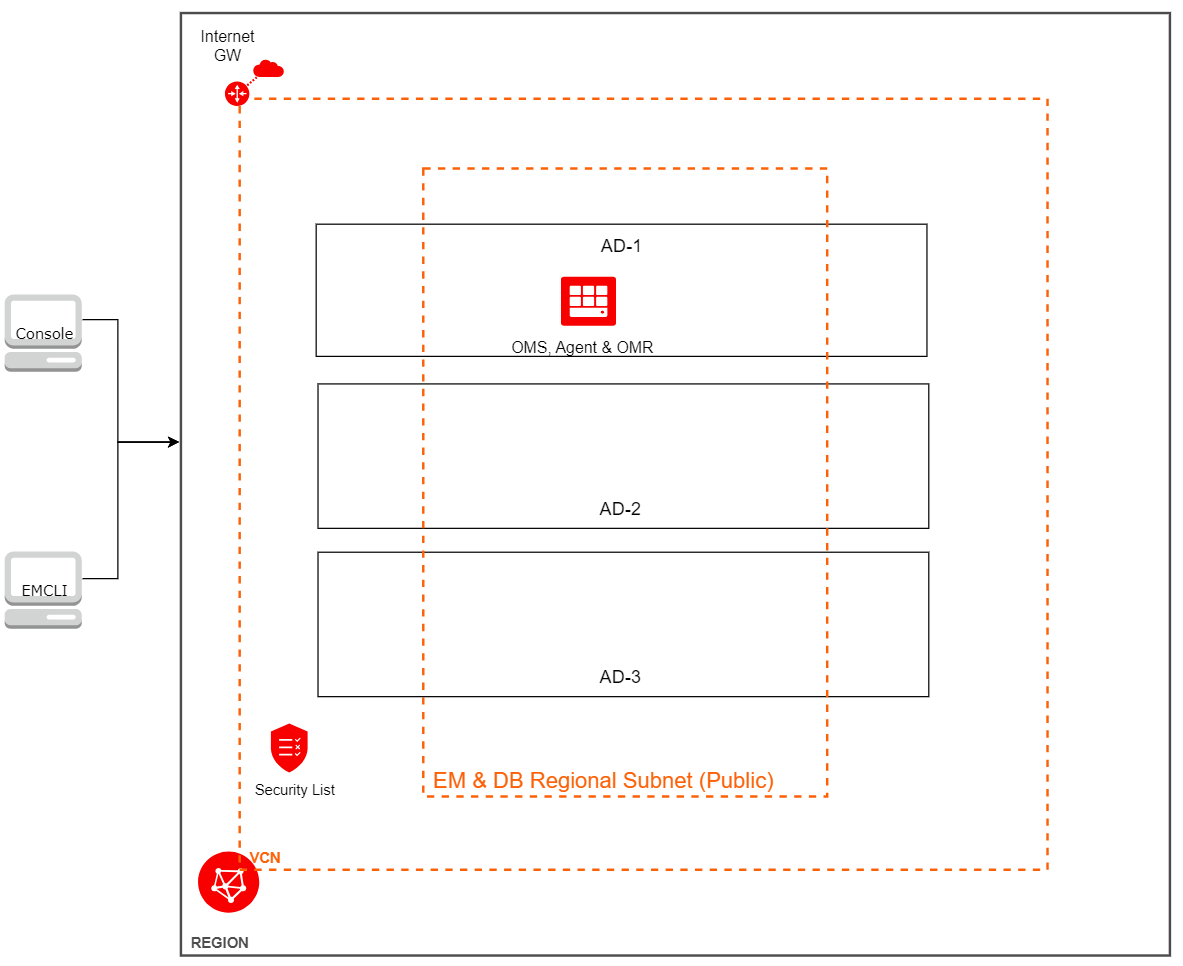
Option 2 Single Node: Enterprise Manager and repository database in an existing
public subnet
For this option, shown in the SingleNode.png
figure, you must already have an existing VCN with at least one public subnet and an
Internet gateway for connections to OCI instates.
Expected preconfigured
components
VCN, for example vcn-template with CIDR 10.0.0.0/16
Internet gateway, for example internet-gateway, it could be with or
without Route Table
Route Table for example:
Route Table Name
Target Type
Destination CIDR Block / Destination Service
Target Internet Gateway
Used in Subnet
route-table-internet-gateway-for-public-subnets
Internet Gateway
0.0.0.0/0
internet-gateway
public-subnet-emdb
Existing public subnet with parameters like:
Subnet Name
Subnet Type
IPv4 CIDR Block
Route Table
Subnet Access
public-subnet-emdb
Regional
10.0.5.0/24
route-table-internet-gateway-for-public-subnets
Public
Deployment steps
Sign in to OCI and from the OCI Main Menu and navigate to Marketplace. Search and
click on Oracle Enterprise Manager, for easier access you can filter
by Type: Stack.
Review the Oracle Enterprise Manager overview, select the compartment where the
stack will be located. Check the Oracle Standard Terms and Restrictions and click
Launch Stack.
In Create Stack step 1 Stack information enter the Name and Description for your
stack (optional). The predetermined deployment name is: Oracle Enterprise
Manager-[yyyymmddhhmmss]. Click Next.
Next, enter the Configuration Details, select Simple in Enterprise Manager
Deployment Size and check Advanced Deployment to allow reuse of existing
VCN and subnets.
Next, pick the Compartment where your existing public subnet exists, in many cases
this will be your VCN compartment. Then, select Use Existing EM/DB subnet, of
type Use Public Subnet and, lastly, select your existing public subnet from
the drop down menu.
In the following section, Oracle Management Server Details, pick
the Compartment where you are planing to provision Enterprise Manager, fill
Host name prefix and Passwords, pick the right
Shape, Boot volume, Availability
Domain and insert public SSH key.
In the Repository Database System Details section enter your
Passwords and click on Next.
Review the configuration variables entered, check Run apply and
click on Create to initiate stack deployment. At this moment, the
stack starts the deployment and the following steps happen in the background:
The security lists, network security groups and routing tables
configuration
Changes in your subnet: include adding a security list to the
public-subnet-emdb subnet
Create the OMS host.
Deploy and configure Enterprise Manager, including the repository database
Note: If you are re-running the stack, do not check RUN APPLY.
Instead, click on Save Changes, navigate to Terraform Actions
and click on Apply to begin stack re-deployment.
Next, in the Apply screen, note the name, plan resolution, and the tags fields are
visible. You can change the job name and apply any Tags needed. Click
Apply to create the OCI Resources and deploy Enterprise
Manager.
In the Resources section under Jobs you can track the Stack
creation process. These processes will show under theTypecolumn as
Apply.
The Apply job takes 20 minutes for Single node. On successful completion of the job,
access to Enterprise Manager can be viewed in the Application
Information tab.
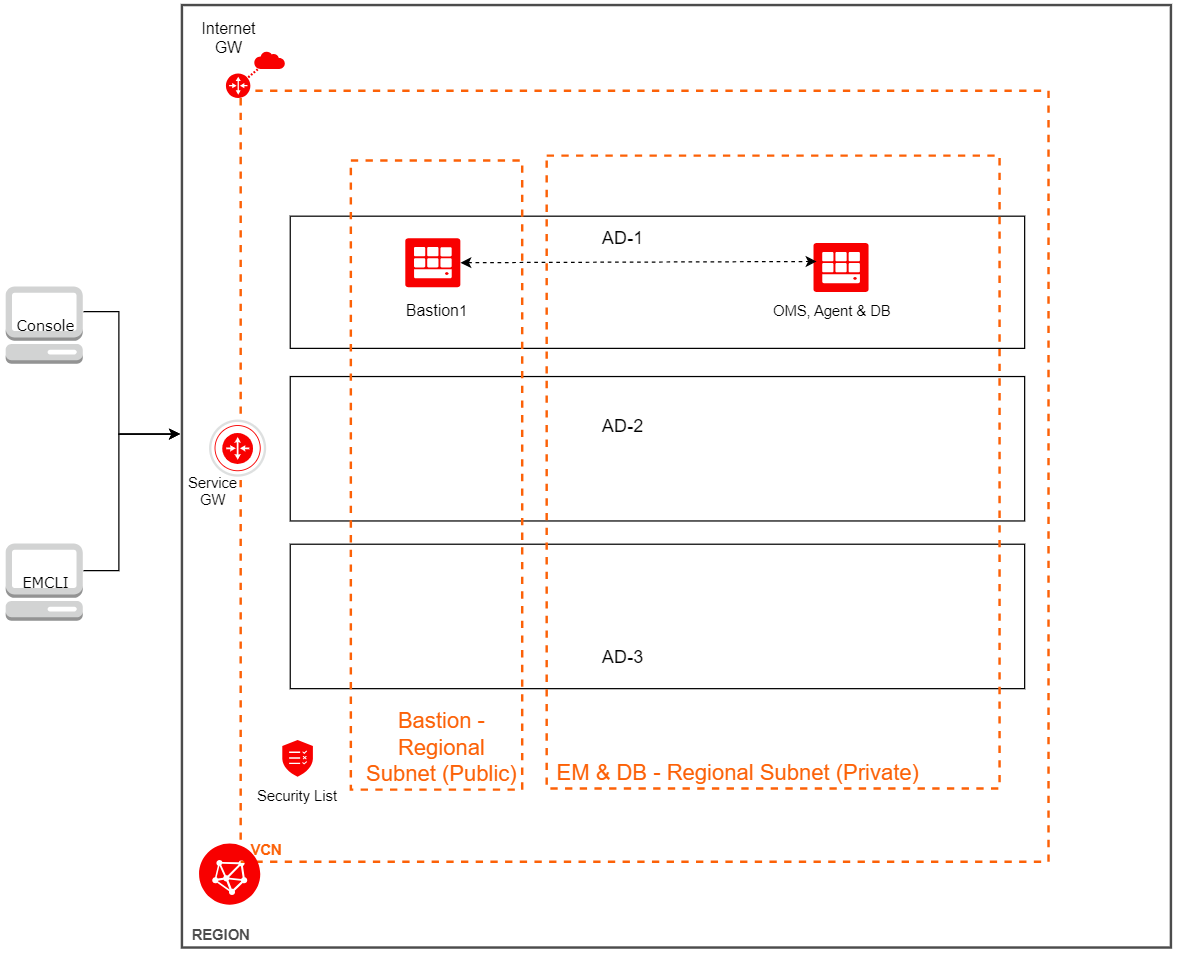
Option 3 Single Node: Enterprise Manager and database placed in existing
private subnet
For this option, shown in the SingleNode1.png
figure, you must already have an existing VCN with at least one private subnet and
optionally one public subnet. Any missing components could be created under your existing
VCN. To allow access to the instances in the private subnet, use one instance as Bastion,
which is in the public subnet. A Bastion instance is created by default during the
Enterprise Manager deployment, you can also reuse an existing one as well. If reusing a
Bastion instance, it is optional for your VCN to have an already existing public subnet.
You must also have an Internet and Service gateway for connections to and among OCI
instances.
Expected preconfigured components
VCN, for example vcn-template with CIDR 10.0.0.0/16
Internet gateway, for example internet-gatewayit could be with or
without Route Table
Service gateway, for example service-gateway with All ABC
Services In Oracle Services Network (the ABC represents the abbreviation of
your OCI region) and it could be with or without Route Table
Route Table, for example:
Route Table Name
Target Type
Destination CIDR Block / Destination Service
Target Internet Gateway
Used in Subnet
route-table-internet-gateway-for-public-subnets
Internet Gateway
0.0.0.0/0
internet-gateway
public-subnet-emdb
route-table-service-gateway-for-private-subnets
Service Gateway
 All ABC
                Services In Oracle Services Network
(the ABC represents the abbreviation of your OCI
region)
service-gateway
private-subnet-emdb
Existing Private and Public Subnet with parameters like:
Subnet Name
Subnet Type
IPv4 CIDR Block
Route Table
Subnet Access
private-subnet-emdb
Regional
10.0.5.0/24
route-table-service-gateway-for-private-subnets
Private
public-subnet-bastion
Regional
10.0.5.0/24
route-table-internet-gateway-for-public-subnets
Public
If you do not have a Bastion, it will be created in the given public subnet. If
reusing an existing bastion, the existing bastion has to be in the re-used VCN
vcn-template.
Deployment steps
Sign in to OCI and from the OCI Main Menu and navigate to Marketplace. Search and
click on Oracle Enterprise Manager, for easier access you can
filter by Type: Stack.
Review the Oracle Enterprise Manager overview, select the compartment where the
stack will be located. Check the Oracle Standard Terms and Restrictions and click
Launch Stack.
Enter the Name and Description for your stack (optional). The predetermined
deployment name is:Oracle Enterprise Manager-[yyyymmddhhmmss]. Click
Next.
Next, enter the Configuration Details: Simple and
check Advanced Deployment to allow reuse of existing VCN and subnets.
Enter the Networking Details for Virtual Cloud Network: pick your
Compartment, select Use Existing VCN, and select your existing VCN from drop
down menu.
Next, pick the Compartment where your existing public subnet exists, in many cases
this will be your VCN compartment. Then, select Use Existing EM/DB subnet,
choose Use Private Subnet and select your existing private subnet
from the drop down menu.
In the Oracle Management Server Details section, pick the
Compartment where you are planing to provisioning Enterprise Manager, fill in the
Host name prefix and Passwords, pick the right
Shape, Boot volume,Availability Domain and insert public SSH key.
Under Repository Database System Details, specify your
Passwords.
In the last section, the Bastion Host Details, depending on your
Bastion Strategy you have two options: you can Create New
bastion instance or Use Existing bastion instance. For more details
about this section, see Bastion Setup.
Click on Next to review the configuration variables entered, check
Run apply and click on Create to initiate stack
deployment. At this moment, the stack starts the deployment and the following steps
happen in the background:
The security lists, network security groups and
routing tables configuration
Changes in your subnet: include adding a security
list to private-subnet-emdb subnet
Create the OMS host.
Deploy and configure Enterprise Manager, including the repository database.
Note: If you are re-running the stack, do not check RUN APPLY.
Instead, click on Save Changes, navigate to Terraform Actions and
click Apply to begin stack re-deployment.
In the Apply screen the name, plan resolution and tags fields are visible. You can
change the job name and apply any Tags needed. Click Apply to create
the OCI Resources and deploy Enterprise Manager.
In the Resources section under Jobs you can track the Stack
creation process. These processes will show under the Type column as
Apply.
The Apply job takes 20 minutes for Single node. On successful completion of the job,
access to Enterprise Manager can be viewed at the Application
Information tab.
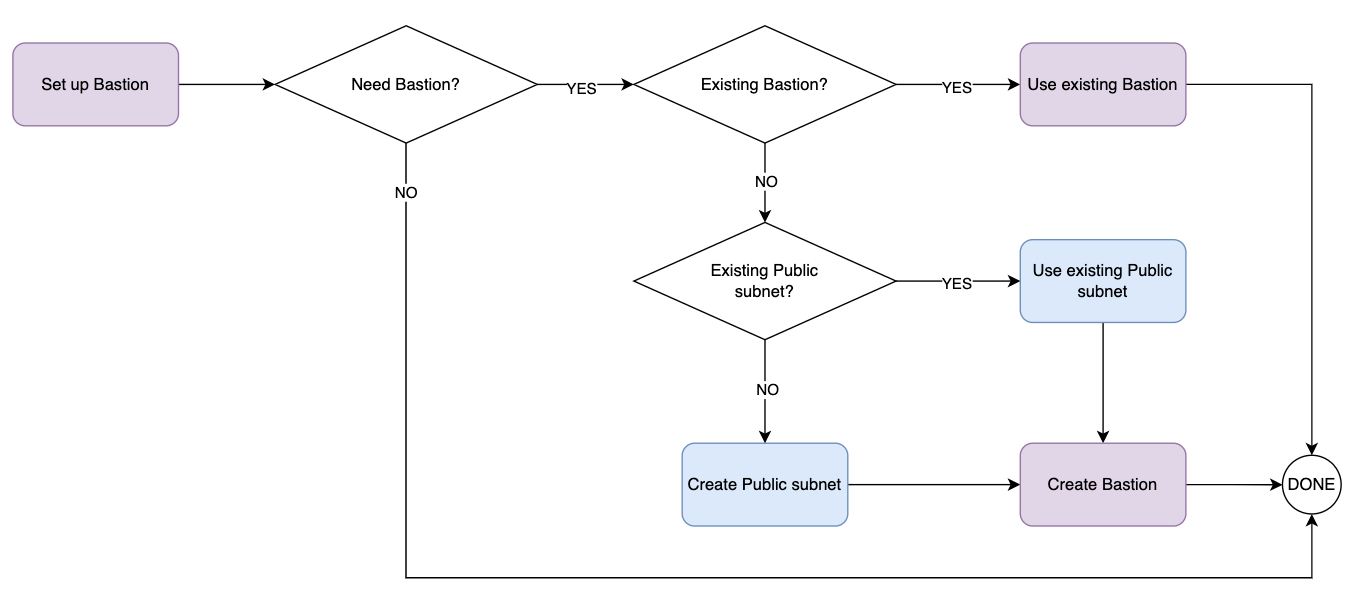
Bastion Setup
The bastion instance allows secure access to resources that do not have public
endpoints and require strict resource access controls. If you do not have an existing
Bastion Instance, it can be created during the provisioning of Enterprise Manager. A
Bastion instance is needed when the EM/DB subnet is private, for both
single node setups and all Multi-Node setups. A Bastion is not needed only in a single
node setup with public EM/DB subnet. When you are reusing an existing
Bastion instance, note that the Bastion public subnet has to be different from
Load Balancer public subnet. In case you do not need Bastion, or you cannot use public subnets in your network, select the "No Bastion Instance" option. This option is usually combined with the reuse of an existing VCN and subnets.
The "Deploy Bastion-less " option allows you to provision EM without a Bastion instance. Use this option if you reuse existing VCN and subnets. If you choose this option while creating new VCN and subnets, your EM system will be deployed but it may not be accessible. This option will internally create and use a Private Endpoint within your VCN for deployment of EM. This Private Endpoint is deleted by the end of the deployment.
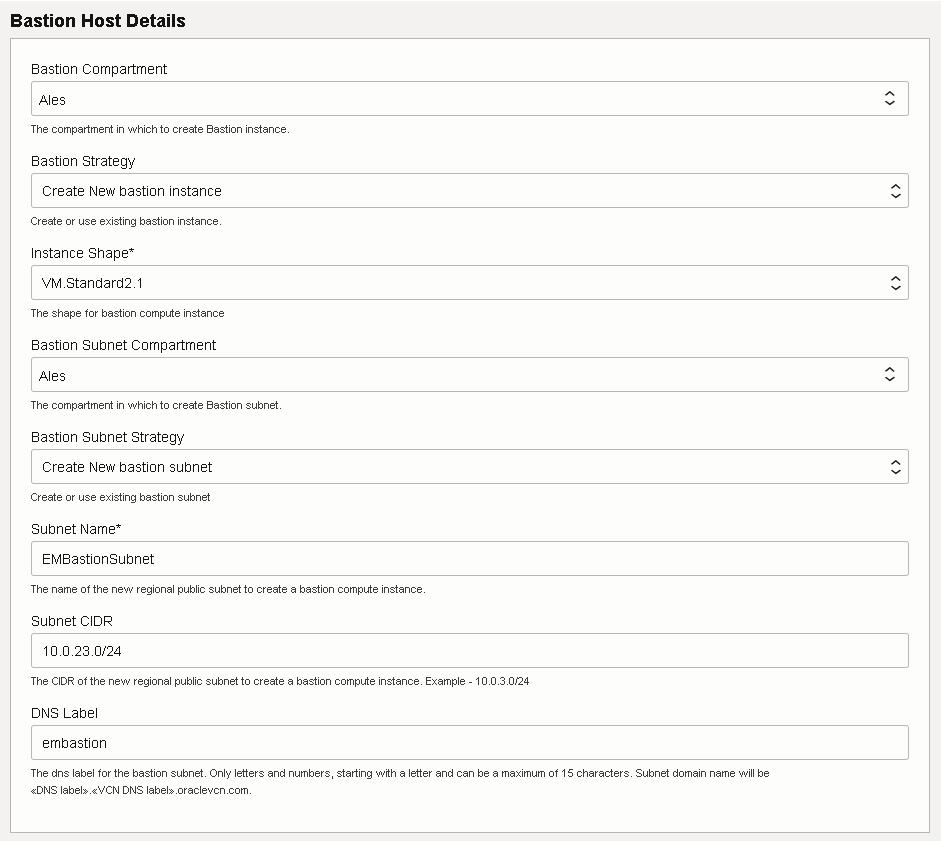
Create a new Bastion instance and a new Bastion subnet
This
option is the default and you have to pick the Compartment where a new Bastion instance
is to be created and its Shape. Bastion subnet compartment can
be different than the Bastion instance compartment, but typically it is the same as your
VCN compartment. Enter values for the Subnet Name, Subnet
CIDR and DNS Label.
Create a new Bastion instance and use an existing Bastion subnet
This option requires you pick the Compartment where a new Bastion instance is to be
created and also it's Shape. The Bastion subnet compartment can
be different than the Bastion instance compartment, but typically it is the same as your
VCN compartment. In the Bastion Subnet Compartment, pick the
compartment where your existing public bastion subnet is, typically the same as your VCN
compartment. For the Bastion Subnet Strategy, select Use existing
bastion subnet and, lastly, in the Existing bastion subnet,
select your existing public Bastion subnet from the drop-down list.
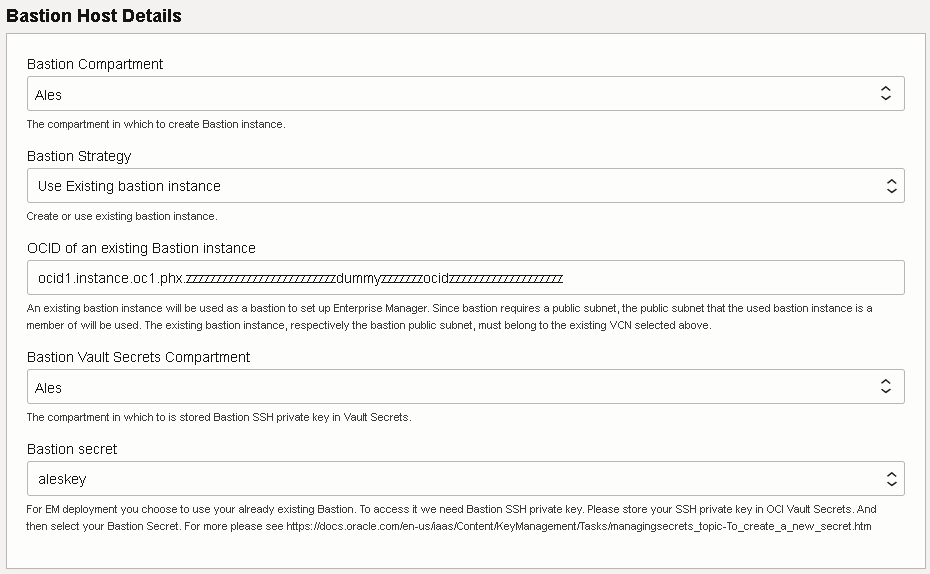
In this case you are able to use an already existing Bastion instance for provisioning
Enterprise Manager. First, select the compartment where the Bastion instance exists.
From from instance details, copy the Bastion OCID. To enable a secure
way to access the existing Bastion instance you need a private SSH key, which will be
securely stored as a Secret in OCI Vault. Follow the documentation describing Creating a Vault and then Creating a Secret in a Vault. Next, in the stack select the
Compartment where your bastion secret is and then in Bastion secret
select from drop down menu your bastion secret. The secret version number is
not important; the latest secret version is referenced automatically. For the bastion
public subnet you must select the subnet where the bastion exists, and it must be a
subnet that is part of your existing VCN.
Review and make a note of the following ports that Enterprise Manager on OCI will
use:
Component
Service
Source Port Range
Destination Port for Single Node
Description
Bastion
SSH
"0.0.0.0/0"
TCP/22
Bastion is only created if EMDB subnet is a private subnet.
Note: Port 22 needs to be enabled for the bastion
host to reach the EM console or the DB in private subnets. If you are
unable, you will need to enable the OCI IP ranges available here: Public IP Addresses for VCNs and the Oracle Services
Network
Enterprise Manager
SSH
Public subnet: "0.0.0.0/0" Private subnet: Bastion & EMDB subnet
CIDR
Public subnet: "0.0.0.0/0" Private subnet: VCN CIDR
TCP/7799
Enterprise Manager
WebLogic Console
Public subnet: "0.0.0.0/0" Private subnet: VCN CIDR
TCP/7101
Enterprise Manager
Admin Server
EMDB subnet CIDR
TCP/7101
Enterprise Manager
Node Manager
EMDB subnet CIDR
TCP/7401
Enterprise Manager
Managed Server / Java Virtual Machine Diagnostics (JVMD)
Public subnet: "0.0.0.0/0" Private subnet: VCN
CIDR
TCP/7301
Enterprise Manager
Agent Upload
Public subnet: "0.0.0.0/0" Private subnet: VCN
CIDR
TCP/4900
Enterprise Manager
Agent Listen (OMS and Database Nodes)
EMDB subnet CIDR
TCP/3872
Database
DB Listener
EMDB subnet CIDR
TCP/1521
For both private and public
Database
DB Nodes
Public subnet: "0.0.0.0/0" Private subnet: VCN
CIDR
TCP/22
A boot volume backup must be taken immediately after deployment and at regular
daily or weekly intervals, this is where Simple Enterprise Manager and repository
database deployments are done. For more information see Overview of Boot Volume Backups.
Note: If a private subnet is used for Enterprise Manager,
then access to the console URL will be using a tunnel running on the bastion host.
Deploy Enterprise Manager in a Multi-Node Configuration
Select one of the options below to deploy Oracle Enterprise Manager in a Multi Node
configuration. If you have not already performed the prerequisites, see Perform Prerequisites.
Recommended Setups for Multi-Node Deployments
Multi-Node deployments can be setup with Small, Medium or Large Enterprise Manager
deployments on a new or existing VCN. Multi-Node deployments are High Availability
configurations that require the following components:
Oracle Cloud Infrastructure Load Balancing service: The Load Balancer nodes
will be on different availability domains to maintain High Availability. It can be
placed either in public or private subnet
Oracle Management Service: Choose different availability domains for each OMS
node for High Availability.
Oracle Management Repository (OMR): The OCI Database System provides an
option to have nodes on different fault domains but will be on the same availability
domains.
Bastion host (subnet-3): It is required and deployed since both
Enterprise Manager and the repository database are deployed in a private subnet.
The following diagrams capture High Availability deployments in Level-3 mode of
Enterprise Manager. All OMS and OMR Database nodes are active in this configuration:
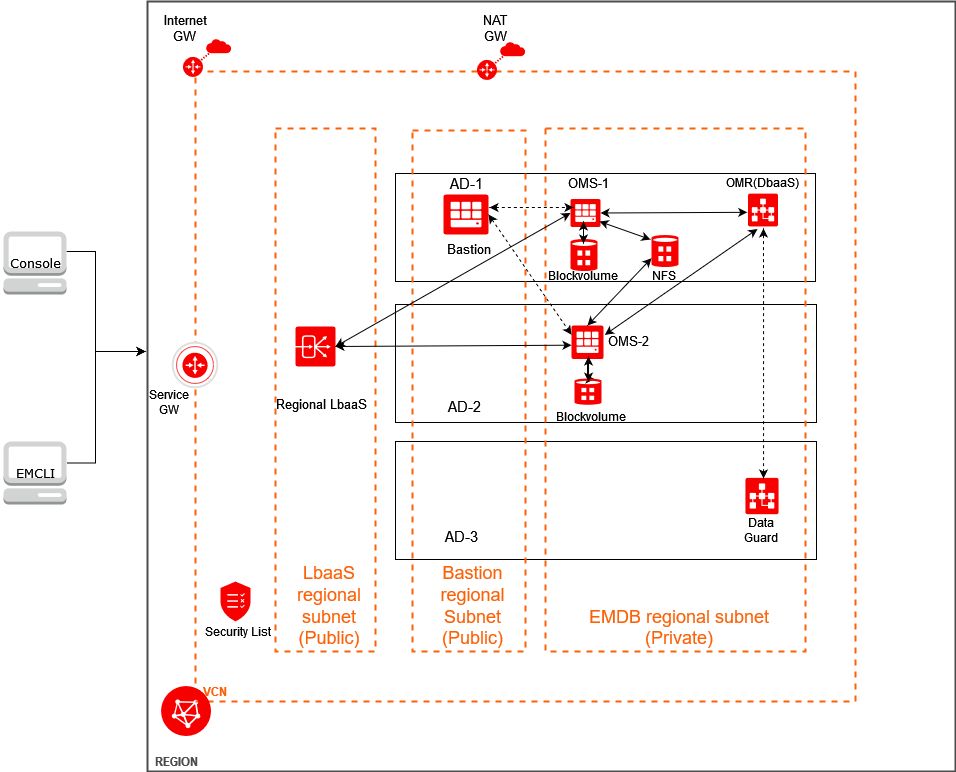
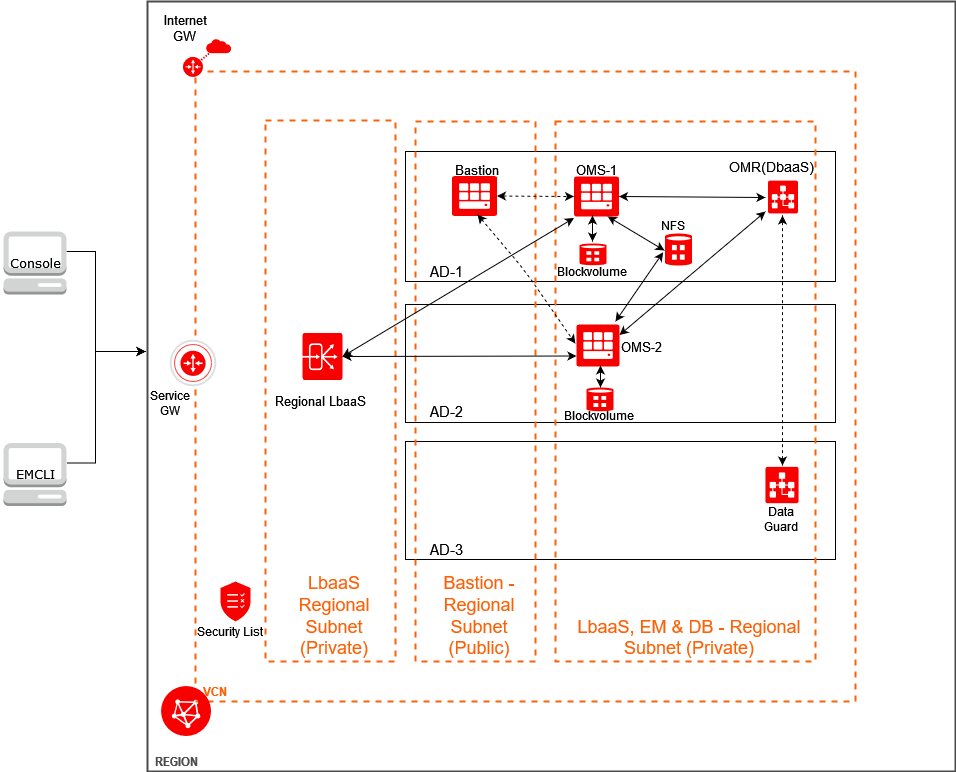
Enterprise Manager and repository database in a private subnet, OCI Load Balancing
service in a public subnet
Option 1 Multi-Node: Enterprise Manager Deployment without reusing existing
subnets
Sign in to OCI and from the OCI Main Menu and navigate to Marketplace. Search and
click on Oracle Enterprise Manager, for easier access you can filter by
Type: Stack.
Review the Oracle Enterprise Manager overview, select the compartment where the
stack will be located. Checkmark the Oracle Standard Terms and Restrictions and click
Launch Stack.
In Edit Stack, select your whether your Terraform configuration source will be a
Folder or Zip File and drag the corresponding option into the assigned space.
Under Stack Information enter the Name and Description for your stack (optional).
The predetermined deployment name is: EnterpriseManager_Deploydate. Click
Next.
Specify the deployment type: Multi-Node, EM Deployment Size: Small,
Medium, Large and Number of OMS Nodes (2). Enter the VCN Network details for the
configuration, OMS details (passwords, shape, storage size), the Oracle Database
System details (password, license, shape, storage), and WebLogic password.
Note: Fields marked with an asterisk (*) are user modifiable. You
should not change fields without an asterisk as this will generate problems during
stack deployment. These fields are only informative.
If you are re-running the stack, in this step enter your current WebLogic password.
Do not enter a new password in this screen. See Enterprise Manager Deployment File Locations for Wallet file location.
At this moment, the stack starts the deployment and the following steps happen in
the background:
Create then VCN (optional, if VCN option is chosen)
Configure the security lists, network security groups, gateways and routing
tables
Create the load balancer
Create the OMS and bastion hosts
Create the RAC database for the Oracle Management Repository (OMR)
Deploy and configure Enterprise Manager
Note: If you are re-running the stack, do not checkmark RUN APPLY.
Instead, click on Save Changes, navigate to Terraform Actions and
click on Apply to begin stack re-deployment.
In the Apply screen the name, plan resolution and tags fields are visible. You can
change the job name and apply any Tags needed. Click Apply to create the OCI
Resources and deploy Enterprise Manager.
The Apply job takes up to 3 hours for Multi-Node. On successful completion of the
job, access to Enterprise Manager can be viewed at the Application
Information tab.
Option 2 Multi-Node: Enterprise Manager and OMR in an existing private subnet,
Load Balancing in an existing public subnet
With this option, you must have an existing VCN with at least one private and one or
two public subnets. If you are missing one of them, you can create it under your
existing VCN. To allow access to the instances in the private subnet, use one public
subnet instance as Bastion. A bastion instance is created during EM Deployment by
default, but if you already have one you can reuse it as well. In addition, you need to
have Internet and Service gateway for connections among OCI instates.
Expected preconfigured components
VCN, for example vcn-template with CIDR 10.0.0.0/16
Internet gateway, for example internet-gateway, with or without Route
Table
Service gateway, for example service-gateway, with All ABC
Services In Oracle Services Network (where ABC is the
abbreviation of your OCI region), with or without Route Table
NAT gateway, for example nat-gateway-ephemeral-public, with or without
Route Table
Route Table, for example:
Route Table Name
Target Type
Destination CIDR Block/Service
Target Internet Gateway
Used in Subnet
route-table-internet-gateway-for-public-subnets
Internet Gateway
0.0.0.0/0
internet-gateway
public-subnet-bastion
route-table-service-gateway-for-private-subnets
Service Gateway
All ABC
                Services In Oracle Services Network
(where
ABC is the abbreviation of your OCI region)
service-gateway
private-subnet-emdb
Existing Private and Public Subnet, for example:
Subnet Name
Subnet Type
IPv4 CIDR Block/th>
Route Table
Subnet Access
private-subnet-emdb
Regional
10.0.1.0/24
route-table-service-gateway-for-private-subnets
Private
public-subnet-loadbalancer
Regional
10.0.3.0/24
route-table-internet-gateway-for-public-subnets
Public
public-subnet-bastion
Regional
10.0.4.0/24
route-table-internet-gateway-for-public-subnets
Public
If there is no bastion, it will be created in the given public subnet. If you want
to re-use an existing bastion, the existing bastion has to be in a re-used VCN
vcn-template vcn-template.
Steps
Sign in to OCI and from the OCI Main Menu and navigate to Marketplace. Search and
click on Oracle Enterprise Manager, for easier access you can filter by
Type: Stack. Description of the illustration
oracle-marketplace.png
Review the Oracle Enterprise Manager overview, select the compartment where the
stack will be located. Check the Oracle Standard Terms and Restrictions and
click Launch Stack.
In Create Stack - 1. Stack information enter the Name and Description for your stack
(optional). The predetermined deployment name is: Oracle Enterprise
Manager-[yyyymmddhhmmss]. Click Next.
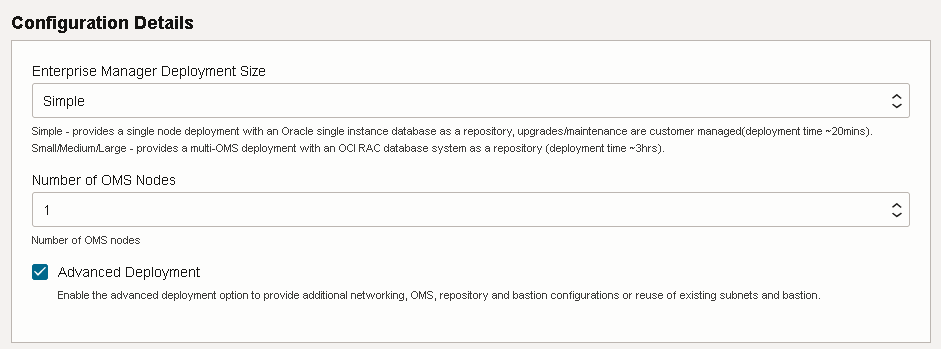
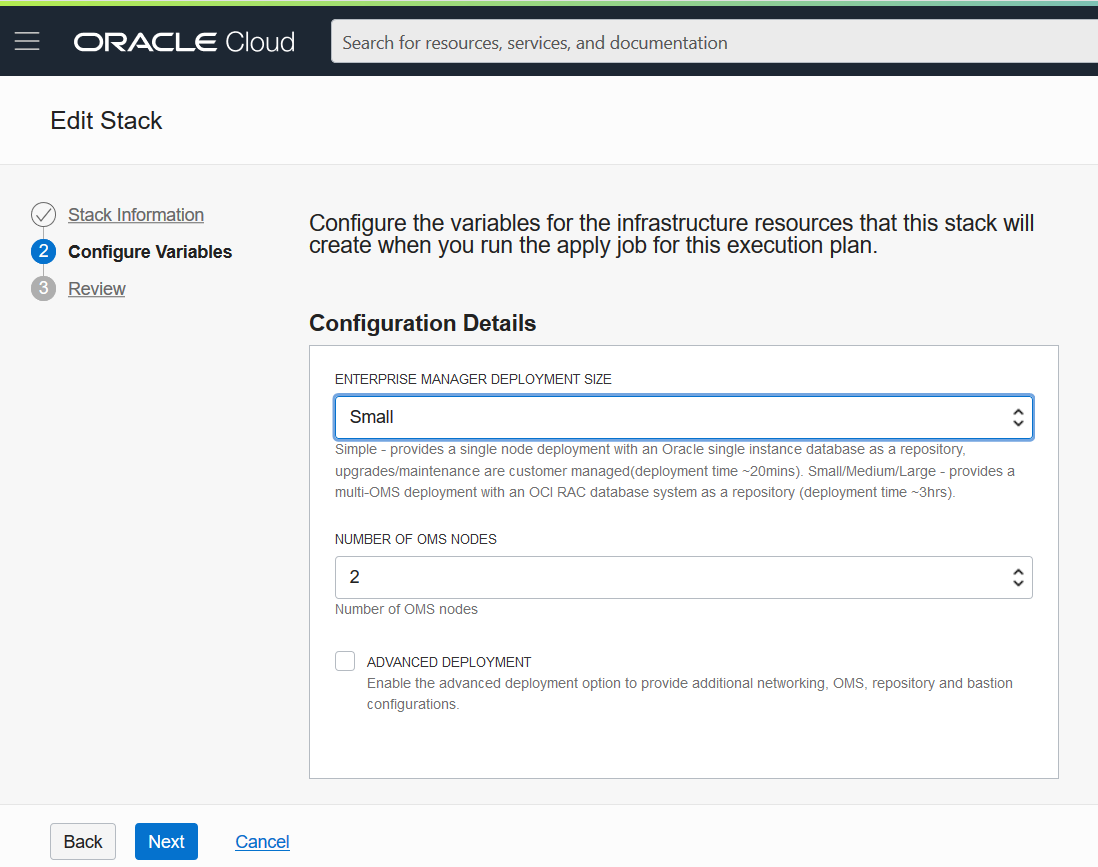
Under Configuration Details, select Small, Medium or
Large for Enterprise Manager Deployment Size and check Advanced
Deployment to allow reuse of existing VCN and subnets. Description of the
illustration advanced_deply.png
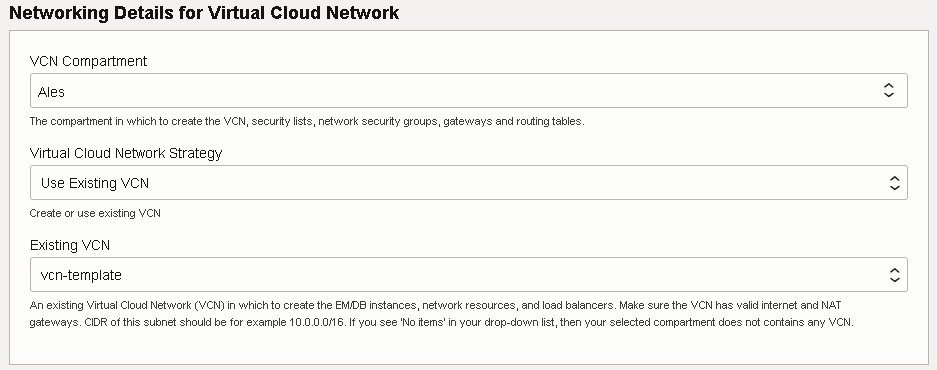
Under Networking Details for Virtual Cloud Network pick your
Compartment, select Use Existing VCN and select your VCN from drop
down menu.
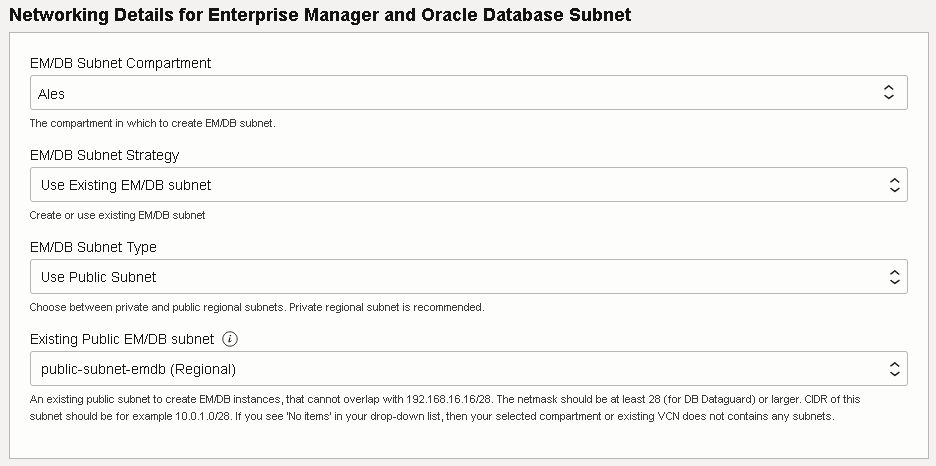
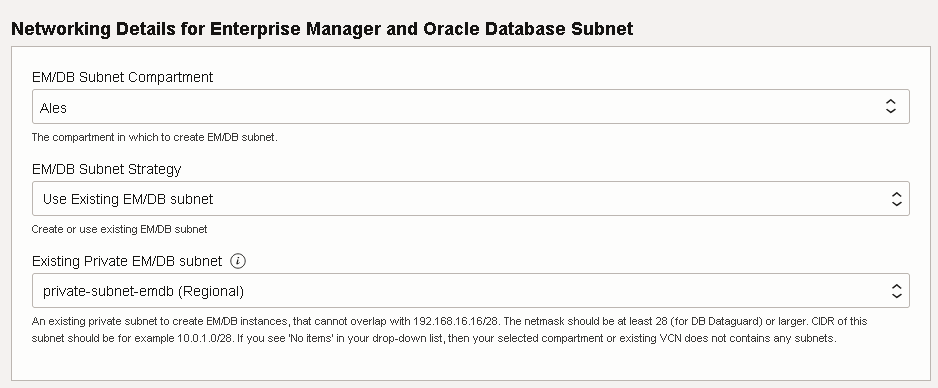
Next, under Networking Details for Enterprise Manager and Oracle Database
Subnet pick the compartment where your existing private subnet exists. In many
cases it will be your VCN compartment. Then, under EM/DB Subnet Strategy select
Use Existing EM/DB subnet and select from drop down menu your existing
private subnet. Description of the illustration networking.png
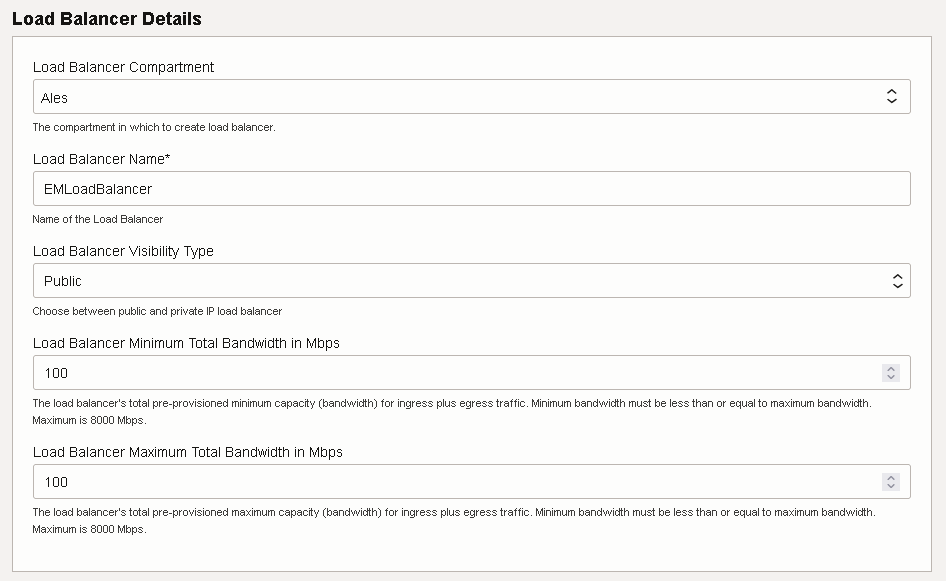
Under Load Balancer Details select the Compartment where the Load Balancer
will be created. In most cases it will be your VCN compartment. Fill the Load
Balancer Name, then select Public for the Load Balancer
Visibility Type. Then, set your desired minimum and maximum bandwidth
capacity for the Load Balancer. Description of the illustration
lb_details.png
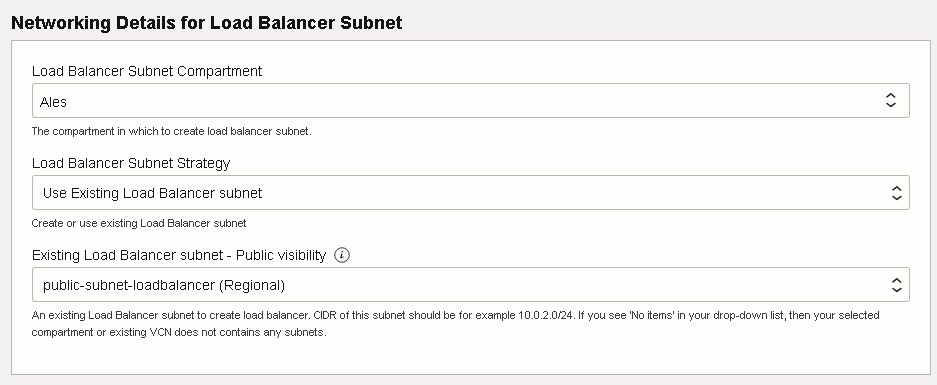
In the section Networking Details for Load Balancer Subnet, pick your
existing public subnet compartment, in most cases this will be your existing VCN
compartment. Then, in Load Balancer Subnet Strategy, select Use Existing
Load Balancer subnet and select your existing public subnet from drop down menu.
Note that Load Balancer public subnet has to be different from the Bastion
public subnet.
In the following section, Oracle Management Server Details, pick the
compartment where you are planing to provision Enterprise Manager, fill Host
name prefix and Passwords, pick the right Shape, Boot
Volume Size, Block Volume Storage Size, Block Volume Elastic
Performance, Shared Storage Compartment, Shared Storage Name, Availability domain
for the primary OMS Node, Availability domain for additional OMS Node and
insert the public SSH key.
In section Repository Database System Details, pick compartment where you are
planing to provision the repository database, fill the DB System Name and
Passwords, fill Database Hostname Prefix and Database Name, pick
the right Type of license for your DB System, pick DB System Instance
Shape, Availabilitydomain and fill Cluster Name and Available storage.
In last section, Bastion Host Details, depending on your Bastion Strategy,
you have two options: you can create a new bastion instance or use an
existing bastion instance. For more details about this, see Bastion Setup.
Click on Next and review the configuration variables entered, check Run
apply and click on Create to initiate stack deployment. At this moment,
the stack starts the deployment and the following steps happen in the background:
Configure the security lists, network security groups and routing tables. Create the
load balancer Create the OMS host Create the RAC database for the Oracle Management
Repository (OMR) Deploy and configure Enterprise Manager
Note: If you are re-running the stack, do not check RUN APPLY.
Instead, click on Save Changes, navigate to Terraform Actions and
click on Apply to begin stack re-deployment.
At this moment, the stack starts the deployment and the following steps happen in
the background:
Configure the security lists, network security groups, gateways and routing
tables; changes in your subnet: a new security list is added to the
private-subnet-emdb subnet
Create the load balancer
Create the OMS and bastion hosts
Create the RAC database for the Oracle Management Repository
Deploy and configure Enterprise Manager
In the Apply screen, note the name, plan resolution and tags fields are
visible. You can change the job name and apply any Tags needed. Click Apply to
create the OCI Resources and deploy Enterprise Manager.
In the Resources section under Jobs you can track the Stack creation
process. These processes will show under the Type column as Apply. The
Apply job takes up to 3 hours for Multi node. On successful completion of the
job, access to Enterprise Manager can be viewed at the Application Information
tab.
Option 3 Multi-Node: Enterprise Manager and OMR in an existing private subnet,
Load Balancing service in an existing private subnet
With this option, you must have an existing VCN with two private and one public
subnets. In case that you are missing one of them, the missing one could be created
under your existing VCN. To allow access to the instances in private subnet we are using
one instance as Bastion, which is in the public subnet. The Bastion instance by default
is created during EM Deployment, but if you already have one you can reuse it as well.
For this case it is optional if your VCN have or does not have an already existing
public subnet. Together with private subnet users need to have Internet and Service
gateway for connections to and among OCI instates.
Expected preconfigured components
VCN, for example vcn-template with CIDR 10.0.0.0/16
Internet gateway, for example internet-gateway, with or without Route
Table
Service gateway, for example service-gateway, with All ABC
Services In Oracle Services Network (where ABC is the
abbreviation of your OCI region), with or without Route Table
NAT gateway, for example nat-gateway-ephemeral-public, with or without
Route Table
Route Table, for example:
Route Table Name
Target Type
Destination CIDR Block/Service
Target Internet Gateway
Used in Subnet
route-table-internet-gateway-for-public-subnets
Internet Gateway
0.0.0.0/0
internet-gateway
public-subnet-bastion
route-table-service-gateway-for-private-subnets
Service Gateway
All ABC
                Services In Oracle Services Network
(where
ABC is the abbreviation of your OCI region)
service-gateway
private-subnet-emdb
Existing Private and Public Subnet, for example:
Subnet Name
Subnet Type
IPv4 CIDR Block/th>
Route Table
Subnet Access
private-subnet-emdb
Regional
10.0.1.0/24
route-table-service-gateway-for-private-subnets
Private
public-subnet-loadbalancer
Regional
10.0.3.0/24
route-table-internet-gateway-for-public-subnets
Private
public-subnet-bastion
Regional
10.0.4.0/24
route-table-internet-gateway-for-public-subnets
Public
If there is no bastion, it will be created in the given public subnet. If you want
to re-use an existing bastion, the existing bastion has to be in a re-used VCN
vcn-template vcn-template.
Steps
Sign in to OCI and from the OCI Main Menu and navigate to Marketplace. Search and
click on Oracle Enterprise Manager, for easier access you can filter by
Type: Stack. Description of the illustration
oracle-marketplace.png
Review the Oracle Enterprise Manager overview, select the compartment where the
stack will be located. Check the Oracle Standard Terms and Restrictions and
click Launch Stack.
In Create Stack - 1. Stack information enter the Name and Description for your stack
(optional). The predetermined deployment name is: Oracle Enterprise
Manager-[yyyymmddhhmmss]. Click Next
Under Configuration Details, select Small, Medium or
Large for Enterprise Manager Deployment Size and check Advanced
Deployment to allow reuse of existing VCN and subnets. Description of the illustration
advanced_deploy.png
Under Networking Details for Virtual Cloud Network pick your
Compartment, select Use Existing VCN and select your VCN from drop
down menu.
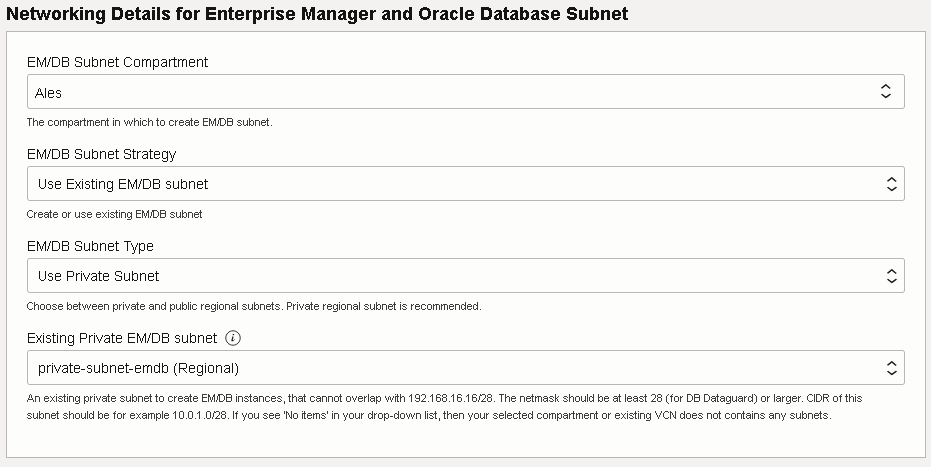
Next, under Networking Details for Enterprise Manager and Oracle Database
Subnet pick the compartment where your existing private subnet exists. In many
cases it will be your VCN compartment. Then, under EM/DB Subnet Strategy select
Use Existing EM/DB subnet and select from drop down menu your existing
private subnet. Description of the illustration
networking.png
In the section Load Balancer Details pick the compartment where the Load
Balancer will be created, in most cases this will be your existing VCN compartment.
Enter the Load Balancer Name, then select Private for the Visibility Type,
and set the desired minimum and maximum bandwidth capacity for Load Balancer.
Description of the illustration
lb_details2.png
Under Networking Details for Load Balancer Subnet pick your existing private
subnet compartment. In many cases this will be will your VCN compartment. Then, select
Use Existing Load Balancer subnet and select your existing private subnet
from the drop down menu. Your Load Balancer private subnet has to be different
from EM/DB private subnet. Description of the illustration
lb_subnet.png
In following section, Oracle Management Server Details pick the compartment
where you are planing to provision Enterprise Manager, fill Host name prefix
and Passwords, pick the right Shape, Boot Volume Size, Block Volume
Storage Size, Block Volume Elastic Performance, Shared Storage Compartment, Shared
Storage Name, Availability domain for primary OMS Node, Availability
domain for additional OMS Node and insert the public SSH
key.
In the section Repository Database System Details, pick the Compartment where
you are planing to provision the repository database, fill DB System Name
and Passwords, fill Database Hostname Prefix and
Database Name, pick the right Type of license for DB System, pick DB
System Instance Shape, Availability domain and fill Cluster Name
and Available storage.
In last section, Bastion Host Details, depending on your Bastion Strategy you
have two options: you can create a new Bastion instance or use existing
bastion instance. For more details about this, see Bastion
Setup.
Click Next and Review the configuration variables entered, check Run
apply and click on Create to initiate stack deployment. At this moment, the
stack starts the deployment and the following steps happen in the background:
Configure the security lists, network security groups and routing tables; a new
security list is added into the private-subnet-emdb subnet
Adding route rule from new Load Balancer to existing NAT Gateway in
route-table-service-gateway-for-private-subnets that is used in
private-subnet-emdb subnet
Create the load balancer
Create the OMS host
Create the RAC database for the Oracle Management Repository (OMR)
Deploy and configure Enterprise Manager
Note: If you are re-running the stack, do not checkmark RUN
APPLY. Instead, click on Save Changes, navigate to Terraform
Actions and click on Apply to begin stack re-deployment.
In the Apply screen the name, plan resolution and tags fields are visible. You
can change the job name and apply any Tags needed. Click Apply to create the
OCI Resources and deploy Enterprise Manager.
In the Resources section, under Jobs, you can track the Stack creation
process. These processes will show under the Type column as Apply.
The Apply job takes up to 3 hours for Multi node. On successful completion of the
job, access to Enterprise Manager can be viewed at the Application Information tab
Advanced configuration of an existing VCN
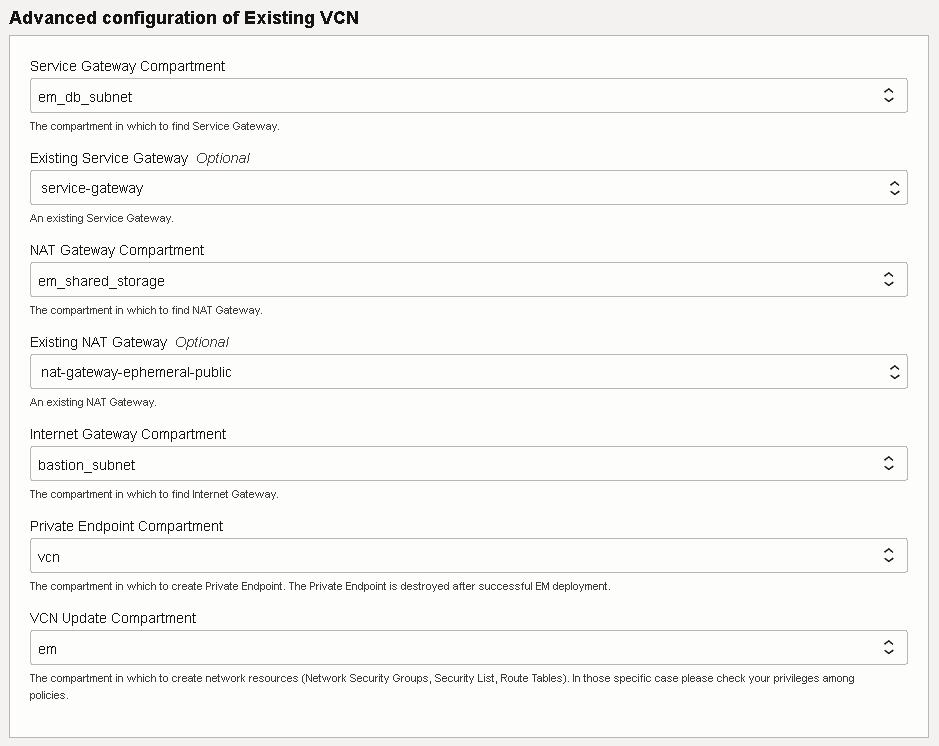
In specific cases, in the multi-node configurations, options 2 and 3 above, you can enable the advanced configuration of an existing VCN. After enabling this option, all stack parameters have to be defined from top to bottom due to mutual dependencies. This advanced configuration of an existing VCN should be the last step before deploying Enterprise Manager. This option applies to cases where your Service or NAT or Internet Gateway are not in the same compartment as the existing VCN. Or, it can be used in situations where you are not able to create network resources (Private Endpoint, Network Security Groups, Security List, Route Tables) in the same compartment as the existing VCN. In this specific case, check your policies privileges. The following screenshot shows all possible values. Also, note that the number of values you can configure is based on the previous stack configuration.
Review and make a note of the following ports that Enterprise Manager on OCI will
use:
Component
Service
Source Port Range
Destination Port for Multi-Node
Description
Bastion
SSH
"0.0.0.0/0"
TCP/22
Connecting to EM Console via Bastion SSH tunnel (Not needed if
Load Balancer is public): ssh [-i private_key] -L
localhost:5443:LBaaS_Private_IP:443
opc@bastion_public_ip Connecting to OMS/DB nodes: ssh -i private_key opc@oms/db privateip -o
"proxycommand ssh -W %h:%p -i private_key
opc@bastionhost"
Note: Port 22 needs to be enabled for the bastion host to reach the EM
console or the database in private subnets. If you are unable, you will need
to enable the OCI IP ranges available here: Public IP Addresses for VCNs
Load Balancer
Console
Public Load Balancer: "0.0.0.0/0" Private Load Balancer:
VCN CIDR
TCP/443
Load Balancer
WebLogic Console
Public Load Balancer: "0.0.0.0/0" Private Load Balancer:
VCN CIDR
TCP/7101
Load Balancer
Agent Upload
Public Load Balancer: "0.0.0.0/0" Private Load Balancer:
VCN CIDR
TCP/4900
Load Balancer
Java Virtual Machine Diagnostics (JVMD)
Public Load Balancer: "0.0.0.0/0" Private Load Balancer:
VCN CIDR
TCP/7301
Enterprise Manager
SSH
Bastion & EMDB subnet CIDR
TCP/22
Enterprise Manager
Console
VCN CIDR
TCP/7799
EMCLI will also be routed via Load Balancer.
Enterprise Manager
Admin Server
EMDB subnet CIDR
TCP/7101
Enterprise Manager
Node Manager
EMDB subnet CIDR
TCP/7401
Enterprise Manager
Managed Server / JVMD
Load Balancer and EMDB subnet CIDR
TCP/7301
Enterprise Manager
Agent Upload
VCN CIDR
TCP/4900
Enterprise Manager
Agent Listen (OMS and Database Nodes)
EMDB subnet CIDR
TCP/3872
Database
DB Listener
EMDB subnet CIDR
TCP/1521
Database
DB Nodes
Bastion and EMDB subnet CIDR
TCP/22
Database
DB Nodes (ONS/FanManager)
EMDB subnet CIDR
TCP/6200
NFS
NFS Service
EMDB subnet CIDR
UDP/111 UDP/2048 TCP/111 TCP/2048-2050
A Backup must be taken immediately after installation and at regular daily or weekly
intervals. Enterprise Manager deployments are done on a block volume, and OMR is
deployed on an OCI Database. For more information and detailed instructions see Overview of Block Volume Backups and Backing Up a Database. Shared storage for the software
library is handled via NFS, this allows for storage that is inherently redundant with
resilient data protection from OCI and can be excluded from the backups.
IMPORTANT:
If the SSH keys for logging into the bastion, OMS or Database system needs to be
rotated, DO NOT overwrite other public keys in the
authorized_keys file that is used by stack. If these keys are flashed
these keys OMR will lose access, only rotate public keys owned by end user.
If a private subnet is used for Load balancers, access to the console URL will be
using a tunnel running on the bastion host.
The CIDR of the new regional private subnet to create the Enterprise Manager and
Database instances should not overlap with 192.168.16.16/28. Also, the
netmask should be at least 28 or larger. Example: 10.0.1.0/28. For more
information see Network Setup for DB Systems.
Steps to Enable Data Guard
This is an optional step available from stack 1.2 onward for Multi-Node deployments
that require Data Guard or if a High Availability deployment is being configured. Only
enable Data Guard from the stack setup when deploying Oracle Enterprise Manager 13.5 on
Oracle Cloud Infrastructure to avoid configuration errors. To enable, follow these
steps:
During step two of the stack configuration, Configure Variables, at the end
of the Repository Database System Details section, select the Enable Data
Guard for Management Repository checkbox.
Note: The Data Guard checkbox and all Data Guard fields marked
with * are user editable and can be edited after deployment by
re-running the stack with the new parameters.
Once the Data Guard Configuration fields have activated enter the following
information into its respective field:
Data Guard DB System Name: The name of the Data Guard Database
system.
Select an Availability Domain for the Data Guard: The availability domain
for the Data Guard database nodes, we recommended you choose a different
availability domain than the primary database system.
Data Guard DB System Instance Shape: The shape for the two DB system
instances for Data Guard. For more information see Perform
Prerequisites for a complete table listing of supported shapes by deployment
size.
Data Guard Database Hostname Prefix: The Database Hostname Prefix.
We recommend once Data Guard is set up, you log into Enterprise Manager and verify
that both Databases appear Up and properly labelled as Primary and
Data Guard.
IMPORTANT:
During a Switchover or Failover, Enterprise Manager
availability will see a less than 5-minute service interruption while the switching from
primary to Data Guard occurs. For more information using Data Guard, including To
perform a database switchover and To perform a database failover see Using Oracle Data Guard.
Enterprise Manager Deployment File Locations
OMS: /u01/app/oracle/em/middleware_135 and
/u01/app/oracle/em/gc_inst_135
Host name prefix vs. host name: You can define a host name prefix in the stack definition when Advanced Deployment is enabled. The host name prefix is the host display name prefix for the Oracle Management Server nodes (prefix for the OCI instance name). This means that the name of this field will be used as the name of the OCI instance where EM will be running. For a single node, this name is used as it is. For Multi-Node, the prefix is followed by 1 or 2, to distinguish between the EM nodes. Do not confuse this instance name with the actual name of the host, which is always oms1 and oms2 for Multi-Node. For single node, the default is oms1. It can be changed only for single node.
Errors will be written in the log file and can be located within the Oracle Resource
Manager and can be accessed by navigating to Resources and click on
Logs.
For further information on viewing and accessing logs, see To view the log job in Managing Stacks and Jobs under
Using the Console.
If you experience Resource Availability error, verify that your Service
Limits are set correctly. For more information on Service Limits including: Viewing
Your Service Limits, Quotas, and Usage; see About Service Limits and Usage.
OMS Node and Host: Error: Service error:LimitExceeded. The following service limits were exceeded:
shape-count Check the limits for Compute service in
the specific compartment and availability domain. Description: Chosen load balancer
bandwidth.
Load Balancer: Error: Service error:LimitExceeded. The limit for this tenancy has been
exceeded Check the limits for the Load Balancer service in the
specific compartment and region. Description: Chosen compute shape.
File Storage or Mount Target: Error: Service error:LimitExceeded. The mount target limit for this availability
domain has been exceeded Check the limits for File Storage
service in the specific compartment and availability domain. Description: Mount Target
Count.
Database System: Error: Service error:LimitExceeded. You have reached your service limit of
XX Virtual Machine CPU Cores in this Availability Domain.
Check the limits for the Database service in the specific compartment and
availability domain. Description: VM.Standard2 OCPU Count.
Terraform Actions: Error: Unsupported Terraform Core version when performing actions like
Plan, Apply, Import State and Destroy on a stack created using Oracle Enterprise
Manager 13.5-BP1-1.0, see MOS note 2672961.1.
Required IAM Policies Error: 404-NotAuthorizedOrNotFound, Authorization failed or requested resource not found.
This error occurs if you do not have sufficient privileges. To resolve this issue, create a group OEM_ADMINS with these policies: Allow group OEM_ADMINS to manage orm-stacks in compartment ABC_COMPARTMENT
Allow group OEM_ADMINS to manage orm-jobs in compartment ABC_COMPARTMENT
Allow group OEM_ADMINS to manage orm-private-endpoints in compartment ABC_COMPARTMENT
Allow group OEM_ADMINS to manage virtual-network-family in compartment ABC_COMPARTMENT
Allow group OEM_ADMINS to manage internet-gateways in compartment ABC_COMPARTMENT
Allow group OEM_ADMINS to manage security-lists in compartment ABC_COMPARTMENT
Allow group OEM_ADMINS to manage route-tables in compartment ABC_COMPARTMENT
Allow group OEM_ADMINS to manage dhcp-options in compartment ABC_COMPARTMENT
Allow group OEM_ADMINS to manage vcns in compartment ABC_COMPARTMENT
Allow group OEM_ADMINS to manage VNICs in compartment ABC_COMPARTMENT
Allow group OEM_ADMINS to manage network-security-groups in compartment ABC_COMPARTMENT
Allow group OEM_ADMINS to manage load-balancers in compartment ABC_COMPARTMENT
Allow group OEM_ADMINS to manage instances in compartment ABC_COMPARTMENT
Allow group OEM_ADMINS to manage instance-family in compartment ABC_COMPARTMENT
Allow group OEM_ADMINS to manage volume-family in compartment ABC_COMPARTMENT
Allow group OEM_ADMINS to manage file-family in compartment ABC_COMPARTMENT
Allow group OEM_ADMINS to manage database-family in compartment ABC_COMPARTMENT
Allow group OEM_ADMINS to manage autonomous-database-family in compartment ABC_COMPARTMENT
Allow group OEM_ADMINS to manage secret-family in compartment ABC_COMPARTMENT
If the policy Allow group OEM_ADMINS to manage orm-stacks in compartment ABC_COMPARTMENT grants excessive permissions within your tenancy, use more specific policies such as: Allow group OEM_ADMINS to use orm-stacks in compartment ABC_COMPARTMENT
Allow group OEM_ADMINS to ORM_STACK_CREATE orm-stacks in compartment ABC_COMPARTMENT
Allow group OEM_ADMINS to ORM_STACK_UPDATE orm-stacks in compartment ABC_COMPARTMENT
RAC database instance might not have access to the applicable regional Oracle YUM
server, impacting functionality of the YUM tool. For more information on
troubleshooting the YUM tool see Known Issues YUM. We have not seen this happen with OMR node YUM
deployments.
If you notice that your Pluggable Databases appear as down, or the database charts
are not displayed in the home page, delete and re-discover the cluster database
target. This will automatically clean up and re-discover the related targets. See Discovering and Adding Database Targets for more details.
Bastion host deployment failure Error: timeout - last error: dial tcp
:22: i/o timeout when attempting to deploy
Enterprise Manager on an existing VCN: To resolve, add 0.0.0.0/0 for port
22 on the VCN's default security list. This entry can be replaced with the bastion
host IP after the deployment is complete. If the default security list cannot be
edited, add the IP CIDR ranges for the region the instance is provisioned from. Add
OCI and OSN IP CIDRs on the security list and allow port 22 for each CIDR. The IP
ranges are listed in: IP Range JSON.
In the case of Multi-Node, the Load Balancer service is created with a self-signed certificate valid for 5 years. To renew the certificate after 5 years, follow these instructions: Updating an Expiring Load Balancer Certificate.
Use Oracle Enterprise Manager
Oracle Enterprise Manager can be used to monitor and manage on-premises or cloud
resources like database systems or Fusion Middleware targets. Monitoring can be done
using local Cloud Control Agents.
For details on getting started with monitoring various targets, review the following
resources:
To deploy agents on your hosts, add the following entry in the
/etc/hosts file of the host or VM instance where the target is running:
$ oms1 <private IP address of the EM VM>
$ oms2 <private IP address of the EM VM>
To enable Hybrid Cloud, navigate to Setup, Extensibility, select
Plug-ins and then enable the following plug-ins:
Oracle Virtualization (oracle.sysman.vt)
Cloud Services Management (oracle.sysman.csm)
Oracle Cloud Application (oracle.sysman.ssa)
You can access the Hybrid Cloud section located under Setup. To
learn more about Hybrid Cloud, including setup and discovering targets, see Hybrid Cloud Management in Oracle Enterprise Manager Cloud
Control Advanced Installation and Configuration Guide.