Before You Begin
This tutorial shows you how to set up Exadata Warehouse through Oracle Enterprise Manager such that it serves as a repository for fine-grained performance metric data collected from on-premises and cloud-based Oracle Engineered Systems like Exadata Database Machine and Zero Data Loss Recovery Appliance (ZDLRA). It provides a platform for long-term retention of fine-grained historical and forecast data for performance and capacity analysis and planning.
Background
The following image illustrates how data flows into the Exadata Warehouse after the configuration is complete:
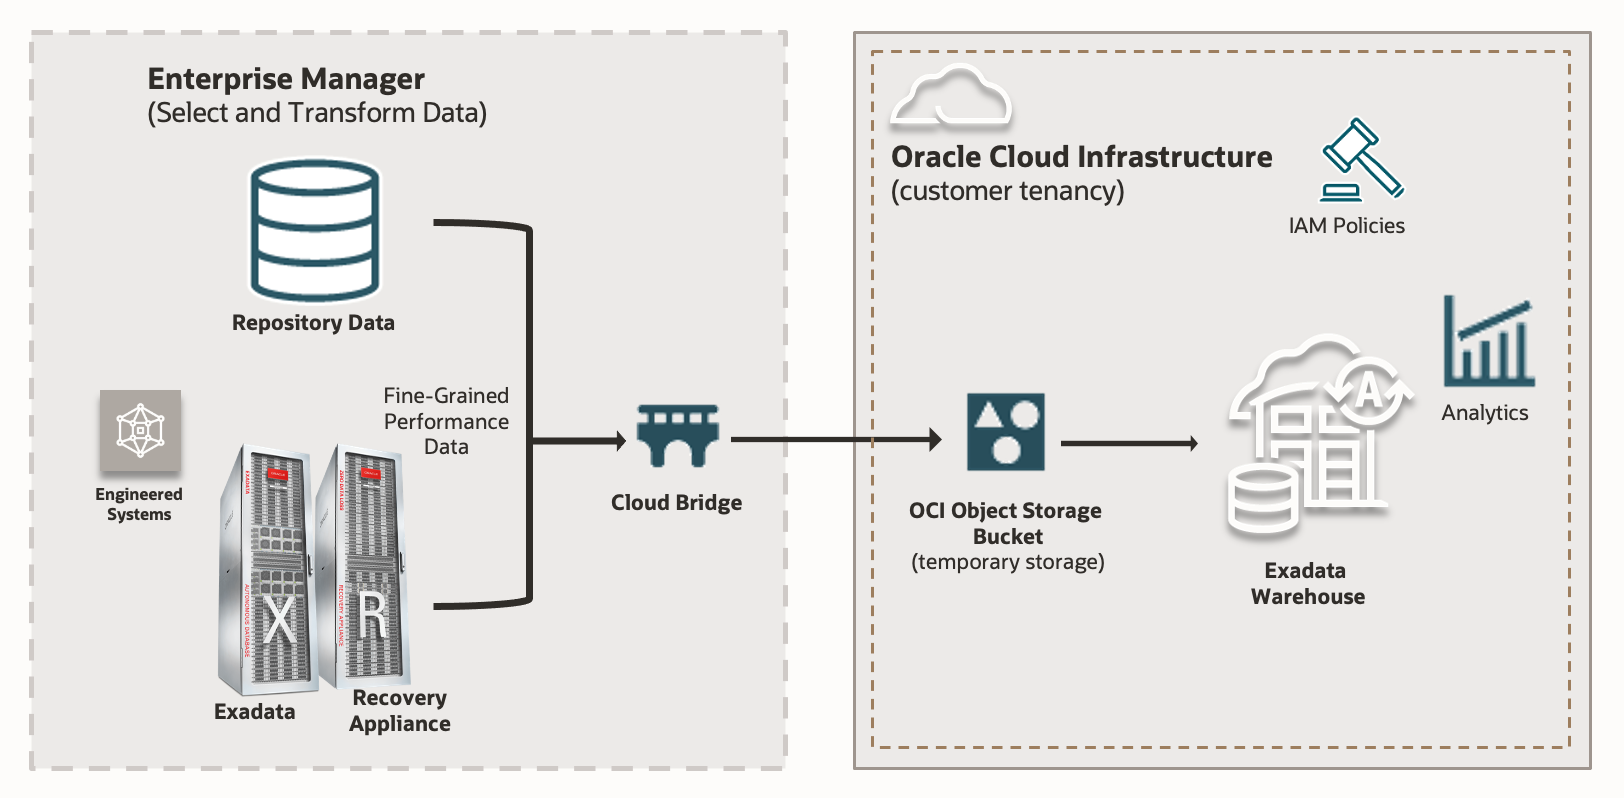
Typically, fine-grained data from Exadata components, like storage servers and compute servers, are uploaded to an Autonomous Database. The Exadata Warehouse generates periodic forecasts based on historical data, which are available for queries and export. Older forecast data points are retained for easy comparison.
Since the Exadata Warehouse resides in an Autonomous Database that you specify, the data uploaded to the Exadata Warehouse can be accessed even after data uploads for the Exadata systems have been paused or terminated.
What Do You Need?
You'll need the following set up ready before we can perform the core tasks pertaining to Exadata Database Machines, Recovery Appliances, and Exadata Warehouse:
- EM Side: Configure software library in Enterprise Manager (EM).
- Set up OCI service connectivity.
- OCI Side: Ensure an OCI Object Storage Bucket has already been created
- EM Side: Define a Global Named Credential in Enterprise Manager for OCI
- EM Side: Define a Host Preferred Credentials for all Database Machine Monitoring Agent hosts and OMS host
- EM Side: Set up an exclusive Enterprise Manager Super Administrator user for the Enterprise Manager login
- EM Side: Create an Enterprise Manager group containing the targets for which you want data exported
- OCI Side: Set up the requisite OCI Policies needed for Enterprise Manager to push data into Object Storage
- OCI Side: Provision Autonomous Data Warehouse (ADW) and create an Analytics User to hold the Analytics Schema.
- EM Side: Discover the ADW on EM.
- EM Side: If you are using CellCLI to monitor the database machine storage servers, then we recommend that you switch to using REST API for monitoring.
Step 1: Configure Software Library
Configure software library in Enterprise Manager (EM). Technically, it is a repository that stores software entities such as software patches, virtual appliance images, reference gold images, application software, and their associated directive scripts. In addition to storing them, it also enables you to maintain versions, maturity levels, and states of these software entities.
Tip:
If you are already using EM, then it is likely that the software library is already configured on your EM.Add a storage location to your local host to upload files for Software Library entities. See Configuring an OMS Shared File system Locations in Oracle Enterprise Manager Administrator's Guide.
Step 2: Create OCI Resources
Create an OCI Object Storage Bucket
Exported target data is stored in an OCI Object Storage bucket where it can be accessed by an OCI service. The collected target data is first transferred to an OCI Object Storage Bucket before it is loaded into Autonomous Data Warehouse. To ensure proper setup of OCI connectivity, make sure that the bucket is created with private visibility. Make note of the OCID of the OCI tenancy, User OCID, Public Key Fingerprint, Private Key and Region.
See Required Keys and OCIDs in Oracle Cloud Infrastructure Documentation.
Create IAM Policies in OCI for Access Management
Set up the requisite OCI Policies needed for Enterprise Manager to push data into Object Storage.
See Let Object Storage admins manage buckets and objects in Oracle Cloud Infrastructure Documentation.
Additionally, include the following policy statement in order for the OCI user to have MANAGE permission to use the Exadata Warehouse:
allow group user_group to manage opsi-warehouses in tenancy
Replace user_group in the above policy statement with the right user group in OCI.
Step 3: Provision Autonomous Data Warehouse
The Exadata Warehouse analytics service requires an Autonomous Data Warehouse (Shared or Dedicated) as the repository for the collected analytics data. Autonomous Data Warehouse must be provisioned in the same region as the Object Storage Bucket and must have access to the Object Storage Bucket created in the prior step.
See Autonomous Data Warehouse.
Create an Analytics User Schema on ADW
Create a new analytics user schema on the ADW by running this script on the SQL Manager. Provide the right user name and password which will also be used later when creating database credential on EM.
Step 4: Use REST API for Monitoring Storage Servers
If you are using CellCLI to monitor the database machine storage servers, then we recommend that you switch to using REST API for monitoring. See Switch from Using CellCLI to REST API in Oracle Exadata Database Machine Getting Started Guide.
Create REST API User for Storage and Compute nodes
- Create REST API USER for compute nodes
SSH to the compute nodes as the root user. Run the following commands:
dbmcli -e 'CREATE ROLE monitor;  GRANT PRIVILEGE list ON ALL OBJECTS ALL ATTRIBUTES WITH ALL OPTIONS TO ROLE monitor;'
dbmcli -e 'create user restapi_user password=your_password';
dbmcli -e 'grant role monitor to user restapi_user';
- Create REST API User for Storage Servers
Note:
This step is only needed if the Storage Servers are not already monitored by REST API.SSH to the storage server as the root user. Run the following commands:
cellcli -e 'CREATE ROLE monitor;  GRANT PRIVILEGE list ON ALL OBJECTS ALL ATTRIBUTES WITH ALL OPTIONS TO ROLE monitor;'
cellcli -e 'create user restapi_user password=your_password';
cellcli -e 'grant role monitor to user restapi_user';
Step 5: Create Credentials and Users
Before setting up the Exadata Warehouse, you must create the following credentials. From EM Console, click Setup, and click Security:
- Autonomous Data Warehouse credential:
Under Security, click Named Credentials. Create a new named credential with the same credentials as the analytics user for the ADW schema.
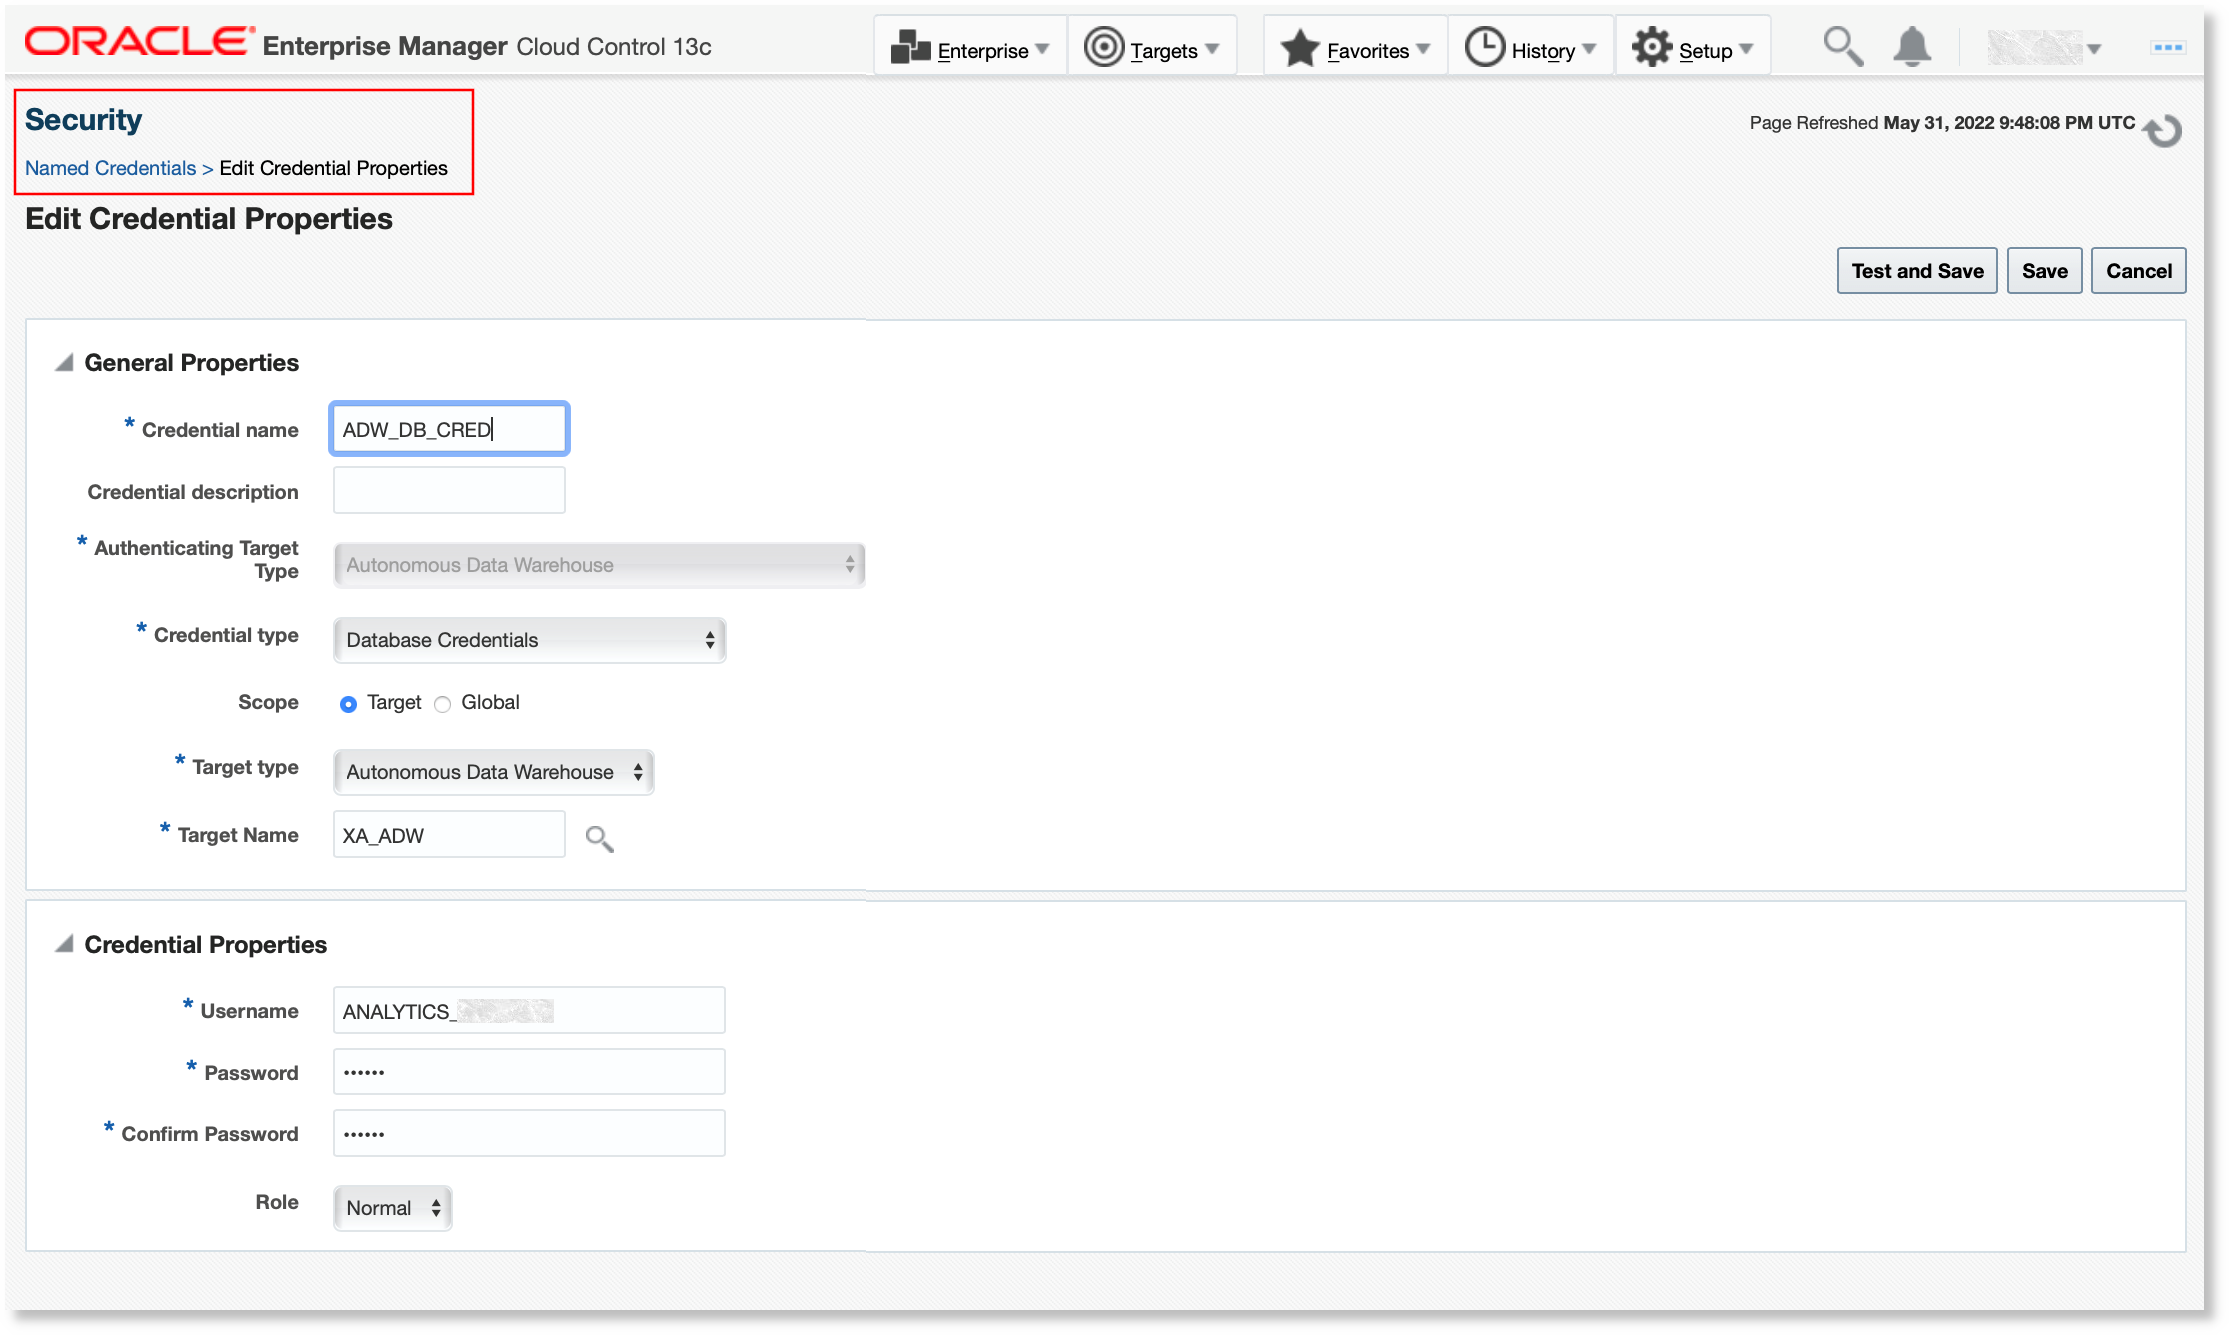
Description of the illustration create_db_cred_for_adw.png Note:
If necessary, you can specify the scope as Global to use the same set of credentials with other targets. - Monitoring credentials for storage servers:
Under Security, click Monitoring Credentials and select Oracle Exadata Storage Server.
Set REST API credentials for the credential set Exadata Monitoring Credential for ExaCLI or REST API with the same credential as REST API credential set for storage server.
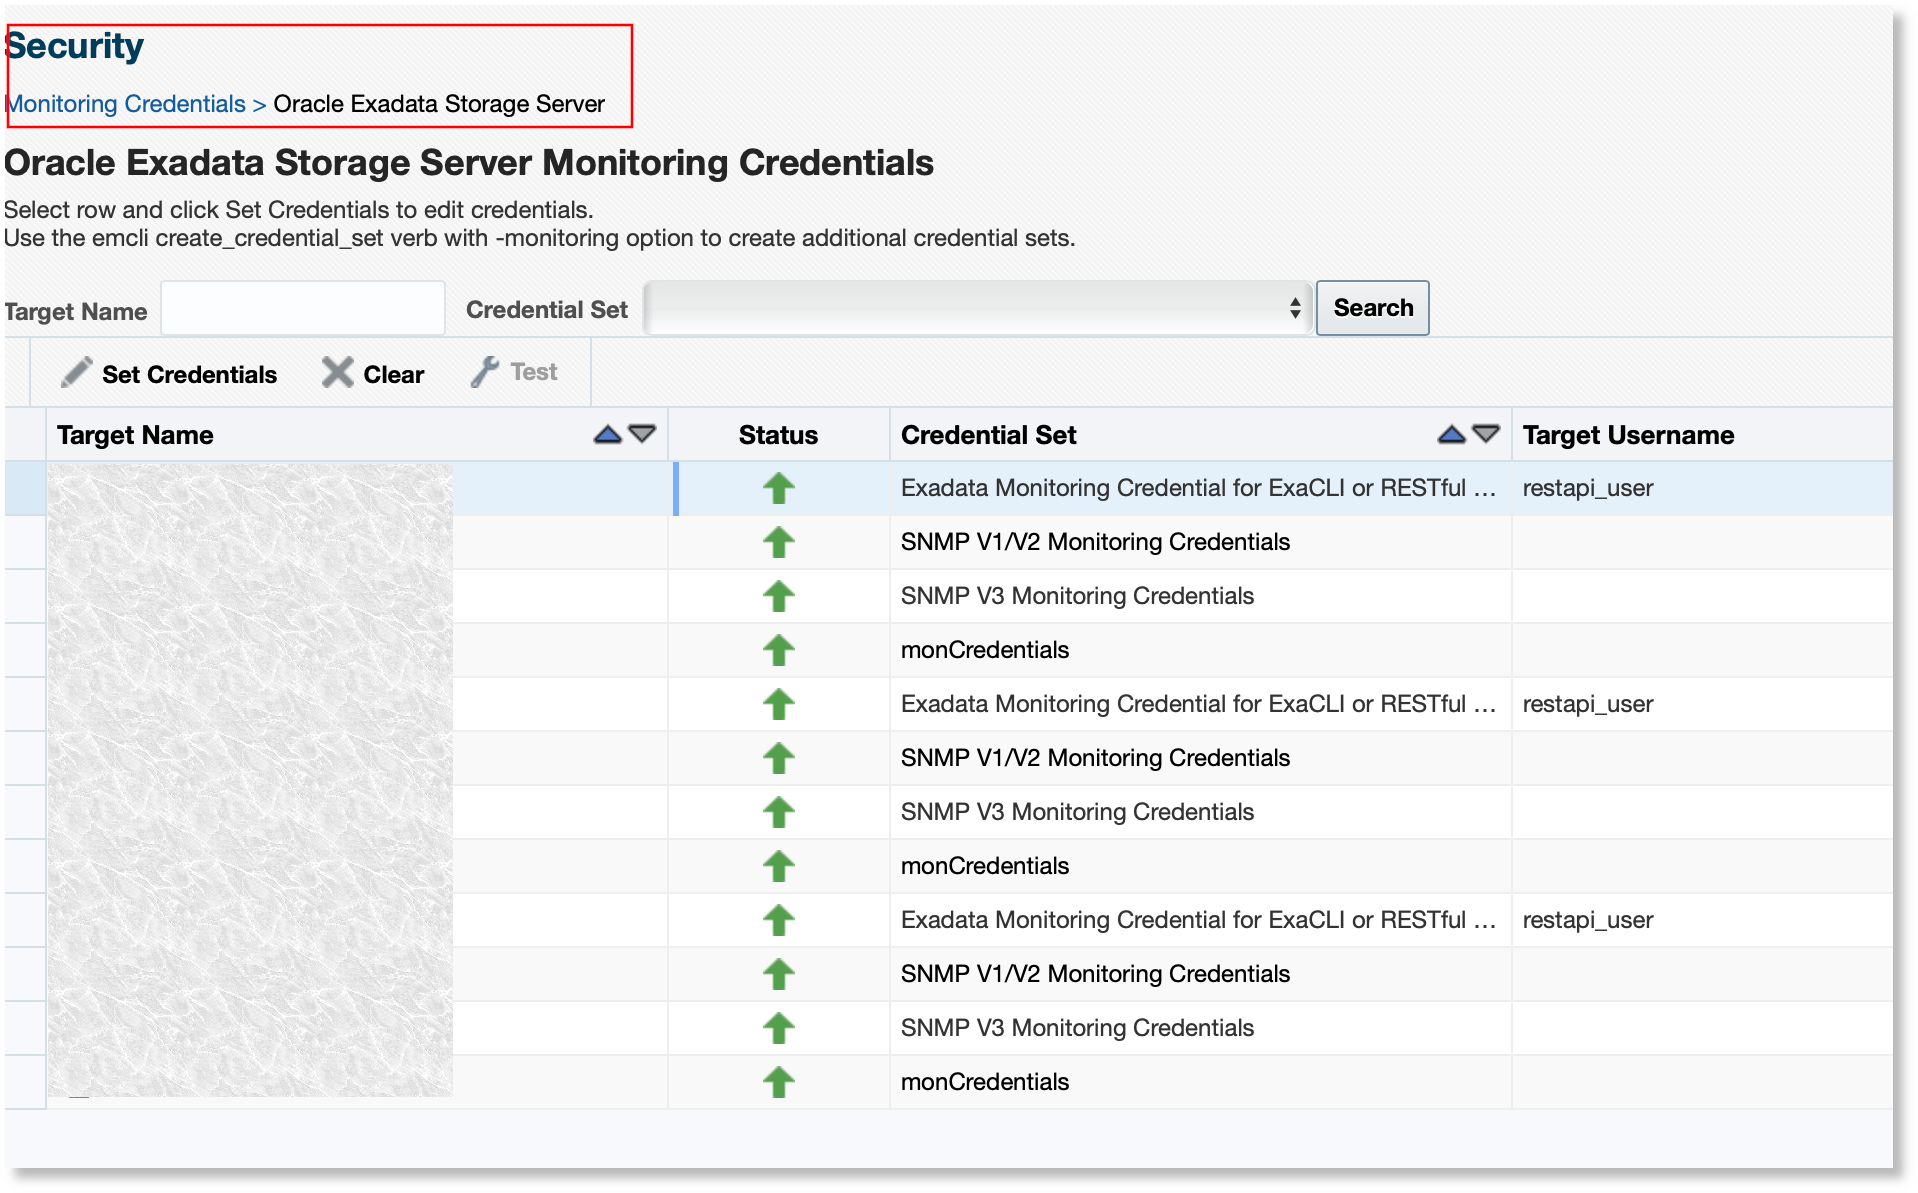
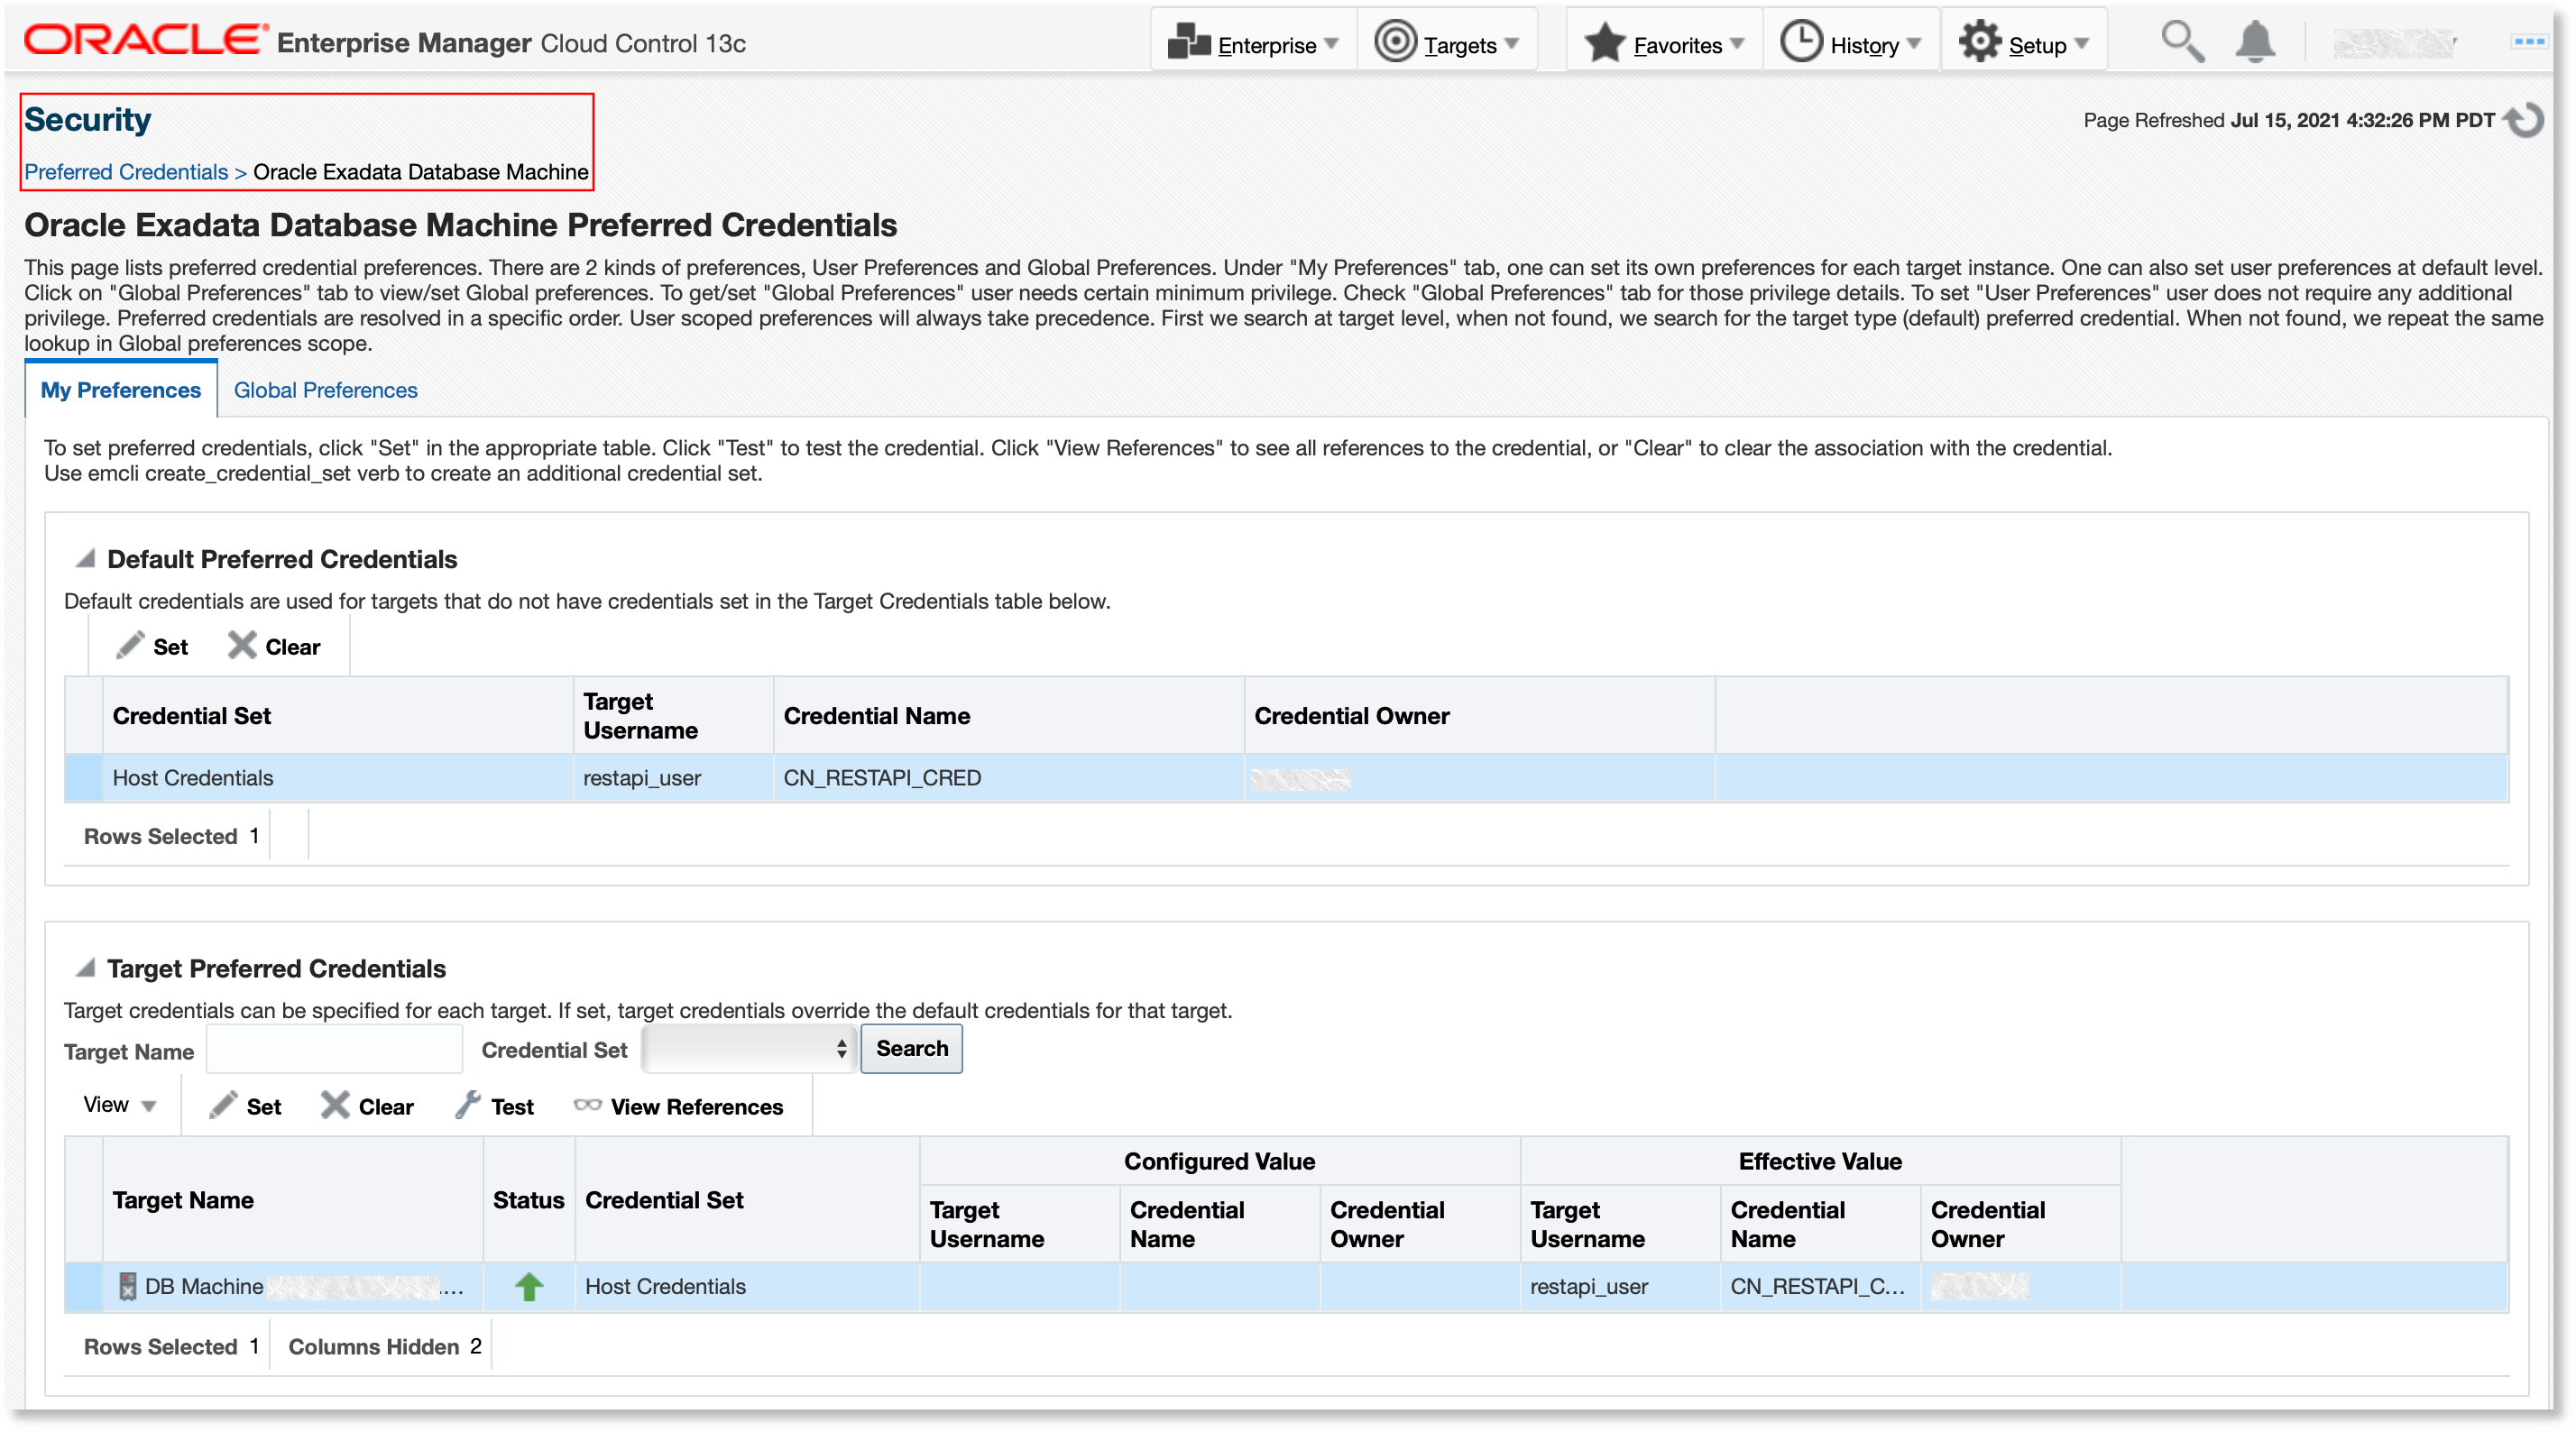
Description of the illustration monitoring_cred_storage_server.png - Preferred credential for the Database Machine:
Under Security, click Preferred Credentials and select Oracle Exadata Database Machine.
Create a preferred host credential with corresponding REST API credentials for the database machine target, using the same credential as REST API credentials created for the compute nodes.
Description of the illustration pref_cred_DB_machine.png - Preferred host credentials for compute node agent hosts and OMS hosts:
Under Security, click Preferred Credentials and select Host.
Set Normal Host Credential and Privileged Host Credential (REST API credential used for compute node).
For the OMS host, set credentials of the user.
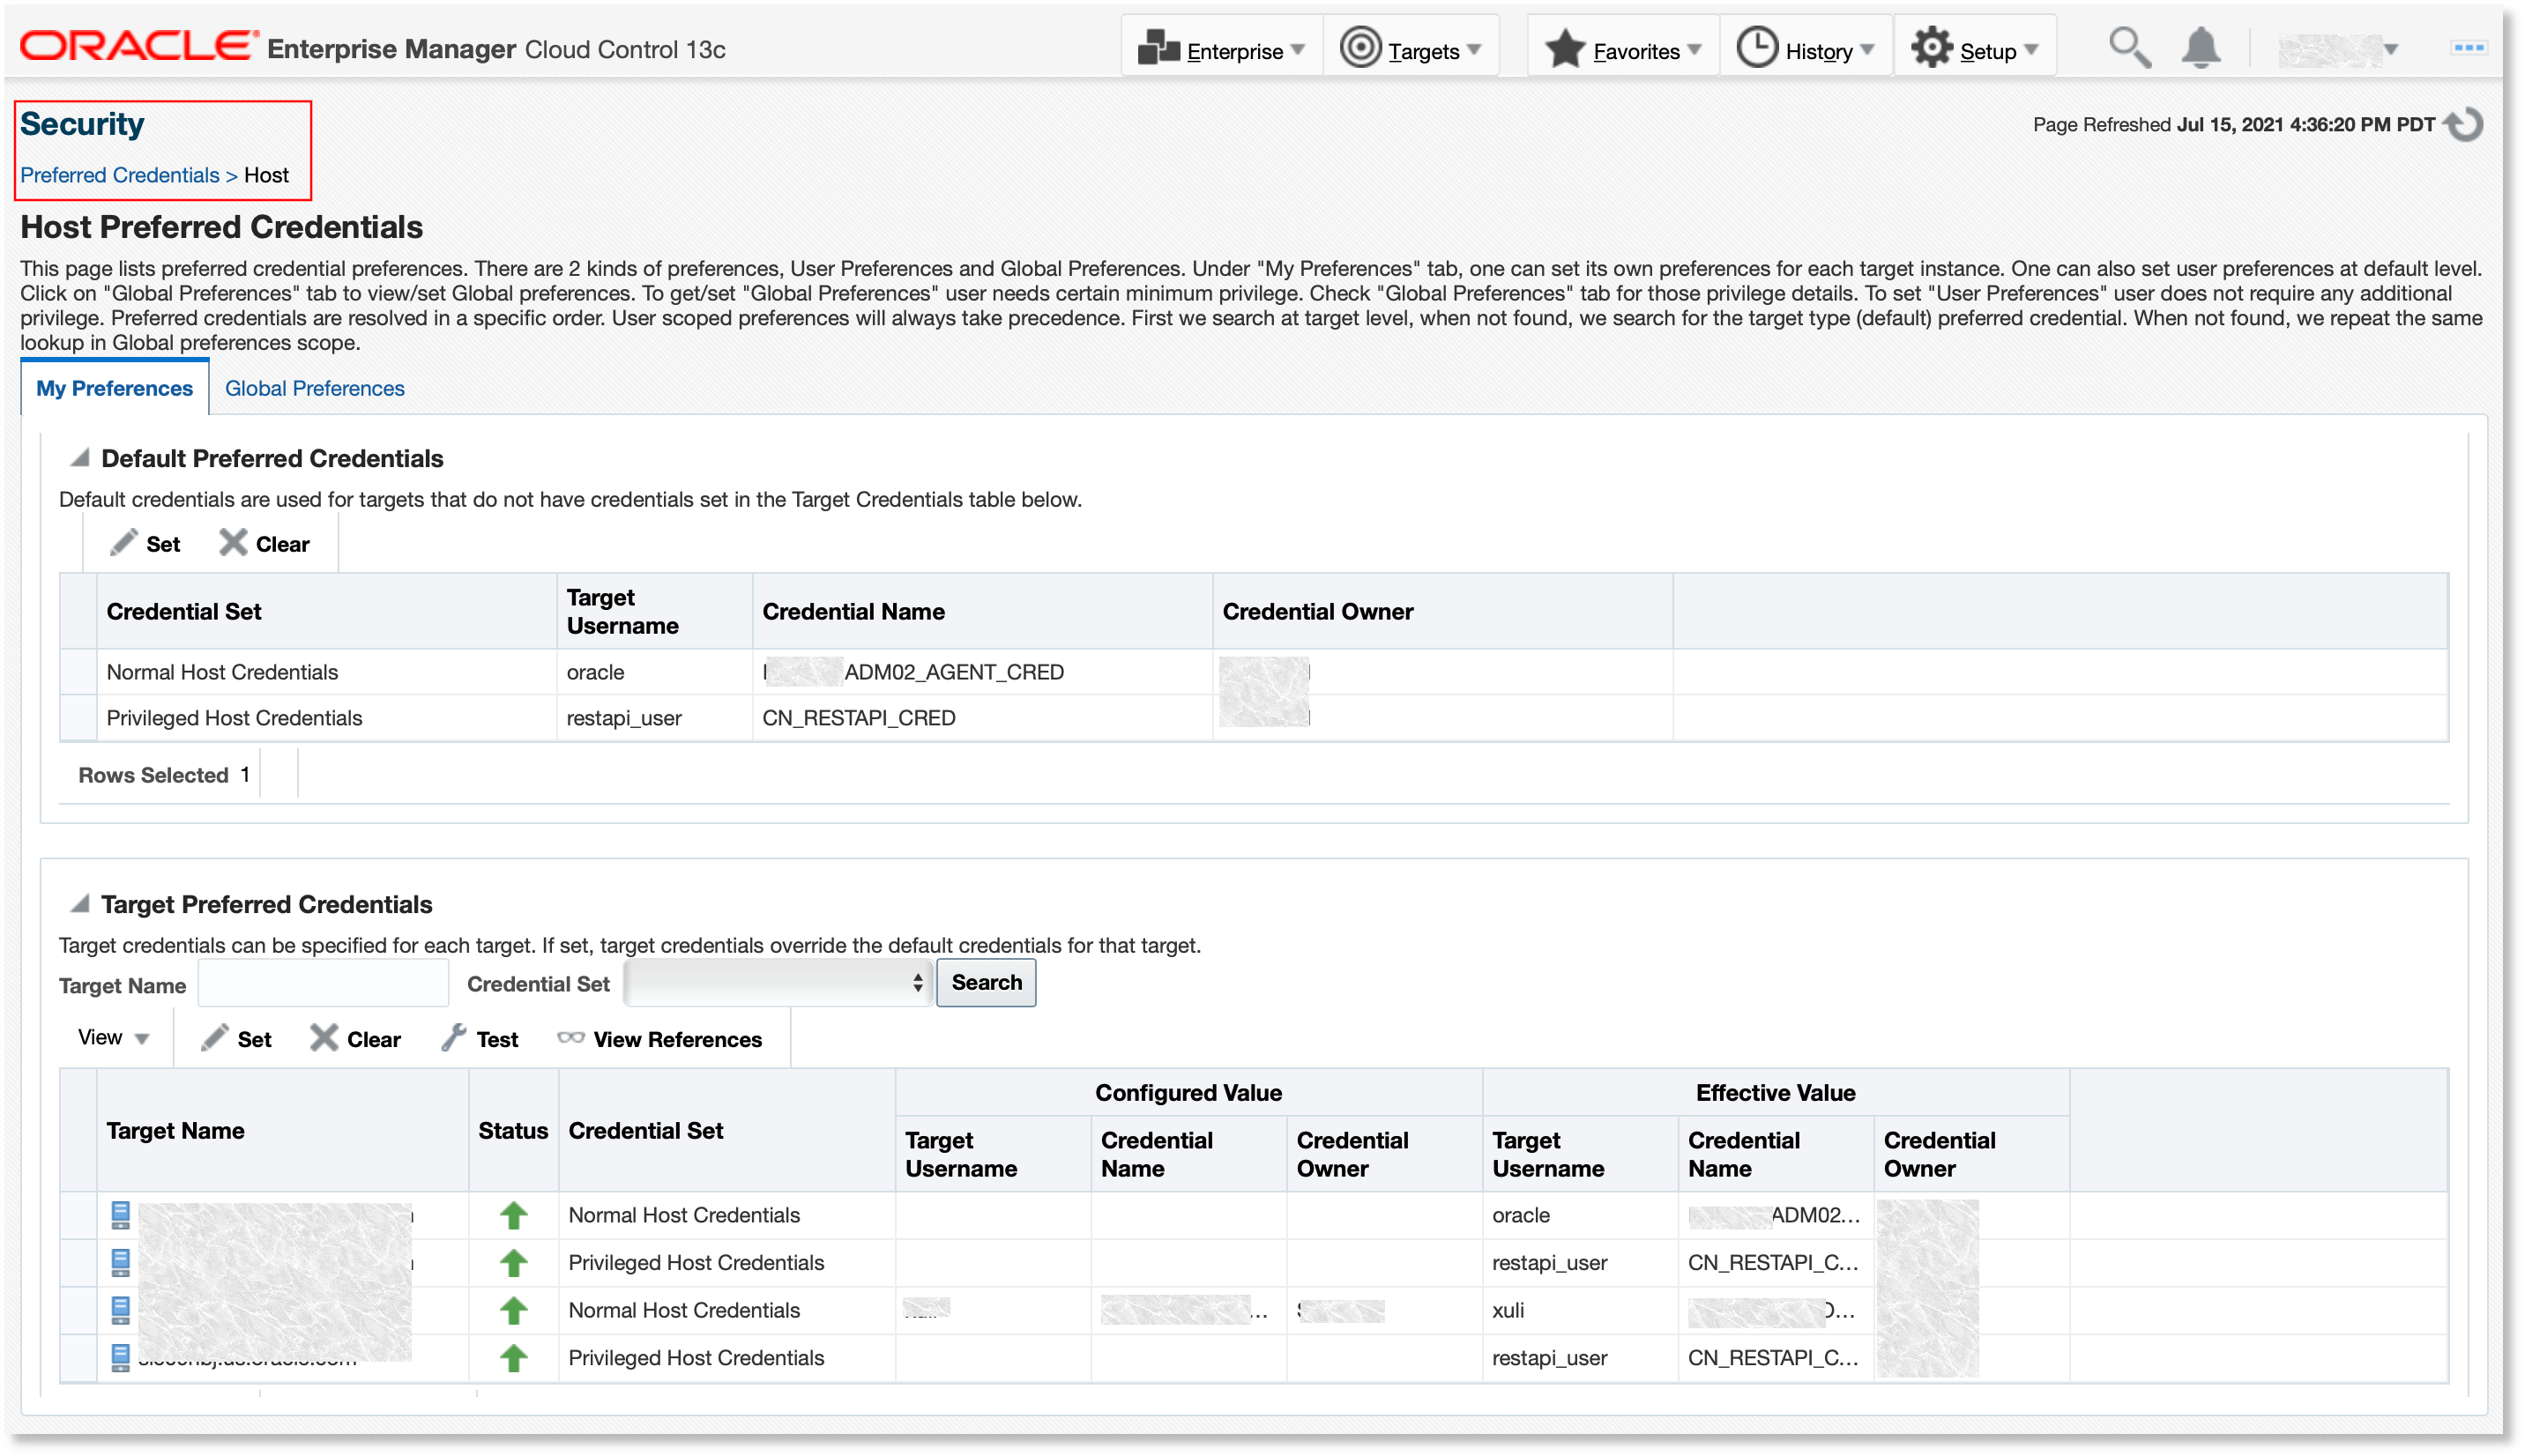
Description of the illustration pref_host_cred_compute_node.png - OCI credentials to establish connection with OCI Object Storage Bucket:
Provide the information that you collected in Step#2 and create a global named credential to export Enterprise Manager target data to OCI Object Storage. See Define a Global Named Credential in Enterprise Manager for OCI in Oracle Enterprise Manager Administrator's Guide.
- Set Up a Super Administrator User (Optional):
As a best practice, Oracle recommends that you set up an exclusive Enterprise Manager Super Administrator user login dedicated to exporting data from Enterprise Manager to OCI Object Storage, specifically a user name that identifies a particular Enterprise Manager instance. For example, you might define a user called EM-austin@mycompany.com instead of john_doe_admin. Creating an instance-specific user name allows for the data flowing into Object Storage to be attributed to an Enterprise Manager instance instead of an actual user.
Additionally, creating an instance-specific user name protects against security keys being invalidated if a user leaves the company.
See Creating Enterprise Manager User Accounts in Oracle Enterprise Manager Database Lifecycle Management Administrator's Guide.
Step 6: Discover ADW in EM
You need to specify which Autonomous Databases in Oracle Cloud Infrastructure will be the destination for the Exadata Warehouse.
Ensure that the chosen Autonomous Database is monitored through Oracle Enterprise Manager. See Discover Autonomous Databases in Administrator's Guide for Oracle Autonomous Databases.
Ensure that the Database plug-in has been deployed at all the Database Machine Agent hosts. The agent could be on the compute nodes or can be a remote agent.
Step 7: Create Group Target for Exadata Database Machines or Recovery Appliances
Create a group target to contain the Exadata Database Machines and Recovery Appliances that will participate in the Exadata Warehouse service.
Once the data export is enabled for the group in a later step, Exadata Warehouse collects all the data from the Database Machines and their applicable members.
- Log in to EM.
- From the Target menu, select Groups. The Groups page opens.
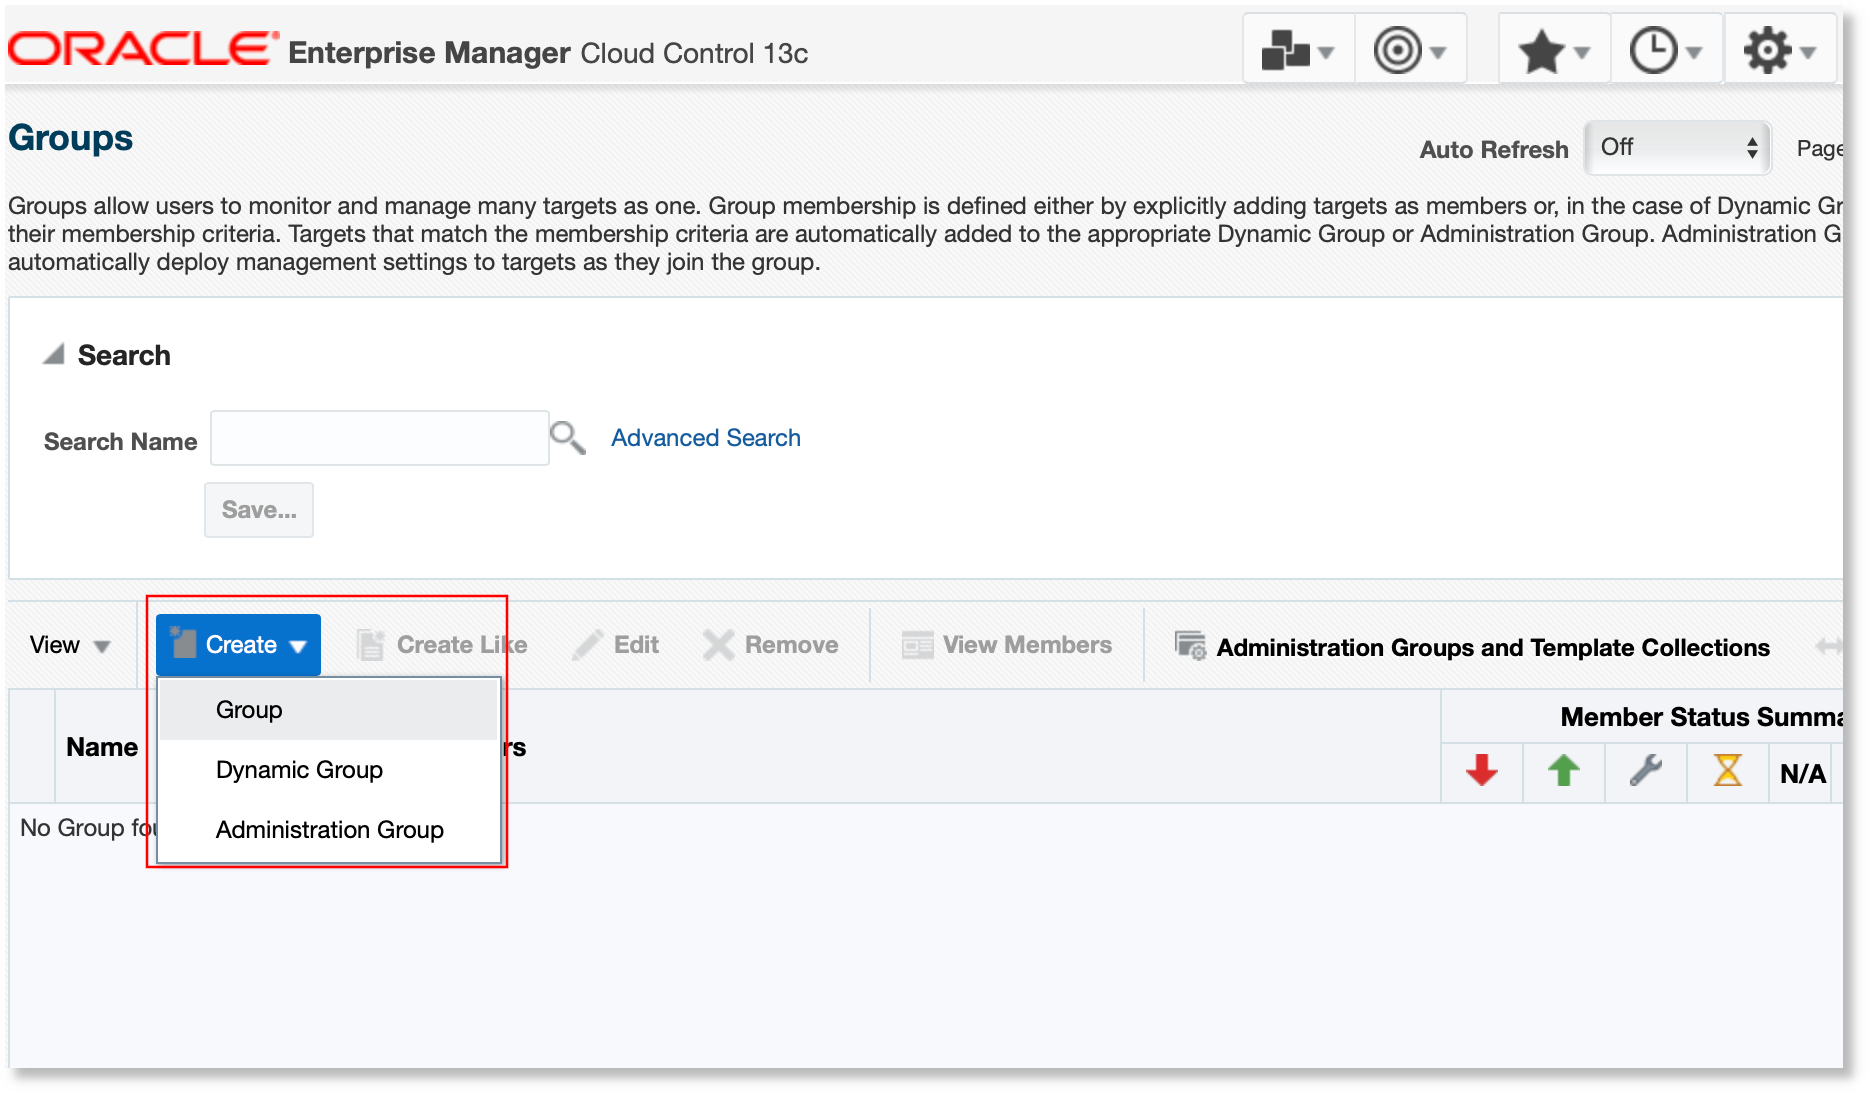
Description of the illustration group_target1.png - Click Create and select Group.
- Specify a name for the group target.
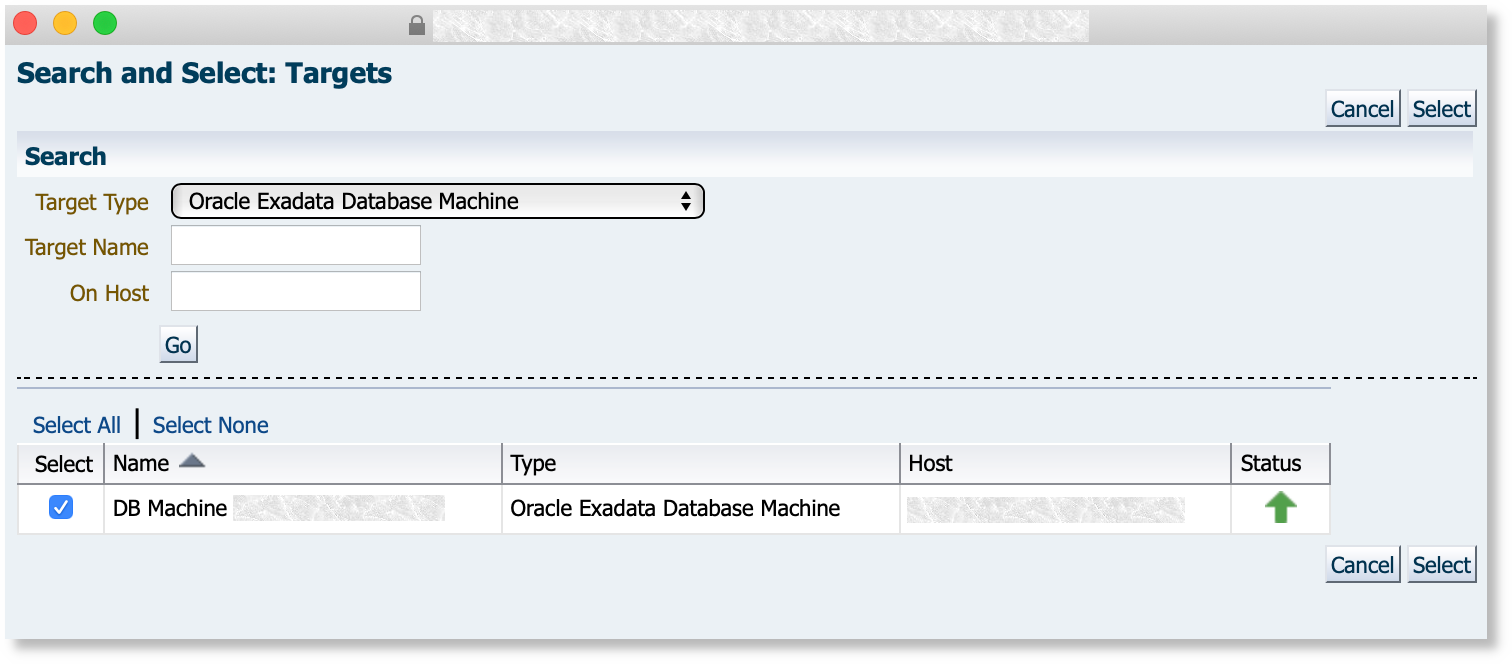
Description of the illustration group_target2.png - Select the target type Oracle Exadata Database Machine or Recovery Appliance to add the member. Select the target from the listing and add it to the target group.
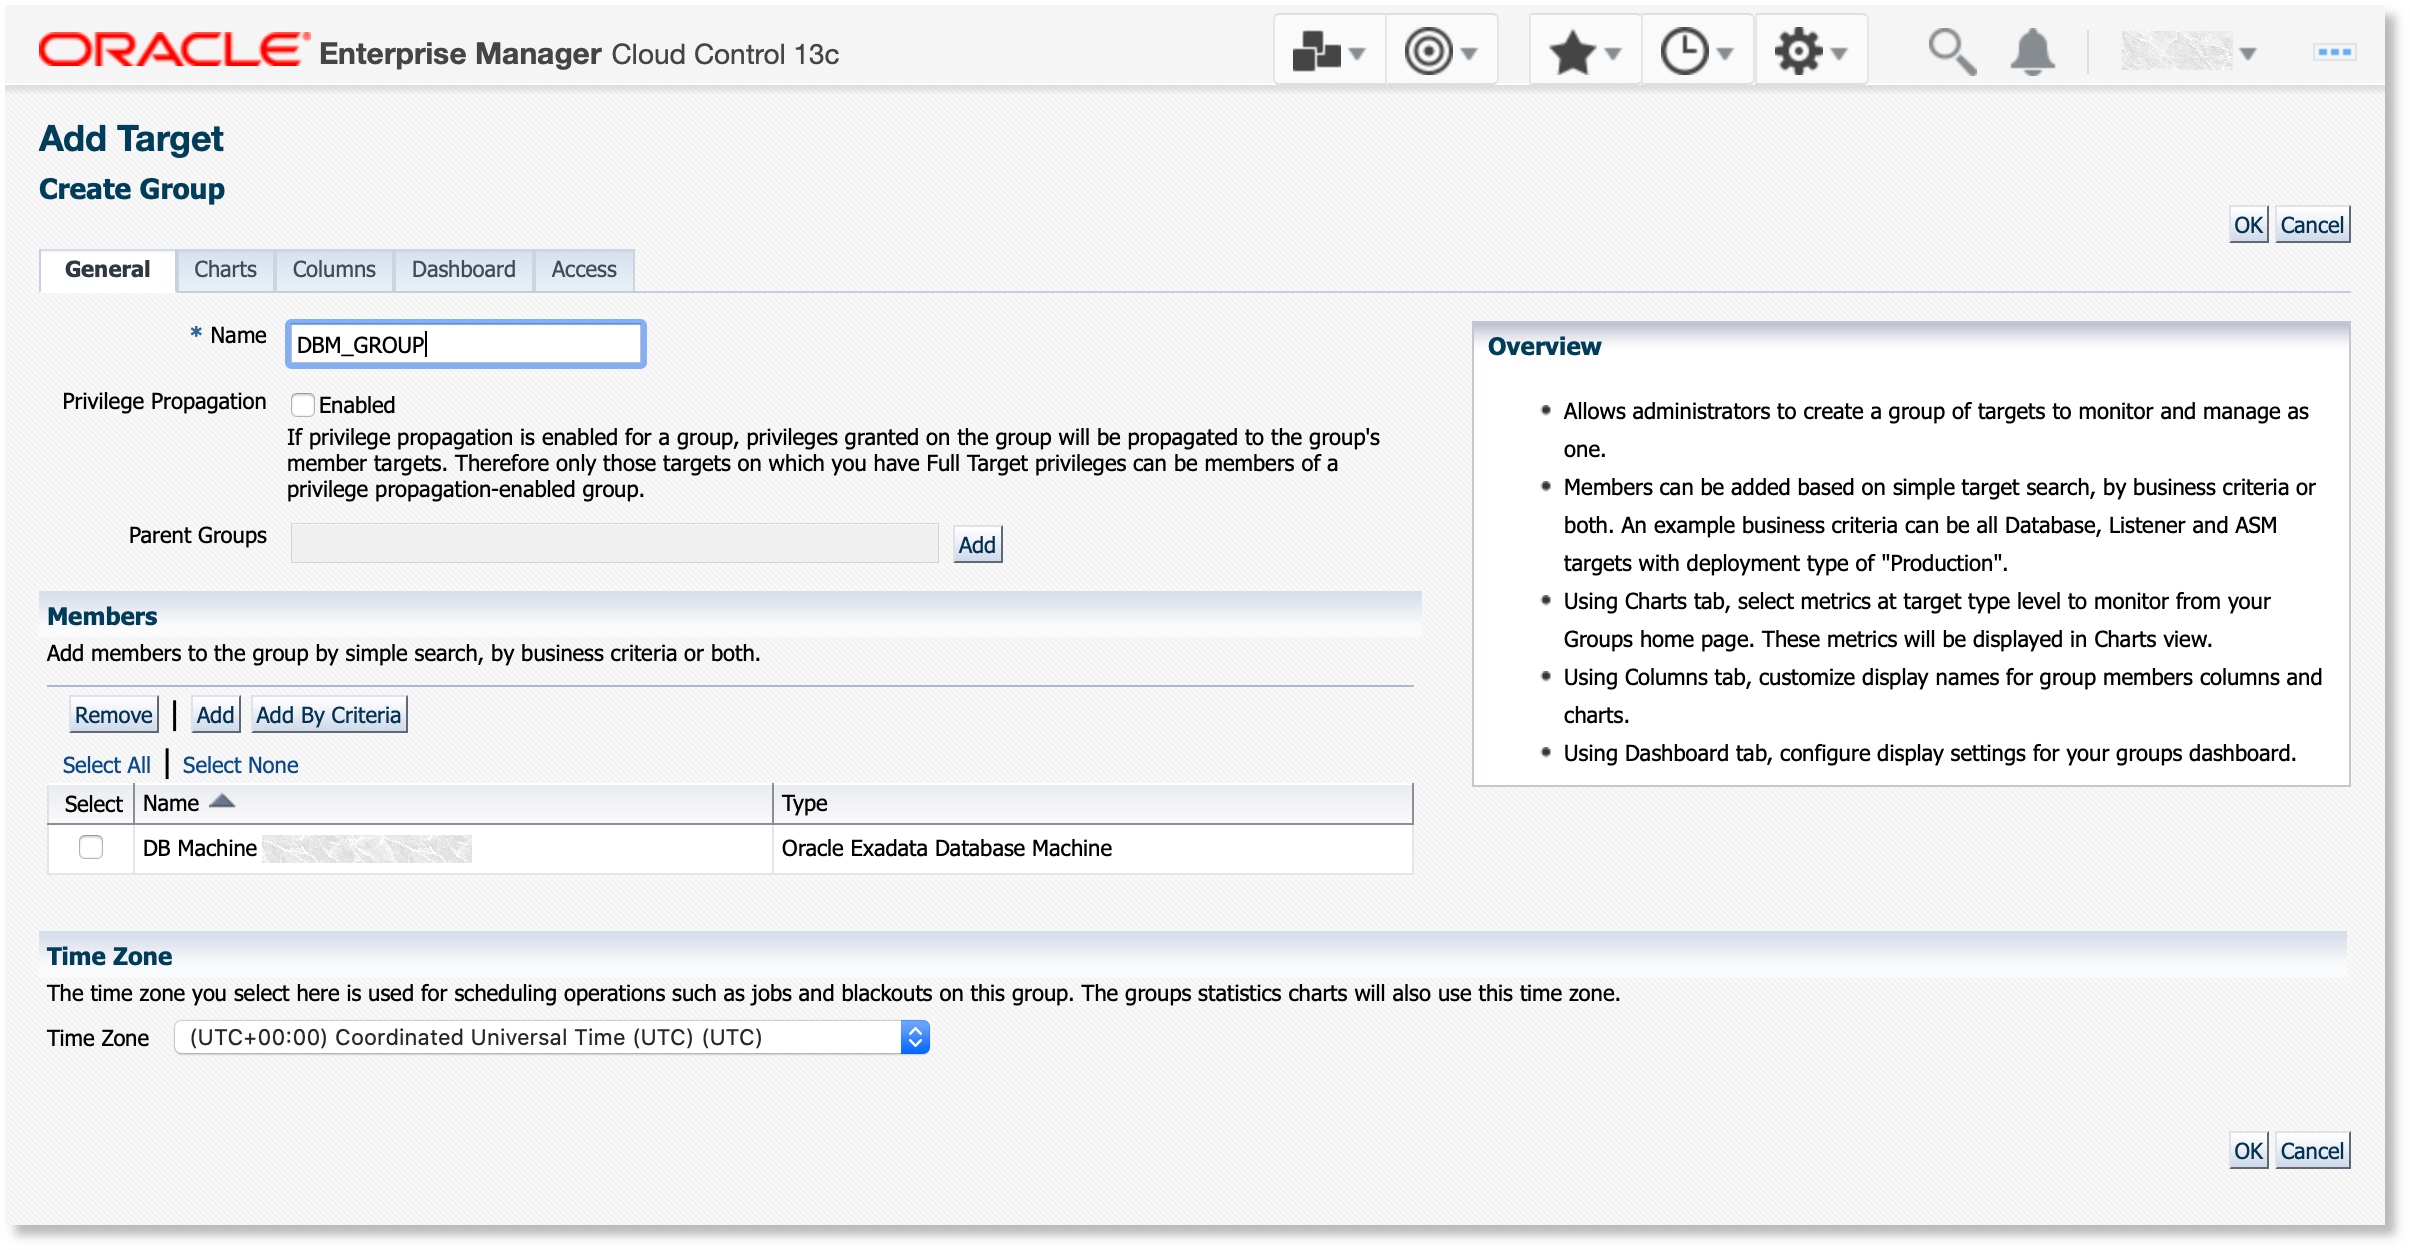
Description of the illustration group_target3.png
Step 8: Create OCI Bridge and Enable Data Export
To move target data from EM to OCI, you must first create an OCI Bridge in EM. The OCI bridge defines a data connection to the OCI Object Storage bucket residing in OCI.
- Log in to EM, as the new Super Administrator User if you set up one in the prior step.
- From the Setup menu, select Export EM Data to OCI. The Manage EM Data for OCI Services page displays. This page will be empty the first time you access it.
- Click Manage OCI Connectivity. In the OCI Bridge tab, enter the OCI credential, the base URL for the Storage Bucket, the bucket name and a name for the bridge you are about to create.

Description of the illustration OCI_bridge1.png - In the Warehouse tab, select the OCI Service Operations Insights: Exadata Warehouse, specify the Autonomous Data Warehouse that you discovered earlier, and database credential that you created.
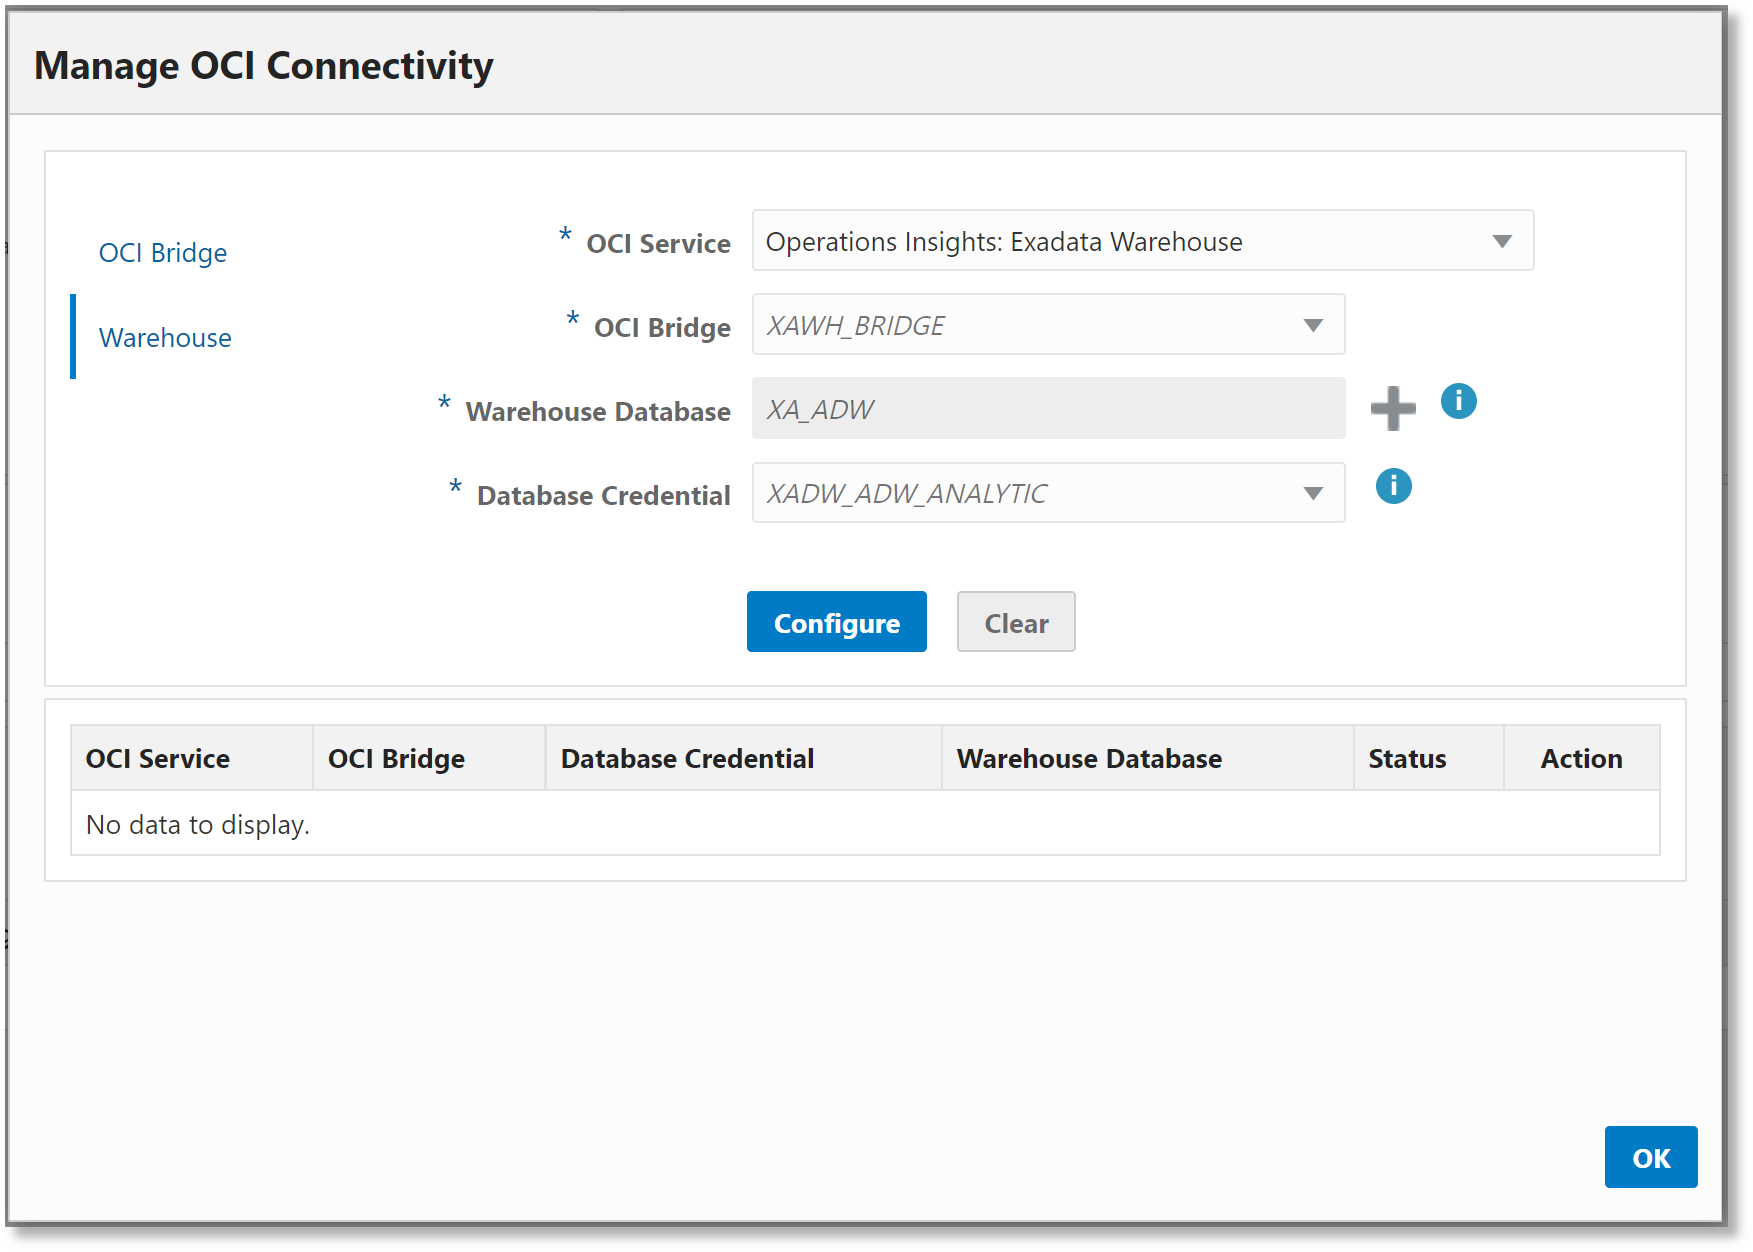
Description of the illustration OCI_bridge2.png - Now return to the Setup menu, select Export EM Data to OCI. The Manage EM Data for OCI Services page displays.
- Click Enable Data export. The OCI Service Data Export page opens.
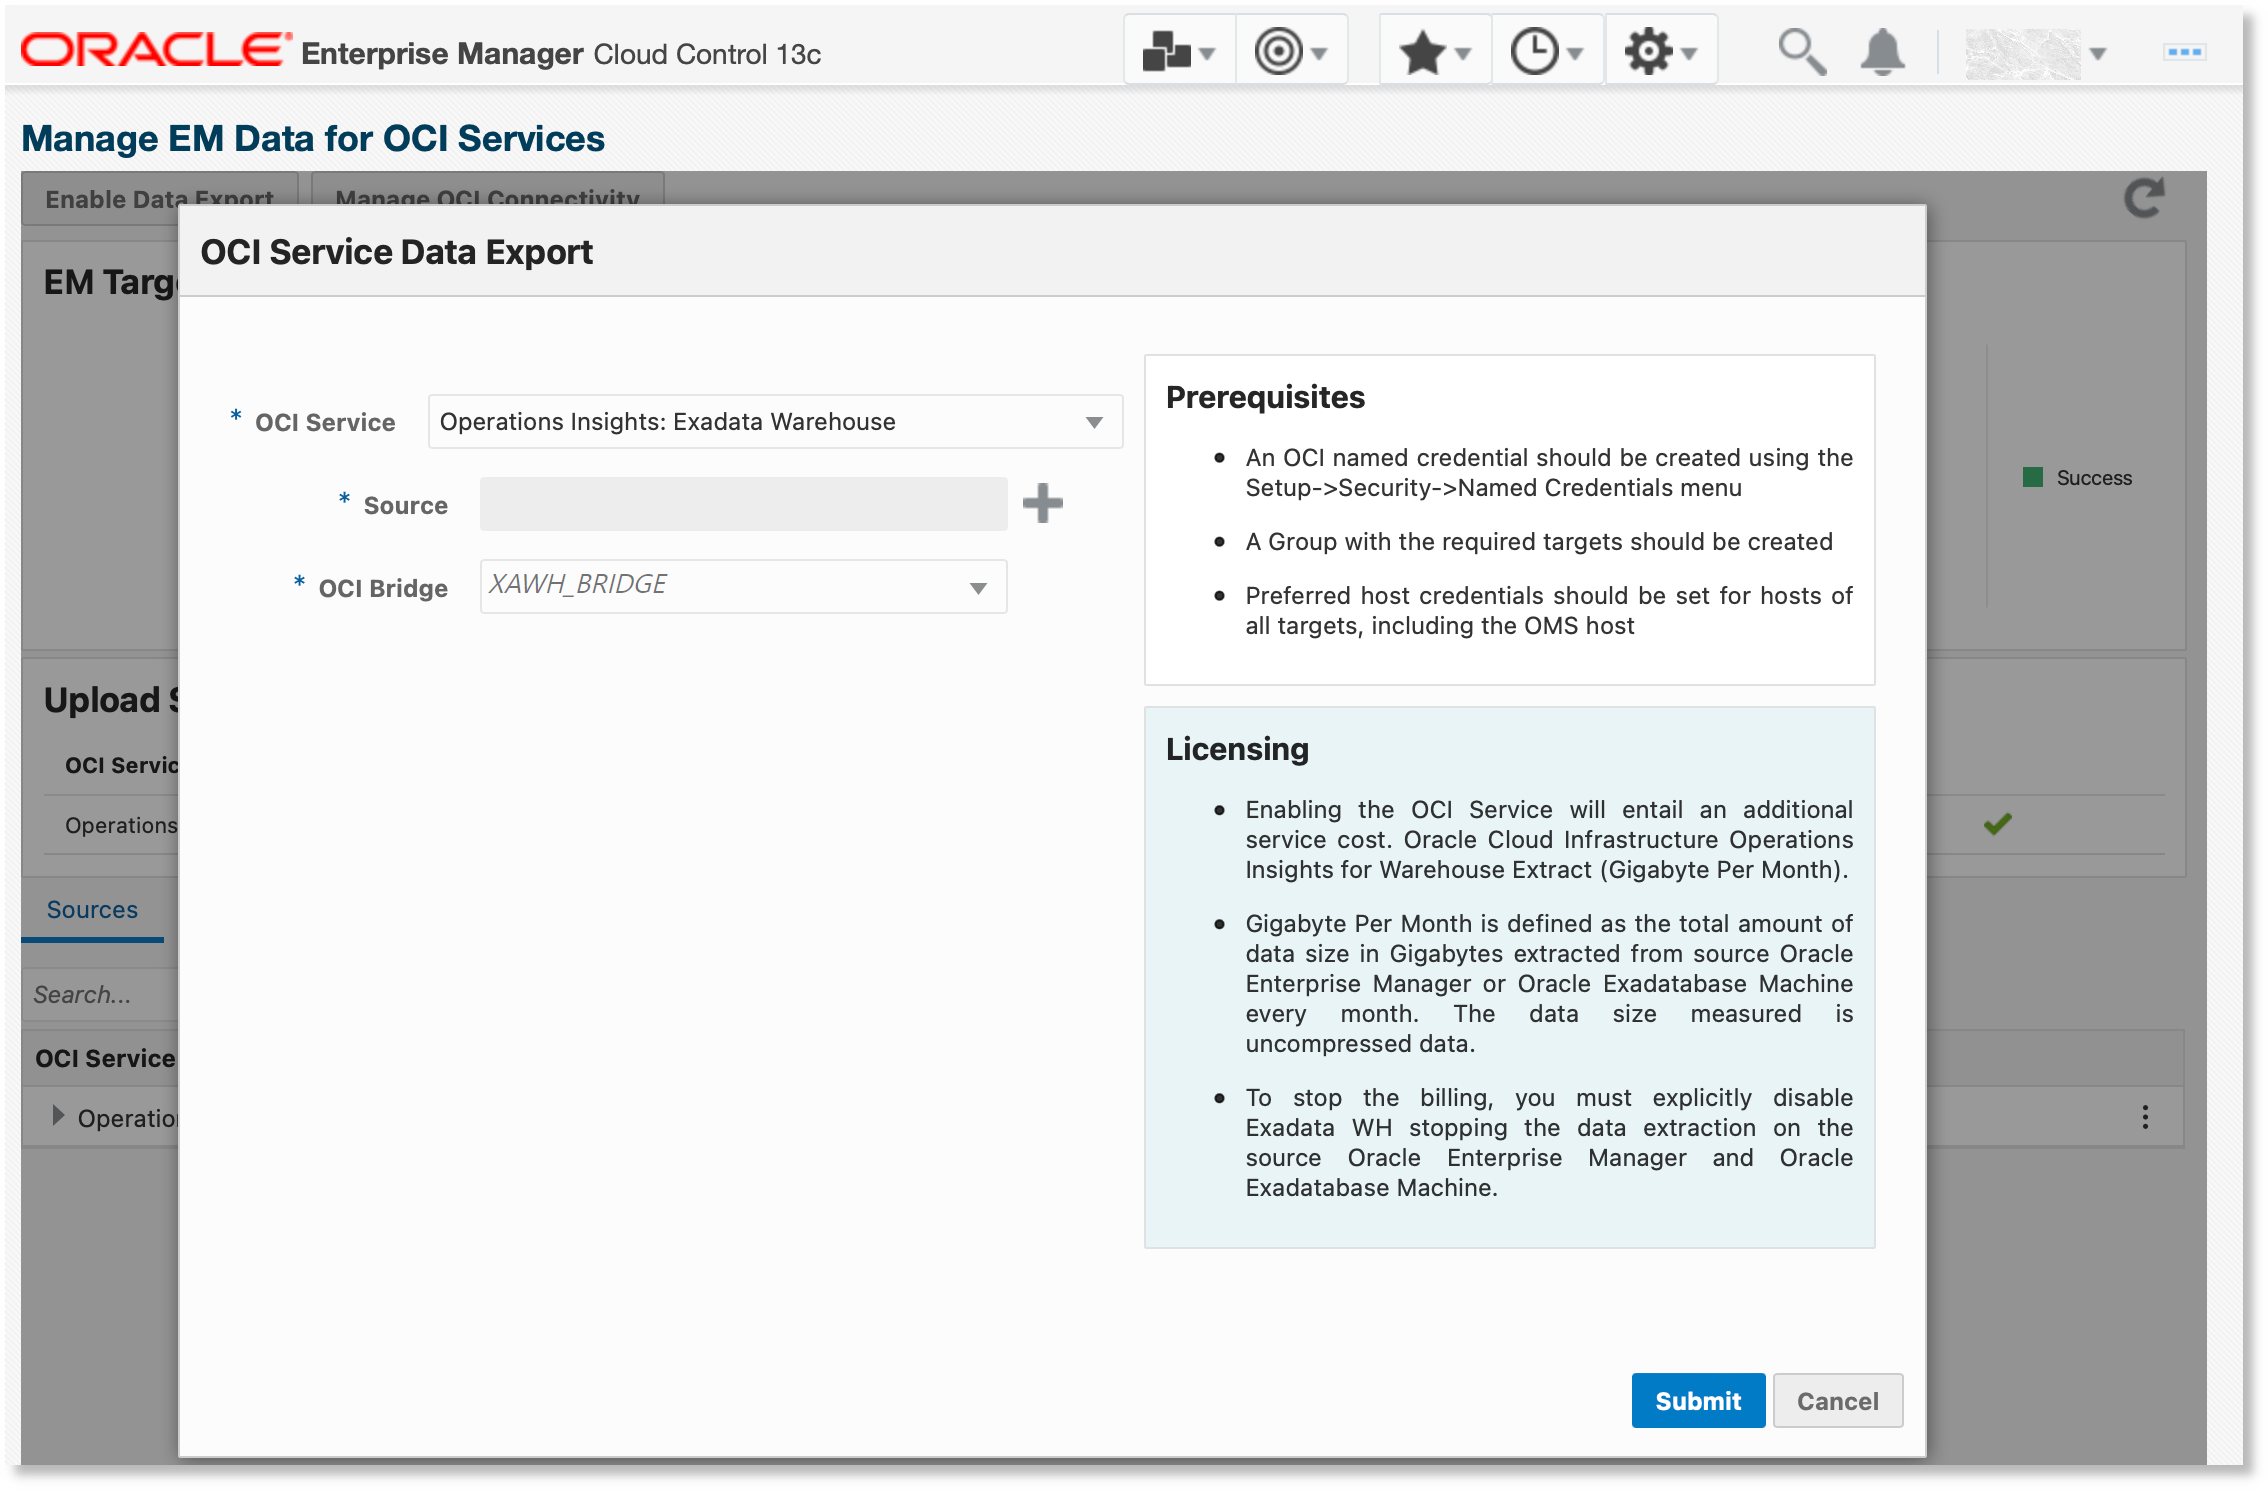
Description of the illustration enable_data_export.png - Select the OCI Service Operations Insights: Exadata Warehouse, the target group that contains all the Database Machine targets as the Source and the OCI Bridge that you created earlier. Now click Submit to enable the data export. The data from your EM instance should start uploading to the OCI bucket that you specified.
- Verify Data Export:
Once you've successfully created an OCI Bridge in Enterprise Manager and selected one or more target groups for data export to OCI, the Manage EM Data for OCI Services dashboard will show the current upload status for each service including the groups that have been added for each service.
The Summary graphs display target upload rollup data for each OCI Service while the table provides a granular view of upload data for each service.
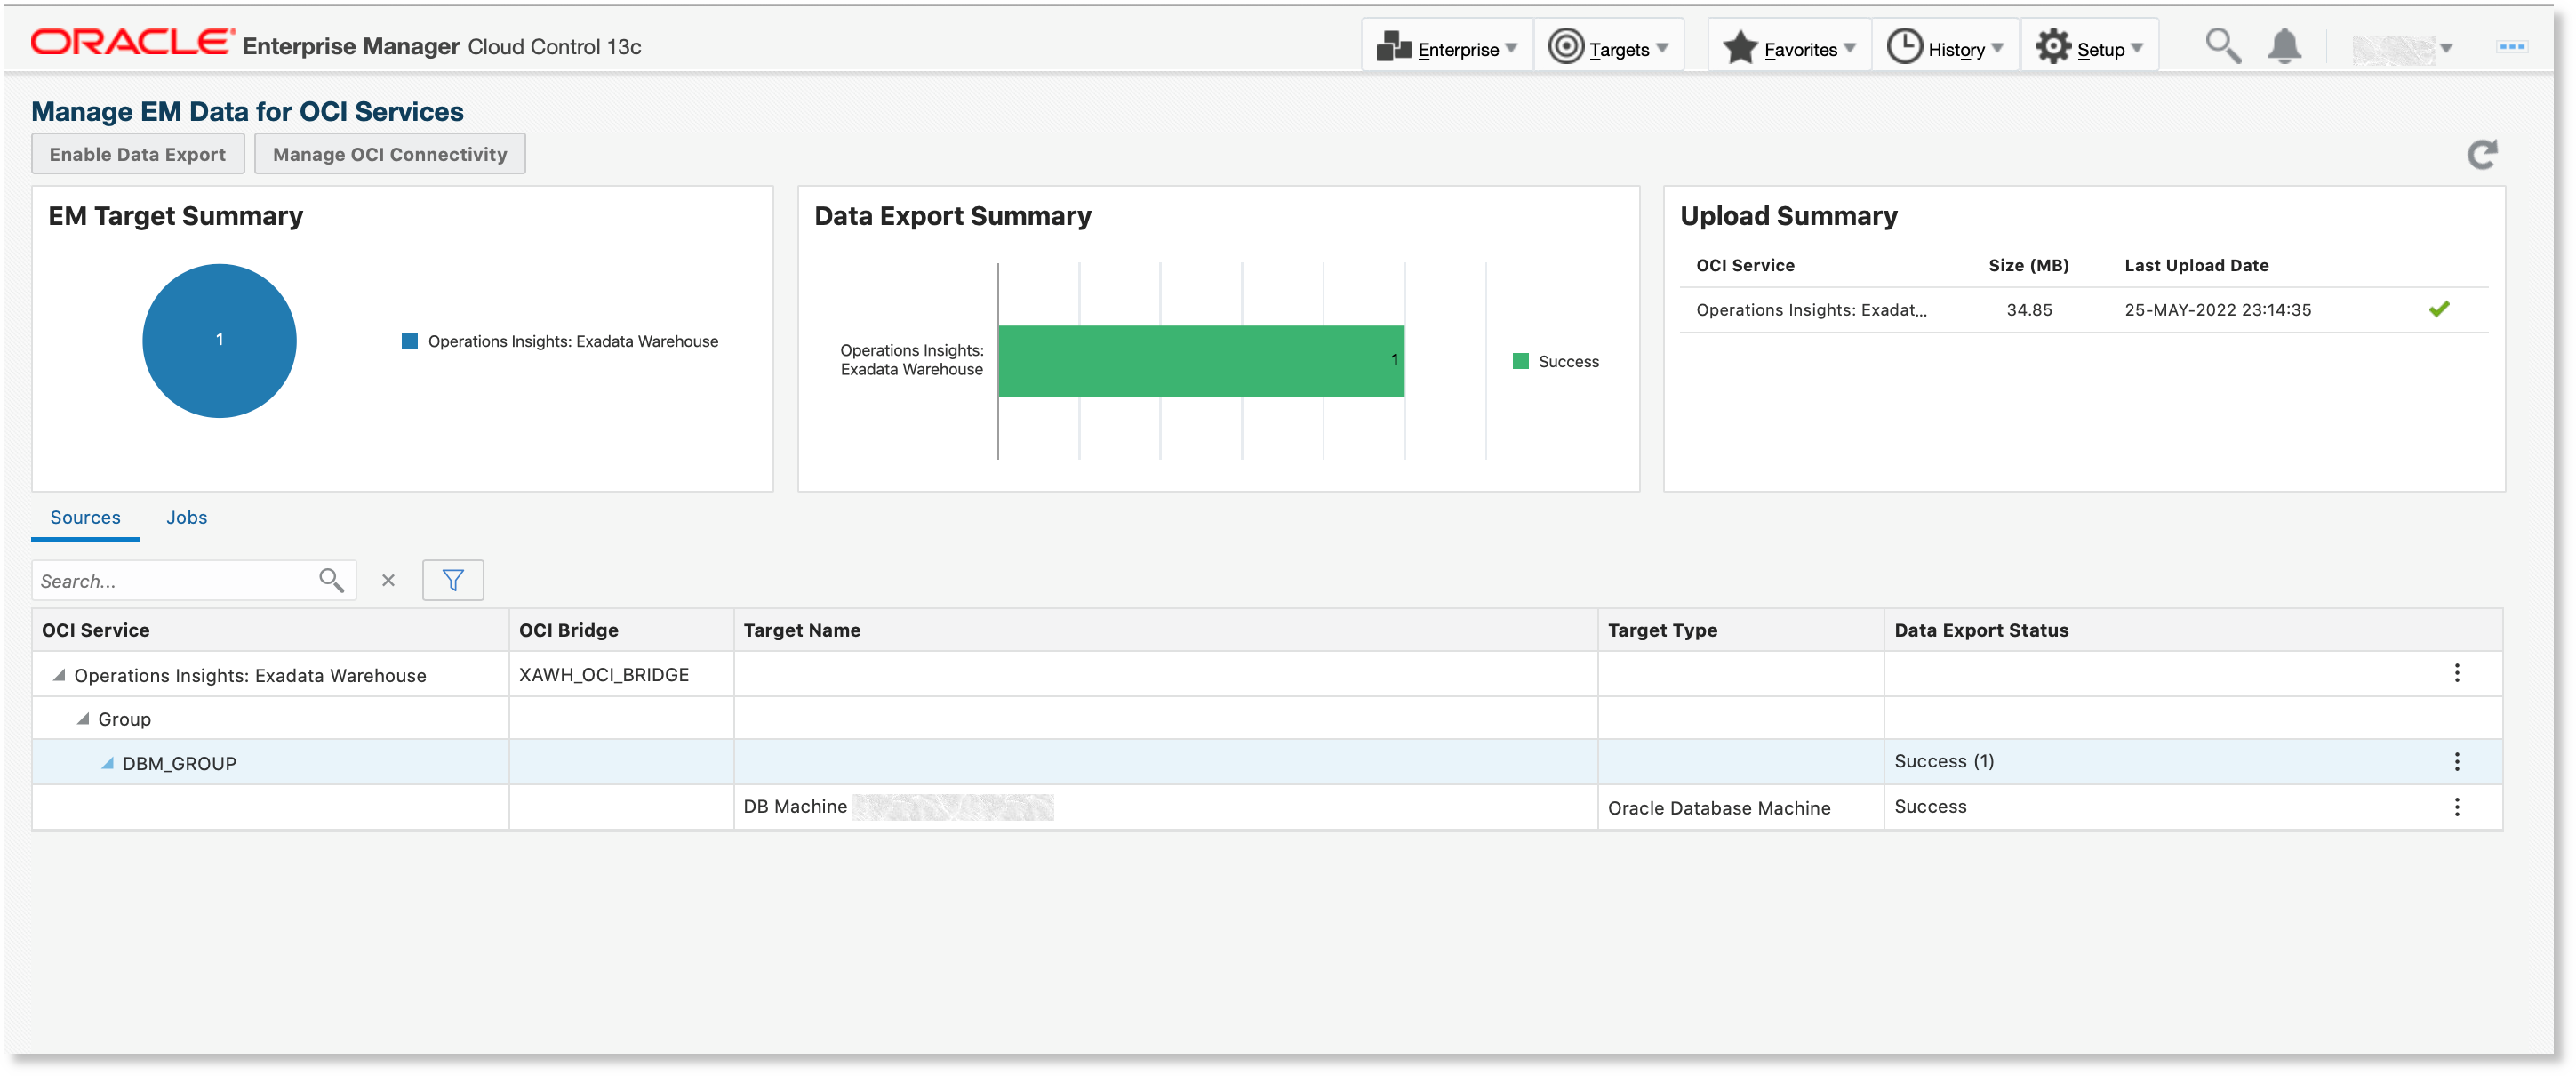
Description of the illustration verify_data_export.png See Viewing Data Upload Status for a Service in Oracle Enterprise Manager Administrator's Guide.
Step 9: Analyze Metrics through Metrics Dashboard
Use the Metrics Dashboard in Enterprise Manager to visualize and analyze key Engineered System hardware and software metrics, as well as metrics relevant to resource planning. The Metrics Dashboard provides customizable visualizations and curated views of performance data. You can access this feature from the Metrics Dashboard menu item in the target menu for supported targets such as Database Machine, Exadata Infrastructure, and Recovery Appliance.
See Metrics Dashboard in Advanced Management and Monitoring for Engineered Systems.
Step 10: (Optional) Analyze Exported Data and Explore Oracle-defined Views Available for Querying in the Warehouse
After the data is collected in Exadata Warehouse, views are published. You can write custom SQL queries using the views published on Exadata Warehouse to obtain the exact information that you're looking for.
To begin with, you can verify that the data is loaded to ADW:
- Check for historical data:
select target_name, metric_column,key_part_1,TO_CHAR(min(metric_time),'YYYY-MM-DD HH24:MI:SS') as start_date,
TO_CHAR(max(metric_time),'YYYY-MM-DD HH24:MI:SS') as end_date , count(1) as  total_data_count
from Exadata_Historical_metric_data
group by EM_ID, target_name, target_type, metric_name, metric_column, KEY_PART_1
order by target_name,metric_column;
- Check that the forecasted data is generated:
select target_name, metric_column,key_part_1,TO_CHAR (min(metric_time),'YYYY-MM-DD HH24:MI:SS') as start_date,
TO_CHAR(max(metric_time),'YYYY-MM-DD HH24:MI:SS') as end_date , count(1) as  total_data_count
from Exadata_forecast_metric_data
group by EM_ID, target_name, target_type, metric_name, metric_column, KEY_PART_1
order by target_name,metric_column;

select count(1) from Exadata_forecasts;
Oracle has curated the following views to help you access data in Exadata Warehouse:
XAWH_TARGETS
The view XAWH_TARGETS contains information regarding the targets for which data is collected in the Exadata Warehouse.
| Column Name | Column Type |
|---|---|
| EM_ID | VARCHAR2(32 BYTE) |
| TARGET_GUID | VARCHAR2(32 BYTE) |
| PARENT_GUID | VARCHAR2(32 BYTE) |
| TARGET_NAME | VARCHAR2(256 BYTE) |
| TARGET_TYPE | VARCHAR2(64 BYTE) |
| TIMEZONE | VARCHAR2(64 BYTE) |
| EM_URL | VARCHAR2(256 BYTE) |
| LAST_DATA_COLLECTION_TIME | DATE |
| LATEST_UPLOAD_TO_WAREHOUSE | DATE |
XAWH_MINUTES_METRIC_DATA
The view XAWH_MINUTES_METRIC_DATA stores historical metric data with per-minute granularity.
| Column Name | Column Type |
|---|---|
| EM_ID | VARCHAR2(32 BYTE) |
| TARGET_NAME | VARCHAR2(256 BYTE) |
| TARGET_TYPE | VARCHAR2(64 BYTE) |
| METRIC_NAME | VARCHAR2(64 BYTE) |
| METRIC_COLUMN | VARCHAR2(64 BYTE) |
| KEY_PART_1 | VARCHAR2(256 BYTE) |
| KEY_PART_2 | VARCHAR2(256 BYTE) |
| KEY_PART_3 | VARCHAR2(256 BYTE) |
| KEY_PART_4 | VARCHAR2(256 BYTE) |
| KEY_PART_5 | VARCHAR2(256 BYTE) |
| KEY_PART_6 | VARCHAR2(256 BYTE) |
| KEY_PART_7 | VARCHAR2(256 BYTE) |
| METRIC_UNIT | VARCHAR2(32 BYTE) |
| METRIC_TIME | DATE |
| METRIC_VALUE | NUMBER |
XAWH_HOURLY_METRIC_DATA
The view XAWH_HOURLY_METRIC_DATA stores historical metric data with per-hour granularity.
| Column Name | Column Type |
|---|---|
| EM_ID | VARCHAR2(32 BYTE) |
| TARGET_NAME | VARCHAR2(256 BYTE) |
| TARGET_TYPE | VARCHAR2(64 BYTE) |
| METRIC_NAME | VARCHAR2(64 BYTE) |
| METRIC_COLUMN | VARCHAR2(64 BYTE) |
| KEY_PART_1 | VARCHAR2(256 BYTE) |
| KEY_PART_2 | VARCHAR2(256 BYTE) |
| KEY_PART_3 | VARCHAR2(256 BYTE) |
| KEY_PART_4 | VARCHAR2(256 BYTE) |
| KEY_PART_5 | VARCHAR2(256 BYTE) |
| KEY_PART_6 | VARCHAR2(256 BYTE) |
| KEY_PART_7 | VARCHAR2(256 BYTE) |
| METRIC_UNIT | VARCHAR2(32 BYTE) |
| METRIC_TIME | DATE |
| MAX_VALUE | NUMBER |
| MIN_VALUE | NUMBER |
| MEAN_VALUE | NUMBER |
| NUM_SAMPLES | NUMBER |
| PERCENTILE_5 | NUMBER |
| PERCENTILE_10 | NUMBER |
| PERCENTILE_15 | NUMBER |
| PERCENTILE_20 | NUMBER |
| PERCENTILE_25 | NUMBER |
| PERCENTILE_30 | NUMBER |
| PERCENTILE_35 | NUMBER |
| PERCENTILE_40 | NUMBER |
| PERCENTILE_45 | NUMBER |
| PERCENTILE_50 | NUMBER |
| PERCENTILE_55 | NUMBER |
| PERCENTILE_60 | NUMBER |
| PERCENTILE_65 | NUMBER |
| PERCENTILE_70 | NUMBER |
| PERCENTILE_75 | NUMBER |
| PERCENTILE_80 | NUMBER |
| PERCENTILE_85 | NUMBER |
| PERCENTILE_90 | NUMBER |
| PERCENTILE_95 | NUMBER |
| PERCENTILE_97 | NUMBER |
| PERCENTILE_99 | NUMBER |
| STDDEV_VALUE | NUMBER |
XAWH_DAILY_METRIC_DATA
The view XAWH_DAILY_METRIC_DATA stores historical metric data with per-day granularity.
| Column Name | Column Type |
|---|---|
| EM_ID | VARCHAR2(32 BYTE) |
| TARGET_NAME | VARCHAR2(256 BYTE) |
| TARGET_TYPE | VARCHAR2(64 BYTE) |
| METRIC_NAME | VARCHAR2(64 BYTE) |
| METRIC_COLUMN | VARCHAR2(64 BYTE) |
| KEY_PART_1 | VARCHAR2(256 BYTE) |
| KEY_PART_2 | VARCHAR2(256 BYTE) |
| KEY_PART_3 | VARCHAR2(256 BYTE) |
| KEY_PART_4 | VARCHAR2(256 BYTE) |
| KEY_PART_5 | VARCHAR2(256 BYTE) |
| KEY_PART_6 | VARCHAR2(256 BYTE) |
| KEY_PART_7 | VARCHAR2(256 BYTE) |
| METRIC_UNIT | VARCHAR2(32 BYTE) |
| METRIC_TIME | DATE |
| MAX_VALUE | NUMBER |
| MIN_VALUE | NUMBER |
| MEAN_VALUE | NUMBER |
| NUM_SAMPLES | NUMBER |
| PERCENTILE_5 | NUMBER |
| PERCENTILE_10 | NUMBER |
| PERCENTILE_15 | NUMBER |
| PERCENTILE_20 | NUMBER |
| PERCENTILE_25 | NUMBER |
| PERCENTILE_30 | NUMBER |
| PERCENTILE_35 | NUMBER |
| PERCENTILE_40 | NUMBER |
| PERCENTILE_45 | NUMBER |
| PERCENTILE_50 | NUMBER |
| PERCENTILE_55 | NUMBER |
| PERCENTILE_60 | NUMBER |
| PERCENTILE_65 | NUMBER |
| PERCENTILE_70 | NUMBER |
| PERCENTILE_75 | NUMBER |
| PERCENTILE_80 | NUMBER |
| PERCENTILE_85 | NUMBER |
| PERCENTILE_90 | NUMBER |
| PERCENTILE_95 | NUMBER |
| PERCENTILE_97 | NUMBER |
| PERCENTILE_99 | NUMBER |
| STDDEV_VALUE | NUMBER |
XAWH_FORECASTS
The view XAWH_FORECASTS stores metadata regarding each forecast that has been performed, including information about targets, metrics, model period, forecast steps, algorithms etc.
| Column Name | Column Type |
|---|---|
| FORECAST_NAME | VARCHAR2(256 BYTE) |
| EM_ID | VARCHAR2(32 BYTE) |
| TARGET_NAME | VARCHAR2(256 BYTE) |
| TARGET_TYPE | VARCHAR2(64 BYTE) |
| METRIC_NAME | VARCHAR2(64 BYTE) |
| METRIC_COLUMN | VARCHAR2(64 BYTE) |
| KEY_PART_1 | VARCHAR2(256 BYTE) |
| KEY_PART_2 | VARCHAR2(256 BYTE) |
| KEY_PART_3 | VARCHAR2(256 BYTE) |
| KEY_PART_4 | VARCHAR2(256 BYTE) |
| KEY_PART_5 | VARCHAR2(256 BYTE) |
| KEY_PART_6 | VARCHAR2(256 BYTE) |
| KEY_PART_7 | VARCHAR2(256 BYTE) |
| MODEL_PERIOD | NUMBER |
| FORECAST_PERIOD | NUMBER |
| FORECAST_INTERVAL | VARCHAR2(64 BYTE) |
| FORECAST_TYPE | NUMBER |
| ALGORITHM | VARCHAR2(64 BYTE) |
| FORECAST_START_TIME | DATE |
| FORECAST_COMPLETION_TIME | DATE |
| FORECAST_TIME_SEC | NUMBER |
| STATUS | NUMBER |
| MODEL_PERIOD_START_TIME | DATE |
| MODEL_PERIOD_END_TIME | DATE |
| MODEL_PERIOD_DATA_COUNT | NUMBER |
| FORECAST_PERIOD_START_TIME | DATE |
| FORECAST_PERIOD_END_TIME | DATE |
| FORECAST_PERIOD_DATA_COUNT | NUMBER |
| LABEL | VARCHAR2(256 BYTE) |
| COMMENTS | VARCHAR2(256 BYTE) |
XAWH_FORECAST_METRIC_DATA
The view XAWH_FORECAST_METRICS_DATA stores forecasted data for each metric.
| Column Name | Column Type |
|---|---|
| FORECAST_NAME | VARCHAR2(256 BYTE) |
| EM_ID | VARCHAR2(32 BYTE) |
| TARGET_NAME | VARCHAR2(256 BYTE) |
| TARGET_TYPE | VARCHAR2(64 BYTE) |
| METRIC_NAME | VARCHAR2(64 BYTE) |
| METRIC_COLUMN | VARCHAR2(64 BYTE) |
| KEY_PART_1 | VARCHAR2(256 BYTE) |
| KEY_PART_2 | VARCHAR2(256 BYTE) |
| KEY_PART_3 | VARCHAR2(256 BYTE) |
| KEY_PART_4 | VARCHAR2(256 BYTE) |
| KEY_PART_5 | VARCHAR2(256 BYTE) |
| KEY_PART_6 | VARCHAR2(256 BYTE) |
| KEY_PART_7 | VARCHAR2(256 BYTE) |
| METRIC_UNIT | VARCHAR2(32 BYTE) |
| METRIC_TIME | DATE |
| METRIC_VALUE | NUMBER |
| METRIC_VALUE_LOW | NUMBER |
| METRIC_VALUE_HIGH | NUMBER |
Step 11: (Optional) Advanced Customizations
These are the optional customizations you might have to perform depending on your requirement:
Customize Data Extraction Location
By default, Exadata Database Machine agents store the data collected from compute nodes and storage servers in the agent stage directory. For example, if the agent stage directory is $agentHome/agent_inst, then the files collected for the warehouse are temporarily stored in the designated folder under $agentHome/agent_inst and later transferred to Object Storage and loaded to the final warehouse. If you want to store the data in a different location than the agent stage directory, then follow these steps:
- Log in to Enterprise Manager repos:
sqlplus sysman/password@repos
- Specify a non-default staging directory applicable for all Exadata Database Machine agents:
insert into xawh_config_props (property_name, property_value) values ('staging_dir', '/user/my_custom_dir'); commit; - Specify a non-default staging directory applicable for a specific target agent:
 insert into xawh_config_props (property_name, property_value,target_name, target_type) values ('staging_dir', '/user/my_custom_dir','agent_host_name_1', 'host');
commit;
The staging directory provided for a specific target has higher precedence compared to the general settings where no target names are specified.
Customize Maximum Data Extraction Space
By default, the space limit threshold is set to 80% of the staging directory. You can adjust this limit as a percentage of available space using the following steps:
- Log in to Enterprise Manager repos:
sqlplus sysman/password@repos
- Update the xawh property for the staging directory limit percentage:
update xawh_config_props set property_value='70.5' where property_name='staging_dir_limit_pct'
commit;
Customize Forecast Settings
By default, Exadata Warehouse automatically performs forecast for the next 90 days using 270 days of rolled-up daily metric data:
- Data Type (Forecast Granularity) : Daily
- Historical Data Set Size (To train forecast model): 270
- Forecast Steps : 90
If there is insufficient data, the forecasted steps are adjusted based on the available data set, but require minimum 30 days of data to generate any forecast. If you want to configure automatic forecast to run using different data granularity, for example, HOURLY data, adjust the forecast steps, increase or reduce training data set size, then you can override the default settings by updating xawh_config_props as below:
- Log in to Enterprise Manager repos:
sqlplus sysman/password@repos
- Specify the forecast settings:
SET SERVEROUTPUT ON

DECLARE
l_sql VARCHAR2(1000);

  PROCEDURE INSERT_OR_UPDATE_PROP(l_prop VARCHAR2, l_value VARCHAR2 )
  IS
  l_insert_sql VARCHAR2(1000) := ' MERGE INTO XAWH_CONFIG_PROPS_E USING (SELECT 1 FROM DUAL) ' ||
  ' on ( PROPERTY_NAME = ''' || l_prop || ''')' ||
          ' WHEN NOT MATCHED THEN INSERT (PROPERTY_NAME, PROPERTY_VALUE) VALUES (''' || l_prop || ''',''' || l_value || ''' )' ||
          ' WHEN MATCHED THEN UPDATE SET PROPERTY_VALUE= ''' || l_value || '''';

  BEGIN
  dbms_output.put_line('sql ' || l_insert_sql);
  EXECUTE IMMEDIATE l_insert_sql;
  EXCEPTION
  WHEN others THEN
  dbms_output.put_line('Error encountered when inserting property ' || l_prop || '. ErrMsg: ' || substr(SQLERRM,1,256));
  END;

BEGIN
INSERT_OR_UPDATE_PROP('forecast_steps', '168');
INSERT_OR_UPDATE_PROP('forecast_model_history','840');
INSERT_OR_UPDATE_PROP('forecast_model_minimum_history','168');
INSERT_OR_UPDATE_PROP('forecast_granularity','HOURLY') ;

COMMIT;

END;
/

SHOW ERRORS;

disconnect;
exit;
Collect Additional Metrics
By default, Exadata Warehouse collects a curated set of metrics. If you want to collect additional metrics from Exadata Database Machine targets, then specify it by adding new metrics in xawh_metric_list table as below:
- Log in to Enterprise Manager repos:
sqlplus sysman/password@repos
- Add collection for all compute nodes for metrics:
DS_SWAP_USAGE:DS_SWAP_OUT_BY_SEC:DS_SWAP_IN_BY_SEC

INSERT INTO XAWH_METRIC_LIST  (TARGET_NAME,  TARGET_TYPE,   METRIC_NAME,  METRIC_COLUMNS)

VALUES ('all','host','fine_grained_metrics','DS_SWAP_USAGE:DS_SWAP_OUT_BY_SEC:DS_SWAP_IN_BY_SEC' );
The target name can be one of the following:
- all: Applies to all targets of the specified type
- Specific target name: Applies to only the specified target
- Add collection for all Exadata Storage Server for metrics CD_IO_BY_R_LG:CD_IO_BY_R_SM:
INSERT INTO XAWH_METRIC_LIST  (TARGET_NAME,  TARGET_TYPE,   METRIC_NAME,  METRIC_COLUMNS)

VALUES ('all','oracle_exadata','fine_grained_metrics','CD_IO_BY_R_LG:CD_IO_BY_R_SM' );
Learn More
- Integrating with Oracle Cloud Infrastructure in Oracle Enterprise Manager Administrator's Guide
- Discover Autonomous Databases in Administrator's Guide for Oracle Autonomous Databases
- Operations Insights: Analyze Exadata Resources in Oracle Cloud Infrastructure Documentation
- Logging Analytics: Harvest Entity Model Data from Enterprise Manager and Collect Logs in Oracle Cloud Infrastructure Documentation
Exporting and Analyzing Oracle Enterprise Manager Engineered Systems Performance Data Using Exadata Warehouse
F57902-05
April 2026
The Exadata Warehouse can be configured through Enterprise Manager to serve as a repository for fine-grained performance metric data collected from on-premises and cloud-based Oracle engineered systems like Exadata Database Machine and Zero Data Loss Recovery Appliance
This software and related documentation are provided under a license agreement containing restrictions on use and disclosure and are protected by intellectual property laws. Except as expressly permitted in your license agreement or allowed by law, you may not use, copy, reproduce, translate, broadcast, modify, license, transmit, distribute, exhibit, perform, publish, or display any part, in any form, or by any means. Reverse engineering, disassembly, or decompilation of this software, unless required by law for interoperability, is prohibited.
If this is software or related documentation that is delivered to the U.S. Government or anyone licensing it on behalf of the U.S. Government, then the following notice is applicable:
U.S. GOVERNMENT END USERS: Oracle programs (including any operating system, integrated software, any programs embedded, installed or activated on delivered hardware, and modifications of such programs) and Oracle computer documentation or other Oracle data delivered to or accessed by U.S. Government end users are "commercial computer software" or "commercial computer software documentation" pursuant to the applicable Federal Acquisition Regulation and agency-specific supplemental regulations. As such, the use, reproduction, duplication, release, display, disclosure, modification, preparation of derivative works, and/or adaptation of i) Oracle programs (including any operating system, integrated software, any programs embedded, installed or activated on delivered hardware, and modifications of such programs), ii) Oracle computer documentation and/or iii) other Oracle data, is subject to the rights and limitations specified in the license contained in the applicable contract. The terms governing the U.S. Government's use of Oracle cloud services are defined by the applicable contract for such services. No other rights are granted to the U.S. Government.
This software or hardware is developed for general use in a variety of information management applications. It is not developed or intended for use in any inherently dangerous applications, including applications that may create a risk of personal injury. If you use this software or hardware in dangerous applications, then you shall be responsible to take all appropriate fail-safe, backup, redundancy, and other measures to ensure its safe use. Oracle Corporation and its affiliates disclaim any liability for any damages caused by use of this software or hardware in dangerous applications.
Oracle and Java are registered trademarks of Oracle and/or its affiliates. Other names may be trademarks of their respective owners.
Intel and Intel Inside are trademarks or registered trademarks of Intel Corporation. All SPARC trademarks are used under license and are trademarks or registered trademarks of SPARC International, Inc. AMD, Epyc, and the AMD logo are trademarks or registered trademarks of Advanced Micro Devices. UNIX is a registered trademark of The Open Group.
This software or hardware and documentation may provide access to or information about content, products, and services from third parties. Oracle Corporation and its affiliates are not responsible for and expressly disclaim all warranties of any kind with respect to third-party content, products, and services unless otherwise set forth in an applicable agreement between you and Oracle. Oracle Corporation and its affiliates will not be responsible for any loss, costs, or damages incurred due to your access to or use of third-party content, products, or services, except as set forth in an applicable agreement between you and Oracle.