Examples
This section provides examples of using compliance. Examples include:
Create Repository Rule Based on Custom Configuration Collections
This example illustrates how a compliance rule can be created and run on a custom configuration which collects a sample configuration file (for this example, /tmp/foo.xml) for targets of type Host.
For this example, create a sample /tmp/foo.xml file with following contents:
<some_config>
   <prop foo="1"/>
   <prop bar="2"/>
</some_config>
The steps include how to:
-
Create a custom configuration
-
Create a custom-based repository rule
-
Create a compliance standard
-
Associate a target
-
View results
To create a custom configuration:
-
From the Enterprise menu, select Configuration, then select Configuration Extensions.
-
From the Configuration Extensions page, click Create. The Create Configuration Extension page appears.
-
Type the Name (for example, compliance_ccs), a description (optional), select Target Type (for this example, Host).
-
In the Files & Commands section, type the Default Base Directory. [Use /tmp as the directory.]
This is an example. For a real target it should be the directory containing the target's configuration files.
Note: All files collected by custom configurations MUST NOT change on a daily basis, but should only change very rarely due to an explicit action by an administrator.
-
Click Add.
- In the Type column, select File.
- In the File/Command column, type foo.xml. The Alias column is automatically filled in with foo.xml.
Note: You can use any file or files, not just xml and not just "foo.xml" expressions. Custom configuration supports many files and corresponding parsers.
- In the Parser column, select XML Parser (default).
-
Click Save located at the bottom of the page.
-
-
In the Custom Configurations page, highlight compliance_css and click Deploy. The Deployments page appears.
-
Click Add to select targets on which CSS needs to be deployed.
-
On the Search and Select: Targets page, highlight the host target where file /tmp/foo.xml was created and click Select.
-
Click Apply on the Deployments page.
-
-
On the Submit Pending Deployment Actions popup, select Yes. This action will submit the deployment action.
On the Deployments page, click Refresh Status to refresh the status of the deployment until the Status column displays "Successfully deployed".
-
Now that deployment is submitted, click Cancel to exit the page. (Note: Clicking Save instead of Apply earlier, would have exited the page right after the submission of the deployment action.)
To create a custom-based repository rule based on custom configuration collection:
-
From the Enterprise menu, select Compliance, then select Library.
-
On the Compliance Library page, click the Compliance Standard Rules tab.
-
Click Create.
-
On the Create Rule popup, select Repository Rule and click Continue.
-
On the Create Rule: Repository Rule: Details page, type in the Rule name, for our example, compliance_css_rule.
-
For the Compliance Rule State, select Development, then select Minor Warning for the Severity. For Applicable To: select Host. Click Next located at the top-right of the page.
-
-
On the Create Rule: Repository Rule: Check Definition (Query) page, click Model Query. New Search Criteria page appears.
-
Select compliance_css (Parsed Data) from the Configuration Item menu under "Commonly Used Search Criteria".
-
Under the Host section and Parsed Data subsection, type foo.xml for Data Source contains. For the Attribute, select is exactly comparison operator and type foo to refer to the "foo" attribute in our sample file. (Note: % sign can also be used as a wild card character in these expressions for Data Source and Attribute.)
-
Click Search to see the rows returned for this filter. A table displays the data with value 1 for attribute foo in our file.
-
Click OK.
-
The Create Rule: Repository Rule: Check Definition (Query) displays again but this time the SQL Source appears.
-
Click Next. Note: In general, you could also update the query before proceeding, if needed.
-
-
The Create Rule: Repository Rule: Check Definition (Violation Condition) page displays.
-
Check all the columns as Key columns (VALUE, ATTR, CONTAINER, and DATA SOURCE NAME), except the INFO column.
-
In the Condition Type section of the page, select Simple Condition, and in the Column Name select VALUE and change the Comparison Operator to equal sign (=). In the Default Value column, type 1. Click Next.
-
-
In the Create Rule: Repository Rule: Test page, click the icon next to Target Name field. The Search and Select: Targets popup appears. Find the host where the custom configuration was deployed. Select it and click Select.
-
In the Create Rule: Repository Rule: Test page, click Run Test. When the test runs successfully, you get a confirmation stating that the Run Test - Completed Successfully.
You should see one violation after running the test because we specified value of "1" in step 5 above for violation condition and our sample file had value "1" for attribute foo. Click Close.
-
On the Create Rule: Repository Rule: Test page, click Next.
-
In the Create Rule: Repository Rule: Review page, ensure that all the information that you added is correct. Click Finish.
To create a compliance standard:
-
From the Enterprise menu, select Compliance, then select Library.
-
Click the Compliance Standards tab and click Create.
-
On the Create Compliance Standard popup, type compliance_css_cs in the Name field, select Host from Applicable To menu, and select Repository as the Standard Type. Click Continue.
-
The compliance standard page displays with the information regarding the compliance_css_cs compliance standard. Right-click on compliance_css_cs on the left side and select the Add Rules... option in the right-click menu.
-
On the Include Rule Reference popup, select compliance_css_rule. Click OK. Click Save to save the compliance_css_cs.
-
A confirmation message appears on the Compliance Library page stating that the compliance standard has been created. Click OK.
To associate targets:
-
Select the compliance_css_cs that was just created. Click Associate Targets.
-
On the "Target Association for Compliance Standard: compliance_css_cs" page, click Add to add targets.
-
On the Search and Select: Targets page, select a target where /tmp/foo.xml is present and click Select. Click OK.
You will then be prompted whether you want to Save the association or not. Click either Yes or No. You will then get an Informational message stating that the compliance standard has been submitted to the target for processing.
To view results:
-
From the Enterprise menu, select Compliance, then select Results.
On the Compliance Results page, select the compliance_css_cs compliance standard and click Show Details to view the details of the compliance standard created.
-
Click the Violations tab associated with the compliance_css_rule. The target is associated with one violation.
-
Click on the rule node in the tree to see the Violation Events tab, then click on this tab to see the violation details for the rule. Click on a violations row in the violations table, to view details of the violation.
Create Compliance Standard Agent-side and Manual Rules
When creating an agent-side compliance standard rule, perform the following steps:
- Create a configuration extension
- Create the agent-side compliance rule
- Create a manual rule
- Create a compliance standard
- Add the rules to the configuration standard
- Associate the compliance standard to a target
Creating a Configuration Extension
Perform the following steps to create a configuration extension:
- From the Enterprise menu, select Configuration, then select Configuration Extensions.
- On the Configuration Extensions page, click Create.
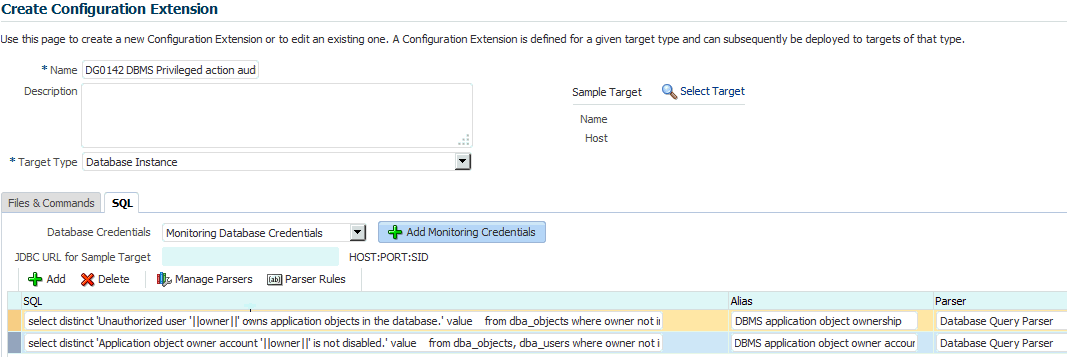
- Type a name for the extension, for example,
DG0142 DBMS Privileged action audit. You will use this name on the Check Definition page. - Select Database Instance for the Target Type.
- Click the SQL tab.
- Click Add to add the first SQL statement.
- In the SQL field, type:
select distinct 'Unauthorized user '||owner||' owns application objects in the database.' value from dba_objects where owner not in ('ANONYMOUS','AURORA$JIS$UTILITY$', 'AURORA$ORB$UNAUTHENTICATED', 'CTXSYS','DBSNMP','DIP','DVF','DVSYS','EXFSYS','LBACSYS','MDDATA', 'MDSYS','MGMT_VIEW','ODM','ODM_MTR', 'OLAPSYS','ORDPLUGINS', 'ORDSYS', 'OSE$HTTP$ADMIN','OUTLN','PERFSTAT', 'PUBLIC','REPADMIN','RMAN','SI_INFORMTN_SCHEMA', 'SYS','SYSMAN','SYSTEM','TRACESVR', 'TSMSYSWK_TEST','WKPROXY','WKSYS', 'WKUSER','WMSYS','XDB', 'OWBSYS', 'SCOTT', 'ORACLE_OCM', 'ORDDATA', 'APEX_030200', 'OWBSYS_AUDIT', 'APPQOSSYS', 'FLOWS_FILES') and owner not in (select grantee from dba_role_privs where granted_role='DBA') - Type an alias, for example,
DBMS application object ownership. This alias is useful when defining the rule on top of this configuration extension. - For the Parser, use Database Query Parser.
- In the SQL field, type:
- Click Add to add the second SQL statement.
select distinct 'Application object owner account '||owner||' is not disabled.' value from dba_objects, dba_users where owner not in ('ANONYMOUS','AURORA$JIS$UTILITY$', 'AURORA$ORB$UNAUTHENTICATED','CTXSYS','DBSNMP','DIP','DVF', 'DVSYS','EXFSYS','LBACSYS','MDDATA','MDSYS','MGMT_VIEW','ODM', 'ODM_MTR','OLAPSYS','ORDPLUGINS','ORDSYS','OSE$HTTP$ADMIN', 'OUTLN','PERFSTAT','PUBLIC','REPADMIN','RMAN', 'SI_INFORMTN_SCHEMA','SYS','SYSMAN','SYSTEM','TRACESVR', 'TSMSYS', 'WK_TEST','WKPROXY','WKSYS','WKUSER','WMSYS','XDB') and owner in (select distinct owner from dba_objects where object_type <> 'SYNONYM') and owner = username and upper(account_status) not like '%LOCKED%'- Type an alias, for example,
DBMS application object owner accounts. - For the Parser, use Database Query Parser.
- Click Save then click Yes on Configuration box.
Figure 23-14 Completed Create Configuration Extension Page
To create an agent-side compliance rule:
- From the Enterprise menu, select Compliance, then select Library.
- On the Compliance Library, click Compliance Standard Rules.
- Click Create. On the Create Rule pop-up, choose Agent-side Rule.
- Click Continue.
-
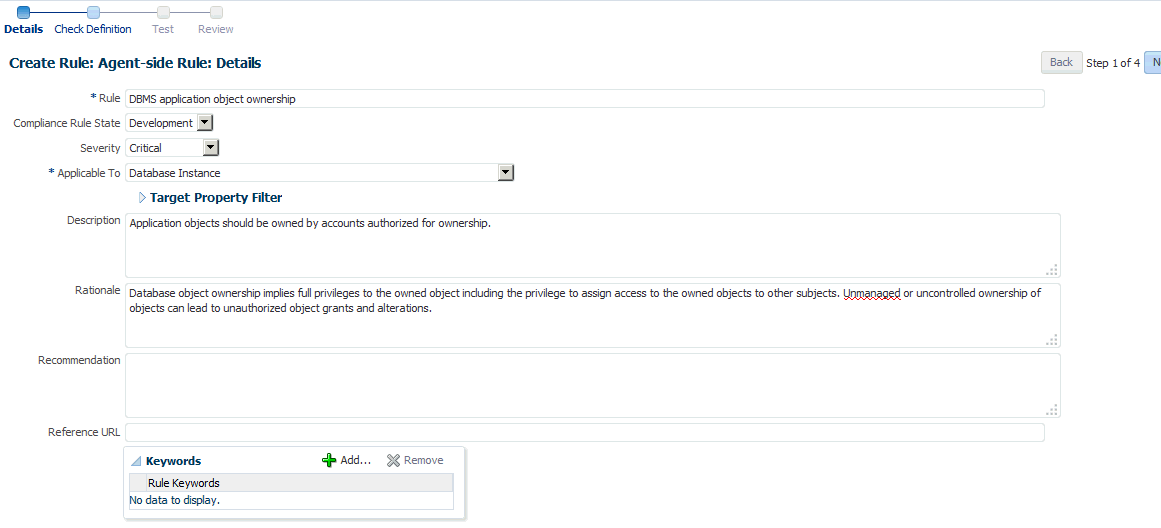
On the Create Rule, Agent-side Rule Details page provide the following information:
- Name: DBMS application object ownership
- Compliance Rule State: Development
- Severity: Critical
- Applicable To: Database Instance
- Description: Application objects should be owned by accounts authorized for ownership.
- Rationale: Database object ownership implies full privileges to the owned object including the privilege to assign access to the owned objects to other subjects. Unmanaged or uncontrolled ownership of objects can lead to unauthorized object grants and alterations.
- Click Next.
Figure 23-15 Completed Compliance Standard Rule Details Page
-
On the Create Rule: Agent-side Rule: Check Definition Page search for the configuration extension and alias you defined earlier.
Note:
The configuration extension name and the alias name are concatenated together to form the name in the Configuration Extension and Name field. For this example, the complete name is: DG0142 DBMS Privileged action audit-DBMS application object ownership.Click Next.
Figure 23-16 Completed Compliance Standard Rule Check Definition Page
- On the Create Rule: Agent-side Rule: Test Page, search for a target, and then click Run Test. A pop-up displays stating that the test is running. Click Close on the Confirmation pop-up.
Note:
You can have test results that intentionally show violations. For example, if you are testing target type equal to host and you are evaluating a host target, then you will see violation results.Click Next.
Figure 23-17 Completed Compliance Standard Rule Test Page
- On the Create Rule: Agent-side Rule: Review, ensure the information is as you intended. If not, click Back and make the necessary corrections. When the information is correct, click Finish.
Note:
The compliance standard rule is not defined until you click Finish.Tips
- Once the compliance standard rule has been created, it is not automatically evaluated. Consider adding the compliance standard rule to a compliance standard.
- Assign a corrective action to the rule after the rule has been created.
- On the Compliance Standard Rules tab, highlight the rule you just created.
- From the Actions menu, select Assign Corrective Action.
- From the Assign Creative Action popup, select an existing corrective action and click OK.
Figure 23-18 Completed Compliance Standard Rule Review Page
- Repeat these steps for the second rule.
Note:
The compliance standard rule is not defined until you click Finish.Creating a Manual Rule
The purpose of creating this manual rule is to keep track of the checks that cannot be automated: ensuring that test plans and procedures have been followed prior to production.
To create a manual rule:
- On the Compliance Library, click Compliance Standard Rules.
- Click Create. On the Create Rule pop-up, choose Manual Rule.
- Click Continue.
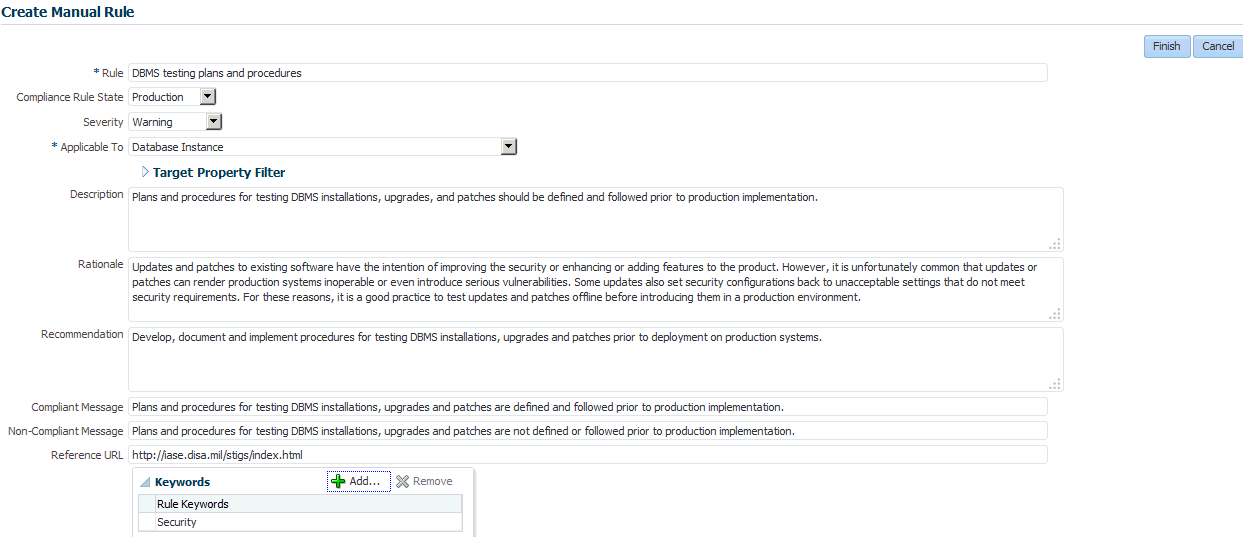
- On the Create Manual Rule page, provide the following information.
- Name: DBMS testing plans and procedures
- Compliance Rule State: Production
- Severity: Warning
- Applicable To: Database Instance
- Description: Plans and procedures for testing DBMS installations, upgrades, and patches should be defined and followed prior to production implementation.
- Rationale: Updates and patches to existing software have the intention of improving the security or enhancing or adding features to the product. However, it is unfortunately common that updates or patches can render production systems inoperable or even introduce serious vulnerabilities. Some updates also set security configurations back to unacceptable settings that do not meet security requirements. For these reasons, it is a good practice to test updates and patches offline before introducing them in a production environment.
- Recommendation: Develop, document and implement procedures for testing DBMS installations, upgrades and patches prior to deployment on production systems.
- Compliant Message: Plans and procedures for testing DBMS installations, upgrades and patches are defined and followed prior to production implementation.
- Non-Compliant Message: Plans and procedures for testing DBMS installations, upgrades and patches are not defined or followed prior to production implementation.
- Reference URL: http://iase.disa.mil/stigs/index.html
- Rule Keywords: Security
- Click Finish.
Creating a Compliance Standard
To create a compliance standard, perform the following steps:
- From the Enterprise menu, select Compliance, then select Library.
- On the Compliance Library page, click Compliance Standards.
- Click Create. On the Create Compliance Standard pop-up, provide the following:
- Name: CS1 - DB Check
- Applicable To: Select Database Instance
- Author: SYSMAN
- Standard Type: Agent-side
- Click Continue
Figure 23-20 Completed Create Compliance Standard Pop-Up
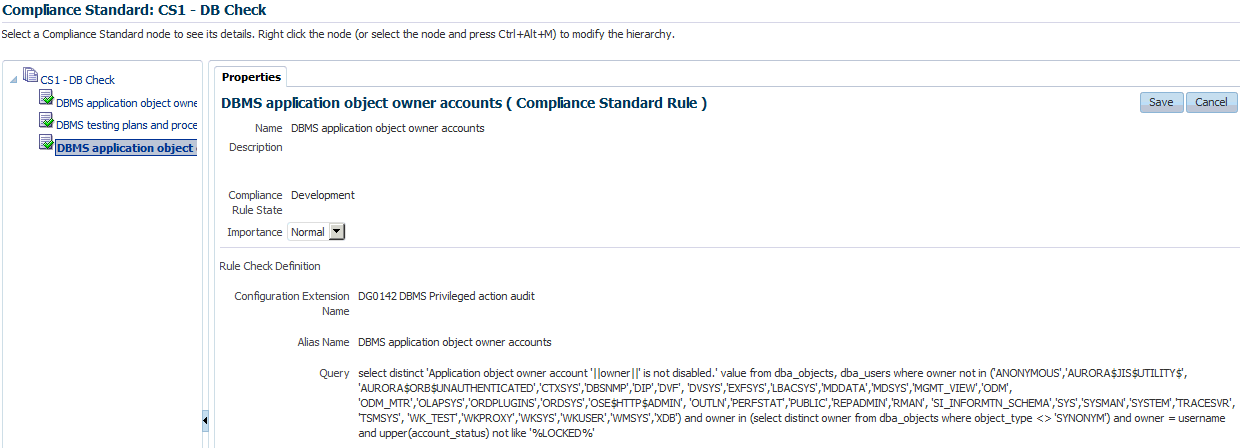
- On the Compliance Standard: CS1 - DB Check page, right-click the standard in the navigation tree. Select Add Rules. On the Include Rule Reference, select DBMS application object ownership, DBMS application owner accounts, and DBMS testing plans and procedures.
Click OK.
- Click Save.
Associating the Compliance Standard to a Target
To associate the compliance standard to a target, perform the following steps:
- From the Enterprise menu, select Compliance, then select Library.
- On the Compliance Library page, click Compliance Standards.
Figure 23-22 Compliance Standards Library Page
- Highlight the newly created standard (CS1 - DB Check) and click the Associate Targets button.
- On the Target Association for Compliance Standard: CS1 - DB Check page click Add.
- Choose one or more targets, for example, Oemrep_Database.
Figure 23-23 Completed Target Association Page
- Click Select. Click OK.
- Click Yes to Save the Association.
Suppress Violations
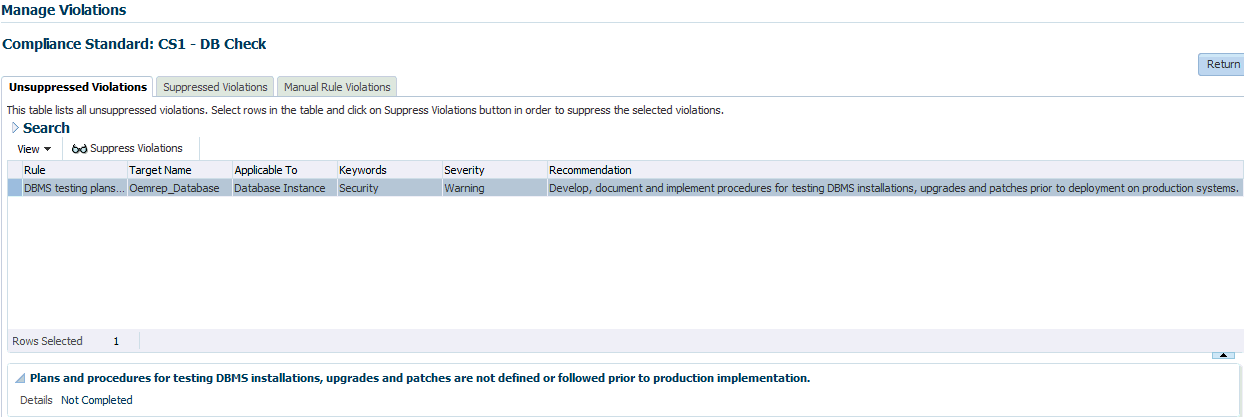
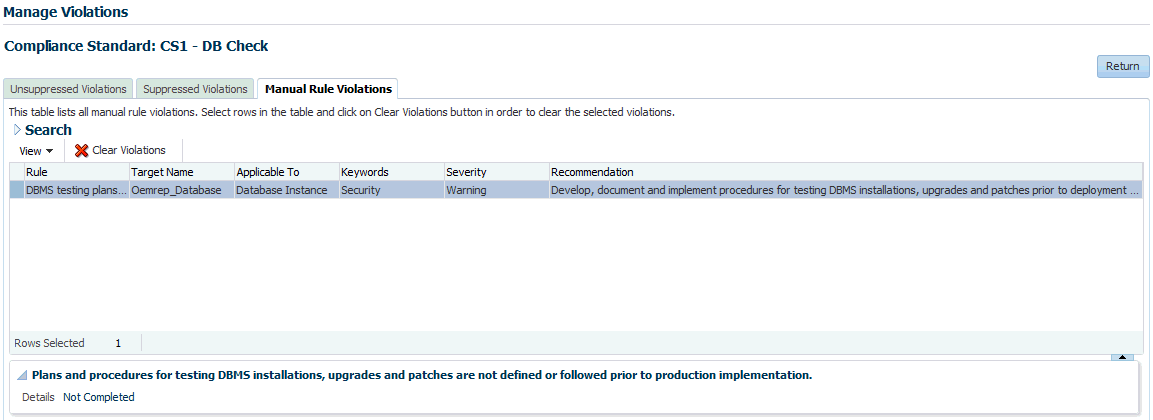
The purpose of this example is to suppress violations. We will suppress the violation that arose due to the manual rule defined in Create Compliance Standard Agent-side and Manual Rules.
Follow these steps:
