2 Installing the Microsoft SCOM Event Connector

The Oracle Enterprise Manager Connector Framework requires a web service interface for forwarding event information to Microsoft SCOM. To integrate with Enterprise Manager, a third-party SCOM web service front-end must be installed. In addition to the web service front-end, an Oracle SCOM Agent must also be installed. Both of these components are included in the Oracle Enterprise Manager SCOM connector installation package.

You can install the web service on any Unix or Windows system that has connectivity with the SCOM server. In addition to the SCOM web service front-end, you must also install a back-end Oracle SCOM Agent. The Oracle SCOM Agent is preconfigured and is also included in the Oracle Enterprise Manager SCOM connector installation package.

Figure 2-1 shows the communication between the various components of the SCOM Connector.

Figure 2-1 Connector Communication Between Components


Connector Communication Between Components

The following sections in this chapter discuss these topics:

Note:

Unless otherwise noted, these instructions apply to the SCOM 2012 connector and to the SCOM 2007 connectors. Instructions specific to the SCOM 2007 connectors are available in Microsoft SCOM 2007 Connector.

Installation Platforms

You can install the SCOM web service on the following platforms that support Oracle Java Development Kit (JDK):

  • Microsoft Windows

  • Oracle Solaris

  • Linux

Depending on the following SCOM connector versions, you can install the Oracle SCOM Agent on the Microsoft Windows server platform:

  • For the SCOM 2012 connector, the Microsoft Windows 2008, 2012, and 2016 server platforms are supported.

  • For both SCOM 2007 connectors, the Microsoft Windows 2000, 2003, and 2008 server platforms are supported.

Note:

For information, see SCOM 2012 Connector Installing the SCOM Connector using Windows Clustering to enable HA High Availability (Doc ID 1674577.1):

https://support.oracle.com/rs?type=doc&id=1674577.1

Prerequisites for the Microsoft SCOM Event Connector

Verify the following prerequisites before installing the connector:

  1. A utility for unzipping .zip files is available where the SCOM Agent is to be installed.
  2. Oracle Java Development Kit (JDK) is installed on the system where the SCOM Web Service will be installed.
  3. In order to create events to Microsoft SCOM, you must import the OracleEnterpriseManager.Alert.Creator Management Pack from the Microsoft SCOM server. The Management Pack file is provided with the SCOM Agent installation binaries.
  4. Verify that the connector is available in Enterprise Manager or available for download from the Self Update feature:
    • For Oracle Enterprise Manager Cloud Control 13c:

      The latest version of the different SCOM connectors come pre-installed and do not need to be downloaded through Self Update. To determine whether the connector needs to be downloaded from self update, perform the following steps:

      1. From the Setup menu, select Extensibility, then select Self Update.

      2. On the Self Update page, select Management Connector to display a list of available connectors.

      3. If the Microsoft SCOM connector that you need is not listed here, then you will need to set up My Oracle Support (MOS) Preferred Credentials.

        Note:

        If the connector you wish to install is not pre-installed, the My Oracle Support (MOS) Preferred Credentials must be set to enable the download of connectors through self update.

    • For Oracle Enterprise Manager Cloud Control 12c:

      In order to install the connector, the My Oracle Support Preferred Credentials must be set to enable the download of the connector through self-update. To set the credentials, perform the following steps:

      1. From the Setup menu, select My Oracle Support.

      2. Select Set Credentials, then enter the username and password information and click Apply.

      3. From the Setup menu, select Extensibility, then select Self Update.

      4. On the Self Update page, select Check Updates to schedule a job to collect the metadata for the connectors.

    Note:

    Refer to the Setting up Self Update section in the Oracle Enterprise Manager Cloud Control Administrator's Guide for more details.

    You can also set up Self Update in offline mode. See the Applying an Update in Offline Mode section for details

Installing the Microsoft SCOM Event Connector in Enterprise Manager

All connectors in the Enterprise Manager store are available on the Self Update page for downloading provided the My Oracle Support Preferred Credentials are configured. See Prerequisites for the Microsoft SCOM Event Connector for instructions. The installation files for the Oracle SCOM agent and web service are packaged with the SCOM connector. The connector must be installed first in order to gain access to the installation files.

  • For Oracle Enterprise Manager Cloud Control 13c:

    The SCOM connector is preloaded; so, in most cases you will only need to apply the connector. If you need to install an older version of the connector or the connector is inadvertently deleted, then the connector will need to be downloaded from Self Update.

    To determine whether you need to download the connector, perform the following steps:

    1. From the Setup menu, select Extensibility, then select Self Update.

    2. On the Self Update page, select Management Connectors to display a list of available connectors.

    3. Look for the Microsoft SCOM connector that you intend to use.

    If it is not listed, you will need to set up My Oracle Support Preferred Credentials as specified in Prerequisites for the Microsoft SCOM Event Connector. Once the update task has completed, the connector should show up with a status of Available.

  • For Oracle Enterprise Manager Cloud Control 12c:

    None of the SCOM connectors are preloaded. To download the SCOM connectors, you will need to set up MOS Preferred Credentials as specified in Prerequisites for the Microsoft SCOM Event Connector. Once the update task has completed, the SCOM connectors should show up with a status of Available.

    If the status of the connector is Available, perform the following steps to download the connector.

If the status of the connector is Available, perform the following steps to download the connector.

  1. From the Setup menu, select Extensibility, then select Self Update.

  2. On the Self Update page, select Management Connectors to display a list of available connectors.

    The Microsoft SCOM connectors should be listed here with a status of Available.

  3. Click the appropriate Microsoft SCOM connector to select it and then click Download.

    The Schedule Download window will be displayed to determine when the download should be performed.

  4. Click Select to download immediately.

    Note:

    If you want to schedule the download for a later time, specify the date/time when the download should take place and click Select. You must return to finish the remainder of this procedure after the scheduled download date/time.

  5. If necessary, refresh the screen until the status of the connector changes to Downloaded.

If the status of the connector is Downloaded, perform the following steps to apply the connector.

  1. From the Setup menu, select Extensibility, then select Self Update.
  2. On the Self Update page, select Management Connectors to display a list of available connectors.
  3. Look for the Microsoft SCOM connector that you intend to use.
  4. Click the appropriate Microsoft SCOM connector to select it and then click Apply.

    You will be prompted to confirm the operation and then a window appears that indicates the request has been submitted.

  5. Refresh the screen until the status of the connector changes from Apply Scheduled to Applied.

Installing the Connector if Enterprise Manager is in “Offline” Mode

Under certain circumstances, such as in high security environments, an active Internet connection between Enterprise Manager and the Enterprise Manager Update Store may not be available. In such situations, Enterprise Manager can be set to install the connector in an "offline" mode.

The installation process still requires that a computer exist at your site that has Internet access, as a connection to the Enterprise Manager Update Store is still required to obtain the necessary files. The files that you download to this computer can then be transferred to a computer behind your firewall.

Note:

For Enterprise Manager 13c: All of the latest SCOM connectors come pre-installed; so, you can ignore this section if the connector that you need has been pre-installed. To determine if it is pre-installed, perform the following steps:

  1. From the Setup menu, select Extensibility, then select Self Update.

  2. On the Self Update page, select Management Connectors to display a list of available connectors.

  3. Look for the Microsoft SCOM connector that you intend to use. If it appears and has a status of Downloaded, you can skip this section.

To install the connector if Enterprise Manager is in "offline" mode:

  1. From the system that you will ultimately deploy the connector, set Enterprise Manager Cloud Control to Offline Mode:
    1. From the Setup menu, select Provisioning and Patching, then select Offline Patching.
    2. In the Online and Offline Settings page, select Offline.
  2. From the Setup menu, select Extensibility, then select Self Update.
  3. On the Self Update page, click Check Updates. A message appears with the following URL to an Oracle site from where the updates catalog file can be downloaded:
    https://updates.oracle.com/Orion/Download/download_patch/p9348486_112000_Generic.zip
  4. From an Internet-enabled computer, download the catalog file using the aforementioned URL.
  5. Copy the downloaded catalog file to the OMS host or the Management Agent host where you plan to import the connector.
  6. Import the catalog file to Enterprise Manager:
    • If the catalog file is on the OMS host:
      emcli import_update_catalog -file="file" -omslocal
      Where:
      • -file: is the direct path to the connector archive (*.zip).

      • -omslocal: indicates that the path mentioned in the -file option is directly accessible to the Enterprise Manager server

    • If the catalog file is on a different host:
      emcli import_update_catalog -file="file" -host="hostname" [-credential_set_name="setname"] | -credential_name="name" -credential_owner="owner"

    Example 2-1 shows a sample for importing the catalog archive.

  7. On the Self Update page, in the table, click Management Connectors.
  8. On the Connector Updates page, select the imported update that is available for download. Click Download.

    A message appears with a URL to an Oracle site from where the update can be downloaded.

  9. From a computer that is connected to the internet, download the update using the aforementioned URL.
  10. Copy the downloaded file to the OMS host or the Management Agent host where you plan to deploy the connector.
  11. To import the downloaded connector archive into Enterprise Manager, run the following command:
    emcli import_update -file=”<path to *.zip file>” -omslocal
    Where:
    • -file: is the direct path to the connector archive (*.zip).

    • -omslocal: indicates that the path mentioned in the -file option is directly accessible to the Enterprise Manager server

Example 2-1 Sample for Importing Catalog Archive

emcli import_update_catalog -file="/u01/common/p9348486_112000_Generic.zip"  -omslocal

Imports the master catalog file p9348486_112000_Generic.zip. The file must exist
on the OMS host. In a multiple OMS setup, the request can be processed by any
OMS, so the file should be accessible from the OMS processing the request. This
means that the file must be kept on a shared location that is accessible from all
the OMS instances.

emcli import_update_catalog -file="/u01/common/p9348486_112000_Generic.zip" -host="host1.example.com" -credential_set_name="HostCredsNormal"
 
Imports the master catalog file p9348486_112000_Generic.zip that is present on 
the host host1.example.com. The host must be a managed host target in Enterprise
Manager, and the Management Agent on this host must be up and running. The
preferred unprivileged credentials for host host1.example.com are used to retrieve
the remote file.

Installing and Running the Oracle SCOM Agent

Preinstallation Requirements

Note:

These requirements apply to the SCOM 2012 connector only. For the SCOM 2007 connectors, see Verify Preinstallation Requirements in Microsoft SCOM 2007 Connector.

The following requirements apply to the system where the Oracle SCOM Agent is installed:

  1. .NET framework 4.0 is installed.
  2. ASP.NET 4.0 is installed.

    After .NET framework 4.0 is installed, enter the following command to install ASP.NET 4.0:

    %SystemRoot%\Microsoft.NET\Framework\v4.0.xxxxx\aspnet_regiis –i

    WARNING:

    This command upgrades other applications running under IIS to version 4.0

  3. Internet Information Services (IIS) 7.0 or higher is installed.
  4. CGI and ISAPI Extensions Role Services are installed. To install the Role Services, perform the following steps:
    1. Click Start, then Administrative Tools, and finally Server Manager to open the Server Manager.
    2. Expand Roles in the left panel.
    3. Scroll down to the Web Server (IIS) section and click Add Role Services. This will open the Add Role Services window.
    4. Check the check box for CGI and ISAPI Extensions under Web Server/Application Development.
    5. Click Next and then Install.
  5. ISAPI and CGI Restrictions are set to allowed for ASP.NET 4.0. To enable ASP.NET 4.0, perform the following steps:
    1. Click Start, then Administrative Tools, and finally Internet Information Services (IIS) Manager to open the IIS Manager.
    2. Click the local machine name under Connections.
    3. Select Content View. ISAPI and CGI Restrictions should be listed
    4. Double click ISAPI and CGI Restrictions. The ISAPI and CGI Restrictions page is displayed.
    5. Right click on the appropriate v4.0 line for your environment and select Allow.

      Note:

      The path that contains Framework is for 32-bit environments, and the path that contains Framework64 is for 64-bit environments.

Setting Up the Agent Account

Note:

These instructions apply to the SCOM 2012 connector only. For the SCOM 2007 connectors, see Verify Preinstallation Requirements in Microsoft SCOM 2007 Connector.

Before installing the Oracle SCOM Agent, you need to set up an account for the Oracle SCOM Agent to access the SCOM API. The account must satisfy the following requirements:

System Center Operations Manager 2012 Administrator Groups

To determine the groups that are designated as an System Center Operations Manager 2012 Administrator, perform the following steps:

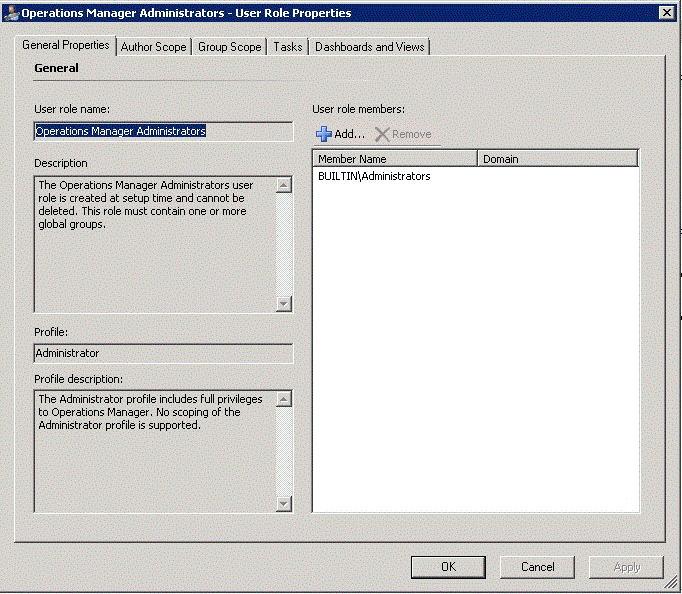
  1. In the Administration pane of the System Center Operations Manager 2012 console (Figure 2-2 shows the console), select Administration, then Security, then User Roles. The User Roles should be displayed in the center pane.
  2. Right-click on Operations Manager Administrators and select Properties. The General Properties tab lists the groups that have administrative permissions in the User Role members window. The account the Agent uses must be a member of one of the groups listed here, or you need to add one of its groups to this list.

Figure 2-2 Operations Manager Administrators Console

Operations Manager Administrators Console

Installing the Oracle SCOM Agent

The SCOM Web Service uses the back-end Oracle SCOM Agent to access the SCOM API. The Oracle SCOM Agent must be installed on a Windows system that has connectivity to the SCOM server. The Oracle SCOM Agent is preconfigured to interface with the SCOM Web Service and requires minimal configuration.

Note:

There should only be one installed instance of the Oracle SCOM Agent.

To install the Oracle SCOM Agent, perform the following steps:

  1. Obtain a copy of the agent installation file from the Management Server host machine as specified in Exporting the Agent Installation Files and put the SCOMAgent.zip installation file into the directory where you want to install the Oracle SCOM Agent.
  2. Unzip the contents of the SCOMAgent.zip file to any directory.
    This extracts the SCOMAgentInstaller.msi and the OracleEnterpriseManager.Alert.Creator.xml files into the designated directory.
  3. Navigate to the directory and run the Oracle SCOM Agent installer by double-clicking the SCOMAgentInstaller.msi file.
    This starts the installer and displays the Welcome to the Oracle SCOM Agent Setup Wizard page.
  4. Click Next to display the Service Type page.
  5. Select the type of service to be installed under IIS. The default and recommended service type is Web Site.
    This installs the service as a stand-alone web site. Selecting Virtual Directory installs the service as a Virtual Directory under an existing web site.
  6. Click Next to display the Select Installation Folder page.
  7. Enter the location to install the Agent or accept the default location of C:\iWaveSoftware\SCOMConnectorAgent.
  8. Click Next to display the SCOM Agent Options page.
  9. Enter the name to use when registering the connector in SCOM, or accept the default value of SCOM Agent.
  10. Click Next to display the Confirm Installation page.
  11. Click Next to display the SCOM Management Group Configuration page, and enter the information for the following required fields on the form:
    1. Host name or IP address of the SCOM server.
    2. Domain of the account to use when connecting to the SCOM API.
    3. User name of the account to use when connecting to the SCOM API.
    4. Password of the account to use when connecting to the SCOM API.

    Note:

    The information for the account from Setting Up the Agent Account should be entered in the Domain, User name, and Password fields.

  12. Click Done to proceed. The window displayed next depends on the Service Type you selected in step 5 above:
    • If you selected Web Site: The Web Site Configuration window appears. This window contains the Web Site Name and Port Number fields, and both have default values. Accept the default values or change them to the desired values.
    • If you selected Virtual Directory: The Virtual Directory Configuration window appears. This window defines the name of the virtual directory to create and the web site within which it will be installed. Accept the default values or change them to the desired values.
  13. For either window, click OK to proceed and display the Web Service Credentials window. This window defines the credentials to specify when testing the newly installed Oracle SCOM Agent.
  14. Specify valid Windows account credentials and click OK.
    The installer now invokes the web service to verify that it is operational. A window pops up with the results of the test.
  15. Close the window. The Installation Successful window appears. This window lists the URL of the Oracle SCOM Agent.
    Make a note of the URL. You will need this whenever you install the SCOM Web Service.
  16. Click OK to continue. The Installation Complete window appears.
  17. Click Close.
The Oracle SCOM Agent installation process is complete.

Configuring Agent Notification

Note:

These instructions apply to the SCOM 2012 connector only.

If the Agent was NOT installed on the SCOM server, you must perform the following steps to configure the SCOM server to send a notification message to the SCOM agent whenever an alert is created by the SCOM 2012 connector:

  1. Obtain a copy of the notification setup file from the Management Server host machine as specified in Exporting the Agent Installation Files and put the SCOMNotification.zip installation file into the directory where you want to install the Agent Notification utility.
  2. Unzip the contents of the SCOMNotification.zip file to any directory. This creates the bin\NotificationConfiguration.exe and the OracleEnterpriseManager.Alert.Creator.xml files in the designated directory.
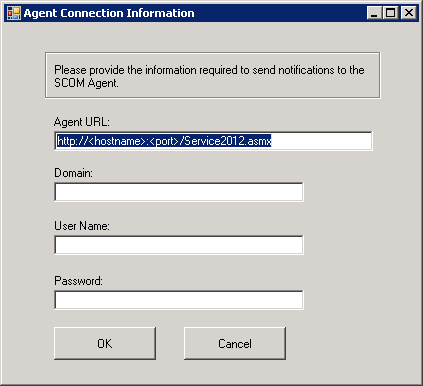
  3. Right click on the NotificationConfiguration.exe file and select Run as administrator. The Agent Connection Information window will be displayed as shown in Figure 2-3.
  4. Enter the information required to connect to the SCOM Agent as described below:
    1. Agent URL: Enter the URL that was noted when you installed the Oracle SCOM Agent. You will need to replace localhost with the actual hostname or IP address of the system where the Oracle SCOM Agent was installed.
    2. Domain: Enter the domain of the account to use when connecting to the Oracle SCOM Agent. This field can be left blank if you are using an account that is local to the system where the Oracle SCOM Agent is installed.
    3. User Name: Enter the username of the account to use when connecting to the Oracle SCOM Agent. This must be a valid user account that has permission to access the system where the Oracle SCOM Agent is installed.
    4. Password: Enter the password to use when connecting to the Oracle SCOM Agent. This must be the password of the account specified in the User Name field.

      Note:

      Most likely, the Domain, User Name, and Password information will be the credentials entered in step 14 of Installing the Oracle SCOM Agent.

  5. Click OK.

Figure 2-3 Agent Connection Information Window

Agent Connection Information Window

Installing the Alert Creator Management Pack

A management pack file named OracleEnterpriseManager.Alert.Creator.xml is also included in the Agent/Notification installation zip files. This management pack is required to create alerts in SCOM.

Note:

These instructions are for SCOM 2012 only. For instructions to install the Alert Creator Management Pack for SCOM 2007, see Install the Alert Creator Management Pack for Microsoft SCOM 2007 in Microsoft SCOM 2007 Connector.

Follow the steps below to import the management pack into SCOM:

  1. In the Administration pane of the Operations Manager console, select Administration, then Management Packs.
  2. Right-click on Management Packs and select Import Management Packs… The Select Management Packs window appears.
  3. For SCOM 2012, click Add and select Add from disk...
  4. Navigate to the directory where the OracleEnterpriseManager.Alert.Creator.xml file is located.
  5. Select the OracleEnterpriseManager.Alert.Creator.xml file and click Open.
    The Import Management Packs window appears.
  6. Click Install to import the management pack.
  7. Click Close after the management pack has been imported.
The Agent is now configured to insert alerts into SCOM.

Starting and Stopping the Agent

The installer automatically starts the Agent. To stop the agent, open the IIS manager, select the web site where it was installed, then click Stop. To start, click Start.

Uninstalling the Alert Creator Management Pack

To remove the alert creator management pack OracleEnterpriseManager.Alert.Creator.xml, perform the following steps:

  1. In the Administration pane of the Operations Manager console, select Administration, then Management Packs.
  2. In the Management Packs pane, right click the Oracle Enterprise Manager Alert Creator management pack and click Delete.
  3. On the message stating that deleting the management pack might affect the scoping of some user roles, click Yes.

Uninstalling the Oracle SCOM Agent

To uninstall the Oracle SCOM Agent, perform the following steps:

  1. Open the Control Panel and select Add/Remove Programs.
  2. Find and select SCOM Agent. Select Uninstall, and click Yes, to confirm.
  3. Manually navigate to the installation directory and remove any remaining installation files. The default installation directory is for the agent is:
    C:\iWaveSoftware\
  4. (Optional) Remove or disable the domain Agent Account created exclusively for the Oracle SCOM Agent.

Exporting the Agent Installation Files

Exporting Agent Installation Files for Enterprise Manager 13c

To export the installation files, first determine where you want to export the installation files. You can export it to a managed host machine or to your workstation:

Exporting Agent Installation Files to a Managed Host

To export to a managed host machine, perform the following steps:

  1. From the Setup menu, select Extensibility, then select Self Update.
  2. On the Self Update page, select Management Connector to display a list of available connectors.
  3. Click the appropriate Microsoft SCOM connector name, then select Export to->Managed Host from the Actions list.
    A pop-up window similar to Figure 2-4 will be displayed:

    Figure 2-4 Export Update to a Managed Host


    Export Update to a Managed Host
  4. Enter the name of the export file name or accept the default name.
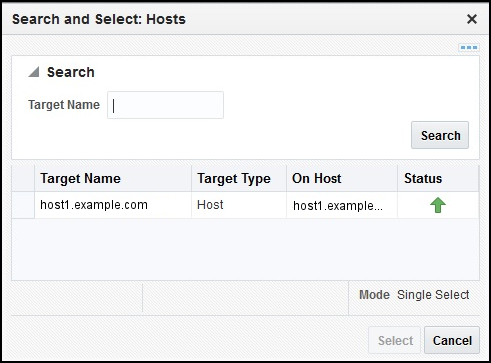
  5. Click the search icon for the Host field. A pop-up window similar toFigure 2-5 is displayed:

    Figure 2-5 Search Hosts


    Search Hosts
  6. Select a host and click Select. You might need to enter a search string to narrow the results.
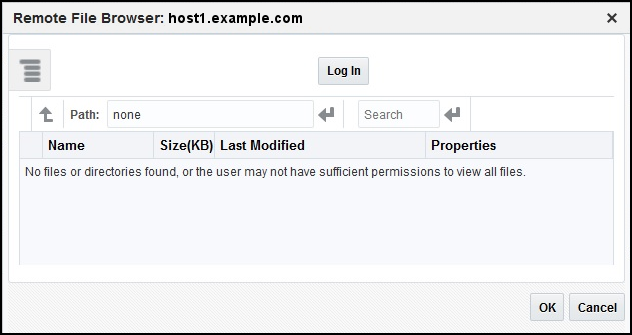
  7. Click the search icon for the Location field. A pop-up window similar to Figure 2-6 is displayed:

    Figure 2-6 Host Location


    Host Location
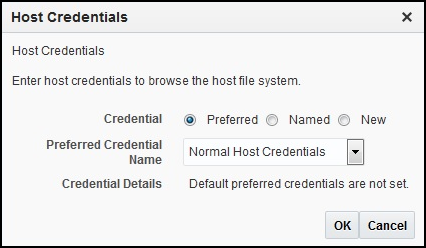
  8. Click Log In. A pop-up window similar to Figure 2-7 is displayed:

    Figure 2-7 Host Credentials


    Host Credentials
  9. Select existing Preferred or Named credentials or enter a New set of named credentials and click OK.
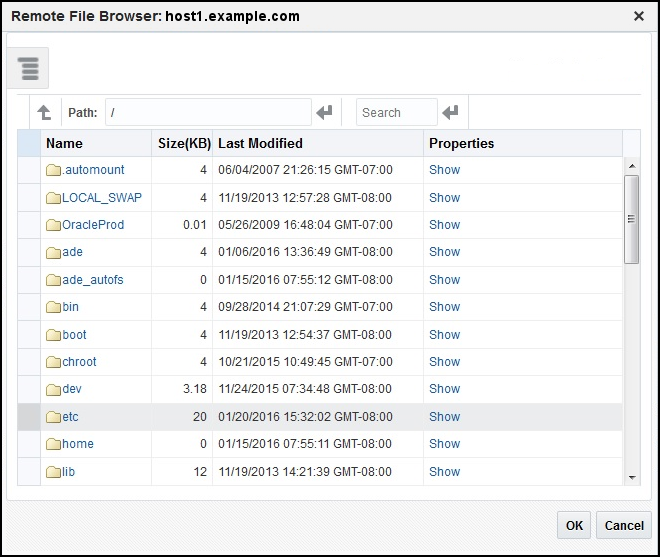
    A pop-up window similar to Figure 2-8 is displayed:

    Figure 2-8 Select Location


    Select Location
  10. Select the path where you want to place the export file and click OK.
  11. The Export Update to a Managed Host pop-up window will be displayed with the selections listed. Click Export.
Exporting Agent Installation Files to Your Workstation

To export to your workstation, perform the following steps:

  1. From the Setup menu, select Extensibility, then select Self Update.
  2. On the Self Update page, select Management Connector to display a list of available connectors.
  3. Click the appropriate Microsoft SCOM connector name, then select Export to->Your Workstation from the Actions list.
  4. A pop-up window will be displayed that prompts whether to open or save the file. Select Save File and click OK.
  5. A pop-up window may be displayed that allows you to select the location where the file will be saved. Select the location and click Save.

Exporting Agent Installation Files for Enterprise Manager 12c

The agent installation file is included in the Self Update archive that was installed in Installing the Microsoft SCOM Event Connector in Enterprise Manager. To extract the installation file, perform the following steps:

  1. Determine the command required to export the agent installation file. To do this, perform the following steps:
    1. From the Setup menu, select Extensibility, then select Self Update.
    2. On the Self Update page, click the Management Connector link in the Type column.
    3. Click the appropriate Microsoft SCOM connector name, then select Export from the Actions list.
    A pop-up window will appear with the command required to export the file, as shown in Figure 2-9:

    Figure 2-9 Export Command Example


    Export Command Example
  2. Open a command window on the Operations Manager host machine and navigate to a temporary directory where the file can be copied.
  3. Log in to EM CLI using the following command. You will be asked to provide the password information for the Super Administrator account.
    emcli login -username=<Super Administrator>

    Note:

    For information about using EM CLI, see the Oracle® Enterprise Manager Command Line Interface guide.

  4. Run the emcli export_update command from your system, changing <dirname> to the full path of the temporary directory.
    A zip file will be created. The file name will be comprised of the ID value specified in the export_update command with a .zip extension.
  5. Extract the agent installation files from the zip file using the following command:
    unzip *.zip archives/SCOM*.zip
  6. Continue with Extracting the Agent Installation Files

Extracting the Agent Installation Files

Once the zip file has been exported, perform the following steps to extract the agent installation files:

  1. Open a command window on the host where the export file was copied and navigate to the directory where the file was copied.
  2. Extract the agent installation files from the zip file using the following command:
    unzip *.zip archives/SCOM*.zip

Installing the Microsoft SCOM Web Service

The SCOM web service acts as a front-end for all data flowing into and out of SCOM. Oracle Enterprise Manager posts calls to the web service whenever it needs to create or update an event.

You can install the SCOM web service on any UNIX or Windows system that has Oracle JDK installed and has connectivity to the Oracle SCOM Agent and the Oracle Enterprise Manager server.

The following sections provide instructions for installing the Microsoft SCOM web service on UNIX and Windows platform:

Installing and Running the Microsoft SCOM Web Service on UNIX

Prerequisites for UNIX

The following prerequisites must be met before proceeding to the next section:

  1. Microsoft SCOM Event Connector Release 13.2.1.0.0 requires JDK 8 Update 5 and later or JDK 11 (any version) installed on the UNIX platform.
  2. Microsoft SCOM Event Connector Release 12.1.0.x.0 supports only JDK 6 and requires JDK 6 Update 11 and later.
  3. JAVA_HOME environment variable must be set to the JDK installation directory.

    Note:

    Microsoft SCOM Event Connector does not support JDK 7, JDK 9, and JDK 10.

Installing the Microsoft SCOM Web Service on UNIX

To install the web service on a UNIX platform, perform the following steps:

  1. Create a directory where you want to install the web service.
  2. Obtain a copy of the web service installation file from the Management Server host machine as specified in Exporting the Web Service Installation File.
  3. Copy the SCOM_webservices_adapter.jar file to the web service installation directory.
  4. Open a terminal and change the working directory to the installation directory.
  5. Enter the following command to unzip and extract the .jar file:
    $JAVA_HOME/bin/jar xvf SCOM_webservices_adapter.jar

    Note:

    If the system where the SCOM web service is being installed does not have the JDK installed, you cannot extract the jar file contents. You need to copy the jar file to a system that has the JDK installed and transfer the files after they have been extracted

    This creates the adapters directory that contains the installation files.
  6. Enter the following command to change the working directory:
    • For SCOM 2012 and 2016: cd adapters/endpoints/SCOM
    • For SCOM 2007: cd adapters/endpoints/SCOM2007
  7. Enter the following command to run the installation script:
    sh ./install.sh
  8. When the script prompts whether you want to use HTTPS:
    • If you specify Y, the web service is set up to use HTTPS port number 8443.
    • If you specify N, the web service is set up to use HTTP port number 8080.

    Note:

    Refer to Changing Default Port Numbers inCustomizing Microsoft SCOM for details on changing default port numbers.

  9. When the script prompts for the user name of the web service, enter the user name that must be provided to access the SCOM Web Service.

    The user name can be any value and is not associated with any specific OS or SCOM account. Make a note of this value and supply it when configuring the SCOM connector in Enterprise Manager.

  10. When the script prompts for the password of the web service, enter the password that must be provided to access the SCOM Web Service.

    The password can be any value and is not associated with any specific OS or SCOM account. Make a note of this value and supply it when configuring the SCOM connector in Enterprise Manager.

  11. After the script prompts for the URL of the Oracle SCOM Agent, enter the URL that was noted when you installed the Oracle SCOM Agent. If the web service is being installed on a different machine than the Oracle SCOM Agent, the localhost in the URL must be replaced with the actual hostname or IP address of the machine where the Oracle SCOM Agent is installed.
  12. After the script prompts for the username and password to use when accessing the Agent, enter a valid Windows username and password.

    Note:

    If the account is a domain account, include the domain information when specifying the username. The format must follow the standard Windows format where the domain is specified first, followed by a backslash, and then the username is specified last. For example: domain\username

  13. After the script displays the message "SCOM Web Service Complete," press Enter to complete the installation.
  14. If the web service was configured to run using the HTTPS protocol, you must set up SSL as specified in Configuring Enterprise Manager to Use SSL.
The web service framework is now installed and ready to start.
Running the Microsoft SCOM Web Service on UNIX

To run the Microsoft SCOM Web Service framework commands listed with the following tasks, first change the working directory to the following in the installation directory:

adapters/bin
  • Start: ./service.sh start

  • Shut Down: ./service.sh stop

  • Restart: ./service.sh restart

  • Check Status: ./service.sh status

Testing the Microsoft SCOM Web Service on UNIX

Perform the following steps to verify that the Microsoft SCOM Web Service is functional:

  1. Open a terminal and change the working directory to the adapters/bin directory in the installation directory.
  2. Enter the following command to run the test script:
    ./testAdapter.sh
  3. When the utility prompts for the web service password, enter the password you specified for the SCOM web service in step 10 of section Installing the Microsoft SCOM Web Service on UNIX.
If the test completes successfully, the last line the utility displays is “Test completed successfully.”

Note:

Starting with Microsoft SCOM Event Connector Release 13.2.1.0.0, the testAdapter script is no longer available.
Uninstalling the Microsoft SCOM Web Service on UNIX

To uninstall the web service on UNIX:

  1. Run the service.sh status command to determine whether the web service is running.
  2. If the web service is running, run the service.sh stop command to stop the web service and verify it completes successfully.
  3. Delete all files in the installation directory.

Installing and Running the Microsoft SCOM Web Service on Windows

Prerequisites for Windows

The following prerequisites must be met before proceeding to the next section:

  1. Microsoft SCOM Event Connector Release 13.2.1.0.0 requires JDK 8 Update 5 and later or JDK 11 (any version) installed on the Windows platform.
  2. Microsoft SCOM Event Connector Release 12.1.0.x.0 supports only JDK 6 and requires JDK 6 Update 11 and later.
  3. JAVA_HOME environment variable must be set to the JDK installation directory.
  4. Zip utility, such as WinZip, is installed for unzipping a zip file.

    Note:

    Microsoft SCOM Event Connector does not support JDK 7, JDK 9, and JDK 10.

Installing the Microsoft SCOM Web Service on Windows

To install the web service on a Windows platform, perform the following steps:

  1. Create a directory where you want to install the web service.
  2. Obtain a copy of the web service installation file from the Management Server host machine as specified in Exporting the Web Service Installation File.
  3. Copy the SCOM_webservices_adapter.jar file to the web service installation directory.
  4. Open a terminal and change the working directory to the installation directory.
  5. Enter the following command to unzip and extract the .jar file:
    %JAVA_HOME%\bin\jar xvf SCOM_webservices_adapter.jar

    Note:

    If the system where the SCOM web service is being installed does not have the JDK installed, you cannot extract the jar file contents. You need to copy the jar file to a system that has the JDK installed and transfer the files after they have been extracted

    This creates the adapters directory that contains the installation files.
  6. Enter the following command to change the working directory:
    • For SCOM 2012 and 2016: cd adapters\endpoints\SCOM
    • For SCOM 2007: cd adapters\endpoints\SCOM2007
  7. Enter the following command to run the installation script:
    .\install.sh
  8. When the script prompts whether you want to use HTTPS:
    • If you specify Y, the web service is set up to use HTTPS port number 8443.
    • If you specify N, the web service is set up to use HTTP port number 8080.

    Note:

    Refer to Changing Default Port Numbers inCustomizing Microsoft SCOM for details on changing default port numbers.

  9. When the script prompts for the user name of the web service, enter the user name that must be provided to access the SCOM Web Service.

    The user name can be any value and is not associated with any specific OS or SCOM account. Make a note of this value and supply it when configuring the SCOM connector in Enterprise Manager.

  10. When the script prompts for the password of the web service, enter the password that must be provided to access the SCOM Web Service.

    The password can be any value and is not associated with any specific OS or SCOM account. Make a note of this value and supply it when configuring the SCOM connector in Enterprise Manager.

  11. After the script prompts for the URL of the Oracle SCOM Agent, enter the URL that was noted when you installed the Oracle SCOM Agent. If the web service is being installed on a different machine than the Oracle SCOM Agent, the localhost in the URL must be replaced with the actual hostname or IP address of the machine where the Oracle SCOM Agent is installed.
  12. After the script prompts for the username and password to use when accessing the Agent, enter a valid Windows username and password.

    Note:

    If the account is a domain account, include the domain information when specifying the username. The format must follow the standard Windows format where the domain is specified first, followed by a backslash, and then the username is specified last. For example: domain\username

  13. After the script displays the message "SCOM Web Service Complete," press Enter to complete the installation.
  14. If the web service was configured to run using the HTTPS protocol, you must set up SSL as specified in Configuring Enterprise Manager to Use SSL.
The web service framework is now installed and ready to start.
(Optional) Installing the Microsoft SCOM Web Services as a Windows Service

If you want the Microsoft SCOM web service to run as a Windows service, perform the following steps.

  1. Change the working directory to the adapters\bin directory in the installation directory.
  2. If the web service will be run using a 64-bit JDK, copy the iWaveAdapters.exe and iWaveAdaptersw.exe files from the x64 directory to the current directory (.) overwriting the existing files.
  3. Enter the following command to install the web service as a Windows service:
    service.bat install
  4. If the web service will be run using a 64-bit JDK, perform the following substeps to configure the service to use the 64-bit JDK:
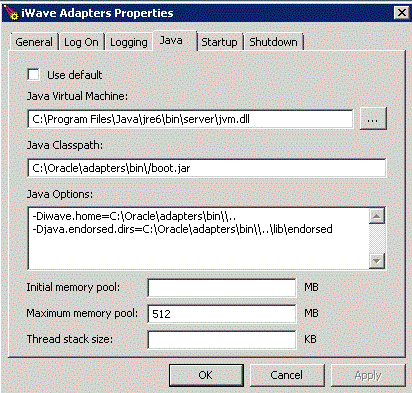
    1. In the adapters\bin directory, double click the iWaveAdaptersw.exe file. This will cause the iWave Adapters Properties window to be displayed.
    2. Click the Java tab. The Java tab will be displayed that shows the JVM settings as shown in Figure 2-10.
    3. Uncheck the Use default check box if it is checked.
    4. Click ellipses to open the Select Java Virtual Machine DLL window.
    5. Navigate to the jvm.dll file in the 64-bit JDK installation directory and click Open.
    6. Click OK.
The web service framework is now installed and ready to start.

Figure 2-10 Java Tab on the iWave Adapters Properties Window

Java Tab on the iWave Adapters Properties Window
Running the Microsoft SCOM Web Service on Windows

Standalone Service

To start the SCOM web service framework when set up as a standalone application (not set up to run as a Windows service):

  1. Change the working directory to the adapters\bin directory in the installation directory.

  2. Run the following command:

    startAdapters.bat

To shut down the SCOM web service framework, close the window where you started the web service.

Windows Service

To start the SCOM web service framework when set up to run as a Windows service, enter the following command:

net start iWaveAdapters

To shut down the SCOM web service framework, enter the following command:

net stop iWaveAdapters
Testing the Microsoft SCOM Web Service on Windows

Perform the following steps to verify that the Microsoft SCOM Web Service is functional:

  1. Open a terminal and change the working directory to the adapters\bin directory in the installation directory.
  2. Enter the following command to run the test script:
    .\testAdapter.sh
  3. When the utility prompts for the web service password, enter the password you specified for the SCOM web service in step 10 of section Installing the Microsoft SCOM Web Service on Windows.
If the test completes successfully, the last line the utility displays is “Test completed successfully.”

Note:

Starting with Microsoft SCOM Event Connector Release 13.2.1.0.0, the testAdapter script is no longer available.
Uninstalling the Microsoft SCOM Web Service on UNIX

To uninstall the web service on Windows, determine if the web service is installed as a Windows service:

  1. If the web service is installed as a Windows service, perform the following steps:
    1. Determine if the web service is running.
    2. If the web service is running, run the service.bat stop command to stop the web service and verify it completes successfully
    3. Run the service.bat uninstall command to remove it as a Windows service and verify it completes successfully.
  2. If the web service is not installed as a Windows service, perform the following steps:
    1. Determine if the web service is running.
    2. If the web service is running, stop the web service by closing the Java window.
  3. Delete all files in the installation directory.

Exporting the Web Service Installation File

The web service installation file is included in the zip file that was extracted in Exporting the Agent Installation Files. To extract the installation file, perform the following steps:

  1. Open a command window on the Operations Manager host machine and navigate to the temporary directory where the zip file was created.
  2. Extract the web service installation file using the following command:
    unzip *.zip archives/SCOM_webservices_adapter.jar

Uninstalling the Microsoft SCOM Event Connector

To uninstall the connector, you must first delete all defined instances of the connector, then you must delete the connector from the Self Update page.

  1. From the Setup menu, select Extensibility, then Management Connectors.
  2. Select an instance of the connector you want to delete, then click Delete.
  3. On the Confirmation page, click Yes.
  4. Repeat steps 2 and 3 until all instances of the connector have been deleted.
  5. From the Setup menu, select Extensibility, then Self Update.
  6. Click the Management Connector link in the Type column. A list of updates appears for Management Connectors.
  7. Click the connector you want to delete, select Actions, then select Delete. The Delete Update window appears.
  8. Click Delete to delete the connector. A pop-up confirmation window appears.
  9. Click OK to confirm and delete the connector.