2 Installing and Configuring the Connector
This chapter provides the following information for setting up and configuring the PagerDuty Connector and related tasks:
Prerequisites
The PagerDuty Connector communicates through PagerDuty’s REST API. Before using the PagerDuty Connector, ensure that you meet the following prerequisites:
-
PagerDuty User exists with all necessary permissions and personnel information.
-
My Oracle Support Preferred Credentials are set. To set the credentials, perform the following steps:
- From the Enterprise Manager console Setup menu, select My Oracle Support, then Set Credentials.
- Enter the user name and password information, then click Apply.
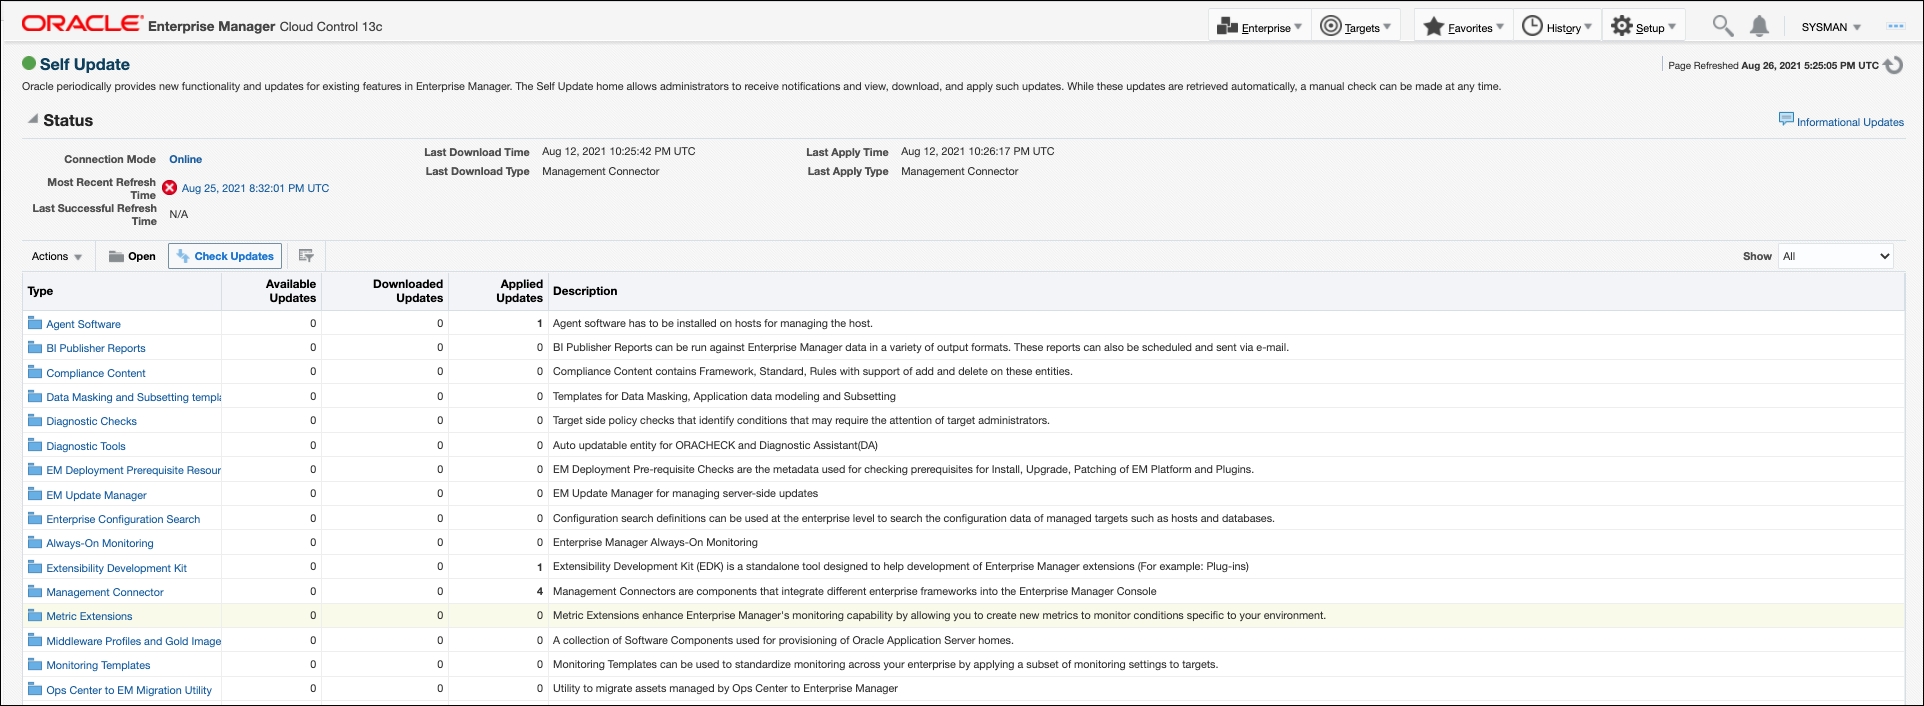
- From the Enterprise Manager console Setup menu, select Extensibility, then Self Update.
- From the Self Update page, look for the PagerDuty REST Ticketing Connector in the table list. If it does not appear, go to the next step.
- Click Check Updates to schedule a job to collect the metadata for the connector, as shown in following figure.
Note:
You can also set up Self-Update in offline mode. See Applying an Update in Offline Mode in the Oracle Enterprise Manager Cloud Control Administrator's Guide for details.Installing the Connector
This section provides the procedure required to download and install (apply) the connector. The PagerDuty connector is not included out-of-the-box, so you need to download it from the Oracle Enterprise Manager store. All connectors in the Enterprise Manager store are available on the Self Update page for downloading.
To install the connector:
-
From the Enterprise Manager console Setup menu, select Setup, then select Extensibility, then select Self Update.
-
Click on the Management Connector link in the Type column.
The PagerDuty connector appears in the list with a status of Available.
-
Click on the appropriate PagerDuty connector to select it, and then click Download.
The Schedule Download window appears, where you can determine when the download should be performed.
-
Click Select to download immediately.
If you want to schedule the download for a later time, specify the date and time when the download should occur, and click Select. You will need to return and finish the remainder of this procedure after the scheduled download date and time.
-
If necessary, refresh the screen until the status of the connector changes to Downloaded.
-
Click on the PagerDuty REST Ticketing Connector to select it, then click Apply.
After you respond to the prompt to confirm the operation, a page appears that indicates the request has been submitted.
-
Refresh the screen until the status of the connector changes from Apply Scheduled to Applied.
Creating a Connector Instance
To use the PagerDuty connector, you need to create one or more instances of this connector type. A connector instance refers to the configured instance of the connector with specific details, such as connector name, API Token, Service ID and so forth of the PagerDuty instance. Multiple connector instances for the same connector type are supported, which provides the flexibility to configure multiple PagerDuty instances with Enterprise Manager.
For example, since Enterprise Manager is monitoring production targets and test targets, you can then create two instances of the connector and configure Enterprise Manager so that incidents from production targets create tickets in one connector instance, and incidents from test targets create tickets in the second connector instance.
To create a connector instance:
-
From the Enterprise Manager console, click Setup.
-
Select Extensibility in the pane.
-
Select Management Connectors in the left pane.
-
Select a connector type from the Create Connector drop-down list and click the Go button.
-
Enter the connector name and description on the next screen and click OK.
The connector instance appears as unconfigured on the Management Connectors page, shown in the following image. .

Configuring the Connector
Perform the following steps for basic configuration:
-
As Super Administrator, from the Enterprise Manager console, click Setup.
-
Click Extensibility, then Management Connectors.
The Management Connectors page appears that lists all created connector instances.
Note:
The status column with a green tick mark indicates that the connector is already configured.
-
Click the Configure button for the PagerDuty Connector. The General tab of the Configure Management Connector page appears.
-
Provide the required settings. See "Providing General Settings" for details.
-
Click OK.
The Management Connectors page reappears. The row for the PagerDuty Connector should have a check mark in the Status column, as shown in the following figure.

-
Optional: Register any customized templates using the
emctl register_template connectorcommand from theORACLE_HOME/bindirectory, whereORACLE_HOMEis the Oracle home directory of the OMS. See Adding Ticket Templates for more information about this command and template registration.You can view all ticket templates by clicking the Ticket Templates tab.
Enabling or Disabling the Connector
You can enable or disable a connector instance without needing to reconfigure or remove the connector from the system.
You can enable or disable a connector from the Management Connector page by selecting the connector and clicking either the Enable or Disable button. After a connector is disabled, you will see a red cross icon under the Status column. By default, the connector instance is enabled as soon as it is configured.
Note:
Only enabled connectors are available for ticketing operations.
Providing General Settings
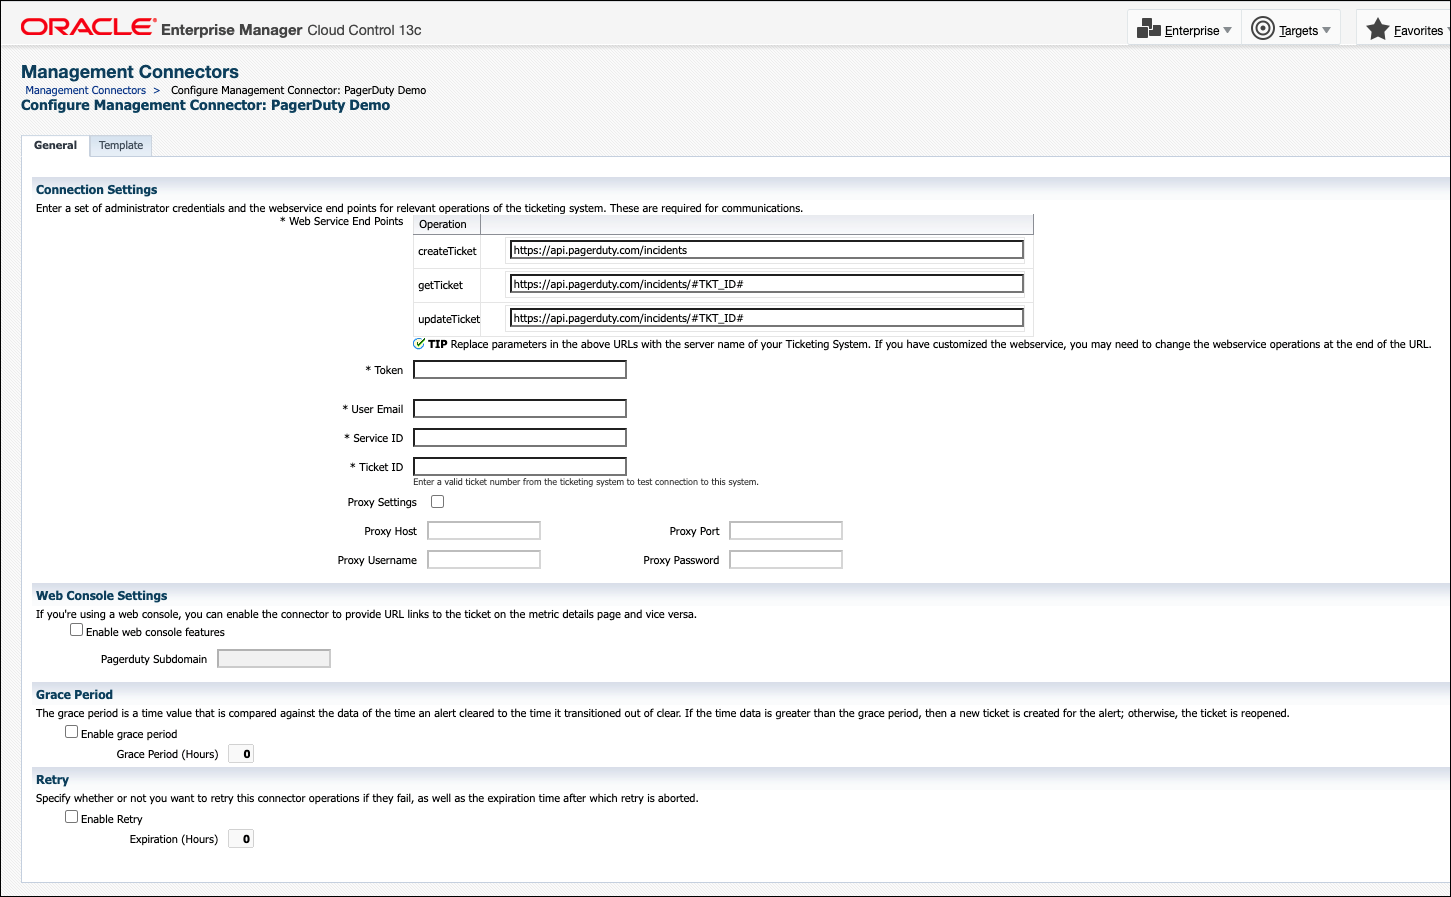
The following sections explain how to provide various configuration details for the General tab of the Configure Management Connector page as shown in the following figure.
Connection Settings
The PagerDuty Connector communicates with the Service Desk through their Web services.
- WebService End Points —End points to createTicket,updateTicket,and
getTicketwebservices exposed by PagerDuty. These should not need to be edited.
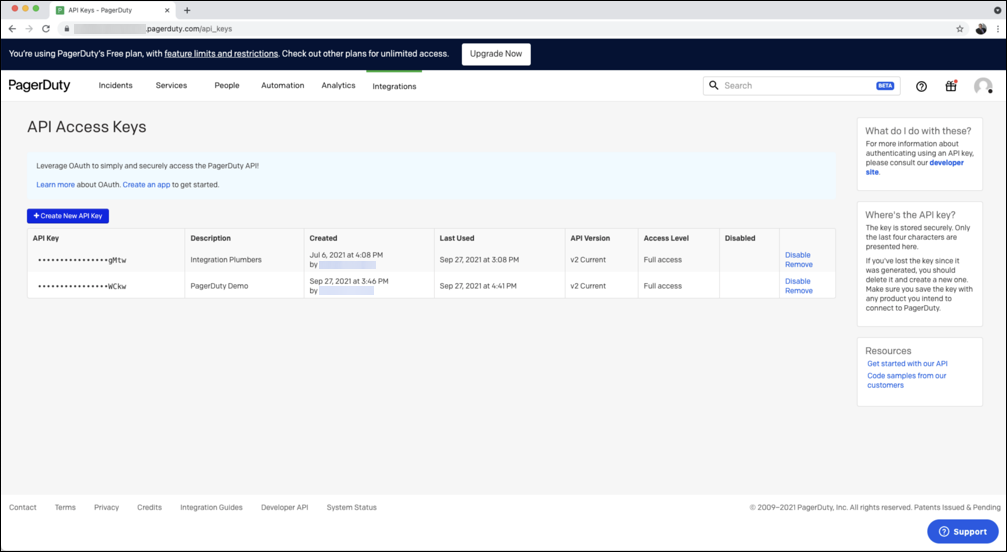
- Token ID—API Token with permissions to retrieve, create, and update tickets from PagerDuty.
- Log in to PagerDuty.
- Hover over the Integrations tab.
- Under the Develop Tools section, select API Access Keys.
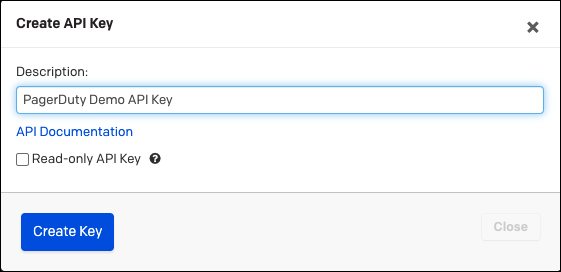
- On the landing page, click Create new API Key and follow the instructions.
Note:
Leave the Read-only API Key option unchecked. You will be using the Create API to create tickets in PagerDuty.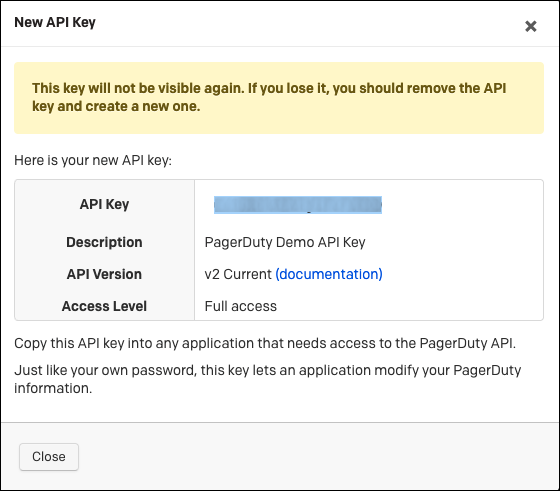
- User Email—Email of the PagerDuty user attached to the API Key.
- Service ID—The ID of the PagerDuty Service the incidents with be created in.
- Log in to PagerDuty.
- Hover over the Services tab.
- Select Service Directory.
- If you have not already done so, create a service for Oracle Enterprise Manager.
- Once your service is created, click on the service name.
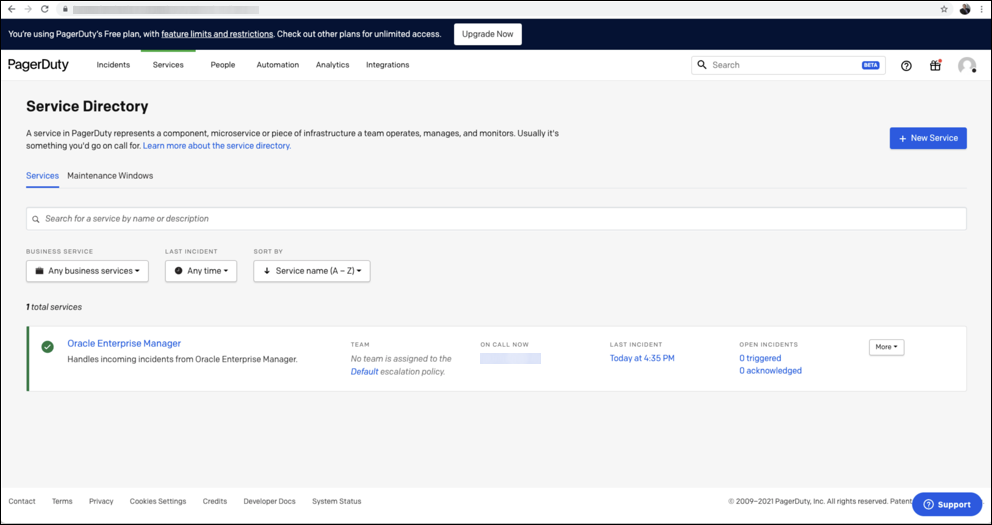
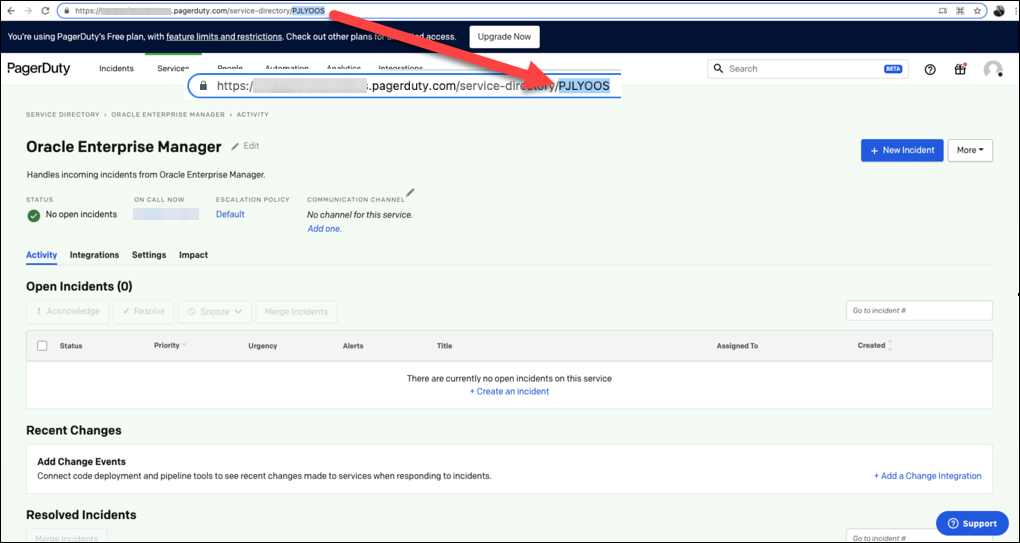
- To get the Service ID, navigate to the landing page and copy the seven letter string at the end of the URL.
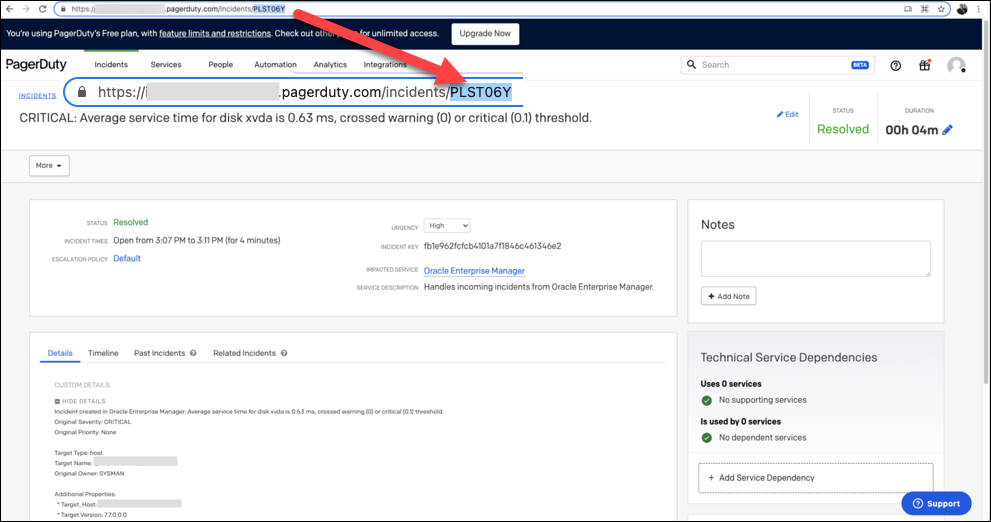
- Ticket ID—An existing Ticket ID to test the connection to the PagerDuty system. The ticket does not need to be open.
- Log in to PagerDuty.
- Click on the Incidents tab.
On the landing page, you'll see a list of your incidents.
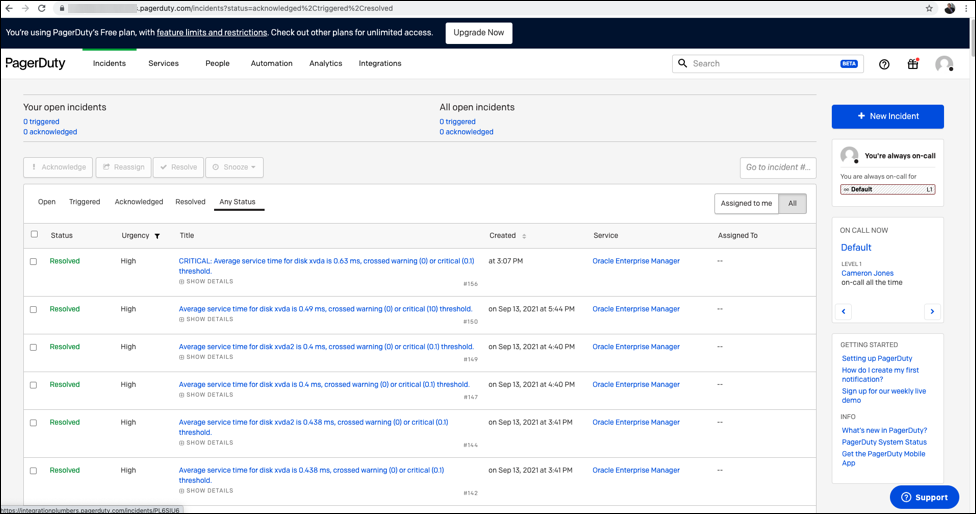
- From the list of incidents, click on the incident for which you want the Ticket ID. The individual ticket information displays.
- To determine the Ticket ID of the selected incident, navigate to the URL and copy the seven letter string at the end of the URL.
Web Console Settings
Web Console settings are required if you want the connector to provide links toPagerDuty tickets created by Enterprise Manager in the context of an incident.
To enable this functionality, provide the following Web console settings.
- EnableWeb Console —Check this box to enable launching of the PagerDuty incident page within context from Enterprise Manager.
- PagerDuty Subdomain — The subdomain of your PagerDuty account.
- Log in to PagerDuty.
- Go to any URL to obtain the subdomain (the text between https:// and .pagerduty.com).
Example:
https://yourcompany.pagerduty.comwhereyourcompanyis the subdomain.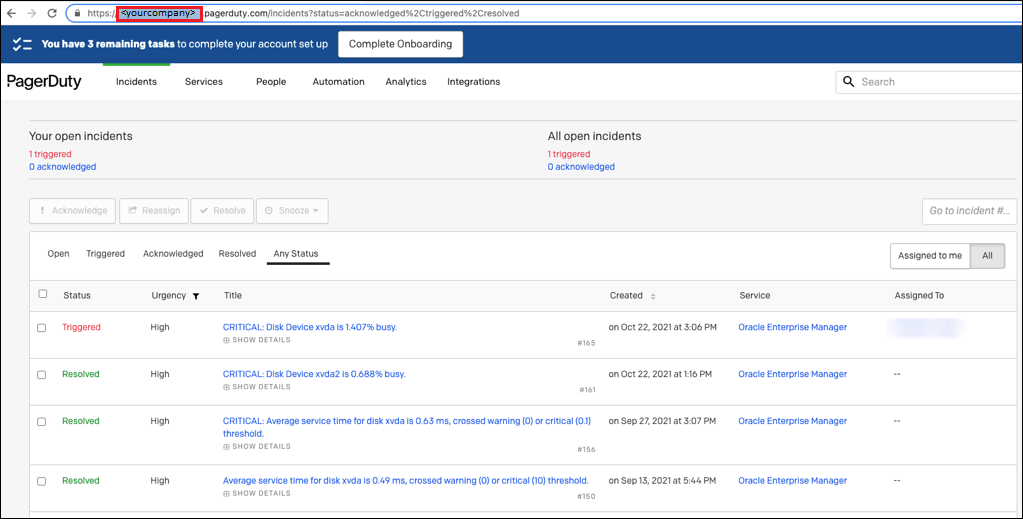
Grace Period
You can enable and disable the grace period and configure its value. By default, the grace period is disabled. See Grace Period for details. This setting applies to all incidents the PagerDuty Connector processes. The grace period interval accepts the number of hours as any integer value. For example, 1 or 2.
Retry
You can enable and disable the Retry option and configure its interval value. By default, the Retry is disabled. See Retry for details. This setting applies to all incidents in the PagerDuty Connector processes. The retry period interval accepts the number of hours as any integer value. For example, - 1 or 2.
Working with Ticket Templates
When a connector instance is created in Enterprise Manager, all associated templates are available for ticket create/update operations. There are two default PagerDuty templates:
-
pagerDutyCreateAndUpdate.xsl
-
pagerDutyCreateUpdateAndResolve.xsl
Tip:
See Template Process for detailed information about these templates.
The following sections provide information about adding, viewing, removing, and replacing ticket templates.
Adding Ticket Templates
You need to add ticket templates before they are recognized in Enterprise Manager. The connector provides out-of-box templates that are automatically registered when the connector instance is created. If you want to edit these, you can do so directly in Enterprise Manager. However, if you need to use a new template (other than one out-of-box), you need to register the new template using the emctl command. You can then edit the template in Enterprise Manager. See Editing Templates for more information.
To add and register a template:
-
Ensure that you have execute privilege on
emctland the ability to read the ticket template. -
For each template, run the following emctl register_template connector command:
$ORACLE_HOME/bin/emctl register_template connector
[-t <template.xml>]
[-repos_pwd <repos password>]
[-cname <connectorName>]
[-iname <internalName>]
[-tname <templateName>]
[-ttype <templateType>]
[-d <description>]
Where:
-t           Template(full path)
-repos_pwd   Enterprise Manager Root (SYSMAN) Password
-cname       Connector Name
-iname       Template Internal Name
-tname       Template Name Displayed
-ttype       Template Type
             <templateType> 1 - inbound transformation
             <templateType> 2 - outbound transformation
             <templateType> 3 - XML outbound transformation
-d           Description
Example 2-1 Template Registration
The following command adds a new outbound template (newTemplate.xsl) for a connector instance with the name PagerDuty Connector Instance:
emctl register_template connector
-t <template.xml>
-repos_pwd <repos password>
-cname "PagerDuty Connector Instance"
-iname "newTemplate"
-tname "newTemplateOutbound"
-ttype 2
-d "Demo template"
Viewing Template Code
To view template code, do the following:
-
Select the connector instance and go to the Configure Management Connector page.
-
Select the Template tab, as shown in the figure below.
-
Click a template name or click View to view the XSLT code for the template.
The ticket templates are in XSLT format. A basic knowledge of XSLT is required to understand the code.

Removing a Template
To remove a template, do the following:
-
Select the connector instance and go to the Configure Management Connector page.
-
Select the Template tab.
-
Select the template and click Delete.
-
Click Yes to confirm the delete operation.
Note:
If the template you delete has an incident rule associated with it, ticketing will not function for this particular incident rule after the deletion.
Editing Templates
You can edit a template directly using the Enterprise Manager console instead of using the EM CLI command line interface.
-
Select the connector instance and go to the Configure Management Connector page.
-
Select the Template tab.
-
Select the template and click Edit.
-
Edit the Description and Template Contents fields as needed, then click Save.
The ticket template is automatically registered. Saving the registered template updates it in the repository.
Restoring Templates
After you edit or customize a template, you can restore it to its previous default contents if needed by performing the following steps using the Enterprise Manager console.
Note:
You can also restore out-of-box templates that you have may edited or customized to their default values.
-
Select the connector instance and go to the Configure Management Connector page.
-
Select the Template tab.
-
Select the template and click Restore.
-
Click Yes in the confirmation page that appears in order to restore.
Deleting the Connector
You can delete a connector from the Management Connector page by selecting the connector and clicking the Delete button. After a connector is deleted, all associated incident rules are no longer configured for ticketing operations.
Additionally, if the connector deleted is the only connector instance of that connector type, the corresponding connector type is also deleted.
Note:
The above rule is not applicable to the out-of-box connector type.