Before you Begin
This tutorial describes how to copy a SQL Tuning Set (STS) from an on-premises database discovered in Oracle Enterprise Manager (EM) to an Autonomous Database discovered in EM. After completing the prerequisite tasks, the time taken to create the additional credentials and copy the STS is approximately 30 minutes.
Background
Oracle Enterprise Manager is a premier tool to manage your Oracle Database environment. Using EM, you can copy an STS from an on-premises database to an Autonomous Database by way of the Oracle Cloud Infrastructure (OCI) Object Storage. An STS is a database object that you can use as input to tuning tools and includes the following components:
- A set of SQL statements
- Associated execution context, such as user schema, application module name and action, list of bind values, and the environment for SQL compilation of the cursor
- Associated basic execution statistics, such as elapsed time, CPU time, buffer gets, disk reads, rows processed, cursor fetches, the number of executions, the number of complete executions, optimizer cost, and the command type
- Associated execution plans and row source statistics for each SQL statement (optional)
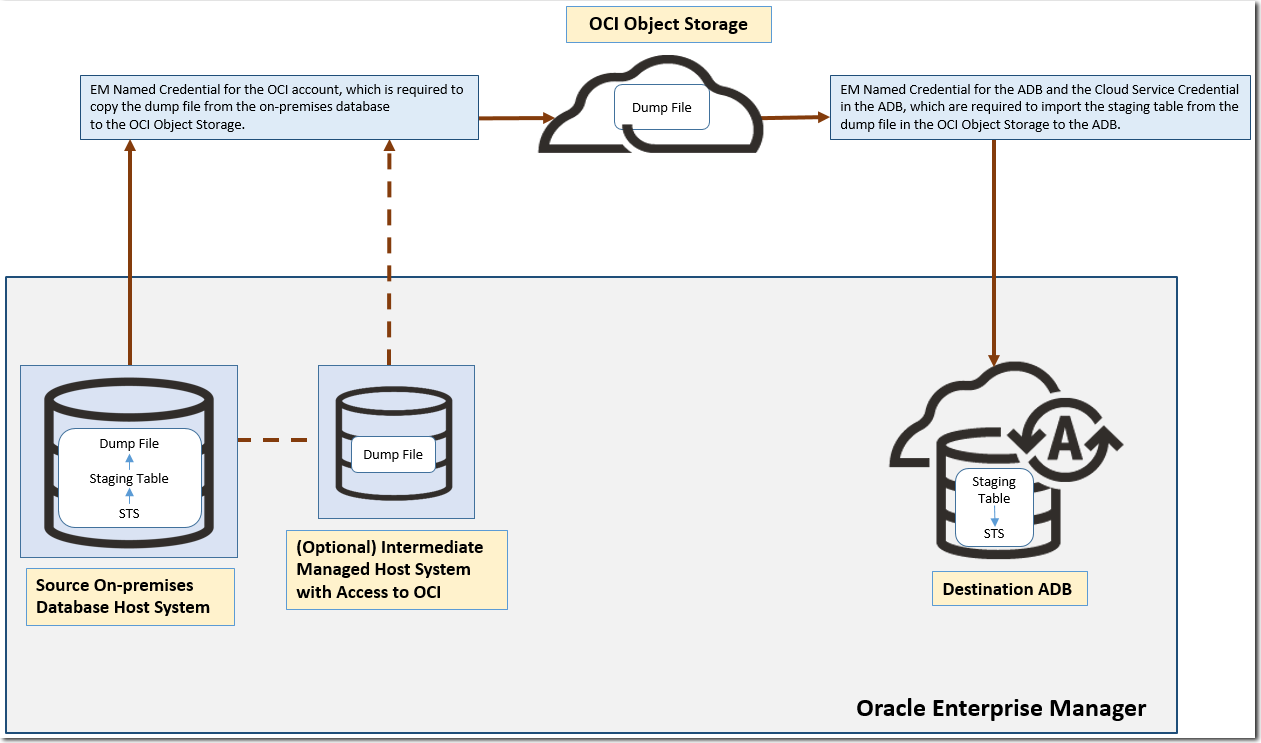
The following diagram provides a broad overview of the components involved in copying an STS. The STS in the on-premises database is packed into a staging table and added to a dump file. The dump file is then copied to the OCI Object Storage, and the Autonomous Database imports the staging table from the dump file and unpacks the STS. This workflow requires:
- The EM Named Credential for your OCI account, which is required to copy the dump file from the on-premises database to the OCI Object Storage.
- The EM Named Credential for your Autonomous Database and the Cloud Service Credential created and stored in your Autonomous Database, which are required to import the staging table from the dump file in the OCI Object Storage to the Autonomous Database.
What Do You Need?
- EM roles and permissions: The
oem_advisorrole to administer an STS. For information, see User Requiring Access to SQL Tuning Advisor in Oracle Enterprise Manager Cloud Control Security Guide. - Oracle Cloud Infrastructure roles and permissions: The required permissions to create an Object Storage bucket and use it. For information, see Overview of Object Storage in Oracle Cloud Infrastructure documentation.
Perform Prerequisite Tasks
Before you create OCI account and Cloud Service credentials and copy an STS, you must perform the following prerequisite tasks:
- Set up the Autonomous Database to which the STS is being moved.
- Ensure that the Autonomous Database is discovered as a target in EM. For information, see Discover Autonomous Databases in Oracle Enterprise Manager Cloud Control Administrator's Guide for Oracle Autonomous Databases.
- Create an EM named credential for your Autonomous Database. For information, see Named Credentials in Oracle Enterprise Manager Cloud Control Security Guide.
- Set up access to the OCI Object Storage, through which the STS is copied from the on-premises database to the Autonomous Database.
- Create an Object Storage bucket. For information, see Creating a Bucket in Oracle Cloud Infrastructure documentation.
- Make a note of the location (URL) to which EM will upload the
dump file. The format of the URL is as follows, and the values
you must specify are in bold.
https://objectstorage.<region name>.oraclecloud.com/n/<tenant name>/b/<bucket name>/o/ - Make a note of the following details, which you'll require to add an EM named credential for your OCI account.
- Tenancy and User OCIDs. For information, see Where to Get the Tenancy's OCID and User's OCID in Oracle Cloud Infrastructure documentation.
- API signing keys. For information on generating API signing keys, see How to Generate an API Signing Key in Oracle Cloud Infrastructure documentation.
- Public Key's fingerprint. For information, see How to Get the Key's Fingerprint in Oracle Cloud Infrastructure documentation.
- Generate and make a note of an Auth Token, which you'll require to create a cloud service credential. For information, see Getting an Auth Token in Oracle Cloud Infrastructure documentation.
Create a Named Credential for the OCI Account
After you complete the prerequisite tasks, you must add a named credential for your OCI account in EM. This named credential will enable you to authenticate the movement of the dump file containing the STS from the on-premises database to the OCI Object Storage.
To complete this step, you'll need the following OCI details:
- Tenancy OCID
- User OCID
- Private Key
- Public Key's Fingerprint
- Sign in to EM and from the Setup menu, select
Security, and then select Named
Credentials.
- Click Create on the Named Credentials
page to create a new named credential.
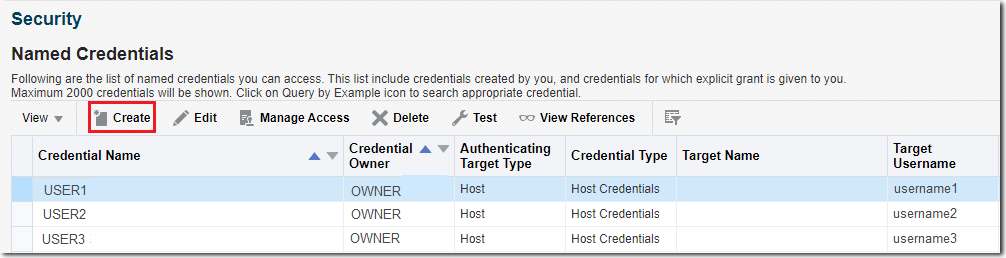
The Create Credential page is displayed. - Enter a name for the credential in the Credential name field.
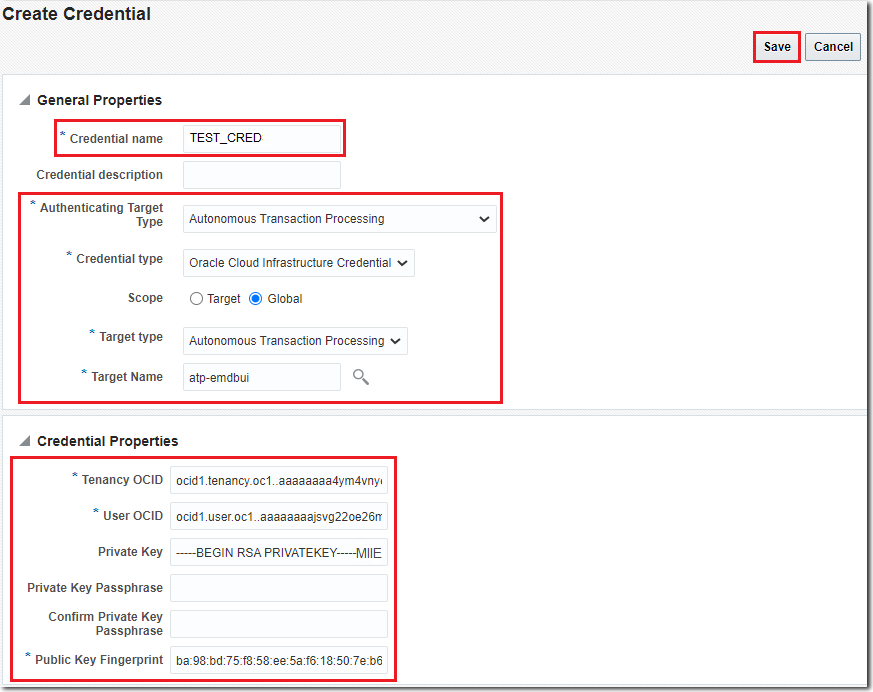
- Update the following sections and click Save:
General Properties
- Select Autonomous Data Warehouse or Autonomous Transaction Processing in the Authenticating Target Type menu.
- Select Oracle Cloud Infrastructure Credential in the Credential Type menu.
- Select Global.
- Select the name of the Autonomous Data Warehouse or
Autonomous Transaction Processing database.
- Enter the Tenancy OCID.
- Enter the User OCID.
- Enter the Private Key.
- Enter the Public Key Fingerprint.
Create Cloud Service Credential
As the next step, you must create a cloud service credential, and
you can do so using SQL worksheet in EM. The cloud service
credential is used by the DBMS_DATAPUMP
package to import the staging table from the OCI Object Storage to
the Autonomous Database. This credential is created and stored in
the Autonomous Database in encrypted format. For more information on
the cloud service credential, see DBMS_CLOUD
for Access Management in Using Oracle Autonomous Database
on Shared Exadata Infrastructure.
To complete this step, you'll need the OCI Auth Token. For information on how to obtain the Auth Token, see the Perform Prerequisite Tasks section.
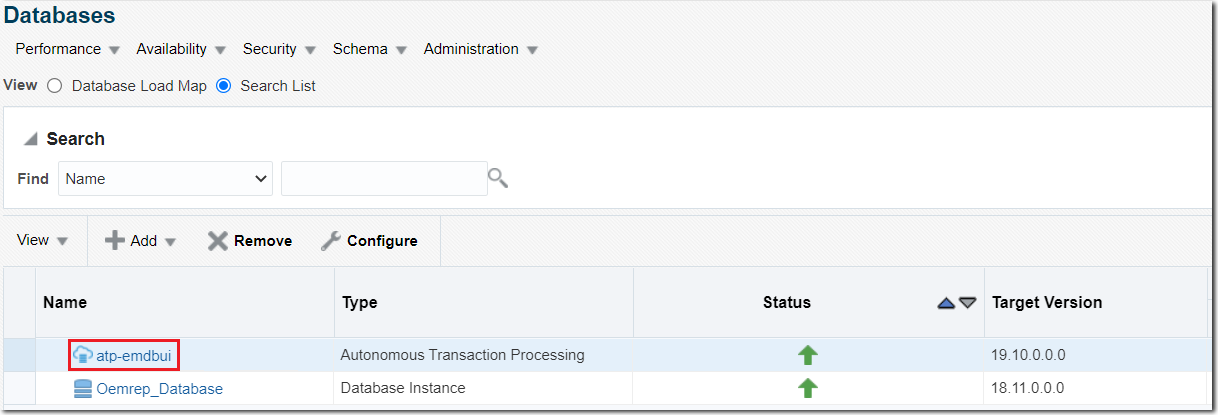
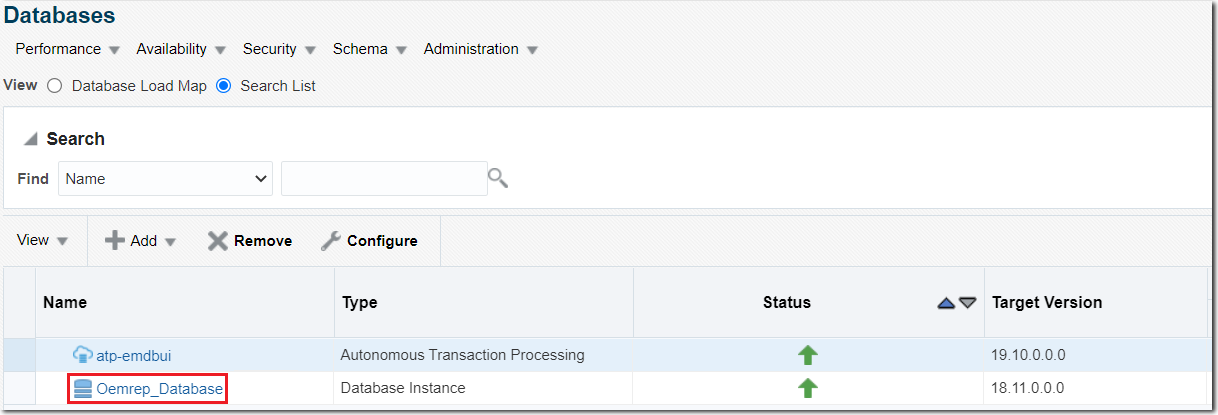
- In EM, from the Targets menu, select Databases,
and click the name of your Autonomous Database on the Databases
page.
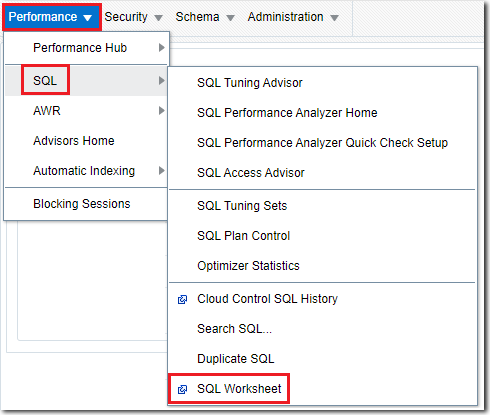
- On the Autonomous Database home page, select Performance,
SQL, and then SQL Worksheet.
- If the Database Login page appears, then log in to the Autonomous Database.
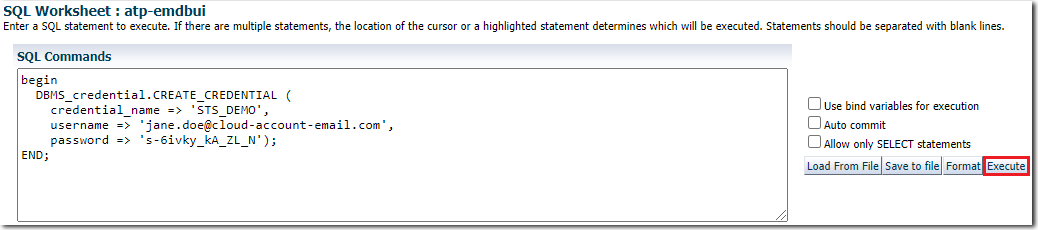
- On the SQL Worksheet page of the Autonomous
Database, add the following SQL statement after replacing the
values within angle brackets
< >with valid values:
begin

                  DBMS_credential.CREATE_CREDENTIAL (

credential_name => '<credential_name>',
username => '<OCI_cloud_account_user_name>',
password => '<auth_token_value>');
END; - Deselect the Allow only SELECT statements
check box, if it's selected, and click Execute.
- Validate if the cloud service credential is successfully created
in the Autonomous Database by executing the following command on
the SQL Worksheet page:
                SELECT credential_name FROM user_credentials WHERE
                credential_name = '<credential_name>'
The newly created cloud service credential should be listed.
Copy STS from the On-premises Database to the Autonomous Database
You can now copy the STS from the on-premises database to the Autonomous Database.
- From the Targets menu, select Databases
and click the name of your on-premises database on the Databases
page.
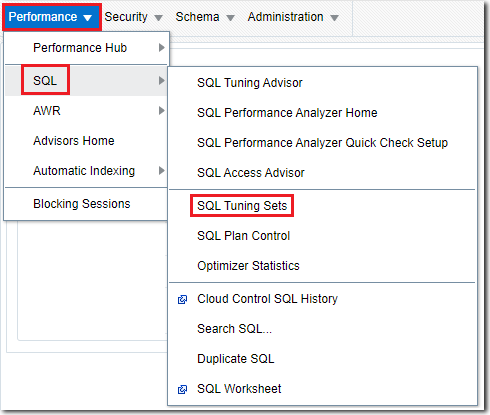
- On the on-premises database home page, select Performance,
SQL, and then SQL Tuning Sets.
- If the Database Login page appears, then log in to the on-premises database.
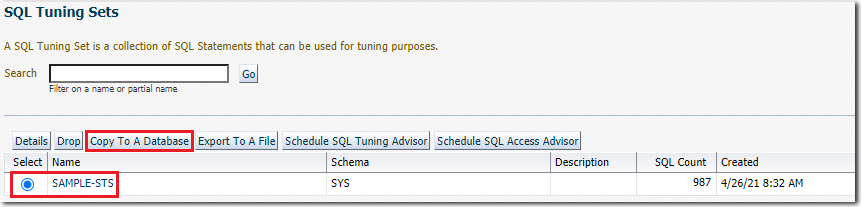
- On the SQL Tuning Sets page, select the STS
that you want to copy to the Autonomous Database, and click Copy
To A Database.
- On the Copy SQL Tuning Set page:
- Search and select the Autonomous Database in the Destination Database field.
- Select a valid Directory Object from the
drop-down list or create a new Directory Object on the
on-premises database.

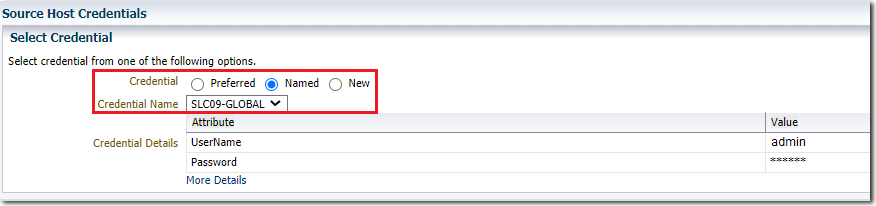
- In the Source Host Credentials section,
select the appropriate Credential radio button
and a named credential for the on-premises database host system.
The EM Job system requires a named credential for the source
database host system, and you can either click the Preferred
or Named radio button and select the
appropriate named credential in the Credential Name
drop-down list, or click the New radio button,
create a new named credential, and select it. The details of the
selected named credential are populated.
- (Optional) In the Upload Host Credentials section, provide the details of an optional EM managed host that has access to OCI. Note that this step must only be performed if the source database host system doesn't have access to OCI.
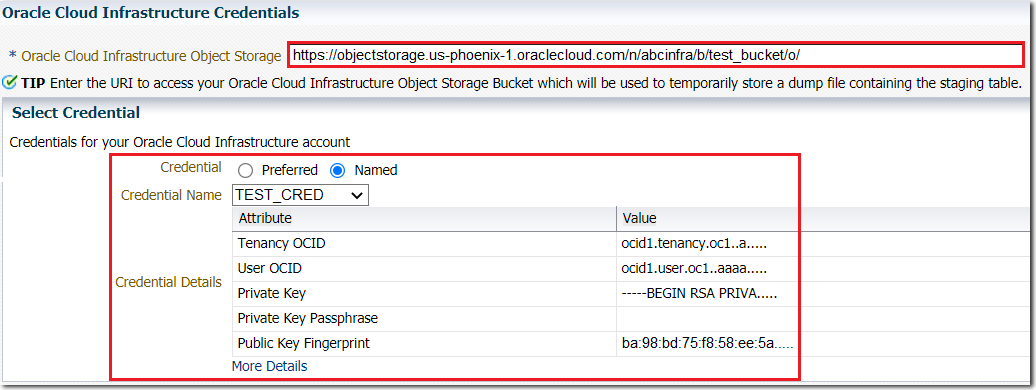
- In the Oracle Cloud Infrastructure Credentials
section:
- Enter the URL (location) of the Object Storage bucket that will be used to temporarily store a dump file containing the staging table. For more information on this URL, see the Perform Prerequisite Tasks section.
- Select the appropriate Credential
radio button and the named credential created in the Create
a Named Credential for the OCI Account section. The
details of the selected named credential are populated.
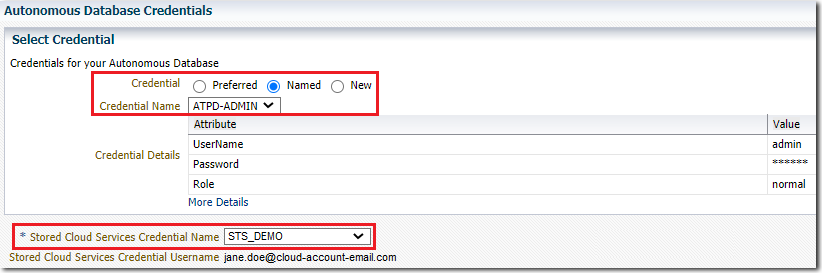
- In the Autonomous Database Credentials
section:
- Select the appropriate Credential radio button and a named credential for your Autonomous Database. The details of the selected named credential are populated.
- In the Stored Cloud Services Credential Name
field, select the cloud service credential created in the Create
Cloud Service Credential section.
- (Optional) In the Job Parameters section, edit the name of the job and add a description.
- (Optional) In the Schedule section, select the options to schedule the copying of the STS at a later time.
- Click OK.
The tasks involved in the entire process of copying the STS from the on-premises databases to the Autonomous Database are displayed on the on-premises database Job Activity page, and once the STS is copied, a Succeeded message is displayed.
Verify the Copy Action
After completing the steps listed in the previous section, you can verify if the STS was successfully copied to the Autonomous Database.
- Go to the Autonomous Database home page.
- Select Performance, SQL, and then SQL Tuning Sets.
STSCOPY_<unique-number>_STS
format. Note that after the STS is copied, the associated dump file containing the staging table is removed from the OCI Object Storage.
Copying a SQL Tuning Set from an On-premises Database to an Autonomous Database
F36987-02
October 2021
Copyright © 2021, Oracle and/or its affiliates.
This tutorial describes how to copy a SQL Tuning Set from an on-premises database to an Autonomous Database in Oracle Enterprise Manager.
This software and related documentation are provided under a license agreement containing restrictions on use and disclosure and are protected by intellectual property laws. Except as expressly permitted in your license agreement or allowed by law, you may not use, copy, reproduce, translate, broadcast, modify, license, transmit, distribute, exhibit, perform, publish, or display any part, in any form, or by any means. Reverse engineering, disassembly, or decompilation of this software, unless required by law for interoperability, is prohibited.
If this is software or related documentation that is delivered to the U.S. Government or anyone licensing it on behalf of the U.S. Government, then the following notice is applicable:
U.S. GOVERNMENT END USERS: Oracle programs (including any operating system, integrated software, any programs embedded, installed or activated on delivered hardware, and modifications of such programs) and Oracle computer documentation or other Oracle data delivered to or accessed by U.S. Government end users are "commercial computer software" or "commercial computer software documentation" pursuant to the applicable Federal Acquisition Regulation and agency-specific supplemental regulations. As such, the use, reproduction, duplication, release, display, disclosure, modification, preparation of derivative works, and/or adaptation of i) Oracle programs (including any operating system, integrated software, any programs embedded, installed or activated on delivered hardware, and modifications of such programs), ii) Oracle computer documentation and/or iii) other Oracle data, is subject to the rights and limitations specified in the license contained in the applicable contract. The terms governing the U.S. Government's use of Oracle cloud services are defined by the applicable contract for such services. No other rights are granted to the U.S. Government.
This software or hardware is developed for general use in a variety of information management applications. It is not developed or intended for use in any inherently dangerous applications, including applications that may create a risk of personal injury. If you use this software or hardware in dangerous applications, then you shall be responsible to take all appropriate fail-safe, backup, redundancy, and other measures to ensure its safe use. Oracle Corporation and its affiliates disclaim any liability for any damages caused by use of this software or hardware in dangerous applications.
Oracle and Java are registered trademarks of Oracle and/or its affiliates. Other names may be trademarks of their respective owners.
Intel and Intel Inside are trademarks or registered trademarks of Intel Corporation. All SPARC trademarks are used under license and are trademarks or registered trademarks of SPARC International, Inc. AMD, Epyc, and the AMD logo are trademarks or registered trademarks of Advanced Micro Devices. UNIX is a registered trademark of The Open Group.
This software or hardware and documentation may provide access to or information about content, products, and services from third parties. Oracle Corporation and its affiliates are not responsible for and expressly disclaim all warranties of any kind with respect to third-party content, products, and services unless otherwise set forth in an applicable agreement between you and Oracle. Oracle Corporation and its affiliates will not be responsible for any loss, costs, or damages incurred due to your access to or use of third-party content, products, or services, except as set forth in an applicable agreement between you and Oracle.