55 Installing Rated Event Loader
This chapter explains how to install the Oracle Communications Billing and Revenue Management (BRM) Rated Event (RE) Loader software.
About Configuring RE Loader
RE Loader uses Batch Controller, which needs access to the pipeline output files. Therefore, Pipeline Manager, Batch Controller, and RE Loader software should be installed on the same system that contains the pipeline output files.
If Pipeline Manager and RE Loader are on different systems, you need to map the Pipeline Manager output directories to a drive local to RE Loader.
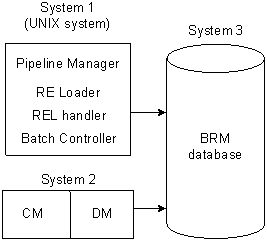
Figure 55-1 shows the recommended configuration for installing RE Loader and its related features:
Note:
Event Extraction Tool can be installed on any of these systems or on its own system.
Figure 55-1 Recommended Configuration for RE Loader Installation

Description of "Figure 55-1 Recommended Configuration for RE Loader Installation"
Note:
Though it is possible to install RE Loader on a BRM system or the database system, you will get better performance if you install it on the Pipeline Manager system.
Installing RE Loader
To install RE Loader, perform the procedures in these sections:
Granting Execute Permission for dbms_lock
Before you install RE Loader, you must grant execute permission to pin_user for dbms_lock:
-
Log in to your database as the SYS user:
% sqlplus sys@databaseAlias
Enter password: password
-
Grant execute privileges to pin_user:
SQL> grant execute on dbms_lock to pin_user
Granting Write Permission to the DM
When you install RE Loader on a system where BRM is not installed, you must grant the DM write permission before installing RE Loader.
Perform the following on all machines containing a DM:
-
In a text editor, open your DM configuration file: BRM_home/sys/dm_oracle/pin.conf.
BRM_home is the directory where you installed BRM components.
-
Write down the values of your dd_write_enable_fields, dd_write_enable_objects, dd_write_enable_portal_objects, and dd_mark_as_portal entries.
-
Set the values of the following entries to 1:
- dm dd_write_enable_fields 1
- dm dd_write_enable_objects 1
- dm dd_write_enable_portal_objects 1
- dm dd_mark_as_portal 1
Note:
If any entry is not in the file, add it.
For more information, see comments in the DM pin.conf file.
-
Save and close the file.
-
Stop and restart the DM.
You can now install RE Loader.
Installing the RE Loader Package
Note:
If you are upgrading from a previous version of RE Loader, you must make sure that all available unrated events are rated by Pipeline Manager and loaded before installing this version of RE Loader.
To install RE Loader, see "Installing Individual BRM Components" in BRM Installation Guide.
Creating Your RE Loader Database Partitions
Note:
You must perform this step to ensure that the new event tables have the same partitioning layout as your existing event tables. If you install several optional components, perform this step only after installing the last component.
To create partitions for RE Loader events:
-
On the system where BRM is installed, go to the BRM_home/apps/partition_utils directory.
-
Run the partition_utils utility to enable delayed-event partitions:
perl partition_utils.pl -o enable -t delayed -c storable_class
where storable_class specifies the event classes for which you want partitioning.
Note:
You must create partitions for all subclasses of a specific service event type that you want to load.
For example, this command creates partitions for /event/delayed/session/telco/gsm delayed events:
perl partition_utils.pl -o enable -t delayed -c /event/session/telco/gsm
Your RE Loader installation is now complete.
Returning DM Permissions to their Original Values
To return your DM permissions to their original values:
-
In a text editor, open your DM configuration file: BRM_home/sys/dm_oracle/pin.conf.
-
Restore the following entries to their original values (the values they had before you modified them). The default value for each entry is 0:
- dm dd_write_enable_fields
- dm dd_write_enable_objects
- dm dd_write_enable_portal_objects
- dm dd_mark_as_portal
-
Save and close the file.
-
Stop and restart the DM.
Uninstalling RE Loader
To uninstall RE Loader, see "Uninstalling Optional Components" in BRM Installation Guide.