14 Customizing the Make a Payment Screen
Learn how to use the Oracle Communications Billing Care SDK to customize the fields displayed in the Billing Care Make a Payment screen according to the selected payment method.
Topics in this document:
About the Make a Payment Screen
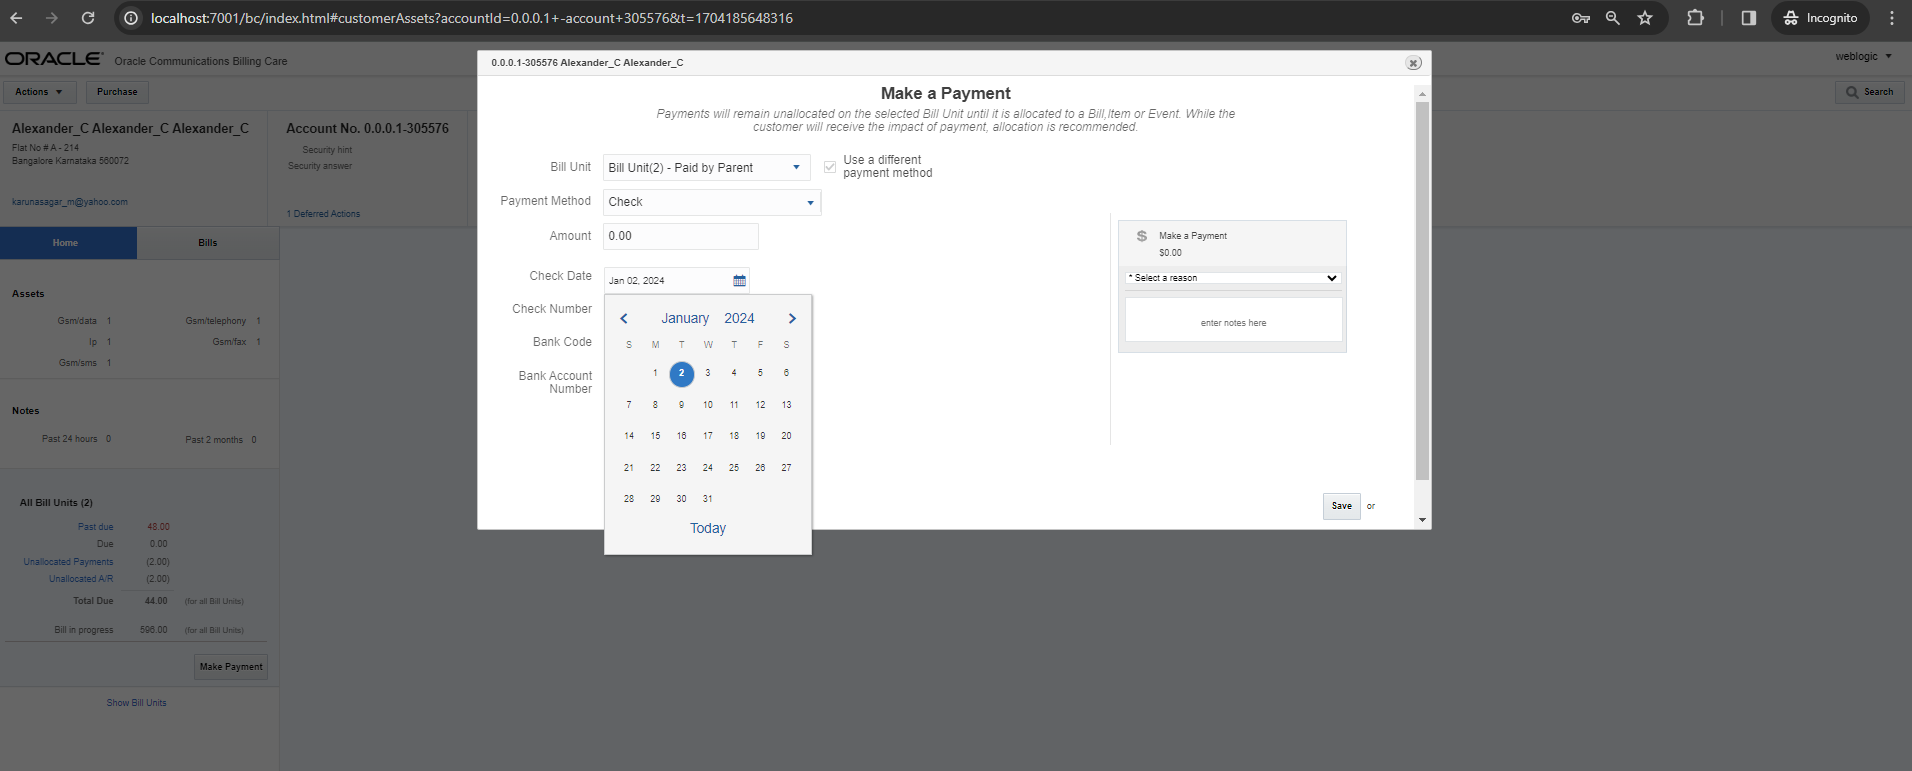
The Billing Care Make a Payment screen displays different fields based on the payment method selected by the user. For example, a credit card payment method contains the Card number, CVV2/CID, and Card expiration fields, but the check payment method contains the Check Date, Check Number, Bank Code, and Bank Account Number fields. Figure 14-1 shows the fields for the check payment method.
You can customize the Make a Payment screen in one or more of the following ways:
-
Modify or remove existing fields based on the payment method
-
Add custom fields based on the payment method
-
Specify whether a field is optional or mandatory
-
Specify the valid range of dates for fields with a date data type
-
Validate whether a user has entered all required information for a specified payment method
Customizing the Fields Displayed for a Payment Method
The Billing Care SDK includes sample payment customizations, including a README.txt file explaining the samples, in the SDK_home/samples/ValidationOnPaymentInfo directory, where SDK_home is the directory where you installed the Billing Care SDK. Use these samples when developing your own payment customizations.
To customize which fields are displayed in the Make a Payment screen based on the payment method:
-
Create a custom view model for the Make a Payment screen. See "Creating a Custom View Model for a Payment Method".
-
Override the registry value for the Billing Care payment type. See "Configuring the Custom Payment Type in the Registry".
-
Package and deploy your payment type changes. See "Packaging and Deploying Customizations".
Creating a Custom View Model for a Payment Method
Billing Care uses AutoGeneratedUIViewModel.js to render the UI fields specific to each payment method. Customizing the Billing Care fields displayed for each payment method requires overriding the default view model behavior.
A sample CustomAutoGeneratedUIVM.js file is provided in the SDK_home/samples/ValidationOnPaymentInfo/web/custom/viewmodels/payment directory. The sample file does the following based on the field name or payment method:
-
For check payment methods, changes the bankCode field to a drop-down list of bank names. It does this by using the oj-select-single tag. For more information, see "Select (Single)" in OJET Cookbook Forms.
-
Specifies that fields with a string data type are mandatory. It does this by using the required attribute.
-
Specifies a valid date range of 15 days before the current date through 15 days after the current date for all fields with a date data type.
-
Validates that users have entered values into all mandatory fields. It does this by overriding the isValid function.
To create a custom view model for a Billing Care payment type:
-
Create the CustomAutoGeneratedUIVM.js file in the myproject/web/custom/viewmodels directory, where myproject is the folder containing your NetBeans IDE project.
-
Make your changes to the preAddElement function, which is called after the DOM element is created but before it is added to the actual DOM.
The README.txt file in SDK_home/samples/ValidationOnPaymentInfo contains details on how the preAddElement function works and the functions it accepts.
-
Save the file in your NetBeans IDE project.
Configuring the Custom Payment Type in the Registry
Create a custom module entry in the customRegistry.js file to use when rendering the Make a Payment screen for a particular payment method.
A sample customRegistry.js file is provided in the SDK_home/samples/ValidationOnPaymentInfo/web/custom directory, where SDK_home is the Billing Care SDK installation directory. Use this sample to create the customRegistry.js file with your custom view model.
To add an entry in the customRegistry.js file:
-
Create a customRegistry.js file in myproject/web/custom by copying the reference registry file.
-
Specify to use your custom view model. For example:
varCustomRegistry = { customPaymentType: { customViewModel: '../custom/viewmodels/payment/CustomAutoGeneratedUIVM' } }; -
Close and save the customRegistry.js file.
-
Save the file in your NetBeans IDE project.
