31 Configuring Disaster Recovery in ECE Cloud Native
Learn how to set up your Oracle Communications Elastic Charging Engine (ECE) cloud native services for disaster recovery.
Topics in this document:
Setting Up Active-Active Disaster Recovery for ECE
Disaster recovery provides continuity in service for your customers and guards against data loss if a system fails. In ECE cloud native, disaster recovery is implemented by configuring two or more active production sites at different geographical locations. If one production site fails, another active production site takes over the traffic from the failed site.
During operation, ECE requests are routed across the production sites based on your load-balancing configuration. All updates that occur in an ECE cluster at one production site are replicated to other production sites through the Coherence cache federation.
For more information about the active-active disaster recovery configuration, see "About the Active-Active System" in BRM System Administrator's Guide.
To configure ECE cloud native for active-active disaster recovery:
-
In each Kubernetes cluster, expose ports on the external IP using the Kubernetes LoadBalancer service.
The ECE Helm chart includes a sample YAML file for the LoadBalancer service (oc-cn-ece-helm-chart/templates/ece-service-external.yaml) that you can configure for your environment.
-
On your primary production site, update the override-values.yaml file with the external IP of the LoadBalancer service, the federation-related parameters, the JMX port for the monitoring agent, the active-active disaster recovery parameters, and so on.
The following shows example override-values.yaml file settings for a primary production site:
monitoringAgent: monitoringAgentList: - name: "monitoringagent1" replicas: 1 jmxport: "31020" jmxEnabled: "true" jvmJMXOpts: "-Dcom.sun.management.jmxremote -Dcom.sun.management.jmxremote.authenticate=false -Dcom.sun.management.jmxremote.ssl=false -Dcom.sun.management.jmxremote.local.only=false -Dcom.sun.management.jmxremote.password.file=../config/jmxremote.password -Dsecure.access.name=admin -Dcom.sun.management.jmxremote.authenticate=false -Dcom.sun.management.jmxremote.port=31020 -Dcom.sun.management.jmxremote.rmi.port=31020" jvmOpts: "-Djava.net.preferIPv4Addresses=true" jvmGCOpts: "" restartCount: "0" nodeSelector: "node1" - name: "monitoringagent2" replicas: 1 jmxport: "31021" jmxEnabled: "true" jvmJMXOpts: "-Dcom.sun.management.jmxremote -Dcom.sun.management.jmxremote.authenticate=false -Dcom.sun.management.jmxremote.ssl=false -Dcom.sun.management.jmxremote.local.only=false -Dcom.sun.management.jmxremote.password.file=../config/jmxremote.password -Dsecure.access.name=admin -Dcom.sun.management.jmxremote.authenticate=false -Dcom.sun.management.jmxremote.port=31021 -Dcom.sun.management.jmxremote.rmi.port=31021" jvmOpts: "-Djava.net.preferIPv4Addresses=true" jvmGCOpts: "" restartCount: "0" nodeSelector: "node2" charging: jmxport: "31022" coherencePort: "31015" ... clusterName: "BRM" isFederation: "true" primaryCluster: "true" secondaryCluster: "false" clusterTopology: "active-active" cluster: primary: clusterName: "BRM" eceServiceName: ece-server eceServicefqdnOrExternalIP: "0.1.2.3" secondary: - clusterName: "BRM2" eceServiceName: ece-server eceServicefqdnOrExternalIp: "0.1.3.4" federatedCacheScheme: federationPort: brmfederated: 31016 xreffederated: 31017 replicatedfederated: 31018 offerProfileFederated: 31019 -
On your secondary production site, update the override-values.yaml file with the external IP of the LoadBalancer service, the federation-related parameters, the JMX port for the monitoring agent, the active-active disaster recovery parameters, and so on.
The following shows example settings in an override-values.yaml for a secondary production site:
monitoringAgent: monitoringAgentList: - name: "monitoringagent1" replicas: 1 jmxport: "31020" jmxEnabled: "true" jvmJMXOpts: "-Dcom.sun.management.jmxremote -Dcom.sun.management.jmxremote.authenticate=false -Dcom.sun.management.jmxremote.ssl=false -Dcom.sun.management.jmxremote.local.only=false -Dcom.sun.management.jmxremote.password.file=../config/jmxremote.password -Dsecure.access.name=admin -Dcom.sun.management.jmxremote.authenticate=false -Dcom.sun.management.jmxremote.port=31020 -Dcom.sun.management.jmxremote.rmi.port=31020" jvmOpts: "-Djava.net.preferIPv4Addresses=true" jvmGCOpts: "" restartCount: "0" nodeSelector: "node1" - name: "monitoringagent2" replicas: 1 jmxport: "31021" jmxEnabled: "true" jvmJMXOpts: "-Dcom.sun.management.jmxremote -Dcom.sun.management.jmxremote.authenticate=false -Dcom.sun.management.jmxremote.ssl=false -Dcom.sun.management.jmxremote.local.only=false -Dcom.sun.management.jmxremote.password.file=../config/jmxremote.password -Dsecure.access.name=admin -Dcom.sun.management.jmxremote.authenticate=false -Dcom.sun.management.jmxremote.port=31021 -Dcom.sun.management.jmxremote.rmi.port=31021" jvmOpts: "-Djava.net.preferIPv4Addresses=true" jvmGCOpts: "" restartCount: "0" nodeSelector: "node2" charging: jmxport: "31022" coherencePort: "31015" ... clusterName: "BRM2" isFederation: "true" primaryCluster: "false" secondaryCluster: "true" clusterTopology: "active-active" cluster: primary: clusterName: "BRM" eceServiceName: ece-server eceServicefqdnOrExternalIP: "0.1.2.3" secondary: - clusterName: "BRM2" eceServiceName: ece-server eceServicefqdnOrExternalIp: "0.1.3.4" federatedCacheScheme: federationPort: brmfederated: 31016 xreffederated: 31017 replicatedfederated: 31018 offerProfileFederated: 31019 -
On your primary and secondary production sites, add the customerGroupConfigurations and siteConfigurations sections to the override-values.yaml file.
If you use incremental customer loading in this active-active configuration, set migration.loader.customerGroupList to the customer group names defined in customerGroupConfigurations, for example, "customergroup1,customergroup2". The names must match exactly across the active-active configuration and the customer loading configuration.
The following shows example settings to add to the override-values.yaml file in your primary and secondary production sites:
customerGroupConfigurations: - name: "customergroup1" clusterPreference: - priority: "1" routingGatewayList: "0.1.2.3:31500" name: "BRM" - priority: "2" routingGatewayList: "0.1.3.4:31500" name: "BRM2" - name: "customergroup2" clusterPreference: - priority: "2" routingGatewayList: "0.1.2.3:31500" name: "BRM" - priority: "1" routingGatewayList: "0.1.3.4:31500" name: "BRM2" siteConfigurations: - name: "BRM" affinitySiteNames: "BRM2" monitorAgentJmxConfigurations: - name: "monitoringagent1" host: "node1" jmxPort: "31020" disableMonitor: "true" - name: "monitoringagent2" host: "node2" jmxPort: "31021" disableMonitor: "true" - name: "BRM2" affinitySiteNames: "BRM" monitorAgentJmxConfigurations: - name: "monitoringagent1" host: "node1" jmxPort: "31020" disableMonitor: "true" - name: "monitoringagent2" host: "node2" jmxPort: "31021" disableMonitor: "true" -
In your override-values.yaml file, configure kafkaConfigurationList with both primary and secondary site Kafka details.
The following shows example settings to add to the override-values.yaml file in your primary and secondary production sites:
kafkaConfigurationList: - name: "BRM" hostname: "hostname:port" topicName: "ECENotifications" suspenseTopicName: "ECESuspenseQueue" partitions: "200" kafkaProducerReconnectionInterval: "120000" kafkaProducerReconnectionMax: "36000000" kafkaDGWReconnectionInterval: "120000" kafkaDGWReconnectionMax: "36000000" kafkaBRMReconnectionInterval: "120000" kafkaBRMReconnectionMax: "36000000" kafkaHTTPReconnectionInterval: "120000" kafkaHTTPReconnectionMax: "36000000" - name: "BRM2" hostname: "hostname:port" topicName: "ECENotifications" suspenseTopicName: "ECESuspenseQueue" partitions: "200" kafkaProducerReconnectionInterval: "120000" kafkaProducerReconnectionMax: "36000000" kafkaDGWReconnectionInterval: "120000" kafkaDGWReconnectionMax: "36000000" kafkaBRMReconnectionInterval: "120000" kafkaBRMReconnectionMax: "36000000" kafkaHTTPReconnectionInterval: "120000" kafkaHTTPReconnectionMax: "36000000" -
If data persistence is enabled, configure a primary and secondary Rated Event Formatter instance on your primary and secondary production sites for each site in the ratedEventFormatter section of the override-values.yaml file.
Note:
In an active-active deployment, keep all primary and secondary Rated Event Formatter pods running. Set the jmxEnabled configuration entry to true for every primary and secondary Rated Event Formatter pod. ECE initializes site configuration only for JMX-enabled processes. A secondary Rated Event Formatter instance begins processing rated events only after it is activated when its corresponding primary instance is unavailable.If jmxEnabled is set to false, site configuration is not initialized and the Rated Event Formatter pod can fail to start.
The following shows example settings to add to the override-values.yaml file in your primary and secondary production sites:
ratedEventFormatter:
  ratedEventFormatterList:
    - jmxEnabled: true
      ratedEventFormatterConfiguration:
        name: "ref_site1_primary"
        clusterName: "BRM"
        primaryInstanceName: "REF-1"
        partition: "1"
        noSQLConnectionName: "noSQLConnection"
        connectionName: "oracle1"
        threadPoolSize: "2"
        retainDuration: "0"
        ripeDuration: "30"
        checkPointInterval: "20"
        siteName: "site1"
        pluginPath: "ece-ratedeventformatter.jar"
        pluginType: "oracle.communication.brm.charging.ratedevent.formatterplugin.internal.SampleFormatterPlugInImpl"
        pluginName: "brmCdrPluginDC1Primary"
        noSQLBatchSize: "25"

    - jmxEnabled: true
      ratedEventFormatterConfiguration:
        name: "ref_site1_secondary"
        clusterName: "BRM2"
        partition: "1"
        noSQLConnectionName: "noSQLConnection"
        connectionName: "oracle2"
        threadPoolSize: "2"
        retainDuration: "0"
        ripeDuration: "30"
        checkPointInterval: "20"
        siteName: "site1"
        pluginPath: "ece-ratedeventformatter.jar"
        pluginType: "oracle.communication.brm.charging.ratedevent.formatterplugin.internal.SampleFormatterPlugInImpl"
        pluginName: "brmCdrPluginDC1Primary"
        noSQLBatchSize: "25"

    - jmxEnabled: true
      ratedEventFormatterConfiguration:
        name: "ref_site2_primary"
        clusterName: "BRM2"
        primaryInstanceName: "REF-2"
        partition: "1"
        noSQLConnectionName: "noSQLConnection"
        connectionName: "oracle2"
        threadPoolSize: "2"
        retainDuration: "0"
        ripeDuration: "30"
        checkPointInterval: "20"
        siteName: "site2"
        pluginPath: "ece-ratedeventformatter.jar"
        pluginType: "oracle.communication.brm.charging.ratedevent.formatterplugin.internal.SampleFormatterPlugInImpl"
        pluginName: "brmCdrPluginDC1Primary"
        noSQLBatchSize: "25"

    - jmxEnabled: true
      ratedEventFormatterConfiguration:
        name: "ref_site2_secondary"
        clusterName: "BRM"
        partition: "1"
        noSQLConnectionName: "noSQLConnection"
        connectionName: "oracle1"
        primaryInstanceName: "ref_site2_primary"
        threadPoolSize: "2"
        retainDuration: "0"
        ripeDuration: "30"
        checkPointInterval: "20"
        siteName: "site2"
        pluginPath: "ece-ratedeventformatter.jar"
        pluginType: "oracle.communication.brm.charging.ratedevent.formatterplugin.internal.SampleFormatterPlugInImpl"
        pluginName: "brmCdrPluginDC1Primary"
        noSQLBatchSize: "25"
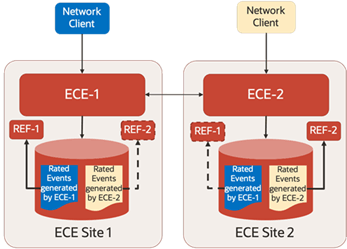
The siteName key specifies which ECE site’s rated events are processed by the Rated Event Formatter instance, independent of which ECE site the Rated Event Formatter instance is running in. Primary Rated Event Formatter instances run in the same site as siteName and are normally active and processing the local ECE site’s rated events. Secondary Rated Event Formatter instances run in a different ECE site as siteName and are only activated when the primary instance is unavailable.
For more information about Rated Event Formatter in active-active systems, see "About Rated Event Formatter in a Persistence-Enabled Active-Active System" in BRM System Administrator's Guide.
-
Depending on whether persistence is enabled in ECE, do one of the following:
-
If persistence is enabled, add the cachePersistenceConfigurations and connectionConfigurations.OraclePersistenceConnectionConfigurations sections to your override-values.yaml file on both primary and secondary production sites.
The following shows example settings to add to the override-values.yaml file on your primary and secondary sites:
 cachePersistenceConfigurations:
      cachePersistenceConfigurationList:
        -  clusterName: "BRM"
           persistenceStoreType: "OracleDB"
           persistenceConnectionName: "oraclePersistence1"
...
        -  clusterName: "BRM2"
           persistenceStoreType: "OracleDB"
           persistenceConnectionName: "oraclePersistence2"
...
   connectionConfigurations:
         OraclePersistenceConnectionConfigurations:
            - clusterName: "BRM"
              name: "oraclePersistence1"
...
            - clusterName: "BRM2"
              name: "oraclePersistence2"
...
Note:
If the secondary production site must receive configuration, pricing, and customer data only through federation from the primary production site, do not start ConfigLoader, Pricing Updater, or Customer Updater on the secondary production site. In the secondary production site’s override-values.yaml file, set the replica counts for Pricing Updater and Customer Updater to 0. Set the ConfigLoader replica count to 0 by using the supported ConfigLoader replica configuration for your version of oc-cn-ece-helm-chart. With these components stopped, ECE remains in the Initial state on the secondary production site until data is federated from the primary production site. -
If persistence is disabled, add the ratedEventPublishers and NoSQLConnectionConfigurations sections to your override-values.yaml file on primary and secondary production sites.
The following shows example settings to add to the override-values.yaml file on your primary and secondary sites:
   ratedEventPublishers:
     -  clusterName: "BRM"
        noSQLConnectionName: "noSQLConnection1"
        threadPoolSize: "4"
     -  clusterName: "BRM2"
        noSQLConnectionName: "noSQLConnection2"
        threadPoolSize: "4"
   connectionConfigurations:
         NoSQLConnectionConfigurations:
            - clusterName: "BRM"
              name: "noSQLConnection1"
...
            - clusterName: "BRM2"
              name: "noSQLConnection2"
...
-
-
Deploy the ECE Helm chart (oc-cn-ece-helm-chart) on the primary cluster and bring the primary cluster to the Usage Processing state.
-
Invoke federation from the primary production site to your secondary production sites by connecting from JConsole of the ecs1 pod.
-
Update the label for the ecs-0 pod:
kubectl label -n NameSpace po ecs-0 ece-jmx=ece-jmx-external -
Update the /etc/hosts file on the remote machine with the worker node of ecs-0:
IP_OF_WORKER_NODE ecs-0.ece-server.namespace.svc.cluster.local -
Connect to JConsole:
jconsole ecs-0.ece-server.namespace.svc.cluster.local:31022JConsole starts.
-
Invoke start() and replicateAll() with the secondary production site name from the coordinator node of each federated cache in JMX. To do so:
-
Expand the Coherence node, expand Federation, expand BRMFederatedCache, expand Coordinator, and then expand Coordinator. Click on start(BRM2) and replicateAll(BRM2), where BRM2 is the secondary production site name.
-
Expand the Coherence node, expand Federation, expand OfferProfileFederatedCache, expand Coordinator, and then expand Coordinator. Click on start(BRM2) and replicateAll(BRM2).
-
Expand the Coherence node, expand Federation, expand ReplicatedFederatedCache, expand Coordinator, and then expand Coordinator. Click on start(BRM2) and replicateAll(BRM2).
-
Expand the Coherence node, expand Federation, expand XRefFederatedCache, expand Coordinator, and then expand Coordinator. Click on start(BRM2) and replicateAll(BRM2).
-
-
From the secondary production site, verify that data is being federated from the primary production site to the secondary production sites, and that all pods are running.
After federation completes, your primary and secondary production sites move to the Usage Processing state, and the monitoring agent pods are spawned.
Note:
By default, the federation interceptor is invoked for events received at the destination site during replicateAll for conflict resolution. You can disable this by setting the disableFederationInterceptor attribute to true in the charging.server AppConfiguration MBean at the destination site before invoking replicateAll for Coherence services from the source site. The cache data will be replicated at the destination site without performing conflict resolution. Once replicateAll is complete, set the disableFederationInterceptor attribute to false.
-
-
Start federation from the secondary production site to the primary production site.
To do so, connect to JConsole for an
ecs-0pod in the secondary production site. For connection instructions, see 9.c.In the Coordinator MBean for each federated cache listed in 9.d, run
start (PrimaryProductionSiteName), wherePrimaryProductionSiteNameis the name of the primary production site. Run only the start operation on the secondary production site.Note:
Federation in the secondary-to-primary direction is not automatically initiated. You must start it manually. -
When all pods are ready on each site, scale down and then scale up the monitoring agent pods in each production site. This synchronizes the monitoring agent pods with the other pods in the cluster.
Note:
Repeat these steps to scale up or down any pod after the monitoring agent is initialized.
-
Scale down monitoringagent1 to 0:
kubectl -n NameSpace scale deploy monitoringagent1 --replicas=0 -
Wait for monitoringagent1 to stop and then scale it back up to 1.
kubectl -n NameSpace scale deploy monitoringagent1 --replicas=1 -
Scale down monitoringagent2 to 0:
kubectl -n NameSpace scale deploy monitoringagent2 --replicas=0 -
Wait for monitoringagent2 to stop and then scale it back up to 1.
kubectl -n NameSpace scale deploy monitoringagent2 --replicas=1
-
-
Verify that the monitoring agent logs are collecting metrics.
Processing CDR Generation in an Active-Active System
When CDR generation is enabled in an active-active system, each production site can generate unrated CDRs for external systems. If a production site fails, the CDR Store retains in-progress CDR sessions, and subsequent 5G usage events are diverted to the CDR Gateway at another production site.
You can configure CDR Generator to mark partially processed CDRs as incomplete, identify possible duplicate usage updates, and add a custom reason when a CDR is closed. Downstream systems can use this information when processing CDRs generated across sites after a failover.
For information about these CDR Generator configurations and prerequisites, see "About CDR Generator in an Active-Active System" in BRM System Administrator’s Guide.
Processing Usage Requests on Site Receiving Request
By default, the ECE active-active disaster recovery mode processes usage requests according to the preferred site assignments in the customerGroup list. For example, if subscriber A's preferred primary site is site 1, ECE processes subscriber A's usage requests on site 1. If subscriber A's usage request is received by production site 2, it is sent to production site 1 for processing.
You can configure the ECE active-active mode to process usage requests on the site that receives the request, regardless of the subscriber's preferred site. For example, if a subscriber's usage request is received by production site 1, it is processed on production site 1. Similarly, if the usage request is received by production site 2, it is processed on production site 2.
Note:
This configuration does not apply to usage charging requests for sharing group members. Usage requests for sharing group members are processed on the same site as the sharing group parent.
To configure the ECE active-active mode to process usage requests on the site that receives the request irrespective of the subscriber's preferred site:
-
In your override-values.yaml file for oc-cn-ece-helm-chart, set the charging.brsConfigurations.brsConfigurationList.brsConfig.skipActiveActivePreferredSiteRouting key to true.
-
Run the helm upgrade command to update your ECE Helm release:
helm upgrade EceReleaseName oc-cn-ece-helm-chart --values OverrideValuesFile --namespace BrmNameSpace
where:
-
EceReleaseName is the release name for oc-cn-ece-helm-chart and is used to track the installation instance.
-
OverrideValuesFile is the path to the YAML file that overrides the default configurations in the oc-cn-ece-helm-chart/values.yaml file.
-
BrmNameSpace is the namespace in which to create BRM Kubernetes objects for the BRM Helm chart.
-
Stopping ECE from Routing to a Failed Site
When an active production site fails, you must notify the monitoring agent about the failed site. This stops ECE from rerouting requests to the failed production site.
To notify the monitoring agent about a failed production site:
-
Connect to the monitoring agent through JConsole:
-
Update /etc/hosts with the worker IP of the monitoringagent1 pod.
worker_IP ece-monitoringagent-service-1 -
Connect through JConsole by running this command:
jconsole ece-monitoringagent-service-1:31020JConsole starts.
-
-
Expand the ECE Monitoring node.
-
Expand Agent.
-
Expand Operations.
-
Set the failoverSite() operation to the name of the failed production site.
Note:
Marking a site as failed affects traffic routing only. It does not prevent ECE components at the failed site from starting or initializing their configured database connections. Components configured for database access can therefore attempt authentication while the site is still marked as failed and before you run recoverSite(), even when the site is not processing usage requests or BRM traffic.
You can also use the activateSecondaryInstanceFor operation to fail over to a backup Rated Event Formatter as described in "Activating a Secondary Rated Event Formatter Instance". See "Resolving Rated Event Formatter Instance Outages" in BRM System Administrator's Guide for conceptual information about how to resolve Rated Event Formatter outages.
Adding Fixed Site Back to ECE System
Notify the monitoring agent after a failed production site starts functioning again. This allows ECE to route requests to the site again.
To add a fixed site back to the ECE disaster recovery system:
-
Connect to the monitoring agent through JConsole:
-
Update /etc/hosts with the worker IP of the monitoringagent1 pod.
worker_IP ece-monitoringagent-service-1 -
Connect through JConsole by running this command:
jconsole ece-monitoringagent-service-1:31020JConsole starts.
-
-
Expand the ECE Monitoring node.
-
Expand Agent.
-
Expand Operations.
-
Set the recoverSite() operation to the name of the original production site.
Activating a Secondary Rated Event Formatter Instance
If a primary Rated Event Formatter instance is down, you can activate a secondary instance to take over rated event processing. For example, in Figure 31-1, you could activate REF-2 in ECE Site 1 if REF-1 in ECE Site 1 goes down.
Figure 31-1 Sample Rated Event Formatter Instance in Active-Active Mode
To activate a secondary Rated Event Formatter instance:
-
Connect to the ratedeventformatter pod through JConsole by doing the following:
-
Update the label for the ratedeventformatter pod:
kubectl label -n NameSpace po ratedeventformatter1-0 ece-jmx=ece-jmx-externalNote:
ece-jmx-service-external has only one endpoint as the IP of the ratedeventformatter pod.
-
Update the /etc/hosts file on the remote machine with the worker node of the ratedeventformatter pod.
IP_OF_WORKER_NODE ratedeventformatter1-0.ece-server.namespace.svc.cluster.local -
Connect through JConsole by running this command:
jconsole redeventformatter1-0.ece-server.namespace.svc.cluster.local:31022JConsole starts.
-
-
Expand the ECE Monitoring node.
-
Expand RatedEventFormatterMatrices.
-
Expand Operations.
-
Run the activateSecondaryInstance operation.
The secondary Rated Event Formatter instance begins processing rated events.
About Conflict Resolution During the Journal Federation Process
In active-active ECE deployments, any changes to the ECE cache on one site are automatically federated to the ECE cache on other sites to keep the sites in sync. Most types of cache objects are replicated seamlessly. However, the following types can encounter conflicts during the federation process:
-
Balance
-
ActiveSession
-
Customer
-
TopUpHistory
-
RecurringBundleIdHistory
Conflicts can arise for these object types when the same cache entry changes simultaneously at both sites or when the same cache entry changes at multiple sites while federation is down. For example, Site 1 processes Joe's purchase of 500 prepaid minutes, while Site 2 processes his usage of 20 prepaid minutes. ECE employs custom conflict resolution logic to detect and resolve these conflicting changes.
On rare occasions, ECE may be unable to resolve certain conflicts. When ECE cannot resolve a conflict, it:
-
Keeps the change to the cache entry at the local ECE site but does not modify the cache entry at the receiving ECE site.
-
Logs details about the unresolved conflict to the ECS log files, which are located in the ECE_home/logs directory, for subsequent review and possible corrective actions.
You can find details about the processing results of ECE federation change events, including cache conflict detection and resolution, in the ece.federated.service.change.records metric. See "ECE Federated Service Metrics" for more details.
Note:
If an ECE site or federation between ECE sites remains down for a significant amount of time, the ECE conflict resolution logic may not be sufficient to synchronize the caches. In such cases, you must replace the ECE site's cache to achieve synchronization. See "Using startWithSync to Resynchronize an ECE’s Cache Contents".
Using startWithSync to Resynchronize an ECE’s Cache Contents
If an ECE site or federation between ECE sites remains down for an extended period, causing ECE cache data to become significantly out of sync, you can completely replace one ECE site’s cache data with the contents of another ECE site. To do this, enable federation from the functioning origin ECE site to the recovering destination ECE site, and replicate all ECE cache data from the origin to the destination. You perform these two steps using the single Coherence startWithSync command.
The ECE cache data resynchronization procedure includes the following steps:
-
Truncate the ECE cache data and the corresponding ECE cache persistence database tables at the recovering destination ECE site.
-
At the recovering ECE destination site, set the disableFederationInterceptor ECE configuration MBean to true. This setting ensures that the federated cache data received from the origin ECE site always overwrites the recovering site's cache data.
-
Create a JMX connection to ECE cloud native using JConsole. See "Creating a JMX Connection to ECE Using JConsole".
-
In JConsole, expand the ECE Configuration node.
-
Expand charging.server.
-
Expand Attributes.
-
Set the disableFederationInterceptor to true.
-
-
From the origin ECE site, run the startWithSync() operation with the recovering destination ECE site's name. Perform these tasks using JConsole:
-
Expand the Coherence node, expand Federation, expand BRMFederatedCache, expand Coordinator, and then expand Coordinator. Click startWithSync(destination), where destination is the recovering ECE site's name. Confirm that ReplicateAllPercentComplete in the Coherence destination MBean for the BRMFederatedCache service reaches 100% for all ecs nodes in the origin site before proceeding.
-
Expand the Coherence node, expand Federation, expand OfferProfileFederatedCache, expand Coordinator, and then expand Coordinator. Click startWithSync(destination). Confirm that ReplicateAllPercentComplete in the Coherence destination MBean for the BRMFederatedCache service reaches 100% for all ecs nodes in the origin site before proceeding.
-
Expand the Coherence node, expand Federation, expand ReplicatedFederatedCache, expand Coordinator, and then expand Coordinator. Click startWithSync(destination). Confirm that ReplicateAllPercentComplete in the Coherence destination MBean for the BRMFederatedCache service reaches 100% for all ecs nodes in the origin site before proceeding.
-
Expand the Coherence node, expand Federation, expand XRefFederatedCache, expand Coordinator, and then expand Coordinator. Click startWithSync(destination). Confirm that ReplicateAllPercentComplete in the Coherence destination MBean for the BRMFederatedCache service reaches 100% for all ecs nodes in the origin site before proceeding.
-
-
From the recovering destination ECE site, verify that all ECE cache data has been federated from the origin ECE site and continues to synchronize with ongoing changes, along with performing other standard ECE health checks.
-
At the recovering destination ECE site, verify that the disableFederationInterceptor ECE configuration MBean matches the value at the origin ECE site (the default is true).