3 Installation Procedures
The installation procedures in this document provision and configure an Oracle Communications Signaling, Network Function Cloud Native Environment (OCCNE). OCCNE offers the choice of deployment platform; the CNE can be deployed directly onto dedicated hardware, (referred to as a bare metal CNE), or deployed onto OpenStack-hosted VMs. (referred to as a virtualized CNE).
Regardless of which deployment platform is selected, OCCNE installation is highly automated. A collection of container-based utilities are used to automate the provisioning, installation, and configuration of OCCNE. These utilities are based on the following automation tools:
- PXE helps reliably automate provisioning the hosts with a minimal operating system.
- Terraform is used to create the virtual resources that the virtualized CNE is hosted on.
- Kubespray helps reliably install a base Kubernetes cluster, including all dependencies (like etcd), using the Ansible provisioning tool.
- Ansible is used to orchestrate the overall deployment.
- Helm is used to deploy and configure common services such as Prometheus, Grafana, ElasticSearch and Kibana.
Note:
In case any procedure requires Linux Shell access, make sure that the shell is with Keepalive to avoid unexpected timeout.Bare Metal Installation
This section describes the procedure to install OCCNE onto dedicated bare metal hardware.
OCCNE Installation Overview
Frame and Component Overview
The initial release of the OCCNE system provides support for on-prem deployment to a very specific target environment consisting of a frame holding switches and servers. This section describes the layout of the frame and describes the roles performed by the racked equipment.
Note:
In the installation process, some of the roles of servers change as the installation procedure proceeds.Frame Overview
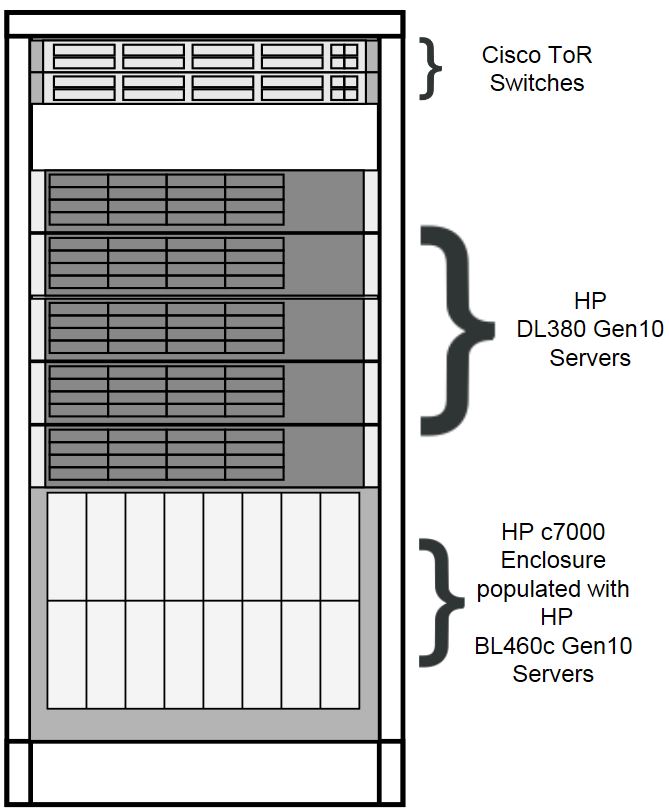
The physical frame is comprised of HP c-Class enclosure (BL460c blade servers), 5 DL380 rack mount servers, and 2 Top of Rack (ToR) Cisco switches. In case any procedure requires Linux Shell access, make sure that the shell is with Keepalive to avoid unexpected timeout.
Figure 3-1 Frame Overview
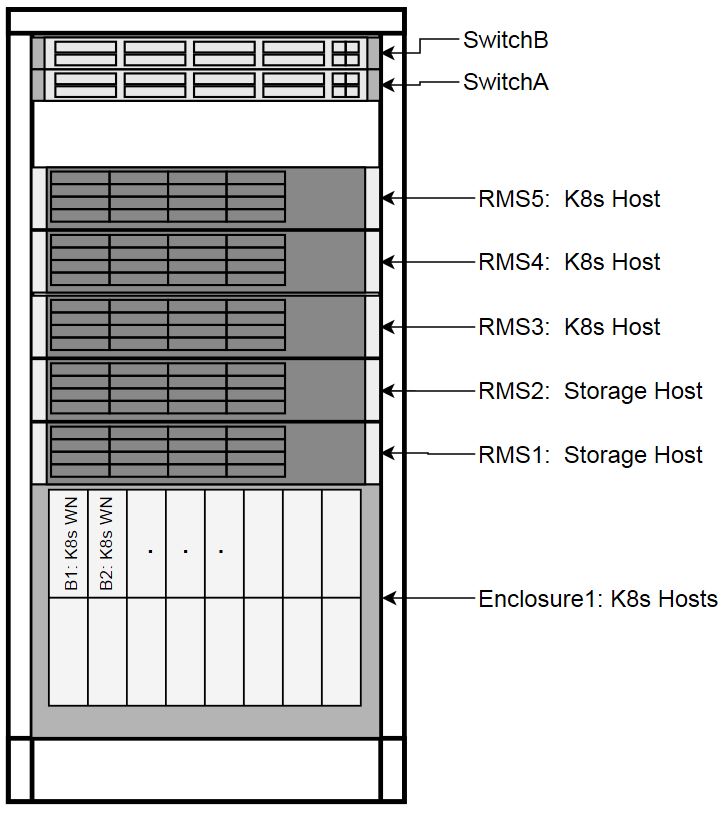
Host Designations
Each physical server has a specific role designation within the CNE solution.
Figure 3-2 Host Designations
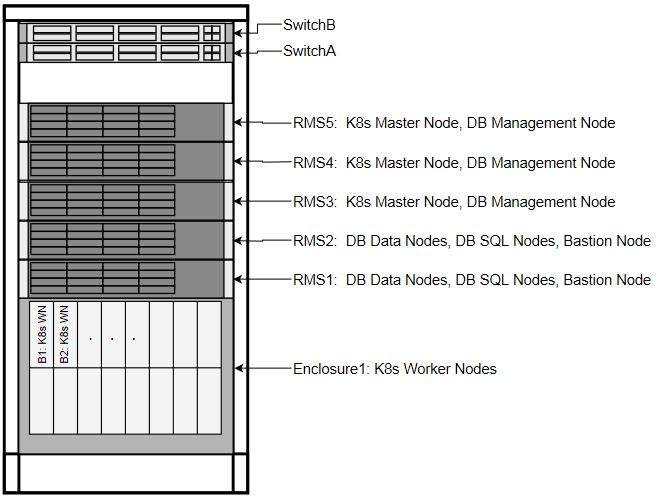
Node Roles
Along with the primary role of each host, a secondary role may be assigned. The secondary role may be software related, or, in the case of the Bootstrap Host, hardware related, as there are unique OOB connections to the ToR switches.
Figure 3-3 Node Roles
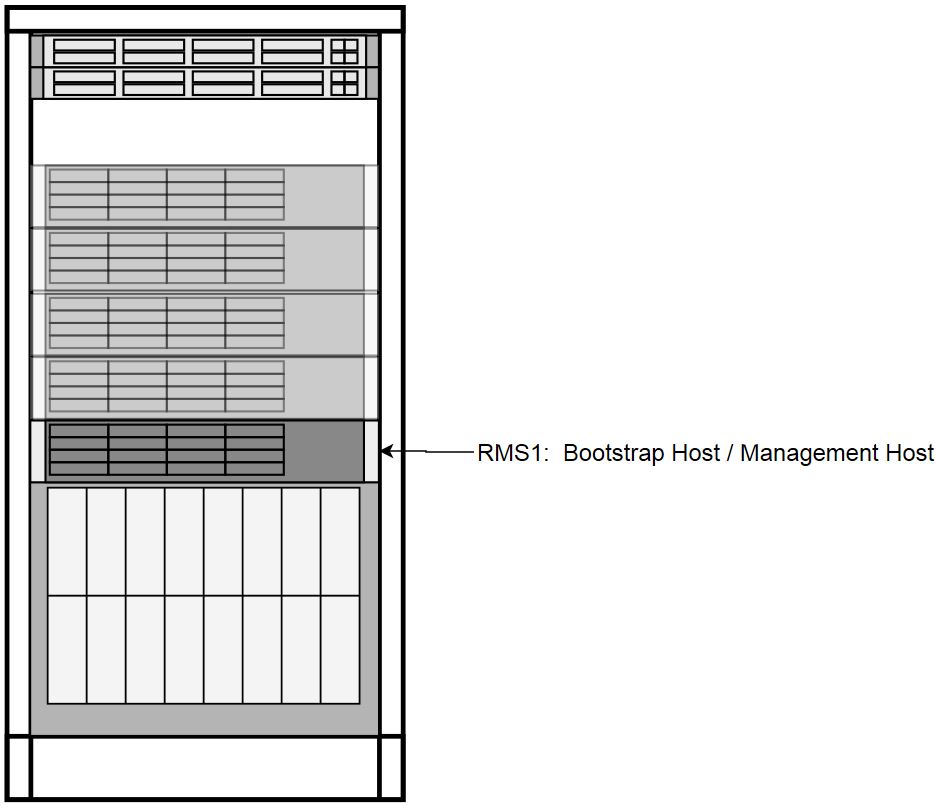
Transient Roles
Transient role is unique in that it has OOB connections to the ToR switches, which brings the designation of Bootstrap Host. This role is only relevant during initial switch configuration and disaster recovery of the switch. RMS1 also has a transient role as the Installer Bootstrap Host, which is only relevant during initial install of the frame, and subsequent to getting an official install on RMS2, this host is re-paved to its Storage Host role.
Figure 3-4 Transient Roles
Create OCCNE Instance
This section describes the steps and procedures required to create an OCCNE instance at a customer site. The following diagrams shows the installation context:
Figure 3-5 OCCNE Installation Overview
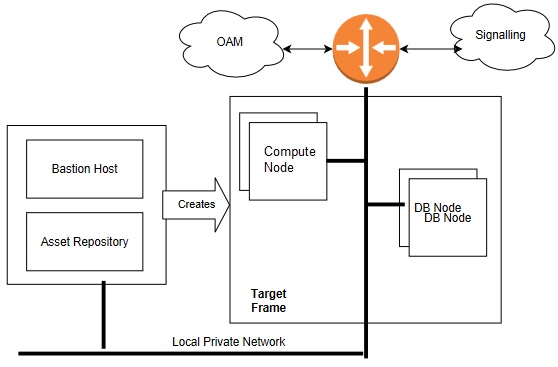
The following is an overview or basic install flow for reference to understand the overall effort contained within these procedures:
- Check that the hardware is on-site and properly cabled and powered up.
- Pre-assemble the basic
ingredients needed to perform a successful install:
-
Identify
- Download and stage software and other configuration files using provided manifests. Refer to Artifact Acquisition and Hosting for manifests information.
- Identify the layer 2 (MAC) and layer 3 (IP) addresses for the equipment in the target frame
- Identify the addresses of key external network services (e.g., NTP, DNS, etc.)
- Verify / Set all of the credentials for the target frame hardware to known settings
-
Prepare
- Software Repositories: Load the various SW repositories (YUM, Helm, Docker, etc.) using the downloaded software and configuration
- Configuration Files: Populate the hosts inventory file with credentials and layer 2 and layer 3 network information, switch configuration files with assigned IP addresses, and yaml files with appropriate information.
-
- Bootstrap the System:
- Manually configure a Minimal Bootstrapping Environment (MBE); perform the minimal set of manual operations to enable networking and initial loading of a single Rack Mount Server - RMS1 - the transient Installer Bootstrap Host. In this procedure, a minimal set of packages needed to configure switches, iLOs, PXE boot environment, and provision RMS2 as an OCCNE Storage Host are installed.
- Using the newly constructed MBE, automatically create the first (complete) Management VM on RMS2. This freshly installed Storage Host will include a virtual machine for hosting the Bastion Host.
- Using the newly constructed Bastion Host on RMS2, automatically deploy and configure the OCCNE on the other servers in the frame
- Final Steps
- Perform post installation checks
- Perform recommended security hardening steps
Cluster Bootstrapping Overview
This install procedure is targeted at installing OCCNE onto a new hardware absent of any networking configurations to switches, or operating systems provisioned. Therefore, the initial step in the installation process is to provision RMS1 (see Installation Procedures) as a temporary Installer Bootstrap Host. The Bootstrap Host is configured with a minimal set of packages needed to configure switches, iLOs, PXE boot environment, and provision RMS2 as an OCCNE Storage Host. A virtual Bastion Host is also provisioned on RMS2. The Bastion Host is then used to provision (and in the case of the Bootstrap Host, re-provision) the remaining OCCNE hosts, install Kubernetes, Database services, and Common Services running within the Kubernetes cluster.
Installation Prerequisites
Obtain Mate Site DB Replication Service Load Balancer IP
Complete the procedures outlined in this section before moving on to the Install Procedures section. OCCNE installation procedures require certain artifacts and information to be made available prior to executing installation procedures. Refer to Configure Artifact Acquisition and Hosting for the prerequisites.
While installing MYSQL NDB on the second site the Mate Site DB Replication Service Load Balancer IP must be provided as the configuration parameter for the geo-replication process to start.
- Login to Bastion Host of the first site and execute the following command to retrieve DB Replication Service Load Balancer IP
- Fetch DB Replication
Service Load Balancer IP of Mate Site MYSQL NDB.
In the above example IPv4: 10.75.182.88 is the Mate Site DB Replication Service Load Balancer IP.$ kubectl get svc --namespace=occne-infra | grep replication Example: $ kubectl get svc --namespace=occne-infra | grep replication occne-db-replication-svc LoadBalancer 10.233.3.117 10.75.182.88 80:32496/TCP 2m8s
Configure Artifact Acquisition and Hosting
OCCNE requires artifacts from Oracle eDelivery and certain open-source projects. OCCNE deployment environments are not expected to have direct internet access. Thus, customer-provided intermediate repositories are necessary for the OCCNE installation process. These repositories will need OCCNE dependencies to be loaded into them. This section will address the artifacts list needed to be in these repositories.
Oracle eDelivery Artifact Acquisition
Table 3-1 Oracle eDelivery Artifact Acquisition
| Artifact | Description | File Type | Destination Repository |
|---|---|---|---|
| occne-images-1.3.x.tgz | OCCNE Installers (Docker images) | Tar GZ | Docker Registry |
| v980756-01.zip | Zip file of MySQL Cluster Manager 1.4.7+Cluster | Zip of tar file | File repository |
| v975367-01.iso | OL7 ISO | ISO | File repository |
| Install Docs | These Install Procedures from OHC | PDFs | N/A |
| Templates | Switch config files, hosts.ini file templates from OHC | Config files (.conf, .ini) | Local media |
Third Party Artifacts
OCCNE dependencies that come from open-source software must be available in repositories reachable by the OCCNE installation tools. For an accounting of third party artifacts needed for this installation, refer to the Artifact Acquisition and Hosting.
Populate the MetalLB Configuration
Introduction
The metalLB configMap file (mb_configmap.yaml) contains the manifest for the metalLB configMap, this defines the BGP peers and address pools for metalLB. This file (mb_configmap.yaml) must be placed in the same directory (/var/occne/<cluster_name>) as the hosts.ini file.
Table 3-2 Procedure to configure MetalLB pools and peers
| Step # | Procedure | Description |
|---|---|---|
| 1.
|
Add BGP peers and address groups | Referring to the data collected in the Preflight Checklist, add BGP peers (ToRswitchA_Platform_IP, ToRswitchB_Platform_IP) and address groups for each address pool. Address-pools list the IP addresses that metalLB is allowed to allocate. |
| 2.
|
Edit the mb_configmap.yaml file | Edit the mb_configmap.yaml file with the
site-specific values found in the
Preflight Checklist
Note: The name "signaling" is prone to different spellings (UK vs US), therefore pay special attention to how this signaling pool is referenced. |
Install Backup Bastion Host
Introduction
This procedure details the steps necessary to install the Backup Bastion Host on the Storage Host db-1/RMS1 and backing up the data from the active Bastion Host on db-2/RMS2 to the Backup Bastion Host.Prerequisites
- Bastion Host is already created on Storage Host db-2/RMS2.
- Storage Host db-2/RMS2 and the Backup Bastion Host are defined in the Customer hosts.ini file as defined in procedure: Inventory File Preparation.
- Host names and IP Address, network information assigned to Backup Management VM are captured in the Installation PreFlight Checklist.
- All the Network information should be configured in Inventory File Preparation.
Expectations
- Bastion Host VM on Storage Host db-1/RMS1 is created as a backup for Bastion Host VM on Storage Host db-2/RMS2.
- All the required config files and data configured in the Backup Bastion Host on Storage Host db-1/RMS1 are copied from the active Bastion Host on Storage Host db-2/RMS2.
Procedure
Create the Backup Bastion Host on Storage Host db-1/RMS1
All commands are executed from the active Bastion Host on db-2/RMS2.
- Login in to the active Bastion Host (VM on RMS2) using the admusr/****** credentials.
- Execute the deploy.sh
script from the /var/occne/ directory with the required parameters set.
$ export CENTRAL_REPO=<customer specific repo name>
$ export CENTRAL_REPO_IP=<customer_specific_repo_ipv4>
$ export OCCNE_CLUSTER=<cluster_name>
$ export OCCNE_BASTION=<bastion_full_name>
$ ./deploy.sh

Customer Example:
$ export CENTRAL_REPO=central-repo
$ export CENTRAL_REPO_IP=10.10.10.10
$ export OCCNE_CLUSTER=rainbow
$ export OCCNE_BASTION=bastion-1.rainbow.lab.us.oracle.com
$ ./deploy.sh

Note: The above example can be executed like the following:
CENTRAL_REPO=central-repo CENTRAL_REPO_IP=10.10.10.10 OCCNE_CLUSTER=rainbow OCCNE_BASTION=bastion-1.rainbow.lab.us.oracle.com ./deploy.sh
Initial Configuration - Prepare a Minimal Boot Strapping Environment
In the first step of the installation, a minimal bootstrapping environment is established that is to support the automated installation of the CNE environment. The steps in this section provide the details necessary to establish this minimal bootstrap environment on the Installer Bootstrap Host using a Keyboard, Video, Mouse (KVM) connection.
Installation of Oracle Linux 7.5 on Bootstrap Host
This procedure outlines the installation steps for installing the OL7 onto the OCCNE Installer Bootstrap Host. This host is used to configure the networking throughout the system and install OL7 onto RMS2. It is re-paved as a Database Host in a later procedure.
Prerequisites
- USB drive of sufficient size to hold the ISO (approximately 5Gb)
- Oracle Linux 7.x iso
- YUM repository file
- Keyboard, Video, Mouse (KVM)
Limitations and Expectations
- The configuration of the Installer Bootstrap Host is meant to be quick and easy, without a lot of care on appropriate OS configuration. The Installer Bootstrap Host is re-paved with the appropriate OS configuration for cluster and DB operation at a later stage of installation. The Installer Bootstrap Host needs a Linux OS and some basic network to get the installation process started.
- All steps in this procedure are performed using Keyboard, Video, Mouse (KVM).
References
- Oracle Linux 7 Installation guide: https://docs.oracle.com/cd/E52668_01/E54695/html/index.html
- HPE Proliant DL380 Gen10 Server User Guide
Bootstrap Install Procedure
Table 3-3 Bootstrap Install Procedure
| Step # | Procedure | Description |
|---|---|---|
| 1. |
Create Bootable USB Media |
|
| 2. |
Install OL7 on the Installer Bootstrap Host. |
|
| 3. |
Install Additional Packages. |
Additional packages are needed to complete the
installation and move on to the next step in the overall
procedure. These additional packages are available within the OL
install media on the USB. To install these packages, a YUM repo
file is configured to use the install media. The additional
packages to install are:
|
Configure the Installer Bootstrap Host BIOS
Introduction
These procedures define the steps necessary to set up the Legacy BIOS changes on the Bootstrap host using the KVM. Some of the procedures in this document require a reboot of the system and are indicated in the procedure.
Prerequisites
Procedure OCCNE Installation of Oracle Linux 7.5 on Bootstrap Host is complete.
Limitations and Expectations
- Applies to HP Gen10 iLO 5 only.
- The procedures listed here applies to the Bootstrap host only.
Steps to OCCNE Configure the Installer Bootstrap Host BIOS
Table 3-4 Procedure to configure the Installer Bootstrap Host BIOS
| Step # | Procedure | Description |
|---|---|---|
| 1.
|
Expose the System Configuration Utility |
This procedure details how to expose the HP iLO 5 System Configuration Utility main page from the KVM. It does not provide instructions on how to connect the console as these may be different on each installation.
|
| 2.
|
Change over from UEFI Booting Mode to Legacy BIOS Booting Mode |
Should the System Utility default the booting mode to UEFI or has been changed to UEFI, it will be necessary to switch the booting mode to Legacy.
|
| 3.
|
Adding a New User Account |
This procedure provides the steps required to add a new user account to the server iLO 5 interface. Note: This user must match the pxe_install_lights_out_usrfields as provided in the hosts inventory files created using the template: OCCNE Inventory File Preparation.
|
| 4.
|
Force PXE to boot from the first Embedded FlexibleLOM HPE Ethernet 10Gb 2-port Adapter |
During host PXE, the DHCP DISCOVER requests from the hosts must be broadcast over the 10Gb port. This procedure provides the steps necessary to configure the broadcast to use the 10Gb ports before it attempts to use the 1Gb ports. Moving the 10Gb port up on the search order helps to speed up the response from the host servicing the DHCP DISCOVER. Enclosure blades have 2 10GE NICs which default to being configured for PXE booting. The RMS are re-configured to use the PCI NICs using this procedure.
|
| 5.
|
Enabling Virtualization |
This procedure provides the steps required to enable virtualization on a given Bare Metal Server. Virtualization can be configured using the default settings or via the Workload Profiles.
|
| 6.
|
Disable RAID Configurations |
|
| 7.
|
Enable the Primary Boot Device |
This procedure provides the steps necessary to configure the primary bootable device for a given Gen10 Server. In this case the RMS would include two devices as Hard Drives (HDDs). Some configurations may also include two Solid State Drives (SSDs). The SSDs are not to be selected for this configuration. Only the primary bootable device is set in this procedure since RAID is being disabled. The secondary bootable device remains as Not Set.
|
| 8.
|
Configure the iLO 5 Static IP Address |
When configuring the Bootstrap host, the static IP address for the iLO 5 must be configured. Note: This procedure requires a reboot after completion.
|
Configure Top of Rack 93180YC-EX Switches
Introduction
This procedure provides the steps required to initialize and configure Cisco 93180YC-EX switches as per the topology defined in Physical Network Topology Design.Note:
All instructions in this procedure are executed from the Bootstrap Host.Prerequisites
- Procedure OCCNE Installation of Oracle Linux 7.5 on Bootstrap Host has been completed.
- The switches are in factory default state.
- The switches are connected as per Installation PreFlight Checklist. Customer uplinks are not active before outside traffic is necessary.
- DHCP, XINETD, and TFTP are already installed on the Bootstrap host but are not configured.
- The Utility USB is available containing the necessary files as per: Installation PreFlight checklist: Create Utility USB.
Limitations/Expectations
All steps are executed from a Keyboard, Video, Mouse (KVM) connection.
References
ProceduConfiguration Procedureres
Table 3-5 Procedure to configure Top of Rack 93180YC-EX Switches
| Step # | Procedure | Description |
|---|---|---|
| 1.
|
Login to the Bootstrap host as root. | Using the KVM, login to the Bootstrap
host as root.
Note: All instructions in this procedure are executed from the Bootstrap Host. |
| 2.
|
Insert and mount the Utility USB | Insert and mount the Utility USB that
contains the configuration and script files. Verify the files are
listed in the USB using the ls /media/usb command.
Note: Instructions for mounting the USB can be found in: Installation of Oracle Linux 7.5 on Bootstrap Server : Install Additional Packages. Only steps 2 and 3 need to be followed in that procedure. |
| 3.
|
Create bridge interface | Create bridge interface to connect
both management ports and setup the management bridge to support
switch initialization.
Note: <CNE_Management_IP_With_Prefix> is from Installation PreFlight Checklist : Complete Site Survey Host IP Table. Row 1 CNE Management IP Addresess (VLAN 4) column. <ToRSwitch_CNEManagementNet_VIP> is from Installation PreFlight Checklist : Complete OA and Switch IP Table. |
| 4.
|
Edit the /etc/xinetd.d/tftp file |
Edit the /etc/xinetd.d/tftp file to enable TFTP service. Change the disable option to no, if it is set to yes. |
| 5.
|
Enable tftp on the Bootstrap host. |
|
| 6.
|
Copy the dhcpd.conf file |
Copy the dhcpd.conf file from the Utility USB in Installation PreFlight checklist : Create the dhcpd.conf File to the /etc/dhcp/ directory. |
| 7.
|
Restart and enable dhcpd service. |
|
| 8.
|
Copy the switch configuration and script files |
Copy the switch configuration and script files from the Utility USB to directory /var/lib/tftpboot/. |
| 9.
|
Modify POAP script File. |
Modify POAP script File. Change Username and password credentials used to login to the Bootstrap host. |
| 10.
|
Modify POAP script file |
Modify POAP script file md5sum by executing the md5Poap.sh script from the Utility USB created from Installation PreFlight checklist : Create the md5Poap Bash Script. |
| 11.
|
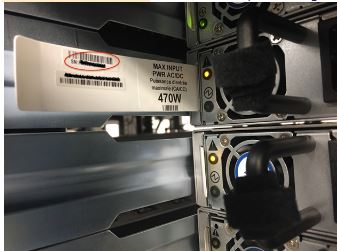
Create the files necessary to configure the ToR switches using the serial number from the switch. | The serial number is located on a
pullout card on the back of the switch in the left most power supply
of the switch.
Note: The serial number is located on a pullout card
on the back of the switch in the left most power supply of the
switch. Be careful in interpreting the exact letters. If the
switches are preconfigured then you can even verify the serial
numbers using ' |
| 12.
|
Copy the /var/lib/tftpboot/93180_switchA.cfg into a file called /var/lib/tftpboot/conf.<switchA serial number> | Modify the switch specific values in
the /var/lib/tftpboot/conf.<switchA serial number> file,
including all the values in the curly braces as following code
block.
These values are contained at Installation PreFlight checklist : ToR and Enclosure Switches Variables Table (Switch Specific) and Installation PreFlight Checklist : Complete OA and Switch IP Table. Modify these values with the following sed commands, or use an editor such as vi etc. |
| 13.
|
Copy the /var/lib/tftpboot/93180_switchB.cfg into a file called /var/lib/tftpboot/conf.<switchB serial number> |
Modify the switch specific values in the /var/lib/tftpboot/conf.<switchA serial number> file, including: hostname, username/password, oam_uplink IP address, signaling_uplink IP address, access-list ALLOW_5G_XSI_LIST permit address, prefix-list ALLOW_5G_XSI. These values are contained at Installation PreFlight checklist : ToR and Enclosure Switches Variables Table and Installation PreFlight Checklist : Complete OA and Switch IP Table. |
| 14.
|
Generate the md5 checksum |
Generate the md5 checksum for each conf file in
/var/lib/tftpboot and copy that into a new file called
conf.<switchA/B serial number>.md5.
|
| 15.
|
Verify the /var/lib/tftpboot directory has the correct files. |
Make sure the file permissions are set as given below. Note: The ToR switches are constantly attempting to find and execute the poap_nexus_script.py script which uses tftp to load and install the configuration files. |
| 16.
|
Disable firewalld. |
Once this is complete, the ToR Switches will attempt to boot from the tftpboot files automatically. Eventually the verification steps can be executed below. It may take about 5 minutes for this to complete. |
| 17.
|
Un-mount the Utility USB | Un-mount the Utility USB and remove
it: umount
/media/usb
|
Verification
Table 3-6 Procedure to verify Top of Rack 93180YC-EX Switches
| Step # | Procedure | Description |
|---|---|---|
| 1.
|
After the ToR switches configured, ping the switches from bootstrap server. The switches mgmt0 interfaces are configured with the IP addresses which are in the conf files. | Note: Wait
till the device responds.
|
| 2.
|
Attempt to ssh to the switches with the username/password provided in the conf files. |
|
| 3.
|
Verify the running-config has all expected configurations in the conf file using the show running-config command. |
|
| 4.
|
Verify license on the switches | In case some of the above features
are missing, verify license on the switches and at least
NXOS_ADVANTAGE level license is "In use". If license not installed
or too low level, contact vendor for correct license key file,
following Licensing document mentioned in reference section to
install license key. Then run "write erase" and "reload" to set back
to factory default. The switches will go to POAP configuration
again.
|
| 5.
|
Verify the RMS1 can ping the CNE_Management VIP |
|
| 6.
|
Enable customer uplink | Connect or enable customer uplink. |
| 7.
|
Verify the RMS1 can be accessed from laptop. Use application such as putty etc to ssh to RMS1. |
|
SNMP Trap Configuration
Table 3-7 Procedure to configure SNMP Trap
| Step # | Procedure | Description |
|---|---|---|
| 1.
|
SNMPv2c Configuration |
When SNMPv2c configuration is needed, ssh to the two switches, run the following commands: These values <SNMP_Trap_Receiver_Address>and <SNMP_Community_String> are from unresolvable-reference.html#GUID-E58EE350-836A-45B0-AC6F-AB6560032E9A |
| 2.
|
Restrict direct access to ToR switches | In order to restrict direct access to ToR
switches, IP access list is created and applied on the uplink interfaces, the
following commands are needed on ToR switches:
|
| 3.
|
Traffic egress | Traffic egress out of cluster, including
snmptrap traffic to SNMP trap receiver, and traffic goes to signal server:
|
Configure Addresses for RMS iLOs, OA, EBIPA
Introduction
This procedure is used to configure RMS iLO addresses and add a new user account for each RMS other than the Bootstrap Host. When the RMSs are shipped and out of box after hardware installation and powerup, the RMSs are in a factory default state with the iLO in DHCP mode waiting for DHCP service. DHCP is used to configure the ToR switches, OAs, Enclosure switches, and blade server iLOs, so DHCP can be used to configure RMS iLOs as well.
Prerequisites
Procedure OCCNE Configure Top of Rack 93180YC-EX Switches has been completed.
Limitations/Expectations
All steps are executed from the ssh session of the Bootstrap server.
Steps to configure Addresses for RMS iLOs, OA, EBIPA
Table 3-8 Procedure to configure Addresses for RMS iLOs, OA, EBIPA
| Step # | Procedure | Description |
|---|---|---|
| 1.
|
Setup team0.2 interface |
|
| 2.
|
Subnet and conf file address |
The /etc/dhcp/dhcpd.conf file should already have been configured in procedure Configure Top of Rack 93180YC-EX Switches and dhcp started/enabled on the bootstrap server. The second subnet 192.168.20.0 is used to assign addresses for OA and RMS iLOs. The "next-server 192.168.20.11" option is same as the server team0.2 IP address. |
| 3.
|
Display the dhcpd leases file at
/var/lib/dhcpd/dhcpd.leases.
The DHCPD lease file will display the DHCP addresses for all RMS iLOs,
Enclosure OAs.
|
|
| 4.
|
Access RMS iLO from the DHCP address with
default Administrator password. From the above
dhcpd.leases file, find
the IP address for the iLO name, the default username is Administrator, the
password is on the label which can be pulled out from front of server.
|
Note: The
DNS Name on the pull-out label. The DNS Name on the pull-out label should be
used to match the physical machine with the iLO IP since the same default DNS
Name from the pull-out label is displayed upon logging in to the iLO command
line interface, as shown in the example below.
|
| 5.
|
Create RMS iLO new user. Create new user with customized username and password. |
|
| 6.
|
Disable the DHCP before able to setup static IP. Setup static failed before DHCP is disabled. |
|
| 7.
|
Setup RMS iLO static IP address. After a while after previous step, can login back with the same address(which is static IP now) and new username/password. If don't want to use the same address, go to next step to change the IP address. |
|
| 8.
|
Set EBIPA addresses for InterConnect Bays (Enclosure Switches). | From bootstrap server, login to OA, set
EBIPA addressed for the two enclosure switches. The addresses have to be in the
subnet with server team0.2 address in order for TFTP to work.
|
| 9.
|
Set EBIPA addresses for Blade Servers. Set EBIPA addressed for all the blade servers. The addresses are in the same subnet with first server team0.2 address and enclosure switches. |
|
| 10.
|
Add New User for OA. |
Create new user, set access level as ADMINISTRATOR, and assign access to all blades, all enclosure switches and OAs. After that, the username and password can be used to access OAs. |
| 11.
|
From OA, go to each blade with "connect server <bay number>", add New User for each blade. |
|
| 12.
|
Change to static IP on OA. In order not reply on DHCP and make the OA address stable, change to static IP. |
Note: After the following change, on the active OA (could be the bay1 OA or bay2 OA) , the OA session will be stuck due to the address change, make another server session ready to ssh with the new IP address and new root user. The change on the standby OA will not stuck the OA session. |
Configure Legacy BIOS on Remaining Hosts
Note:
The procedures in this document apply to the HP iLO console accessed via KVM. Each procedure is executed in the order listed.Prerequisites
Procedure OCCNE Configure Addresses for RMS iLOs, OA, EBIPA is complete.
Limitations and Expectations
- Applies to HP iLO 5 only.
- Should the System Utility indicate (or defaults to) UEFI booting, then the user must go through the steps to reset booting back to the Legacy BIOS mode by following step: Change over from UEFI Booting Mode to Legacy BIOS Booting Mode in Table 3-9.
- The procedures listed here apply to both Gen10 DL380 RMSs and Gen10 BL460c Blades in a C7000 enclosure.
- Access to the enclosure blades in these procedures is via the Bootstrap host using SSH on the KVM. This is possible because the prerequisites are complete. If the prerequisites are not completed before executing this procedure, the enclosure blades are only accessible via the KVM connected directly to the active OA. In this case the mouse is not usable and screen manipulations are performed using the keyboard ESC and directional keys.
- This procedure does NOT apply to the Bootstrap Host.
References
Steps to configure the Legacy BIOS on Remaining Hosts
Table 3-9 Procedure to configure the Legacy BIOS on Remaining Hosts
| Step # | Procedure | Description |
|---|---|---|
| 1. |
Expose the System Configuration Utility on a RMS Host | Expose the System Utility screen to
the user for a RMS host on the KVM. This procedure does not provide
instructions on how to connect the KVM as this may be different on
each installation.
|
| 2. |
Expose the System Utility for an Enclosure Blade |
|
| 3. |
Change over from UEFI Booting Mode to Legacy BIOS Booting Mode |
|
| 4. |
Force PXE to boot from the first Embedded FlexibleLOM HPE Ethernet 10Gb 2-port Adapter |
|
| 5. |
Enabling Virtualization |
This procedure provides the steps required to enable virtualization on a given Bare Metal Server. Virtualization can be configured using the default settings or via the Workload Profiles. Verifying Default Settings
|
| 6. |
Disable RAID Configurations |
OCCNE does not currently support any RAID configuration. Follow this procedure to disable RAID settings if the default settings of the System Utility include any RAID configuration(s). Note: There may be more than one RAID Array set up. This procedure should be repeated for any RAID configuration.
|
| 7. |
Enable the Primary and Secondary Boot Devices |
This steps provide necessary to configure the primary and secondary bootable devices for a Gen10 Server. Note: There can be multiple configurations of hardware drives on the server that include both Hard Drives (HDD) and Solid State Hard Drives (SSD). SSDs are indicated by SATA-SSD ATA in the drive description. The commands below include two HDDs and two SSDs. The SSDs are not to be selected for this configuration. The actual selections may be different based on the hardware being updated.
|
Configure Enclosure Switches
Introduction
This procedure is used to configure the 6127XLG enclosure switches.
Prerequisites
- Procedure Configure Top of Rack 93180YC-EX Switches has been completed.
- Procedure Configure Addresses for RMS iLOs, OA, EBIPA has been completed.
- The Utility USB is available containing the necessary files as per: Installation PreFlight checklist: Create Utility USB.
Limitations/Expectations
All steps are executed from a Keyboard, Video, Mouse (KVM) connection.
Procedure
Table 3-10 Procedure to configure enclosure switches
| Step # | Procedure | Description |
|---|---|---|
| 1.
|
Copy the 6127XLG configuration file |
Copy the 6127XLG configuration file from the Utility USB (See Installation PreFlight checklist : Create the OA 6127XLG Switch Configuration File) to the /var/lib/tftpboot directory on the Installer Bootstrap Host and verify it exists and the permissions. |
| 2.
|
Modify the switch specific values in the /var/lib/tftpboot/6127xlg_irf.cfg file. |
These values are contained at Installation PreFlight checklist : Create the OA 6127XLG Switch Configuration File from column Enclosure_Switch. |
| 3.
|
Access the InterConnect Bay1 6127XLG | Access the InterConnect Bay1 6127XLG
switch to configure the IRF (Intelligent Resilient Framework).
Note: On a new switch the user is presented with the following when connecting to the console and must type CTRL_C or CTRL_D to break out of the loop. Note: When trying to save the config, the following prompt is received: [HPE] [HPE] save The current configuration will be written to the device. Are you sure? [Y/N]: Before pressing ENTER you must choose 'YES' or 'NO'[Y/N]:y Please input the file name(*.cfg)[flash:/startup.cfg] (To leave the existing filename unchanged, press the enter key): User can leave this default startup.cfg unchanged, or change to another name. The cfg file will be used for next reboot. |
| 4.
|
Access the InterConnect Bay2 6127XLG |
Access the InterConnect Bay2 6127XLG switch to re-number to IRF 2. |
| 5.
|
Configure the IRF on Bay2 6127XLG switch |
After rebooting, the interfaces will begin with number 2 such as Ten-GigabitEthernet2/0/17, Ten-GigabitEthernet2/1/5. Run the following commands: |
| 6.
|
Run "reboot" command on both switches |
|
| 7.
|
Verify the IRF for the 6127XLG switches. | When reboot is finished, verify IRF
is working with both member and ports from previous two switches,
which form IRF to act as one switch now.
|
| 8.
|
Configure the IRF switch with predefined configuration file. |
|
Bastion Host Installation
This section outlines the use of the Installer Bootstrap Host to provision db-2/RMS2 with an operating system and configure it to fulfill the role of Database Host. After the Bastion Host is created, it is used to complete the installation of OCCNE.
Provision Second Database Host (RMS2) from Installer Bootstrap Host (RMS1)
Table 3-11 Terminology used in Procedure
| Name | Description |
|---|---|
| bastion_full_name | This is the full name of the Bastion Host as defined in the
hosts.ini file.
Example: bastion-2.rainbow.us.labs.oracle.com |
| bastion_kvm_host_full_name | This is the full name of the KVM server (usually RMS2/db-2)
that hosts the Bastion Host VM.
Example: db-2.rainbow.us.labs.oracle.com |
| bastion_kvm_host_ip_address |
This is the IPv4 ansible_host IP address of the server (usually RMS2/db-2) that hosts the Bastion Host VM. Example: 172.16.3.5 |
| bastion_short_name | This is the name of the Bastion Host derived from the
bastion_full_name up to the first ".".
Example: bastion-2 |
| bastion_external_ip_address | This is the external address for the Bastion Host
Example : 10.75.148.5 for bastion-2 |
| bastion_ip_address |
This is the internal IPv4 "ansible_host" address of the Bastion Host as defined within the hosts.ini file. Example: 172.16.3.100 for bastion-2 |
| cluster_full_name | This is the name of the cluster as defined in the hosts.ini
file field: occne_cluster_name.
Example: rainbow.us.labs.oracle.com |
| cluster_short_name | This is the short name of the cluster derived from the
cluster_full_name up to the the first ".".
Example: rainbow |
Note:
The Bootstrap Host must be setup to use root/<customer_specific_root_password> as the credentials to access it. Setting that user/password is part of the instructions at: Installation of Oracle Linux 7.x on Bootstrap Host.Table 3-12 Bastion Installation
| Step # | Procedure | Description |
|---|---|---|
| 1.
|
Copy the Necessary Files from the Utility USB to Support the OS Install |
|
| 2.
|
Set up the /etc/hosts file for the Central Repo and Verify Access |
|
| 3.
|
Copy the OL7 ISO to the Installer Bootstrap Host |
The iso file must be accessible from a Customer Site Specific repository. This file should be accessible because the ToR switch configurations were completed in procedure: Configure Top of Rack 93180YC-EX Switches
Copy the OL7 ISO file to the /var/occne directory. The example below uses OracleLinux-7.5-x86_64-disc1.iso. If this file was copied to the Utility USB, it can be copied from there into the same directory on the Bootstrap Host. Note: If the user copies this ISO from their laptop then they must use an application like WinSCP pointing to the Management Interface IP. |
| 4.
|
Install Packages onto the Installer Bootstrap Host | Use YUM to install necessary packages onto
the installer Bootstrap Host.
|
| 5.
|
Set up access to the Docker Registry on the Installer Bootstrap Host |
|
| 6.
|
Setup NFS on the Installer Bootstrap Host |
Run the following commands using sudo (assumes nfs-utils has already been installed in procedure: Installation of Oracle Linux 7.x on Bootstrap Host : Install Additional Packages). Note: The IP address used in the echo command is the
Platform VLAN IP Address (VLAN 3)of the Bootstrap Host (RMS 1) as given in:
Installation PreFlight Checklist : Site Survey Host Table.
|
| 7.
|
Set up the Boot Loader on the Installer Bootstrap Host | Execute the following commands:
|
| 8.
|
Verify and Set the PXE Configuration File Permissions on the Installer Bootstrap Host | Each file configured in the step above must
be open for read and write permissions.
|
| 9.
|
Disable DHCP and TFTP on the Installer Bootstrap Host | The TFTP and DHCP services running on the
Installer Bootstrap Host may still be running. These services must be disabled.
|
| 10.
|
Disable SELINUX | Set SELINUX to permissive mode. In order to
successfully set the SELINUX mode, a reboot of the system is required. The
getenforce command is used to determine the status of SELINUX.
|
| 11.
|
Generate the SSH private and public keys on Bootstrap Host. |
This command generates a private and public key for the cluster. These keys are passed to the Bastion Host and used to communicate to other nodes from that Bastion Host. The public key is passed to each node on OS install. Do not supply a passphrase when it asks for one. Just hit enter. Note: The private key (occne_id_rsa) must be copied to a server that going to access the Bastion Host because the Bootstrap Host is repaved. This key is used later in the procedure to access the Bastion Host after it has been created. Execute the following commands on the Bootstrap Host: |
| 12.
|
Execute the OS Install and Bastion VM Creation on Bastion KVM Host (RMS2) from the Installer Bootstrap Host |
|
Automated Installation
This section details the steps required to execute the automated configuration of the Bastion Host VM. This consists of two main section:
- Setting up and executing the deploy.sh script on the Bootstrap Host.
- Accessing the Bastion Host and executing the final commands to execute the pipeline.sh script to complete the Bastion Host configuration and deploy the OCCNE cluster.
Table 3-13 Automated Installation
| Step # | Procedure | Description | |||||||||||||||||||||
|---|---|---|---|---|---|---|---|---|---|---|---|---|---|---|---|---|---|---|---|---|---|---|---|
| 1.
|
Setting up for and executing the deploy.sh script on the Bootstrap Host |
The deploy.sh script performs the initial pre-configuration of
the Bastion host. This includes installing ansible, executing the ansible
playbook configBastionHost.yaml to setup the initial files and staging
directories on the Bastion Host and executing the pipeline to setup the
artifacts directory. The script is executed on the Bootstrap Host using a set
of environment variables that can be initialized on the command line along with
the deploy.sh script. These variables include the following:
|
|||||||||||||||||||||
| 2.
|
Copy necessary files from Utility USB to the Bootstrap Host staging directory |
|
|||||||||||||||||||||
| 3.
|
Execute Deploy |
Execute the deploy.sh script from the /var/occne/ directory
with the required parameters set.
|
|||||||||||||||||||||
| 4.
|
Executing Final Deploy on Bastion Host |
The following commands are executed from the Bastion Host to complete the Bastion Host configuration and deploy OCCNE on the Bare Metal system. Note: The Bootstrap Host cannot be used to access the Bastion Host as it will be re-paved from execution of this command.
Note: While Installing on the First Site ignore DB_ARGS configuration parameter which Provides Mate Site DB Replication Service Load Balancer IP. Provide the Mate Site DB Replication Service Load Balancer IP and MySQL Cluster identifier while Installing MYSQL NDB Cluster on second site. |
|||||||||||||||||||||
| 5.
|
Update the Bastion KVM Host repo file |
Since db-2 was not part of the final OS install and cluster deploy, it's /var/occne/yum.repos.d/*.repo file is not pointing to the Bastion Host as its YUM repo. That file on RMS2/db-2 must be updated so that it now points to the Bastion Host as the repo. After the Bastion Host was created, the .repo file that was copied onto the Bastion Host has the correct settings. That file can just be copied back to RMS2/db-2.
|
|||||||||||||||||||||
| 6.
|
Change MySQL root user password | Refer to Change MySQL root user password |
Virtualized CNE Installation
This procedure details the steps necessary to configure and install an OCCNE cluster in an OpenStack Environment.
Prerequisites
- The user has access to an existing OpenStack Environment including the OpenStack Desktop.
- The OpenStack Environment is configured with appropriate resource flavors and network resources for resource allocation to the VMs created via this procedure.
- Octavia Load Balancing plugin must be installed on the OpenStack Environment.
- Users must have a pub key
that can be configured for logging into the Bootstrap Host. This key should be
placed into the customer OpenStack Environment prior to running this procedure
using the following:
Use the Import Keytab on the Launch Instance→Key Pair dialog or via the Compute→Access and Security
Limitation/Expectations
- It is expected that the
user is familiar with the use of OpenStack as a virtualized provider and the
OpenStack Client.
Note:
All OpenStack Client commands listed in this procedure are executed from the Bootstrap Host after it has been instantiated. - All necessary images, binaries, etc have been downloaded from Oracle OSDC prior to executing this procedure and these resources are available for use in this procedure.
- The customer has made available a central repository for all images, binaries, helm charts, etc, prior to executing this procedure.
Note:
The OpenStack commands in the procedures below are from a specific version of the OpenStack Desktop. The desktop used at the customer site may be slightly different depending on the version installed. The operations should be compatible.Upload an Image to an OpenStack Environment
This is the process of uploading the qcow2 image. The image is provided via OSDC.
Note:
This procedure is executed from the OpenStack Desktop.Table 3-14 Upload an Image to an OpenStack Environment
| Step # | Procedure | Description |
|---|---|---|
| 1.
|
Navigate to Images |
Go to Compute → Images |
| 2.
|
Create Image |
Select the +Create Image button. This brings up a new dialog. You have to enter a name for the image. Use the same name as was used to create and download the imag (ex: occne_bootstrap-1.3.0.qcow2). |
| 3.
|
Choose the source of the image |
Using the Image Source pull down select: Image File. This will enable a Browse button. Select this button to bring up a Windows Explorer dialog. From the Windows dialog, select the image that was created in the previous procedures. This will insert the image name into the OpenStack Create Image dialog and set the Format for you. |
| 4.
|
Upload Image | Select the Create Image button at the bottom right of the dialog. This will start the image upload process. It will take a while so be patient. You will not be able to actually see the image being uploaded even if you log into another OpenStack instance. |
| 5.
|
Check the image | When the process is complete, the image should be listed in the Compute → Images screen. Again you will have to use Next to go through all the images and finally get to the image you uploaded depending on how many images are on the system. |
Bootstrap Host Creation
The Bootstrap Host is provisioned to drive the creation of the virtualized cluster using Terraform, the OpenStack Client, and Ansible Playbook(s). A qcow2 image was provided as part of the OSDC download and should be available on the users OpenStack Environment as per the previous section of this document.
Note:
The examples below are for reference only. While the steps are correct the actual values used will be different. The following steps are to be performed manually on the customer specific Openstack Environment Desktop.Table 3-15 Bootstrap Host Creation
| Step # | Procedure |
|---|---|
| 1.
|
Login to the OpenStack Environment using your OpenStack credentials, the appropriate domain and project name. |
| 2.
|
Select Compute → Instances |
| 3.
|
Select the Launch Instances tab on the upper right. A dialog will appear to configure a VM instance. |
| 4.
|
Enter an Instance Name (for example: occne-<name>). Leave the Availability Zone and Count set as is. |
| 5.
|
Select Source on the left hand side of the dialog. A new dialog appears (Note: there might be a long list of available images to choose from) |
| 6.
|
Make sure the filter pulldown is set to Image |
| 7.
|
Enter occne_bootstrap in the filter. This will display the occne_bootstrap-<x.y.z>.qcow2 image uploaded in the previous sections of this procedure. |
| 8.
|
Select the OCCNE Bootstrap Host image by selecting the "+" on the right side of the image listing. This adds the image as the source for this VM. |
| 9.
|
Select Flavor |
| 10.
|
Enter a string which best describes the flavor being used for this customer specific OpenStack Environment in the search filter. This brings up a new dialog. |
| 11.
|
Select the appropriate customer specific Flavor (for example: occne_bsh_flavor) by selecting the "+" on the right side of the flavor listings. This adds the resources to the Launch Instance dialog. Note: The BSH image requires a flavor that includes a disk size of 40GB or higher. The RAM size should be 8GB or higher although that is not a restriction. |
| 12.
|
Select Networks |
| 13.
|
Enter the appropriate network name as defined by the customer with the OpenStack Environment (example: ext-net) in the search filter. This brings up a new dialog. |
| 14.
|
Select the appropriate network by selecting the "+" on the right side of the flavor listings. This adds the external network interface to the Launch Instance dialog. |
| 15.
|
Select Key Pair. This dialog assumes you have already uploaded a public key to to OpenStack (see Prerequisites). |
| 16.
|
Select the appropriate key by selecting the "+" on the right side of the key pair listings. This adds the public key to the authorized_keys file on the Bootstrap Host. |
| 17.
|
Select
Configuration. This screen allows the user to add
configuration data which is used by cloud-init to set on the VM, the initial
admusr and hostname/FQDN additions to the /etc/hosts file. Use the following
configuration until there is more information available. This must be copied
into the
Customization Script text box. Make sure the fields marked
as <instance_name_from_details_screen> are updated with the instance name
you used in step 5 above. Leave the other fields on this dialog in their
default setting.
|
| 18.
|
Select Launch Instance at the lower right side of the initial dialog. This will launch the creation of the VM. This can be observed back at the Compute→Instances screen. |
Pre-deployment Configuration
Table 3-16 Pre-deployment Configuration
| Step # | Procedure | Description |
|---|---|---|
| 1.
|
Obtain the TLS Certificate for OpenStack |
Depending on the Customer's environment it is very likely that the customer's OpenStack uses certificates for TLS access to the API. Without this certificate, OpenStack commands will not work. Customer's may have to obtain this certificate before using OpenStack client commands.
|
| 2.
|
Get the Openstack RC (API v3) File |
This file exports a number of environment variables on the Bootstrap Host for the given user which directs the OpenStack Client commands towards the particular OpenStack Environment. It must be copied to the users home directory on the Bootstrap Host so that the OpenStack Client commands can be executed. Note: These instructions may be somewhat different on OpenStack Desktops.
|
| 3.
|
Create SSH Key on Bootstrap Host | Create the keys that will be used to access
the other VMs. This command generates the private and public keys that are
passed to the Bastion Host and used to communicate to other node from that
Bastion Host. Do not supply a passphrase when it asks for one. Just hit enter.
Also the private key should be copied to a place for safe keeping should the
Bootstrap Host be destroyed.
|
| 4.
|
Add Files to /tmp Directory |
These files must be copied to the directories listed using scp or some other means (ie. winSCP).
|
| 5.
|
Updating the ~.configure/openstack/clouds.yaml File |
|
| 6.
|
Updating cluster.tfvars File | The fields in the cluster.tfvars file must
be configured to adapt to the current customer Openstack Environment. The steps
below detail how to collect and set the fields that must be changed.
Note: Image to use for bastion, masters, standalone etcd instances, and nodes image = "OracleLinux-7.5-x86_64". An Admin user of the customer specific OpenStack Environment must upload this image 'OracleLinux-7.5-x86_64.qcow2' to the openstack env and it should be accessible under image list. WARNING: The number of master nodes must be set to an odd number. The recommended value for number_of_k8s_masters_no_floating_ip is 3.
|
| 7.
|
Obtain Mate Site DB Replication Service Load Balancer IP |
While installing MYSQL NDB on the second site we need to provide the Mate Site DB Replication Service Load Balancer IP as the configuration parameter for the geo-replication process to start. Note: If this is a single deploy and or a mated site with this being the first site deployed, this step can be skipped.
|
Deploy the OCCNE Virtualized Cluster
The execution of the following command does all the work to deploy the VMs in the OpenStack Environment, configure the Bastion Host, and deploy and configure the Kubernetes clusters.
Table 3-17 Deploy the OCCNE Virtualized Cluster
| Step # | Procedure | Description |
|---|---|---|
| 1.
|
Deploy OCCNE Virtualized Cluster | Execute the following command from the
/var/terraform directory on the Bootstrap Host. This command may take a while
to run (can be up to 2 hours depending on the machines its run on).
Note: While Installing on the First Site ignore OCCNE_PIPELINE_ARGS configuration parameter which Provides Mate Site DB Replication Service Load Balancer IP. Provide the Mate Site DB Replication Service Load Balancer IP and MySQL Cluster identifier while Installing MYSQL NDB on second site. Note: The release version defaults to the 1.4.0 GA release. If there is a reason to use a different version, it can be specified by setting the OCCNE_VERSION=<release> variable on the command line. |
| 2.
|
Change MySQL root user password | Refer to Change MySQL root user password |