2 NF ATS Installation Procedure
- NRF
- PCF
- SCP
NRF ATS Installation Procedure
- Locating and downloading ATS and Simulator Images
- Preparing to deploy ATS and Stub Pod in Kubernetes Cluster
- Deploying ATS and Stub Pod in Kubernetes Cluster
Locating and Downloading ATS Images
To download the ATS image from MOS:
- Login to My Oracle Support with your credentials.
- Select Patches & Updates tab to locate the patch.
- In Patch Search window, click Product or Family (Advanced).
- Enter Oracle Communications Cloud Native Core - 5G in Product field. Select Oracle Communications Cloud Native Core Network Repository Function 1.8.0.0.0 from Release drop-down.
- Click on Search. The Patch Advanced Search Results displays a list of releases.
- Select the required patch from the search results. The Patch Details window opens.
- Click Download. File Download window appears.
- Click the <p********_<release_number>_Tekelec>.zip file to downlaod the CNC Policy ATS package file.
- Untar the zip file to access all the ATS Images.
- The
ocats-nrf-tools-pkg-1.8.0.0.0.tgzdirectory has following files:ocats-nrf-tools-pkg-1.8.0.0.0.tgz ocats-nrf-tools-pkg-1.8.0.0.0-README.txt ocats-nrf-tools-pkg-1.8.0.0.0.tgz.sha256 ocats-nrf-custom-configtemplates-1.8.0.0.0.zip ocats-nrf-custom-configtemplates-1.8.0.0.0-README.txt - The
ocats-nrf-tools-pkg-1.8.0.0.0-README.txtfile contains all the information required for the package. - The
ocats-nrf-tools-pkg-1.8.0.0.0.tgzfile has following images and charts packaged as tar files:ocats-nrf-tools-pkg-1.8.0.0.0.tgz | |_ _ _ocats-nrf-pkg-1.8.0.0.0.tgz | |_ _ _ _ _ _ ocats-nrf-1.8.0.tgz (Helm Charts) | |_ _ _ _ _ _ ocats-nrf-image-1.8.0.tar (Docker Images) | |_ _ _ _ _ _ OCATS-NRF-Readme.txt | |_ _ _ _ _ _ ocats-nrf-1.8.0.tgz.sha256 | |_ _ _ _ _ _ocats-nrf-image-1.8.0.tar.sha256 | | |_ _ _ocstub-python-pkg-1.8.0.0.0.tgz |_ _ _ _ _ _ ocstub-python-1.8.0.tgz (Helm Charts) |_ _ _ _ _ _ ocstub-python-image-1.8.0.tar (Docker Images) |_ _ _ _ _ _ OCSTUB-PYTHON-Readme.txt |_ _ _ _ _ _ ocstub-python-1.8.0.tgz.sha256 |_ _ _ _ _ _ ocstub-python-image-1.8.0.tar.sha256In addition to the above images and charts, the ocats-nrf-custom-configtemplates-1.8.0.0.0.zip file is also there in the same location. The ocats-nrf-custom-configtemplates-1.8.0.0.0-README.txt file contains the information about the content of this zip file. The content of the zip file is as follows:ocats-nrf-custom-configtemplates-1.8.0.0.0.zip | |_ _ _ocats-nrf-custom-values.yaml (Custom values file for installation) | |_ _ _ocats-nrf-custom-serviceaccount.yaml (Template to create custom service account) | |_ _ _ocstub-python-custom-values.yaml (Custom values file for stub installation) - The user can copy the tar file from here to the OCCNE/OCI/Kubernetes cluster where they want to deploy ATS.
Preparing to Deploy ATS and Stub Pod in Kubernetes Cluster
The steps to deploy ATS and Stub Pod in Kubernetes Cluster are as follows:
- Execute the following command to extract tar file
content.
tar -xvf ocats-nrf-tools-pkg-1.8.0.0.0.tgzThe output of this command is:ocats-nrf-pkg-1.8.0.0.0.tgz ocstub-python-pkg-1.8.0.0.0.tgz - Execute the following command to extract the final
helm charts and docker images of ATS.
tar -xvf
							ocats-nrf-pkg-1.8.0.0.0.tgz
The output of this command is:ocats-nrf-image-1.8.0.tar ocats-nrf-1.8.0.tgz OCATS-NRF-Readme.txtNote:
TheOCATS-NRF-Readme.txtfile contains all the information required for the package. - Execute the following command to untar the ocstub package.
tar -xvf ocstub-python-pkg-1.8.0.0.0.tgzThe output of this command is:ocstub-python-image-1.8.0.tar ocstub-python-1.8.0.tgz OCSTUB-PYTHON-Readme.txt - Execute the following command to extract the content of the custom values
file:
unzip
							ocats-nrf-custom-configtemplates-1.8.0.0.0.zip
The output of this command is:ocats-nrf-custom-values.yaml (Custom yaml file for deployment of OCATS-NRF) ocats-nrf-custom-serviceaccount.yaml (Custom yaml file for service account creation to help the customer if required) ocstub-python-custom-values.yaml (Custom yaml file for deployment of OCSTUB-PYTHON) - In your cluster, load the ATS docker image,
'
ocats-nrf-image-1.8.0.tar' and Stub docker image, 'ocstub-python-image-1.8.0.tar' and push it to your registry.docker load -i ocats-nrf-image-1.8.0.tar docker tag ocats/ocats-nrf:1.8.0 <local_registry>/ocats/ocats-nrf:1.8.0 docker push <local_registry>/ocats/ocats-nrf:1.8.0 docker load -i ocstub-python-image-1.8.0.tar docker tag ocats/ocstub-python:1.8.0 <local_registry>/ocats/ocstub-python:1.8.0 docker push <local_registry>/ocats/ocstub-python:1.8.0 - Update the image name and tag in the
ocats-nrf-custom-values.yamlandocstub-python-custom-values.yamlfile as required.For this, you need to open the
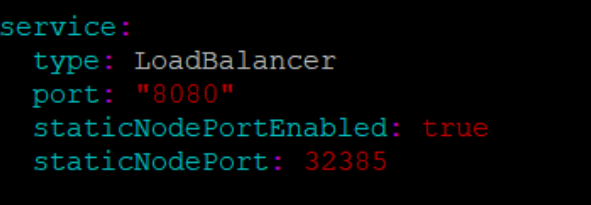
ocats-nrf-custom-values.yamlandocstub-python-custom-values.yamlfile and update theimage.repositoryandimage.tag - ATS supports static port. By default, this feature is not available. To enable
this feature:
- In the ocats-nrf-custom-values.yaml file under service section, set the staticNodePortEnabled parameter value to 'true' and staticNodePort parameter value with valid nodePort.
- A sample screen is given below:
Figure 2-1 ocats-nrf-custom-values.yaml - service section
Enabling Service Mesh for ATS
Note:
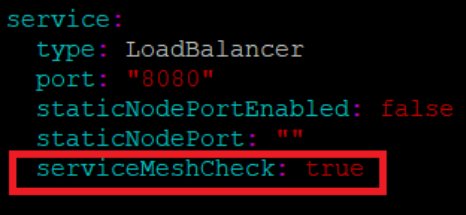
This procedure is applicable only if you want to enable service mesh.To enable service mesh for ATS, perform the following steps:
- Under the service section of the
ocats-nrf-custom-values.yaml file, set the serviceMeshCheck
parameter true. By default, this parameter is set to false. A snippet of
service section in the yaml file is given below:
Figure 2-2 Enabling Service Mesh
- If the service mesh is not enabled at the global level for the
namespace, execute the following command to enable it before deploying
ATS.
kubectl label --overwrite namespace <namespace_name> istio-injection=enabledExample
kubectl label --overwrite namespace ocnrf istio-injection=enabled - Add the following annotation under the lbDeployments parameter of the
global section in ocats-nrf-custom-values.yaml file. Sample is as
follows:
traffic.sidecar.istio.io/excludeInboundPorts:
							"8080"
Figure 2-3 Sample Annotation

Enabling NF FQDN Authentication Feature
Note:
Perform below steps only if the NF FQDN Authentication feature is tested. Or, else proceed to the "Deploying ATS and Stub pod in K8s cluster" section.- Use previously unzipped file "ocats-nrf-custom-serviceaccount.yaml" to
create a service account. Add the following annotation in the
service-account file.
"certificate.aspenmesh.io/customFields": '{ "SAN": { "DNS":
								[ "<NF-FQDN>" ] } }'
Figure 2-4 Sample: Service Account File - Annotation

Note:
"AMF.d5g.oracle.com" is the NF FQDN that you must provide in the serviceaccount DNS field. - Execute the following command to create a service account:
kubectl apply -f ocats-nrf-custom-serviceaccount.yaml - After creating the service account, update the service account name in the
ocats-nrf-custom-values.yaml file as shown below:
Figure 2-5 Updating Service Account Name

- Deploy ATS using helm2 or helm3 commands shared in the Deploying ATS and Stub Pod in Kubernetes Cluster section.
Deploying ATS and Stub Pod in Kubernetes Cluster
Note:
It is important to ensure that all the three components; ATS, Stub and NRF are in the same namespace.You need two Stubs for the NRF tests to be executed. The service name for the stubs should be notify-stub-service and notify-stub-service02.
ATS and Stub supports Helm2 and Helm3 for deployment.
If the namespace does not exists, execute the following command to create a namespace:
kubectl
					create namespace ocnrf
helm install ocats-nrf-1.8.0.tgz --name <release_name> --namespace
<namespace_name> -f <values-yaml-file>

Example:
helm install ocats-nrf-1.8.0.tgz --name ocats --namespace ocnrf -f
ocats-nrf-custom-values.yaml
Using Helm 2 for Stubs:
helm install ocstub-python-1.8.0.tgz --set service.name=<stub-service-name>
--name <release_name> --namespace <namespace_name> -f <values-yaml-file>

Example:
helm install ocstub-python-1.8.0.tgz --set service.name=notify-stub-service --name
ocstub --namespace ocnrf -f ocstub-python-custom-values.yaml
helm install ocstub-python-1.8.0.tgz --set service.name=notify-stub-service02 --name
ocstub1 --namespace ocnrf -f ocstub-python-custom-values.yaml
Using Helm 3 for ATS:
helm3 install -name <release_name> ocats-nrf-1.8.0.tgz --namespace
<namespace_name> -f <values-yaml-file>

Example:
helm3 install -name ocats ocats-nrf-1.8.0.tgz --namespace ocnrf -f
ocats-nrf-custom-values.yamlhelm3 install -name <release_name> ocstub-python-1.8.0.tgz --set
service.name=<stub-service-name> --namespace <namespace_name> -f <values-yaml-file>
Example:
helm3 install -name ocstub ocstub-python-1.8.0.tgz --set
service.name=notify-stub-service --namespace ocnrf -f ocstub-python-custom-values.yaml
helm3 install -name ocstub1 ocstub-python-1.8.0.tgz --set
service.name=notify-stub-service02 --namespace ocnrf -f ocstub-python-custom-values.yaml
helm status
					<release_name>
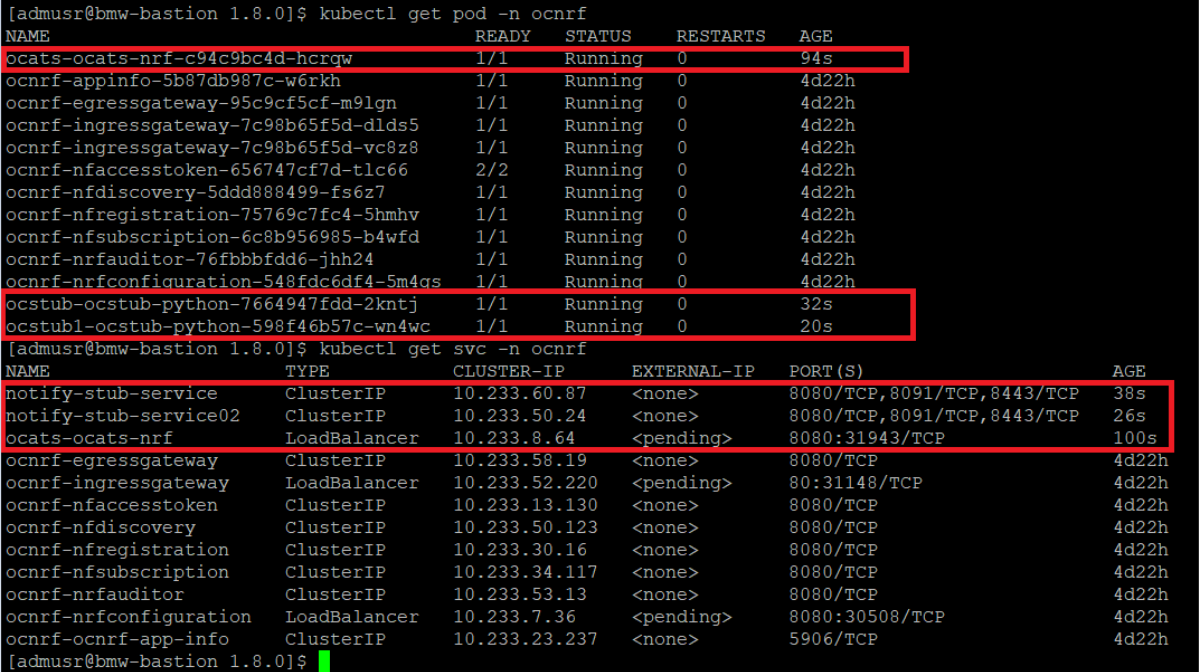
Checking Pod Deployment:
kubectl get pod -n ocnrf
Checking Service Deployment:
kubectl get service -n ocnrf
Figure 2-6 Checking Pod and Service Deployment without Service Mesh
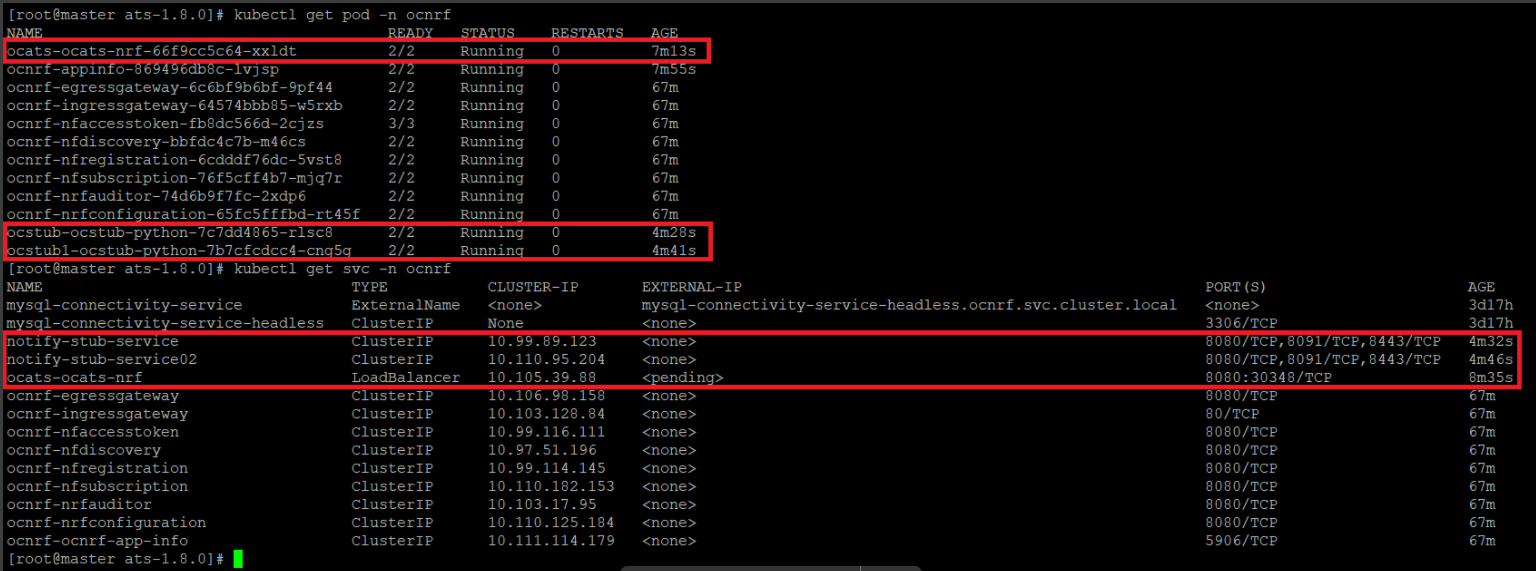
If ATS is deployed with side car of service mesh, you need to ensure that both ATS and Stub pods have 2 containers in ready state and shows "2/2". A sample screen is shown below:
Figure 2-7 ATS and Stub Deployed with Service Mesh
NSSF ATS Installation Procedure
- Locating and downloading ATS and Simulator Images
- Deploying ATS and Stub Pod in Kubernetes Cluster as per NSSF
Locating and Downloading ATS Images
To download the ATS image from MOS:
- Login to My Oracle Support with your credentials.
- Select Patches & Updates tab to locate the patch.
- In Patch Search window, click Product or Family (Advanced).
- Enter Oracle Communications Cloud Native Core - 5G in Product field. Select Oracle Communications Cloud Native Core Network Slice Selection Function 1.4.0.0.0 from Release drop-down.
- Click on Search. The Patch Advanced Search Results displays a list of releases.
- Select the required patch from the search results. The Patch Details window opens.
- Click Download. File Download window appears.
- Click the <p********_<release_number>_Tekelec>.zip file to downlaod the CNC Policy ATS package file.
- Untar the zip file to access all the ATS Images.
- The
ocats-nssfdirectory has the following files:ocats-nssf-tools-pkg-1.4.0.0.tgzocats-nssf-tools-pkg-1.4.0.0-README.txtNote:
Theocats-nssf-tools-pkg-1.4.0.0-README.txtfile contains all the information required for the package.
- The
ocats-nssf-tools-pkg-1.4.0.0-README.txtfile contains all the information required for the package. - The
ocats-nssf-tools-pkg-1.4.0.0.tgzfile has following images and charts packaged as tar files:ocats-nssf-tools-pkg-1.4.0.0.tgz | |_ _ _ocats-nssf-pkg-1.4.0.0.tgz | |_ _ _ _ _ _ ocats-nssf-1.4.tgz (Helm Charts) | |_ _ _ _ _ _ ocats-nssf-image-1.4.tar (Docker Images) | |_ _ _ _ _ _ Readme.txt - The user can copy the tar file from here and copy in their OCCNE/OCI/Kubernetes cluster where they want to deploy ATS.
Deploying ATS in Kubernetes Cluster
The steps to deploy ATS in Kubernetes Cluster are as follows:
- Execute the following command to extract tar file content:
tar -xvf ocats-nssf-tools-pkg-1.4.0.0.tgzThe output of this command is:
ocats-nssf-pkg-1.4.0.0.tgz - Execute the following command to extract final helm charts and docker images of
ATS:
tar -xvf ocats-nssf-pkg-1.4.0.0.tgzThe output of this command is:
ocats-nssf-image-1.4.tar
                            ocats-nssf-1.4.tgz
Readme.txt - In your cluster, load the ATS image,
'
ocats-nssf-image-<version>.tar' and push to your registry.docker load -i ocats-nssf-image-<version>.tar- Execute the following command to grep the image.
docker images | grep ocats-nssf - Copy the Image ID from the output of the grep command and change the tag
to your registry.
Example:
docker tag <Image_ID>
                                    <your-registry-name/ocats-nssf:<tag>>
docker push <your-registry-name/ocats-nssf:<tag>>
- Execute the following command to grep the image.
- Untar the helm charts,
ocats-nssf-<version>.tgztar -xvf ocats-nssf-<version>.tgz - Update the image name and tag in the
ocats-nssf/values.yamlfile as required. For this, you need to open thevalues.yamlfile and update theimage.repositoryandimage.tag. - ATS supports static port. By default, this feature is not available.
To enable this feature:
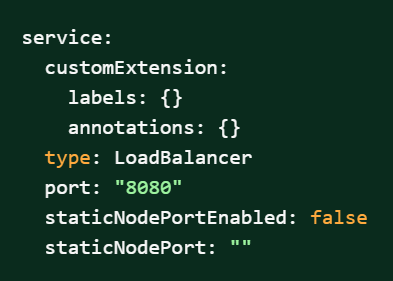
- In the ocats-nssf/values.yaml file under service section, set the value of staticNodePortEnabled parameter as true and provide a valid nodePort value for staticNodePort.
- A sample screen is given below:
Figure 2-8 ocats-nssf/values.yaml - service section
- Deploy ATS using the updated helm charts after performing the previous step
5.
helm install ocats-nssf --name <release_name>
                            --namespace <namespace_name> -f
                            ocats-nssf/values.yaml
Example:
helm install ocats-nssf --name ocats --namespace ocnssf -f
                            ocats-nssf/values.yaml
If this command returns an error like,
<Error: validation failed: unable to recognize "": no
                            matches for kind "Deployment" in version "apps/v1beta2">
then, open thetemplate/deployment.ymlfile and change the apiVersoin to apiVersion: apps/v1. - Execute the following command to verify the ATS deployment:
helm
                            status <release_name>
A sample screen showing ATS Helm release is given below:Figure 2-9 ATS Helm Release
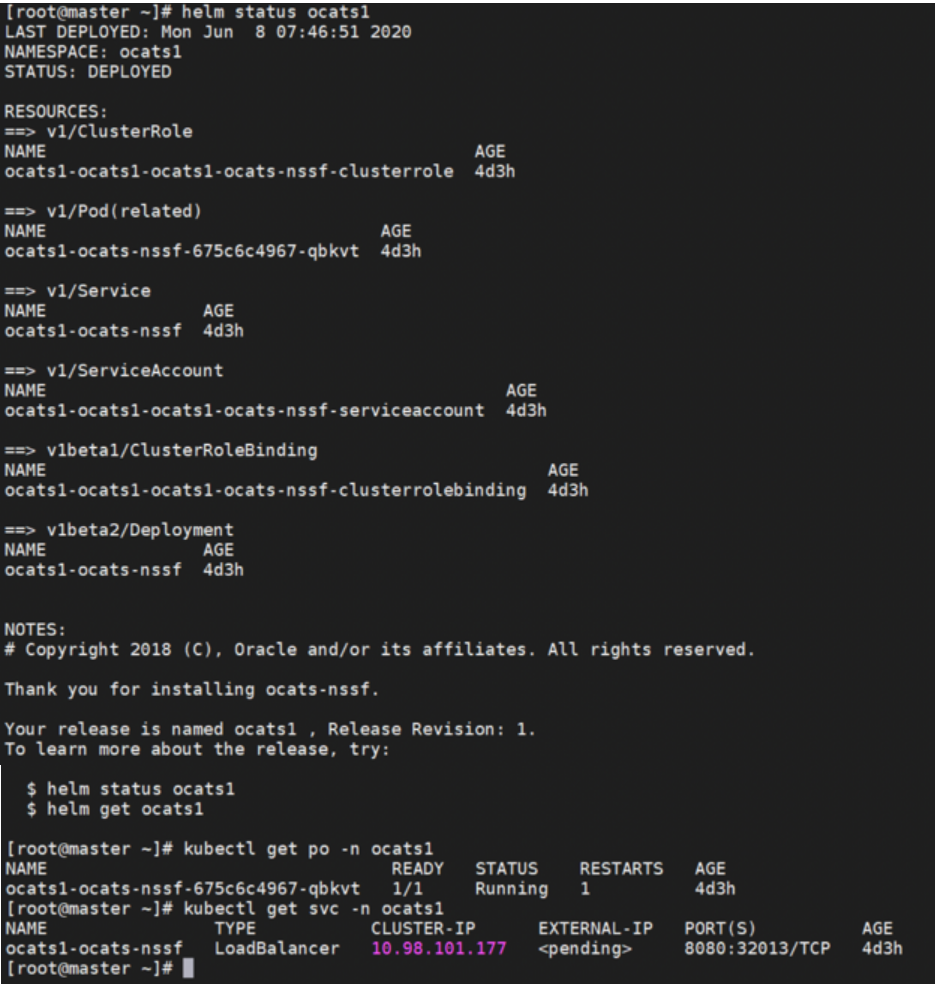
Policy ATS Installation Procedure
The Policy ATS installation procedure covers two steps:
- Locating and downloading the ATS images.
- Deploying ATS images.
Note:
Restart the Nrf-client pod of Policy for UDR and CHF discovery as part of each test case.Downloading ATS Image
To download the ATS Image from MOS:
- Login to My Oracle Support with your credentials.
- Select Patches & Updates tab to locate the patch.
- In Patch Search window, click Product or Family (Advanced).
- Enter Oracle Communications Cloud Native Core - 5G in Product field. Select Oracle Communications Cloud Native Core Policy 1.8.0.0.0 from Release drop-down.
- Click on Search. The Patch Advanced Search Results displays a list of releases.
- Select the required patch from the search results. The Patch Details window opens.
- Click Download. File Download window appears.
- Click the <p********_<release_number>_Tekelec>.zip file to downlaod the CNC Policy ATS package file.
- Untar the zip file to access all the ATS Images.
- The
ocats-policy-tools-1.8.1.0.0.tgzdirectory has following images and charts packaged as tar files:ocats-policy-tools-1.8.1.0.0.tgz | |_ _ _ocats-policy-pkg-1.8.1.0.0.tgz | |_ _ _ _ _ _ ocats-policy-1.8.1.tgz (Helm Charts) | |_ _ _ _ _ _ ocats-policy-images-1.8.1.tar (Docker Images) | |_ _ _ocstub-pkg-1.1.0.0.0.tgz | |_ _ _ _ _ _ ocstub-go-1.1.0.tgz(Helm Charts) | |_ _ _ _ _ _ ocstub-go-image-1.1.0.tar (Docker Images) | |_ _ _ocdns-pkg-1.1.0.0.0.tgz | |_ _ _ _ _ _ ocdns-bind-1.1.0.tgz(Helm Charts) | |_ _ _ _ _ _ ocdns-bind-image-1.1.0.tar (Docker Images) - The user can copy the tar file from here to their Kubernetes cluster where, they want to deploy ATS.
Deploying ATS in Kubernetes Cluster
- Execute the following command to extract the tar
file content:
tar -zxvf
								ocats-policy-tools-1.8.1.0.0.tgz
The output of this command is:ocats-policy-pkg-1.8.1.0.0.tgz ocstub-pkg-1.1.0.0.0.tgz ocdns-pkg-1.1.0.0.0.tgz - Go to the
ocats-policy-tools-1.8.1.0.0folder and execute the following command to extract the final helm charts and docker images of ATS.tar -zxvf ocats-policy-pkg-1.8.1.0.0.tgzThe output of this command is:
ocats-policy-1.8.1.tgz ocats-policy-images-1.8.1.tar - In your cluster, execute the given command to load
the ATS image.
docker load --input ocats-policy-images-1.8.1.tar - Execute the following commands to tag and push the ATS
images
docker tag ocats-policy:1.8.1 <registry>/ocats-policy:1.8.1
docker push <registry>/ocats-policy:1.8.1
Example:
docker tag ocats-policy:1.8.1 localhost:5000/ocats-policy:1.8.1 docker push localhost:5000/ocats-policy:1.8.1 - Untar the helm charts,
ocats-policy-1.8.1.tgztar -zxvf ocats-policy-1.8.1.tgz - Update the registry name, image
name and tag in the
ocats-policy/values.yamlfile as required.For this, you need to open the
values.yamlfile and update theimage.repositoryandimage.tag - ATS supports static port. By default, this feature is not
available. To enable this feature:
- In the ocats-policy/values.yaml file under service section, set the value of staticNodePortEnabled parameter as true and provide a valid nodePort value for staticNodePort.
- A sample screen is given below:
Figure 2-10 ocats-policy/values.yaml-service section
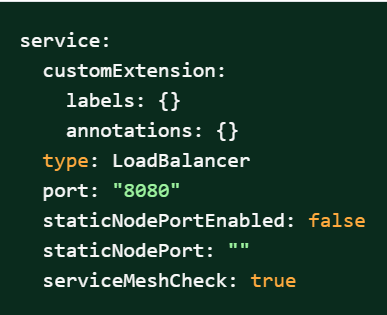
- To enable service mesh feature:
- Under the service section of the
values.yaml file, there is a parameter,
'serviceMeshCheck'. By default, this feature is set to
false. To get ASM support, set this parameter to
true. A snippet of service section in the yaml file is
shown below:
Figure 2-11 Service Mesh Check Enabled
- If you do not enable ASM at global level for the
namespace, then execute the following command to enable it before
deploying the ATS.
kubectl label --overwrite
										namespace <namespace_name>
										istio-injection=enabled
Example:
kubectl label --overwrite namespace
										ocpcf istio-injection=enabled
- Under the service section of the
values.yaml file, there is a parameter,
'serviceMeshCheck'. By default, this feature is set to
false. To get ASM support, set this parameter to
true. A snippet of service section in the yaml file is
shown below:
- Deploy ATS using the updated helm charts (refer to
step 5 for helm
charts).
Note:
You need to ensure that all the four components, 'ATS, go-Stub, dns-bind and CNPolicy are deployed in the same namespace.Using Helm 2
helm install ocats-policy --name
								<release_name> --namespace <namespace_name> -f
								ocats-policy/values.yaml
Example:
Using Helm 3helm install ocats-policy --name ocats --namespace ocpcf -f ocats-policy/values.yamlhelm3 install -name <release_name> ocats-policy-1.8.1.tgz --namespace <namespace_name> -f <values-yaml-file>Example:
helm3 install -name ocats ocats-policy-1.8.1.tgz --namespace ocpcf -f ocats-policy/values.yaml - Execute the following command to
verify ATS deployment.
helm status
								<release_name>
Figure 2-12 Verifying ATS Deployment in Policy Namespace

Deploying Stub Pod in Kubernetes Cluster
To deploy Stub Pod in Kubernetes cluster:
- Go to the
ocats-policy-tools-1.8.1.0.0folder and execute the command to extract the ocstub tar file content.tar -zxvf ocstub-pkg-1.1.0.0.0.tgzThe output of this command is:ocstub-go-1.1.0.tgz ocstub-go-images-1.1.0.tarNote:
To deploy additional stubs required for session, retry feature validation:- nf11stub, nf12stub → Alternate FQDN for nf1stub
- nf21stub, nf22stub → Alternate FQDN for nf2stub
- nf31stub, nf32stub → Alternate FQDN for nf3stub
- In your cluster, execute the following command to
load the STUB image
docker load --input ocstub-go-image-1.1.0.tar - Execute the following commands to tag and push the STUB
image
docker tag ocstub-go:1.1.0 <registry>/ocstub-go:1.1.0docker push <registry>/ocstub-go:1.1.0 - Untar the helm charts,
ocstub-go-1.1.0.tgz.tar -zxvf ocstub-go-1.1.0.tgz - Update the registry name, image name and tag (if
required) in the
ocstub-go/values.yamlfile as required.Open the values.yaml file and update the
image.repositoryandimage.tag - If required, change the
apiVersiontoapps/v1in the ocstub-go/templates/deployment.yaml file as shown below.apiVersion: apps/v1 - Deploy Stub.
Using Helm 2:
helm install ocstub-go --set service.name=<service> --name <name> --namespace <namespace_name> -f ocstub-go/values.yamlExample:helm install ocstub-go --set service.name=nf1stub --name nf1stub --namespace ocpcf -f ocstub-go/values.yaml helm install ocstub-go --set service.name=nf2stub --name nf2stub --namespace ocpcf -f ocstub-go/values.yaml helm install ocstub-go --set service.name=nf3stub --name nf3stub --namespace ocpcf -f ocstub-go/values.yaml helm install ocstub-go --set service.name=nf11stub --name nf11stub --namespace ocpcf -f ocstub-go/values.yaml helm install ocstub-go --set service.name=nf12stub --name nf12stub --namespace ocpcf -f ocstub-go/values.yaml helm install ocstub-go --set service.name=nf21stub --name nf21stub --namespace ocpcf -f ocstub-go/values.yaml helm install ocstub-go --set service.name=nf22stub --name nf22stub --namespace ocpcf -f ocstub-go/values.yaml helm install ocstub-go --set service.name=nf31stub --name nf31stub --namespace ocpcf -f ocstub-go/values.yaml helm install ocstub-go --set service.name=nf32stub --name nf32stub --namespace ocpcf -f ocstub-go/values.yamlUsing Helm 3:
helm3 install -name <release_name> ocstub-go-1.1.0.tgz --set service.name=<stub-service-name> --namespace <namespace_name> -f <valuesyaml-file>Example:helm3 install -name nf1stub ocstub-go-1.1.0.tgz --set service.name=nf1stub --namespace ocpcf -f ocstub-go/values.yaml helm3 install -name nf2stub ocstub-go-1.1.0.tgz --set service.name=nf2stub --namespace ocpcf -f ocstub-go/values.yaml helm3 install -name nf3stub ocstub-go-1.1.0.tgz --set service.name=nf3stub --namespace ocpcf -f ocstub-go/values.yaml helm3 install -name nf3stub ocstub-go-1.1.0.tgz --set service.name=nf11stub --namespace ocpcf -f ocstub-go/values.yaml helm3 install -name nf3stub ocstub-go-1.1.0.tgz --set service.name=nf12stub --namespace ocpcf -f ocstub-go/values.yaml helm3 install -name nf3stub ocstub-go-1.1.0.tgz --set service.name=nf21stub --namespace ocpcf -f ocstub-go/values.yaml helm3 install -name nf3stub ocstub-go-1.1.0.tgz --set service.name=nf22stub --namespace ocpcf -f ocstub-go/values.yaml helm3 install -name nf3stub ocstub-go-1.1.0.tgz --set service.name=nf31stub --namespace ocpcf -f ocstub-go/values.yaml helm3 install -name nf3stub ocstub-go-1.1.0.tgz --set service.name=nf32stub --namespace ocpcf -f ocstub-go/values.yamlFigure 2-13 Stub - Checking Helm Status

- Similarly, install all other stubs.
- Execute the following command to check the Stub
deployment.
helm status
							<release_name>
A sample screen showing stubs deployment is given below:
Figure 2-14 Stubs After Installation
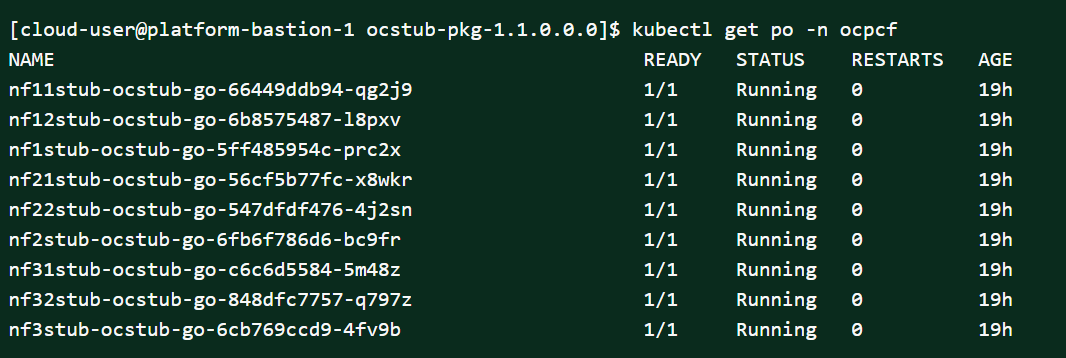
Figure 2-15 Policy Namespace

Deploying DNS Stub in Kubernetes Cluster
Note:
Please make sure that the sufficient resource requests and limit is configured for DNS Stub. Set the resource request and limit values in the resources section in the values.yaml file as follows:
resources: {}
  # We usually recommend not to specify default resources and to leave this as a conscious
  # choice for the user. This also increases chances charts run on environments with little
  # resources, such as Minikube. If you do want to specify resources, uncomment the following
  # lines, adjust them as necessary, and remove the curly braces after 'resources:'.  # limits:
  #  cpu: 1000m
  #  memory: 1024Mi
  # requests:
  #  cpu: 500m
# memory: 500Mi- Go to the ocats-policy-tools-1.8.1.0.0 folder and
execute the following command:
tar -zxvf
								ocdns-pkg-1.1.0.0.0.tgz
The output is shown below:
Figure 2-16 Untar DNS Package

- In your cluster, execute the following command to load the DNS
Stub image:
docker load --input ocdns-bind-image-1.1.0.tar - Execute the following command to tag and push the DNS stub to
the registry:
docker tag ocdns-bind:1.1.0
								localhost:5000/ocdns-bind:1.1.0
docker push localhost:5000/ocdns-bind:1.1.0 - Execute the following command to untar the helm charts
(ocdns-bind-1.1.0.tgz):
tar -zxvf ocdns-bind-1.1.0.tgz - Update the registry name, image name and tag (if required) in
the
ocdns-bind/values.yamlfile as required. Open the values.yaml file and update theimage.repositoryandimage.tag - Execute the following command to install DNS
Stub:
helm2 : [cloud-user@platform-bastion-1 ocdns-bind]$ helm install ocdns-bind-1.1.0.tgz --name ocdns --namespace ocpcf -f ocdns-bind/values.yaml helm3 : [cloud-user@platform-bastion-1 ocdns-bind]$ helm3 install -name ocdns ocdns-bind-1.1.0.tgz --namespace ocpcf -f ocdns-bind/values.yaml - Execute the following command to capture the cluster name of
the pcf deployment, namespace where nfstubs are deployed and cluster IP of
DNS Stub.
kubectl get svc -n ocpcf | grep
								dns
Figure 2-17 DNS Stub Cluster IP

Note:
This information is required to configure DNS stub.Figure 2-18 Cluster Name

Replacing PCF Service Ports in ATS
Note:
After starting/restarting the ATS Pod, you have to execute the same script to update the ports.- Create a script called replace_port.sh on the server from where you are executing the kubectl commands.
- Add the following content to the
script:
#!/bin/bash NAMESPACE=${NAMESPACE} atspod=$(kubectl get pod -n ${NAMESPACE} | grep ocats | awk '{ print $1 }') config_mgmt_svc=$(kubectl get svc -n ${NAMESPACE} | grep config-mgmt | awk '{ print $1 }') config_mgmt_port=$(kubectl get svc -n ${NAMESPACE} ${config_mgmt_svc} -o jsonpath={.spec.ports[].port}) config_server_svc=$(kubectl get svc -n ${NAMESPACE} | grep config-server | awk '{ print $1 }') config_server_port=$(kubectl get svc -n ${NAMESPACE} ${config_server_svc} -o jsonpath={.spec.ports[].port}) echo -e "Please see below Environment variables" echo -e "NAMESPACE: ${NAMESPACE}" echo -e "ATS pod: ${atspod}" echo -e "config-mgmt port: ${config_mgmt_port}" echo -e "config-server port: ${config_server_port}" # This Step will login to ATS pod and dynamically replace the port for 'config-mgmt' and 'config-server' services kubectl exec -it ${atspod} -n ${NAMESPACE} -- bash -c "egrep -lRZ 'config-mgmt' /var/lib/jenkins/ocpcf_tests/features/ | xargs -0 -l sed -i -e 's/config-mgmt. *$/config-mgmt '"$config_mgmt_port"'/g' && \egrep -lRZ 'config-server' /var/lib/jenkins/ocpcf_tests/features/ | xargs -0 -l sed -i -e 's/config-server.*$/config-server '"$config_server_port"'/g'" echo -e "Successfully updated config-mgmt port to ${config_mgmt_port} and config-server port to ${config_server_port} in all the feature files" - Provide execute permission as follows:
chmod +x replace_port.sh - Execute the following command to replace the PCF Service
Port:
NAMESPACE=<PCF Namespace>
								./replace_port.sh
Example:
NAMESPACE=ocpcf ./replace_port.sh
SCP ATS Installation Procedure
The SCP ATS installation procedure covers two steps:
- Locating and downloading the ATS images.
- Deploying ATS images.
Locating and Downloading ATS Images
To download the ATS image from MOS:
- Login to My Oracle Support with your credentials.
- Select Patches & Updates tab to locate the patch.
- In Patch Search window, click Product or Family (Advanced).
- Enter Oracle Communications Cloud Native Core - 5G in Product field. Select Oracle Communications Cloud Native Core Service Communication Proxy 1.8.0.0.0 from Release drop-down.
- Click on Search. The Patch Advanced Search Results displays a list of releases.
- Select the required patch from the search results. The Patch Details window opens.
- Click Download. File Download window appears.
- Click the <p********_<release_number>_Tekelec>.zip file to downlaod the CNC Policy ATS package file.
- Untar the zip file to access all the ATS Images.
- The
ocats-scp-pkg-1.8.0.0.0.tgzdirectory has following files:ocats-scp-pkg-1.8.0.0.0.tgz ocats-scp-pkg-1.8.0.0.0-readme.txt ocats-scp-custom-configtemplates-1.8.0.0.0.zip ocats-scp-custom-configtemplates-1.8.0.0.0-readme.txtNote:
Theocats-scp-custom-configtemplates-1.8.0.0.0-readme.txtfile contains all the information required for the package.Theocats-scp-pkg-1.8.0.0.0.tgzfile has following images and charts packaged as tar files:ocats-scp-pkg-1.8.0.0.0.tgz | |_ _ _ocats-scp-pkg-1.8.0.0.0.tgz | |_ _ _ _ _ _ ocats-scp-1.8.0.tgz (Helm Charts) | |_ _ _ _ _ _ ocats-scp-images-1.8.0.tar (Docker Images) | |_ _ _ _ _ _ Readme.txtTheocats-scp-custom-configtemplates-1.8.0.0.0.zipfile has following images and charts packaged as tar files:ocats-scp-custom-configtemplates-1.8.0.0.0.zip |_ _ _ _ _ _ ocats-scp-custom-serviceaccount-1.8.0.yaml (Template to create custom service account) |_ _ _ _ _ _ ocats-scp-values-1.8.0.yaml (Custom values file for installation)The user can copy the tar file from here to their kubernetes cluster where, they want to deploy ATS.
Deploying ATS in Kuberbetes Cluster
Note:
Deploy ATS and SCP in the same namespace.Note:
ATS is deployed with role binding by default instead of cluster role binding.- Execute the following command to
extract the tar file content.
tar -xvf
                                ocats-scp-pkg-1.8.0.0.0.tgz
The output of this command is:ocats-scp-1.8.0.tgz ocats-scp-images-1.8.0.tar Readme.txtThe
ocats-scp-images-1.8.0.tarfile contains ocats-scp:1.8.0 (ATS Image) and ocats-gostub:1.8.0 (stub image). - In your cluster, execute the given command to load the ATS image
and then, push it to your registry.
docker load --input ocats-scp-images-1.8.0.tar - Execute the following command to extract the zip file
content.
Unzip "ocats-scp-custom-configtemplates-1.8.0.0.0.zip"The output of this command is:ocats-scp-values-1.8.0.yaml ocats-scp-custom-serviceaccount-1.8.0.yaml - Update the image name and tag in the
ocats-scp-values-1.8.0.yaml file as required.
For this, you need to open the
ocats-scp-values-1.8.0.yamlfile and update theimage.repositoryandimage.tag - ATS supports static port. By default, this feature is not
available. To enable this feature:
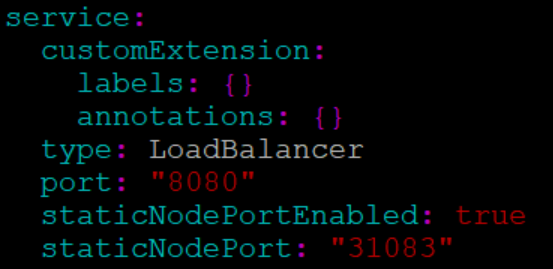
- In the ocats-scp-values-1.8.0.yaml file under service section, set the value of staticNodePortEnabled parameter as true and provide a valid nodePort value for staticNodePort.
- A sample screen is given below:
Figure 2-19 ocats-scp-values-1.8.0.yaml- service section
Note:
You can enable static node port at the time of deployment. - Add an appropriate value for the serviceMeshCheck parameter. Its value depends on whether ATS needs to be executed with aspen mesh or not.
- Update the lbDeployments section of the helm deployment
file in SCP ATS with the following annotations, wherein
- 8091 port is added to fetch soothsayer pod metrics
traffic.sidecar.istio.io/excludeOutboundPorts:
                                        "8091"
Note:
This point is applicable only if you are planning to test ATS with service mesh. Also, do not modify this port.
- 8091 port is added to fetch soothsayer pod metrics
- Execute the following command to
deploy ATS.
Using Helm 2:
helm install
                                ocats-scp-1.8.0.tgz --name <release_name> --namespace
                                <namespace_name> -f ocats-scp-values-1.8.0.yaml
Example:
helm install ocats-scp-1.8.0.tgz
                                --name ocats-scp --namespace scpsvc-f
                                ocats-scp-values-1.8.0.yaml
Using Helm 3:
helm3 install <release_name>
                                ocats-scp-1.8.0.tgz -n <namespace_name> -f
                                ocats-scp-values-1.8.0.yaml
Example:
helm3 install ocscp-ats ocats-scp-1.8.0.tgz -n scpsvc -f
                                ocats-scp-values-1.8.0.yaml
Note:
If there are two Helm versions on your system then, specify the version number in the Helm commands. If there is only one Helm version then there is no need to mention the version number. - Verify ATS deployment by executing
the given command.
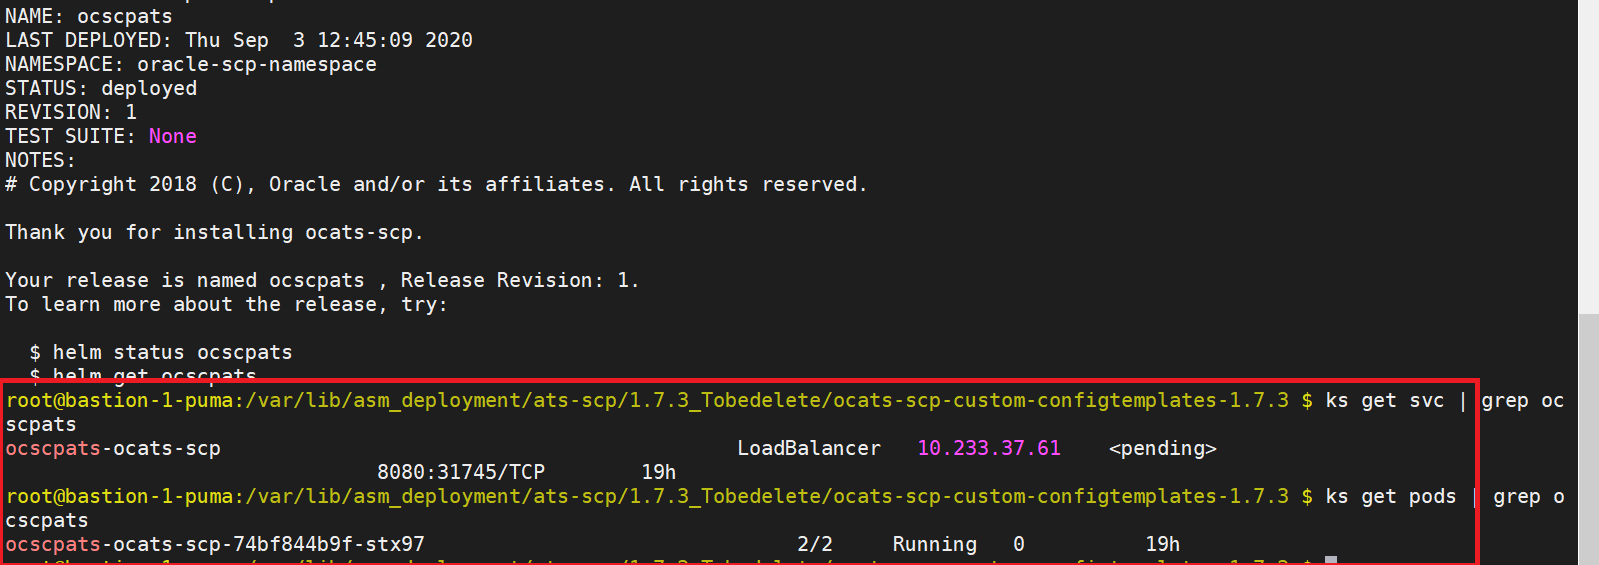
helm3 status
                                <release_name> -n <namespace_name>
The following sample screen checks ATS helm release.Note:
If ATS is deployed in service mesh environment, the Ready field for pods shows 2/2.Figure 2-20 Checking ATS Helm Release
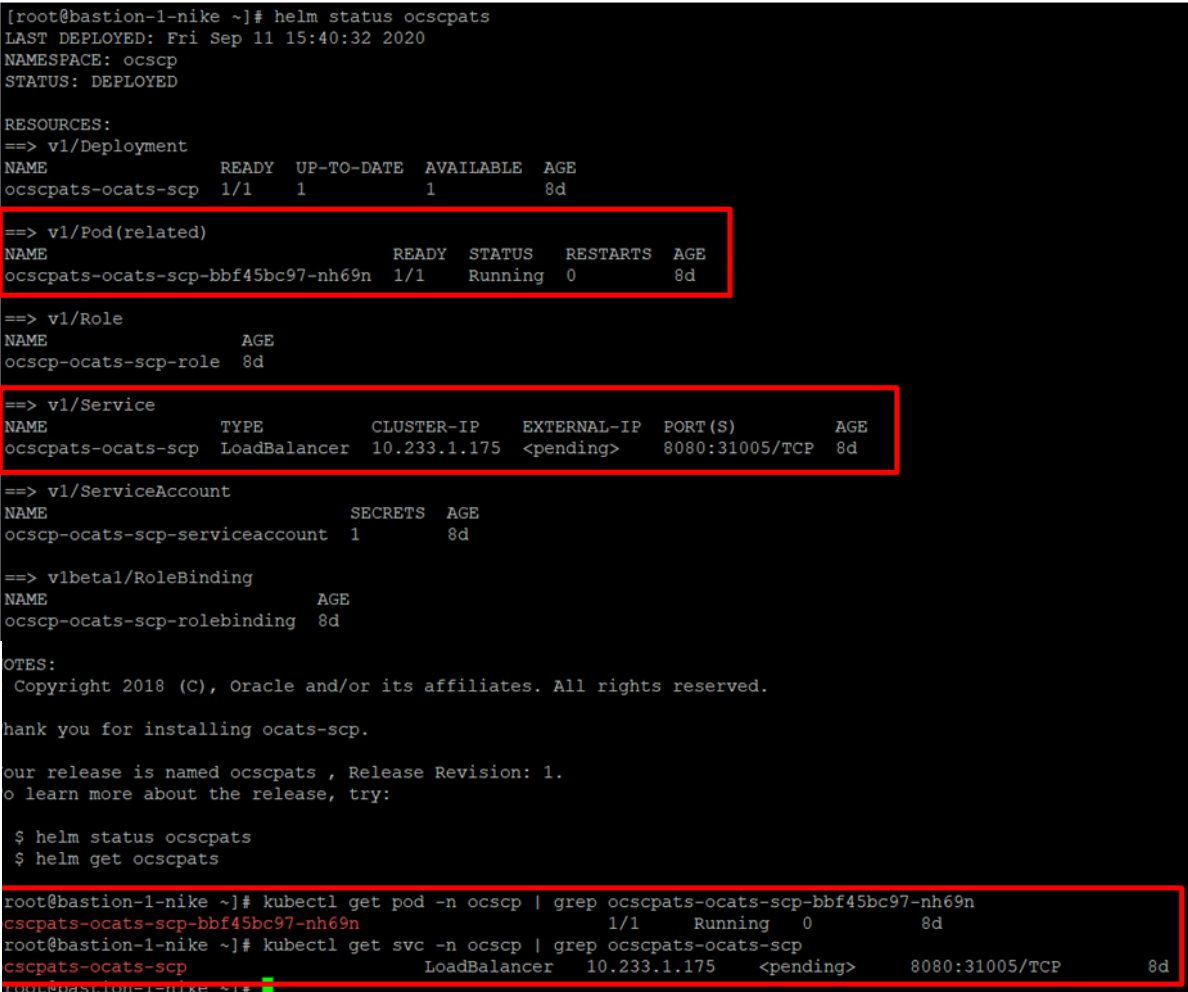
Figure 2-21 Helm Status Image
SEPP ATS Installation Procedure
- Locating and downloading ATS and Simulator Images
- Deploying ATS and Stub Pod in Kubernetes Cluster as per SEPP
Locating and Downloading ATS Images
To download the ATS image from MOS:
- Login to My Oracle Support with your credentials.
- Select Patches & Updates tab to locate the patch.
- In Patch Search window, click Product or Family (Advanced).
- Enter Oracle Communications Cloud Native Core - 5G in Product field. Select Oracle Communications Cloud Native Core Security Edge Protection Proxy 1.4.0.0.0 from Release drop-down.
- Click on Search. The Patch Advanced Search Results displays a list of releases.
- Select the required patch from the search results. The Patch Details window opens.
- Click Download. File Download window appears.
- Click the <p********_<release_number>_Tekelec>.zip file to downlaod the CNC Policy ATS package file.
- Untar the zip file to access all the ATS Images.
- The
ocats-sepp-pkg-1.4.0.0.0.tgzdirectory has following files:ocats-sepp-pkg-1.4.0.0.0.tgzocats-sepp-pkg-1.4.0.0.0-readme.txtocats-sepp-custom-configtemplates-1.4.0.0.0.zipocats-sepp-custom-configtemplates-1.4.0.0.0-readme.txtNote:
Theocats-sepp-pkg-1.4.0.0.0-readme.txtfile contains all the information required for the package.
- The
ocats-sepp-pkg-1.4.0.0.0.tgzfile has the following images and charts packaged as tar files:ocats-sepp-pkg-1.4.0.0.0.tgz | |_ _ _ocats-sepp-pkg-1.4.0.0.tgz | |_ _ _ _ _ _ ocats-sepp-1.4.0.tgz (Helm Charts) | |_ _ _ _ _ _ ocats-sepp-image-1.4.tar (Docker Images) | |_ _ _ _ _ _ Readme.txt - List of contents in
ocats-sepp-custom-configtemplates-1.4.0.0.0.zip:ocats-sepp-custom-configtemplates-1.4.0.0.0.zip|_ _ _ _ _ _
ocats-sepp-custom-serviceaccount-1.4.0.yaml(Template to create custom service account)|_ _ _ _ _ _
ocats-sepp-values-1.4.0.yaml(Custom values file for installation) - The user can copy the tar file from here and copy in their OCCNE/OCI/Kubernetes cluster where they want to deploy ATS.
Deploying ATS in Kubernetes Cluster
The steps to deploy ATS in Kubernetes Cluster are as follows:
- Execute the following command to extract tar file content:
tar -xvf ocats-sepp-pkg-1.4.0.0.tgzThe output of this command is:
ocats-sepp-1.4.0.tgzocats-sepp-images-1.4.0.tarReadme.txt
ocats-sepp-images-1.4.0.tarcontains ATS Image (ocats-sepp:1.4.0) and stub image (seppstub:1.4.0). - Load images and push to the registry.
- Create Kubernetes secret with certificates for ats client and stub server.
Execute following command to create secret:
Example:kubectl create secret generic {secret-name} --from-file={private_key_file} --from-file={trust store password file) --from-file={key store pasword fie} --from-file={private_certificate} --from-file={ca root certificate} -n {namespace}kubectl create secret generic ocsepp-secret --from-file=rsa_private_key_pkcs1.pem --from-file=trust.txt --from-file=key.txt --from-file=ocsepp.cer --from-file=caroot.cer -n defaultNote:
Subject Alternative Name in certificate must be{ats-helm-release-name}-stubserver.{ats-namespace}and signing CA must be part of trusted CA of deployed SEPP. - Unzip "
ocats-sepp-custom-configtemplates-1.4.0.0.0.zip". The output of this command is:ocats-sepp-values-1.4.0.yamlocats-sepp-custom-serviceaccount-1.4.0.yaml
- Update image name and tag in
ocats-sepp-values-1.4.0.yamlfile as required. - Update Kubernetes secret and certificates details.
- Execute the below command to deploy ATS
:
helm install ocats-sepp-1.4.0.tgz --name <release_name>
--namespace <namespace_name> -f ocats-sepp-values-1.4.0.yaml
Example:
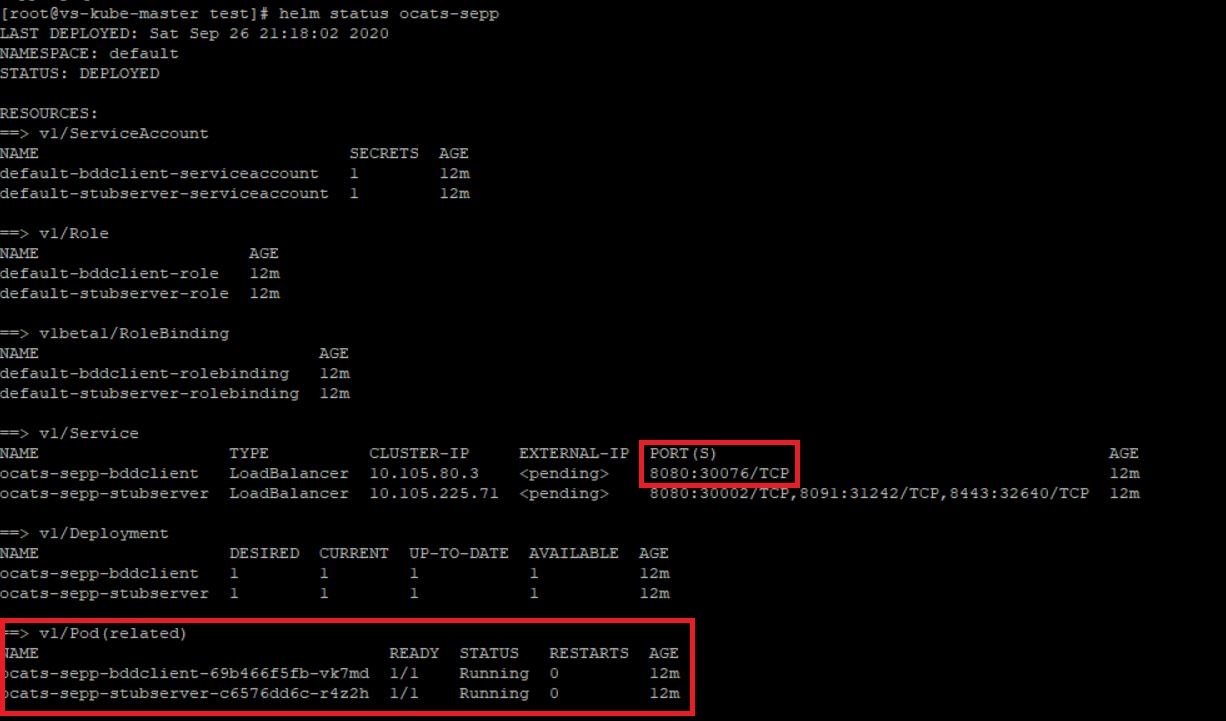
helm install ocats-sepp-1.4.0.tgz --name ocats-sepp --namespace seppsvc-f ocats-sepp-values-1.4.0.yaml - Execute the following command to verify the ATS deployment:
helm status <release_name>A sample screen showing ATS Helm release is given below:Figure 2-22 ATS Helm Release
SLF ATS Installation Procedure
The SLF ATS installation procedure covers two steps:
- Locating and downloading the ATS images.
- Deploying ATS images.
Locating and Downloading ATS Images
To download the ATS image from MOS:
- Login to My Oracle Support with your credentials.
- Select Patches & Updates tab to locate the patch.
- In Patch Search window, click Product or Family (Advanced).
- Enter Oracle Communications Cloud Native Core - 5G in Product field. Select Oracle Communications Cloud Native Core Unified Data Repository 1.8.0.0.0 from Release drop-down.
- Click on Search. The Patch Advanced Search Results displays a list of releases.
- Select the required patch from the search results. The Patch Details window opens.
- Click Download. File Download window appears.
- Click the <p********_<release_number>_Tekelec>.zip file to downlaod the CNC Policy ATS package file.
- Untar the zip file to access all the ATS Images.
- The
ocats-udr-slf-pkg-1.8.0.0.0.tgzdirectory has following files:ocats-udr-slf-pkg-1.8.0.0.0.tgz |_ _ _ _ _ _ ocats-udr-slf-1.8.0.tgz (Helm Charts) |_ _ _ _ _ _ ocats-udr-slf-images-1.8.0:1.8.0.tar.tgz (Docker Images)The user can copy the tar file from here to their kubernetes cluster where they want to deploy ATS.
Preparing to Deploy ATS in Kuberbetes Cluster
Note:
Deploy ATS and SLF in the same namespace.- Execute the following command to
extract the tar file content.
tar -xvf
                                ocats-udr-slf-pkg-1.8.0.0.0.tgz
The output of this command is:ocats-udr-slf-1.8.0.tgz ocats-udr-slf-images-1.8.0:1.8.0.tar.tgzThe
ocats-udr-slf-images-1.8.0:1.8.0.tar.tgzfile contains ocats-udr-slf-images-1.8.0 (ATS Image). - In your cluster, execute the given command to load the ATS
image.
docker load --input ocats-udr-slf-images-1.8.0:1.8.0.tar.tgz - Execute the following command to tag and push the ATS image to
your
registry.
docker tag ocats-udr-slf-images-1.8.0:1.8.0 <registry>/ocats-udr-slf-images-1.8.0:1.8.0 docker push <registry>/ocats-udr-slf-images-1.8.0:1.8.0Example:docker tag ocats-udr-slf-images-1.8.0:1.8.0 localhost:5000/ocats-udr-slf-images-1.8.0:1.8.0 docker push localhost:5000/ocats-udr-slf-images-1.8.0:1.8.0 - Execute the following command to untar the helm charts
(ocats-udr-slf-1.8.0.tgz) and update the registry name, image name and tag
(if required) in the ocats-udr-slf/values.yaml file.
tar -xvf ocats-udr-slf-1.8.0.tgzThe list of content in ocats-slf is:ocats-slf ├── Chart.yaml ├── destination-rule-ats.yaml ├── templates │ ├── deployment.yaml │ ├── _helpers.tpl │ ├── ingress.yaml │ ├── NOTES.txt │ ├── serviceaccount.yaml │ └── service.yaml └── values.yaml - ATS supports static port. By default, this feature is not
available. To enable this feature:
- In the ocats-udr-slf/values.yaml file under
service section, add the staticNodePortEnabled parameter as
true and staticNodePort parameter with valid nodePort value.
A sample screen is given below:
Figure 2-23 ocats-udr-slf/values.yaml - service section
- In the ocats-udr-slf/values.yaml file under
service section, add the staticNodePortEnabled parameter as
true and staticNodePort parameter with valid nodePort value.
A sample screen is given below:
Enabling Service Mesh
Figure 2-24 Service Mesh Check Enabled
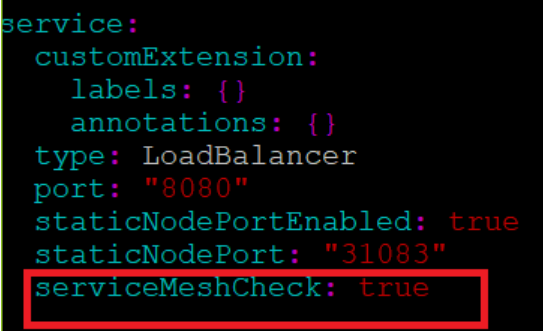
If service mesh is not enabled at the global level for the namespace then, execute the following command to enable service mesh at the namespace level before deploying ATS.
kubectl label --overwrite namespace <namespace_name>
                    istio-injection=enabled
Example:
kubectl label --overwrite namespace ocudr
                    istio-injection=enabled
Note:
Execute this command only if you are planning to deploy ATS on service mesh enabled system.Deploying ATS Pod in Kubernetes Cluster
You can deploy ATS Pod in Kubernetes cluster using Helm 2 or Helm 3 commands.
Using Helm 2
Execute the following command to deploy ATS.
helm install --name <release_name> --namespace
                    <namespace_name> -f <values-yaml-file> ocats-udr-slf
Example:
helm install --name ocats-udr-slf --namespace ocudr -f
                    ocats-udr-slf/values.yaml ocats-udr-slf
Using Helm 3
Execute the following command to deploy ATS.
helm3 install -name <release_name> --namespace
                    <namespace_name> -f <values-yaml-file> ocats-udr-slf
Example:
helm3 install -name ocats-udr-slf --namespace ocudr -f
                    ocats-udr-slf/values.yaml ocats-udr-slf
To verify ATS deployment, execute the following command:
helm status
                    <release_name>
Figure 2-25 Verifying ATS Deployment

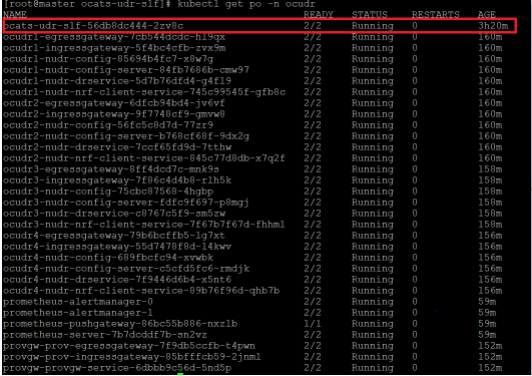
Figure 2-26 ATS and SLF Deployed in Same Namespace
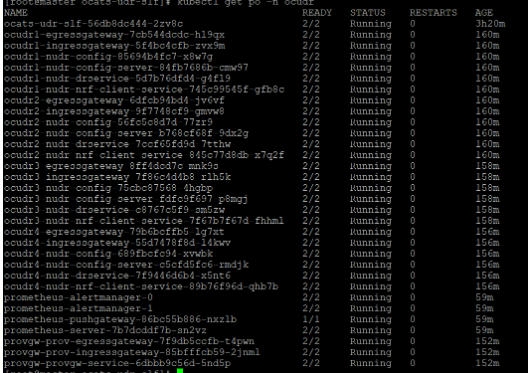
Figure 2-27 ATS Deployed with Side Car of Service Mesh
Creating a Policy and Destination Rule
Following steps to create a policy are applicable only if a service mesh is enabled at the namespace level:
- Edit the policy.yaml file as follows:
- Change the spec.targets.name to ocats-udr-slf svc name.
- Change the namespace in which ocats-udr-slf is deployed.
The policy.yaml file snippet is given below:
apiVersion: "authentication.istio.io/v1alpha1" kind: Policy metadata: name: ocats-udr-slf namespace: myudr spec: targets: - name: ocats-udr-slf peers: - mtls: mode: PERMISSIVE - Execute the following command to create a policy:
kubectl create -f policy.yamlOutput:
policy.authentication.istio.io/ocats-udr-slfis created.
- If Service Mesh check is enabled, you need to create a
destination rule to fetch the metrics from the Prometheus. This is so
because in most of the deployments, Prometheus is kept outside of the
service mesh and a destination rule is required to communicate between TLS
enabled entity (ATS) and non-TLS entity (Prometheus). To create a
destination
rule:
kubectl apply -f - <<EOF
apiVersion:networking.istio.io/v1alpha3
kind:DestinationRule
metadata:
  name:prometheus-dr
  namespace:myudr
spec:
  host:oso-prometheus-server.myudr.svc.cluster.local
  trafficPolicy:
    tls:
      mode:DISABLE
EOF
In the above rule,- name indicates the name of destination rule.
- namespace indicates where the ATS (ocats-udr-slf) is deployed.
- host indicates the hostname of the prometheus server. Change the spec.host value to fqdn of Prometheus server.
- Execute the following command to create a destination rule:
kubectl create -f
                                destination-rule-ats.yaml
Output:
destinationrule.networking.istio.io/ocats-udr-slf-dris created.