4 Use Cases
The following use cases describe different scenarios through which policies are getting installed with different set of conditions.
Note:
The performance and capacity of the Policy system may vary based on the Call model, Feature/Interface configuration, underlying CNE and hardware environment, including but not limited to the complexity of deployed policies, policy table size , object expression and custom json usage in policy design.
4.1 Policy Control Function Use Cases
This section describes Policy Control Function use cases.
Use Case 1
- a Session Rule and a PCC Rule for DNN “internet”
- a PRA Rule and a list of Triggers
- additional PCC Rules based on the initial status of Policy Counters received from CHF
The following screen capture shows the created policy after applying the above policy
rules: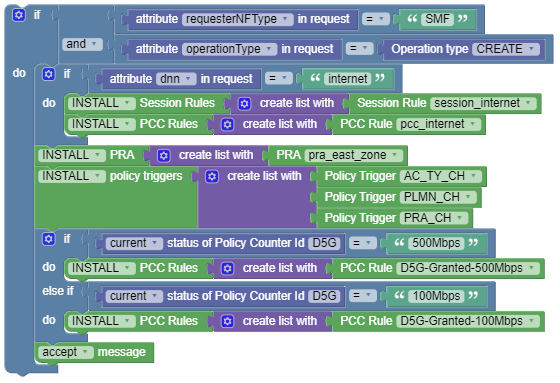
Use Case 2
When PCF receives an npcf-smpolicycontrol update association message due to PLMN_CHANGE, update a Session Rule and PCC Rule based on the MCC-MNC received.The following screen capture
shows the created policy after applying the above policy
rules:
Use Case 3
When PCF receives Policy Counter Status from the Nchf interface, remove the previous rule and install a new PCC rule based on the current status of the Policy Counter.
The following screen capture shows the created policy after applying the
above policy rules: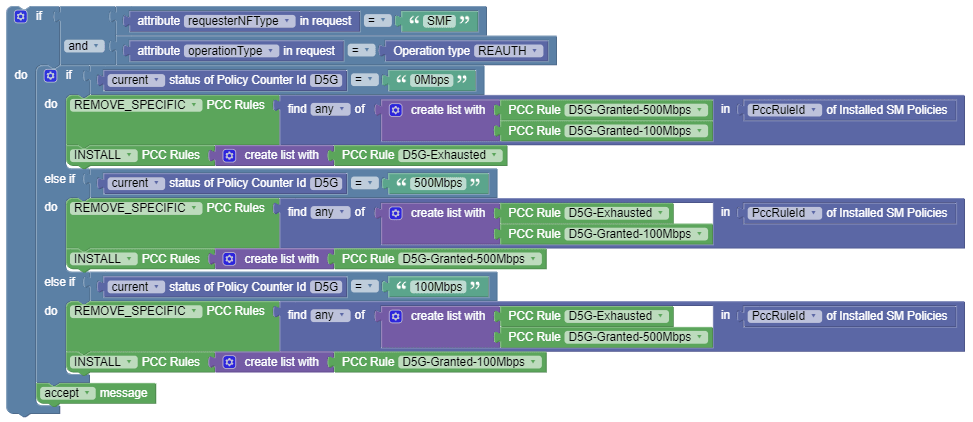
Use Case 4
When PCF receives a npcf-policyauthorization create association request, which might be a translated Rx AAR request, then override PCC rules for the received flows based on the media type. If there are no policies, PCF generates a default flow and sends it to smf. To change this default flow, a policy is required.
The following screen capture shows the created policy after applying the above policy rules:
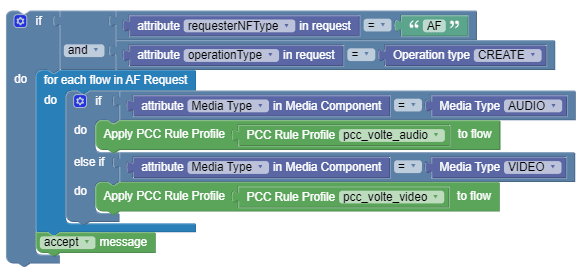
Use Case 5
Check the DNN and RAT type in the smf create message, and then install a corresponding PCC Rule. The data is received from the Policy Table.
The following screen capture shows the created policy after applying the above policy rules:

Use Case: Fetch Policy Counters from CHF
The following screen capture shows a sample policy condition to check if spendingLimitStatus is present or not in PRE request. If it is not present then it gives action to fetchFromCHF to SM service. Currently, PDS uses workflow for processing.
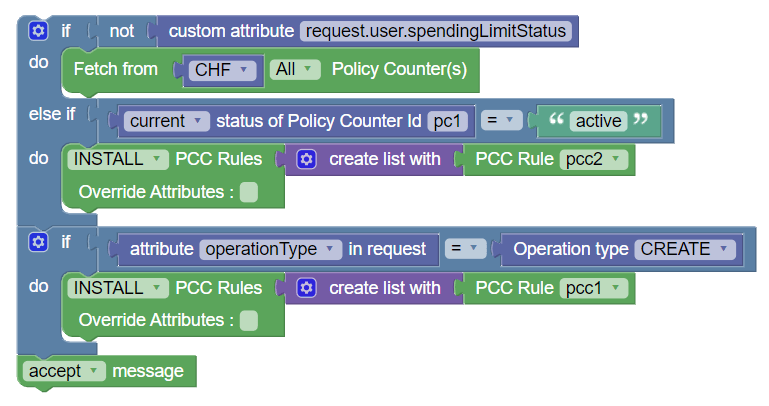
Use Case: Remove PCC Rules in Bulk
The following policy example shows how you can use Remove PCC Rules block to remove pre-defined and dynamic PCC rules in bulk.
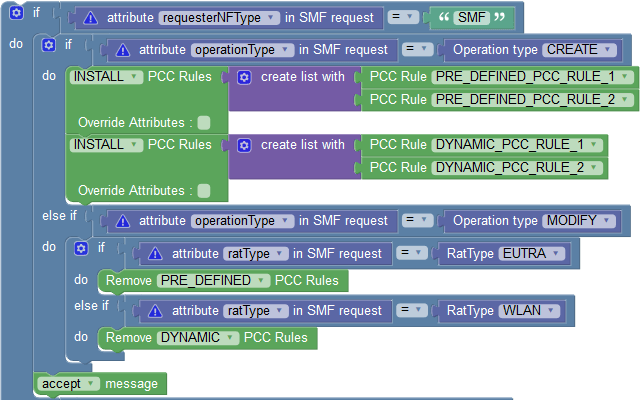
In the above example, the policy removes pre-defined PCC rules when SM policy association update request changes ratType to EUTRA. Similarly, when SM policy association update request changes ratType to WLAN, policy removes dynamic PCC rules.
When PCF triggers INSTALL and REMOVE actions on the same PCC/Session Rules when the remove action is Remove ALL (ALL, Predefined, Dynamic, Conditioned, non-conditioned), the conflict is resolved based on the value of Install/Remove Rule Conflicts Strategy parameter under the Rule group on the PCF Session Management page in CNC Console.
The Install/Remove Rule Conflicts Strategy parameter can take the following values:
INSTALL/MODIFY: Indicates to Remove all Session/PCC Rules previously installed and ignore all the remove actions for rules in conflict.REMOVE: Indicates to Remove all Session/PCC Rules previously installed and ignore all the install actions for rules in conflict.IGNORE: Indicates to Remove all Session/Pcc Rules previously installed and ignore all actions for rules in conflict, and does not run anything(install/remove).Default: Process the remove actions and then the INSTALL or MODIFY actions.
If Install/Remove Rule Conflicts Strategy parameter is not configured, the project first runs the INSTALL and MODIFY actions and then runs REMOVE action for the PCC rule/ Session.
Following are some of the examples of conflict resolution:
Figure 4-1 Example 1
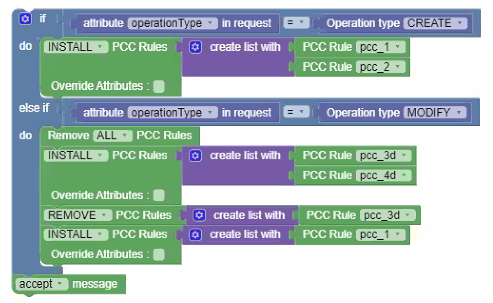
- Removes the previously installed pcc_1 and pcc_2.
- Installs pcc_3d and pcc_4d.
Figure 4-2 Example 2

- Removes the previously installed pcc_1 and pcc_2.
- Installs pcc_4d.
- Ignores installation of pcc_1 and pcc_3d which are in conflict.
Figure 4-3 Example 3

- Removes the previously installed pcc_1 and pcc_3.
- Installs pcc_4.
- Ignores install or remove actions on pcc_1 and pcc_3 which are in conflict.
Figure 4-4 Example 4

- Removes the previously installed pcc_1 and pcc_2.
- Installs pcc_3d, pcc_4d_ and pcc_1
Figure 4-5 Example 5

- Removes the previously installed pcc_1 and pcc_3.
- Installs PCC Rules pcc_4 and pcc_5.
- Ignores installation of pcc_1 and pcc_3 which are in conflict.
Figure 4-6 Example 6

- Removes previously installed pcc_1 and pcc_3.
- Installs PCC Rule pcc_5.
- Ignores installation of pcc_3 and pcc_4.
Figure 4-7 Example 7

- Removes previously installed pcc_1 and pcc_3.
- Installs pcc_5.
- Ignores INSTALL/ REMOVE actions on pcc_1 and pcc_3.
Figure 4-8 Example 8
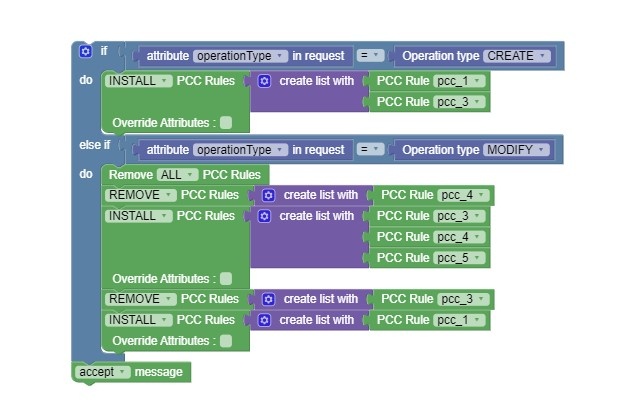
- Removes previously installed pcc_1 and pcc_3.
- Installs pcc_4 and pcc_5.
Figure 4-9 Example 9
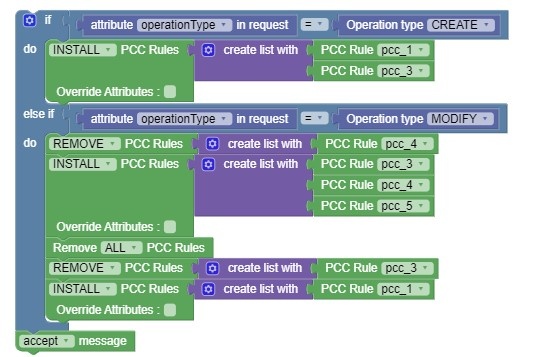
- Removes previously installed pcc_1 and pcc_3.
- Installs pcc_4 and pcc_5
Use Case: Dyamic Update/Override of PCC Rule Attributes
The following policy example shows how you can override PCC
rule attributes in real-time. It shows a create request to install
PCC rule dynamically overriding Charging Data attributes.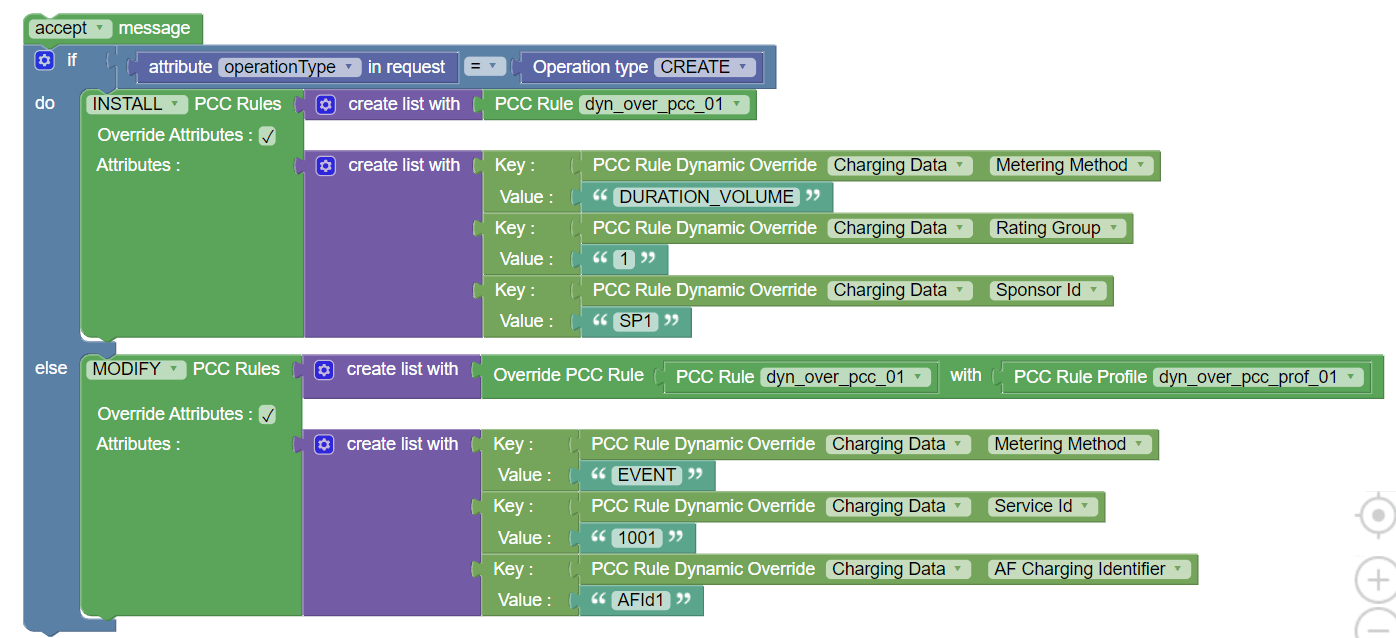
Use Case: Dynamic Override of PCC Rule Attributes with Policy Tables
The following policy example shows how you can use nested
policy tables to override PCC rule attributes in real-time.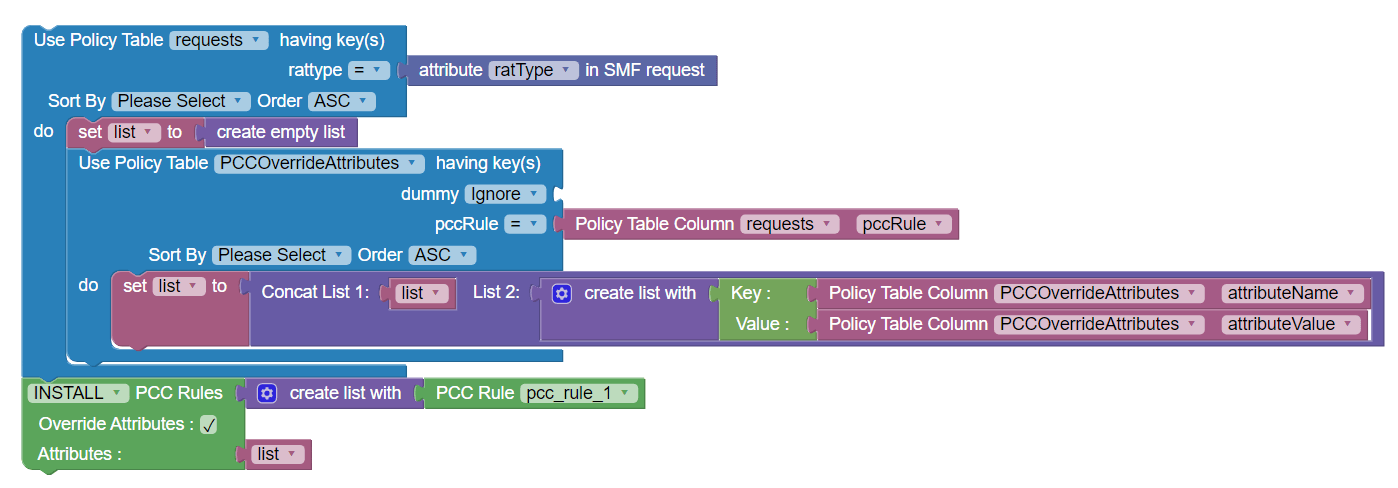
- Outer Use Policy Table block filters table data by rattype that is received in request.
- Inner Use Policy Table block
loops through override attributes and their values
for particular PCC Rule. After this step, list of
override attributes becomes
available.
Note:
Concat List block is used to append {key:value} pair of attributes to list variable. - The list, received in the previous step, is directly added to override attributes in Install PCC Rule block.
Use Case: Override sdfHandl attribute
The following sample policy shows how operators can use
PCC Rule Dynamic Override block to
override the value of sdfHandl attribute of Charging data. This
attribute indicates whether the service data flow is allowed to
start while the SMF is waiting for a response to the credit request
from CHF.
Use Case: Using Custom Attributes block for OperatorSpecificData
The following policy example shows how you can use Custom
Attributes block to get value from
OperatorSpecificData object.
Note:
When you select one attribute, the child attributes automatically appear in block. The attribute list is imported from the custom JSON schema.Use Case: WaitForChf VendorSpecific attribute provisioning over N7
Using the Set custom attribute block, operators may configure and send VendorSpecific waitForChf attribute to SMF in SMPolicyDecision via policy. Depending on the waitForChf attribute value, it is decided whether the SMF waits for the CHF session establishment response before installing rules in the UPF or sending the response towards the RAN.
If this attribute is included and set to true (default), SMF waits before proceeding with the UPF and RAN signaling.
Note:
The waitForChf attribute is not present when the online charging method is not applicable to the PDU session or to any of the PCC rules.The following sample policy shows how operators can use
Set custom attribute block to send
VendorSpecific waitForChf attribute to SMF in
SMPolicyDecision: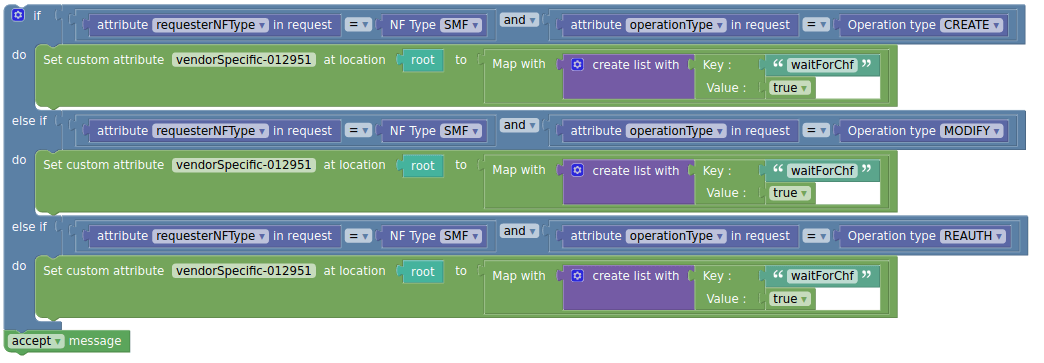
Use Case: Using User Attributes block for SmPolicyData
The following screen capture shows a sample policy where User Attributes
block is used to access vendorSpecific-123456
attribute and trigger a policy:
Use Case: Wildcard character matching
The following policy example shows how operators can use
comparison block for wildcard pattern matching: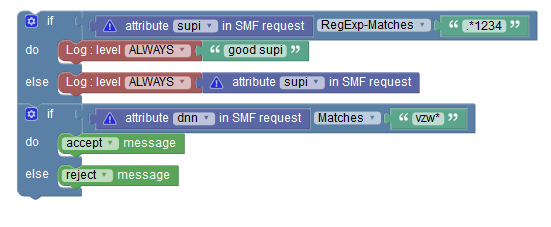
Use Case: UDR Subscriber Delete Resources
The following screen capture shows a sample policy to release a policy
association and terminate active subscriber session by SM service
when the subscriber resources are deleted on the UDR.
Use Case: PRE capturing log information using Log Blocks
PRE service records log information when an event occurs using blockly. In blockly, any condition blocks such as the accessor blocks are used along with log blocks to log application information. It logs subscriber identifier values of SUPI, GPSI, DNN, MCC-MNC. The Policy tables data are also logged.
The following screen capture shows a sample of enabling logging in PCF-SM.
Figure 4-10 Example 1: Blockly logging supi, gpsi, dnn and ratType values

Figure 4-11 Example 2: Blockly logging the SM Policy data from the Policy table

Figure 4-12 Example 3: Blockly logging the Subscriber billing details

4.2 PCF UE Use Cases
This section describes use cases where PCF UE blocks are used to evaluate policies.
Support for policy Evaluation after N1Message Notify
Table 4-1 Sample Policies Project
| Policy | Description |
|---|---|
|
Figure 4-13 Use case scenario 1: 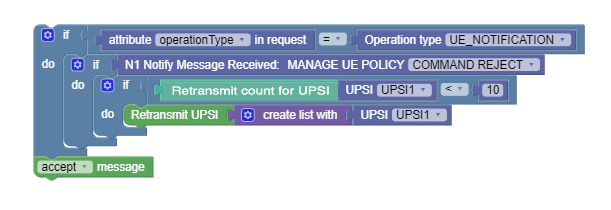 |
This policy will retransmit UPSI1 until the retransmit action has
happened 10 times.
Note: The get retransmit count for UPSI statement is important since it will allow the policy to retransmit in a finite amount of times, otherwise it can go in an infinite loop. |
|
Figure 4-14 Use case scenario 2:  |
This policy skips the current transmit after encountering a Command Reject message from the AMF. |
|
Figure 4-15 Use case scenario 3:  |
This policy aborts the current transmit after encountering a Command Reject message from the AMF. |
|
Figure 4-16 Use case scenario 4: 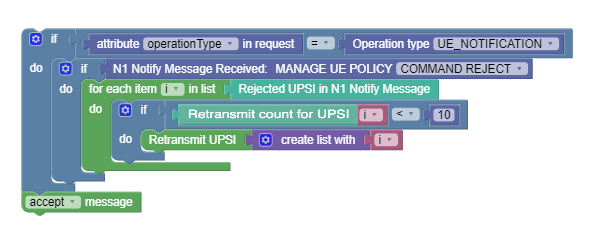 |
This policy retransmits every rejected UPSI up to a maximum of 10 times. |
Use Case 1
The given screen capture shows a sample UE policy that evaluates if the subscriber profile for UE Policy in the UDR (UEPolicySet) has UPSIs provisioned, and then sends the same to UE in the N1 message transfer command. If not, it sends a configured UPSI. In addition, it arrms the location change trigger on the AMF.
Figure 4-17 PCF UE use case

Sample projects to list and compare UPSIs received from UDR
To get the delta of UPSIs between the PCF configured UPSIs and the ones on AMF

Example:
PCF Configured UPSIs has UPSIs ids 1,2,3,4.
UE Indicated UPSIs in AMF Request has UPSIs ids 3,4,5,6.
Expected output of this project:
Install the delta of the UPSIs 1 and 2.
To get the Intersection of UPSIs between the PCF configured UPSIs and the ones from UDR

Example:
PCF Configured UPSIs has UPSIs ids 1,2,3,4,5.
UE Policy Set from UDR has UPSIS 5,6.
Expected output of this project:
Remove the common UPSI 5.
To get the delta of UPSIs between the PCF configured UPSIs and the ones on AMF and validate the matching parameters

Example:
PCF Configured UPSIs has UPSIs ids 1,2,3,4
UE Indicated UPSIs in AMF Request has UPSIs ids 3,4,5,6.
VSA UPSIs from UDR has UPSIS 5,6.
Expected output of this Policy project:
- Install the UPSIs 1 and/or 2 if, for each of these UPSIs, its corresponding upsc is equal to 345, and override its PLMN to be 222-333.
- Remove the UPSIs 5 and/or 6 if, for each of theseUPSIs, its corresponding mcc is equal to 340 and mnc equals to 350, and override its PLMN to be 222-333.
Note: When Match Additional Attributes option is enable, it is not mandatory to fill all the attributes with a value, as shown in example.
To check for specific attributes values from the PCF Configured UPSIs and the ones that are on VSA by name
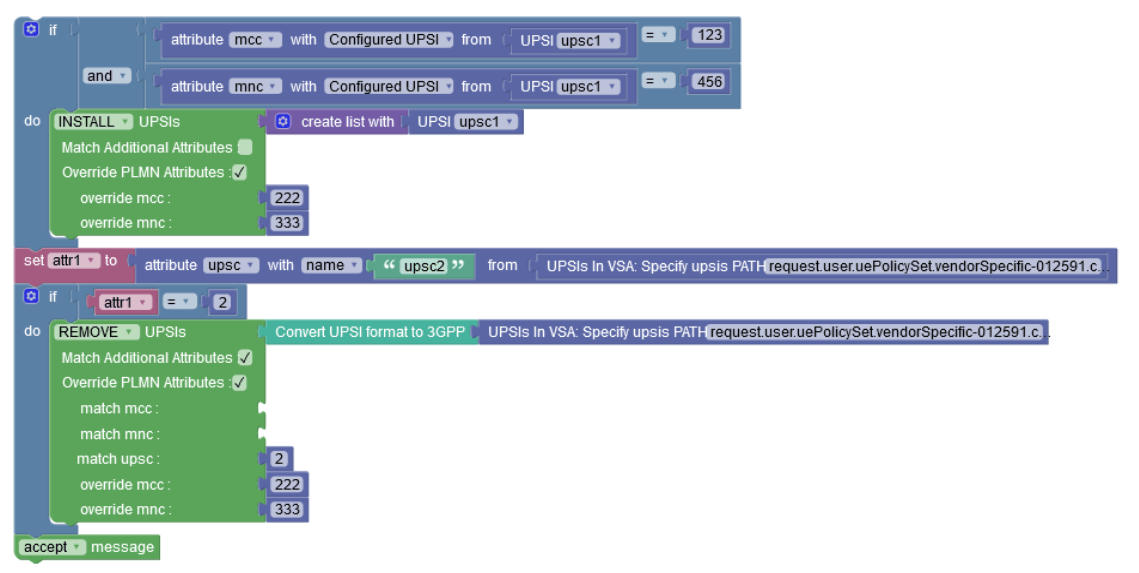
In this example, the first part of the blockly will install the "upsc1" upsi if its mcc equals to 123 and mnc equals to 456 and override its PLMN to be 222-333.
Similar for the second part, it will assign a variable called attr1 with the attribute of upsc from the UPSI which has the name "upsc2" on the VSA UPSIs list, and if this value is equal to 2, it will remove this UPSI and will override its PLMN to be 222-333.
To loop on all the UPSIs that are located on AMF Request

This policy will loop on all the UPSIs that are located on AMF Request.
It allows to access an attribute from specific UPSI on AMF Request. In this example, it allows to check if any of the UPSIs on the list has its upsc as 2.
If found, it removes the corresponding UPSI and overrides its PLMN to be 222-333.
4.3 AM Use Cases
This section describes use cases where PCF AM blocks that are used to evaluate policies.
Use Case 1
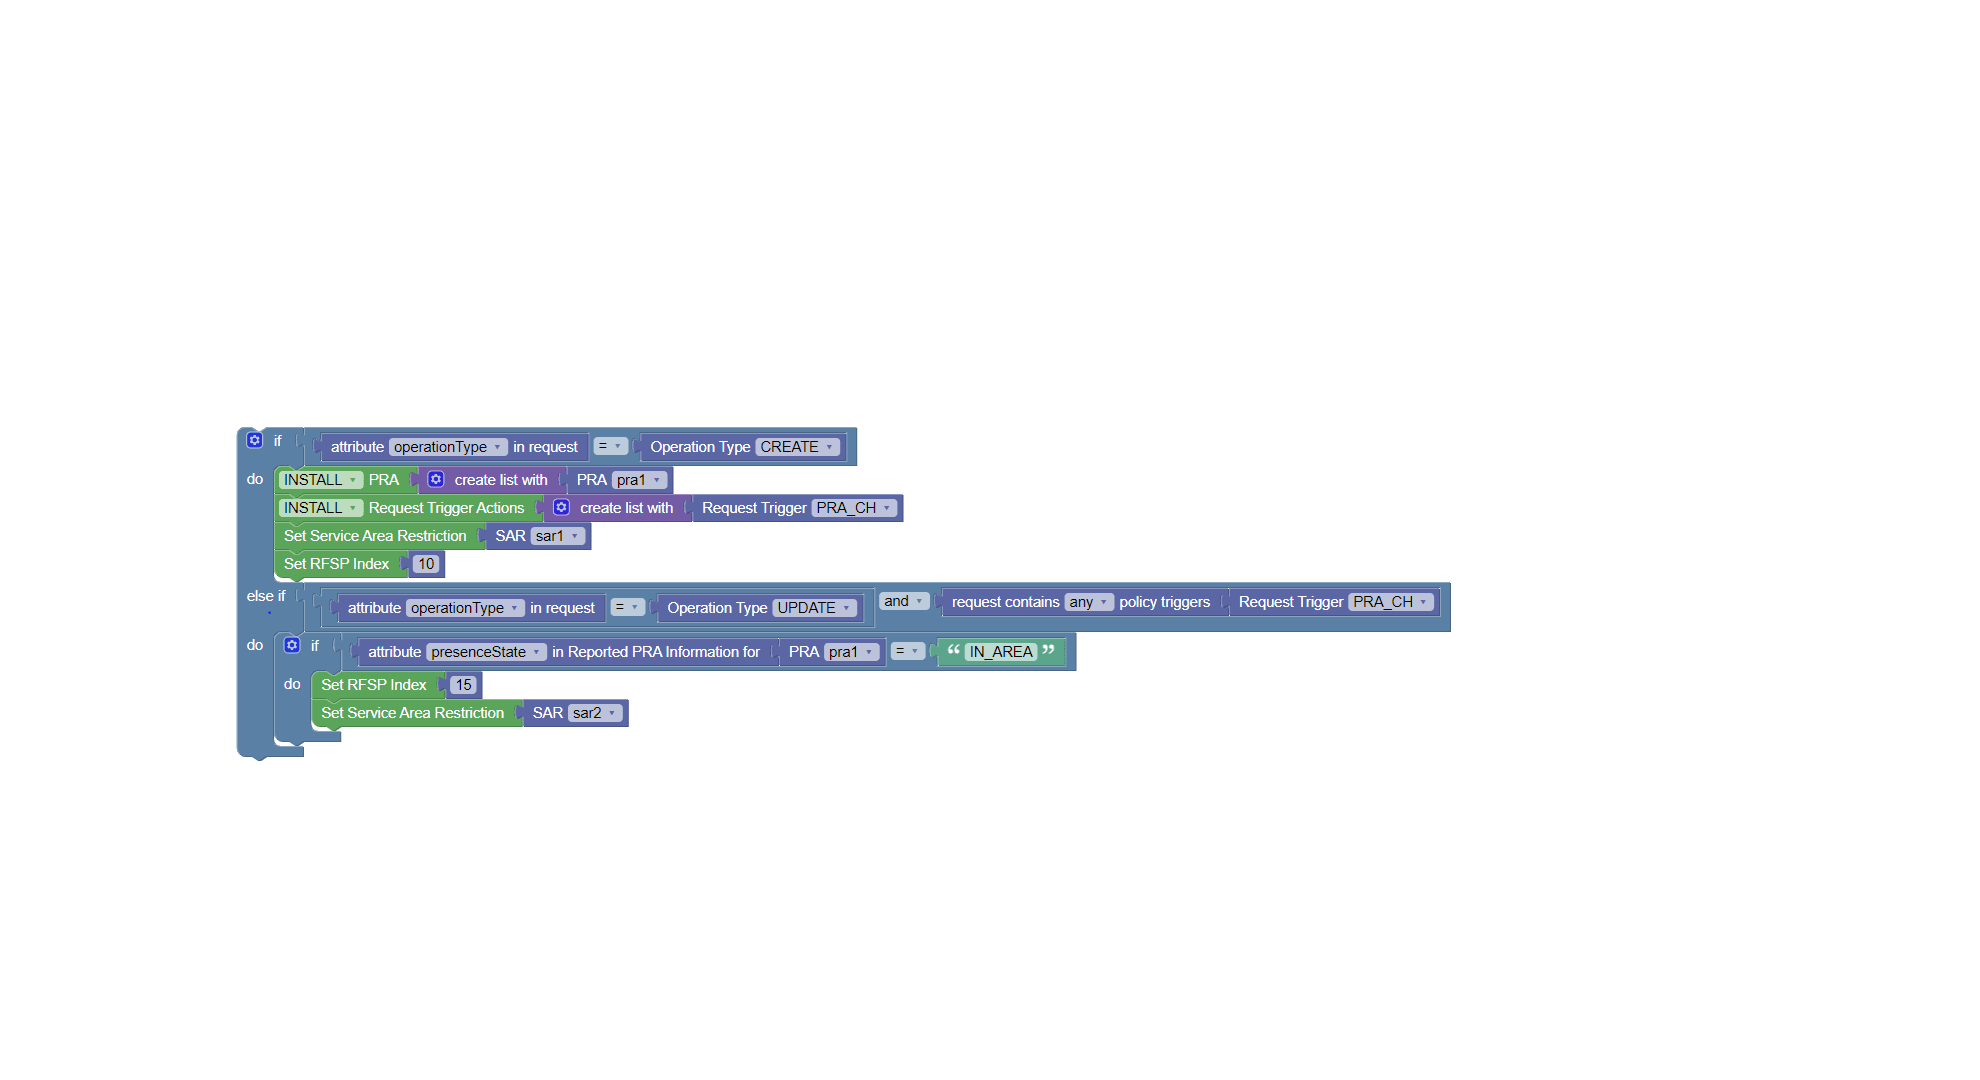
The given screen capture shows a sample AM policy that if the request received by AM service is create, it installs configured PRA (Presence Reporting Area), trigger, i.e., PRA_CH, SAR (Serivce Area Restriction) and RFSP Index. If the service receives Update request and request contains trigger PRA_CH and if the value in already configured PRA for that user is "IN_AREA" then the RFSP index and SAR for that user is updated.
4.4 Cloud Native Policy Charging and Rules Function Use Cases
Following are the Cloud Native Policy Charging and Rules Function (PCRF) use cases:
Use Case 1
When Cloud Native PCRF receives CCR-Initial requests, install 10MbpsPcc Rule. When Rx flow is observed, then modify the upload limit to 20 MBPS.
The following screen capture shows the created policy after applying the
above policy rules:
Use Case 2
When Cloud Native PCRF receives CCR-Initial requests, install 10MbpsPcc Rule. When Cloud Native PCRF receives CCR-Update requests, install 20MbpsPcc Rule.
After Cloud Native PCRF receives CCR-Initial requests, when Rx flow is observed and specific action is INDICATION_OF_SUCCESSFUL_RESOURCES_ALLOCATION taken, then modify the maximum upload limit to 1234 MBPS.
The following screen capture shows the created policy after
applying the above policy rules:
Use Case 3
When Cloud Native PCRF receives CCR-Initial requests, install 10MbpsPcc Rule for the next 20 seconds. When Cloud Native PCRF receives CCR-Update requests, install 20MbpsPcc Rule.
The following screen capture shows the created policy after
applying the above policy rules:
Use Case 4
When highSpeedCounter is received with current status as true from OCS, install 20MbpsPcc Rule. When highSpeedCounter is received with current status as false from OCS, install 50MbpsPcc Rule. For rest of the scenarios, such as when highSpeedCounter is not received from OCS or does not have current status as true or false, perform the "reject message" action.
The following screen capture shows the created policy after applying the above policy rules:

Use Case 5
When Cloud Native PCRF receives requests with APN, install pcc1 Rule.
The following screen capture shows the created policy after applying the above policy
rules:
Use Case 6
Single PRA: Installing PRA on initial request and removing on update request.
The following screen capture shows the created policy after applying the
above policy rules:
Multiple PRA: Installing PRA on initial request and removing on update request.
The following screen capture shows the created policy after applying the
above policy rules:
Use Case for Rule Report Conditions
The following screen capture shows the created policy for rule report conditions:
Figure 4-18 Use case for Rule Report Conditions

Use Case for User Specific Conditions
The following screen capture shows the created policy for user specific conditions:
Figure 4-19 Use case for User specific conditions

4.5 Subscriber Notification Use Cases
This section describes the Subscriber notification use cases.
Use Case 1
When HTTP end point is used for communication between Notification
Service and the external Notification Server, to configure the URI based parameters,
use the PATH key for HTTP Header blockly.
The PATH key accepts the url values from dynamic
variables that are built with variables taken from object expression or other
blocks.
Note:
The HTTP Header key: PATH must be in all capital
letters as shown here.
The complete URI comprises the IPv4/IPv6/FQDN[:Port] (from the static
configuration) followed by the value of the PATH key.
where [:Port] is optional. If port number is not specified, default port will be used.
If you are not using dynamic parameters, you can use the static UriPath from the configuration.
The value of PATH key will override the statically
configured URI Path.
Figure 4-20 Configuring URI Based Parameters for Subscriber Notification

Use Case 2
When Notifier Service uses Short Message Service (SMS) based notification
via an SMS gateway for communication between External Short Message Entities (ESME)
and internal Message Centres (MC), use Send SMS action.
You can include text strings as message body and specify the Destination address with User IDs.
- E164
- IMSI
- NAI
- IP
- SIP
- IMEI
- IPO
The text message accepts string values and supports multiple languages.
Send SMS action, you must also configure additional
attributes:
- Source Address
- Source Address TON
- Source Address NPI
- Destination Address TON
- Destination Address NPI
- Delivery Receipt
- SMS Gateway Group
Figure 4-21 Sample Send SMS blockly configuration

For more details on Send SMS action and the additional attributes
that must be configured, see Subscriber Notification under Public Category.
Note:
As of Policy 23.2.0, this action is supported only for PCRF-Core call flows.4.6 Usage Monitoring Use Cases
This section includes some of the Usage Monitoring and Control Use Cases.
Home Monthly Plan with Throttling
Scenario- All data plans are configured in CNC Console.
- Subscriber has purchased a monthly plan. Name of the plan is provided in a vendor specific custom attribute "homePlanName" under SmData.
- As long as subscriber is in the home region and has data left, the subscriber can use this plan.
- Data is denied if the subscriber is in a roaming region.
- QoS Throttling is applied when the data in the plan is exhausted.
- The Billing Day is provided in a vendor specific custom attribute "billingDay" under SmData.
In CNC Console, Navigate to Policy Data Configurations → Usage Monitoring → Data Limit Profiles and create a Data Limit Profile.
The following fields are mandatory to be set:
- Name
- Usage Limit
- Reset Period
In CNC Console, Navigate to Service Configurations → Common Data → Attribute Forwarding Profile and create a Attribute Forwarding Profile with the field values as displayed in the below screenshot.
Figure 4-22 Forwarded Attributes for Home Monthly Plan with Throttling

Figure 4-23 Forwarded Attributes for Home Monthly Plan with Throttling for Billing Day as per Vendor Specific attribute in SMData

Figure 4-24 Forwarded Attributes for Home Monthly Plan with Throttling

In CNC Console, Navigate to Service Configurations → PCRF Core → Settings and set the following field(s) under Usage Monitoring Group:
- Enabled: true
- APN List: the list of APNs for which Usage Monitoring is required.
- Attribute Forwarding: the forwarding profile created for each desired interface/message type.
In CNC Console, Navigate to Service Configurations → Usage Monitoring and set the following field(s):
- Enable PRE: true
Configure other fields as necessary.
Match ListIn CNC Console, Navigate to Policy Data Configurations → Common → Match List and create a Match List to fill in the home MCC/MNCs.
Policy TableNot required for this scenario.
Usage Monitoring Policy
Figure 4-25 Policy Project

Figure 4-26 PCRF Core Policy Project

Home Monthly Plan with Roaming Pass
Scenario- All data plans are configured CNC Console.
- Subscriber has purchased a monthly plan. Name of the plan is provided in a vendor specific custom attribute "homePlanName" under SmData.
- As long as subscriber is in the home region and has data left, the subscriber can use this plan.
- QoS Throttling is applied when the data in the home plan is exhausted.
- The Billing Day for home plan is provided in a vendor specific custom attribute "billingDay" under SmData.
- Subscriber has also purchased a roaming plan (Roaming Pass). Name of the plan is provided in a vendor specific custom attribute "roamingPlanName" under SmData. The start and end dates are also provided in vendor specific custom attributes "roamingPlanStartDate", "roamingPlanEndDate" under SmData. This is a one-time plan and will expire when entirely consumed.
- As long as subscriber is in the roaming region, the plan is within its validity time and has data left, the subscriber can use this plan.
- When Roaming Quota is exhausted, the subscriber is redirected to a charging portal.
- Subscriber is entitled to different Home and Roaming QoS and Charging.
In CNC Policy, Navigate to Policy Data Configurations → Usage Monitoring → Data Limit Profiles and create a Data Limit Profile for Home Plan.
The following fields are mandatory to be set:
- Name
- Usage Limit
- Reset Period
For Roaming Plan, follow the same steps, however set the following field values:
- Plan Type: Pass
- Reset Period: Empty
In CNC Policy, Navigate to Service Configurations → Common Data → Attribute Forwarding Profile and create a Attribute Forwarding Profile with the field values as displayed in the below screenshot.
Figure 4-27 Forwarded Attributes for Home Monthly Plan with Roaming Passes

Figure 4-28 Forwarded Attributes for Home Monthly Plan with Roaming Passes

Figure 4-29 Forwarded Attributes for Home Monthly Plan with Roaming Passes

Figure 4-30 Forwarded Attributes for Home Monthly Plan with Roaming Passes

Figure 4-31 Forwarded Attributes for Home Monthly Plan with Roaming Passes

Figure 4-32 Forwarded Attributes for Home Monthly Plan with Roaming Passes

In CNC Policy, Navigate to Service Configurations → PCRF Core → Settings and set the following field(s) under Usage Monitoring Group:
- Enabled: true
- APN List: the list of APNs for which Usage Monitoring is required.
- Attribute Forwarding: the forwarding profile created for each desired interface/message type.
In CNC Policy, Navigate to Service Configurations → Usage Monitoring and set the following field(s):
- Enable PRE: true
Configure other fields as necessary.
Match ListIn CNC Policy, Navigate to Policy Data Configurations → Common → Match List and create a Match List to fill in the home MCC/MNCs.
Policy TableNot required for this scenario
Usage Monitoring Policy
Figure 4-33 Policy Project for Home Monthly Plan with Roaming Passes

Figure 4-34 PCRF Core Project for Home Monthly Plan with Roaming Passes

Home Monthly Plan with Top-up
Scenario- All data plans are configured In CNC Policy
- Subscriber has purchased a monthly plan. Name of the plan is provided in a vendor specific custom attribute "homePlanName" under SmData.
- As long as subscriber is in the home region and has data left, the subscriber can use this plan.
- The Billing Day is provided in a vendor specific custom attribute "billingDay" under SmData.
- Subscriber has also purchased a Top-up. Name of the Top-up is provided in a vendor specific custom attribute "topUpName" under SmData. The start and end dates for this top-up are also provided in vendor specific custom attributes "topUpPlanStartDate", "topUpPlanEndDate" under SmData. This is a one-time plan and will expire when entirely consumed.
- The base plan will be consumed before the top-up as long as there is quota left in the base plan.
- QoS and Charging for base and top-up plans are same.
- When both base and top-up quota are exhausted, QoS throttling is applied.
- Data is denied if the subscriber is in a roaming region.
In CNC Policy, Navigate to Policy Data Configurations → Usage Monitoring → Data Limit Profiles and create a Data Limit Profile for Home Plan.
The following fields are mandatory to be set:
- Name
- Usage Limit
- Reset Period
For Top-up, follow the same steps, however set the following field values:
- Plan Type: Top-up
- Reset Period: Empty
In CNC Policy, Navigate to Service Configurations → Common Data → Attribute Forwarding Profile and create a Attribute Forwarding Profile with the field values as displayed in the below screenshot.
Figure 4-35 Forwarded Attributes for Home Monthly Plan with Top-up

Figure 4-36 Forwarded Attributes for Home Monthly Plan with Top-up

Figure 4-37 Forwarded Attributes for Home Monthly Plan with Top-up

Figure 4-38 Forwarded Attributes for Home Monthly Plan with Top-up

Figure 4-39 Forwarded Attributes for Home Monthly Plan with Top-up

In CNC Policy, Navigate to Service Configurations → PCRF Core → Settings and set the following field(s) under Usage Monitoring Group:
- Enabled: true
- APN List: the list of APNs for which Usage Monitoring is required.
- Attribute Forwarding: the forwarding profile created for each desired interface/message type.
In CNC Policy, Navigate to Service Configurations → Usage Monitoring and set the following field(s):
- Enable PRE: true
Configure other fields as necessary.
Match ListIn CNC Policy, Navigate to Policy Data Configurations → Common → Match List and create a Match List to fill in the home MCC/MNCs.
Policy TableNot required for this scenario.
Usage Monitoring Policy
Figure 4-40 Policy Project for Home Monthly Plan with Top-ups

Figure 4-41 PCRF Core Project for Home Monthly Plan with Top-ups

Monthly Plan with Weekend Pass
Scenario- Home Plan conditions as in the previous scenarios
- Subscriber has purchased a one-time (non-recurring) "Weekend"
Pass.
- The Pass is provided in the UDR UmDataLimits sections in SmData resource identified by custom attribute "passType"="weekend".
- The Pass has a start date and an end date provided in respective UDR attributes.
- The pass is applicable every week starting from "Friday 9:00PM" to "Monday 6:00AM".
- QoS and Charging for base and weekend pass plans are different.
In CNC Policy, Navigate to Policy Data Configurations → Usage Monitoring → Data Limit Profiles and create a Data Limit Profile for Home Plan.
The following fields are mandatory to be set:
- Name
- Usage Limit
- Reset Period
For the "Weekend" Pass, provision the same in the UDR using the provisioning interface for the targeted subscriber(s).
- Plan Type: Pass
- Custom Attribute: "passType=weekend"
- Reset Period: Empty
In CNC Policy, Navigate to Service Configurations → Common Data → Attribute Forwarding Profile and create a Attribute Forwarding Profile with the field values as displayed in the below screenshot.
Figure 4-42 Forwarded Attributes for Monthly Plan with Weekend Passes

Figure 4-43 Forwarded Attributes for Monthly Plan with Weekend Passes

Figure 4-44 Forwarded Attributes for Monthly Plan with Weekend Passes

In CNC Policy, Navigate to Service Configurations → PCRF Core → Settings and set the following field(s) under Usage Monitoring Group:
- Enabled: true
- APN List: the list of APNs for which Usage Monitoring is required.
- Attribute Forwarding: the forwarding profile created for each desired interface/message type.
In CNC Policy, Navigate to Service Configurations → Usage Monitoring and set the following field(s):
- Enable PRE: true
- data plans Selection Order:
Figure 4-45 PCRF Core Configuration for Monthly Plan with Weekend Pass

In CNC Policy, Navigate to Policy Data Configurations → Common → Match List and create a Match List to fill in the home MCC/MNCs.
Policy TableNot required for this scenario.
Usage Monitoring Policy
Figure 4-46 Policy Project for Home Mobthly Plan with Weekend Passes

Monthly Plan with Multiple Top-ups
Scenario- Subscriber has purchased a monthly plan. Name of the plan is provided in a vendor specific custom attribute "homePlanName" under SmData.
- As long as subscriber is in the home region and has data left, the subscriber can use this plan.
- The Billing Day is provided in a vendor specific custom attribute "billingDay" under SmData.
- Subscriber has purchased two Top-up Plans - the names of which are provided in the custom attributes "topup1Name" and "topup2Name" under SmData.
- The start and end dates for these top-up plans are also provided in vendor specific custom attributes "topUpPlan1StartDate", "topUpPlan1EndDate", "topUpPlan2StartDate", "topUpPlan2EndDate" under SmData. These are one-time plans and will expire when entirely consumed.
- The base plan will be consumed before the top-up as long as there is quota left in the base plan.
- "TOPUP1" will be consumed before "TOPUP2".
- QoS and Charging for base and top-up plans are same.
- When both base and top-up quota are exhausted, QoS throttling is applied
- Subscriber has purchased two Top-up Plans - "TOP1" and "TOP2"
In CNC Policy, Navigate to Policy Data Configurations → Usage Monitoring → Data Limit Profiles and create a Data Limit Profile for Home Plan.
The following fields are mandatory to be set:
- Name
- Usage Limit
- Reset Period
For Top-up, follow the same steps, however set the following field values:
- Plan Type: Top-up
- Reset Period: Empty
In CNC Policy, Navigate to Service Configurations → Common Data → Attribute Forwarding Profile and create a Attribute Forwarding Profile as described in previous scenarios.
PCRF Core ConfigurationIn CNC Policy, Navigate to Service Configurations → PCRF Core → Settings and set the following field(s) under Usage Monitoring Group:
- Enabled: true
- APN List: the list of APNs for which Usage Monitoring is required.
- Attribute Forwarding: the forwarding profile created for each desired interface/message type.
In CNC Policy, Navigate to Service Configurations → Usage Monitoring and set the following field(s):
- Enable PRE: true
- data plans Selection Order:
Figure 4-47 Configuration for Monthly Plan with Multiple Top-ups

In CNC Policy, Navigate to Policy Data Configurations → Common → Match List and create a Match List to fill in the home MCC/MNCs.
Policy TableNot required for this scenario.
Usage Monitoring Policy
Figure 4-48 Policy Project for Monthly Plan with Multiple Top-ups

Autoenrolled Roaming Subscriber with Multiple Roaming Passes
Scenario- All data plans are configured In CNC Policy
- All roaming subscribers are given roaming plans based on the roaming
zone, which is defined based on MCC-MNC.
- If there is a match found for the Country Code and Network Code => Zone=RZ_WithAgreement
- If there is a match found for the Country Code but not for Network Code => Zone=RZ_WithoutAgreement
- If there is no match found for Country Code => Zone=0
- Each Subscriber is given two daily recurring Roaming Plans.
- When Roaming Plan 1 is exhausted, Roaming Plan 2 is applied.
- When Roaming Plan 2 is exhausted, subscribers belonging to Zone 0 are redirected to a Portal, rest are Throttled.
In CNC Policy, Navigate to Policy Data Configurations → Usage Monitoring → Data Limit Profiles and create Data Limit Profiles for Roaming Plan.
- Periodicity: Daily
In CNC Policy, Navigate to Service Configurations → Common Data → Attribute Forwarding Profile and create a Attribute Forwarding Profile as described in previous scenarios.
PCRF Core ConfigurationIn CNC Policy, Navigate to Service Configurations → PCRF Core → Settings and set the following field(s) under Usage Monitoring Group:
- Enabled: true
- APN List: the list of APNs for which Usage Monitoring is required.
- Attribute Forwarding: the forwarding profile created for each desired interface/message type.
In CNC Policy, Navigate to Service Configurations → Usage Monitoring and set the following field(s):
- Enable PRE: true
Configure other fields as necessary.
Match ListIn CNC Policy, Navigate to Policy Data Configurations → Common → Match List and create a Match List to fill in the home MCC/MNCs.
Policy Table
Figure 4-49 Roaming Zones for Autoenrolled Roaming Subscriber with Multiple Roaming Passes

Figure 4-50 Roaming Plans for Autoenrolled Roaming Subscriber with Multiple Roaming Passes

Usage Monitoring Policy
Figure 4-51 Policy Porject for Autoenrolled Roaming Subscriber with Multiple Roaming Passes

Figure 4-52 PCRF Core Porject for Autoenrolled Roaming Subscriber with Multiple Roaming Passes

4.7 Match List
A match list is a set of values in various categories, including access point names (APNs), subscriber IMSIs, location area codes (LACs), service area codes (SACs), Internet addresses, and user equipment identities. A match list can function as a whitelist (listing items to be included) or a blacklist (listing items to be excluded). By using a match list, you can, for example, apply a policy to all subscribers in a set of LACs, or block access to a list of Internet addresses known to be high risk.
Match List is used during a list creation to either select or omit the items from a list. The items in the list must be homogeneous.
You can create the list of items using Match List page under Common section for Policy Data Configuration in CNC Console.
For more details, see Match List section in Configuring CNC Console in Oracle Communications Cloud Native Core, Converged Policy User Guide.
Policy Projects in CNC Console includes a Contains in matchList block, which indicates to select items specified in Match List block.
Match List specifies the list to be used for matching criteria.
Figure 4-53 Here is an example of match list functionality:

In the Match List Block Match List name is provided the right side and the value is provided on the left side. On the right side, multiple Match List can be given. But, it must contain only one value on the left side.
any- If the attribute value from left side matches with any of the values of Match List in the right side, the output of Contains in matchList will betrue. Otherwise,false.all- If the attribute value from left side is present in all the given values of Match List on the right side, the output of Contains in matchList will betrue. Otherwise,false.none- If the attribute value from left side not present in any of the given values of Match List on the right side, the output of Contains in matchList will betrue. Otherwise,false.
-
String: In this case, the match list name on the right side of the block is
Stringtype. The Match List screen on Policy Data Configurations can be verified to check that the data type for the match list string isString, that is the data type of the given value to match on the left side of the block. If Match List block contains the item which isStringdata tuype, same as the given value, then the output of the condition istrue. Otherwise, the output isfalse.Figure 4-54 Example for String Data Type in Match List

In this example, Forwarded Attribute block gets the value from the PRE body. If the PRE value for Forwarded Attribute block is
DNN1, this value will be matched withDNNStringmatch list to check whether the IP is the subnet or not. -
WildCard: In this case, the match list name on the right side of the block is
WildcardString. The Match List screen on Policy Data Configurations can be verified to check the data type for the match listipv4is IPv4 Subnet, the given value to match on the left side of the block. In the given example, the value isstring333444. If the match listWildcardStringcontains item with wildcard characters (example - "string", "str*" or "string3?3444"), then the output of this condition istrue. Otherwise, the output isfalse.Figure 4-55 Example for Widdcard Data Type in Match List

-
IPv4: In this case, the match list name is
ipv4. The Match List screen under Policy Data Configurations section can be verified to check the data type for the match list ipv4 is IPv4 Subnet, which is the data type of the value mentioned on the right side of the block. In this case the value is"193.12.32.12". If match list IPv4 contains the item that is IPv4 Subnet (example - "193.12.23.18/14", "193.12.32.25/24"), the output of this condition istrue. Otherwise, the outpus isfalse.Figure 4-56 Example for IPV4 Data Type in Match List

In this example, the Forwarded Attribute block receives the value from the PRE. For example, if the PRE value for Forwarded Attribute block is
"193.12.32.12", with this value, it will try to match withIPListmatch list to check whether the IP is the subnet or not. -
IPv6: In this case, the match list name is IPv6. The Match List screen under Policy Data Configurations can be verified to check that the data type for the match list IPv6 is IPv6 Subnet, that is the data type of the value mentioned on the right side of the block. The given value to match is given on the left side of the block, in this case that is
"FE80:CD00:0:CDE:1257:0:211E:729C". If the match listIPv6contains the item that is IPv6 Subnet (example - "FE80:CD00:0:CDE::/30", "FE80:CD00::/14", "FE80:CD00:0:CDE:1257::/48"), then the output of this condition istrue. Otherwise, the output isfalse.Figure 4-57 Example for IPV6 Data Type in Match List

In this example, the Forwarded Attribute block receives the value from the PRE. For example, if the PRE value for the Forwarded Attribute block is
"FE80:CD00::CDE:1257::211E::",, with this value it will try to match with"IPv6List"match list to check whether the IP is the subnet or not. -
Regular Expression: In this case, the Match List name is
RegularExpression. The Match List screen under Policy Data Configurations section can be verified to check that the data type for the match list isRegularExpression, that is the data type of the value on the right side of the block. The given value to match is given on the left side of the block. In this example, the value is"hello@gmail.com". If the match listRegularExpressioncontains the item that is RegularExpression Subnet (example - "/^[\w-\.]+@([\w-]+\.)+[\w-]{2,4}$/g"), then the output of this condition istrue. Otherwise, the output isfalse.
Using Match List with Policy Tables
When there are multiple Policies with similar structure, Policy tables can be used to consolidate and capture the differences in structure. The Use Policy Table block can be used to specify a parameter in a rule that uses a Policy table. The parameter name must be the column (field) name in the Policy table.
Figure 4-58 Exmple for Use Policy Table

-
Matches: ForMatchesto be used in Policy Table, the data type must beString.Figure 4-59 Example: Use Policy Table with Matches option

In the above example, in table DNN1, the value of column dnn is matched with "DNNAdminAccess: and the value of column dnnType is matched with "ADMIN".
-
Matches all of: The data type of the Policy table should beMatchListorMatchLists(array of matchlist)If the data type is
MatchLists, the array ofMatchListcan be present per row (in policy table) and in this case all theMatchListshould be matched in a single row (policy table) to returntrueand pass that row.Figure 4-60 Example: Use Policy Table with Matches All Of option

In the above example, the value of Forwarded Attribute block (such as "333444") is matched with both "DNN2" and "DNN" or "IPList" and "HomeZone" to return the respective row.
-
Matches any of: The data type of the Policy table should beMatchListorMatchLists(array ofMatchList)If the data type is
MatchLists, the array ofMatchListcan be present per row (in policy table) and in this case anyMatchListshould be matched in a single row (Policy table) to return true and pass that row.Figure 4-61 Example: Use Policy Table with Matches Any Of option
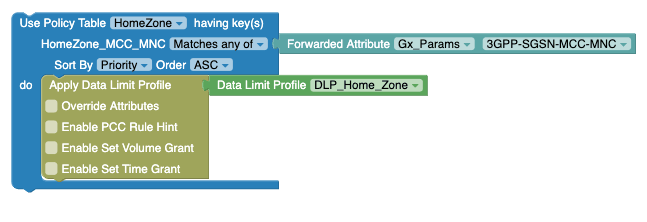
In the above example, Forwarded Attribute the value is (such as "333444") is matched with any of "DNN2" and "DNN" or "IPList" and "HomeZone" to return the respective row.
Note:
The data type of the policy table column
MatchListis same for both the operatorsMatches all ofandMatches any of, as there will be only oneMatchListpresent per row. -
Matches none of: The data type of the Policy table should beMatchListorMatchLists(array ofMatchList).If the data type is
MatchLists, the array ofMatchListcan be present per row (in policy table) and in this case allMatchListshould not be matched in a single row (policy table) to returntrueand pass that row.Figure 4-62 Example: Use Policy Table with Matches None Of option

In the above example, the value of Forwarded Attribute block (such as "333444") must not match with both "DNN2" and "DNN" or "IPList" and "HomeZone" to return the respective row
.
Using Policy Table Columns
Policy supports matching the value of a particular column similar to Match Lists.
Figure 4-63 Policy Table Column
Figure 4-64 Example: Use of Policy Table Column block

In the above example, If PRE value for the Forwarded Attribute
block should be an exact match or the wildcard match with column
DNNString in the table HomeZone1, then in the
if condition block, the PRE value for the
Forwarded Attribute block should match with the match
list defined in the column IPList under the table
HomeZone1.
If the given value "311", which exactly matches with the column name MCC, then in the
MatchList block the given value "311490" will match with any of
the value in the table column MCCMNC.
It can have any MatchList data type such as string, wildcard, IPv4,
IPv6, or Regular expression.