3 Data Access Pack Feature Nodes
This chapter describes the Oracle Communications Convergent Charging Controller Data Access Pack (DAP) feature nodes.
This chapter contains the following topics.
DAP Feature Nodes List
This table lists the feature nodes available from the DAP palette group in the ACS Control Plan Editor and the fast key for each feature node in the list. You can use fast keys to search for feature nodes in the palette or the canvas.
| Node name | Node description |
|---|---|
| Send Request |
The DAP Send Request node allows ACS to send DAP requests to a DAP interface for forwarding to an external ASP. Fast key: DAP1 |
| DAP Request |
The DAP Request feature node allows ACS to select, configure and then send DAP requests to a DAP interface for forwarding to an external ASP. Fast key: DAP2 |
| DAP VXML |
Warning: This feature node has now been deprecated and should no longer be used. This functionality has been replaced by the Diameter Charging Driver features. This feature node plays an announcement based on a text string stored in a profile. Fast key: DAPV |
Note: The Send Request node is deprecated and is included for backward compatibility to enable older control plans to compile and run correctly.
Profile Blocks and DAP
In order to read from or write to the profile blocks, the control plan needs to have access to the profile. Profiles are generally handled by ACS, however, some components use the profile loaded by the service library which is handling the call. You can load a new profile using the Load Profile feature node.
Note: The DAP Send Request node has no service loader of its own, and therefore the profiles that can be written are dependent on the type of control plan used. For example, you can write to Application Specific 7 to move data between USSD and Send Request nodes as this is the temporary profile available within USSD GW control plans.
For more information about which profile is loaded by a service library, see the technical documentation for the component that the service library comes from.
For more information about profile blocks, see ACS User's Guide.
DAP Request
The DAP Request feature node allows ACS to select, configure and then send DAP requests to a DAP interface for forwarding to an external ASP.
Request parameters can be configured in three places:
-
When importing WSDL files (SMS > DAP > Import WSDL), before saving the operation, all errors including parameter configuration values must be resolved.
-
After WSDL files have been imported and saved, they appear in the SMS > DAP > Resources> Operations dialog, where they may be edited.
-
At control plan creation time, within this node.
Note:
-
If a parameter has been flagged as hidden either when importing or later editing the operation, this parameter will not be seen in the node parameters list. All required configuration is done outside of the node.
-
The opposite is that any parameter not set to hidden, must be configured in the node.
Node exits
This node has one entry and five exits. The number of exits cannot be changed.
| Exit | Cause | Description |
|---|---|---|
| 1 | Success |
This branch taken for any of the following conditions: If the DAP macro node instance receives an indication from the DAP interface indicating that the message has been successfully sent and the outstanding request does not expect parameters to be returned. Note: Any unexpected returned parameters are ignored. When all of the expected ASP response parameters have been copied into the stated designated fields or/and profile tag blocks. |
| 2 | Parameter Problem |
This branch taken for any of the following reasons: If there is a problem retrieving the value of a stated profile tag (for example, CCS productTypeID field) and no default value has been specified. If the node could not convert the returned value to a profile tag. If the value cannot be stored in the profile tag. |
| 3 | Mismatch | If the outstanding request expects response parameters to be returned from the ASP but the parameters returned from the ASP do not match what is expected. |
| 4 | ASP Failure | If the ASP returns a response that is configured as "Indicating Error". |
| 5 | Error |
This branch taken for any of the following conditions: If there is a format problem with the retrieved parameter string. If a DAP interface cannot be determined to send the request to. If an unknown short code is specified for an ACS run time parameter. If the DAP macro node instance receives an indication from the action handler or DAP interface indicating that the message has not been successfully sent. If there is a format problem with the ASP response related parameters. If an unknown short code is specified for an ACS run time parameter within the ASP response parameter information. If an unknown profile application block code is stated within the ASP response parameter information. If the macro node fails to retrieve profile block references. |
Configuring the node
Follow these steps to configure the node request parameters.
-
Click the Request tab if not already displayed.
-
Select a parameter to configure from the Request Parameters list (click on the parameter name).
Result: Any errors for this parameter are shown in the text box above the Exit Branches.
Note: The various configuration fields become available for completion according to how the parameter was defined in the SMS > DAP > Import WSDL or SMS > DAP > Resources> Operations configuration screens:
-
Text - Only the Description and Default Value fields available.
-
Profileblock - Only the Description, Profile Field Type, Profile Block and Prfile Field fields available.
-
Either - all fields are available.
-
-
Enter a description for the parameter in the Description field.
-
If available, optionally enter a default value in the Default Value field.
-
If available, select the type and location of the value from the Profile drop down lists.
Note: If an expected profile field is missing, it can be added via the ACS Configuration screens. See Profile Tag Details.
-
Repeat steps 2 to 5 for all the parameters in the list.
Note: All errors for all parameters in both tabs must be resolved before the Save button is available.
-
Click Save.
Configuring response tab - default
Follow these steps to configure the parameters
-
Click the Response tab if not already displayed.
-
Select the parameter to configure a response for from the Parameter drop down list.
Result: Any configuration requirements for this parameter are shown in the text box above the Exit Branches.
Note: The various configuration fields become available for completion according to how the parameter was defined in the SMS > DAP > Import WSDL or SMS > DAP > Resources> Operations configuration screens:
-
Text - Just the Description and Default Value fields available.
-
Profileblock - Just the Description Profile Field Type, Profile Block and Profile Field fields available.
-
Either - all fields are available.
-
-
Type a description for the parameter in the Description field.
-
If available, optionally type a default value in the Default Value field.
-
If available, select the type and location of the value from the Profile drop down lists.
Note: If an expected profile field is missing, it can be added via the ACS Configuration screens. See Profile Tag Details.
-
Repeat steps 2 to 5 for all the parameters in the list.
Note: All errors for all parameters in both tabs must be resolved before the Save button is available.
-
Click Save.
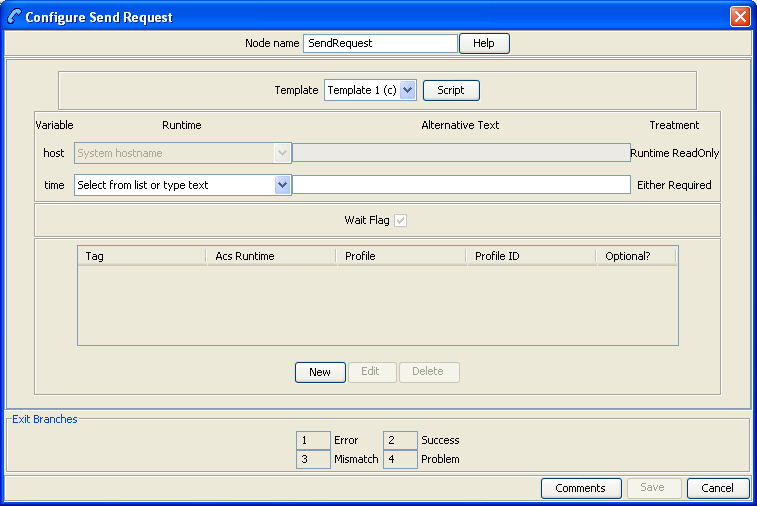
Send Request
Warning: This feature node has now been deprecated and should no longer be used. This feature node will still function in existing control plans. For new control plans please use the DAP Request feature node.
The DAP Send Request feature node allows ACS to send DAP requests to a DAP interface for forwarding to an external ASP.
Optionally following a send, the Send Request node can also read DAP responses received on the DAP interface sent by the ASP.
Node exits
This node has one entry and four exits. The number of exits cannot be changed.
| Exit | Cause | Description |
|---|---|---|
| 1 | Error |
This exit is taken when the receiving system cannot be contacted, or there is a problem with sending the request (for example, when a NACK reply is received from an ASP). Note: This branch will be taken at startup if slee_acs has started to process calls before the DAP interface is available. |
| 2 | Success | This exit is taken when either an ACK is received for the message sent, or if the message is successfully sent and the wait flag is not checked. |
| 3 | Mismatch | A mismatch has occurred between the configured and actual tags received in the ASP response. |
| 4 | Problem | If the associated value received within an ASP response cannot be stored within ACS or profile. For example, incorrect size or invalid storage location. |
Configuring the node
Follow these steps to configure the Send Request node.
-
Select the Template to be assigned to the feature node.
Note: The templates available in the list are those that have been created using the DAP application screens. Template names suffixed with (c) indicates the template has been created with correlation.
Result: The fields in the box below the template selection list will be populated with the data assigned for the selected template using the Operations tab on the DAP Resources screen. The area displays all the variables, but only allows you to select options that were made available by selecting a Node Disposition that is not
Hidden, for each parameter.
The Variable field displays the parameter variable defined in the script for the template.
The Treatment field displays the permissible treatment options for each variable. Must be one of;
-
Either Required. You must either select the Runtime or enter Alternative Text.
-
Text ReadOnly. Displays the alternative text supplied in the template.
-
Runtime ReadOnly. Displays the runtime supplied in the template.
-
Runtime Required. You must select the Runtime.
-
Text Required. You must enter Alternative Text for the parameter.
Note:Save will become available once you have filled in all the required fields in this section.
-
-
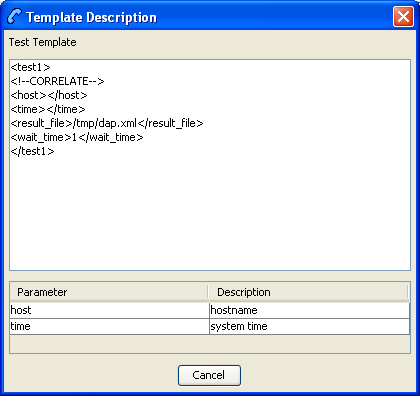
Click Script to view the script used by the selected template in the Template Description screen. For more information, refer to Script Format.
Click Cancel to close the screen.
-
If a Runtime field is active, you can change the selected runtime value that is to be associated with the variable. The parameter will be replaced by the dynamic value at runtime.
-
If you select the runtime of
Profile tag, the screen will display the Profile Block group.Select the Tag Data Type, Tag Location and Tag Field from the lists.
Notes:
-
The Tag Field is populated with the tags that have a Profile Tag Type of
String,Numeric String, orLimited Numeric String, as specified on the Profile Tag Details tab of the ACS Configuration screen. -
The Profile Blocks that can be used are dependent upon the other applications installed and the control plan you are using. For more information about how profile blocks are used, see Profile blocks.
-
If the selected template specifies a Profile Tag that cannot be defined in this screen, edit the selected template on the Operations tab on the DAP Resources screen, so that it is available.
-
-
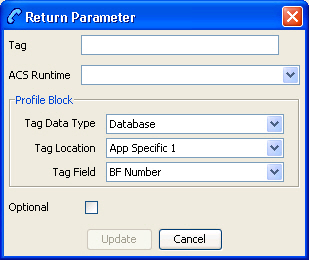
You create up to 20 return parameters to associate with either an ACS Runtime Variable Part or in a user-defined profile block and ID.
Click New to create a return parameter.
Result: The Return Parameter screen appears.
-
In the Tag text box, enter the name of the XML tag containing the return details.
Note: This must match an existing XML tag that is returned by the ASP.
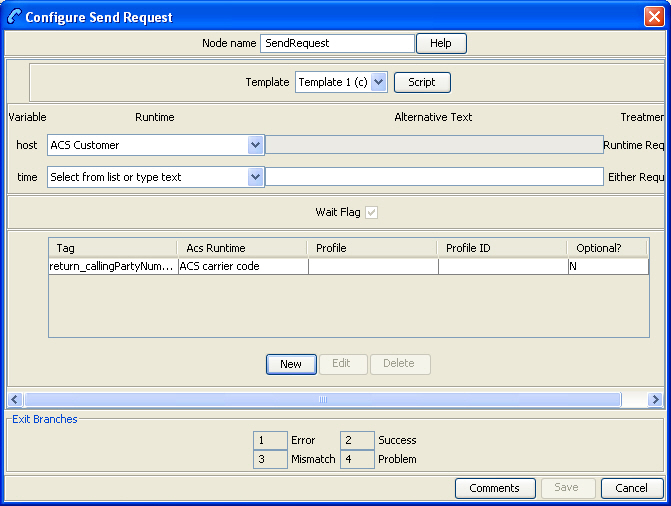
Example: For an XML script returned from an ASP containing
<return_callingPartyNumber>441473289900</return_callingPartyNumber>, the tag name to enter isreturn_callingPartyNumber. -
Select from either the ACS Runtime or the three fields in the Profile Block frame.
-
To make the return parameter optional, select the Optional check box.
-
If mandatory, this parameter must be returned from the ASP. If it is not, then it will go to exit branch 3 (Mismatch) and will log a syslog error naming the missing parameter.
-
If optional, the node will process the return parameter if it is returned from the ASP. If it is not, then it will still process successfully.
-
-
Click Update to save the return parameter.
Result: The Configure Send Request screen shows the added return parameter.
Note: To edit the return parameter, select the record in the table and click Edit.
-
The Wait Flag check box displays whether the system waits for a response from the ASP before returning a DAP response to the client.
If correlation has:
-
Been defined for the template, the Wait Flag check box is selected and cannot be modified.
-
Not been defined, you can select the Wait Flag check box, if required.
-
-
Click Save.
DAP VXML
This feature node plays an announcement based on a text string stored in a profile.
Node exits
This feature node has one entry and three exits. The number of exits cannot be changed.
| Exit | Cause | Description |
|---|---|---|
| 1 | Success | The announcement was played successfully. |
| 2 | Abandon | The caller hung up during the announcement. |
| 3 | Error | General Error Handling. |
Configuring the node
Follow these steps to configure the node.
Note: If an expected profile field is missing, it can be added via the ACS Configuration screens. See Profile Tag Details.
-
In the Text to Play Location field, select the profile block in which relevant information is stored.
-
In the Text to Play Field field, select the profile tag that identifies the information required by the node.
-
In the Resource Name field, enter the name of the media server which will provide the announcement.
Warning: This string must be set to
uugw.


